teching Craftsman Galileo Pendulum Clock DM35 User manual

Galileo PendulumClock
Clock Series
Metallic MechanicalAssemblyModel

ck
ide +
Product name: Galileo pendulum clo
Product model: DM35
Main materials: anodic aluminum ox
stainless steel
Assembly difficulty: ★★
Quality grade: A


Assembly Instructions for Teching Craftsman
◆Perform assembly rigorously and orderly, keep the tabletop tidy, look at drawings carefully, and pay attention to safety;
◆If you have any doubt when adjusting any assembly clearance or tightness after the completion of assembly, please refer to our
website or WeChat public account;
◆The user is encouraged to modify part defects or fitting clearances, and apply lubricant under adult supervision to further
improve assembly;
◆The user is encouraged to use simple material removal tools (file, sandpaper, etc.)under adult supervision;
◆The user is encouraged to modify or generally refit parts of this product to enter the refitting stage as early as possible;
◆The user may disassemble this product and put it in the package again according to the parts list attached hereto;
◆If any part is lost, please inquire of or purchase it from us (Teching store on www.taobao.com);
◆The product structure is subject to continual improvement.If the real object differs fromthe instruction manual, please refer to
our latest assembly information.
If you are willing to share with us, after completing product assembly tasks of different difficulty levels at different stages,
you will receive corresponding gifts, and have a chance to win our special medals and take part in relevant events.
“Teching Craftsman” is a metallic assembly model other than a toy for playing only. It serves to improve hands-on
skills of children and youngsters, and let them learn common industrial knowledge mainly. By keeping using our
products, the user can reach the goal of assembly –refitting –creation in stages.
The requirements for product assembly are as follows:

•1. Some safety awareness is required to use this product, and improving safety awareness is also one of the functions of this
product;
•2. This product is not intended for children below 8 years, and adult guidance on assembly is recommended for children
below 10 years;
•3. Use assembly tools rationally, assemble the parts in strict conformity with the instruction manual, and avoid forcible
handling to avoid scratches;keep sharp points of tools or parts away from the eyes to avoid contusions;
•4. This product is made up of metallic parts mainly, and has a certain level of hardness and a certain weight; please place it
properly to avoid bodily injuries;
•5. During mechanical movement, do not put a finger or any other part of the body within the movement range to avoid
contusions;
•6. When any mechanical part is turning, do not put a finger or any other part of the body beside it to avoid entanglement and
contusions;
•7. Wire connectors must be connected according to the marks specified in the instruction manual to avoid short-circuit or
failure arising from wrong connection;
•8. Charge,discharge and place the battery as required;it is advised to replace the battery when it has not been used for3
months or more;
•9. Do not prevent any part fromrunning forcibly in any form;to do this, turn off the power directly;
•10. The charging cable of the product is a 5V dedicated cable (USB). Do not use any other charging cable to avoid damaging
the circuit.
•11. To refit this product, please pay attentionto the relevant part parameters, and avoid using any high-power electric part
that may result in an accident.
Safety Tips

Contents
Assembly of top cap
Assembly of main
board
Assembly of pendulum
Assembly of base
Assembly of rope

1
Right Wrong
2. Mounting sequence of screws
Mount the screws diagonally in
order of number.
Teching Craftsman®
Basic knowledge on standard parts assembly
1. Mounting of screws 3. Mounting of snap ring
Right Wrong
Push in thesnap
ring in parallel. Push in the snap
ring obliquely
4. Lubricant mark
Where this mark is shown, it is recommended to apply
create to improve mechanical performance.

Teching Craftsman®
2
1. Assembly of top cap
1.1 Mounting of pulley
The slot of the ratchet pawl
should hang on this boss.
1.3 Mounting of ratchet pawl
1.2Assembly of rope pulley and
front top cap
1.4Assembly of ratchet pawl and front top cap

Teching Craftsman®
3
1.5 Mounting of swing arm 1.6Assembly of swing arm and front top cap
The eyelet faces
downward when
this swing armis
placed
horizontally.
Level
The eyelet
faces the front.
Flat and
facingupward

Teching Craftsman®
4
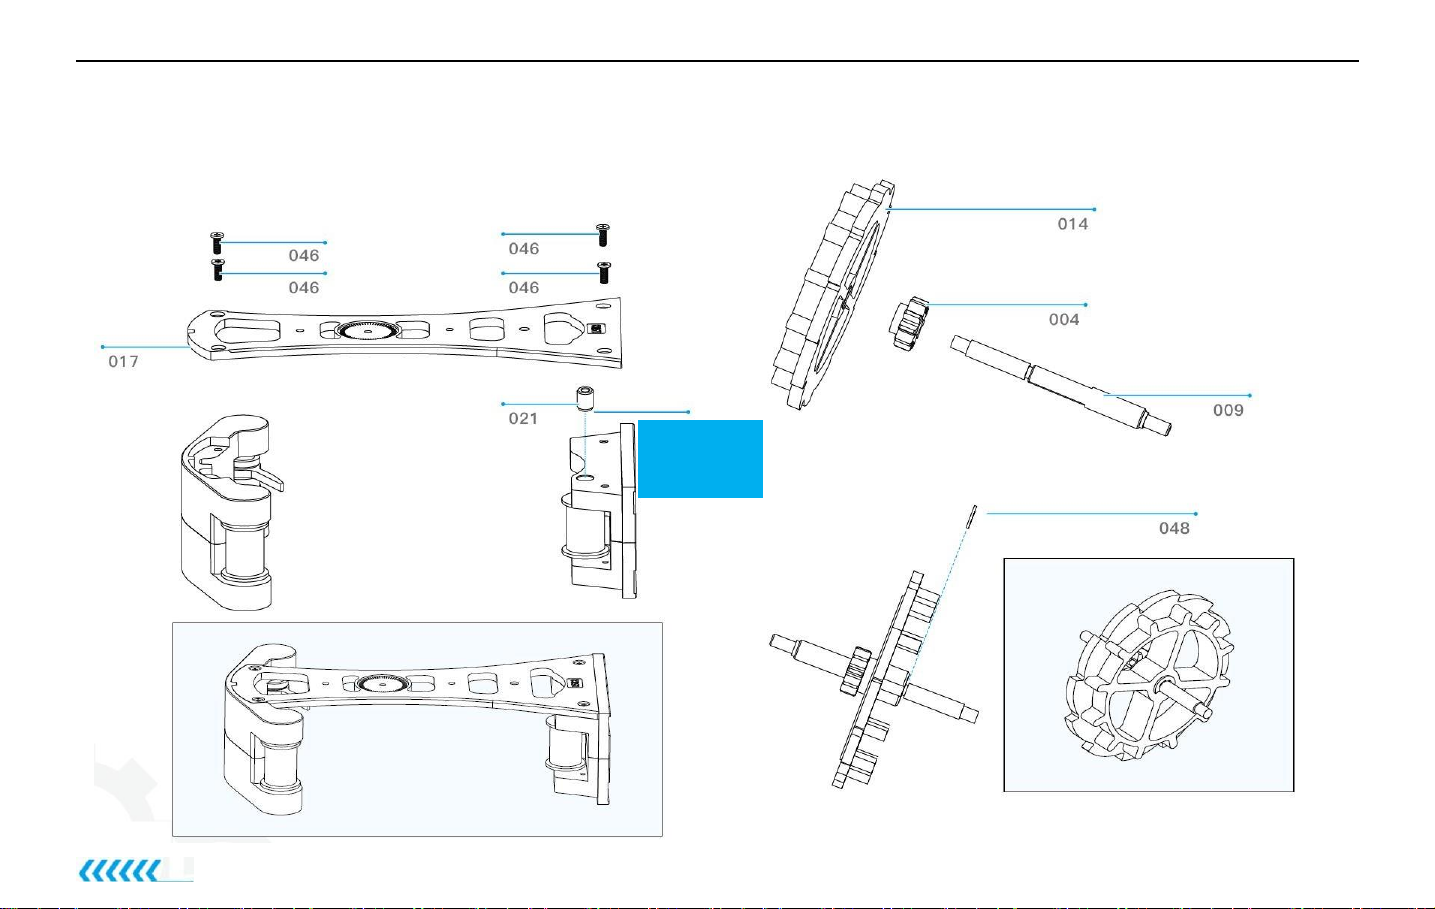
1.7 Assembly of front and rear top caps 2. Assembly ofbase
2.1 Mounting of pulley
2.2Assembly of pulley and front base

Teching Craftsman®
5
2.4Assembly of front and rearbases2.3 Mounting of cylindrical pin and front base
Teching Craftsman®
6
3 Assembly of main board
3.1 Mounting of front main board, top cap and base 3.2 Mounting of ratchet
The small
end faces
downward.

Teching Craftsman®
7
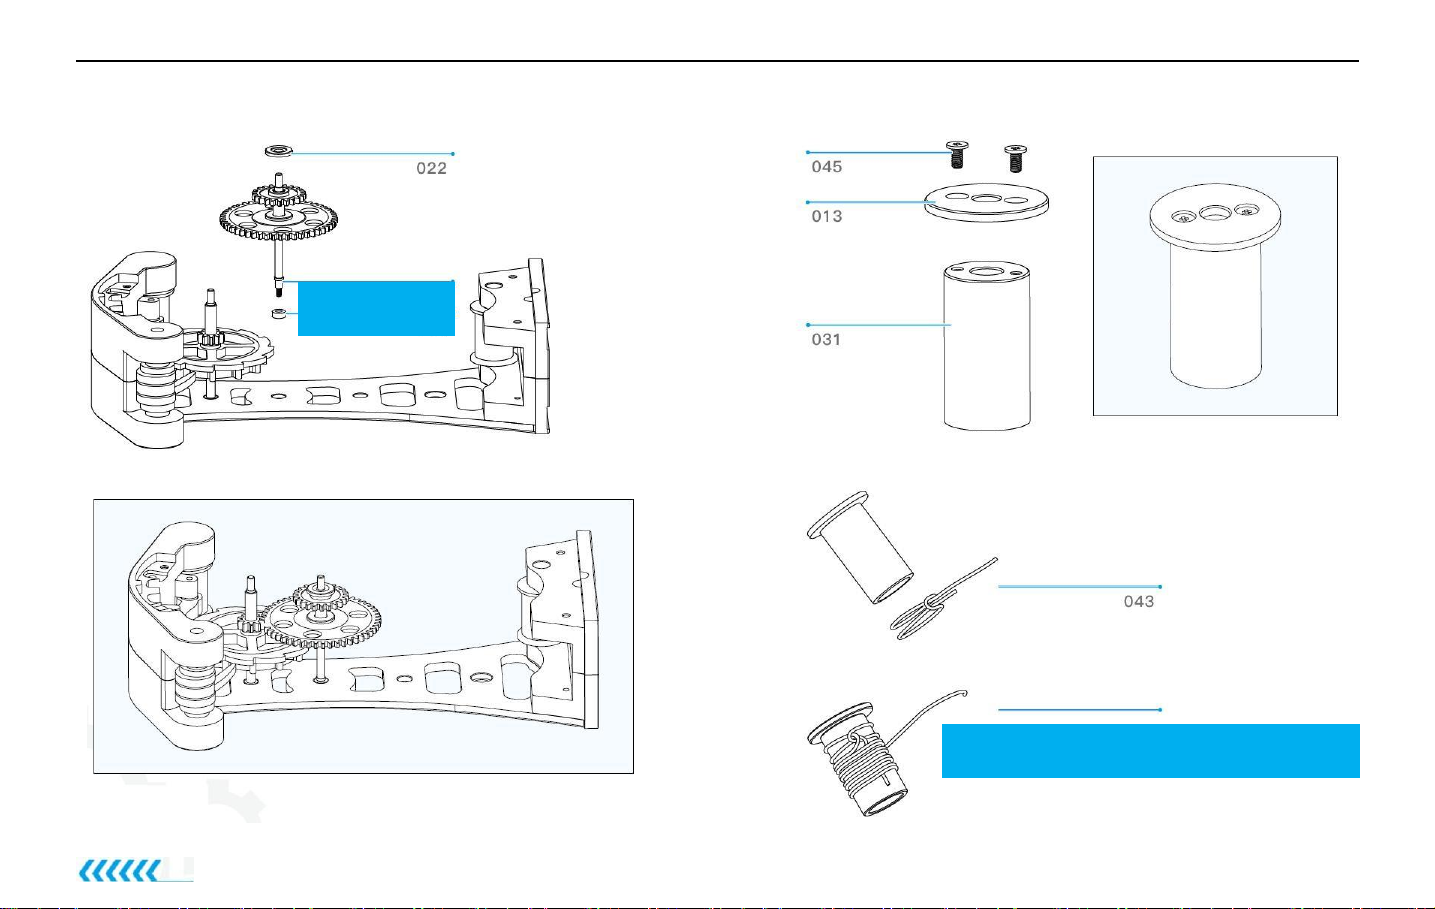
3.3 Mounting of ratchet and front main board 3.4 Mounting of Shaft II and gear
Teching Craftsman®
8
3.5 Combination of Shaft II, gear and front main
board
Wind the rope reversely and tightenen the
rope end to prevent the knot from loosening.
3.6 Mounting of rope pulley
3.7 Winding of knot
The threadfaces
downward.

Teching Craftsman®
9
3.8 Mounting of rope pulley, rope pulley shaft and gear 3.9 Mounting of rope pulley and front main board
Run the rope through the inside
of the pulley.

Teching Craftsman®
10
3.10 Mounting of Shaft I and gear 3.11Assembly of Shaft I, gear and front main board
The long end is
the direction of
the bull gear.

Teching Craftsman®
11
3.12 Mounting of rope pulley and bearing
The small
end faces
downward.
3.13 Mounting of rear main board

Teching Craftsman®
12
3.14 Mounting of rear main board and bearing 3.15 Fixation of rear main board

Teching Craftsman®
13
3.16 Mounting of rear main board and shaft cap 3.17 Mounting of foot pad Remove the sealing
sticker during
mounting.

Teching Craftsman®
14
4. Assembly of rope
4.1 Mounting of rope and pulley
Wind the rope end
reversely by one turn, and
then tighten the lock screw
to prevent the knot from
loosening.
Step 1:
Wind the rope up from the
bottom of the pulley.
4.2 Mounting of rope in drop hammer cap
This is a X5
schematic view of
winding of PointA.
Step 3:
Run the rope through the
center hole of the drop
hammer cap.
Step 2:
Wind the rope from inside the
pulley.
Table of contents
Other teching Clock manuals


