Tecmec Sirio HH Compact Instructions for use

Sirio HH Compact
Instruction and maintenance manual
Page 1di 24
Instruction n° 207 - Rev. 4 datel 19/10/2017
IT
Copyright © 2017TecmecS.r.l. Translated from the ORIGINAL instructions
Sirio HH
Compact
Code. 012633 Code. 012634 Code. 012635
Instruction and maintenance manual

Sirio HH Compact
Instruction and maintenance manual
Page 2di 24
Instruction n° 207 - Rev. 4 datel 19/10/2017
IT
Copyright © 2017TecmecS.r.l. Translated from the ORIGINAL instructions
Indice
1GENERAL INFORMATION 3
1.1 MANUFACTURE IDENTIFICATION 3
1.2 PRODUCT IDENTIFICATION 3
1.3 CE DECLARATION 4
1.4 REFFERED NORMS 5
1.5 WARRANTY 5
2EQUIMENT DESCRIPTION 6
3SAFETY 7
3.1 SAFETY NORMS 7
3.2 ELECTRICAL POWER SUPPLY 7
3.3 WORKING ZONES 8
3.4 COMPONENTS AND SAFETY DEVICES 8
3.5 RESIDUAL RISKS 8
3.6 SYMBOLS SHOWN ON THE EQUIPMENT 9
3.7 INTENDED USE OF THE EQUIPMENT 9
3.8 NON INTENDED USE 9
4TRANSPORT AND HANDLING 10
5INSTALLATION 11
6OPERATING 14
6.1 OPERATION INSTRUCTION AND ELECTRICAL PANEL ADJUSTMENT 14
6.2 CUSTOMIZED AGITATION AND PAUSE SETTINGS 15
6.3 MODIFICA DELLA MODALITÀ DI FUNZIONAMENTO ERRORE.IL SEGNALIBRO NON È DEFINITO.
6.4 LOADING AND UNLOADING OF CANS 18
7MAINTENANCE 19
7.1 ORDINARY MAINTENANCE 19
7.2 NON USE PERIODS 19
8TROUBLESHOOTING 20
9SPECIFICS 21
10 ELECTRICAL SCHEMATIC 22
10.1 WIRING ELECTRICAL PANEL STANDARD MOTOR SINGLE PHASE 22
11 DISPOSAL 23
12 SPARE PARTS 24

Sirio HH Compact
Instruction and maintenance manual
Page 3di 24
Instruction n° 207 - Rev. 4 datel 19/10/2017
IT
Copyright © 2017TecmecS.r.l. Translated from the ORIGINAL instructions
1 GENERAL INFORMATION
1.1 Manufacture identification
TECMEC S.r.l.
Località Faustina, 63
20080 Albairate (MI) –Italy
Tel: +39 02 9469871
Fax: +39 02 94698741
e-mail: tecmec@tecmec.com
web: www.tecmec.com
1.2 Product identification
The identification label, is located o the left side of the structure, with the below mentioned data:
Safety and Health Requirements Symbols
Manufacture Data
CE Mark
Production Year
Serial Number
Univocal Machine Code
Motor Protection Class
Electrical Characteristics
Sirio HH Compact
Instruction and maintenance manual
Page 4di 24
Instruction n° 207 - Rev. 4 datel 19/10/2017
IT
Copyright © 2017TecmecS.r.l. Translated from the ORIGINAL instructions
1.3 CE Declaration

Sirio HH Compact
Instruction and maintenance manual
Page 5di 24
Instruction n° 207 - Rev. 4 datel 19/10/2017
IT
Copyright © 2017TecmecS.r.l. Translated from the ORIGINAL instructions
1.4 Reffered norms
2006/42/CE Machine directive
2014/35/UE Low voltage directive
UNI EN ISO 12100:2010 Safety Machinery - General Principles for Design - Risk reduction and
assessment
CEI EN 60204-1 Electrical Equipment of Machines
2014/30/UE Electromagnetic Compatibility
1.5 Warranty
The warranty covers free of charge the repair or replacement of the components with manufacturing
defects.
For the condition, please refer to the document containing the warranty terms inside the CD supplied
with the equipment.
In particular the warranty will not cover any transport damage, or non compliance with the installation
and or due to operating instructions, and for unauthorized personnel, and for reason not caused by the
manufacturer.

Sirio HH Compact
Instruction and maintenance manual
Page 6di 24
Instruction n° 207 - Rev. 4 datel 19/10/2017
IT
Copyright © 2017TecmecS.r.l. Translated from the ORIGINAL instructions
2 EQUIMENT DESCRIPTION
The timed dispenser HH Compact is an equipment designed for the professional sector.
The unique feature of this equipment is to store/stow in a sheltered place the color pastes contained in
suitable container/cans.
In order to avoid accidents or injury to person, or and things, the equippment have to be used by trained
personnel.

Sirio HH Compact
Instruction and maintenance manual
Page 7di 24
Instruction n° 207 - Rev. 4 datel 19/10/2017
IT
Copyright © 2017TecmecS.r.l. Translated from the ORIGINAL instructions
3 SAFETY
3.1 Safety norms
The products of the series HH Compact must be included in the assessment of the corporate risk, and
requires compliance with applicable laws regarding safety at work .
To ensure the highest possible degree of safety, for the correct use of the equipment, all measure deemed
necessary have been adopted, during the phase of the desing, construction, testing and installation.
For a proper use, the dispenser have to be used by trained personnel, in order to avoid
accidents or injury to person or things.
The used components is in accordance with the applicable standards.
The dispenser SHC Compact must be located in a special tank/container, suitable to contain any accidental
products leaks.
3.2 Electrical power supply
Determined the installation area the following prerequisites have to be implemented:
The main power supply have to be provided through an electrical panel, placed on the wall near to the
dispenser.
The maximun expected power is 0.2Kw. The section of each conductor must be a minimum of 1,5 mm².
The main power supply line must be fitted with an efficient ground connection, and complies with all the
requirements in force.
The electrical power supply panel must be composed of a differential switch (IΔn=0,03A) with voltage
and phase compatible with the agitation motor (single phase).
To ensure a complete safe operation for the operator and the equipment, it's very important using during
the assembly of the electrical panel the above mentioned type of switch, due to the fact that the switch will
have a protective function against possible direct or accidentals voltage hazard down to ground .
It's important to make the necessary assessment of the site, and follow the requiring and characteristic rules
of the electrical system, to ensure that they are not a cause of accidents or injuries.
To avoid that the equipment have instability issues, it's necessary to verify the perfect leveling of the feets
loceded in the bottom part of the structure as per the assembly instructions.

Sirio HH Compact
Instruction and maintenance manual
Page 8di 24
Instruction n° 207 - Rev. 4 datel 19/10/2017
IT
Copyright © 2017TecmecS.r.l. Translated from the ORIGINAL instructions
3.3 Working zones
The zones where improper use and not allowed intervention may present risks are the below mentioned :
Operator Zone (front zone: for cans loading and unloading lateral zone: dispensing )
Maintenance Zone (front and rear zone)
3.4 Components and safety devices
The machine is equipped with an emergency button, placed on the control panel.
A pressing action of this button cause an immediately emergency stop, classified as category 0, the power to
the motor will be interrupted, and will interrupt the agitation movement.
Once the emergency situation is resolved, release the emergency button to restore the normal operation:
Release the emergency button
Press the START button
3.5 Residual risks
In spite of precaution adopted in the design of the equipment, to ensure safe use there may be reasonably
foreseeable situation for which it has only been possible to reduce the risk without completely eliminating it.
Risk
Precaution
Injuries and or crushing during the loading and or
unloading of the cans.
Use protective gloves and safety shoes during loading and
unloading of the cans.
Eyes damage due to paint splashes.
Use protective glasses.
Improper actions during the agitation cycle.
Don't load or unload cans during the agitation.
Don't put your hands, or tools/items in the agitation zone
during the normal operation cycle.
The dispenser is designed to handle colorant/pastes of various types. Prior to their use, follow
the instructions, warning and safety instruction on each individual can/package, and on the
data sheet issued by the producer.
MAINTENANCE ZONE
0.5MT
.
1.4M
T.
0.5MT
.
OPERATOR ZONE
(DRIVER PROGRAMMING )
OPERATOR ZONE
(LOADING AND UNLOADING )
0.2MT.
1.4M
T.
0.2MT
.
Sirio HH Compact
Instruction and maintenance manual
Page 9di 24
Instruction n° 207 - Rev. 4 datel 19/10/2017
IT
Copyright © 2017TecmecS.r.l. Translated from the ORIGINAL instructions
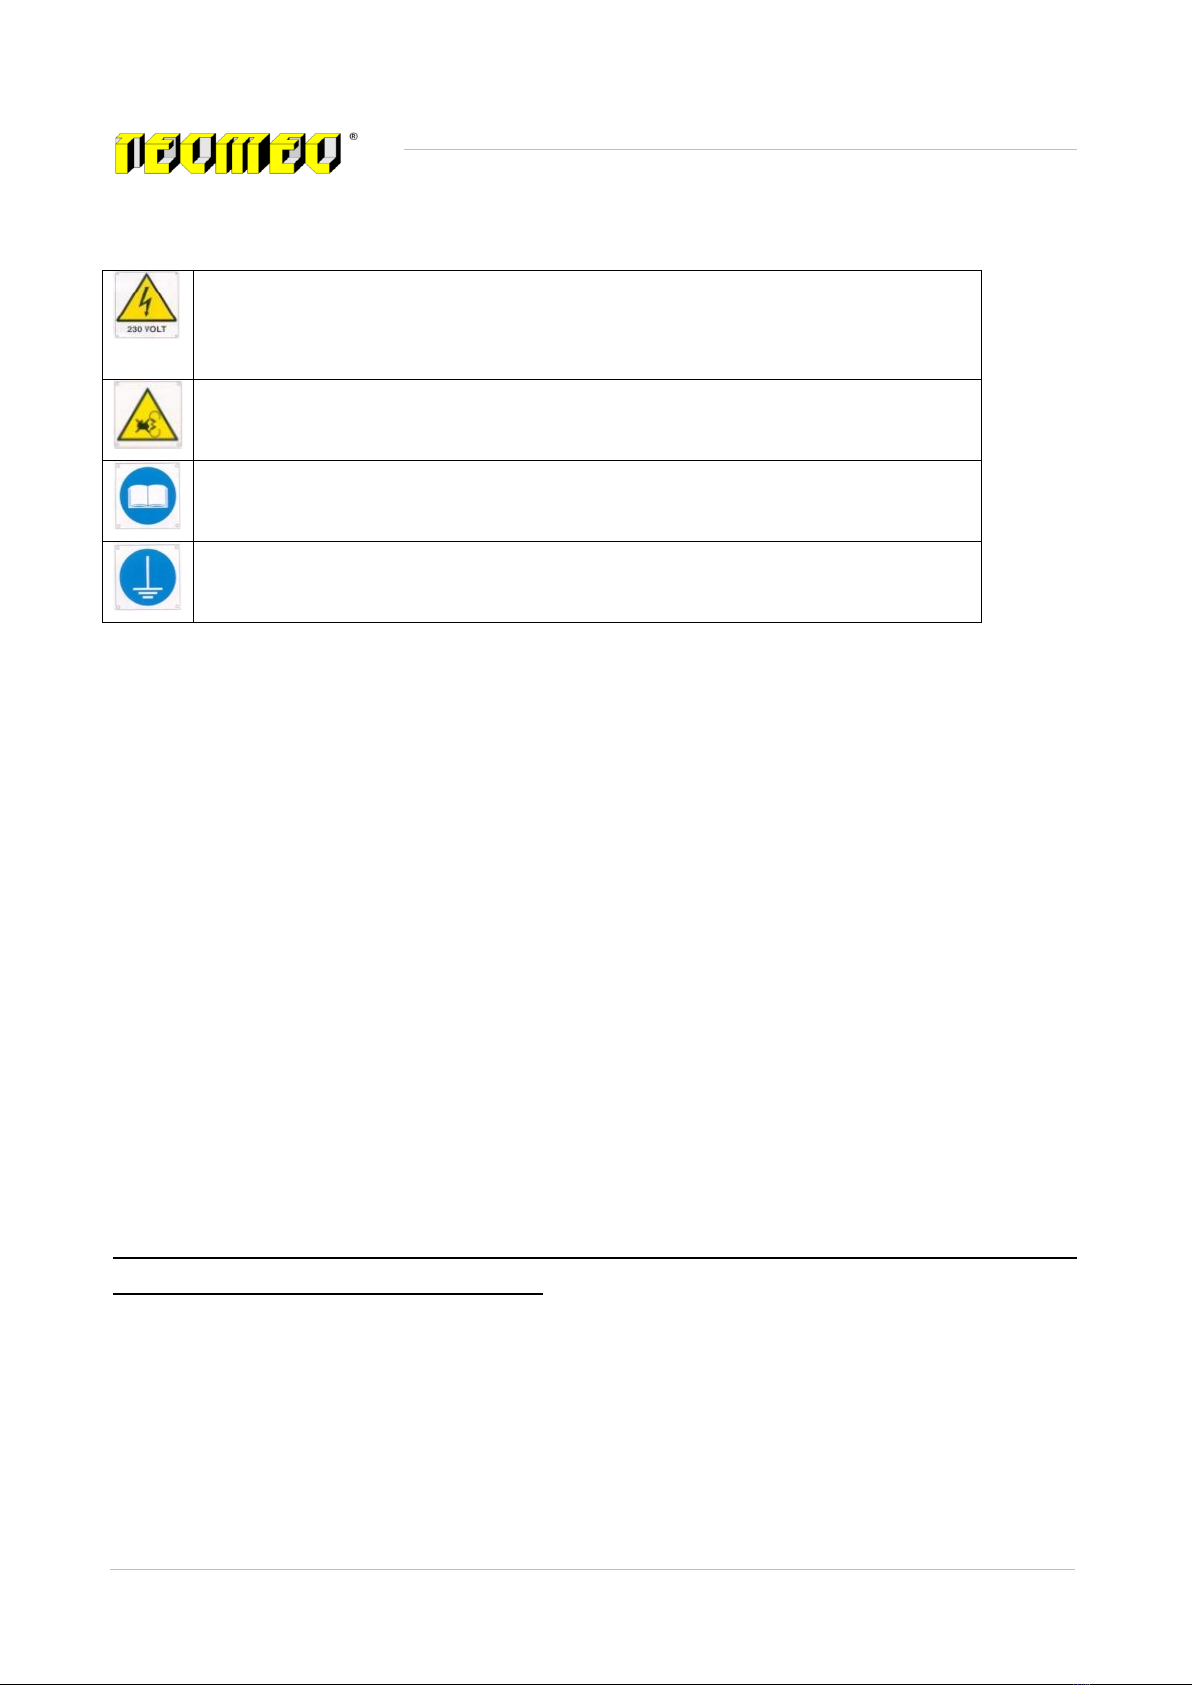
3.6 Symbols shown on the equipment
Danger electricall hazard .
Is forbidden to carry out work on the equipment under voltage.
Is forbidden to operate on the electrical system without authorizations.
Danger gear in movements.
Forbidden to load or unload the cans during the agitation cycle.
Mandatory to read carefully the instruction manual, before carry out any operations on
the equipment.
Obligation earthing requirement of the electrical system.
3.7 Intended use of the equipment
The unique feature of this equipment is to store/stow in a sheltered place the color pastes contained in
suitable container/cans (not provided byTecmec) closed by suitable lids (provided by Tecmec).
3.8 Non intended use
Any other use of this equipment that are not described in this manual are considered improper and therefore
prohibited.
In particular it is forbidden:
Load or unload the cans during the agitation cycle/process, as the drive blades are in motion.
During this process the Led warning is clearly visible on the control panel.
Any kind of manumission or unauthorized intervention on the electrical control panel.
Access the motor compartment by unauthorized personnel, and in any case when the plug for the main
power is connected.
Remove the protection from the motor compartment, if so only during the maintenance phase done only
by expert personnel.
In any case it is absolutely mandatory to remove the plug from the main electrical/power line
before executing any kind of maintenance.

Sirio HH Compact
Instruction and maintenance manual
Page 10 di 24
Instruction n° 207 - Rev. 4 datel 19/10/2017
IT
Copyright © 2017TecmecS.r.l. Translated from the ORIGINAL instructions
4 TRANSPORT AND HANDLING
The equipment are packed in special cardboard boxes and transported on pallets.
Each box is labeled with: type of module, code, production order.
The identification label with the symbols, and the risks and residual risks is located on the front side of the
motor module panel.
In case of needs to move an operating equipment please follow the below points:
always operate by following the instruction provided by existing accident prevention regulation
remove the shelf’s, and place all the colorants cans in a appropriated place
place the dispenser on a pallet
move the pallets with appropriated means to the new destination
install the equipment by following the instructions
For movement over long distance, the equipment MUST be packed and secured on pallets, as
when it was delivered.
Sirio HH Compact
Instruction and maintenance manual
Page 11 di 24
Instruction n° 207 - Rev. 4 datel 19/10/2017
IT
Copyright © 2017TecmecS.r.l. Translated from the ORIGINAL instructions
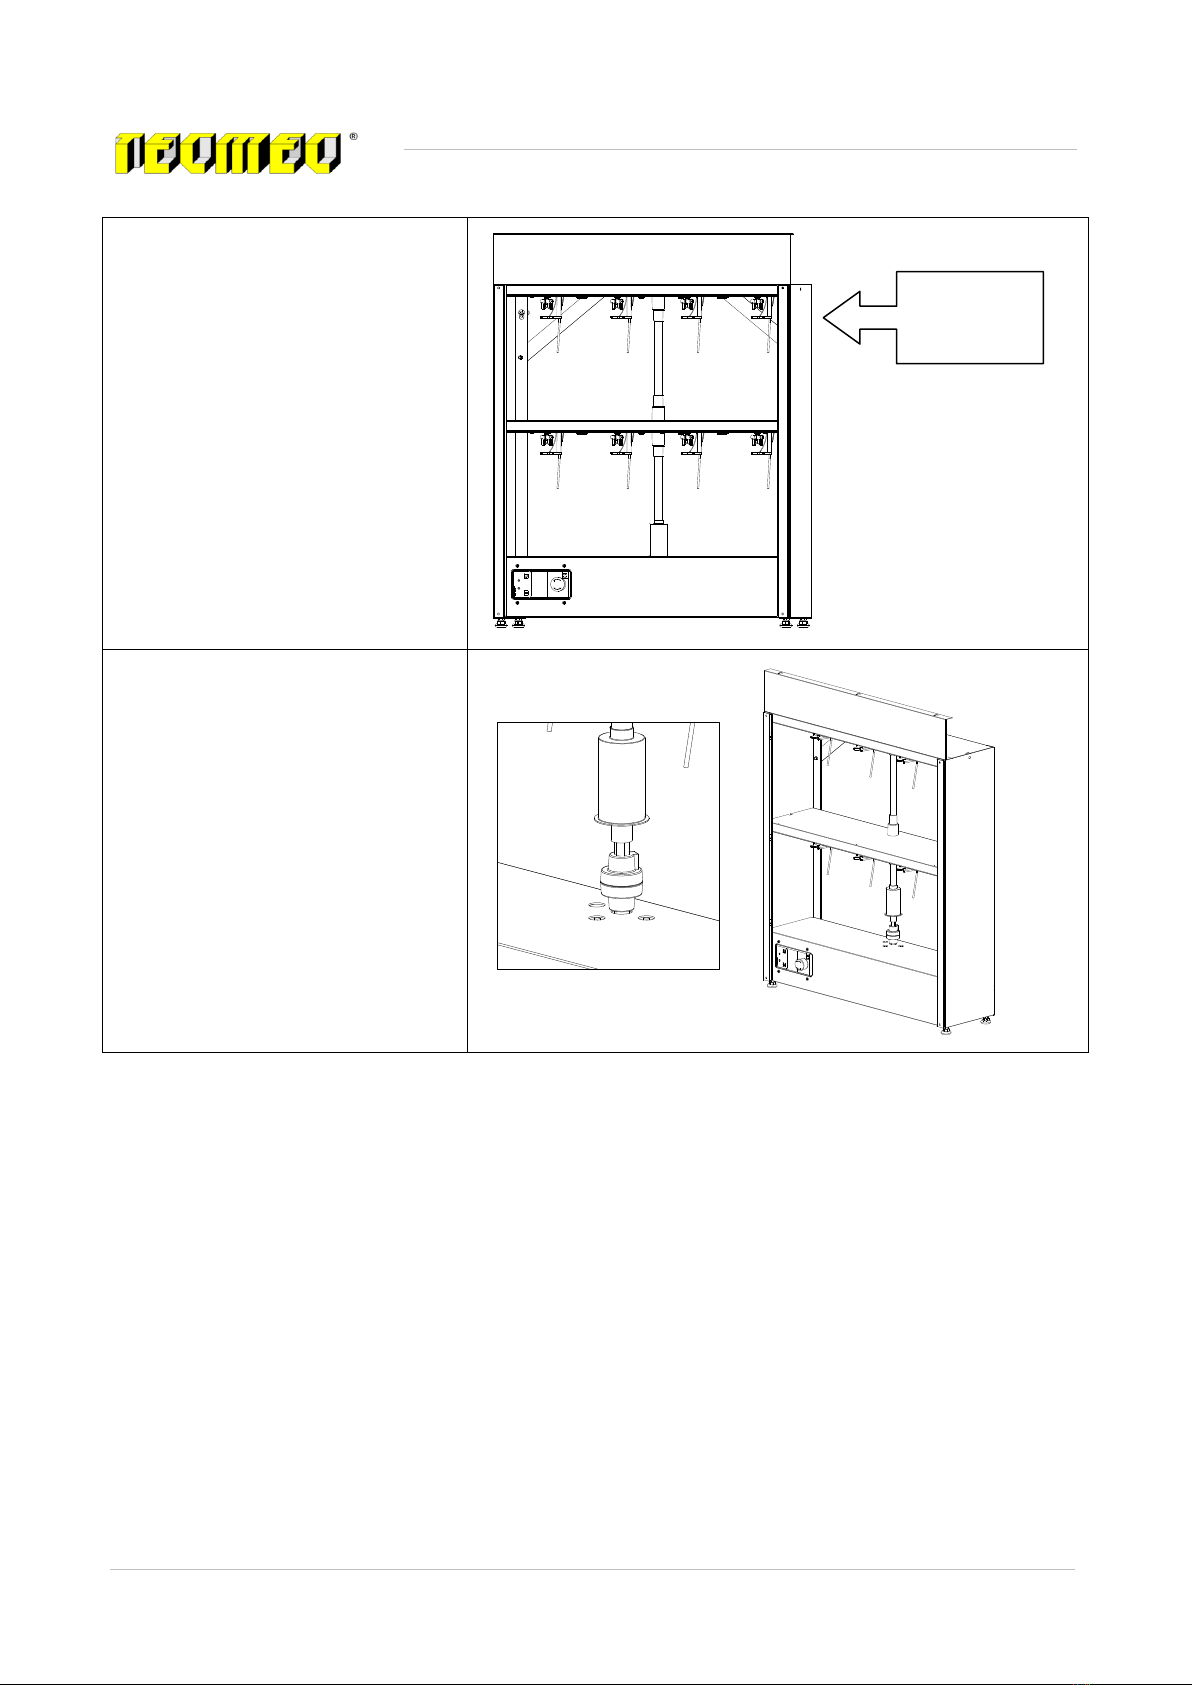
5 INSTALLATION
Warning
Consider the size and weights of the various components that will be moved is fundamental
constraint that the below mentioned installation steps are carried out by four (4) person.
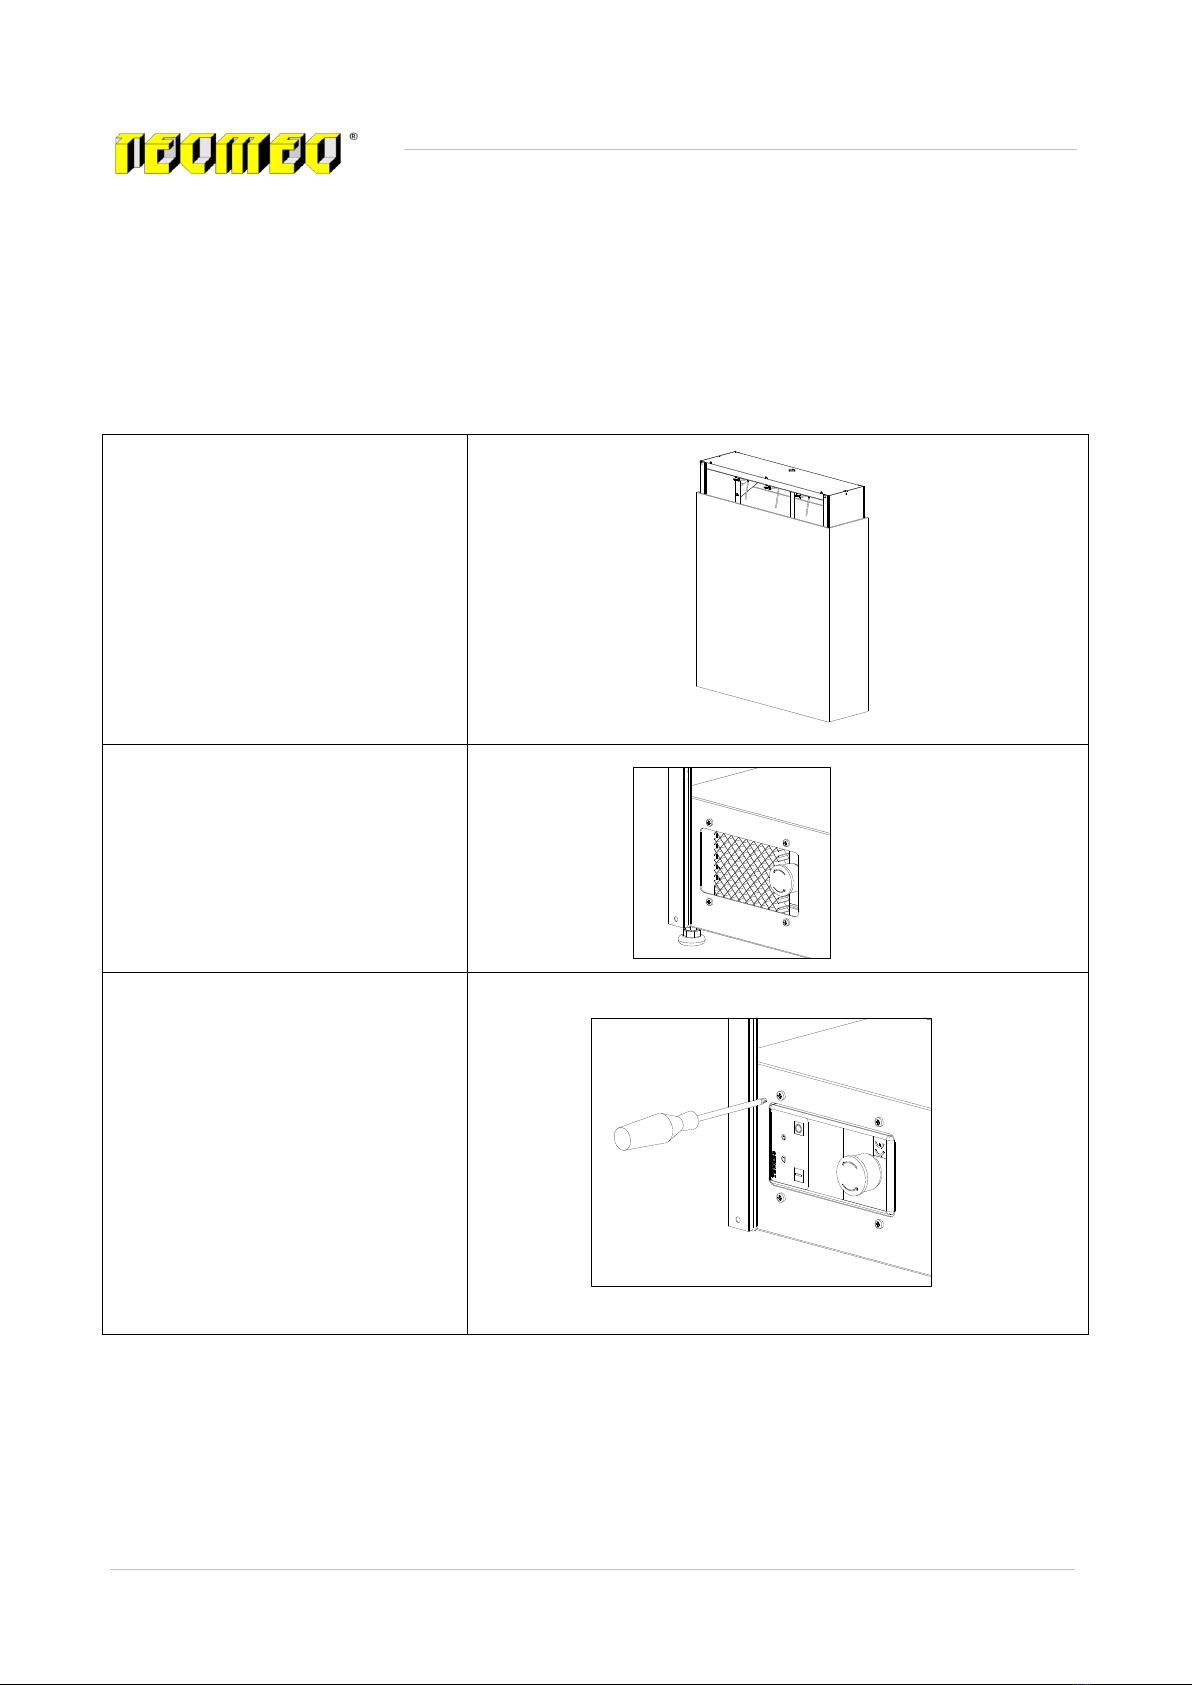
A
Remove the module from the box.
B
Remove the protective cardboard
placed in from of the control panel.
C
Reposition the control panel by tighten
the 4 screws.
Sirio HH Compact
Instruction and maintenance manual
Page 12 di 24
Instruction n° 207 - Rev. 4 datel 19/10/2017
IT
Copyright © 2017TecmecS.r.l. Translated from the ORIGINAL instructions
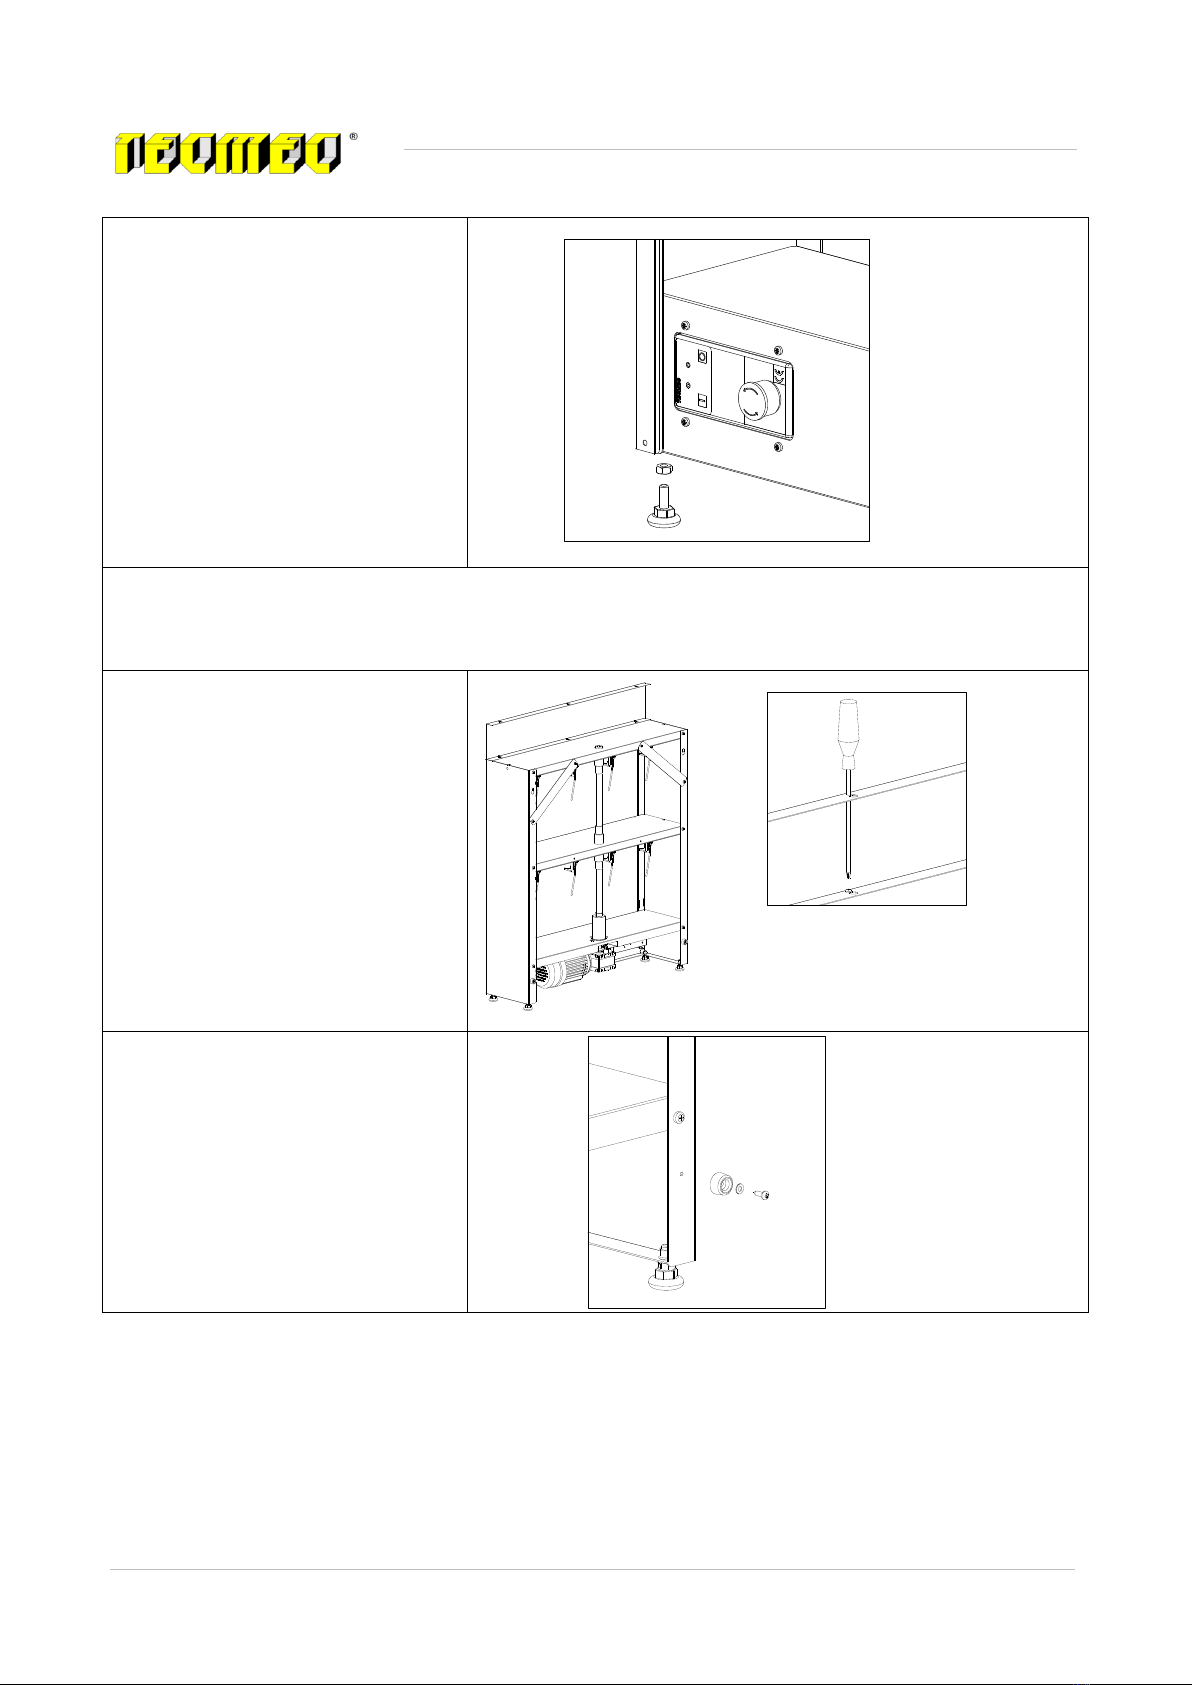
D
in case of wall mounting go to step F
Proceed with the assembly of the
leveling feet and nuts.
Verify that the floor where the
dispenser will be installed, is leveled.
In case the dispenser is not stable,
adjust the 4 fleets and lock the
counter nuts.
If this procedure is not carried out, the resault could lead to noise, malfunctions,
abnormal wear of moving parts, and pose risks to the end user.
E
Secure the front panel using the self-
tapping screws.
F
Wall mounting
Add the spacer on the structure pillar,
and secure them by using the self-
tapping screw and washer .
Sirio HH Compact
Instruction and maintenance manual
Page 13 di 24
Instruction n° 207 - Rev. 4 datel 19/10/2017
IT
Copyright © 2017TecmecS.r.l. Translated from the ORIGINAL instructions
G
Independently if it will be positioned
on the floor or against the wall, the
dispenser must be secured against the
wall, or a similar structure, in order to
support the weight, and prevents
overturning
For the fixing use the provided
anchors.
H
Verify the transmission joints.
Lift up the plastic protection of the
transmission joint, and ensure the
perfect coupling of the 2 half
coupling.
Place back the protection.
Fixing
point
Sirio HH Compact
Instruction and maintenance manual
Page 14 di 24
Instruction n° 207 - Rev. 4 datel 19/10/2017
IT
Copyright © 2017TecmecS.r.l. Translated from the ORIGINAL instructions
6 OPERATING
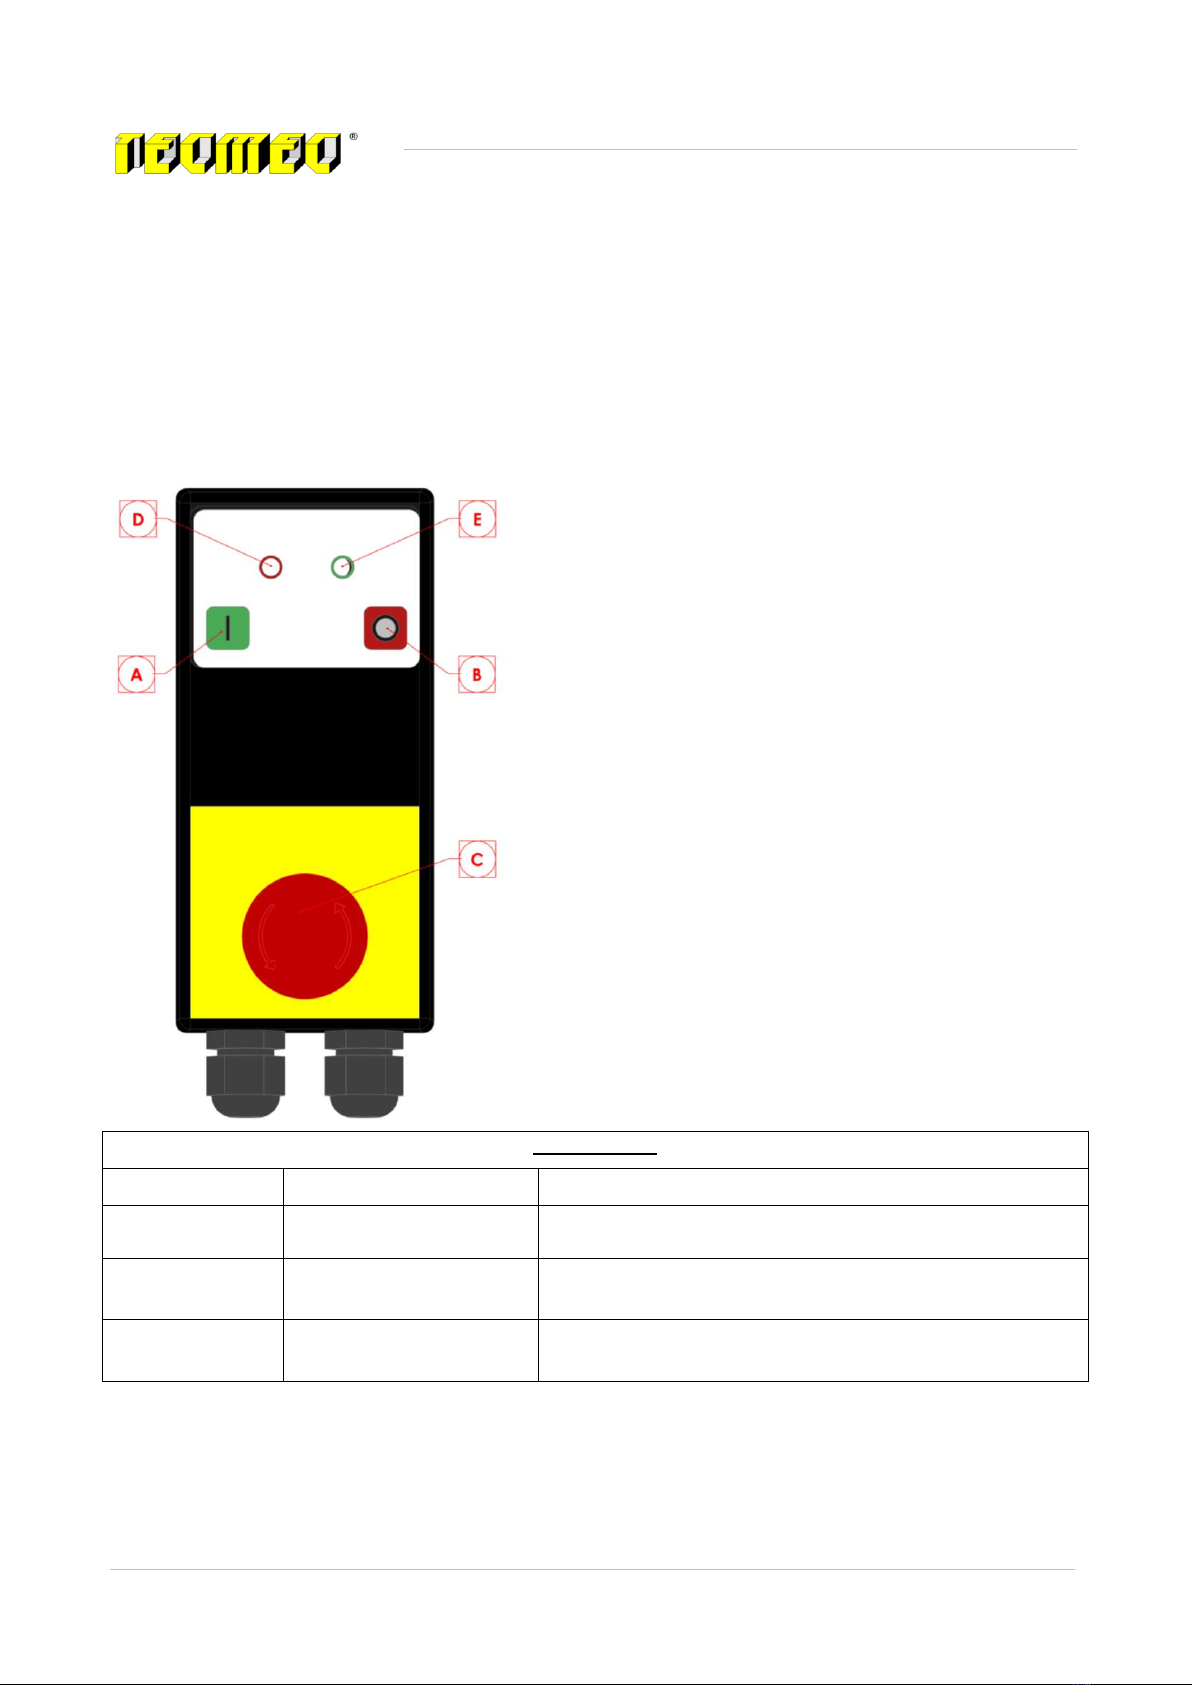
6.1 Operation instruction and electrical panel adjustment
The mixing machine is controlled by a electrical panel with internal CPU, that will generate the signal/input
to the agitation motor. The control panel is located in the lower part of the machine.
ⒶSTART BUTTON
Enables to start the motor in the cyclical function based on
the setted time (Std 20 min. ON, 240 min OFF)
ⒷSTOP BUTTON
Stops the motor and the cyclical function
ⒸEMERGENCY BUTTON
Will stop the motor, but will maintain the electrical panel
feeded. To restart the motor and the cyclical function, turn
the emergency button clockwise, and press the start button.
INDICATIONS
Led
Mode
Meaning
Ⓔ
Green Led fixed light
Dispenser powered (tension present)
Ⓓ+Ⓔ
Red Led flashing and
Green Led off
Motor on, agitation phase active
Ⓓ+Ⓔ
Red and Green Led fixed
light
Cycle mode active (agitation motor off ready to start)
Note:
To restart the motor during the pause period, press the red STOP button, wait a few seconds
and press the green START button.
Sirio HH Compact
Instruction and maintenance manual
Page 15 di 24
Instruction n° 207 - Rev. 4 datel 19/10/2017
IT
Copyright © 2017TecmecS.r.l. Translated from the ORIGINAL instructions
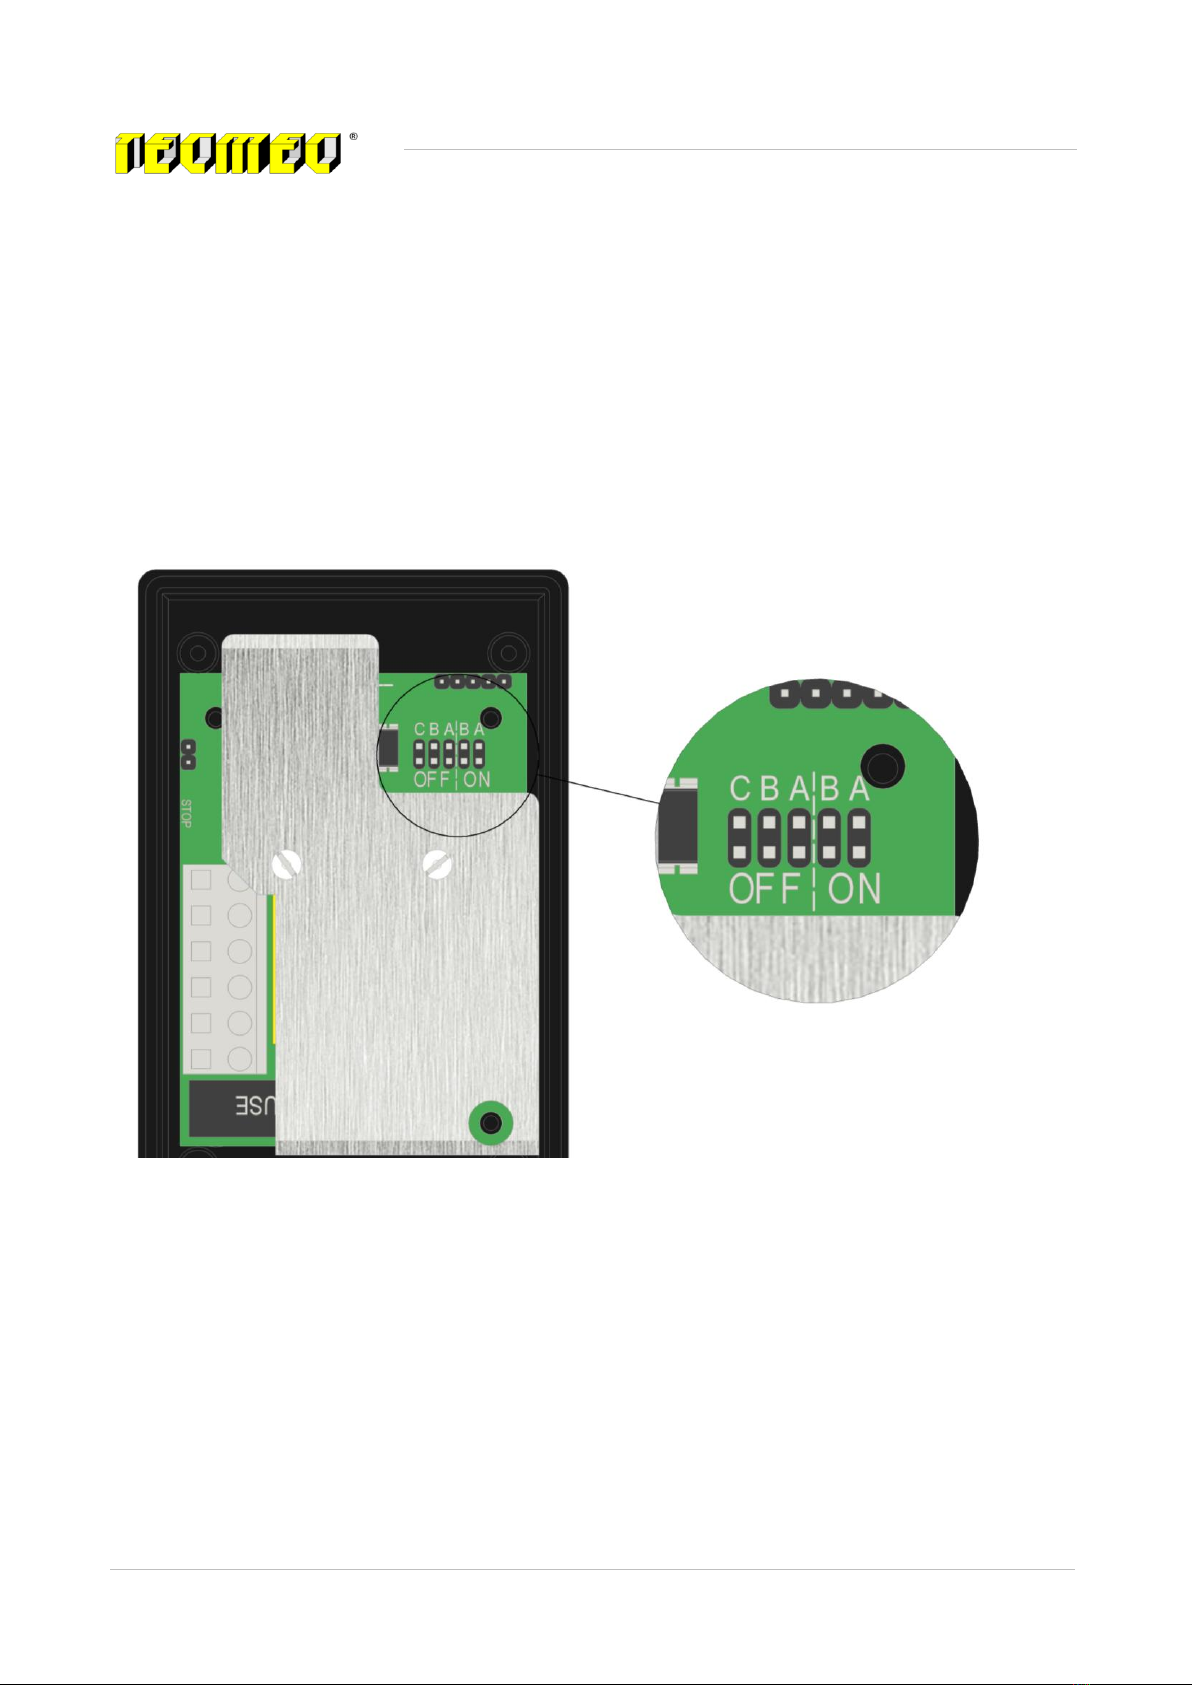
6.2 Customized agitation and pause settings
The factory setting (012245) is setted as follow: 20 minutes agitation 240 minutes pause.
If necessary, you can change these settings by doing the following:
- disconnect the machine from the power line
- remove the frame from the bracket
- remove the cover of the panel by unscrewing the 4 rear screws
- following the table below, close the desired contacts with jumpers of the area shown in the figure

Sirio HH Compact
Instruction and maintenance manual
Page 16 di 24
Instruction n° 207 - Rev. 4 datel 19/10/2017
IT
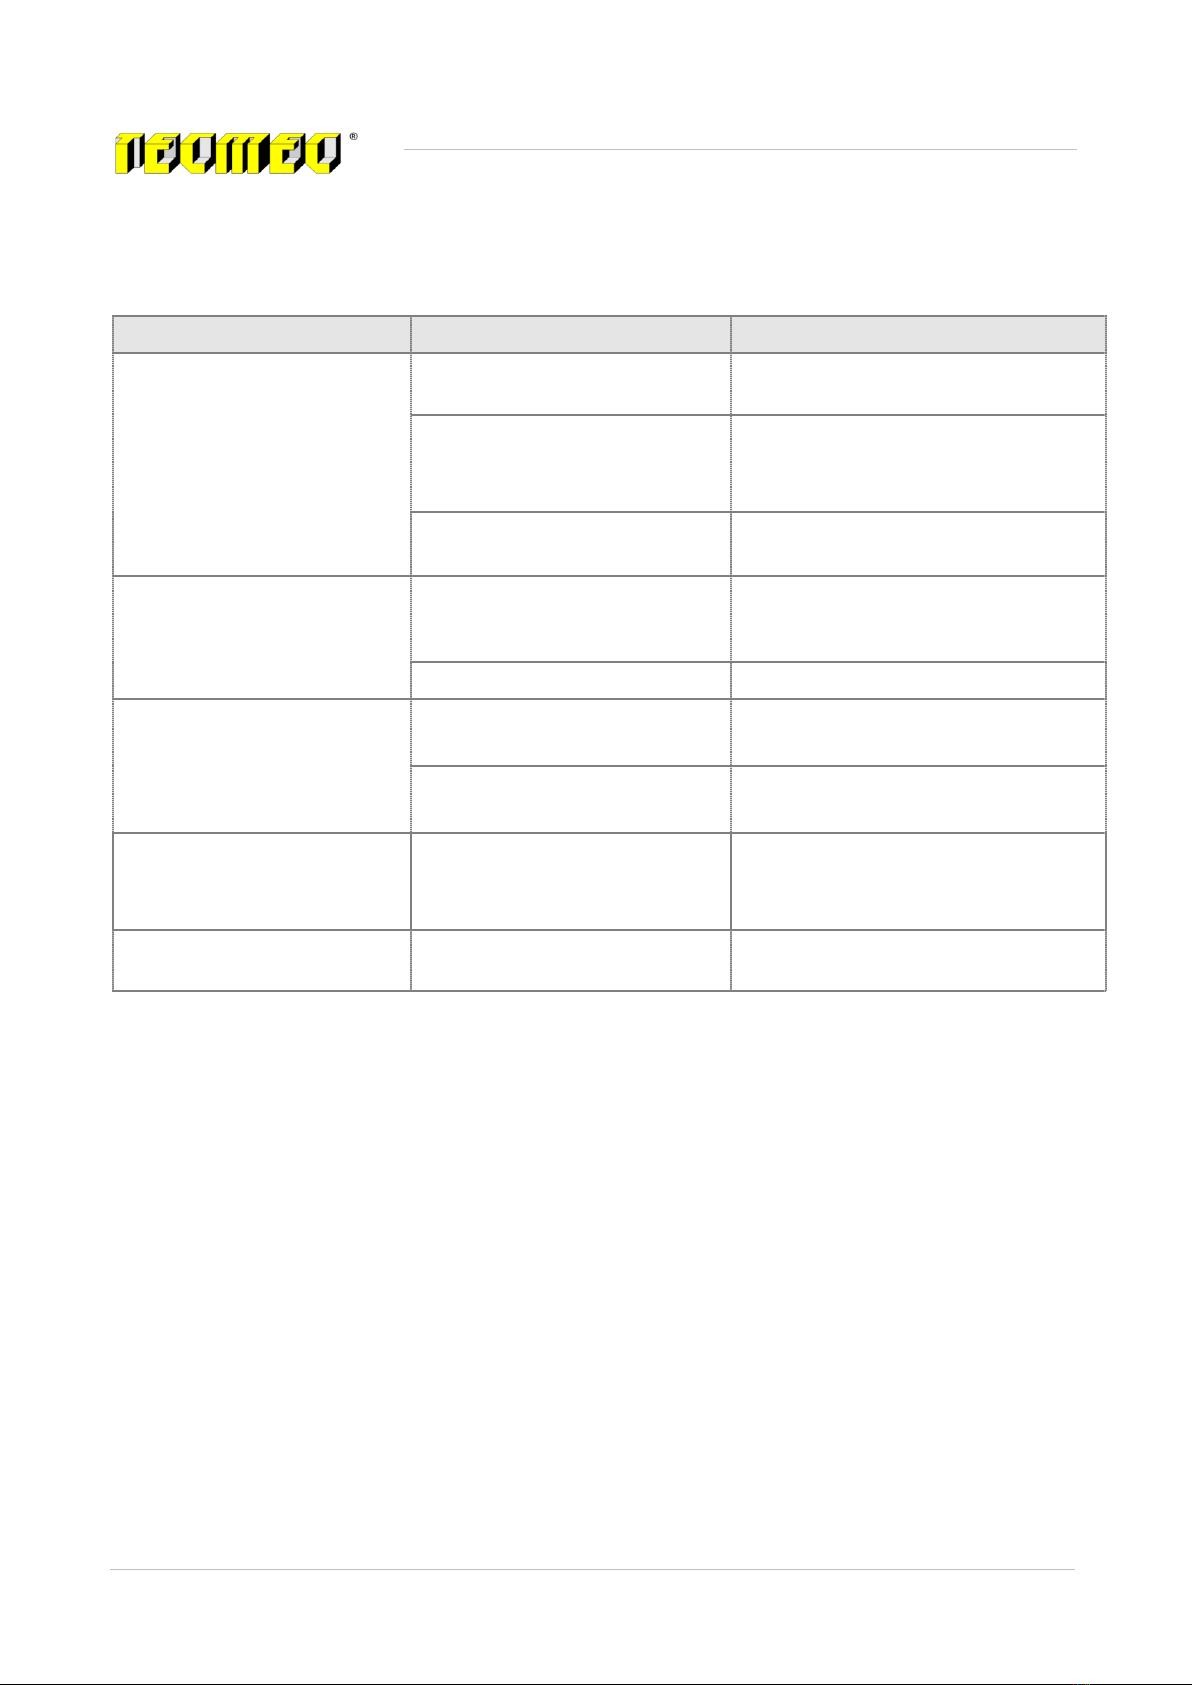
Copyright © 2017TecmecS.r.l. Translated from the ORIGINAL instructions
Pause time (min.)
Shaking time (min.)
60 min.
No jumper
10 min.
No jumper
120 min.
Jumper on C
15 min.
Jumper on B
180 min.
Jumper on B
20 min.
Jumper on A
240 min.
Jumper on B+C
25 min.
Jumper on A+B
300 min.
Jumper on A
360 min.
Jumper on A+C
420 min.
Jumper on A+B
480 min.
Jumper on A+B+C

Sirio HH Compact
Instruction and maintenance manual
Page 17 di 24
Instruction n° 207 - Rev. 4 datel 19/10/2017
IT
Copyright © 2017TecmecS.r.l. Translated from the ORIGINAL instructions
6.3 Change of function mode
Regardless of the factory settings, if necessary, the electronic control panel can be changed from cyclic
(ON/OFF) into timer (only one stirring cycle).
The change of operation mode from cyclic to timer is possible by acting on the side contact jumper of the
card shown in the figure.
In cyclic operating condition the jumper is not present (open contact) and in timer mode the jumper is
present (closed contact).
When the change is made, follow the previous table for stirring and pause settings.
Close the control panel, supply voltage and check if the operation is the desired one.

Sirio HH Compact
Instruction and maintenance manual
Page 18 di 24
Instruction n° 207 - Rev. 4 datel 19/10/2017
IT
Copyright © 2017TecmecS.r.l. Translated from the ORIGINAL instructions
6.4 Loading and unloading of cans
Add or remove the cans from the respective location only when the machined is turned off.
When placing the can make sure that the lid is properly positioned. The reference point are 2, the spout
against the anti rotation "nail", and the fork against the reference point.

Sirio HH Compact
Instruction and maintenance manual
Page 19 di 24
Instruction n° 207 - Rev. 4 datel 19/10/2017
IT
Copyright © 2017TecmecS.r.l. Translated from the ORIGINAL instructions
7 MAINTENANCE
7.1 Ordinary maintenance
To extend the life time of the equipment, the HH Compact needs some flew precaution:
verify every morning that the power lights in ON;
verify that all the lids of the cans/tins are properly placed in the agitation zone;
in case of liquids spill, disconnect the equipment from the main electrical line, clean immediately the
area by using the proper products;
leave the equipment in always operation mode, even during the evening and weekends , in order to
keep the products always ready to be used;
verify every six months the correct tightening of the transmission, transmission joints, and the proper
tension of the motor belt;
verify every months the functionality of the emergency button by following the below steps:
1- press the button during any operation phase, verify that the lights on the control panel are
switched off, and in case of agitation that the motor will stop .
2- once the procedure is done, restore the equipment by pressing the green START button.
For any other kind of issues or doubts, please, contact the Customer Service Dep. in Tecmec.
7.2 Non use periods
In case that the equipment will be switched off, due to a prolonged period of non-use, to avoid a overload
issues on the motor it is necessary to proceed as follow:
remove all the cans/tins from the shelf's, execute a mixing trough a mixer/shaker or in
alternative a manual mixing, and verify any eventual consistency problem.
in group of 2-3 locate them on the equipment, and mix them for at least 5 minutes.
stop the agitation, and add other cans/tints for the mixing cycle. Proceed as above until all the
cans/tins are stored in the equipment.
In case of power failure, verify the reason, once restored the situation, restart the agitation cycle by pressing
the green START button, in order to always ensure a good homogenization of the product.
During the loading and unloading of the cans, stop the agitation cycle by pressing the red STOP button.
Sirio HH Compact
Instruction and maintenance manual
Page 20 di 24
Instruction n° 207 - Rev. 4 datel 19/10/2017
IT
Copyright © 2017TecmecS.r.l. Translated from the ORIGINAL instructions
8 TROUBLESHOOTING
Problem
Possible cause
Possible solution
The motor is stopped and the
electrical panel is switched off.
No power.
Verify that the power cord is connected
and intact.
The thermal protiction internal of
the motor have been activaded.
Unplug the unit, wait an hour before
connecting again, verify the functioning.
If not working change the motor.
Emergency button pressed.
Release the button by turning; then
press the start button.
The electrical panel is not
working in all or in some of the
buttons.
Possibile tension overload.
Remove the power plug, wait a few
minutes before reinsert the plug and
operate the equipment.
Failure on the electrical panel.
Replace the electrical panel.
The motor is turning but does
not transmit the rotation to the
vertical shaft.
Feather key missing or broken on
the reducer shaft.
Replace /insert the feather key.
Transmission joint broken or
unhooked.
Verify the connection between the
various joints.
Noise machine.
Machine not correctly positioned.
The feets are not adjusted
correctly.
Adjust the feets.
The panel is on, but the motor
is not working.
Fuse blown
Change fuse.
For any other kind of issues or doubts, please, contact the Customer Service Dep. in Tecmec
This manual suits for next models
3
Table of contents
Other Tecmec Dispenser manuals

Popular Dispenser manuals by other brands


Cornelius
Cornelius Pro Fast Gate IDC255 Specification sheet

Silver King
Silver King Majestic SK15MAJ Technical manual and replacement parts list

Kimberly-Clark PROFESSIONAL
Kimberly-Clark PROFESSIONAL 9960 manual

Haws
Haws 2000S installation guide

Elkay
Elkay LK315 Installation & owner's manual

Franke
Franke RODX612 Installation and operating instructions