Tecnet TP-8000 SERIES Owner's manual

TP-8000 Series Portable Radio
PC Programming Manual

TP-8000 Programming Manual
2
TP-8000 SERIES PC PROGRAMMING MANUAL
TABLE OF CONTENTS
1-1 PROGRAM INSTALLATION 3
1-2 LANGUAGE SELECTION WINDOW 3
1-3 COMMUNICATION PO RT SELECTION WINDOW 3
1-4 SCREEN SIZE SELECTION WINDOW 4
1-5 USER SELECTION W INDOW 4
1-6 RADIO TYPE SELECTION WINDOW 5
1-7 MAIN WINDOW (FREQUENCYINPUT WINDOW) 5
1-8 INPUT SETUP WINDOW 8
1-9 ID EDITOR/5-TONE 12
1-10 CONFIGURATIONWINDOW 14
1-1 1 2-TONE SETUP WINDOW 19
1-12 KEY ASSIGNMENT SETUP WINDOW 21
1-13 GPS SETUP WINDOW 22
1-14 GPS USE METHOD 24
1-15 DEFAULT V A L U E COMPARISION WINDOW 26
1-16 RADIO MANAGEMENT WINDOW 27
1-17 CLONE FREQUENCY 28
1-18 P A S S W O R D DELETE 28
1-19 STUN DELETE 29
1-20 WIRELESS CLONING 29
1-21 CHANNEL SWITCH LOCK 30

TP-8000 Programming Manual
3
1-1 Program Installation
Install the CD and run the ACC-805 software. After running ACC-805_Program_Setup.exe, install with basic
values on the screen. Caution: Do not change program installation route.
1-2 Language Selection Window
Select a language to use (after installing program, run one time).
1-3 Communication Port Selection Window
Select a port to use for data communication.

TP-8000 Programming Manual
4
1-4 Screen Size Selection Window
Select Normal button (after installing program, run one time).
Select Netbook button when using smaller size screen.
1-5 User Selection Window
Select Consumer button (after installing program, run one time).

TP-8000 Programming Manual
5
1-6 Radio T y p e Selection Window
This screen is to select type of radio.
After turning on a radio and connecting programming cable, you can select the type of radio.
1-7 Main Window (Frequency Input Window)
Selection for each header is as follows:
Name – Typeinname as wanted to appear on display of radio for each channel (up to 10 characters).

TP-8000 Programming Manual
6
Narrow/Wide, 2 Tone, Open CH, BCLO, Compander (COM.), Scrambler (SCR.), and S-Key – click on cell
to display choices for that function.
RX Frequency (RX FRQ) – enter RX frequency then hit enter; remaining RX settings of RX Narrow/Wide
(RX Step), RX Tone, Scan, Shift will appear. Click on cell to display choices for that function.
TX Frequency (TX FRQ) – enter TX frequency then hit enter; remaining TX settings of TX Narrow/Wide (RX
Step), TX Tone, and Power will appear. Click on cell to display choices for that function.
Explanations for certain programming parameters: A special tone which is not available in the pull down
menu may be inputted. (Examples: CTCSS - 54.5, DCS - H022).
The Narrow/Wide band (Step) are determined automatically according to frequency input.
When Open CH is YES, the radio will transmit normally. If Open CH is NO, the radio will only transmit when
it receives a call from another radio/user. (Normally leave YES as default).
Shift allows the RX frequency input for elimination of adjacent channel interference, or the user can edit (for
prevention of adjacent channel interference). When the other relevant receiving selection items (including 2
Tone) are vacant and the RX frequency is inputted, the initial values are placed automatically from the
selections in the Default Value Tab of Input Setting Menu. If a value exists already, it is not changed
automatically.
As per the TX transmitting setup, the same method with RX receiving is applied.
Shortcut Key (S-Key) allows the radio/user to obtain channel(s) that are often used. When the Shortcut
option is activated via a pre-determined button on the radio, those channels with S-Key as YES will allow the
radio/user to obtain those channels quickly through the channel selector switch.
Tab Menu Explanation
New: Removes the input content, and return to default/initial status.
Read File: Reads a group and channel data that are restored in *. fre file.
Write File: Saves data into*. fre file.
Print: Prints showed values in the screen.
Input Setting: Input Setting Window.
RX to TX Copy: Copies from receiving frequency and receiving tone, to transmitting frequency
and transmitting tone.
Read Radio: Reads the restored data in a radio.
Write Radio: Writes data on screen into a radio.

TP-8000 Programming Manual
7
5 Tone: Shifts to setup window for 5 Tone & Stun / Revive ID configurations.
2-Tone: Shifts to setup window for 2 Tone configurations.
Config: Shifts to setup window for various on/off functions.
KeyAssign: Shifts to set up window for assignment functions of each button.
Model Select: Shifts to set up window for model of radio being programmed.
SDS: Shifts to set up window of single message transmission.
GPS: Shifts to set up window related to GPS and Bluetooth.
Port Select: Select computer communication port to use.
Default Data: Shifts to set up window for change in default file value and saved values in a radio.
Radio Records: Shifts to window that shows radio management information.
Password Delete: Removes the password saved in a radio.
STUN Delete: This function is to remove stun from a radio.
Reference: In case of newer laptop, a serial port is not available. Therefore a conversion connector, USB to
Serial may be utilized. The port number is usually setup over 4.

TP-8000 Programming Manual
8
1-8 Input Setting Window
1.8.1 Input Initial Value
When inputting TX and RX frequency, the default setup values are inputted automatically for Band, 2-tone,
Open CH, BCLO, Compander, Scramble, Scan, Power, Channel Name, and Subtone (sub-audible). When
there are values already inputted, they are not affected.
Selecting “ Identical ” applies the selected subtone to all channels.
Selecting “ Continual ”increases in incremental order from the selected subtone.

TP-8000 Programming Manual
9
1.8.2 Grouping Setup
This window is used to assign channels to a group. Total number of channels (aggregate of groups) cannot
exceed 512 channels.
After assigning channels, the “ Apply ” button should be pressed.
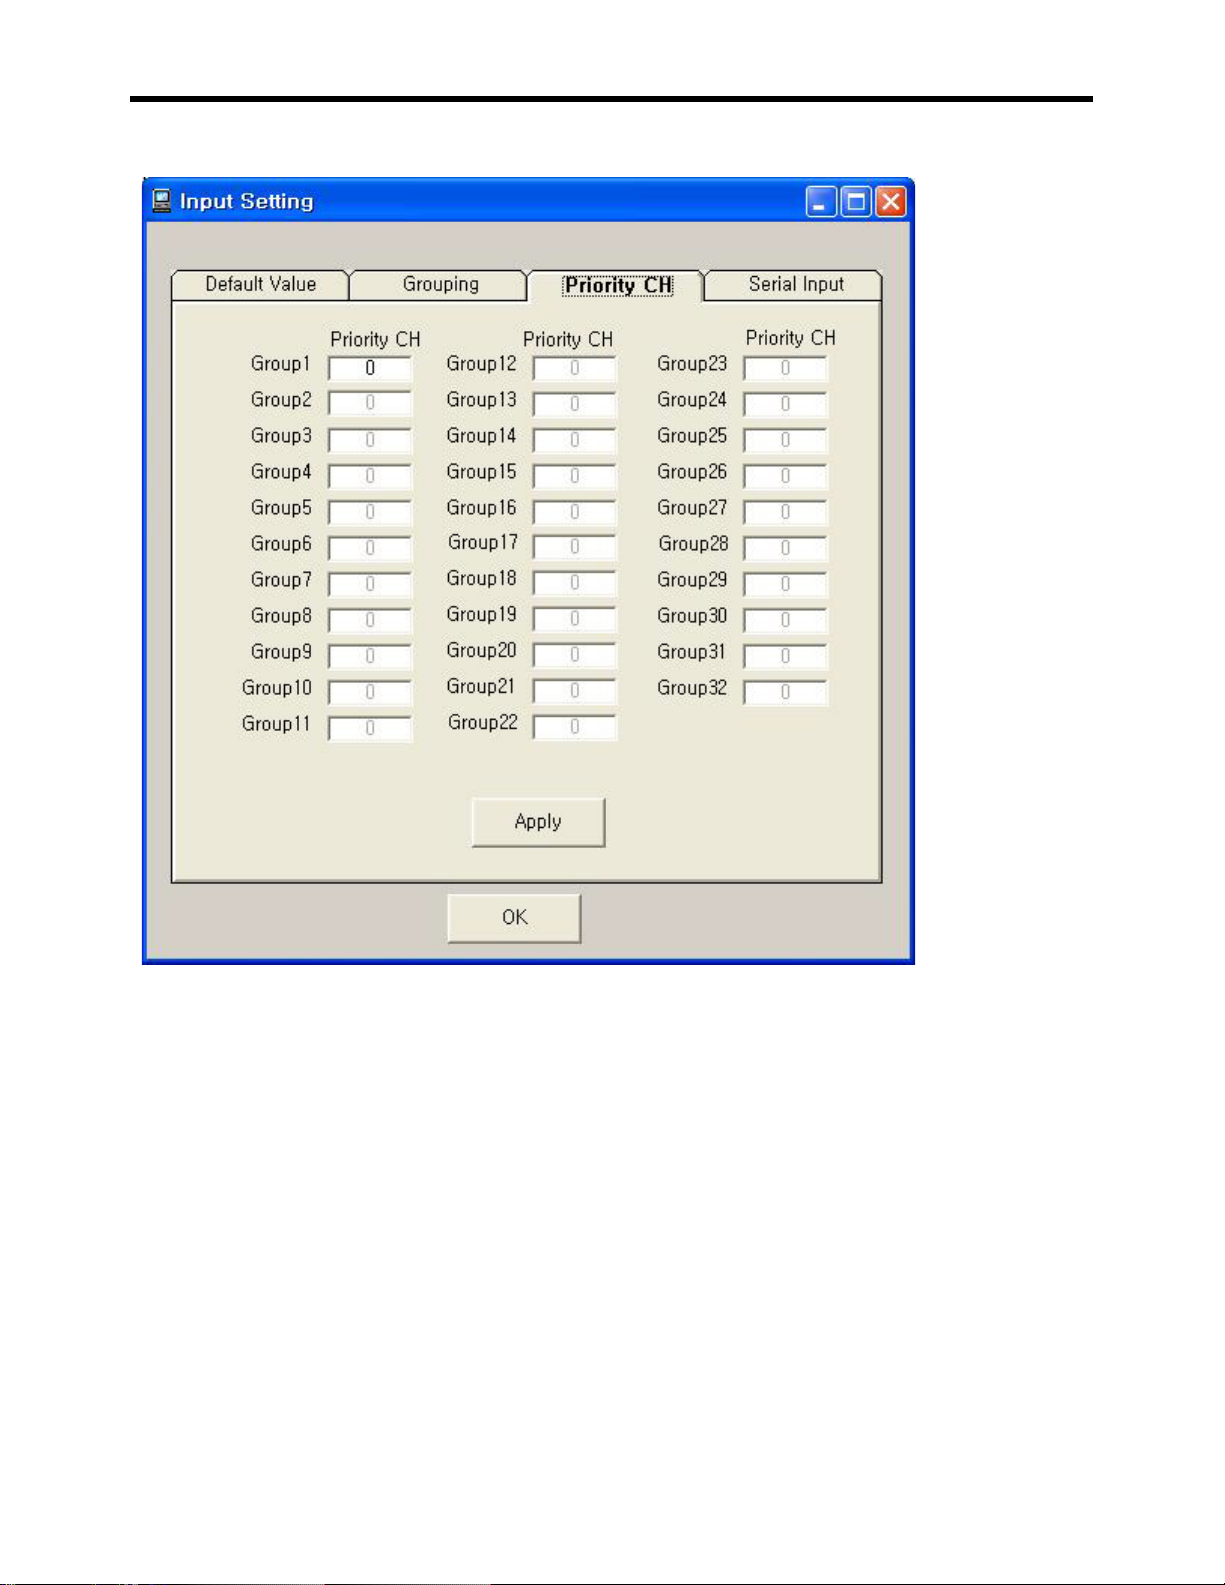
1.8.3 Priority Channel
TP-8000 Programming Manual
10
This window is for setting up Priority Scan Channel in a specified Group.
Only channels that are selected as scan channels in channel setup can be assigned as a priority scan
channel.
After assigning channels, “Apply ” button should be pressed.

TP-8000 Programming Manual
1 1
1.8.4 Serial Input Frequency
This window is for inputting frequency continually by same frequency interval.
Group Selection: This is to assign a group (1-32) to input frequency.
Start Channel: This is to assign a channel to first input frequency.
End Channel: This is to assign a channel to last input frequency.
Start Frequency: This to assign a frequency that the first input begins.
Frequency Internal: This is to assign a frequency interval to be inputted continually.
Rx Input: RX data is restored with same setup values as per the above.
Rx to Tx Copy: This copies RX data to TX data.

TP-8000 Programming Manual
12
1-9 ID Editor/5 Tone
This window is to format the 5Tone signaling option.
Click on “ New “ to create a 5 Tone ID. A 5 Tone ID can be inputted by 200. Call Name can be inputted
by English (10 letters) and Call ID is inputted by 3 to 6 characters.
When Enable is No, the tone does not transmit or receive.

TP-8000 Programming Manual
13
ID number (1~200) is assigned to Own ID (STUN ID).
A station controls terminals.
If a station transmits Stun ID by using 5tone (CCIR), the relevant terminal(s) loses all functions.
If it transmits Revive ID, the relevant terminals are returned to normal functions. (Once a terminal is stunned,
it is not normalized even if the power is on/off).
STUN / REVIVE ID can be inputted by 2~7.
5TONE Format: This selects 5TONE standard set.
Lead In Delay Time: The delay time from the time requesting 5TONE ANI or 5TONE CALL
generation to the time the first signal happens.
First Tone Time: The generating time of the firstly applied tone out of composed 5 tones.
Next Tone Time: The tone generating time applied to each tone of composed 5 tones.
Lead Out Delay Time: The delay time from the time requesting 5TONE ANI to the time the first
signal occurs.
5TONE Type: It is to decide whether or not transmitting own ID when transmitting 5 tone.
Repeater: It is to decide whether or not transmitting through repeater and selecting
Repeater/Transmission ID.
5Tone Response: It is to receive own ID, to decide whether sending response or not and to select
the kind.
Section Tone: It is to select tone to send together with emergency call or Reset Tone.
5Tone Option: It is to select 5 Tone ANI on or off for transmission location (front, back) and
response alarm or not.
TP-8000 Programming Manual
14
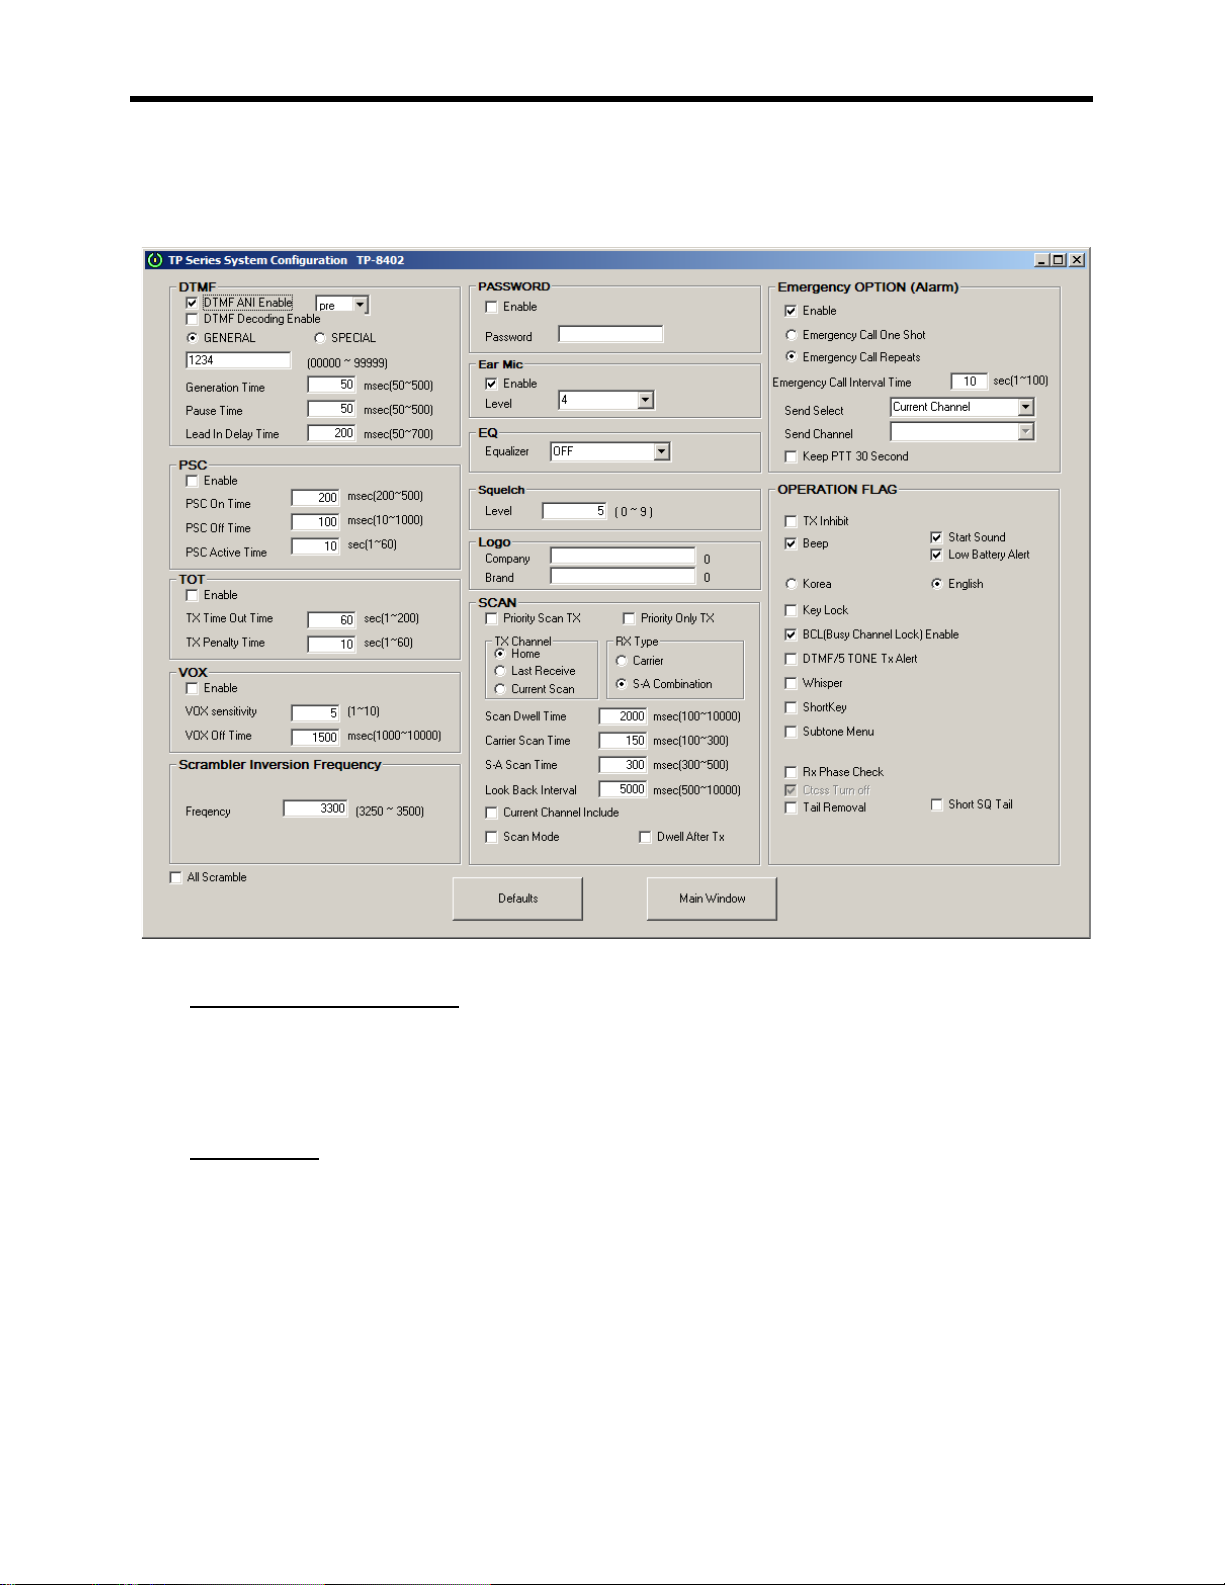
1-10 Configuration Window
1.10.1 Button Explanation
Defaults: Changes all values to standard values.
Main Window: Returns to main screen.
1.10.2 DTMF
DTMF ANI Enable check box: Check to enable transmit DTMF ID before and after starting
transmission (pre and post).
DTMF Decoding Enable check box: To decide to show reception DTMF tone on screen or not.
Generation Time: The time that one signal of DTMF ID generates.
Pause Time: The time that signal does not generate between DTMF ID and ID.

TP-8000 Programming Manual
15
Lead In Delay Time: The delay time from the time requesting DTMF ID generation to the time the
first signal happens.
1.10.3 PSC
Controls setup of Power Save Control (PSC) to reduce battery current consumption.
Enable Check box: Check to enable PSC.
PSC On Time: The time when reception part is ON during PSC operation.
PSC Off Time: The time when reception part is OFF during PSC operation.
PSC Active Time: The time that PSC operates after transmission or reception finishes or channel
changes.
1.10.4 TOT
Controls setup of Time Out Timer (TOT) that prohibits continual transmission. When TOT is used,
transmitting ceases if it exceeds time inputted.
Enable Check box: Check to enable TOT.
TX Time Out Time: Inputs the maximum time for one time transmission.
TX Penalty Time: The prohibition time to transmit when transmission time exceeds time out time.
1.10.5 VOX
Controls setup of VOX (voice actuation) which enables transmission by voice signal through microphone
without PTT.
Enable Check box: Check to enable VOX function.
VOX Sensitivity: To set transmission sensitivity on input signal.
VOX Off Time: When VOX is activated, this sets transmission stopping time after no voice input.
Reference: VOX Sensitivity means not signal size of voice input into MIC but level difference between
sampling data of input signal.
1.10.6 Scrambler Inversion Frequency
Controls setup of frequency input to use during security call (Default Standard 3300Hz)

TP-8000 Programming Manual
16
1.10.7 PASSWORD
Controls setup of radio Password.
Enable check box: Check to enable Password function.
Password: Input Password number(s) to a maximum of 10 digits.
1.10.8 Ear Mic
Controls setup of audio output of accessory.
Enable check box: Check to enable Ear Mic setup.
Levels: Steps of audio output 1 (Low) to 7 (High). Default is 4.
1.10.9 EQ
Controls setup of Equalizer function.
Equalizer: Emphasizes high tone and low tones in radio. Default is OFF.
1.10.10 Squelch
Controls setup of Squelch sensitivity.
Squelch: Sets level of Squelchsensitivity from 0 (Low) to 9 (High). Default is 5.
1.10.11 Logo
Company and/or Brand: Names that will appear in display when radio is first turned on (maximum 14
characters) then reverts to occupied channel.
1.10.12 SCAN
Controls setup of Scan operation.
Priority Scan TX Check box: When scan operates, transmission goes via the last receiving
channel before Dwell time, and goes via Priority channel after Dwell time.
Priority Only TX Check box: When scan operates, transmission goes via priority channel.
TX Channel Radio button: To assign transmission channel, when transmitting during scan.
Home: Radio transmits on the channel in which scan was initiated.
Last receive: Radio transmits to the last channel during scanning.

TP-8000 Programming Manual
17
. Current scan: Radio transmits on the current scanned channel.
RX Type Radio button: Assigns conditions for scan to cease during scanning
Carrier: If frequencies are same, scan stops.
S-A Combination: If frequency and sub-audible tone are same, scan stops.
Scan Dwell Time: When scan stop conditions disappear during scanning, scan dwell is the time
available after RX audio ceases that allows the radio to remain on the stopped channel without
moving to the next channel in the scan sequence.
Carrier Scan Time: Time being checked for whether or not a carrier exists.
S-A Scan Time: Time being checking for whether sub-audible tones are same.
Look Back Interval: When scan is stopped in a general channel during priority scan, look back
interval is the interval time of periodical checking whether or not there is a carrier in the priority
channel.
Current Channel Include: If the current channel is not assigned in the scan channel list, the
previous channel of entering scan mode is automatically included into scan channel list.
Scan Mode: After entering scan mode, this maintains scan mode even when scan mode is not
stopped and power is on/off.
Dwell After Tx: Even after transmission ends, it keeps the current channel and the radio does not
scan per the time designated in the Scan Dwell Time.
Reference Note: During scan operation, scan stop and audio reception are not always same. In
case the RX is carrier type and there is a sub-audible tone in the recent scanning channel and if
carrier are same, scan stops and RX Lamp is blinking and audio does not open. Except for this
scenario, scan stop and audio reception are normally same.
1.10.13 EMERGENCY OPTION
Controls setup of Emergency Option (alarm) operation and related setups.
Enable Box: This enables Emergency Option.
Emergency Call One Shot: Makes Emergency bell ring one time.
Emergency Call Repeats: Makes Emergency bell ring periodically.
Emergency Call Interval Time: This setup makes Emergency bell ring periodically per time
selected in Emergency Call Interval Time (1-100 seconds).
Send Select: This is to determine the channel to transmit between current located channel or

TP-8000 Programming Manual
18
setup channel.
Send Channel: To select transmitting channel.
1.10.14 OPERATION FLAG
Controls various operation setup related to radio features.
Tx Inhibit : Check to inhibit transmission.
Beep: Check if audible sounds are desired for radio turn on and low battery indications.
Language Selection: Check if channel annunciation is wanted per desired language.
Key Lock: Check if Key Lock is to be applied. Does not apply to PTT.
BCL (Busy Channel Lock): Check if BCL is desired. (Apply to frequency input window each
channel).
DTMF/5 TONE Tx Alert: Check to enable sound of DTMF and 5Tone when transmitting.
Whisper: Check to enable whisper mode use.
ShortKey: Check to enable channel abbreviated number (priority channel).
Subtone Menu: Check to enable the change of subtone in menu.
Rx Phase Check: Check to enable phase inversion after transmission end.
Tail Removal: Check to disable squelch tail sound.
Short SQ Tail: Check to enable short squelch tail sound.
Charts indicates transmission availability according to setup.

TP-8000 Programming Manual
19
1-11 2-Tone Setup Window
This window is to setup 2- Tone frequency and space time.
1.11.1 Button Explanation
Save: Saves decoding data and writes to radio.
Main Window: Returns to main screen.
1.11.2 Tone Selection Frequencies
From the Code Type pull down menu, select “ Other “ .
Type in the frequency in the Tone A box being used to decode the first tone signal.
Type in the frequency in the Tone B box being used to decode the second tone signal.
You may also choose the Tone A and Tone B tones via the Code Type and First Digit scroll down
boxes. Once the desired frequency is located in the Tone Frequency grid, double click on that
frequency under Tone A column and it will automatically be inputted into the Tone A box. Perform

TP-8000 Programming Manual
20
the same function under the Tone B column to input the frequency into the Tone B box.
Space time: The time to distinguish between Tone A and Tone B.
Select Save and the following window will appear. Select Yes to write.
Confirms 2-Tone data has been saved when complete Write Radio occurs.
Important: Individual Tone A and Tone B durations are entered through the 5 Tone configuration
menu in the First Tone Time (Tone A) and Next Tone Time (Tone B) boxes. Set 5Tone format to
CCIR.
Important: The 2/5 Tone Enable box must be checked I the 5 Tone configuration menu to enable
2-Tone capability.
Caution: If a user selects ‘ Other…’ for Code Type and inputs the frequency of Tone A and Tone B, the
data is restored that values under decimal are removed during calculation process when saving data.
Accordingly, if saved values are read, there can be a little valuedifference
Other manuals for TP-8000 SERIES
2
Table of contents
Other Tecnet Portable Radio manuals


