Tejovat TJ-SH-DP1000 User manual
Tejovat Smart Home Products
720P HD Smart Video Doorbell
TJ-SH-DP1000
User Manual
Rev 1.0


1. Introducon
Tejovat DP1000 is a smart video doorbell which provides 720P HD quality pictures and videos of
visitor’s on the connected smartphones. The DP1000 gets connected to your home network
easily through either Wi-Fi, with the help of Smartlink interface or wired Ethernet connecon.
With ‘Smart Home Cloud’ smartphone app, DP1000 provides user an easy way to have video
conversaon with the visitors along with controlling the door lock ideally from anywhere. The
DP1000 provides an alert like phone call on the user’s smartphone when the visitor presses the
video doorbell’s call buon. The DP1000’s smart camera monitors all the acvies in front of
your door which can record photos or videos of the moon detecon during day and night with
the help of PIR and night sensors. User can monitor all the acvies any me with the help of
their smartphones or configure the doorbell for recording these acvies on the micro SD card.
With the help of email push opon, user can have emails of the photo aached to it when
there is a moon detecon in front of your door.
2. In the Box
• Smart Video Doorbell (TJ-SH-DP1000) * 1 pc
• Indoor Chime (bell) * 1 pc
• 12V/1.5A Power Adapter * 1 pc
• This User Manual * 1 pc
• Rain Shield * 1pc
• Screws and 12V Adapter Connecng Cable
• Door Lock Connector Cable
3. Before Using the Device DP1000
Before using the device D 1000, please read the following points carefully.P
• If the product is found cracked, deformed or has other anomalies when the package is
received, please stop using it immediately and contact the seller or manufacturer.
• Don’t place the product in the fire, water, high temperature (<60 °C) or low temperature
(>20 °C) environment.
• Don’t disassemble or modify the product to avoid damage to yourself or the product.
• Use a dry and so cloth to clean the surface, don’t use chemicals, soap or detergent.
• If the product is damaged as a result of breach of the warnings above, we will not bear any
legal responsibility.
• Please read warranty terms and condions for further details about the warranty.
Rev 1.0 1 | P a g e
Tejovat Technologies
DP1000 User Manual
4. Overview of Smart Video Doorbell DP1000
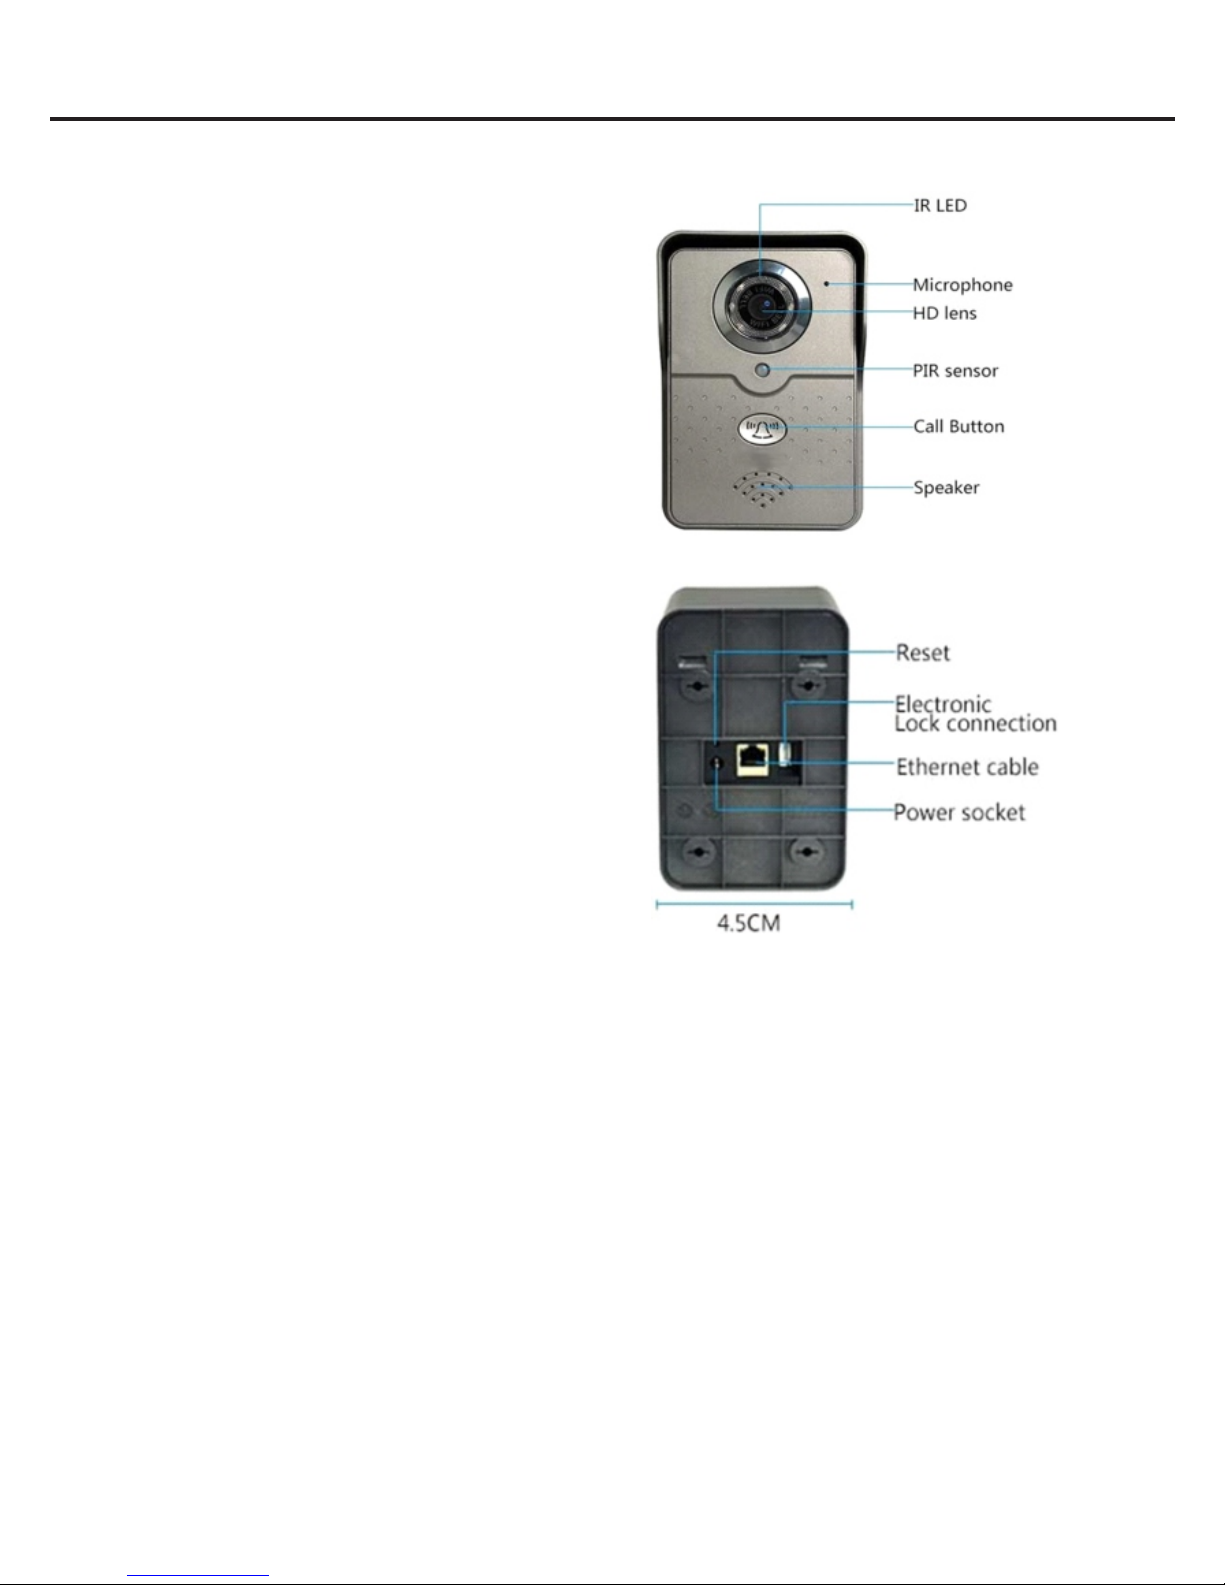
4.1 Front Panel
• PIR Sensor: To sense movement of
people, animals or other objects with
the help of passive infrared technology.
• IR LED: 6 IR LED’s used for night vision
camera.
• Call Buon: To nofy the presence of
visitor to owner or the user of the doorbell.
• Speaker: For audio communicaon.
• Microphone: For audio communicaon.
4.2 Back Panel
• Reset Buon: To restore the doorbell to
the factory sengs.
• Power Socket: To power the doorbell by
DC 12V / 1.5 A supply.
4.3 Main Features
The major features of the smart video doorbell DP1000 device are as below:
1. Support both Android and iOS operang system.
2. No maer where you are, you could answer your visitors call, control the lock, see the
circumstances in front of the door at any me via mobile apps.
3. With the funcon of infrared vision, the device can also provide photos and videos during
the night me.
4. With the funcon of moon detecon, the device can take the photos whenever anything
unusual happens in front of the door.
5. The smart video doorbell is IP 54 water resistant.
6. Several smartphones (up to five users) could connect with one doorbell at the same me.
7. Powered by DC 12V / 1.5 A
Rev 1.0 2 | P a g e
Tejovat Technologies
DP1000 User Manual

5. Range Test
1. For longer range applicaons, check if the router is or can be located at the front of the
building, preferably near a window or glass as this will greatly extend the range.
2. If it is not possible to have the Wi-Fi router at the front of the building, consider installing a
standard “on the market” Wi-Fi repeater or range extender. These can be purchased as a
plug in device and are sold in DIY and consumer electronics stores.
3. For even greater range, you can alternavely connect home plug power line adapters to the
LAN socket on the device and on the home router.
DP1000 User Manual Rev 1.0 3 | P a g e
Tejovat Technologies

6. Power Supply
If possible, locate the power supply as close as to the doorbell.
Note: Most technical calls received are due to installers using CAT5 or alarm cable to power
the doorbell. Neither are rated to carry enough power (1.5-amp peak). Please use following
cable sizes…
• Up to 2 meters (6 feet) – Minimum 0.5mm2 (20 gauge)
• Up to 4 meters (12 feet) – Minimum 1mm2 (16 gauge)
• Up to 8 meters (12 feet) – Minimum 1.5mm2 (14 gauge)
7. Installaon Guidelines
Following guidelines can be adopted to install the DP1000 doorbell assuming sasfactory
operaon of the doorbell at full Wi-Fi range at desired locaon:
• Mount the doorbell at the desired height for pedestrian or car users. The camera angle is
wide at 140 degrees to cover most scenarios.
Rev 1.0 4 | P a g e
Tejovat Technologies
DP1000 User Manual

• Make sure the availability of electric connecon for power adapter behind the wall where
you want to fit the doorbell.
• On stucco, brick or concrete, use the drill bit to drill two holes to install the doorbell as well
as one large whole for its power supply in the wall.
• If you’re installing on wood or siding you can directly screws with the help of screwdriver.
Sll you will require large hole for power supply.
• Remove the rain shield out of your doorbell to access the mounng holes and install the
screws as shown in figure 1 below.
• Make connecons for the power adapter with the help of power connector to the doorbell.
• Make door lock connecons as per the instrucons given in the secon “Lock Control
Wiring”.
• Fit the doorbell device in the rain shield with the help of two snap joints as shown in the
figure 3 below.
• Tighten the screws as shown in the figure 3 below.
Figure below shows posion of the snap joints and screw holes along with other details.
Rev 1.0 5 | P a g e
Tejovat Technologies
DP1000 User Manual
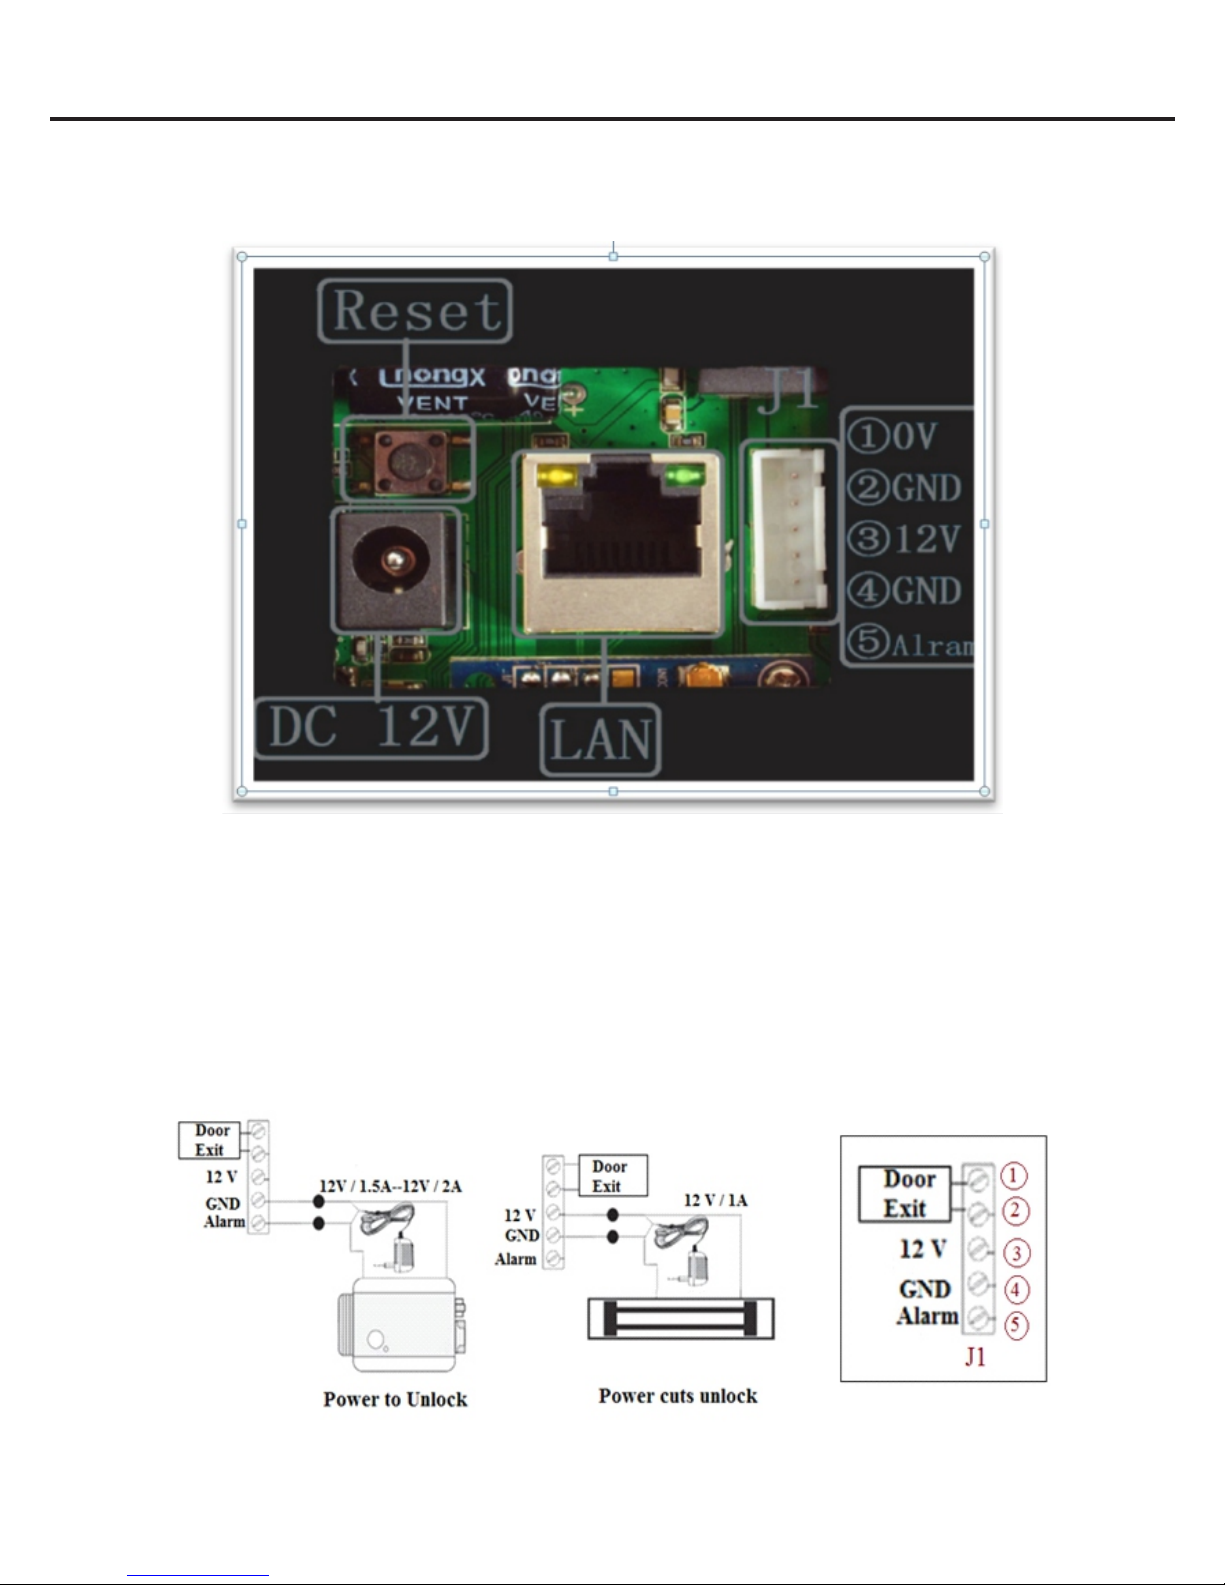
8. Lock Control Wiring
Figure below shows the locaon and the Pin connecons for door lock.
Electronic lock pin connecon instrucons are as below:
1. For normally open (NO) electromagnec locks, connect J1 ① and ② (The ② is for the
public GND).
2. For normally closed (NC) electromagnec locks, connect J1 ③ and ② (The ② is for the
public GND).
3. For normally open (NO) door unlock buon or alarm input device, connect J1 ④ and ⑤.
Rev 1.0 6 | P a g e
Tejovat Technologies
DP1000 User Manual

9. One Key to Call
When visitor press the doorbell’s call buon, smartphone user receives ring on his/her
smartphone. User can decide to answer it or hang up. Please note that Smart Home Cloud
applicaon need to be installed on the mobile through either Google Play store or Apple App
store. Also user need to register, login and connect to doorbell either through the Wi-Fi or
Ethernet. Aer that applicaon need to be running in order to receive the ring.
③ Aer answering, you can have video call with the visitor, take photos, open the door etc.
Note: Because of restricons by Apple, your iphone will receive noficaon message first. If
your screen is locked, you must swipe the noficaon banner, then unlock the screen.
② Ringing screen appears
on Smart Phone App; User
can answer or hang up.
① Visitor press the
calling buon.
Rev 1.0 7 | P a g e
Tejovat Technologies
DP1000 User Manual
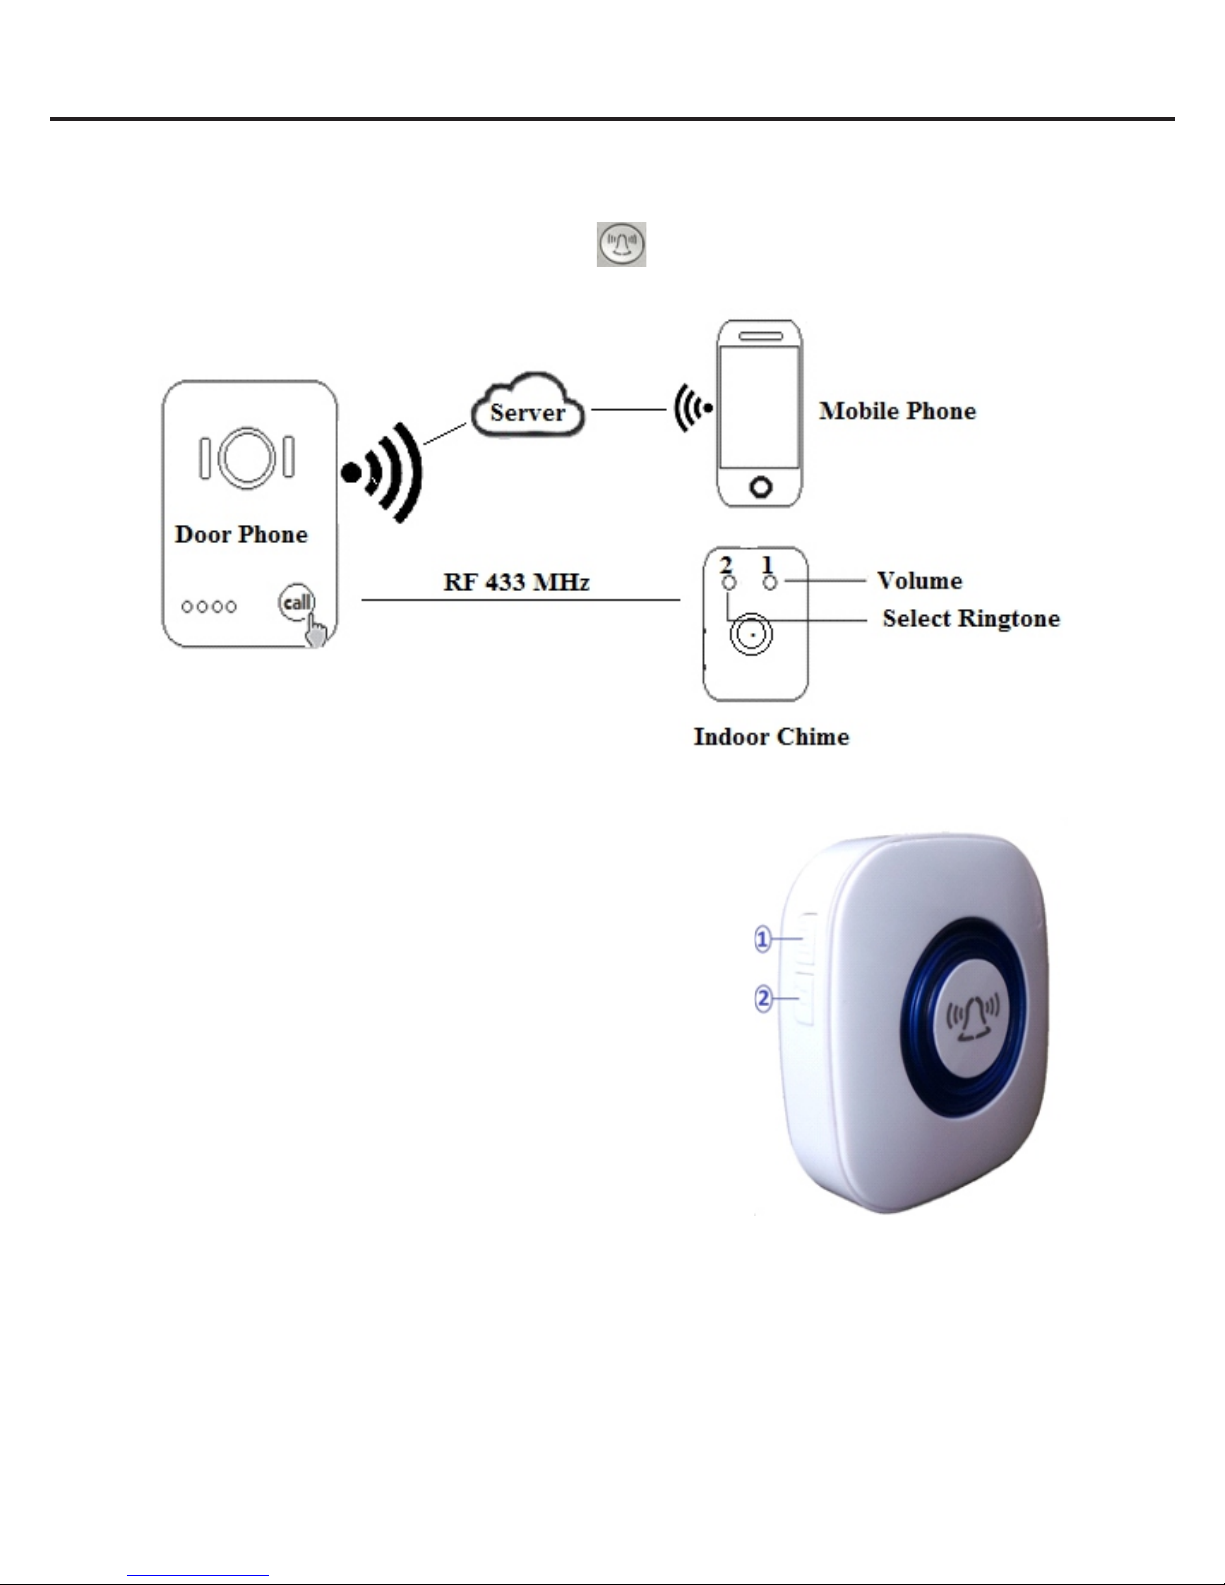
10. Indoor Chime
10.1 General Features
• Aer pressing smart video doorbell’s call buon, smartphone and indoor chime
rings simultaneously.
• Smart video doorbell and indoor chime uses 433
MHz frequency for their connecon, no need of wiring.
• Indoor chime operates on DC power (3 x 1.5V AAA
baeries).
• Open distance of transmission between smart video
doorbell and indoor chime is 300 meters.
• Smart video doorbell and indoor chime are using 433
MHz to learn the code. One smart video doorbell can
connect to maximum 8 indoor chimes. And an indoor
chime can connect to maximum 8 smart video doorbells
using 433 MHz.
• Smart video doorbell chime has been paired before
shipping.
• ① is Volume adjust and ② is Ring tone switch
(built-in 52 ring tones can be selected with this).
Rev 1.0 8 | P a g e
Tejovat Technologies
DP1000 User Manual

10.2 Code Operaon
1. Switch ON power to the smart video doorbell and indoor chime.
2. Long press indoor chime ① volume buon.
3. Aer 5 seconds, indoor chime will quickly flash it’s light and now it’s status under code.
4. Press smart video doorbell’s call buon and indoor chime will stop flashing it’s light.
This means code change is successful.
5. To change the ringtone, select buon ② of indoor chime. Every press of this buon will
change the ring tone. Select desired ringtone and then follow step 2 and 3 above.
11. Soware Installaon
11.1 Download and Install the Applicaon
• Please search the “Smart Home Cloud” on Google Play store for the Android based
smartphones and on App Store for the iphones. Look for the icon as shown below in the
middle.
• User can also scan the QR code below to download and install the app.
Android Smart Home Cloud iOS
11.2 iOS Configuraon
11.2.1 Register and Login into Applicaon
• Once applicaon is installed properly, open applicaon and register for a new user as per
onscreen instrucons.
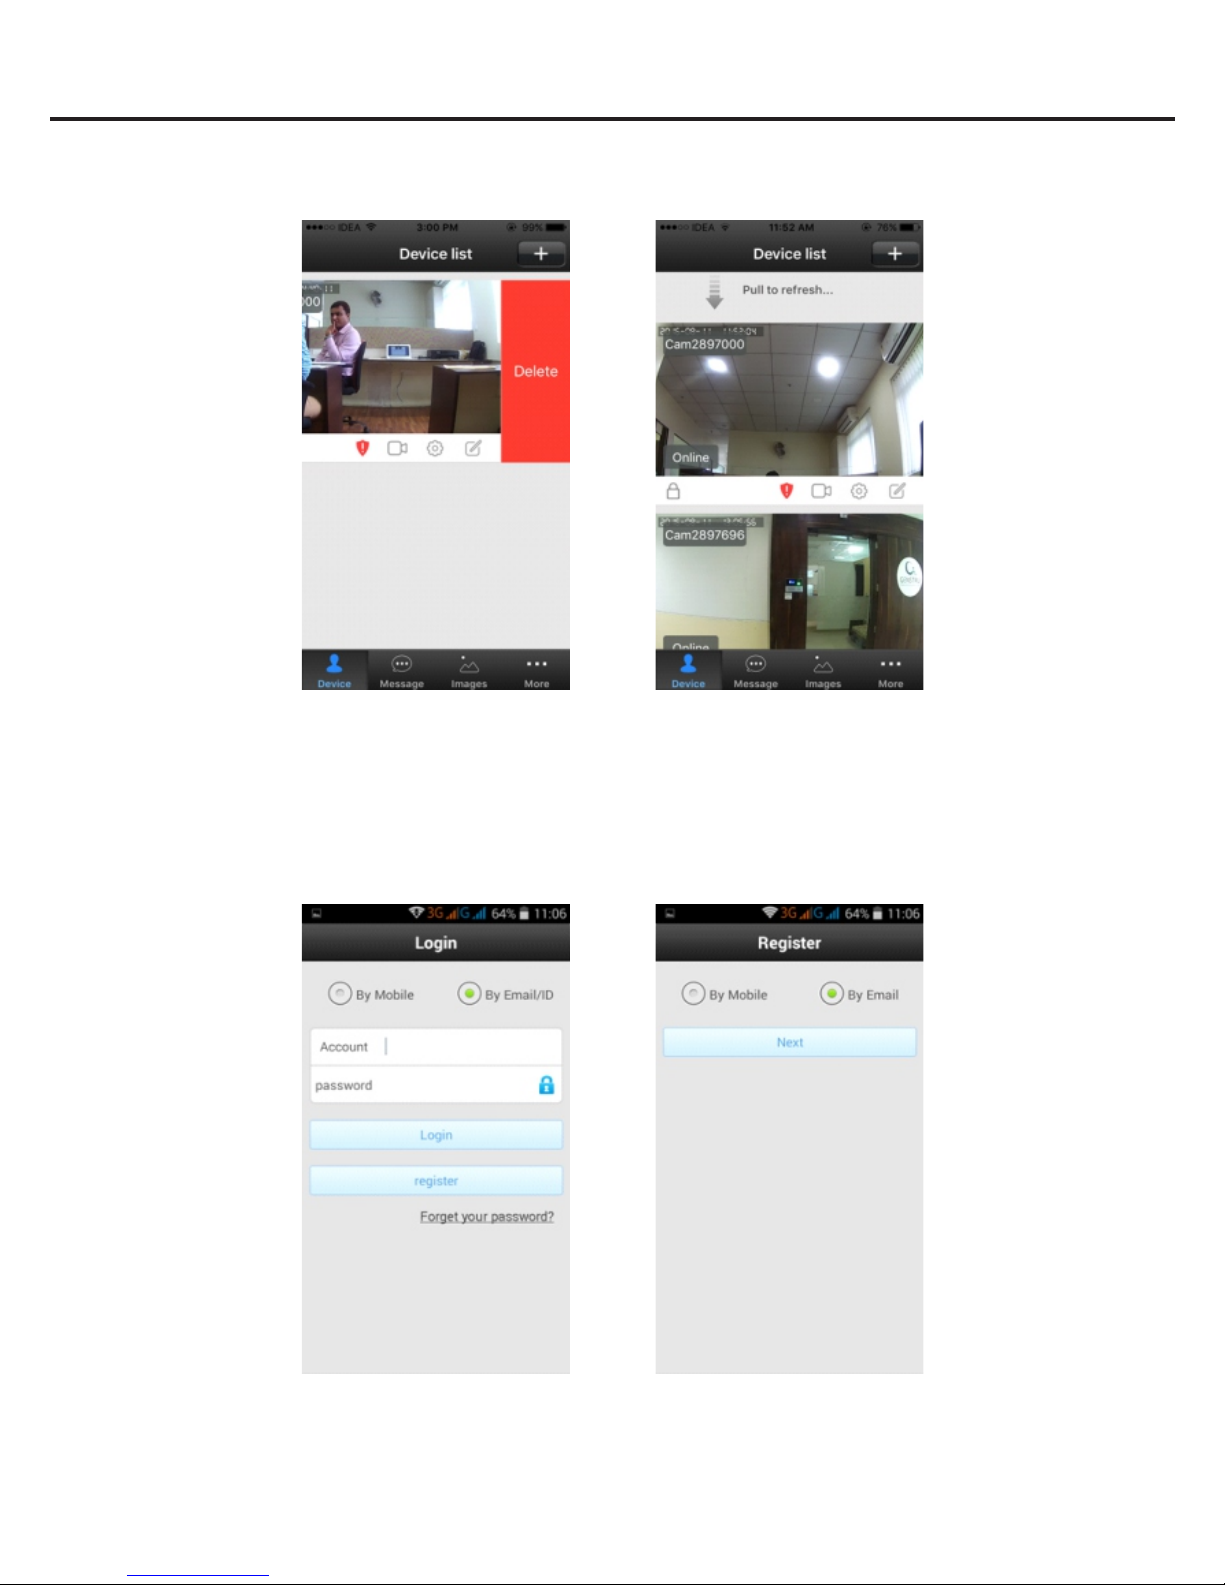
① Open App and click on
the Register buon.
② Choose either Register
by email or Register by phone.
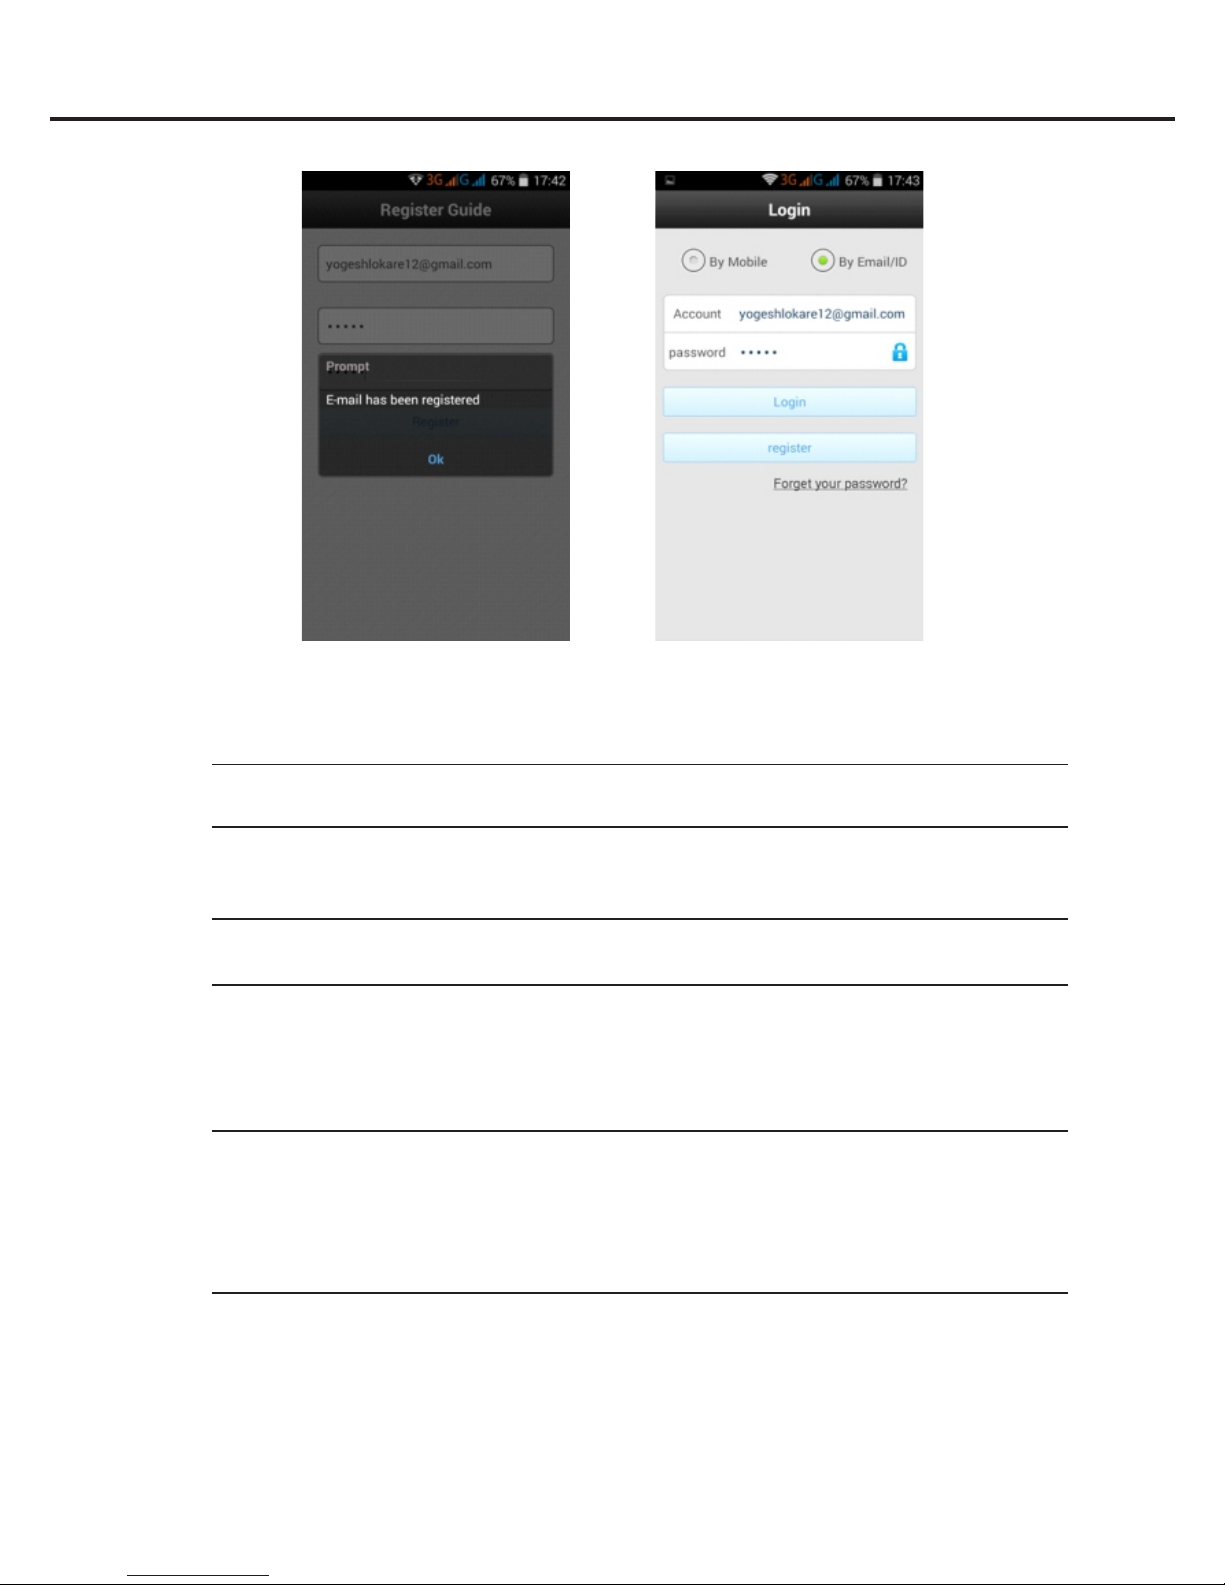
③ Successful registraon
by Email.
④ Enter username and password
and press “Login” buon.
Rev 1.0 9 | P a g e
Tejovat Technologies
DP1000 User Manual

• Aer successful registraon, login into the applicaon.
Note: Each user has a unique username/user ID and password. The username is a phone
number/ email id or user ID created during successful registraon.
• Follow either Smartlink sengs or Manual Add sengs depending upon the case.
11.2.2 iOS Smartlink Sengs
Note: Select Smartlink opon to add device for either first me or if the device is in the
factory reset mode.
Follow steps below to add the device using Smartlink opon:
1. Power on the smart video doorbell and wait for beep sound.
2. Open and login into the Smart Home Cloud Applicaon to do the Wi-Fi sengs.
Notes:
a) Ensure the Wi-Fi network that you are going to set can connect to the smartphone or iPad
normally.
b) Make sure to add doorbell using Smartlink within 5 minutes or ll doorbell produces beep
sound otherwise restart (power cycle) the doorbell again.
3. When doorbell starts and produces beep sound then click “+” buon to add the new device
and follow the steps as per below screen shots.
③ Enter Wi-Fi password and click Next.
Rev 1.0 10 | P a g e
Tejovat Technologies
DP1000 User Manual

Note: When doorbell gets connected to the router, Connecon Successful message appears
in the applicaon screen and doorbell produces big beep sound.
11.2.3 Adding Device using Manual Add Opon
Notes: a) If you add smart video doorbell for the second or subsequent users, select manual
add opon.
b) When you use RJ45 cable to connect to the doorbell, choose Manual Add opon only.
The following screen shot shows how to add device using Manual Add opon.
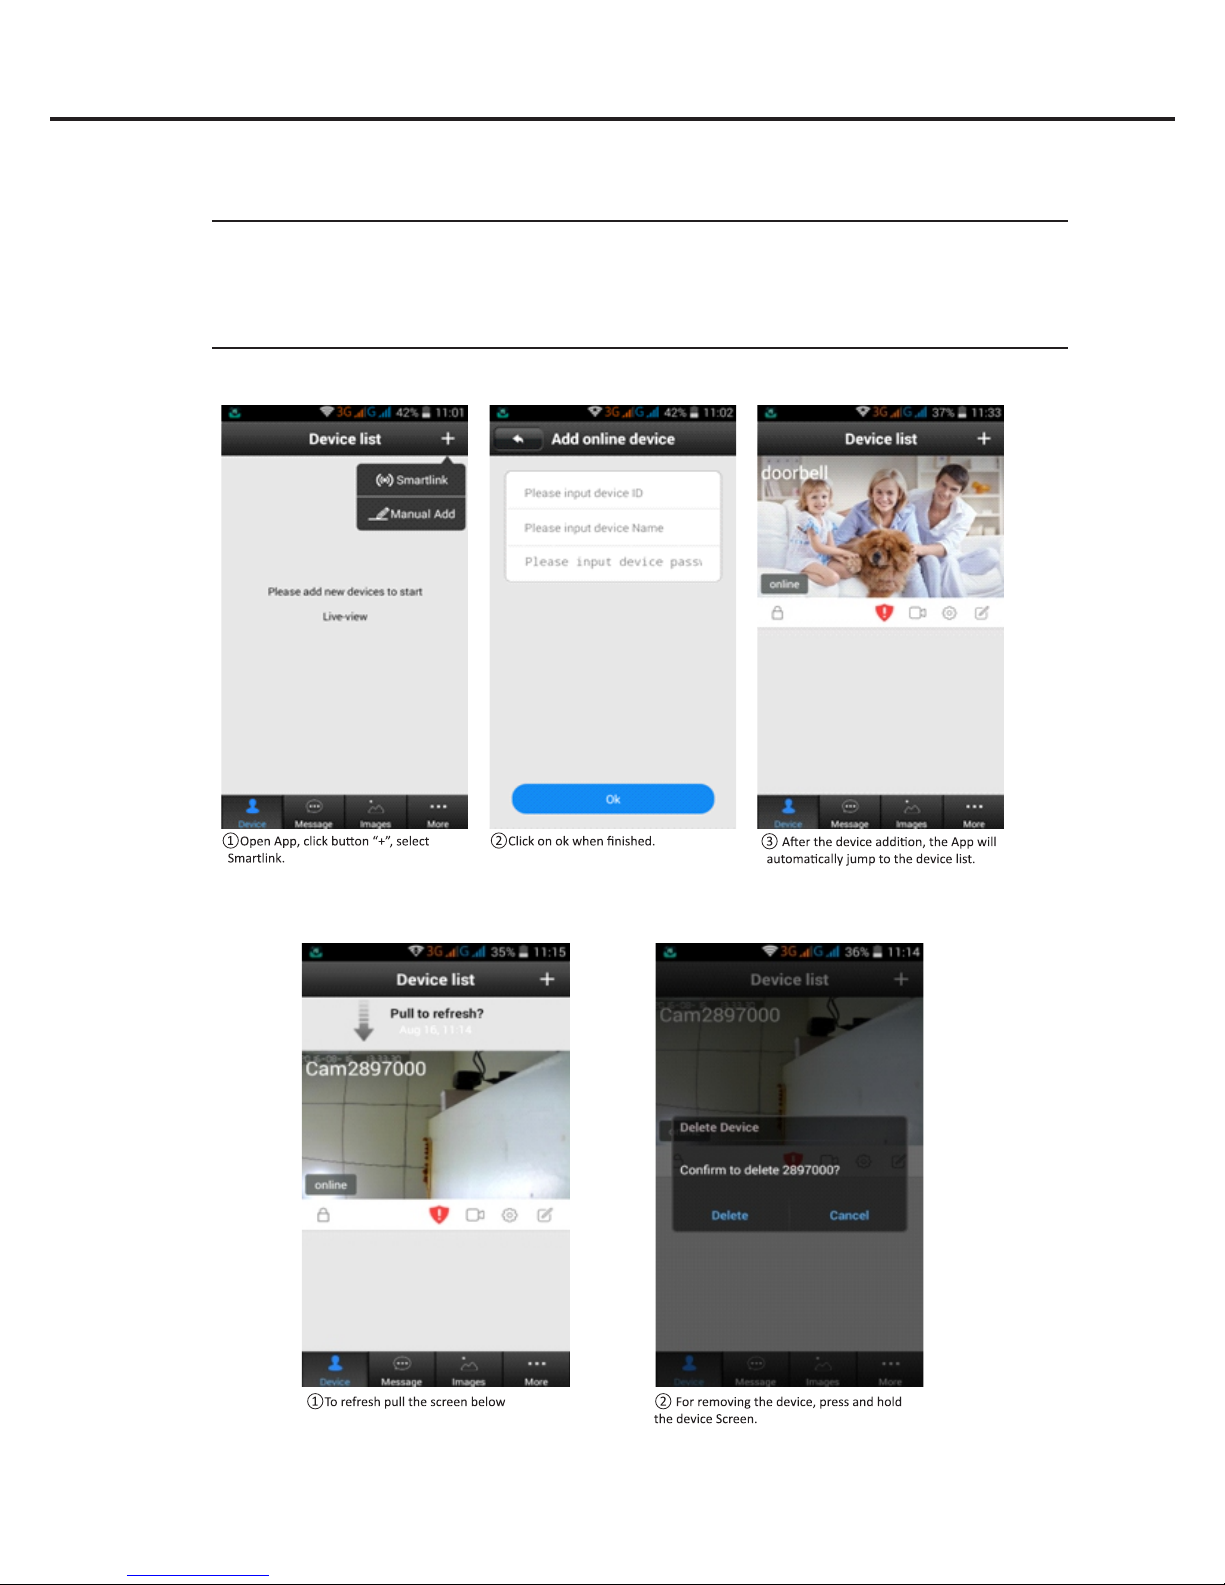
② Enter device ID and Password.
Provide device name as per your choice.
① Open App, click “+” buon, select
Manual
③ Aer the addion, the soware will
automacally jump to the device list.
Rev 1.0 11 | P a g e
Tejovat Technologies
⑥ Aer device addion, the App will
automacally jump to the device List
⑤ Aer connecng Wi-Fi, input the
device password and click Save buon on
the top right corner.
④ Wait for the Wi-Fi connecon.
DP1000 User Manual
11.2.4 Refresh and Remove Device
The following screen shot shows how to refresh and remove doorbell.
11.3 Android Configuraon
11.3.1 Register and Login into Applicaon
• Once applicaon installed properly, open applicaon and register for a new user as per
onscreen instrucons.
① Open App and click on the Register
buon.
②Choose either Register by email or
Register by phone.
① For removing the device, push the
device screen to the right side.
② To refresh pull the screen below
Rev 1.0 12 | P a g e
Tejovat Technologies
DP1000 User Manual
• Aer successful registraon, login into the applicaon.
Note: Each user has a unique username/user ID and password. The username is a phone
number/ email id or user ID created during successful registraon.
11.3.2 Android Smartlink Sengs
Note: Select Smartlink opon to add device for either first me or if the device is in the
factory reset mode.
Follow steps below to add the device using Smartlink opon:
1. Power on the smart video doorbell and wait for beep sound.
2. Open and login into the Smart Home Cloud Applicaon to do the Wi-Fi sengs.
Notes:
a) Ensure the Wi-Fi network that you are going to set can connect to the smartphone or iPad
normally.
b) Make sure to add doorbell using Smartlink within 5 minutes or ll doorbell produces
beep sound otherwise restart (power cycle) the doorbell again.
3. When doorbell starts and produces beep sound then click “+” buon to add the new
device and follow the steps as per below screen shots.
Rev 1.0 13 | P a g e
Tejovat Technologies
③Successful registraon by Email ④ Enter username and password
and press “Login” buon.
DP1000 User Manual
Note: When doorbell gets connected to the router, Connecon Successful message
appears on the applicaon screen and doorbell produces big beep sound.
Rev 1.0 14 | P a g e
Tejovat Technologies
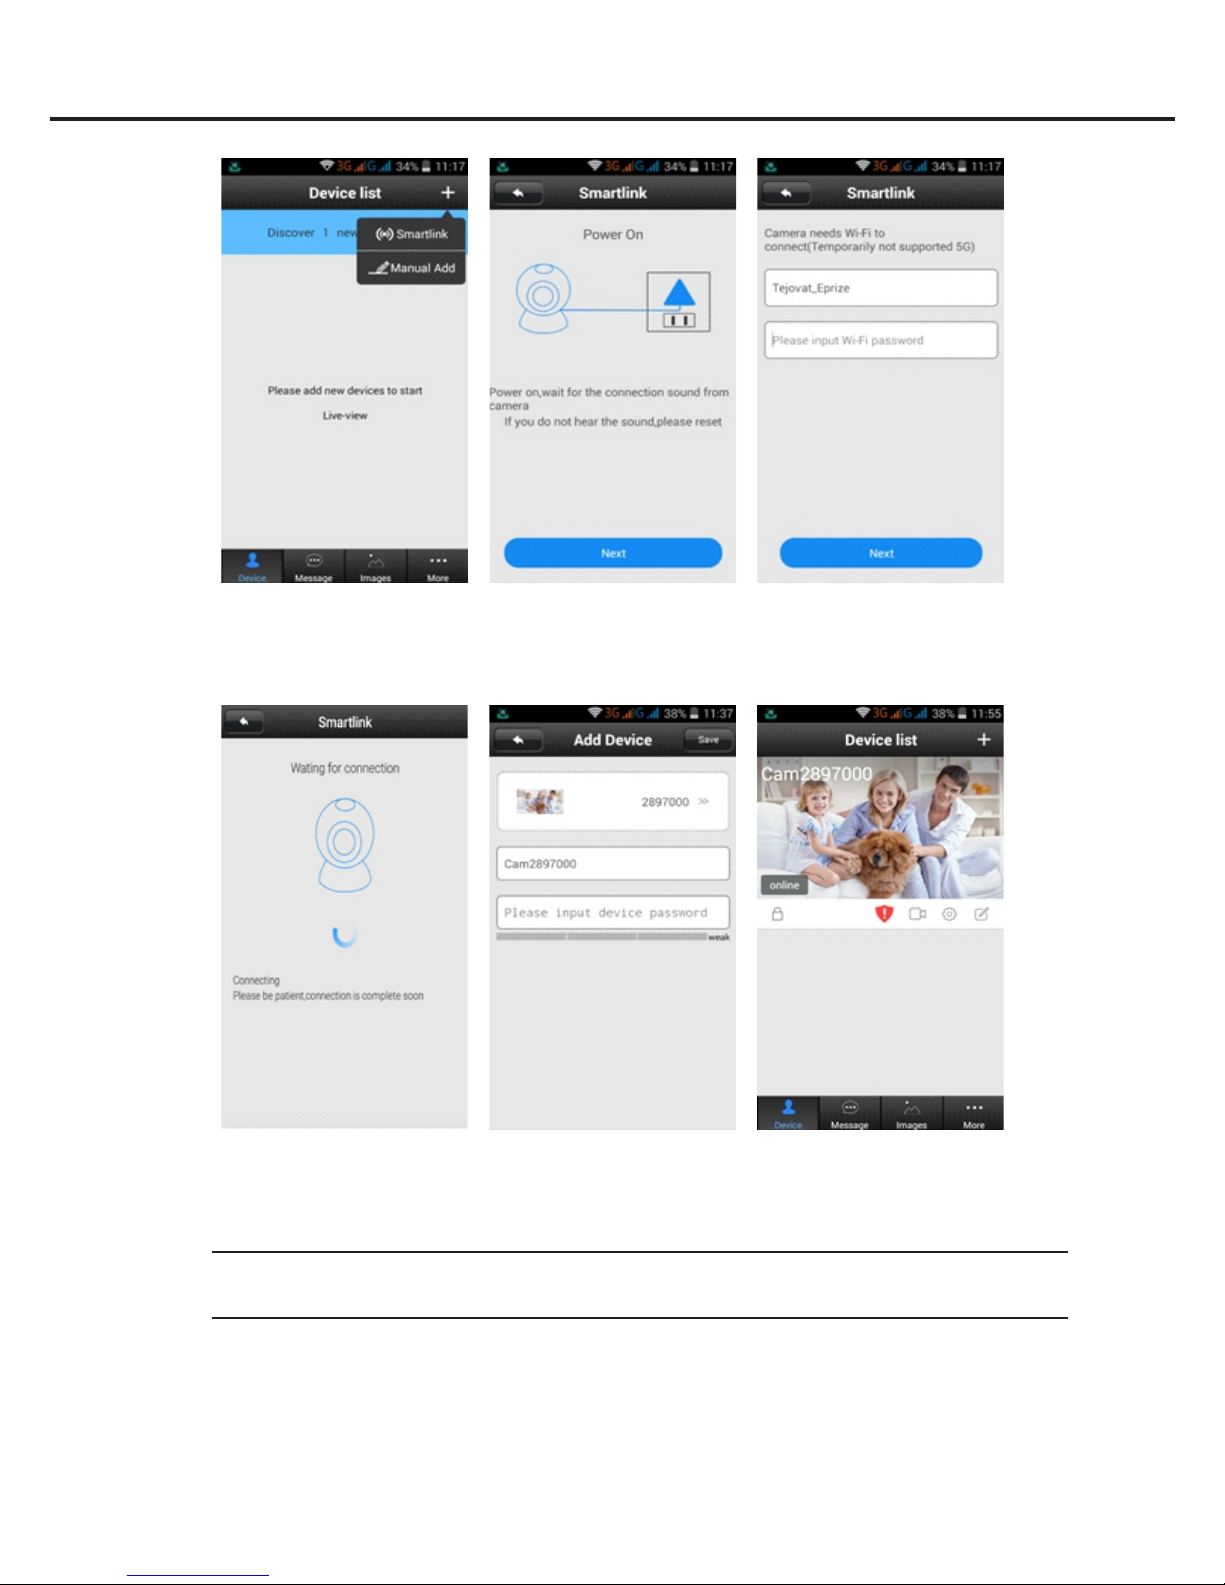
④Wait for the Wi-Fi connecon.
⑤Aer connecng Wi-Fi, setup the
device password and click Save buon on
the top right corner.
⑥Aer the device addion, the app will
automacally jump to the device list.
①Open APP, click “+” buon, select
Smartlink.
② Click on Next when finished.
③Enter Wi-Fi password and click Next.
DP1000 User Manual
11.3.3 Adding Device using Manual Add Opon
Notes:
a) If you add smart video doorbell for the second or subsequent users, select manual add
opon.
b) When you use RJ45 cable to connect to the door bell, choose Manual Add opon only.
The following screen shot shows how to add device using Manual Add opon.
11.3.4 Refresh and Remove Device
The following screen shot shows how to refresh and remove doorbell.
Rev 1.0 15 | P a g e
Tejovat Technologies
DP1000 User Manual

12. Alarms
12.1 Alarm Informaon
Following sengs are present in the device for alarm:
• Receive Alarm Message: Default is ON. If it is OFF, you will not receive visitors call and
alarm. If turned ON, user ID gets added into push ID list and you receive call or alarm.
• Alarm push ID: Contains maximum 5 user ID in the list.
• Alarm push Email: User can bind email with the applicaon for geng alarm noficaon
email with photo aached to it, when there is a moon detecon in front of your door.
• Moon Detecon: Default is OFF. When turned ON, if there is movement, device will send
alarm noficaon to your mobile, if Receive Alarm is ON. If there is moon detecon,
device will take picture automacally and send to the set email.
• Buzzer: Default is OFF. If it is turned ON, device will itself sound an alarm (hooter) on
moon or PIR detecon.
• PIR Detecon: Default is OFF. If it is turned ON, device capture early-warming is more
sensive and accurate.
12.2 Alarm Sengs
Following screen shot shows how to set alarm on either moon or PIR detecon.
Note: If there are five user ID’s bounded with the account, you need to delete one of the user
ID to add new user for receiving alarm.
① Click the Seng icon of the device
.② Click on Alarm Sengs ③ Make sure that receiving alarm
informaon is ON
Rev 1.0 16 | P a g e
Tejovat Technologies
DP1000 User Manual

13. Soware Features
13.1 General Features
Following figure shows the soware general
features of the Smart Home Cloud App.
• Playback: Plays the Micro SD card recordings
(Videos).
• Edit: Edits doorbell name and its password.
• Sengs: This icon shows the device seng.
• Device: Displays the doorbell list.
• Message: Shows visitors recorded alarm
messages.
• Images: Shows the captured snapshots or
pictures.
• More: This icon shows more sengs related
to system or user account sengs.
13.2 System Sengs
Following figure shows the system and user account
features of the Smart Home Cloud App aer going into
the More sengs.
• My Account: Checks account related informaon and
modify App log in and password.
• Sengs: Enable/Disable alarm, set ringtone or
vibrator (For Android only).
• Update: Checks App version.
• System Noficaon: Receive the soware system
noficaon.
• About: App informaon.
• Sign Out: Log out from current account.
• Exit: Exit the Smart Home Cloud applicaon.
Rev 1.0 17 | P a g e
Tejovat Technologies
DP1000 User Manual

14. Other Sengs
Following screen shot shows the list of door bells and its sengs.
1. Device Info: Shows the current device firmware informaon.
2. Date and Time: Sets device date and me, default is network synchronizaon me.
3. Media Sengs: Reverses image, adjust volume and set video format (PAL/NTSC).
4. Security Sengs: User can modify the password of doorbell and sets password for guest
user.
5. Network Sengs: To switch between Ethernet and Wi-Fi connecon, shows Wi-Fi sengs.
6. Alarm Sengs: Sets alarm noficaon, email binding, moon detecon, buzzer and PIR
detecon.
7. Record Sengs: Select recording method. Select Manual, Alarm or Scheduled recording.
Note: Make sure that micro SD card is installed properly.
8. Defense Area Sengs: Not supported.
9. Storage Sengs: Checks Micro SD card informaon. Check space and formang.
10.Device Update: Checks firmware update.
Note: Keep device connected with power when updang firmware.
① Click the seng buon
of doorbell
② choose the doorbell
seng
Rev 1.0 18 | P a g e
Tejovat Technologies
DP1000 User Manual
Table of contents


