Teka CM 45 User manual

Service Manual
CM 45 / CML 45 Coffee Maker
Service Manual: SM-CM-0002-01-1109 Technical Training Department - 1 -
Service Manual: MS-CM-0002-01-1109
CM 45 / CML 45 Coffee Maker Service
Manual
(January 2010)

Service Manual
CM 45 / CML 45 Coffee Maker
Service Manual: MS-CM-0002-01-1109 Technical Training Department - 2 -
Contents
1. General description and operation instructions ...............................................................- 5 -
2. Product data identification ...............................................................................................- 7 -
Counting the number of coffees ...........................................................................................- 7 -
3. Installation process ...........................................................................................................- 9 -
Step 1: Position the rails on the side of the cabinet ...........................................................- 10 -
Step 2: Fix the power cable with the clip ............................................................................- 10 -
Step 3: Position the coffee maker on the rails....................................................................- 11 -
Step 4: Correct alignment with spacer if necessary............................................................- 12 -
Step 5: Appliance settings...................................................................................................- 12 -
4. Security and operation guide ..........................................................................................- 16 -
5. Product operation ...........................................................................................................- 17 -
Main functions ....................................................................................................................- 17 -
Coffee with coffee beams ...............................................................................................- 17 -
Coffee with ground coffee ..............................................................................................- 17 -
Coffee quantity................................................................................................................- 18 -
Adjust grinding level........................................................................................................- 18 -
Maintenance and cleaning..................................................................................................- 19 -
Cleaning the coffee grounds container...........................................................................- 20 -
Cleaning the drip tray......................................................................................................- 21 -
Cleaning the water tank ..................................................................................................- 21 -
Cleaning the spouts.........................................................................................................- 21 -
Cleaning the pre-ground coffee funnel...........................................................................- 22 -
Cleaning the inside of the coffee maker .........................................................................- 22 -
Cleaning the infuser ........................................................................................................- 22 -
Cleaning the cappuccino nozzle ......................................................................................- 23 -
Decaling...........................................................................................................................- 23 -
Electrical diagram................................................................................................................- 25 -
Hydraulic diagram ...............................................................................................................- 32 -
How the coffee maker works ..............................................................................................- 35 -
When choosing a coffee the coffee maker follows the steps below:.............................- 35 -
When choosing hot water or steam the coffee maker works as indicated below: ........- 37 -
6. Product components.......................................................................................................- 38 -

Service Manual
CM 45 / CML 45 Coffee Maker
Service Manual: MS-CM-0002-01-1109 Technical Training Department - 3 -
Water pump ........................................................................................................................- 38 -
Flowmeter ...........................................................................................................................- 38 -
Heating elements ................................................................................................................- 39 -
Hot water and coffee heating element:..........................................................................- 39 -
Steam heating element...................................................................................................- 39 -
Grinder ................................................................................................................................- 40 -
Infuser group kit..................................................................................................................- 42 -
Infuser block........................................................................................................................- 43 -
Fan.......................................................................................................................................- 44 -
Electrovalves .......................................................................................................................- 44 -
Water level..........................................................................................................................- 45 -
7. Service test ......................................................................................................................- 46 -
Components auto test procedure:......................................................................................- 46 -
Display test procedure ........................................................................................................- 47 -
Counting procedure ............................................................................................................- 48 -
Error messages....................................................................................................................- 48 -
8. Troubleshooting section..................................................................................................- 49 -
From user symptoms...........................................................................................................- 49 -
Water tank empty“ is not shown ....................................................................................- 49 -
Water is not dispensed or is dispensed with insufficient pressure?...............................- 49 -
Coffee is not dispensed uniformly or is dispensed without flowing? .............................- 49 -
Coffee tastes bitter?........................................................................................................- 50 -
Coffee tastes bland?........................................................................................................- 50 -
Coffee tastes rancid?.......................................................................................................- 50 -
The coffee does not have a good crema? .......................................................................- 51 -
The display is showing general error message....................................................................- 51 -
Pump and lime deposits..................................................................................................- 51 -
Flowmeter .......................................................................................................................- 51 -
Coffee heating element...................................................................................................- 51 -
Steam heating element...................................................................................................- 52 -
Grinder ............................................................................................................................- 52 -
Infuser group kit..............................................................................................................- 53 -
PCB and interface boards................................................................................................- 53 -

Service Manual
CM 45 / CML 45 Coffee Maker
Service Manual: MS-CM-0002-01-1109 Technical Training Department - 4 -
9. Client manual. Question guide to identify easy-to-solve problems................................- 54 -
10 Version changes ..........................................................................................................- 56 -
Section 2:.............................................................................................................................- 56 -
Figure 1 CM 45 built in coffee maker........................................................................................- 5 -
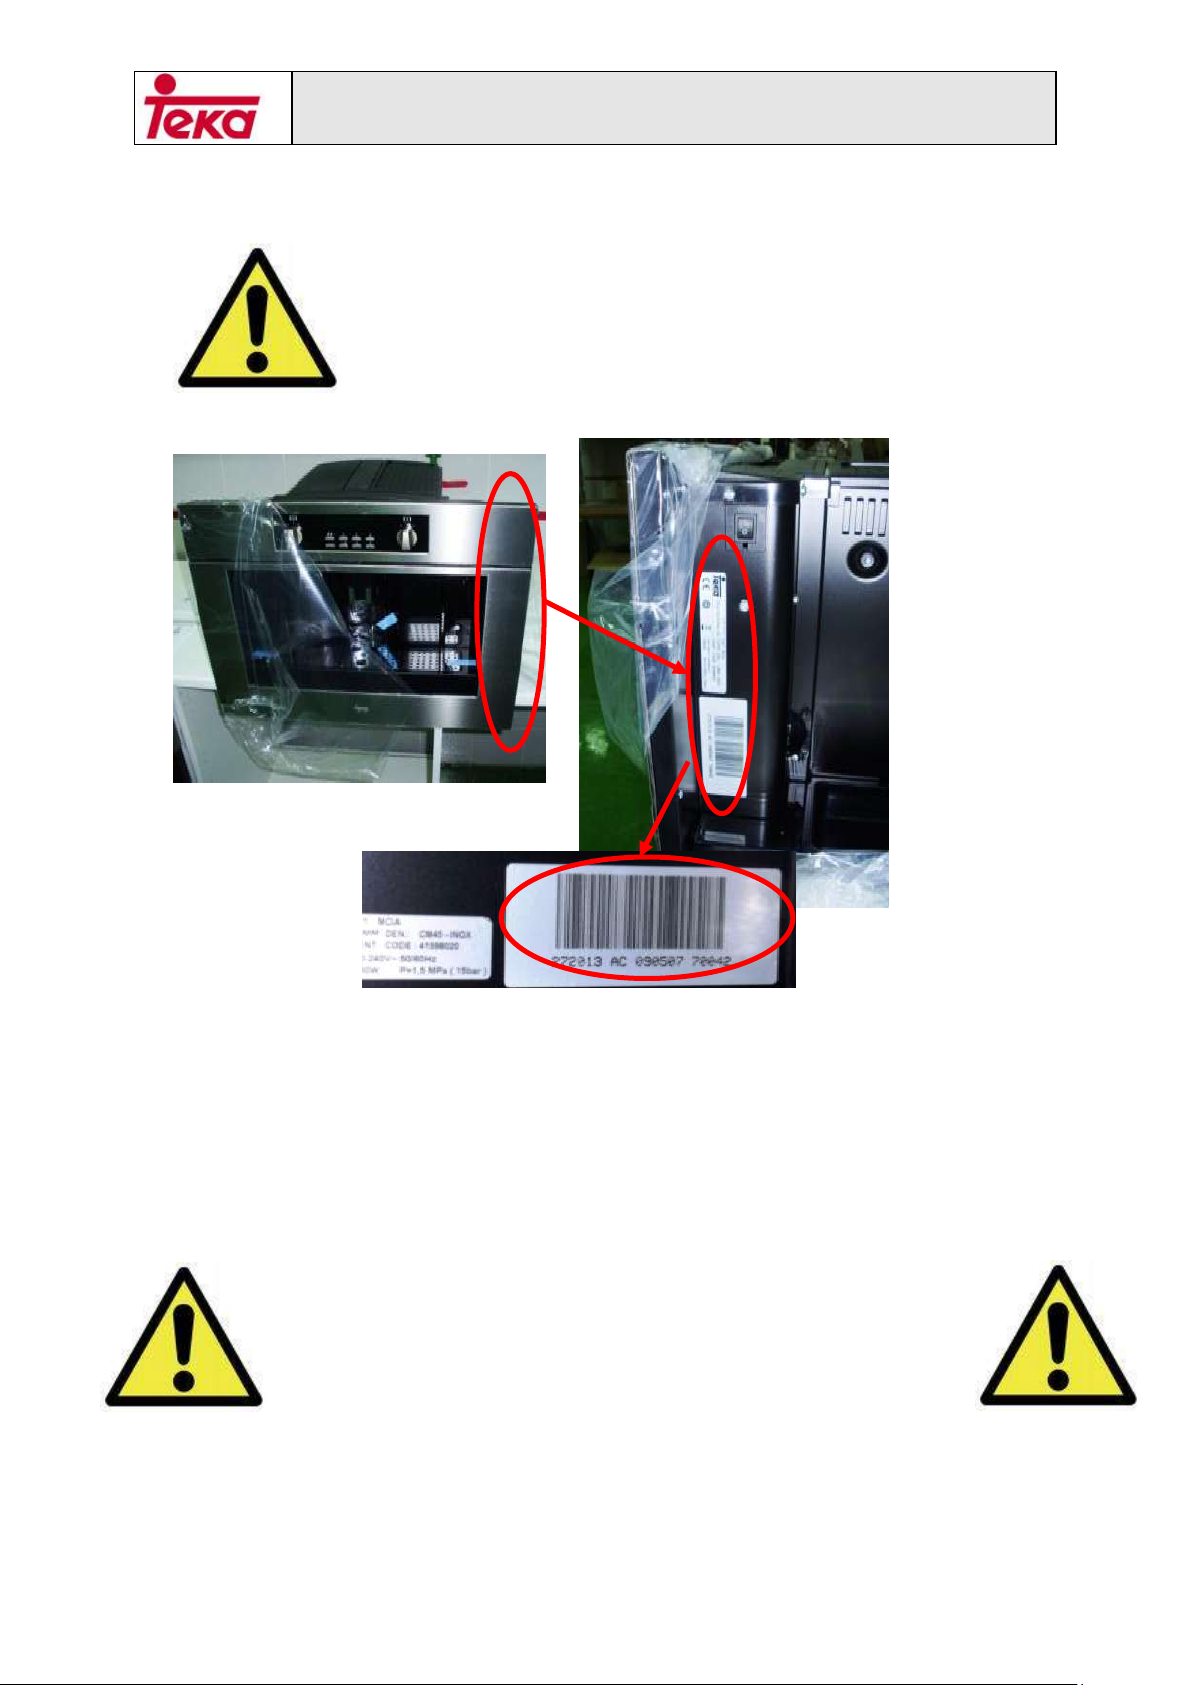
Figure 2 Serial number location ................................................................................................- 7 -
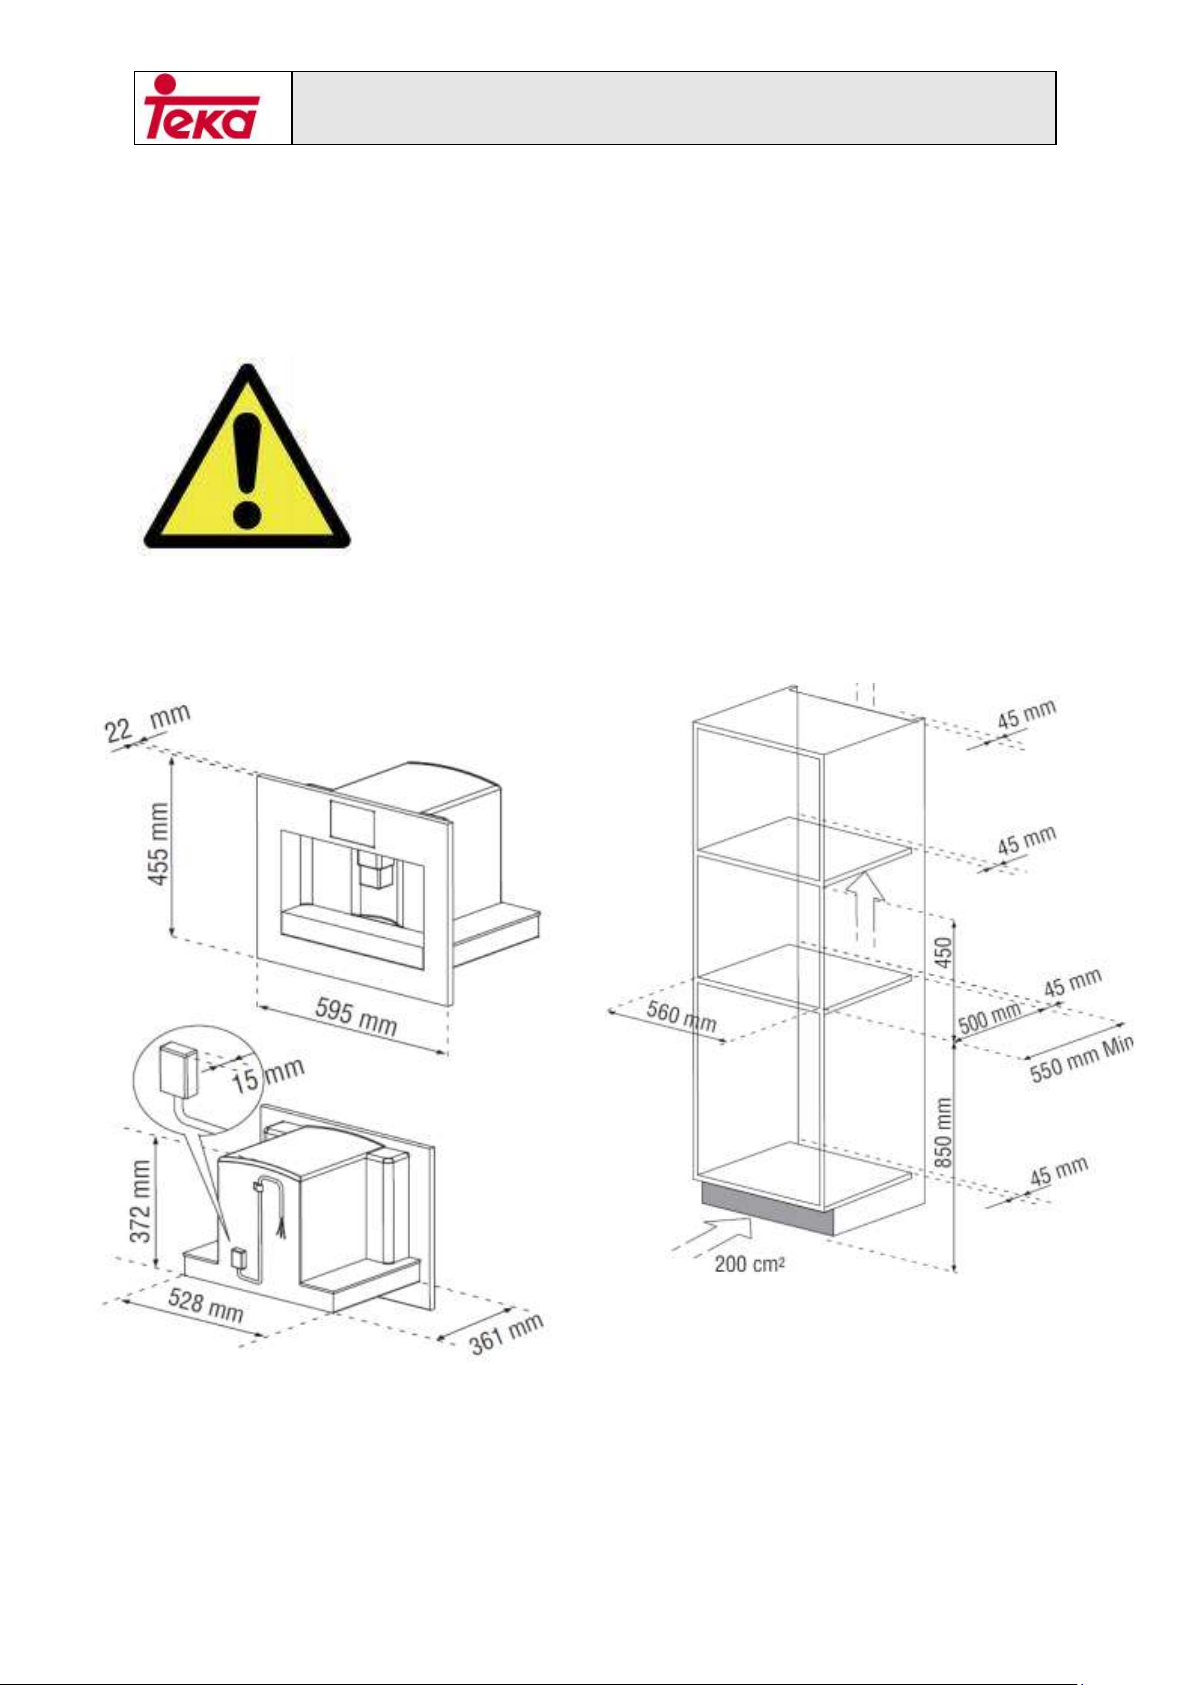
Figure 3 CM 45 dimensions, furniture dimensions and ventilation gap dimensions................- 9 -
Figure 4 Positioning of the side rails .......................................................................................- 10 -
Figure 5 Fixing the power cable with the clip .........................................................................- 10 -
Figure 6 Positioning the CM 45 in the rails .............................................................................- 11 -
Figure 7 Correcting the alignment of the CM45 .....................................................................- 12 -
Figure 8 Main switch ...............................................................................................................- 12 -
Figure 9 Control panel buttons ...............................................................................................- 13 -
Figure 10 Filling the water tank...............................................................................................- 13 -
Figure 11 Components to be cleaned .....................................................................................- 20 -
Figure 12 PCB structure...........................................................................................................- 31 -
Figure 13 Hydraulic diagram ...................................................................................................- 32 -
Figure 14 Hydraulic diagram explanation ...............................................................................- 33 -
Figure 15 Hydraulic diagram explanation 2 ............................................................................- 34 -
Figure 16 Coffee Maker hydraulic block .................................................................................- 36 -
Figure 17 Infuser .....................................................................................................................- 36 -
Figure 18 3 ways valve. ...........................................................................................................- 37 -
Figure 19 Steam valve .............................................................................................................- 37 -
Figure 21 Flowmeter ...............................................................................................................- 38 -
Figure 20 Water pump ............................................................................................................- 38 -
Figure 22 Hot water and coffee heating element...................................................................- 39 -
Figure 23 Steam heating element ...........................................................................................- 40 -
Figure 24 Grinder ....................................................................................................................- 40 -
Figure 25 Infuser group Kit......................................................................................................- 43 -
Figure 26 Infuser block............................................................................................................- 44 -
Figure 27 Fan...........................................................................................................................- 44 -
Figure 28 3 ways and 2 ways steam electrovalves..................................................................- 45 -
Figure 29 CM 45 User interface ..............................................................................................- 46 -
Table 1 Technical data...............................................................................................................- 6 -
Table 2 Water pump technical data........................................................................................- 38 -

Service Manual
CM 45 / CML 45 Coffee Maker
Service Manual: MS-CM-0002-01-1109 Technical Training Department - 5 -
1. General description and operation instructions
The following Service Manual aims to explain the use and how to repair
the Coffee Maker CM 45 which has been recently introduced within TEKA
range.
Figure 1 CM 45 built in coffee maker
It is a built in coffee maker provided with the features listed below:
Electro mechanical control panel
30 automatic programmes
Capacity for two coffee cups simultaneously
Adjustable coffee dispenser
Retractable pipe for steam and hot water
Integrated coffee grinder with grinding coarseness regulation up to
13 positions
Coffee beams deposit with capacity up to 200 gr
Preground coffee deposit
1,8l water tank
Self cleaning function at the beginning/end of the cycle

Service Manual
CM 45 / CML 45 Coffee Maker
Service Manual: MS-CM-0002-01-1109 Technical Training Department - 6 -
Automatic descaling function
Regulation of coffee intensity (extra light, light, medium, strong and
extra strong)
Regulation of quantity of coffee
Regulation of coffee temperature (low, medium, high)
Display with 8 languages
Technical data:
Table 1 Technical data
PLEASE REMEMBER TO DELETE PREVIOUS VERSIONS OF
THIS DOCUMENT AS THEY MAY PROVIDE MISLEADING
INFORMATION
Technical data
Voltage 220-240/50-60 v/Hz
Máx Input Power 1350 W
Coffee section
Temperature probe 98 ºC
Thermal fuse TCO 192 ºC
Heating element power 600+600 W
Pump ULKA EP5/48 Type/W
Steam section
Temperature probe 145 ºC
Thermal fuse TCO 318 ºC
Heating element power 1000 W

Service Manual
CM 45 / CML 45 Coffee Maker
Service Manual: MS-CM-0002-01-1109 Technical Training Department - 7 -
2. Product data identification
In order to ensure the correct treatment of each
incidence TEKA product serial number should be
provided together with the incidence information. This
serial number can be found as indicated in the figures
below:
It is very important to describe as much as possible the incidence so that
information can be processed and factories can be informed of their
appliances quality problems, so that a quality improvement can be
attained.
Counting the number of coffees
Always when reporting an incidence on a coffee maker,
we MUST take note of the total number of coffees that
have been made up to date. Please find below the
procedure in order to enter the counting procedure
Figure 2 Serial number location

Service Manual
CM 45 / CML 45 Coffee Maker
Service Manual: MS-CM-0002-01-1109 Technical Training Department - 8 -
To enter the procedure: Press and Hold: Menu' + CHANGE buttons, then
plug the machine On
The display will show:
Total number of coffees made;
Total liters of water used.
Pressing the button NEXT, the Display will show:
Total number of decaling procedures performed.
Please check that decaling have been performed as required,
otherwise warranty does not apply to the appliance.

Service Manual
CM 45 / CML 45 Coffee Maker
Service Manual: MS-CM-0002-01-1109 Technical Training Department - 9 -
3. Installation process
Verify the minimum measurements required for correct installation of the
appliance. The coffee maker must be installed in a column and the column
must be firmly fixed to the wall with commercially available brackets.
All installation or maintenance operations must be
performed with the appliance disconnected from the
mains electricity supply.
Kitchen furniture in direct contact with the appliance
must be heat resistant (65°C min)
Find below the dimensions of the appliance, kitchen furniture and
ventilation gaps:
Figure 3 CM 45 dimensions, furniture dimensions and
ventilation gap dimensions
This appliance can be installed in combination with a built-in oven if the
latter is fitted with a cooling fan at the rear (maximum oven power: 3 kW).

Service Manual
CM 45 / CML 45 Coffee Maker
Service Manual: MS-CM-0002-01-1109 Technical Training Department - 10 -
Step 1: Position the rails on the side of the cabinet
Figure 4 Positioning of the side rails
Fix with the screws, then extract completely. If the coffee maker is
installed over a warmer drawer (500 W max.), use the top surface of this
as a reference to position the rails. In this case, there will be no surface to
rest the rails on.
Step 2: Fix the power cable with the clip
Figure 5 Fixing the power cable with the clip
The clip avoids the cable power to get tangle when the appliance is
inserted or extracted.

Service Manual
CM 45 / CML 45 Coffee Maker
Service Manual: MS-CM-0002-01-1109 Technical Training Department - 11 -
The power cable must be long enough to allow the appliance to be
extracted from the cabinet to fill the coffee beans container.
The appliance must be earthed in compliance with legislation.
Electrical connections must be performed by a qualified
electrician in compliance with the manufacturer's instructions
and legislation in force in the country of installation.
The electrical socket must be accessible.
Check that the mains power supply voltage corresponds to the value
indicated on the appliance rating plate.
Connect the appliance to an efficiently earthed and correctly
installed socket with a minimum current rating of 10A only.
Do not use multiple sockets or extensions.
Step 3: Position the coffee maker on the rails
Figure 6 Positioning the CM 45 in the rails
Position the appliance on the rails, making sure the pins are correctly
inserted in the housings, then fix it with the screws supplied

Service Manual
CM 45 / CML 45 Coffee Maker
Service Manual: MS-CM-0002-01-1109 Technical Training Department - 12 -
Step 4: Correct alignment with spacer if necessary
Figure 7 Correcting the alignment of the CM45
If necessary, correct alignment of the appliance by positioning the spacers
supplied under or at the sides of the support.
Step 5: Appliance settings
1/ Connect the appliance to the mains electricity
supply and press the main switch
2/ Select the required language, wait for the appliance
to display "PRESS OK TO INSTALL ENGLISH” (or the
language you want to install); While the message is
displayed, press the OK button for at least 3 seconds
until "ENGLISH (or chosen language) INSTALLED" is
displayed. The appliance then displays the setting
confirmed message in English (or the chosen
language). If you set the wrong language by mistake,
press the CHANGE button for at least 5 seconds until
the appliance displays the installation message in various languages.
Select the required language as described above.
Figure 8 Main switch

Service Manual
CM 45 / CML 45 Coffee Maker
Service Manual: MS-CM-0002-01-1109 Technical Training Department - 13 -
Figure 9 Control panel buttons
3/ After 5 seconds, the appliance displays "FILL TANK".
Follow the instruction as per the figure below:
Figure 10 Filling the water tank

Service Manual
CM 45 / CML 45 Coffee Maker
Service Manual: MS-CM-0002-01-1109 Technical Training Department - 14 -
4/ Place a cup under the cappuccino maker.The
appliance now displays: "HOT WATER PRESS OK". Press
the OK button and after a few seconds a little water
comes out of the cappuccino maker. (Delivery stops
automatically).
5/ The machine now displays "TURNING OFF...PLEASE
WAIT" and goes off.
6/ Extract the appliance by pulling it out using the
handles. Open the lid and fill the container with coffee
beans, then close the lid and push the appliance in.
7/ You should customise the water hardness as soon as possible following
the instructions below:
The descale message is displayed after the appliance has been operated
for a factory set period of time calculated on the basis of the maximum
quantity of limescale which may be contained in the water used. The
operating period can be extended if required, making descaling less
frequent by programming the machine on the basis of the real lime
content in the water used.
Proceed as follows:
• Remove the "Total Hardness Test" strip (attached to page 2 of the user
manual) from its packaging then dip it fully in the water for a few seconds,
Then remove and wait about 30 seconds (until it changes colour and forms
red squares).
• Switch the machine on by turning the knob (A7 as per figure 9).
• Press the MENU button (B6 as per figure 9) then press the NEXT button
(B7 as per figure 9) repeatedly until the appliance displays "WATER
HARDNESS 4".

Service Manual
CM 45 / CML 45 Coffee Maker
Service Manual: MS-CM-0002-01-1109 Technical Training Department - 15 -
• Press the CHANGE button repeatedly until the number coincides with
the number of red squares on the test strip (for example, if there are 3 red
squares on the test strip, press the button until "WATER HARDNESS 3" is
displayed).
• Press the OK button (B9) to confirm.
The coffee maker is now programmed to provide the descale warning
when necessary based on the actual hardness of the water.
To prevent malfunction, remember to advice the costumer
about never introducing pre-ground coffee, freeze dried
coffee, caramelised beans or anything else which could
damage the appliance.

Service Manual
CM 45 / CML 45 Coffee Maker
Service Manual: MS-CM-0002-01-1109 Technical Training Department - 16 -
4. Security and operation guide
As with other kitchen appliances, please mind the edges of the metallic
plates within the appliance. The use of protective gloves when
manipulating the metal plates is highly advisable.
Make sure that the coffee maker is not connected to the electric network
when manipulating electrical items that might be wet (e.g. pump,
heater...)
Do not touch the heating element during or immediately after use.

Service Manual
CM 45 / CML 45 Coffee Maker
Service Manual: MS-CM-0002-01-1109 Technical Training Department - 17 -
5. Product operation
Main functions
As the coffee maker is an appliance that requires to introduce the main
functions to the costumer, they are described below:
Coffee with coffee beams
The appliance is preset to make coffee with a standard taste. You can also
choose coffee with an extra-light, light, strong or extra strong taste.
1/ To choose the required taste, press the button (B2) (fig. 9). The
required coffee taste is displayed.
2/ Place 1 cup under the spouts to make 1 coffee or 2 cups for 2 coffees.
3/ Lower the spouts as near as possible to the cup for a creamier coffee.
4/ Press the button (B3) to make a short coffee, the button (B4) for a
standard coffee and the button (B5) for a long coffee. To make 2 coffees,
press the button twice (within 2 seconds).
5/ After a few seconds, the ready message is displayed again and you can
make another coffee.
While the appliance is making coffee, delivery can be interrupted at any
moment by pressing the previously selected button, (B3), (B4) or (B5).
When switching off the appliance, it performs an automatic rinse cycle.
Coffee with ground coffee
Press the button (B7) (fig. 9) to select the pre-ground coffee function. This
disable the coffee mill function. The appliance
now displays the message: "READY PRE-
GROUND".
• Extract the machine by pulling it outwards using
the handles.
• Lift the central lid, place one measure of
preground coffee in the funnel , push the

Service Manual
CM 45 / CML 45 Coffee Maker
Service Manual: MS-CM-0002-01-1109 Technical Training Department - 18 -
appliance in, then proceed as described for coffee with coffee beams.
N.B.: You can make just one coffee at a time by pressing the (B3), (B4) or
(B5) button once only.
• After using the machine with pre-ground coffee, to go back to making
coffee using beans, deactivate the pre-ground coffee function by pressing
the button (B2) (fig.9) again to enable the coffee mill.
Coffee quantity
Press the button corresponding to the quantity you want to change, small,
medium size or large coffee buttons, for at least 3 seconds, then release
until the message "PROGRAM QUANTITY" is displayed and coffee delivery
commences.
• When the coffee in the cup reaches the required level, press the same
button again to memorise the new amount.
The appliance is now reprogrammed with the new settings and displays:
"READY".
Adjust grinding level
The grinding adjustment knob must only be turned when the
coffee mill is in operation.
For slower delivery and creamier coffee, turn one click
anticlockwise (finer pre-ground coffee). For faster delivery
(not a drop at a time), turn one click clockwise (coarser
pre-ground coffee). (Coffee has been used to factory test
the appliance and it is therefore completely normal for
there to be traces of coffee in the mill. It is, however,
guaranteed to be new.)
Please note that coffee quality and thickness depends on:
oWater temperature
oWater quality
oType of coffee

Service Manual
CM 45 / CML 45 Coffee Maker
Service Manual: MS-CM-0002-01-1109 Technical Training Department - 19 -
oQuantity of ground coffee
oCup temperature when pouring the coffee
oAmount of water
oGrinding size
Maintenance and cleaning
Before performing any cleaning operations, leave the
machine to cool down completely and unplug from the
mains power supply. Never immerse the coffee maker in
water. It is an electrical appliance.
Do not use solvents or abrasive detergents to clean the
coffee maker. A soft damp cloth will suffice. Never wash
any of the components of the coffee maker in the
dishwasher.
The following parts of the machine must be cleaned regularly: (See figure
11)
• Coffee grounds container (A4).
• Drip tray (A14).
• Water tank (A12).
• Coffee spouts (A13), cappuccino maker nozzle (A11) and cappuccino
maker spouts (A10).
• Pre-ground coffee funnel (A21).
• Inside the machine, accessible after opening the service door (A2).
• Infuser (A5).

Service Manual
CM 45 / CML 45 Coffee Maker
Service Manual: MS-CM-0002-01-1109 Technical Training Department - 20 -
Figure 11 Components to be cleaned
Cleaning the coffee grounds container
When "EMPTY GROUNDS CONTAINER" is displayed, the grounds container
must be emptied and cleaned.
Until the grounds container has been cleaned, the appliance continues to
display the message and coffee cannot be made.
Other manuals for CM 45
1
This manual suits for next models
1
Table of contents
Other Teka Coffee Maker manuals