Tekvox ShareView Wireless User manual

www.tekvox.com
ShareView Wireless
79060
-
WPS User Manual
ShareView Wireless
Wireless AV Content Sharing & BYOD collaboration System
(Quad Viewer)
All Rights Reserved
Version: 79060-WPS_2020V2.0

www.tekvox.com
ShareView Wireless
79060
-
WPS User Manual
Preface
Read this user manual carefully before using the product. Pictures shown in this manual are for
reference only. Different product model specifications may vary.
This manual is only for operation instruction, please contact the local distributor for maintenance
assistance. The functions described in this version were updated August, 2020. In order to continue
improving the product, we reserve the right to make function or parameter changes without notice or
obligation. Please refer to the dealers for the latest details.
FCC Statement
This equipment generates, uses, and can radiate radio frequency energy and, if not installed and
used in accordance with the instructions, may cause harmful interference to radio communications.
It has been tested and found to comply with the limits for a Class A digital device, pursuant to part
15 of the FCC Rules. These limits are designed to provide reasonable protection against harmful
interference in a commercial installation.
Operation of this equipment in a residential area is likely to cause interference, in which case the
user at their own expense will be required to take whatever measures may be necessary to correct
the interference.
Any changes or modifications not expressly approved by the manufacture would void the user’s
authority to operate the equipment.

www.tekvox.com
ShareView Wireless
79060
-
WPS User Manual
Safety Precautions
To ensure the best performance from the product, please read all instructions carefully before using
the device. Save this manual for further reference.
Unpack the equipment carefully, and save the original box and packing material for possible
future shipment
Follow basic safety precautions to reduce the risk of fire, electrical shock and injury to persons
Do not dismantle the housing or modify the module (electrical shock or burn hazard)
Using supplies or parts not meeting the products’ specifications may cause damage,
deterioration or malfunction
Refer all servicing to qualified service personnel
To prevent fire or shock hazard, do not expose the unit to rain, moisture or install this product
near water
Do not put any heavy items on the product’s power cable
Do not remove the housing of the device as opening or removing housing may expose you to
dangerous voltage or other hazards
Install the device in a place with sufficient ventilation to avoid damage caused by overheating
Keep the module away from liquids
Spillage into the housing may result in fire, electrical shock, or equipment damage. If an object
or liquid falls or spills on to the housing, unplug the module immediately.
Do not twist or pull by force ends of the optical cable. It can cause malfunction.
Do not use liquid or aerosol cleaners to clean this unit. Always unplug the power to the device
before cleaning.
Unplug the power cord when left unused for a long period of time
Information on disposal for scrapped devices: do not burn or mix with general household
waste, please treat them as normal electrical wastes

www.tekvox.com
ShareView Wireless
79060
-
WPS User Manual
Table of Contents
1. Product Introduction .................................................................................................................... 8
1.1 Features ............................................................................................................................................... 8
1.1.1 WMS-10 & WMS-20/WMS-40: ................................................................................................... 8
1.1.2 WMT2-C/WMT-Mini/WMT3-H/WMT3-HC: .............................................................................. 8
2. Specifications .............................................................................................................................. 9
3. Panel Layout .............................................................................................................................. 10
3.1 Hardware Interface ........................................................................................................................... 10
3.1.1 WMS-10/20/40 Front Panel .................................................................................................... 10
3.1.2 WMS-10 & WMS-20/40 Rear Panel ......................................................................................... 12
3.1.3 Factory Reset ............................................................................................................................ 14
3.1.4 Dongle Front Panel................................................................................................................... 16
3.2 Software Interface ............................................................................................................................ 20
3.2.1 Home Screen ............................................................................................................................ 20
4. Installation ................................................................................................................................. 22
4.1 Installation methods for the base unit ............................................................................................ 22
4.2 Wiring Diagram .................................................................................................................................. 24
4.3 Power Connection ............................................................................................................................. 24
4.3.1 How to connect the external power adapter ......................................................................... 24
4.3.2 Power over Ethernet................................................................................................................. 25
4.4 Video Connection .............................................................................................................................. 25
4.5 Audio Connection .............................................................................................................................. 26
4.5.1 Audio via HDMI output............................................................................................................. 26
4.5.2 How to connect separate audio .............................................................................................. 26
4.5.3 Sound is not sent out ............................................................................................................... 27
4.5.4 PC/Laptop Sound ..................................................................................................................... 27
4.6 LAN Connection ................................................................................................................................ 28
4.7 Usage of USB Device ........................................................................................................................ 29
4.7.1 USB control ............................................................................................................................... 29

www.tekvox.com
ShareView Wireless
79060
-
WPS User Manual
5. Quick-to-Start ............................................................................................................................ 30
5.1 Mobile device: Wireless Connection ............................................................................................... 30
5.1.1 Enable Portable Hotspot: ........................................................................................................ 31
5.1.2 Enable LAN Connection ........................................................................................................... 31
5.2 Pairing Transmitter with Base Unit .................................................................................................. 32
5.3 Mirroring ............................................................................................................................................ 34
5.3.1 PC/Laptop ................................................................................................................................. 34
5.3.2 WMT-Mini.................................................................................................................................. 35
5.3.3 Non-Driver Based Transmitter ................................................................................................ 37
5.3.4 Quad View Mirroring: ............................................................................................................... 37
5.3.5 Mobile Devices ......................................................................................................................... 38
5.3.6 Sharing on iOS Devices............................................................................................................ 41
5.4 Preview Window ................................................................................................................................ 41
5.5 Whiteboard & Annotation ................................................................................................................. 43
5.5.1 How to Start Whiteboard or Annotation Mode ...................................................................... 44
5.5.2 Whiteboard ............................................................................................................................... 44
5.5.3 Annotation ................................................................................................................................ 46
5.5.4 Download the Drawings to Connected Users ........................................................................ 47
6. Web Setting Management Configuration .................................................................................... 48
6.1 Network Settings ............................................................................................................................... 51
6.1.1 Wireless Network ..................................................................................................................... 51
6.1.2 Ethernet ..................................................................................................................................... 59
6.1.3 Auto Change Password ........................................................................................................... 60
6.2 Display and Audio ............................................................................................................................. 61
6.2.1 HDMI ......................................................................................................................................... 61
6.2.2 Audio ......................................................................................................................................... 63
6.2.3 Airplay Screen Quality .............................................................................................................. 64
6.2.4 Screen Display ID ..................................................................................................................... 64
6.2.5 Home Screen Background Image ........................................................................................... 65
6.3 Moderator Control ............................................................................................................................. 65

www.tekvox.com
ShareView Wireless
79060
-
WPS User Manual
6.4 System Settings ................................................................................................................................ 67
6.4.1 Buttons ...................................................................................................................................... 67
6.4.2 Date & Time .............................................................................................................................. 68
6.4.3 Auto Standby ............................................................................................................................ 70
6.4.4 Language .................................................................................................................................. 71
6.4.5 Reset ......................................................................................................................................... 72
6.4.6 Configuration File ..................................................................................................................... 72
6.5 Security Settings ............................................................................................................................... 73
6.5.1 Security Level ........................................................................................................................... 73
6.5.2 Login Password........................................................................................................................ 74
6.5.3 Connection Password.............................................................................................................. 74
6.6 Firmware Upgrade............................................................................................................................. 75
6.6.1 Firmware Update ...................................................................................................................... 75
6.6.2 Automatic Upgrading ............................................................................................................... 75
6.7 Other Settings .................................................................................................................................... 76
6.7.1 Auto Create Launcher .............................................................................................................. 76
6.7.2 Clear History After Meeting ..................................................................................................... 76
7. Updating Wireless Media ............................................................................................................ 77
7.1 Check Current Firmware Information .............................................................................................. 77
7.1.1 Windows OS ............................................................................................................................. 77
7.1.2 MAC OS ..................................................................................................................................... 78
7.2 Upgrading Firmware of Base Unit .................................................................................................... 80
7.3 Upgrading and Pairing Dongle ......................................................................................................... 81
7.4 Upgrading Launcher.......................................................................................................................... 82
7.5 Clean Leftover Files of Older Versions of Launcher Program in Laptop ...................................... 84
8. Operation Guide ......................................................................................................................... 85
8.1 Mirroring PC Desktop ....................................................................................................................... 85
8.1.1 Extended Desktop for Windows 10 ........................................................................................ 85
8.1.2 Microsoft Windows PC/Laptop with Dongle ......................................................................... 85
8.1.3 Microsoft Windows PC/Laptop Without Dongle ................................................................... 87

www.tekvox.com
ShareView Wireless
79060
-
WPS User Manual
8.1.4 Options for Microsoft Windows PC/Laptop – Extended Screen ......................................... 89
8.1.5 MAC OS PC/Laptop with Dongle ............................................................................................ 92
8.1.6 Mac OS PC/Laptop without Dongle ........................................................................................ 93
8.1.7 Options for Apple MacOS, MacBook – Extended Screen ..................................................... 94
8.2 Transmitting IOS Mobile Device ...................................................................................................... 95
8.2.1 How to use AirPlay? ................................................................................................................. 95
8.3 Transmit Android Device Wireless .................................................................................................. 95
8.3.1 Wireless Media Apk for Android ............................................................................................. 95
9. Wi-Fi Recommendation Setting .................................................................................................. 97
9.1 Check Wi-Fi Configuration on Base Unit ......................................................................................... 97
9.2 Check the Wi-Fi RSSI on Dongle or Mobiles ................................................................................... 98
10. Troubleshooting ....................................................................................................................... 98

www.tekvox.com
ShareView Wireless
79060
-
WPS User Manual
1. Product Introduction
ShareView Wireless makes it simple to connect to or participate in a meeting. A typical ShareView
Wireless kit contains one WMS Base Unit and two Transmitters e.g. WMT2-C/WMT1/WMT3-
H/WMT3-HC/WMT-Mini.
1.1 Features
1.1.1 WMS-10 & WMS-20/WMS-40:
Supports quad-view on one display.
Supports VESA PC resolution input and auto-detection.
Can transmit PC or Macbooks’ mirrored/extended desktop.
Can transmit smart devices' screen, photos, videos, music, etc.
Supports Wireless Media Teleporter "show-me" button.
Supports USB/HDMI/USB-C plug-in auto configuration/pairing for Wireless Media Teleporter
"show-me" button.
Supports "Airplay" for Apple devices.
1.1.2 WMT2-C/WMT-Mini/WMT3-H/WMT3-HC:
Supports VESA PC resolution, auto-detecting.
Can wirelessly transmit PC's mirrored/extended desktop to the base unit.
Quick "Show-me" button to selection switcher
"Show-me" button can independently step in/out the source of PC.
Dual color LED - Green indicates active source signal while red indicates power/link. (Hardware
is supported via USB, USB-C, and HDMI)
Note: Please contact your distributor immediately if any damages or defects in the components are
found.

www.tekvox.com
ShareView Wireless
79060
-
WPS User Manual
2. Specifications
HDMI output 1x HDMI 19-pin female connector
Video Output Resolution 3840x2160@60Hz,3840x2160@30Hz, 1920x1080@60Hz
Format Compliance HDMI1.4/HDMI2.0
Video Capacity:
1080P @ <60Hz Airplay for IOS devices
1080P @ <60Hz "WirelessMedia" app
1080P @ <60Hz for all show-me button
HDCP HDCP1.4/HDCP2.2
Analog Audio Output 1x 3.5mm PC audio female connectors
LAN port RJ45 x2:1000Mbps x1,100Mbps x1
USB interface USB3.0 x1, USB 2.0 x1,Type-C x1
Audio Input AirPlay, Windows/MAC, WMH
Control connectors 3.5mm Phoenix terminal/ RS232 interface
Number of window
simultaneous on screen ≥4+14(4 main windows+14 thumbnail windows)
Number of simultaneous
connections ≥16
Data rate in wireless Up to 1200Mbps
Video Playback Frame Rate 20-60 FPS
Latency <100ms,Min 20ms
Wireless transmission protocol WIFI IEEE 802.11 a/g/n/ac
Frequency band 2.4 GHz & 5 GHz
Dimension (W x D x H) 165mm x 95mm x 24.5mm(including antenna: 165mm x
125mm x 24.5 mm)
Weight 0.4lbs(200g)
Temperature -4° ~ +140° F (-20° ~ +60° C)
Humidity (Storage / Operating) 20 ~ 90%(non-condensing)
DC Power 12V / POE
POE standard IEEE802.3af
Power Consumption 10W(MAX)
www.tekvox.com
ShareView Wireless
79060
-
WPS User Manual
3. Panel Layout
3.1 Hardware Interface
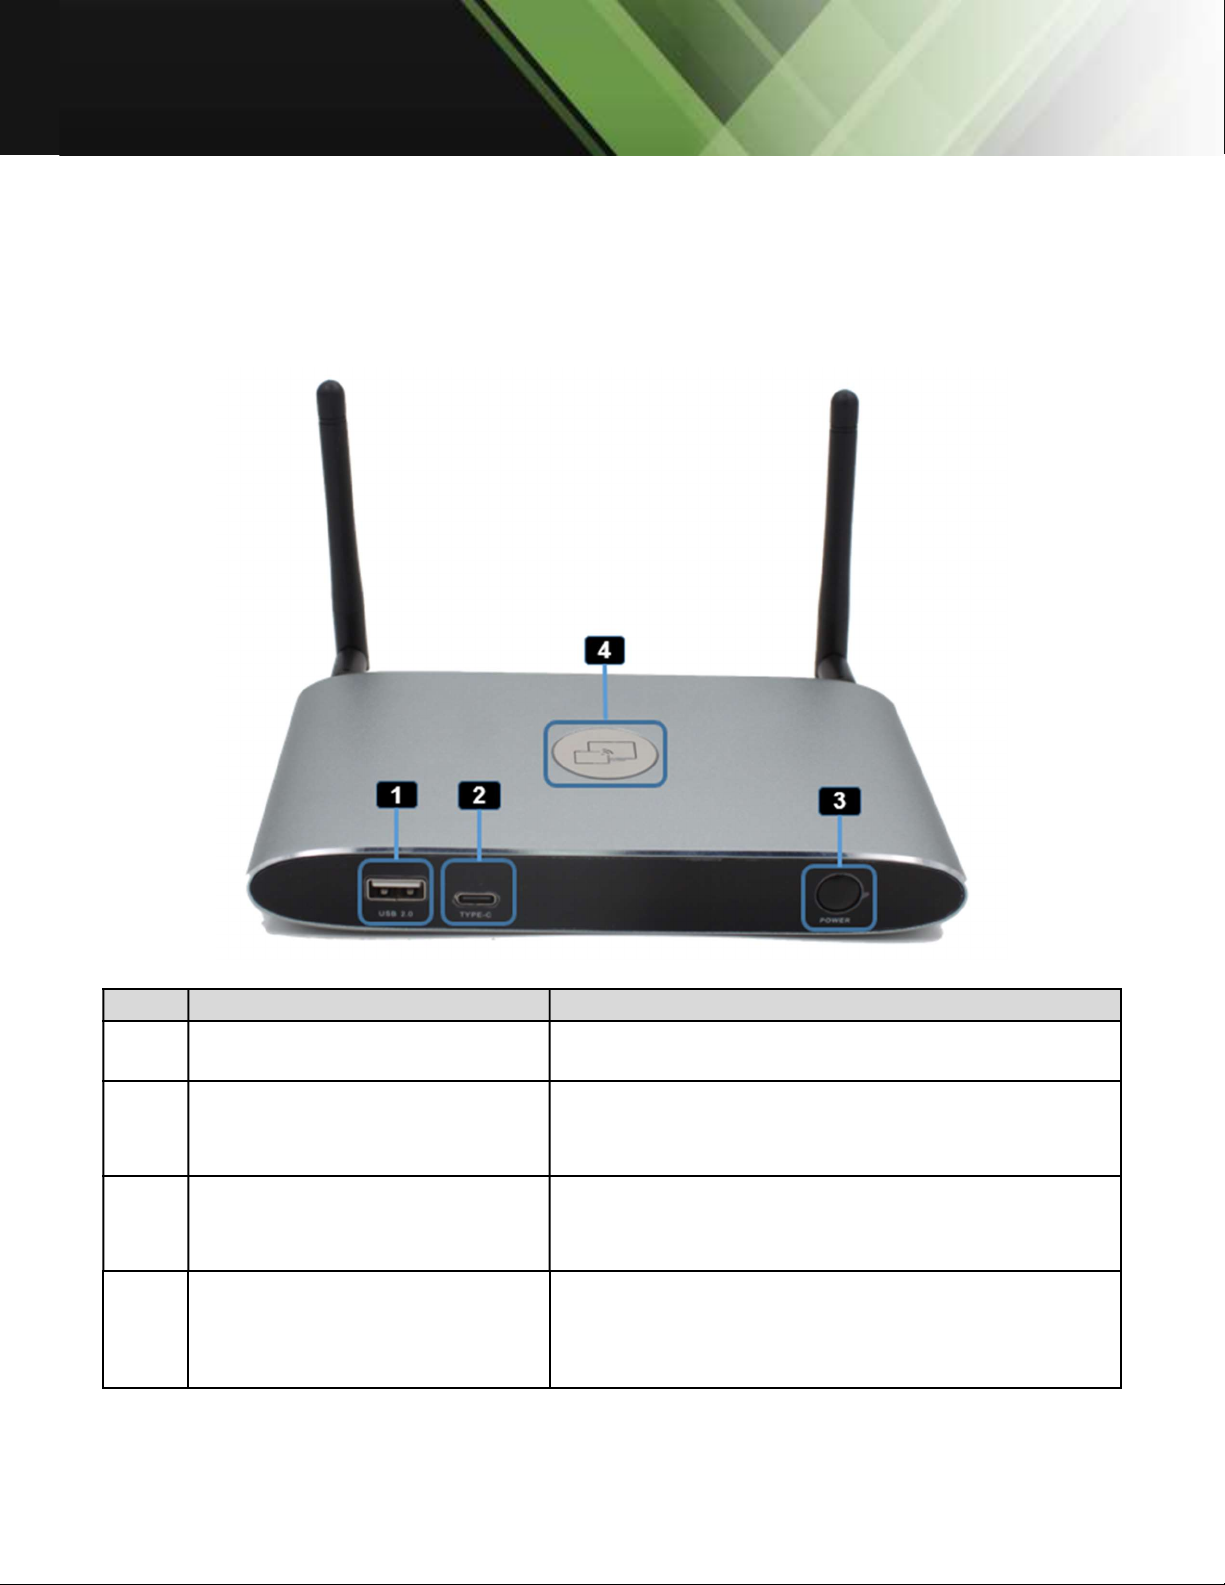
3.1.1 WMS-10/20/40 Front Panel
ID Name Description
1 Front USB connector USB port for transmitter pairing, mouse control,
USB touch screen, etc.
2 Front USB-C connector USB-C port for pairing to transmitter
3 Power Button Turns the device on or off
4 Back-lit LED indicator
RED: Initializing
Flashing GREEN: Power on
Static GREEN: Ready to share
Static CYAN: Sharing

www.tekvox.com
ShareView Wireless
79060
-
WPS User Manual
USB port (1)
The USB port is used to update the software of the WMS-40.
The USB port is used for pairing the dongle and base unit when the transmitter is plugged-in.
The USB port is used for connecting a mouse to create/upgrade Launcher by clicking
Download button, hide SSID, PASS, Wi-Fi IP and Lan IP by clicking Info, check Security level
button and control PC source device, when a PC desktop is mirroring to the screen by plugging
in the dongle.
The USB port is used for connecting a USB-based touch screen to create/upgrade Launcher by
clicking the Download button, hide SSID, PASS, Wi-Fi IP and Lan IP by clicking Info, check
Security level button and control PC source device, when a PC desktop is mirroring to the
screen by plugging in the dongle.
The USB port is used for creating or upgrading Launcher by clicking Download button, when a
USB stick is plugged in.
USB-C port (2)
The Type-C port is used for pairing USB-C transmitter with base unit.
Mechanical fixture points
The mechanical fixture points are located at the bottom of the base unit.

www.tekvox.com
ShareView Wireless
79060
-
WPS User Manual
3.1.2 WMS-10 & WMS-20/40 Rear Panel

www.tekvox.com
ShareView Wireless
79060
-
WPS User Manual
ID Name Description
1 Line audio output 2 channel analog audio output. Connect a 3.5mm mini-jack PC
connector from this jack to the line in jack of an audio system.
2 Rear USB 3.0
connector
USB port, for USB dongle pairing, mouse control, USB touch screen
etc.
3 Reset Reset button to restore to the factory default setting.
4 HDMI output Connect an HDMI cable from this port to an HD or 4K/HDMI2.0
display.
5 RS-232 Connect an RS-232 cable from this port to an RS-232 device. (Note:
WMS-10 does not have an RS-232 port)
6 LAN Ethernet port 1 100Mbps, Connect an Ethernet cable between this jack and a LAN to
connect WMS-40 to LAN.
7 LAN Ethernet port 2
1000Mbps, Connect an Ethernet cable between this jack and a LAN
to connect WMS-40 to LAN. Support POE. (Note: WMS-10 does not
have LAN Port 2)
8 DC Power socket Connect the included power adapter to this socket and connect the
plug to an available electrical outlet.
9 Antenna fixture
points Screw in the included two antennae to these two ports.
Note: LAN port 2 and RS-232 is only included with WMS-20 & WMS-40 models
USB 3.0 Port (2)
The USB port is used to update the software of the WMS-40.
The USB port is used for pairing the dongle and base unit when the transmitter is plugged-in.
The USB port is used for connecting a mouse to create/upgrade the launcher by clicking the
“Download” button, hide SSID, PASS, Wifi IP and Lan IP by clicking Info, check Security level
button and control PC source device, when a PC desktop is projecting to the screen by
plugging in the dongle.
The USB port is used for connecting a USB-based touch screen to create/upgrade Launcher by
clicking Download button, hide SSID, PASS, Wifi IP and Lan IP by clicking Info, check Security
level button and control PC source device, when a PC projecting is mirroring to the screen by
plugging in the dongle.
The USB port is used for creating or upgrading Launcher by clicking Download button, when
the USB stick is plugged in.

www.tekvox.com
ShareView Wireless
79060
-
WPS User Manual
3.1.3 Factory Reset
Start up the Base unit.
When the Home Screen appears, press the reset button at the rear panel of the base unit with a
pointed object, (e.g. a paper clip) until the “Factory Reset” page appears as shown below
The Base unit will reboot after 3 seconds to be default configuration.
If you do not have a picture, press and hold the reset button until the red LED in the top panel
lights up
After a factory reset, all previous settings will be lost and require a new set up.

www.tekvox.com
ShareView Wireless
79060
-
WPS User Manual
Default Configuration
Ethernet:
Proxy: None
DHCP: Enable
Wireless network:
Frequency: 5GHZ
Channel: Auto
Auto change Wi-Fi hotspot password: 5 minutes
Display & Audio
HDMI resolution: Auto
HDMI CEC:
Device auto power off: ON
Base unit auto power on: OFF
Audio output: Jack & HDMI
Airplay screen quality: High
Show device name and password when mirroring: OFF
Show PCs user name when mirroring: ON
Moderator Control
Add a sub-window bar to enable previewing the connected devices: ON
Real time preview: ON
System settings
Date & time: Automatic date & time: use network-provided time
Auto Standby: Never
Language: English
Security Settings
Security Level: Security level 1
Connection Password: 4-digits password beginning with 0000
Change admin password: admin(default)
Other settings
Auto create launcher: Disabled
Clear history after meeting: Always

www.tekvox.com
ShareView Wireless
79060
-
WPS User Manual
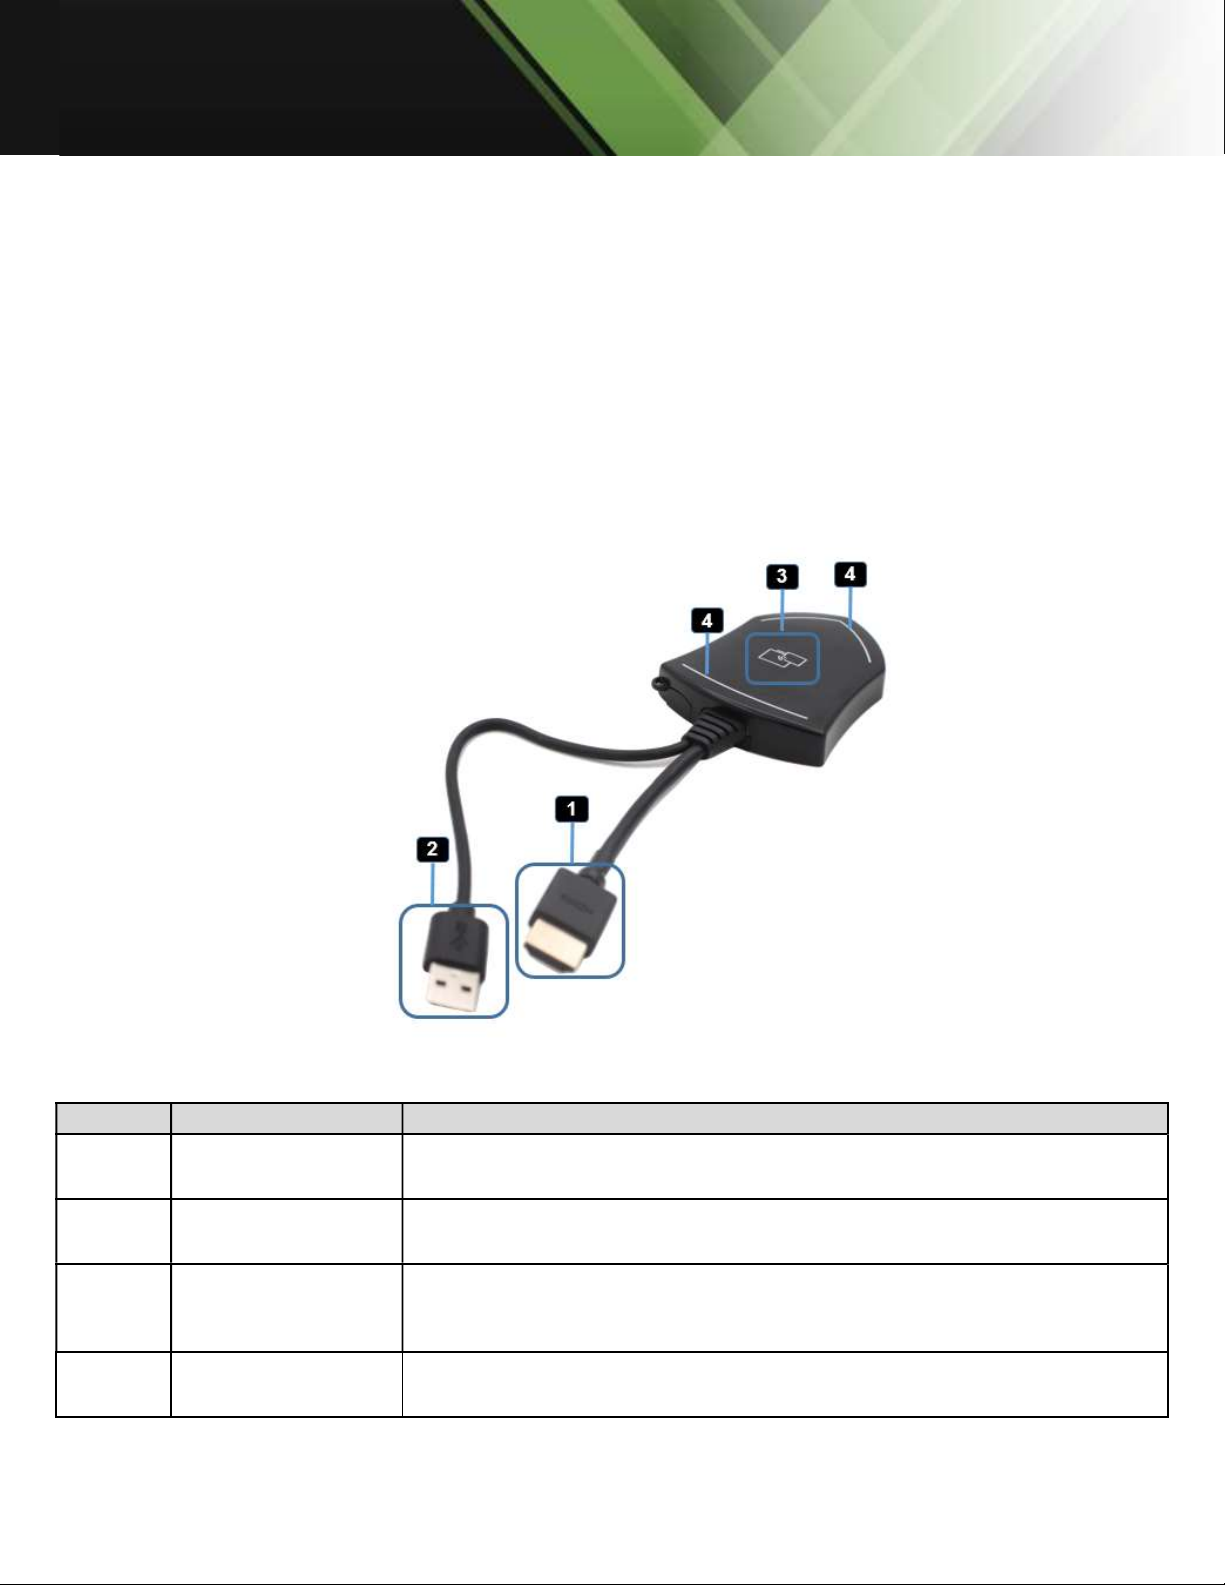
3.1.4 Dongle Front Panel
WMT2-C, WMT-Mini, WMT3-H, and WMT3-HC are dongles used for toggling the presenting from PC
on the main screen.
ID Name Description
1 USB connector
USB can be plugged into a PC/Laptop (for sharing your screen) or
the base unit (for pairing the button to base unit or updating its
software)
2 LED ring indicator Indicates the status of the button
3 Display Button
Press the button to start displaying the content of the PC/Laptop’s
screen on the main screen. Touching the button during the
meeting will toggle the sharing of the screen.
4 USB stick
Plug USB stick into USB connector of WMS to create or upgrade
the launcher. Plug USB stick into PC to run Wireless Media
exe/APP. Program to mirror.
www.tekvox.com
ShareView Wireless
79060
-
WPS User Manual
LED ring indicator behavior (2)
When LED indicator is static green, it’s ready to project your PC desktop to the main screen.
When LED indicator is static red, 1) it can project your PC desktop to the screen, 2) pairing is
complete. You can now unplug the button from the base unit.
When LED indicator blinks Green, it indicates that 1) the button is plugged into the laptop and
is initializing or waiting for user to start the Wireless Media application, 2) pairing/software
upgrading of the button in the Base Unit is in progress.
When LED indicator is off (no light), it indicates 1) the button is not plugged in the PC/Laptop;
2) the button is defective; 3) the USB port or computer might be defective.
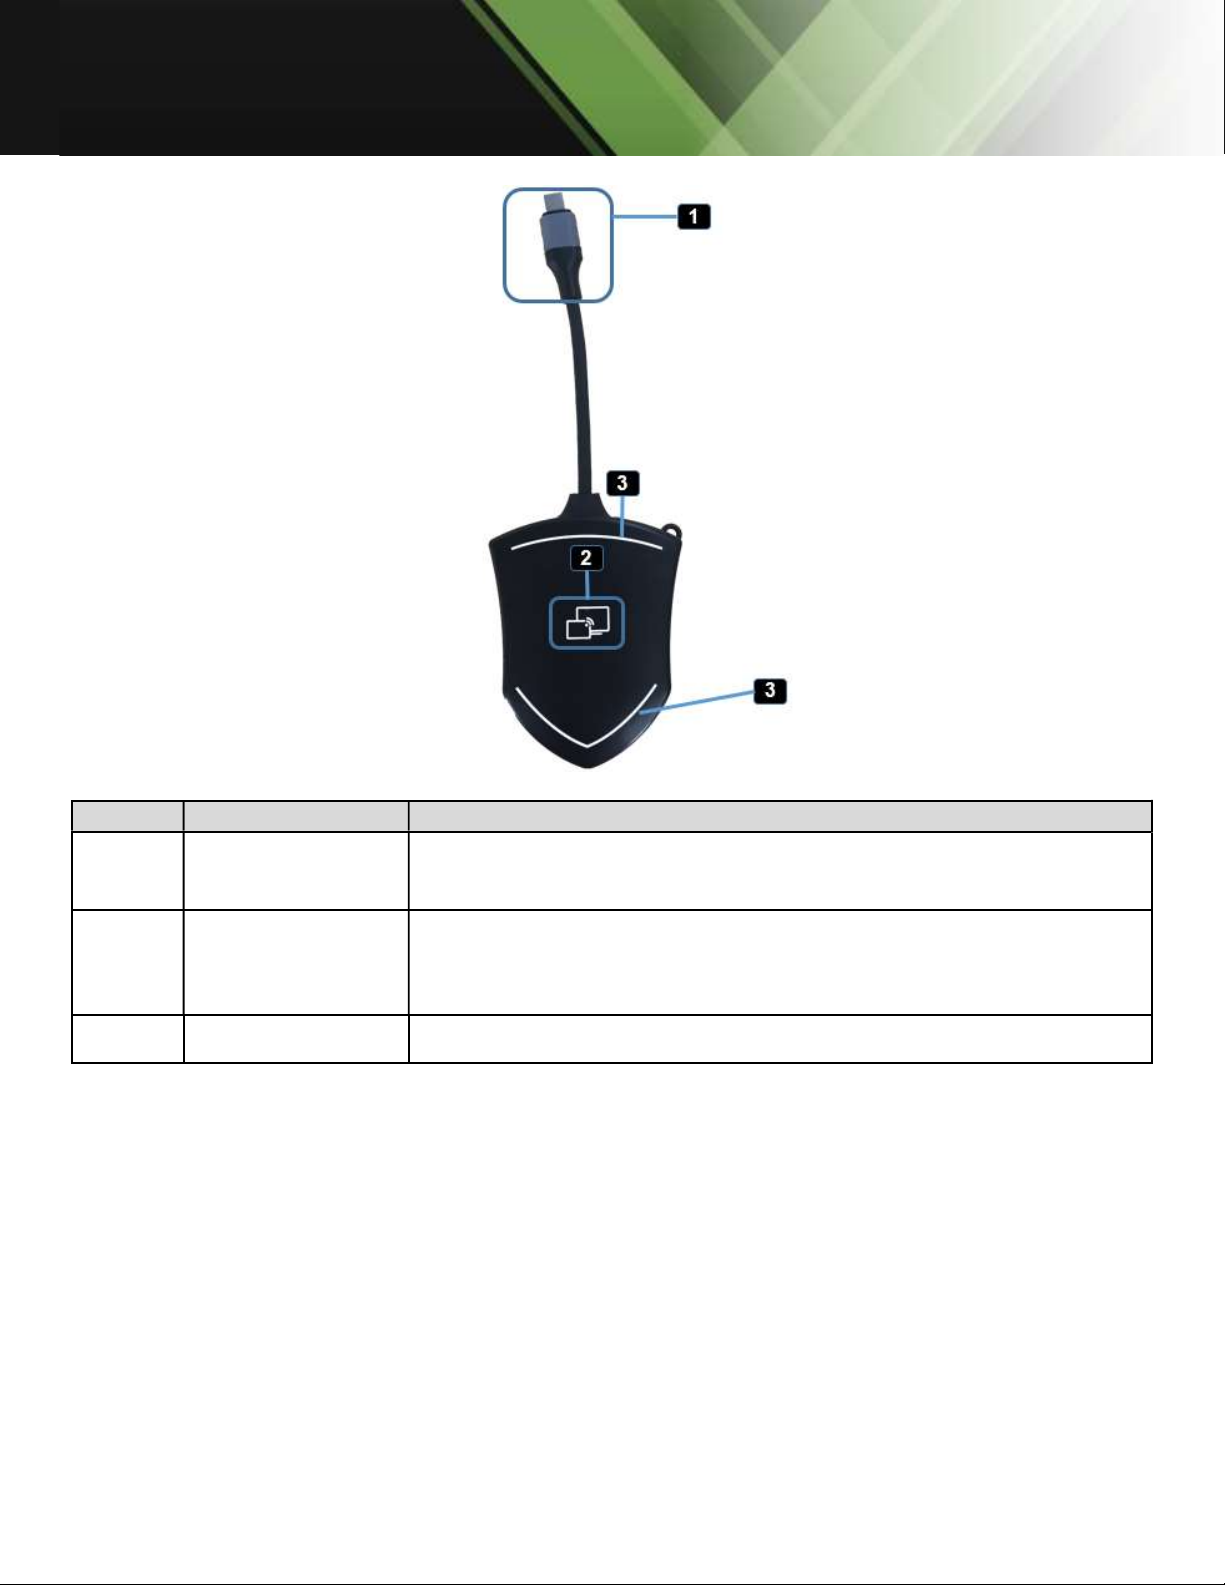
ID Name Description
1 HDMI connector Using HDMI connector of the button can be plugged into a
PC/Laptop for sharing your screen.
2 USB connector Supply power or plug into the base unit for pairing the Button to the
Base Unit or upgrading the dongle.
3 Display Button
Touch the sensor button to start displaying the content of the
PC/Laptop’s screen on the main screen. Touch the button during the
meeting will toggle the sharing of the screen.
4 LED ring indicator Indicates the status of the button.
www.tekvox.com
ShareView Wireless
79060
-
WPS User Manual
ID Name Description
1 HDMI Type C
connector
Using HDMI Type C connector of the button can be plugged into a
PC/Laptop for sharing your screen.
2 Display Button
Touch the sensor button to start displaying the content of the
PC/Laptop’s screen on the main screen. Touch the button during
the meeting will toggle the sharing of the screen.
3 LED ring indicator Indicates the status of the button.

www.tekvox.com
ShareView Wireless
79060
-
WPS User Manual
ID Name Description
1 USB connector Using USB connector of the dongle can be plugged into a
PC/Laptop for sharing your screen.
2 USB-C connector Using Type C connector of the dongle can be plugged into a
PC/Laptop for sharing your screen.

www.tekvox.com
ShareView Wireless
79060
-
WPS User Manual
3.2 Software Interface
3.2.1 Home Screen
ID Name Description
1 Wi-Fi Indicator
Wi-Fi Direct mode: internal access point is enabled
Wi-Fi Infrastructure mode: “Client-Mode“ ,
Wi-Fi connection to router is established,
icon displays the current signal strength.
A secure Wi-Fi connection is established, or connection to a
router failed:
Wi-Fi is not available:
LAN Infrastructure mode: access point is disabled
2 ID Wi-Fi name or device name of the Base-unit access point.
This manual suits for next models
1
Table of contents
Popular Projector Accessories manuals by other brands


Christie
Christie D4K40-RGB Technical reference

Qomo
Qomo QConnect-1700 Quick installation guide

Viz-Art Automation
Viz-Art Automation SLIM Series installation manual

CHIEF
CHIEF RPAA1 installation instructions

Sony
Sony LMP-Q120 operating instructions

EliteProAV
EliteProAV WhiteBoardScreen TE CLR 2 Series user guide

New Star
New Star Neomounts BEAMER-W050BLACK instruction manual

EliteProAV
EliteProAV AV Yard Master Series user guide

Smart Technologies
Smart Technologies Unifi 45 Configuration and user's guide

UltraLift
UltraLift Spider 70 product manual

Black Box
Black Box Coalesce WC-COA Deployment guide

VOGELS
VOGELS VPC 545 - MANUAL PROJECTOR ORIGINAL manual