TeleEye GX624 User manual

GX Series
HD Video Recording Server
GX624 / GX629 / GX6216
Quick Start Guide
Intelligent Security & Fire Ltd

Contents
1. Introduction......................................................................................................................................1
1.1. Package Contents..................................................................................................................1
1.2. Hardware Features ................................................................................................................3
1.3. Functional Features...............................................................................................................5
1.4. Hard Disk Installation...........................................................................................................5
2. Setup for Local Monitoring & Recording........................................................................................9
3. Setup for Remote Monitoring & Recording ..................................................................................13
4. Reference .......................................................................................................................................18
Notice:
Signal Communications Limited reserves the right to make improvements to the product described in this manual at
any time and without notice.
This manual is copyrighted. All rights are reserved. This manual should not be copied, reproduced or translated in
whole or part without prior consent from Signal Communications Limited.
TeleEye is a trademark of Signal Communications Limited and is registered in China, European Communities, Hong
Kong, US and other countries.
All other trademarks are the property of their respective owners.
Copyright (c) 2012 Signal Communications Limited (A member of TeleEye Group). All rights reserved.
Version 1.02
Limits of Liability and Disclaimer of Warranty
Signal Communications Limited has taken care in preparation of this manual, but makes no expressed or implied
warranty of any kind and assume no responsibility for errors or omissions. No liability is assumed for incidental or
consequential damages in connection with or arising out of the use of the information or accessories contained herein.
Features and specifications are subject to change without prior notice.
Intelligent Security & Fire Ltd

Quick Start Guide PAGE 1
1. Introduction
TeleEye GX Series HD Video Recording Server operates with its revolutionary multi-rate video
coder to fulfill the highest video coding requirements for simultaneous transmission and recording.
Real time recording rate up to 25 fps on all video channels can be achieved at HD resolution.
TeleEye GX provides professional and real life security control of premises with its
sophisticated event management scheme. It responses to a wide range of events triggered by
external alarm sensor, video motion, power interruption and tamper. Besides an arm/disarm
mechanism for controlling the event handling, every external alarm input is configurable with its
own operation zone, entry/exit delay and tamper detection setting. Various actions like sending
video back to a designated receiving PC, video recording, email notification, etc. can be performed
upon event triggering. TeleEye GX can also keep a comprehensive operation and event log for audit
trail.
TeleEye GX is designed to fully comply with the British Standard BS 8418, providing
professional remote monitoring and visual alarm verification solution to central monitoring station.
Video footage stored inside TeleEye GX can be extracted easily for evidential purposes using
USB flash device. Backed up video can be played back in any PC without any special software.
1.1. Package Contents
Make sure the following items are included within the package
TeleEye GX HD Video Recording Server
Intelligent Security & Fire Ltd

Quick Start Guide PAGE 2
Item
Description
Item
Description
Quick start guide
Power adaptor
Registration code sheet
HDD screws
HDD recommendation
sheet
Straight-through Ethernet
cable
Warranty card
Alarm port connector &
alarm port cover
Software CD
Resistors
(for tamper detection)
Mouse
Intelligent Security & Fire Ltd

Quick Start Guide PAGE 3
1.2. Hardware Feature
1.2.1. Front View
1. Notification LEDs
LED
Description
Light up when power on
Light up when performing recording
Blink when an event is triggered
2. Main control buttons
Button
Description
Select camera /
Enter password
Quick button for recording
Display next camera /
Start sequential mode
Change to next screen mode
(e.g. Full 2x2)
Open main OSD menu /
Back to previous menu
Intelligent Security & Fire Ltd

Quick Start Guide PAGE 4
3. Menu control / local playback control buttons
Button
Description
Menu mode
Playback mode
Up
Pause
Down
Stop
Left
Rewind
Right
Fast forward
Enter
Play
4. Front USB port
1.2.2. Back View
1. Power switch
2. Power input (16V DC)
3. Ethernet jack (10/100/1000 Base-T)
4. Rear USB port
5. RS-485 in/out port
6. VGA output
7. TV output
8. Audio in/out port, PA
9. Digital video input ports
10. Alarm/switch port
Intelligent Security & Fire Ltd

Quick Start Guide PAGE 5
1.3. Functional Features
-Independent & efficient HD recording stream
-720p HDTV resolution (1280 x 720 progressive scan)
-Video recording up to 400 fps
-Configurable recording frame rate
-Supporting up to 4 SATA HDDs
-USB video extraction
-Flexible connections: LAN, broadband & mobile network
-Support both static & dynamic IP
-Independent video network: require only one IP for up to 16 MX HD Video Cameras
-IP filtering
-Single point video throughput control
-Mobile video monitoring
-Triplex operation: simultaneous video monitoring, recording & playback
-HD video output
-Multiple login accounts
-Compliance with BS 8418
-Sophisticated event management
-Multi-language OSD
-Mouse control
1.4. Hard Disk Installation
1. Make sure that the video recording server is turned off.
2. Loosen the screws that hold the cover.
Intelligent Security & Fire Ltd

Quick Start Guide PAGE 6
3. Pull off the cover.
4. Loosen the screws of the hard disk holder.
Intelligent Security & Fire Ltd

Quick Start Guide PAGE 7
5. Insert HDD into one of the available holders. Maximum 4 HDD can be installed.
6. Mount the HDD to holder with attached screws.
Intelligent Security & Fire Ltd

Quick Start Guide PAGE 8
7. Remount the hard disk holder to TeleEye GX.
8. Connect the SATA cable to the HDD.
Intelligent Security & Fire Ltd

Quick Start Guide PAGE 9
2. Setup for Local Monitoring & Recording
Equipment:
- TeleEye GX HD video recording server and its power adaptor
- Cameras and their power adaptors
- CAT-5 cable
- VGA / TV monitor
- VGA / HDTV cable
Setup Procedures:
1. Install a hard disk to the TeleEye GX
Note: If there is no hard disk installed, Recording and Playback are not functional
2. Connect cameras to the video ports of TeleEye GX
3. Connect a monitor to the VGAoutput of TeleEye GX
4. Plug in the power adaptors to TeleEye GX, cameras and monitor
5. Switch on the power of TeleEye GX, a startup screen will appear on the connected monitor.
Intelligent Security & Fire Ltd
Quick Start Guide PAGE 10
6. If an installed hard disk is not in TeleEye GX recognized format, it would be formatted
automatically when startup completes.
7. TeleEye GX is ready for operation. Live video should appear on the monitor. By default, manual
recording will be started automatically.
8. User can connect a mouse to the USB port or use the control buttons on the front panel to
perform different operations.
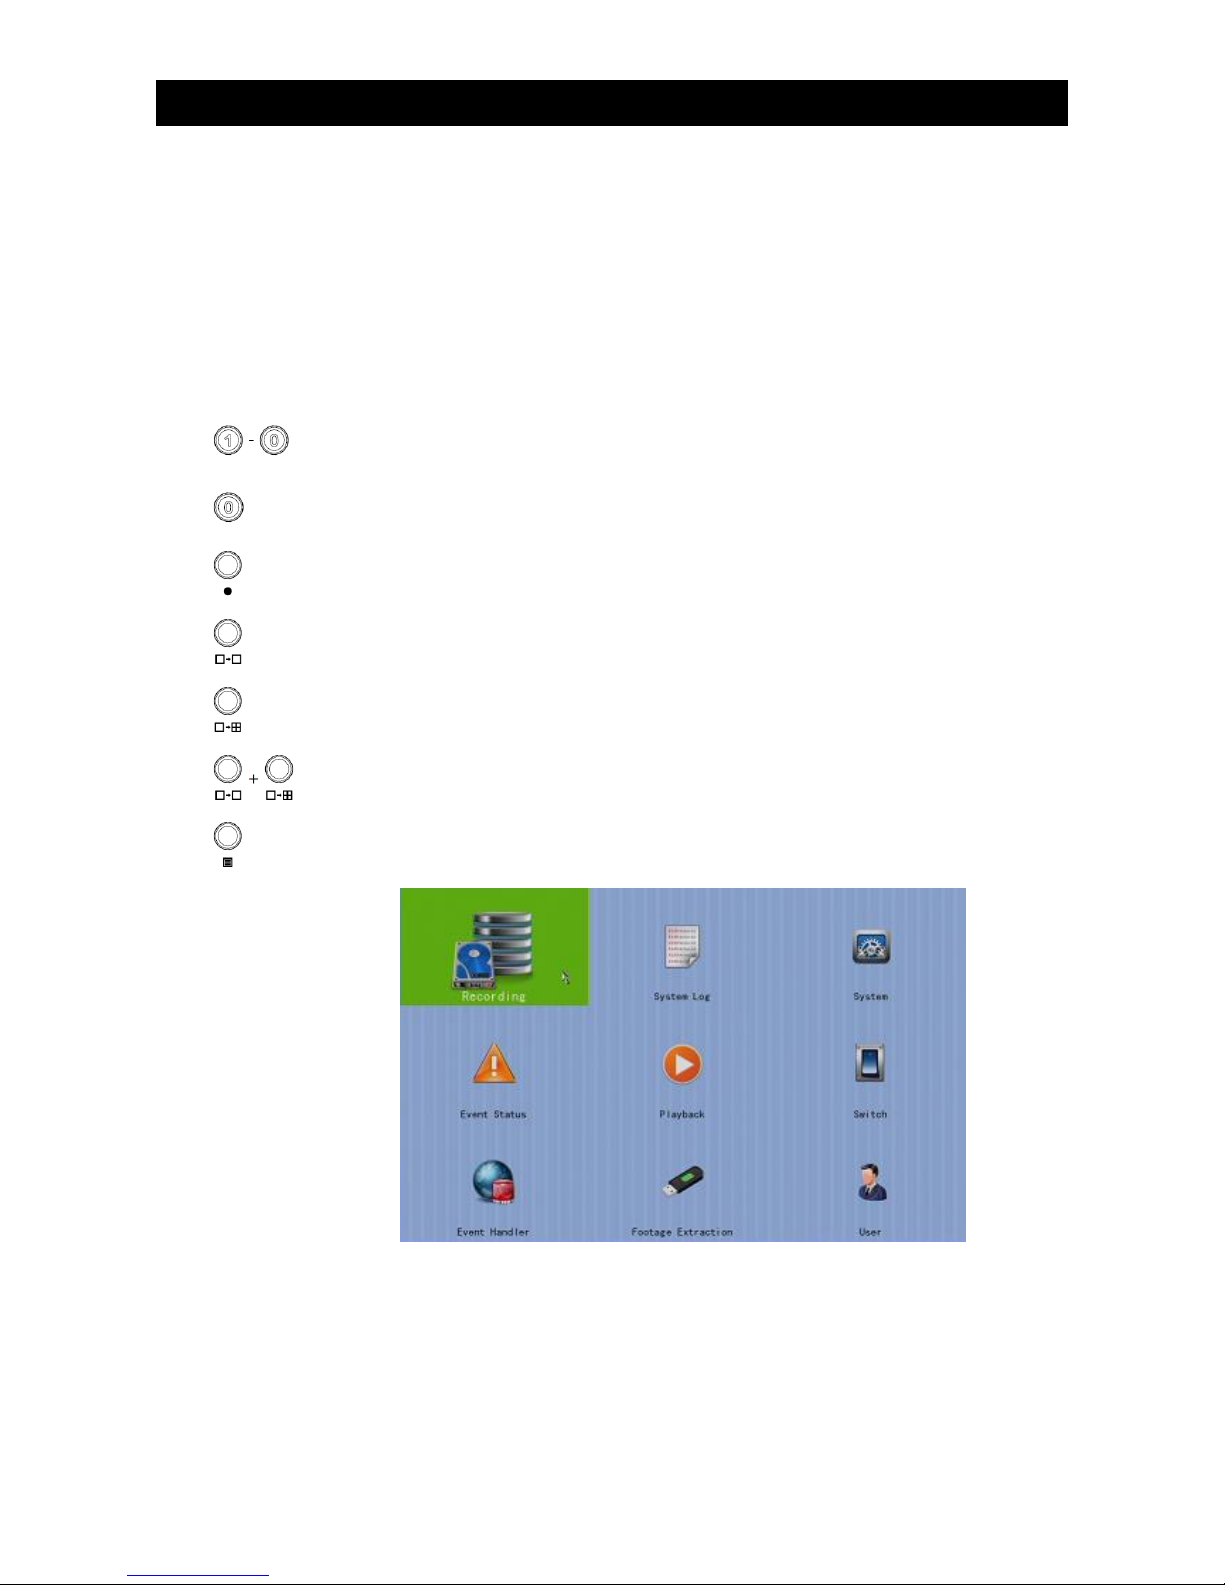
When using buttons on the front panel:
Press button 1 to 9 to select Camera 1 to 9.
Press button 0 first, then press button 0 to 6 to select Camera 10 to 16.
Hold down button 0 for a few seconds to change the display resolution.
Quick button to change recording to on, off or schedule.
Display next page of cameras (e.g. Cam 2 Cam 3).
Hold down the button for a few seconds to start sequential mode.
Switch to next screen mode (e.g. Full 2x2).
Hold down both buttons for a few seconds to refresh the local display.
Menu button: used to open and close main OSD menu, or navigate backward
to previous menu.
Intelligent Security & Fire Ltd
Quick Start Guide PAGE 11
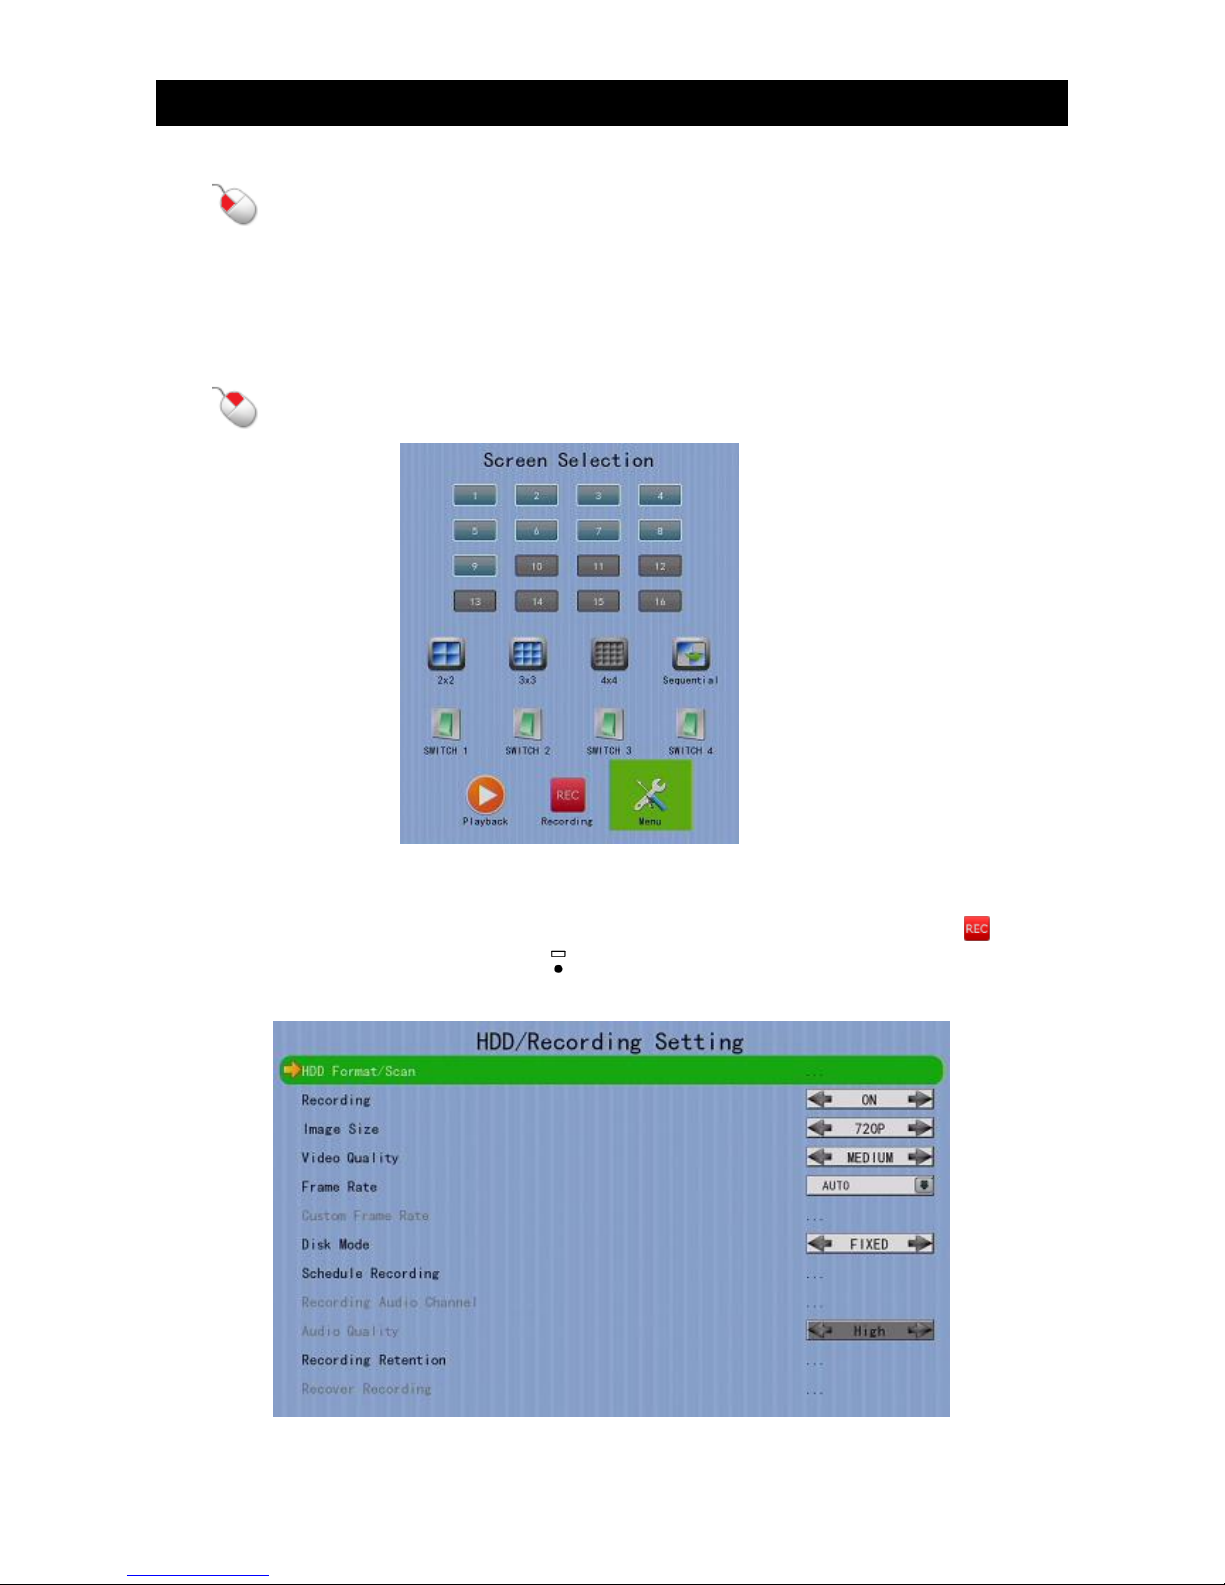
When using mouse:
(Left click)
Enter a sub-menu.
Select an option.
Double click on a recording log to select playback cameras.
Double click on a system log to perform searching.
Double click on an IP filtering entry to edit.
(Right click)
Used to open and close the OSD menu, or navigate backward to previous
menu.
9. TeleEye GX supports 3 recording modes to suit different situations: manual recording, schedule
recording and event recording. When a camera’s video is being recorded, the icon will be
shown next to its name and the LED will light up. For advanced recording settings, go to
[Main Menu][Recording]
Intelligent Security & Fire Ltd

Quick Start Guide PAGE 12
HDD Format/Scan:
View hard disk information
Format and scan disk
Recording:
Select the recording mode
- Off: Disable recording
- On: Enable recording of all cameras
- Schedule: Enable schedule recording
Image Size:
Set recording resolution
- 720P: 1280 x 720
- Q720P: 640 x 360
Video Quality:
Set video quality
Frame Rate:
Set recording frame rate and apply to all cameras
- Auto: Record at highest achievable frame rate
- X fps: Record at X frames per second
- Custom: Enable custom frame rate for individual camera
Custom Frame Rate:
Set recording frame rate of individual cameras
Disk Mode:
Set disk mode
- Cyclic: Remove oldest data when hard disk full
- Fixed: Stop recording when hard disk full
Schedule Recording:
View or change recording schedules
RecordingAudio Channel:
Select the recording audio channel
Audio Quality:
Set audio quality
Recording Retention:
Set recording retention settings
Recover Retention:
Recover damaged recorded video
Intelligent Security & Fire Ltd
Quick Start Guide PAGE 13
3. Setup for Remote Monitoring & Recording
Equipment:
- TeleEye GX HD video recording server and its power adaptor
- Cameras and their power adaptors
- CAT-5 cable
- Network switch or router
- PC
PC Requirements:
- CPU: Intel ® Core i3 Processor
- RAM: 2 GB
- HDD: 10 GB free space
- Display: Direct 3D, Nvidia GeForce GT 220 / ATI Radeon HD 5450 or above
- OS: Windows XP, Windows Vista or Windows 7
Other Requirements:
- Java: Sun Microsystems Java 2 runtime Version 1.5.0 or above
- IE: Windows Internet Explorer Version 6 or above
Intelligent Security & Fire Ltd

Quick Start Guide PAGE 14
Setup Procedures on Camera Side:
1. Run TeleEye IP Setup Utility.
2. Select the camera and the “Obtain an IPaddress automatically”checkbox.
3. The default IP address of the camera is 169.254.xx.yy, where xx is any number between 1 and
254 and yy is between 0 and 255. Change the IP address of the PC to 169.254.xx.zz, with zz not
equal to yy.
4. Double click the row representing the camera. A web browser should be opened automatically.
5. Enter password and press [Connect] to login.
6. Adjust video view angle and focus if needed.
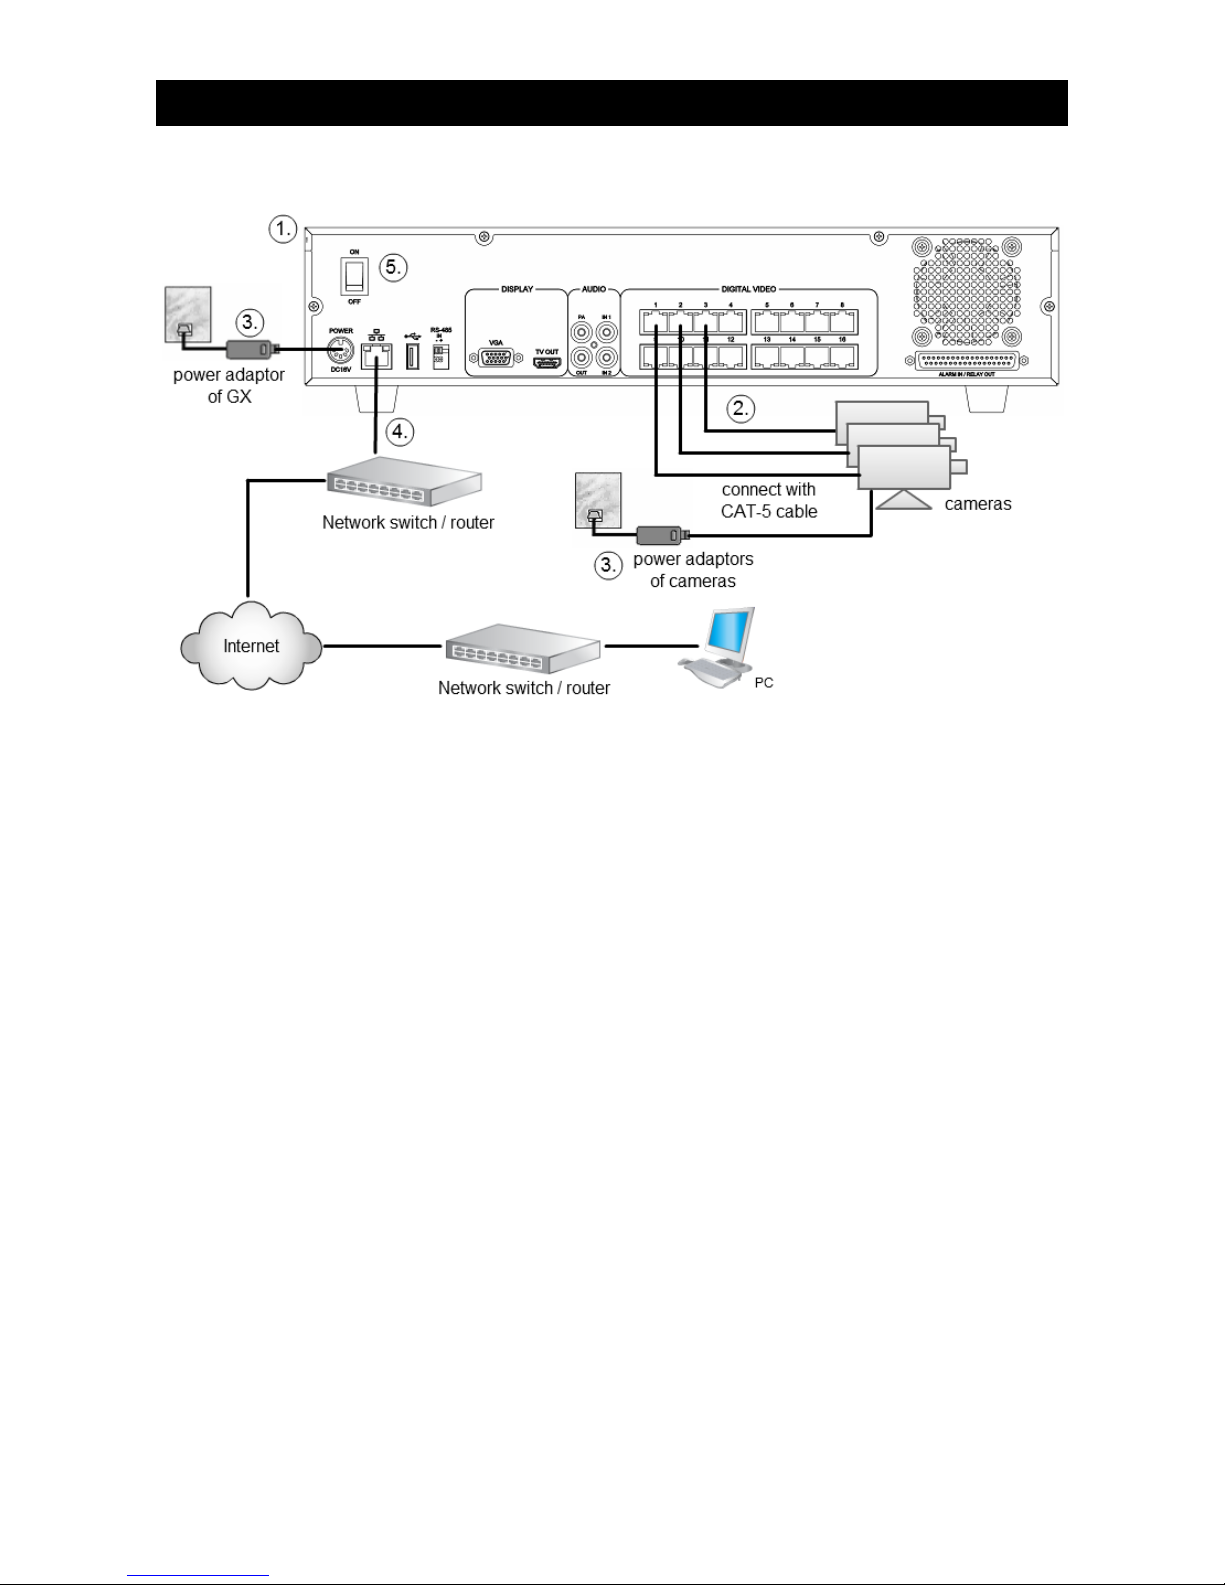
Setup Procedures on GX Side:
1. Install a hard disk to the TeleEye GX
Note: If there is no hard disk installed, Recording and Playback are not functional
2. Connect cameras to the video ports of TeleEye GX
3. Plug in the power adaptors to TeleEye GX and cameras.
4. Connect TeleEye GX to the network switch.
5. Switch on the power switch of TeleEye GX.
6. If all installed hard disks are not in TeleEye GX recognized format, they would be formatted
automatically when startup completes.
Setup Procedures on PC Side:
1. Configure the network settings of TeleEye GX through PC with LAN connection.
2. Install TeleEye IP Setup Utility. .NET framework is also needed for the operations. Both can be
found in the included software CD.
Intelligent Security & Fire Ltd

Quick Start Guide PAGE 15
3. Run IP Setup Utility.
4. Find the video recording server according to the serial number provided by the provider.
5. By default, TeleEye GX obtains the IP address, netmask and gateway automatically through
DHCP. To assign a static value, deselect the “Obtain an IP address automatically”checkbox
and enter the corresponding information. The gateway should be the IP address of the router.
Note: The DNS setting is used for sureLINK, time synchronization and e-mail notification.
6. Reconnect the video recording server to the Internet network.
7. Configure other network settings for TeleEye GX and the PC if necessary, such as router port
mapping, firewall, etc. Please refer to the manual of the router.
8. Open a web browser and type the IP address plus port number in the format
http://IPAddress:PortNumber (e.g. http://192.168.1.2:1024) or sureLINK address in address bar
directly.
9. By default, basic security mode is applied and username is not required. Enter password and
press [Connect]. (The default administrator password is “000000”. Details can be found in the
registration code sheet)
Intelligent Security & Fire Ltd

Quick Start Guide PAGE 16
10. Use screen mode selection panel and camera selection panel (circled in red color in below figure)
to view video.
Note: If a cross sign is shown at the top left corner of the web page, it implies that Java JVM is
not installed in the computer. It can be obtained through the following methods
-Install through the software CD in the package
-Download from http://www.java.com and install it
Intelligent Security & Fire Ltd

Quick Start Guide PAGE 17
Setup Procedures on Router Side:
Port forward of router is required to establish the Internet connection of the camera. Please refer to
the user manual of your router for setup detail. An example of establishing the port forward of a
router is given below.
1. Open a web browser and type the router IP address (e.g. http://192.168.1.1) in address bar to
access the web-based utility of router.
2. Enter the user name and password if login is required. Please refer to the setup manual of router.
3. Enter the IP address and port number of TeleEye GX in the NAT / port forward table of the
router. Note that the naming for port forwarding may be different for different routers.
Intelligent Security & Fire Ltd

Quick Start Guide PAGE 18
4. Reference
For advanced operations, please refer to the TeleEye GX full user guide in the software CD.
Intelligent Security & Fire Ltd
This manual suits for next models
2
Table of contents


