manuals.online logo
Brands
  1. Home
  2. •
  3. Brands
  4. •
  5. Unico
  6. •
  7. Recording Equipment
  8. •
  9. Unico DUAL PLUS 1C Reference manual

Unico DUAL PLUS 1C Reference manual

4
CONNECTION
CONFIGURATION
Connection and configuration procedure
of the Unico Dual Plus 1C module (from FWP 50)
on vehicles with steering wheel commands without long key pressing system
and with RESISTIVE LEARNING Radios (as Macrom, Phonocar, Hardstone).
For GMLAN connections, please consult the appropriate technical sheets of the Paser website: http: /
automotive.paser.it/technical_tables.php.
To connect Unico Dual Plus 1C module, first connect the purple wire of the module to the Key A (or SW 1)
of the radio.
Then connect the grey-black wire of the module to the Key GND (or SW GND) of the radio.
WARNING!
For the correct working of the system, you ALWAYS need to configure the PIONEER radio protocol
(radio profile # 4), regardless of the brand of resistive learning radio installed.
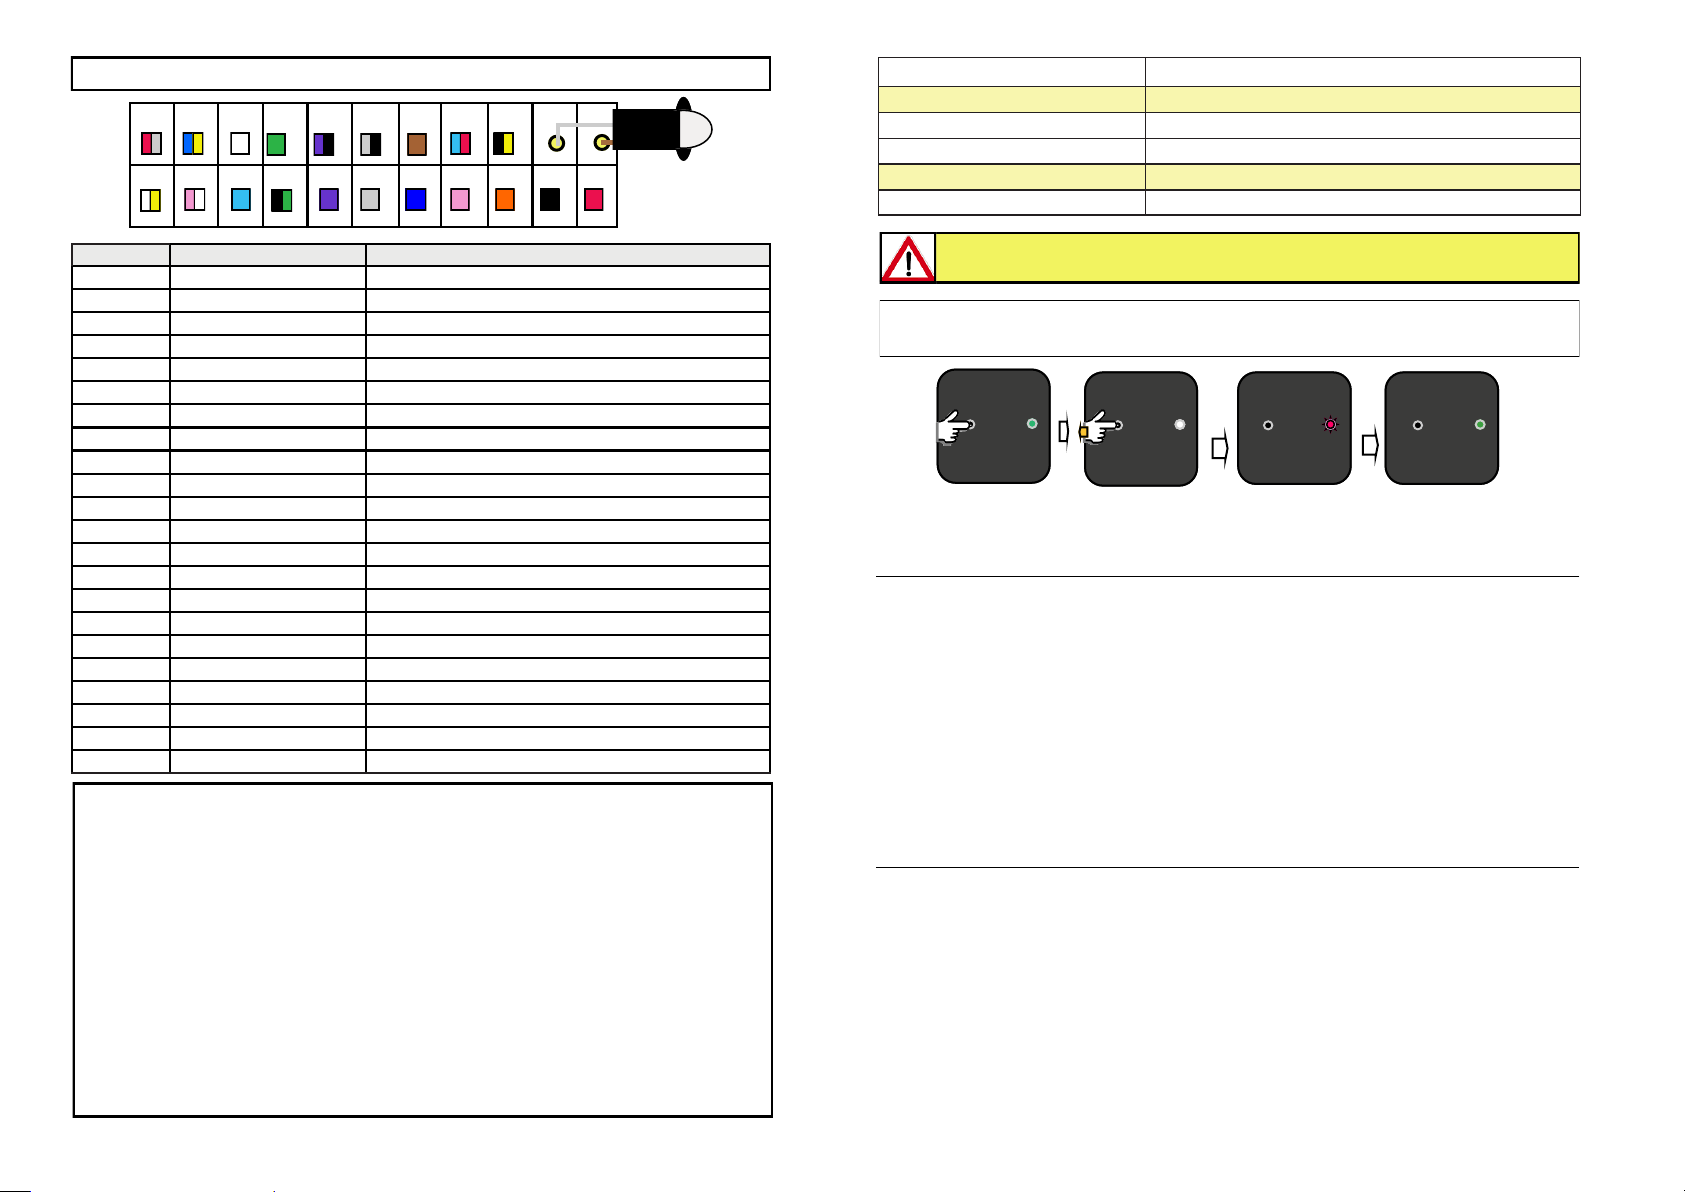
X. Turn on the panel, the Unico Dual Plus 1C led starts blinking GREEN once and then pauses, which
means that the module is ready to receive the radio profile setting.
Press the VOLUME + button 3 times on the steering wheel commands, check that the interface LED flash-
es 4 times GREEN and then pauses.
Confirm by pressing the SEEK + key shortly from the steering wheel commands: the LED will become
FIXED GREEN.
Press the RESET button 5 times on Unico Dual Plus 1C, the interface will start to flash RED and GREEN
(to simulate the long press system on the steering wheel commands).
Enter the radio's resistive learning menu and memorize the steering wheel commands according to the
radio documentation.
Wait at least 5 seconds during the pairing of one button to the other, the maximum number of keys recov-
ered is 6, excluding the phone keys not recovered.
Save the memorization of the keys following the saving mode of the installed radio.
Switch the panel on and off, the Unico Dual Plus 1C led will return to FIXED GREEN (this will deactivate
the long press simulation of the steering wheel controls).
Finally, you can test steering wheel commands working towards the radio.
WARNING!
In case of an already configured module (starting with FIXED GREEN LED), it is necessary to RE-
SET the module by proceeding as follows:
 press the RESET button for 10 seconds then release the button.
 at this point, the module is reset, the LED will become BLINKING GREEN and it will be pos-
sible to follow the procedure indicated at point X.
1
UNICO DUAL PLUS 1C
Adapter for CAN BUS 1 WIRE (GM LAN)
protocol Steering Wheel Commands
dedicated to aftermarket radios rev. 1.15
MANUAL OF INSTALLATION AND USE
UNICO DUAL 1C
UNICO DUAL 1C is an adapter for the OEM steering wheel commands connection.
Its compatibility extends to a range of vehicles having CAN BUS 1 wire protocol best known as GMLAN and
to the most famous aftermarket car radios available on market.
This unit recovers not only the SWC but also the services and the sounds of the car.
The display it is not recovered
The function is totally managed by a microprocessor able to self-recognize the steering wheel commands
protocol. The GMLAN protocol setting is managed in SELF-SELECTION.
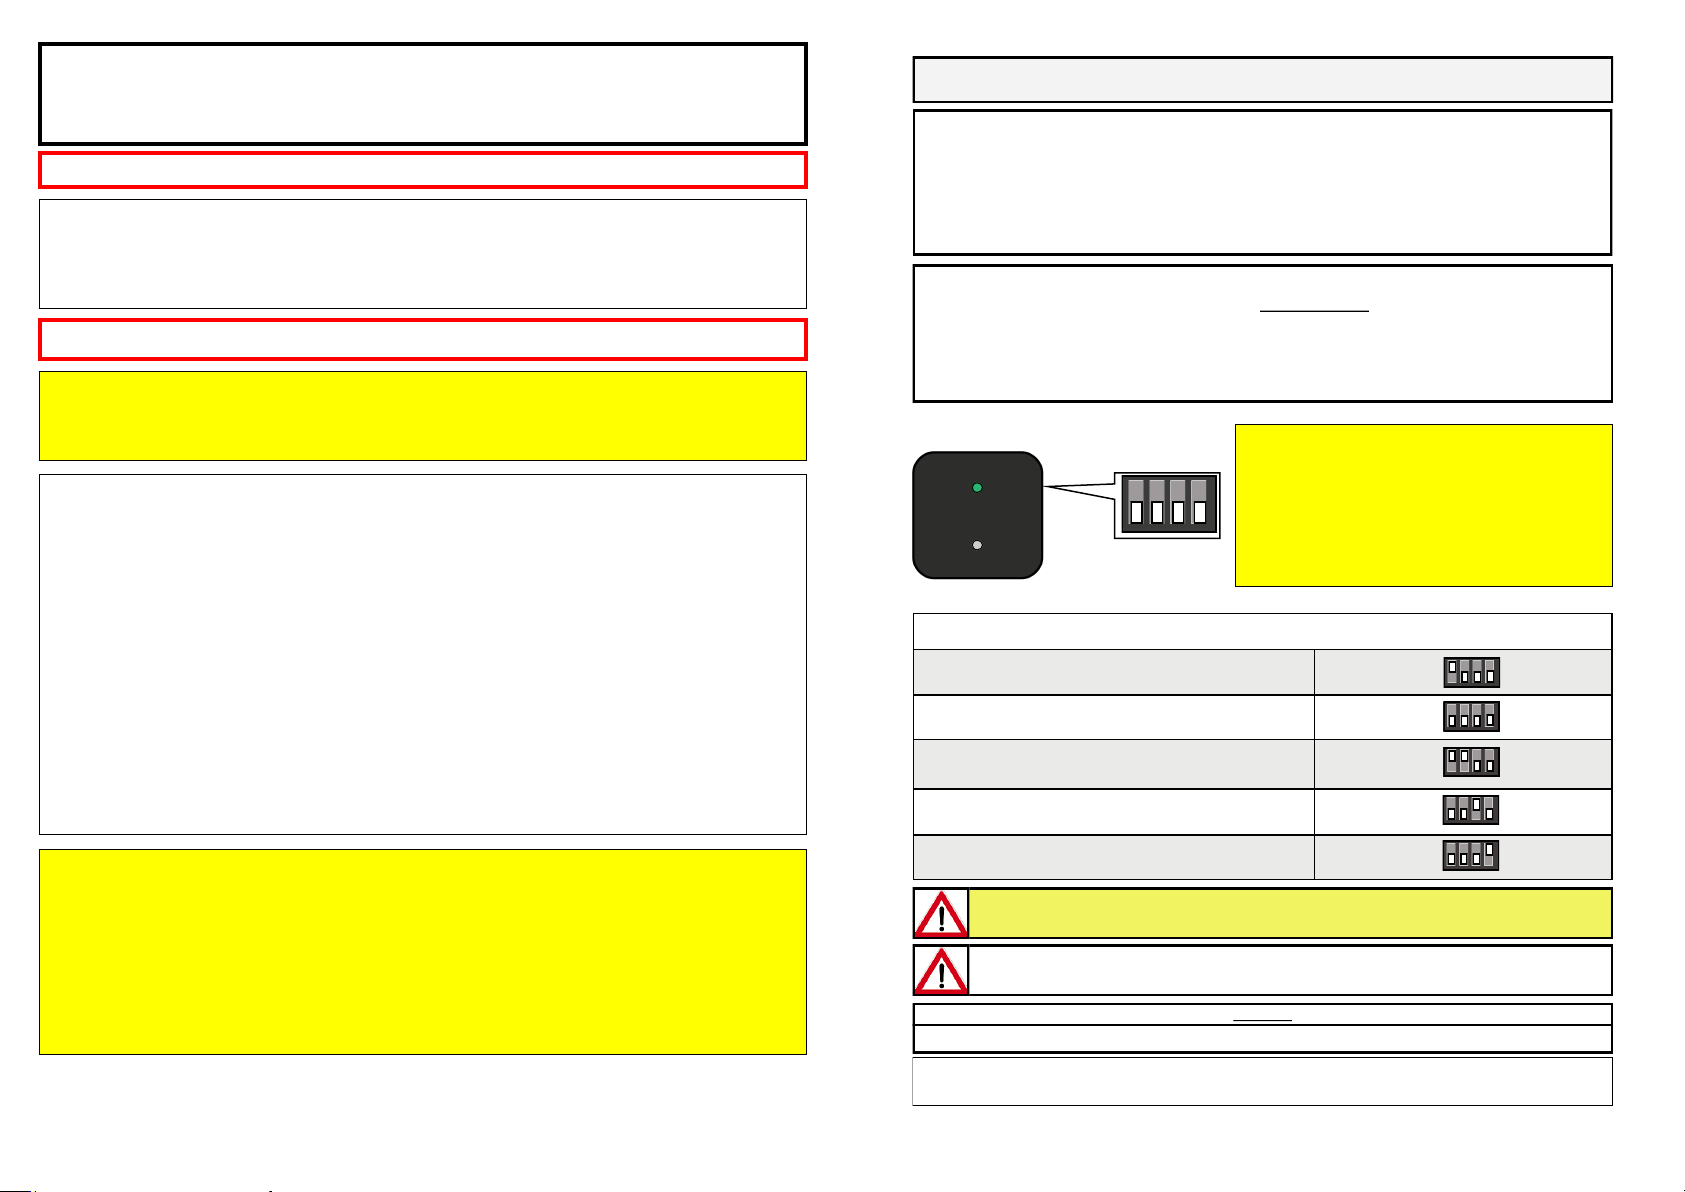
SET THE DIP SWITCHES ONLY
WITH UNICO DUAL 1C NOT POWERED
DIP SWITCHES
UNICO DUAL 1C has 4 dip switches. Please do not set them if not necessary.
NOT USED DIP 1 ON
CAN BUS 1C DIP 1 OFF
NOT USED DIP 1 e 2 ON
OPTIONS MANAGING
(SEE PAGE ATTACHED)
DIP 3 ON
UNIT UPGRADING DIP 4 ON
ATTENTION! YOU ALWAYS MUST TO SET DIP 4
IN POSITION “OFF” AFTER THE SETTING IS DONE
WARRANTY
THIS PRODUCT IS GUARANTEED FOR TWO YEARS AGAINST ANY MANUFACTURING DEFECT.
PURCHASE INVOICE IS REQUIRED AS A VALIDITY OF THE GUARANTEE
The information in this guide are purely for information purposes, therefore, are subject to change without notice. At the time of publication the information
is correct and reliable. However Paser can not be held responsible for any consequences resulting from errors or omissions in this manual. Paser reserves
the right to improve / change the product or manual without obligation to notify users.
ATTENTION!
In case of radio Pioneer,
phone buttons are NOT managed!
2
CONNECTIONS
POS. COLOUR FUNCTION
1RED 12V
2BLACK GND
3ORANGE LIGHTS OUTPUT
4PINK RESISTIVE INPUT
5BLUE REVERSE OUTPUT
6GREY AUX 1 (WITH RESISTANCE 1.5k IN SERIES)
7VIOLET RADIO RESISTIVE OUTPUT
8GREEN/BLACK AUX 3 (WITH RESIST. 560 ohm TO THE GND)
9LIGHT BLUE AUX 4 (WITH RESIST. 3.3 k TO THE GND)
10 PINK/WHITE AUX 5 (WITH RESIST. 1 k TO THE GND)
11 YELLOW/WHITE HANDBRAKE OUTPUT
12 INFRARED CATHODE
13 INFRARED ANHODE
14 YELLOW/BLACK AUX 6 (WITH RESIST. 4,7 k TO THE GND)
15 RED/BLUE AUX 7 (WITH RESIST. 220 ohm TO GND)
16 BROWN RADIO CODE OUTPUT
17 GREY/BLACK GND
18 VIOLET/BLACK K-BUS
19 GREEN CAN H
20 WHITE CAN L
21 BLUE/YELLOW STK OUT
22 RED/GREY ODOMETER
18 17 16 15 14 13 121922 21 20
7654321811 10 9
HOW TO SET THE RADIO PROFILE
On default the unit offers the first profile available that is the CLARION, the GREEN LED make’s one flashes.
With the attached table select the radio needed so verify how many flashes it must to do the LED releted to
the radio of interest.
If the radio we want to set it’s the first one just press SEEK + to confirm the selection, the LED will light on
GREEN.
To select a different radio press VOLUME + on the steering wheel to increase the number of flashings of the
LED or VOLUME - to decrease.
Once the radio desired is selected to confirm the choice press SEEK + on the steering wheel. the LED will light
on GREEN as confirmation.
The logic of the flashes of the LED follows this behaviour:
LED GREEN flash meaning= units
LED RED flash meaning= tens
For example 5 GREEN flashes of LED , indicate the radio in the 5th position.
2 RED flashes of the LED, indicate the radio in position 20.
1 RED flash of the LED followed by 2 GREEN flashes of the LED indicate the radio in position 12.
Once the radio of interest is selected to confirm the choice press SEEK + on the steering wheel.
The led of the unit will light GREEN.
3
CBL007UNAL22 ALPINE ADAPTER
CBL007UNBL12 BLAUPUNKT ADAPTER
CBL007UNCL12 CLARION / JVC ADAPTER
CBL007UNKE11 KENWOOD ADAPTER
CBL007UNPI12 PIONEER / SONY ADAPTER
CBL007UNPN21 PANASONIC ADAPTER
IF YOU WANT TO RE-INSTALL UNICO DUAL 1C IN A NEW VEHICLE, AFTER THE
INSTALLATION YOU MUST RESET THE UNIT AS DESCRIBED HERE BELOW
LED
BUTTON
PRESS AND KEEP
PRESSED THE BUTTON
WHEN THE LED TURNS
OFF, RELEASE THE
BUTTON
LED
BUTTON
THE LED WILL LIGHT
RED FOR FEW
SECONDS
THEN THE LED WILL LIGHT
GREEN: THE UNIT IS SET
LED
BUTTON LED
BUTTON
ATTENTION! THE INFRARED LED AND THE ADAPTERS NOT
INCLUDED IN THE KIT ARE SUPPLIED SEPARATELY
TROUBLESHOTTING
 The unit doesn’t work and the LED is off.
 Verify that the power supplying wires are correctly connected .
 The unit is correctly connected but the LED is off and the unit doesn’t work.
 Verify the connection of the GMLAN wires .
 The unit is correctly connected and the LED flashes RED quickly.
 The unit can’t do the GMLAN synchronization; please, contact Paser.
 The unit is correctly connected and the LED flashes RED irregularly.
 Verify the connection of the GMLAN wires.
 The unit is correctly connected and the LED is lighted on RED fix.
 The unit has done the GMLAN synchronization but it doesn’t recognizes the vehicle;
please, contact Paser.

Popular Recording Equipment manuals by other brands

Druck RTD-INTERFACE Quick Start and Safety Manual

Druck

Druck RTD-INTERFACE Quick Start and Safety Manual

Sony PCM-D100 Specifications

Sony

Sony PCM-D100 Specifications

Naya HDI-TI manual

Naya

Naya HDI-TI manual

Creative PCB Assembly instructions

Creative

Creative PCB Assembly instructions

NexWatch PW-5000 installation manual

NexWatch

NexWatch PW-5000 installation manual

National Geographic NG3900 instruction manual

National Geographic

National Geographic NG3900 instruction manual

Palmer PAN 04 user guide

Palmer

Palmer PAN 04 user guide

Roland R-8 mkII owner's manual

Roland

Roland R-8 mkII owner's manual

Monoprice DARK MATTER 44708 user manual

Monoprice

Monoprice DARK MATTER 44708 user manual

SpeakerCraft LiftLock VST60 owner's manual

SpeakerCraft

SpeakerCraft LiftLock VST60 owner's manual

Teac CD-RW890 owner's manual

Teac

Teac CD-RW890 owner's manual

Danville Signal Processing DSP-8200d operating manual

Danville Signal Processing

Danville Signal Processing DSP-8200d operating manual

Eventide VR240 Operator's manual

Eventide

Eventide VR240 Operator's manual

Musicom Lab MVC user manual

Musicom Lab

Musicom Lab MVC user manual

flamco Meibes A1CX Series Technical information for installation and operation

flamco

flamco Meibes A1CX Series Technical information for installation and operation

QRS Music Technologies QRS-Connector user manual

QRS Music Technologies

QRS Music Technologies QRS-Connector user manual

Noise Engineering Loquelic Iteritas manual

Noise Engineering

Noise Engineering Loquelic Iteritas manual

Apogee Apogee Duet user guide

Apogee

Apogee Apogee Duet user guide

manuals.online logo
manuals.online logoBrands
  • About & Mission
  • Contact us
  • Privacy Policy
  • Terms and Conditions

Copyright 2025 Manuals.Online. All Rights Reserved.