manuals.online logo
Brands
  1. Home
  2. •
  3. Brands
  4. •
  5. Teletek electronics
  6. •
  7. Measuring Instrument
  8. •
  9. Teletek electronics SR-300B User manual

Teletek electronics SR-300B User manual

4 en 1 Soil Survey Instrument
Operation Manual SR-300B
Overview
The 4 in 1 soil survey instrument can test moisture of soil, pH value,
temperature and environment sunlight intensity using a probe with the length
of 200mm. The unit with backlight function can easily display various readings
with the oversi e LCD.
The unit also has low battery indication and auto power off function. It is with
reliable performance, easy to carry and easy to operate. It also can do fast and
precise measuring, The unit is a good companion for flowers and grasses
planting and garden virescence.
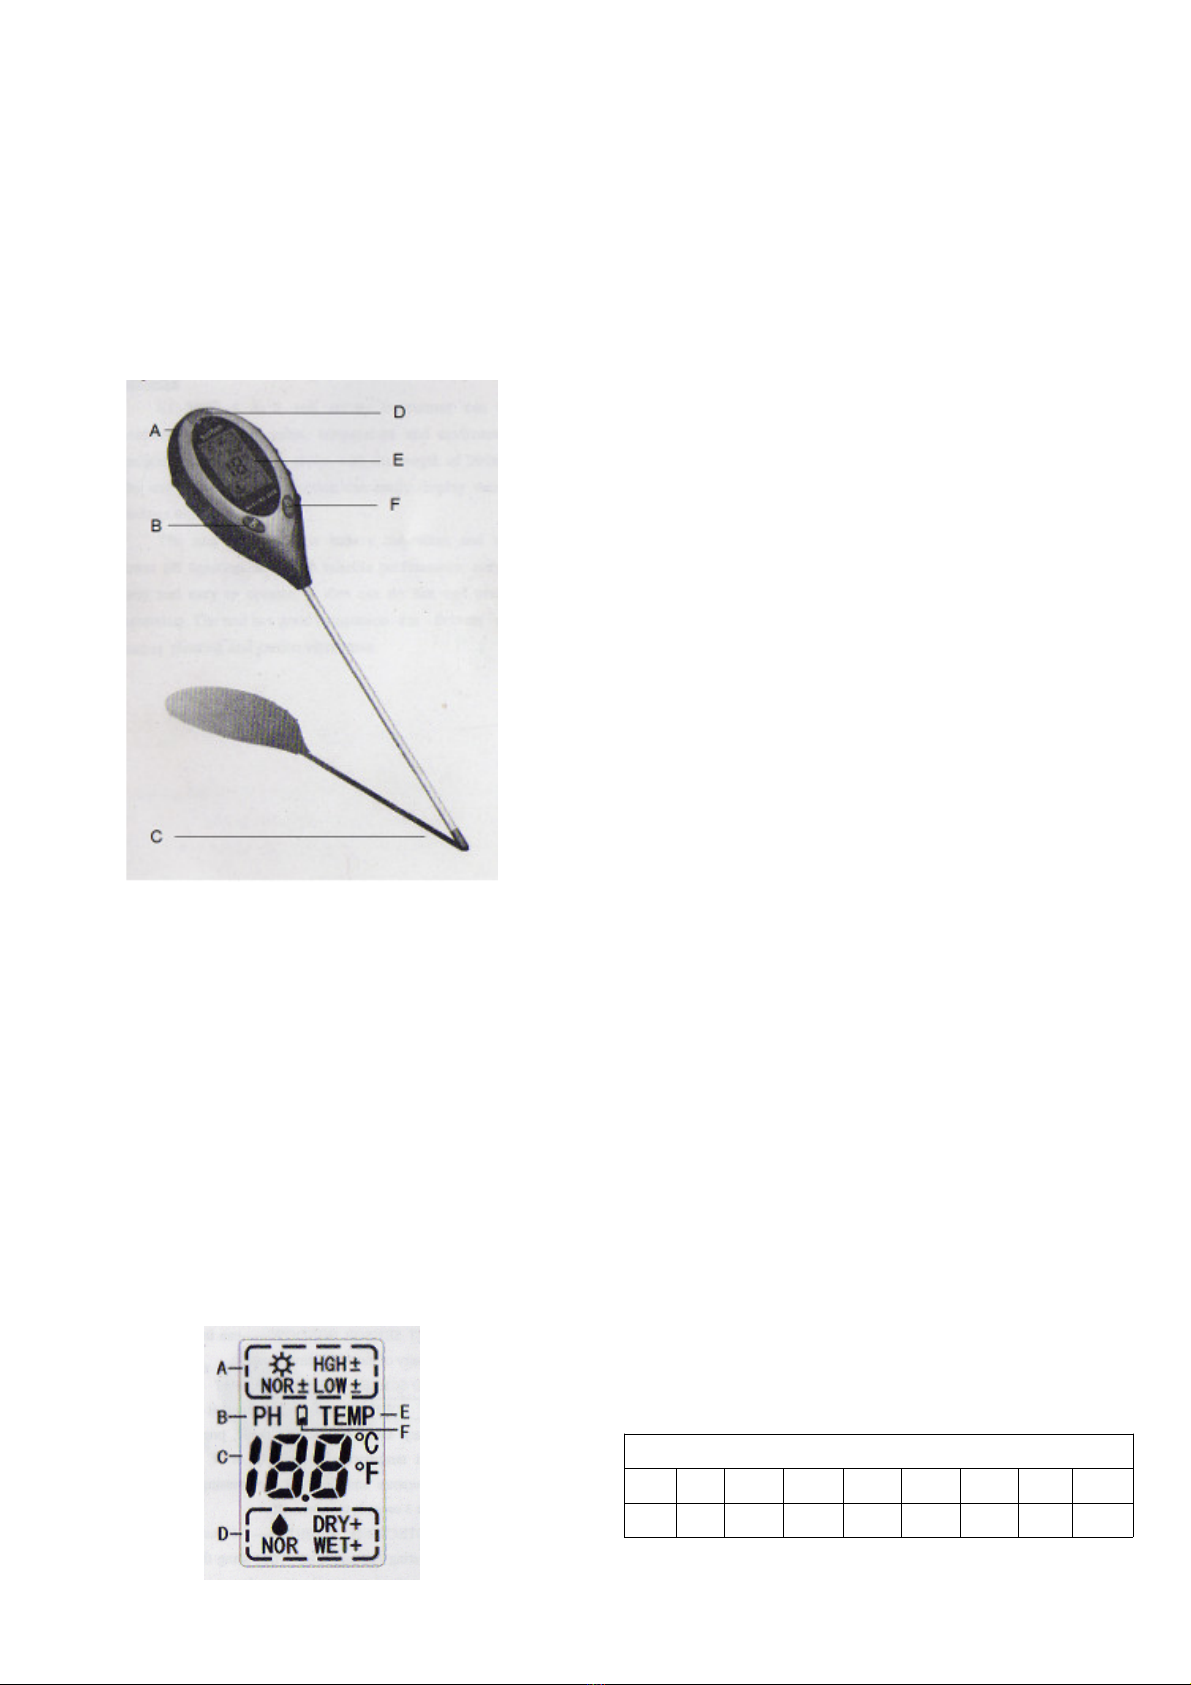
Tool Components
A) PH TEMP KEY --- mode switch: Set the mode for pH Value, temperature
or moisture
B) ON KEY --- press the key to start the unit.
C) TEST PROBE ---can test pH value, moisture and temperature.
D) LIGHT SENSOR WINDOW --- can induct sunlight intensity of measured
environment.
E) LCD SCREEN WITH BACKLIGHT
F) °C °F OFF KEY --- temperature unit switch/power OFF key: under
temperature mode, press the key to select temperature unit is °C or °F (the
default temperature unit is °C). Keep pressing the key for about 3 seconds
to power off.
G) PROTECTION BUSHING --- Please take the protecting bushing away
when using the test probe. Put on the protecting bushing when it is not in
use to protect the test probe (accessory).
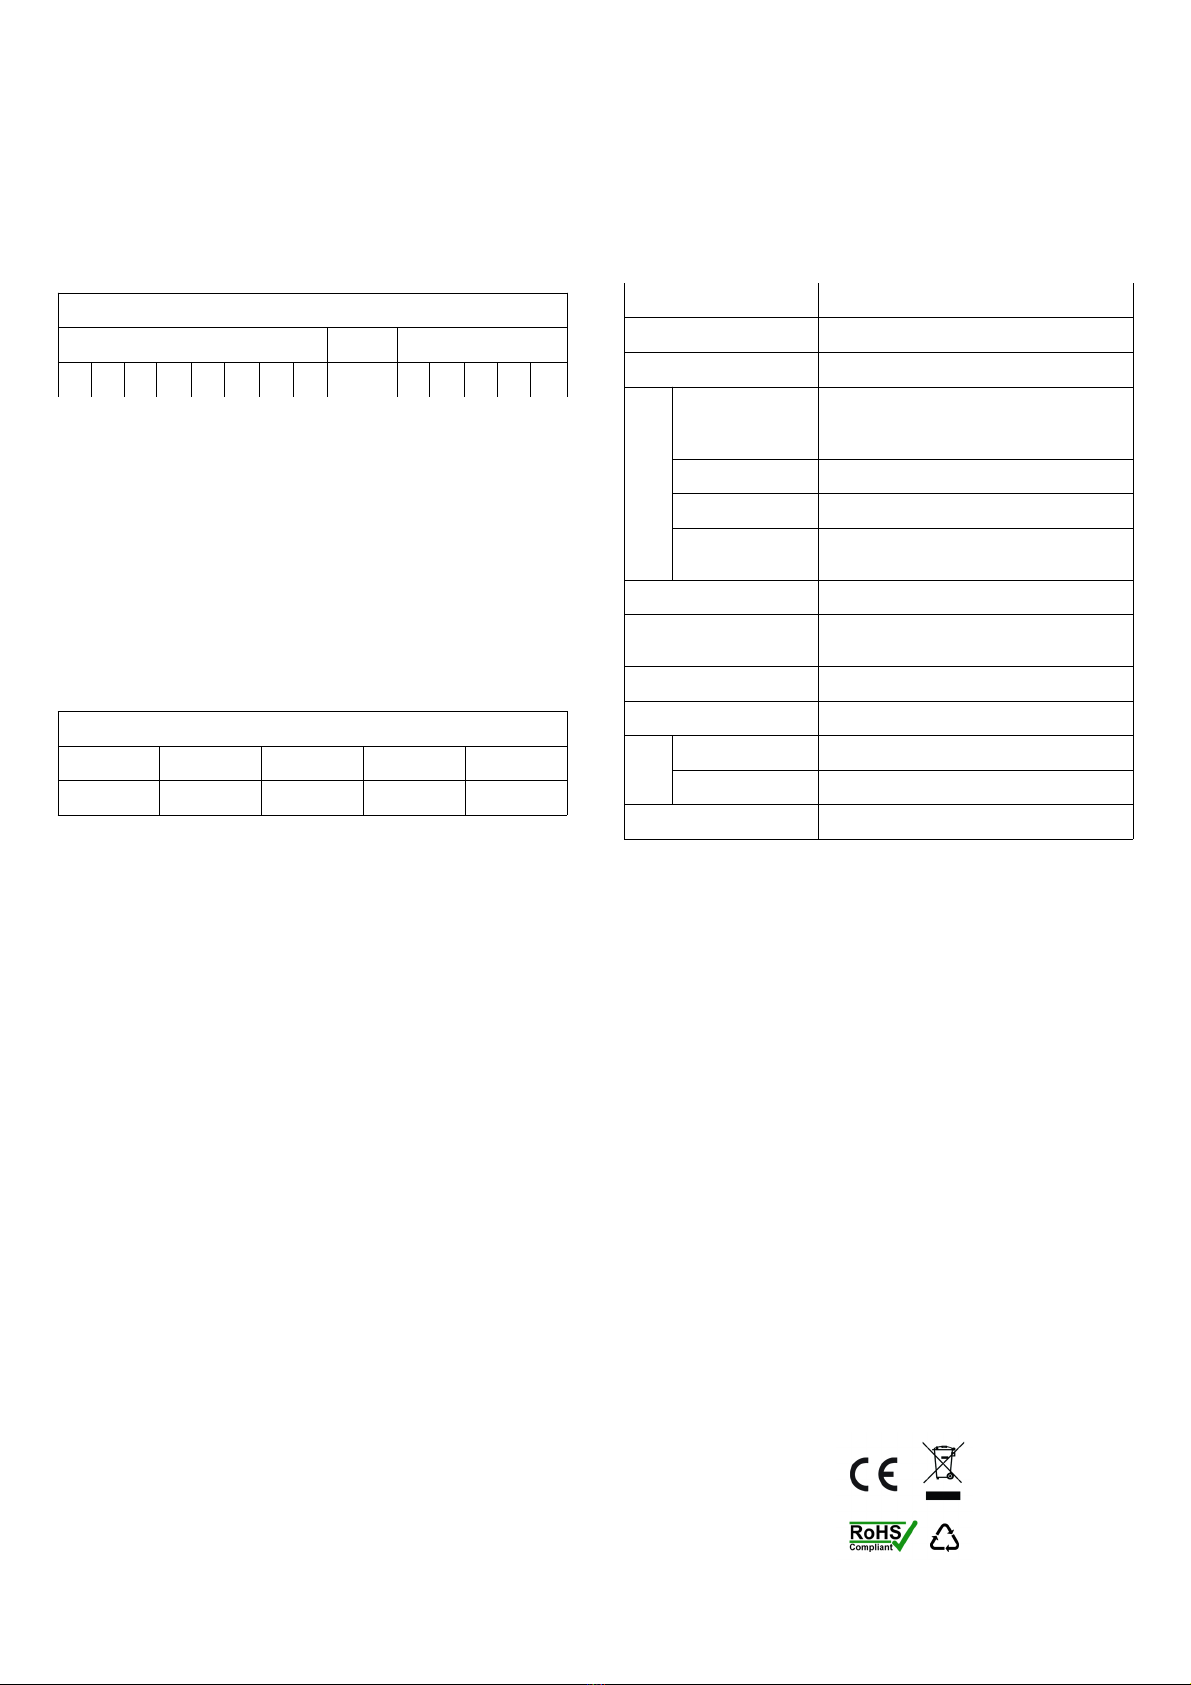
Illustration of the display screen
A) Sunlight intensity display area ----- 9 levels: LOW-, LOW, LOW+, NOR·,
NOR, NOR+,HGH-, HGH, HGH+, each increasing in amount and quality.
LOW- means an extremely dim environment. HGH+ means an extremely
bright environment.
B) pH function display
C) pH or temperature value display ----- It shows 3,5 to 9,0 for pH value and
-9°C to +50°C (16°F to 122°F) for temperature. When showing "Lo" or
"HH", it means the value is beyond the measurable range.
D) Moisture display area ----- 5 levels: DRY+, DRY, NOR, WET, WET+, each
increasing in wetness. WET+ means an extremely wet environment while
DRY + means an extremily dry environment.
E) Temperature function display.
F) aLow battery display ----- The symbol will display on the LCD continuously
when the battery is low.
How to use
Please install one 9 V battery before use
Battery installation
Open the battery compartment door on the back of the tool and plug one 9 volt
block battery onto the battery connector. Put the battery back to the
compartment and close the door.
Operation Guide
1. Operation for sunlight measurement
a) Press the ON button to start the unit
b) Point the light sensor window toward max light source
c) The current light intensity will be shown on the LCD
Tips: please do not obstruct or cast a shadow over the light sensor
2. Operation for pH value
a) Switch the pH/TEMP button on the back of the unit to pH function
b) Push the probe down as vertically as possible into the soil which needed to
be tested. Do not push the probe too near the stem to avois damage to the
plant roots.
c) Press ON button to start the unit.
d) pH value of the tested soil will be displayed on the LCD.
e) Take several readings to confirm your findings.
Tips:
1 - Insert the probe straight up and down, about halfway between the plant
stem and the edge of the pot. For pots over 30cm in diameter, position the
probe about a third of the way between the stem and the edge of the pot.
For a deep pot, insert the probe more deeply aiming for where the heaviest
root concentration is likely to be.
2 - Please softly push the probe into the soil to avoid damage to the probe.
3 - If the tested soil is extremely dry or too fertile and can't be tested the pH
value, the user should sprinkle some water into the soil. Test again after half
an hour.
3. Moisture measurement
a) Switch the pH/TEMP button on the back of the unit to TEMP position.
b) Push the probe down as vertically as possible into the soil which needed to
be tested. Do not push the probe too near the stem to avois damage to the
plant roots.
c) Press ON button to start the unit.
d) Moisture of the tested soil will be displayed on the LCD
e) Take several readings to confirm your findings.
Tips :
1-Insert the probe straight up and down, about halfway between the plant
stem and the edge of the pot. For pots over 30cm in diameter, position the
probe about a third of the way between the stem and the edge of the pot.
For a deep pot, insert the probe more deeply aiming for where the heaviest
root concentration is likely to be.
2- Please softly push the probe into the soil to avoid damage to the probe.
4. Temperature of the soil measurement
a) While testing moisture, the temperature of the soil will be displayedon the
LCD at the same time.
b) Press °C/°F OFF button to set the unit temperature to °C or °F
Tips: If the user doesn't push the probe into the soil, the current
environment temperature will be displayed on the LCD.
Interpret environment sunlight intensity reading
Appropriate light does well in plant's growth (some plants need more light than
others). The unit has graduated the environment light and displays according to
intensity, which can offer reference for your plant's growth.
Here is the list:
===========> Increse in amount and quality of light
LOW-
LOW
LOW+
NOR-
NOR
NOR+
HIGH-
HIGH
HIGH+
very
low
much
slightly
normal
slightly
much
high
very
Interpretation pf pH values of the soil
Extremely acid or alkaline is an important factor for restricting plant's growth
and feature. Most plants can't grow in soil which is extremely acid or alkaline.
By testing your soil, the user can choose plants with the correct pH or adjust
pH more accurately, effectively and economically.
pH = 7 : indicates a neutral soil
pH < 7 : acidic soil
pH > 7 : alkaline soil
Here is the list of pH values of the soil compared with acidity and alkalinity:
Out of range <=================== =========> Out of range
Increase in acidity Neutral Increase in alkalinity
Lo
3.5
4.0
4.5
5.0
5.5
6.0
6.5
7.0
7.5
8.0
8.5
9.0
HH
Look up the pH reference list. If the pH reading is lower than the pH range for
your plant, then you can add lime to increase pH. If the pH reading is higher
than the pH reference range for your plant, then you can addchemicals or
organic to reduce pH.
Tips: Raising or lowering pH is not an exact science and most plants have a
reasonably wide pH tolerance. A majority of plants can survive on a pH of 6.5,
some need a particularly acid or alkaline soil.
Soil moisture
Appropriate moisture does well in plant's growth. The unit has graduated the
display in 5 level, which can offer reference for your plant's growth.
Here is the list:
===========> Increse in wetness
DRY+ DRY NOR WET WET+
very dry dry normal wet very wet
If the reading is lower than that shown in the table, it's time to water your
plants. If the reading is higher than that shown in the table, you do not need to
water the plants.
Check small pots more often than large ones - they dry out more quickly. Over
watering rots the roots, so do not water too frequently. Out of season, most
plants only need water once a week.
Operation tips
 The unit will be automatically off after 5 minutes disabling for electricity.
 The unit only can be used in soil, please don't place the probe into water or
other solutions.
 Don't leave the probe in the soil longer than necessary to avoid the possibility
of dammage to the probe.
 Don't bend the probe.
 Don't use the probe to break the soil.
 Don't put the probe near metal objects and be sure to keep the probe away
from metal objects.
 Wipe the probe clean and dry before taking another test reading and after use.
 Before testing, please lightly shine 10-12cm of the probe and any oxides that
may have formed on the surface of the metal.
 Insure that the probe is wiped clean and the protecting bushing is put on the
test probe before storing in order to avoid oxidation of the probe.
 When the unit is withdrawn from the soil, remember not to grasp the probe.
Troubleshooting
• Low battery: battery "icon" will be displayed on the LCD, please replace the
battery.
• Out of range, the pH value of the unit is 3.5 to 9.0 and for the temperature
-9°C to +50°C.
• Stones, organic matter had touched the probe, plese wipe again and test in
another place.
• Probe is too close to the side and/or the bottom of the pot.
• Haven't cleaned the probe before measuring.
• Sample area is too dry.
• The soil around the probe isn't even.
• Soil or potting soil is tested too soon after re-potting.
• There is houseplant fertili er or tablet stick near the probe.
• Dammaged probe
Cautions
 Handle with care and do not let the unit drop down.
 Do not disassemble the unit to avoid failure.
 Don't place the unit in a toolbox.
 Avoid dust and water, which may stain the unit.
 Do not store the unit above 50°C.
 Clean the unit with soft fabric.
 Remove the battery when not in use for an extended period of time.
Technical specifications
Name 4 in 1 Soil Survey Instrument
Type KC-300B , SR-300B
Test objects Sunlight, Moisture, pH-value, Temperature
test
range
sunlight (9 levels) LOW-, LOW, LOW+
NOR-, NOR, NOR+
HIGH-, HIGH, HIGH+
moisture (5 levels) DRY+, DRY, NOR, WET, WET+
pH value (12 levels)
3.5 ~ 9.0 (display resolution 0.5)
temperature -9°C ~ +50°C (16°F ~ 122°F)
(display resolution 1°C/1°F)
Power supply One 9V block battery
Automatic off
The tool will be off automatically if there is no
action within 4.5 minutes
Backlight function It will be off automatically within 1.5 minutes
Operating temperature +5°C ~ +40°C
Si e Main unit 122mm x 63mm x 36mm
Test probe ø 5mm x 200mm
Weight About 73g (battery not included)
Warranty
The product is warrented to be free from defects in materials and workmanship
for a period of one year from the date of purchase.
Notice :
The warranty does not apply to the following conditions:
 Disassembling the laser tool will void the warrenty
 We are not responsable for any damage resulting from abrasion, water,
dropping or disassembling.

This manual suits for next models

1

Popular Measuring Instrument manuals by other brands

Vaisala BAROCAP PTB330 user guide

Vaisala

Vaisala BAROCAP PTB330 user guide

Lenntech Testomat 2000 CLO2 operating instructions

Lenntech

Lenntech Testomat 2000 CLO2 operating instructions

thomann the t.racks VM-100 user manual

thomann

thomann the t.racks VM-100 user manual

Waltron 9072 user manual

Waltron

Waltron 9072 user manual

Reed Instruments Smart Series instruction manual

Reed Instruments

Reed Instruments Smart Series instruction manual

Spectrum Technologies WatchDog 3670I product manual

Spectrum Technologies

Spectrum Technologies WatchDog 3670I product manual

NIVELCO UNICONT PDF Installation and programming manual

NIVELCO

NIVELCO UNICONT PDF Installation and programming manual

Greenlee ANM-50 instruction manual

Greenlee

Greenlee ANM-50 instruction manual

Endress+Hauser analytikjena Biometra TMS installation instructions

Endress+Hauser

Endress+Hauser analytikjena Biometra TMS installation instructions

Contrel EMM-m3-VA instruction manual

Contrel

Contrel EMM-m3-VA instruction manual

Beta 1760 PA/AC manual

Beta

Beta 1760 PA/AC manual

National Instruments NI 435 Series user manual

National Instruments

National Instruments NI 435 Series user manual

Bushnell Phantom quick start guide

Bushnell

Bushnell Phantom quick start guide

Anaheim Scientific E200 user manual

Anaheim Scientific

Anaheim Scientific E200 user manual

Shimadzu MOC-120H Service manual

Shimadzu

Shimadzu MOC-120H Service manual

Megger MOM200A user manual

Megger

Megger MOM200A user manual

Rigol DSA1000 Series Performance Verification Guide

Rigol

Rigol DSA1000 Series Performance Verification Guide

Elcomponent SPCPro2 user manual

Elcomponent

Elcomponent SPCPro2 user manual

manuals.online logo
manuals.online logoBrands
  • About & Mission
  • Contact us
  • Privacy Policy
  • Terms and Conditions

Copyright 2025 Manuals.Online. All Rights Reserved.