Telldus 14759 User manual

Adjustment or Calibration of Trådlös väderstation
(14759)
Note: The calibrated value can only be adjusted on the console. The remote sensor(s) always displays the un-
calibrated or measured value.
Note: The measured humidity range is between 10 and 99%. Humidity cannot be accurately measured outside
of this range. Thus, the humidity cannot be calibrated below 10% or above 99%.
The purpose of calibration is to fine tune or correct for any sensor error associated with the devices margin of
error. The measurement can be adjusted from the console to calibrate to a known source.
Calibration is only useful if you have a known calibrated source you can compare it against, and is optional. This
section discusses practices, procedures and sources for sensor calibration to reduce manufacturing and
degradation errors. Do not compare your readings obtained from sources such as the internet, radio, television or
newspapers. They are in a different location and typically update once per hour.
The purpose of your weather station is to measure conditions of your surroundings, which vary significantly from
location to location.
The Trådlös väderstation supports up to eight remote sensors. Each of the eight sensors can be calibrated.
1. Temperature+Calibration+
In normal mode, press and hold the SET and CHANNEL/+ buttons at the same time for five seconds to enter the
temperature calibration mode. The indoor temperature will begin flashing.
Press the [+] or [-] button to increase or decrease the temperature reading (in increments of 0.1). Press and hold
the [+] or [-] button for three seconds to increase or decrease rapidly.
Press the ALARM button to reset to the current value.
Press the SET button to switch between temperature channels 1 through 8. To exit the calibration mode at any
time, press the SNOOZE/LIGHT button on the top of the display console. If no operation is performed, the
calibration mode will timeout in 30 seconds.
2. Humidity+Calibration+
In normal mode, press and hold the SET and MIN/MAX/- buttons at the same time for five seconds to enter the
humidity calibration mode. The indoor humidity will begin flashing.
Press the [+] or [-] button to increase or decrease the humidity reading (in increments of 1%). Press and hold the
[+] or [-] button for three seconds to increase or decrease rapidly.
Press the ALARM button to reset current value.
Press the SET button switch to channel humidity 1through 8. To exit the calibration mode at any time, press the
SNOOZE/LIGHT button on the top of the display console. If no operation is performed, the calibration mode
will timeout in 30 seconds.
Note: Humidity is a difficult parameter to measure accurately and drifts over time. The calibration feature
allows you to zero out this error. To calibrate humidity, you will need an accurate source, such as a sling
psychrometer or Humidipaks One Step Calibration kit.
3. Absolute+and+Relative+Barometer,+Wind+and+Rain+Calibration+
3.1. Quick Reference Guide:
Command
Mode
Default
Settings
Copyright © 2023 Telldus Technologies AB. All rights reserved.!Page 1
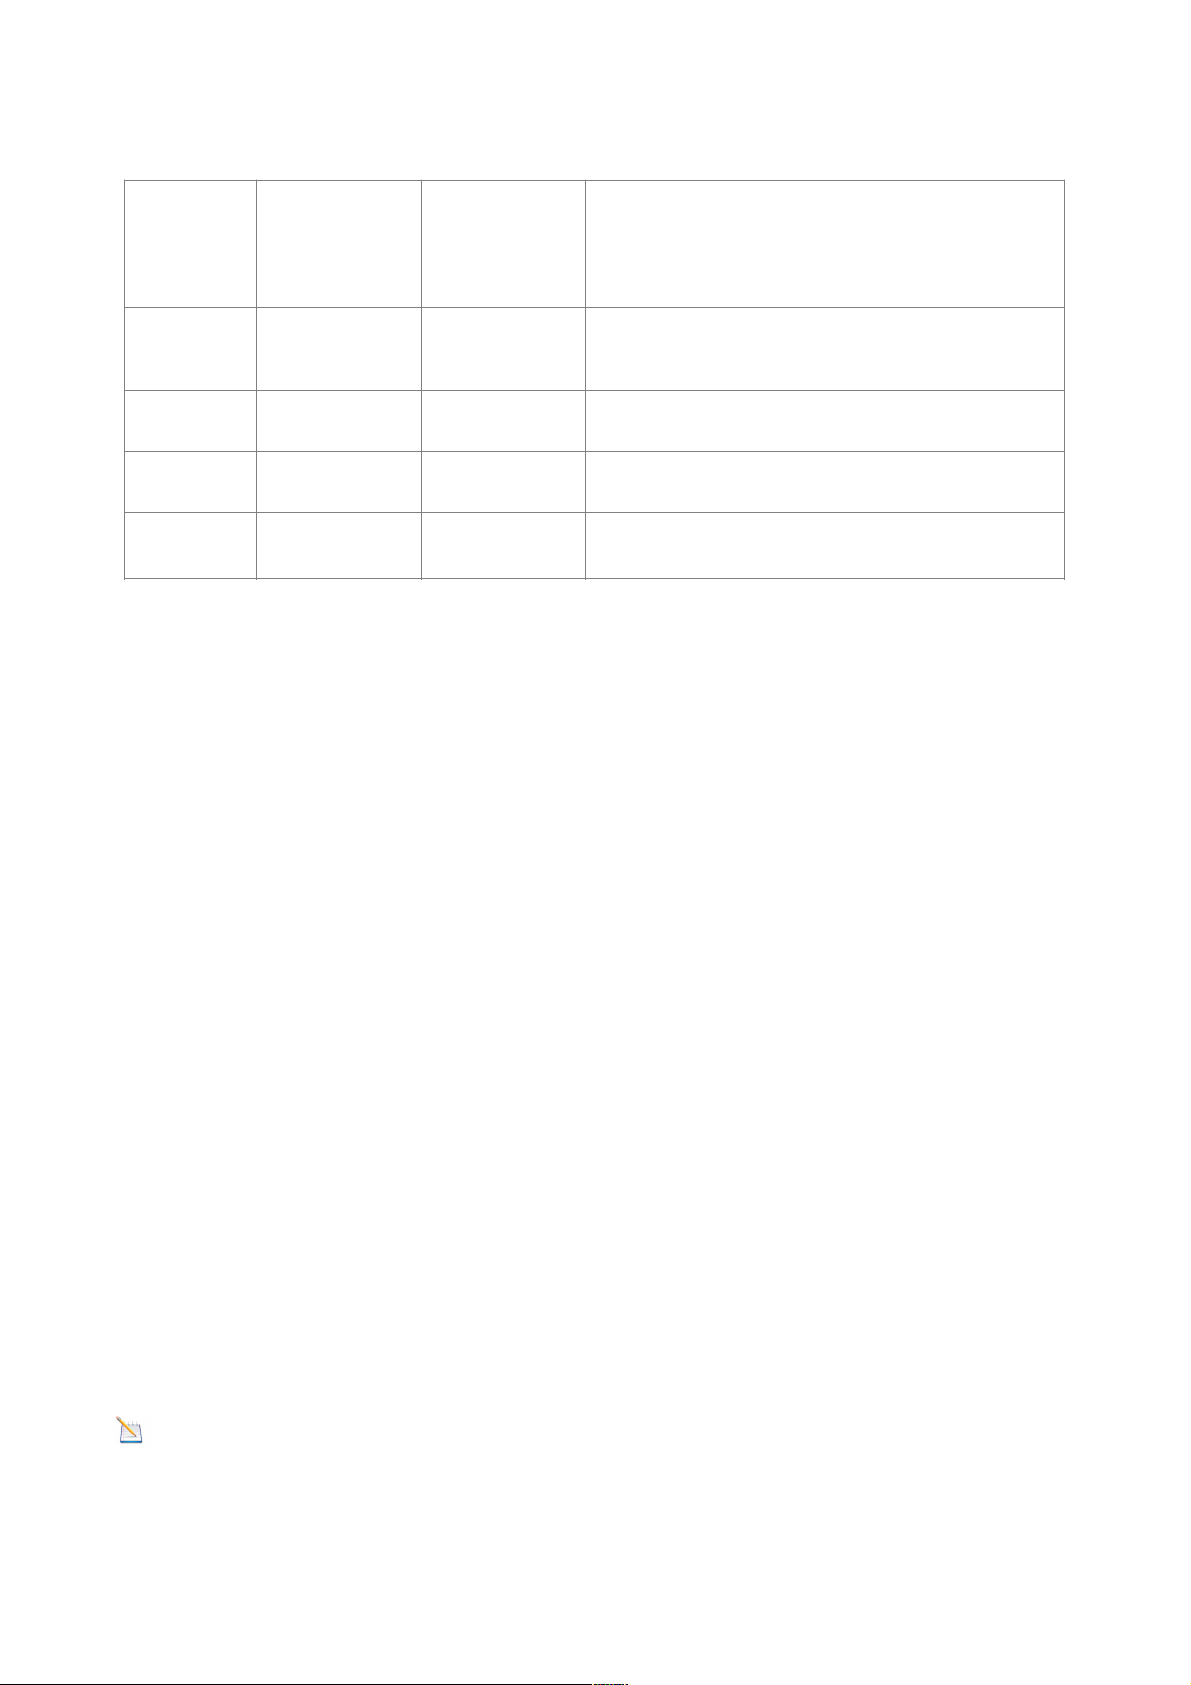
3.2.
[SET] + [ALARM] + 3 seconds = press and hold the SET and ALARM buttons at the same time for 3
seconds.
[SET] = press (but do not hold) the SET button
3.3. Step by Step Guide
In normal mode, press and hold the SET and ALARM buttons at the same time for five seconds to enter the
barometer, wind speed, rainfall and calibration mode. To skip over a parameter, press (do not hold) the SET
button. The word CAL will appear at the bottom of the screen.
4. Absolute+Pressure+Calibration+
The absolute pressure offset will begin flashing. The default offset is 0.00 inHg.
Press the [+] or [-] button to increase or decrease the absolute pressure offset.
Press and hold the [+] or [-] button for three seconds to increase or decrease rapidly.
Press the ALARM button to reset current value.
Example: The calibrated pressure source measures 28.00 inHg. The display absolute pressure reads 28.83 inHg on
the console.
Offset = 28.00 – 28.83 = 0.83 inHg.
5. Relative+Pressure+Calibration+
Press the SET button and the relative pressure offset will flash. The default is 0.00 inHg
Press the [+] or [-] button to increase or decrease the relative pressure offset.
Press and hold the [+] or [-] button for three seconds to increase or decrease rapidly.
Press the ALARM button to reset current value.
Example: The local official barometer measures 30.00 inHg. The display absolute pressure reads 29.92 inHg on
the console.
Offset = 30.00 – 29.92 = 0.08 inHg.
Note: The display console displays two different pressures: absolute (measured) and relative (corrected to
sea-level).
To compare pressure conditions from one location to another, meteorologists correct pressure to sea-level
conditions. Because the air pressure decreases as you rise in altitude, the sea-level corrected pressure (the pressure
[SET] +
[ALARM] +
3 seconds
Absolute
Barometer Offset
0.00
Press [+] or [-] to adjust the absolute pressure up or
down.
Note that you normally not calibrate absolute pressure
unless you have a specific application example,
measuring air density.
[SET]
Rela%ve
Barometer Offset
0.00
Press [+] or [-] to adjust the relative pressure offset up
or down. See discussion below on how to calibrate
relative pressure based on conditions at a local airport.
[SET]
Wind Gain
1.00
Press [+] button or [-] to adjust the wind gain up or
down.
[SET]
Rain Gain
1.00
Press [+] button or [-] to adjust the rain gain up or
down.
[SET]
Exit Calibra% on
Mode
Copyright © 2023 Telldus Technologies AB. All rights reserved.!Page 2

your location would be at if located at sea-level) is generally higher than your measured pressure.
Thus, your absolute pressure may read 28.62 inHg (969 mb) at an altitude of 1000 feet (305 m), but the relative
pressure is 30.00 inHg (1016 mb).
The standard sea-level pressure is 29.92 in Hg (1013.2hpa). This is the average sea-level pressure around the
world. Relative pressure measurements greater than 29.92 inHg (1013.2hpa) are considered high pressure and
relative pressure measurements less than 29.92 inHg are considered low pressure.
To determine the relative pressure for your location, locate an official reporting station near you (the internet is the
best source for real time barometer conditions, such as Weather.com or Wunderground.com), and set your weather
station to match the official reporting station.
6. Wind+Gain+Calibration+
Press the SET button and the wind gain will flash. The default is 1.00 (the display will show 100 but it is actually
1.00. There is no provision for the decimal point).
Press the [+] or [-] button to adjust the wind speed calibration factor from 0.75 to 1.25, where:
Calibrated Wind Speed = Calibration factor x Measured Wind Speed
Press and hold the [+] or [-] button for three seconds to increase or decrease rapidly.
Press the ALARM button to reset current value.
Note: The wind gust is also affected by the wind speed calibration factor.
Discussion: Wind speed and wind gust are adversely affected by installation constraints. The rule of thumb is
to install the weather station four times the distance of the height of the tallest obstruction (for example, a 6 m
house would require an installation 24 m away).
In many instances, due to trees and other obstructions, this is not possible. The wind speed calibration allows you
to correct for these obstructions.
In addition to installation challenges, wind speed bearings (any moving part) wears over time. To correct for wear,
the correction value can be increased until the wind cups must be replaced.
Without a calibrated source, wind speed is a difficult parameter to measure. We recommend using a calibrated
wind meter and constant, high speed fan.
7. Rain+Calibration+
Press the SET button again and the Rain Calibration value will begin flashing (the default is 1.0). Press the [+] or
[-] button to adjust the rain calibration factor from 0.75 to 1.25, where:
Calibrated Rain = Calibration factor x Measured Rain
Press and hold the [+] or [-] button for three seconds to increase or decrease rapidly.
Press the ALARM button to reset current value.
Discussion: The rain collector is calibrated at the factory based on the funnel diameter. The bucket tips every
0.01” of rain (referred to as resolution). The accumulated rainfall can be compared to a sight glass rain gauge with
an aperture of at least 4”.
Note: that debris and insects can collect inside the tipping mechanism (they make a good spiders nest).
Carefully remove the funnel and inspect the tipping mechanism for debris prior
to calibration.
Copyright © 2023 Telldus Technologies AB. All rights reserved.!Page 3
Table of contents
Other Telldus Weather Station manuals


Popular Weather Station manuals by other brands

Youshiko
Youshiko YC9431 manual

Uzoli
Uzoli EM3390 user manual

Hama
Hama 00092659 EWS-165 Operating instruction

Airmar
Airmar PB100 WeatherStation owner's guide

HoMedics
HoMedics EnviraStation DWS-400 Instruction manual and warranty information

La Crosse Technology
La Crosse Technology 327-1414W Instructional manual

Bresser
Bresser FREEK VONK 9820200 operating instructions

DAVIS
DAVIS Wireless Temperature Station installation manual

Youshiko
Youshiko YC9390 user manual

Alecto
Alecto WS-1560 user manual

La Crosse Technology
La Crosse Technology Wireless Weather Station instruction manual

La Crosse Technology
La Crosse Technology Weather Direct WD-3303 owner's manual


