Telular SX7P-300G series User manual
www.telular.com
Telular SX7P
Content
01
For Your Safety
Getting Started
1. SIM Card Installation
2. Insert Battery
3. Charging the Battery
4. Connect the handset
5. Wall Mounting
6. Connect the SX7P to AC Power
7. Phone Features
8. Function Buttons
9. LCD Display Icons
10. Service Indication
Call Functions
1. Making Calls
2. Receiving Calls
3. Ending Calls
4. In-Call Functions
3
7
8
10
11
12
13
15
16
18
19
20
21
22
22
23
24
www.telular.com
Telular SX7P
Content
02
5. Conference Calling
6. Using the Headset
Basic Operations
1. Menu Structure
2. Special Features
3. Messages
4. Phonebook
5. Call History
6. Network Service
7. Profiles
8. Phone Settings
9. Organizer
Data Features (SX7P-300G series only)
Specifications
Warranty Statement
24
25
27
28
29
30
35
38
40
45
46
55
58
62
64

www.telular.com
Telular SX7P
For your safety
03
For Your safety
The SX7P functions as both a radio transmitter and receiver. When it is ON, the SX7P receives and sends
out radio frequency (RF) energy. The SX7P GSM 900/1800 unit operates in the frequency ranges of 890
MHz to 960 MHz and 1710 MHz to 1880 MHz. The SX7P 850/1900 unit operates in the frequency range
of 824MHz to 894MHz and 1850 MHz to 1990 MHz. Both units employ commonly used phase/frequency
modulation techniques. When you use the SX7P, the cellular system handling your call controls the power
level at which the unit transmits.
Safe Operation Requirement
The SX7P must be either wall mounted or desk mounted and should not be operated when any person is
within 200 mm (8 inches) of the phone.
Temperature Environment
Operating Temperature: From -10°C to +50°C ; Up to 95% relative humidity (non-condensing).
Storage Temperature: From -40°C to +60°C; Up to 95% relative humidity (non-condensing).
.
Driving

www.telular.com
Telular SX7P
04
Check the laws and regulations on the use of cellular products in the areas where you drive. Some jurisdic-
tions prohibit your using a cellular device while driving a vehicle. Even if your juris-diction does not have
such a law, we strongly suggest that, for safety reasons, the driver use extreme caution when operating the
cellular device while the vehicle is in motion. Always obey the law.
Electronic Devices
Most modern electronic equipment is shielded from RF energy. However, RF energy from cellular devices
may affect inadequately shielded electronic equipment.
RF energy may affect improperly installed or inadequately shielded electronic operating and entertainment
systems in motor vehicles. Check with the manufacturer or its representative to determine if these systems
are adequately shielded from external RF energy. You should also check with the manufacturer of any equip-
ment that has been added to your vehicle. Consult the manufacturer of any personal medical devices (such
as pacemakers, hearing aids,etc.) to determine if they are adequately shielded from external RF energy.
Turn your SX7P OFF in health care facilities when any regulations posted in the areas instruct you to do so.
Hospitals or health care facilities may be using equipment that could be sensitive to external RF energy.
Aircraft
• Turn OFF your SX7P before boarding any aircraft.
• Use it on the ground only with crew permission.
• Do not use it in the air.
To prevent possible interference with aircraft systems, U.S. Federal Aviation Administration (FAA) regulations
require you to have permission from a crew member to use your cellular phone (or any other cellular prod-
uct) while the plane is on the ground. To prevent interference with cellular networks, FCC regulations prohibit
using your cellular device while the plane is in the air.

www.telular.com
Telular SX7P
Children
Do not allow children to play with your SX7P to prevent damage to the unit.
Blasting Areas
Construction crews often use remote control RF devices to set off explosives. Therefore, to avoid interfering
with blasting operations, turn your SX7P OFF when in a “blasting area” or in areas posted: “Turn off two-way
radio.”
Turn your SX7P OFF when in any area with a potentially explosive atmosphere. It is rare, but your SX7P
or its accessories could generate sparks. Sparks in such areas could cause an explosion or fire resulting in
bodily injury or even death. Areas with a potentially explosive atmosphere are often, but not always, clearly
marked. They include fueling areas such as gas stations; below deck on boats; fuel or chemical transfer or
storage facilities; areas where the air contains chemicals or particles, such as grain, dust, or metal powders;
and any other area where you would normally be advised to turn off your vehicle engine.
Do not transport or store flammable gas, liquid or explosives in the area of your SX7P or accessories.
Vehicles using liquefied petroleum gas (such as propane or butane) must comply with the National Fire Pro-
tection Standard (FPA-58). For a copy of this standard, contact the National Fire Protection Association, One
Batterymarch Park, Quincy, MA 02269, Attn: Publications Sales Division.
IMPORTANT NOTICES
TERMS AND CONDITIONS FOR USE OF PHONECELL® PRODUCTS (“Product”)
These Terms and Conditions are a legal contract between you and Telular Corporation for the title to and
use of the Product. BY RETAINING AND USING THE PRODUCT AFTER RECEIPT OF IT, YOU AGREE TO
THE TERMS AND CONDITIONS INCLUDING WARRANTY DISCLAIMERS, LIMITATIONS OF LIABILITY
AND INDEMNIFICATION PROVISIONS BELOW. IF YOU DO NOT AGREE TO THE TERMS AND CONDI-
TIONS, DO NOT USE THE PRODUCT AND IMMEDIATELY RETURN THE UNUSED PRODUCT FOR A
COMPLETE REFUND. You agree to accept sole responsibility for any misuse of the Product by you; and,
05
www.telular.com
Telular SX7P
06
For your safety
in addition, any negligent or illegal act or omission of your or your agents, contractors, servants, employees,
or other users of the Product so long as the Product was obtained from you, in the use and operation of the
Product.
INDEMNIFICATION OF TELULAR CORPORATION (“TELULAR”)
YOU SHALL INDEMNIFY, DEFEND AND HOLD HARMLESS TELULAR FOR ANY OF THE COST, INCLUD-
ING REASONABLE ATTORNEYS’ FEES, AND FROM CLAIMS ARISING OUT OF YOU, YOUR CLIENTS’
OR OTHER THIRD PARTIES’ USE OR OPERATION OF THE PRODUCT: (i) FOR MISUSE OR IN A MAN-
NER NOT CONTEMPLATED BY YOU AND TELULAR OR INCONSISTENT WITH THE PROVISIONS OF
THIS MANUAL; (ii) IN AN ILLEGAL MANNER OR AGAINST PUBLIC POLICY; (iii) IN A MANNER SPECIFI-
CALLY UNAUTHORIZED IN THIS MANUAL; (iv) IN A MANNER HARMFUL OR DANGEROUS TO THIRD
PARTIES; (v) FROM CLAIMS BY ANYONE RESPECTING PROBLEMS, ERRORS OR MISTAKES OF THE
PRODUCT; OR (vi) COMBINATION OF THE PRODUCT WITH MATERIAL, MODIFICATION OF THE
PRODUCT OR USE OF THE PRODUCT IN AN ENVIRONMENT NOT PROVIDED, OR PERMITTED, BY
TELULAR IN WRITING. THE PARTIES SHALL GIVE EACH OTHER PROMPT NOTICE OF ANY SUCH
COST OR CLAIMS AND COOPERATE, EACH WITH THE OTHER, TO EFFECTUATE THIS INDEMNIFICA-
TION, DEFENSE AND HOLD HARMLESS.

www.telular.com
Telular SX7P
Getting started
1. SIM Card Installation
2. Insert Battery
3. Charging the Battery
4. Connect the handset
5. Wall Mounting
6. Connect the SX7P to AC
Power
7. Phone Features
8. Function Buttons
9. LCD Display Icons
10. Service Indication
Getting started
07
www.telular.com
Telular SX7P
08
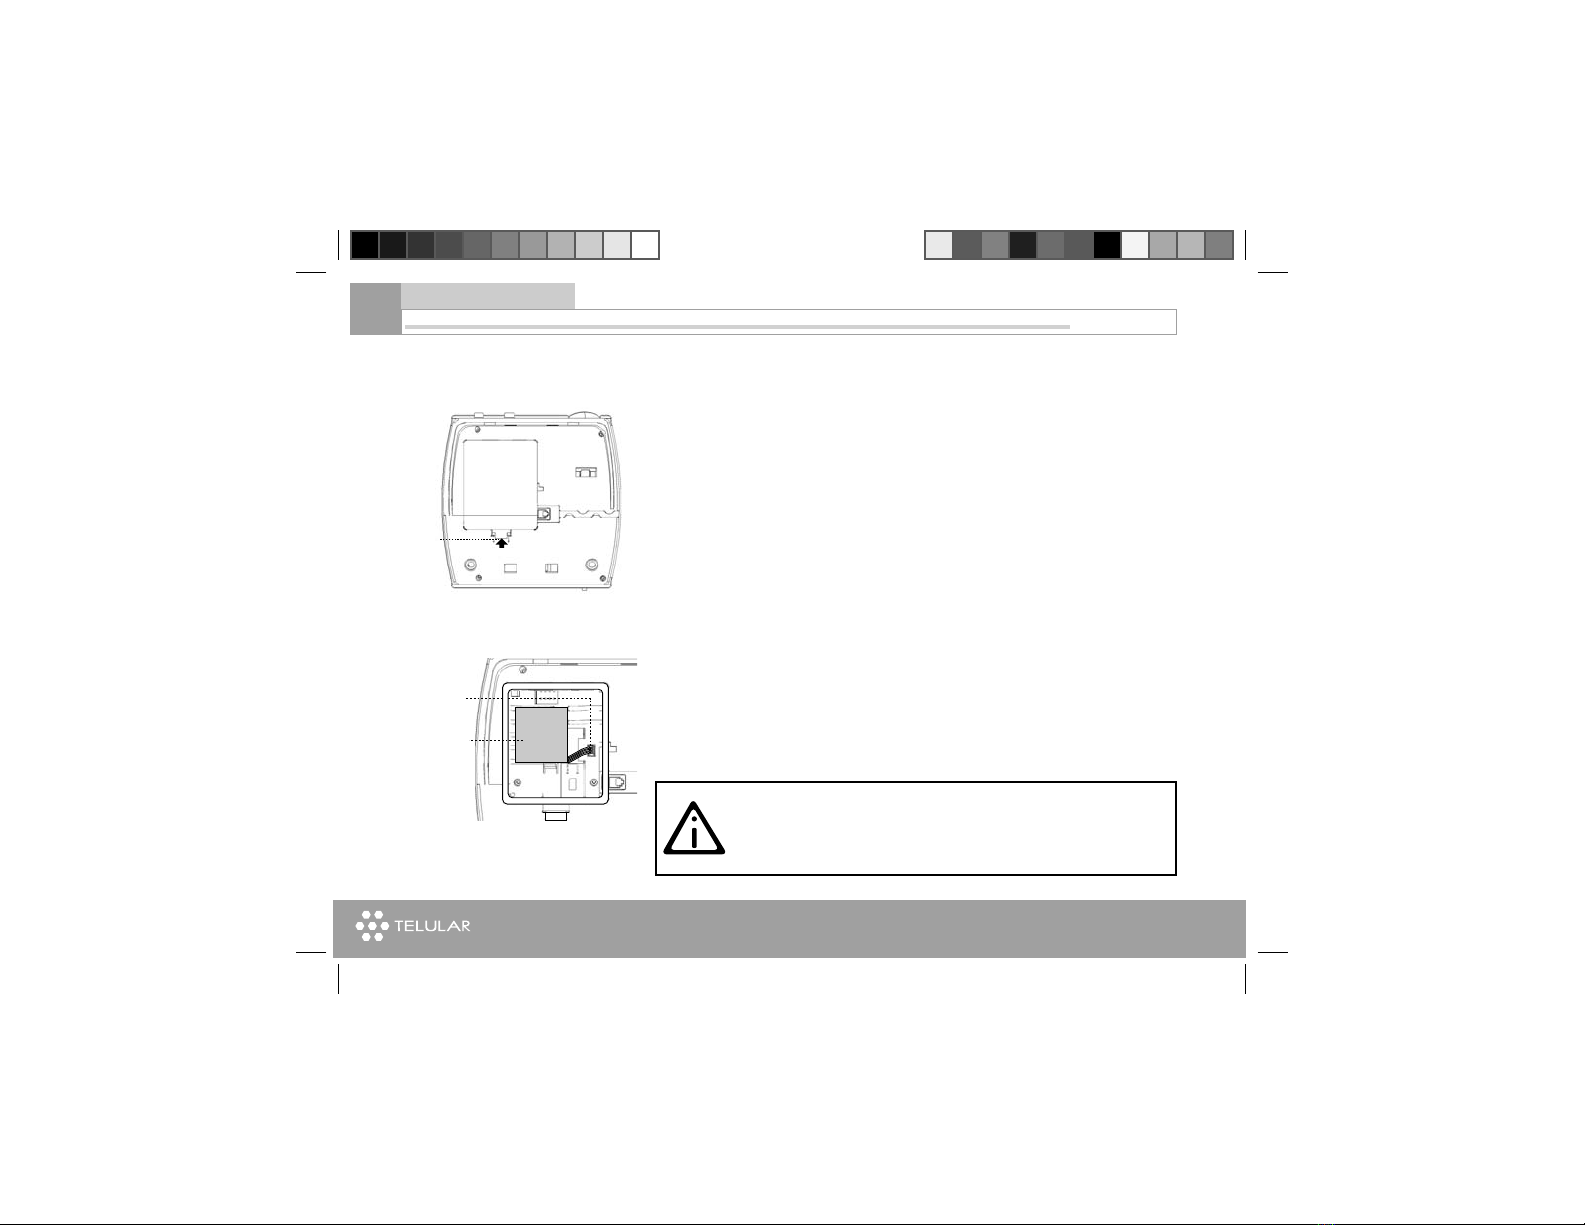
The SX7P requires a Subscriber Identification Module (SIM) for normal
operation. The service provider supplies the SIM card, which carries the
account information needed to operate the SX7P. The SIM compartment
is on the back of the SX7P.
NOTE: If you don’t have a SIM card, contact your network service pro-
vider.
(1). Make sure the unit is off and the power supply disconnected before
removing or installing a SIM Card.
(2). Remove the Battery/SIM compartment cover by pushing the latch.
(3). Gently remove the battery from its compartment.
0USHTHE
LATCHTO
OPEN
THE"ATTERY
$OOR
"ATTERY
'ENTLYREMOVETHE
BATTERY
3)-INSTALLATIONSLOT
1. SIM Card Installation
Getting started

www.telular.com
Telular SX7P 09
(4). Place the SIM card in to the SIM card shaped slot
(5). Gently push the SIM card forward until it locks into position.
Note: To remove the SIM push down on the locking tab and slide the SIM
back.
(6). Place the battery back into its compartment
(7). Close the compartment door.
3)-
"ATTER
Y
#AREFULLYSLIDETHE3)-CARD
UPTOFITINTHEFINALPOSITION
3)-
"ATTERY
0LACETHE3)-CARD
INTHESHAPEDSLOT
Getting started
www.telular.com
Telular SX7P
10
(1). Press the battery access door latch and open the battery access door
located on the bottom of the unit;
(2). Gently plug the battery cable into the connector;
(3). Place the battery pack into the compartment to fit.
(4). Close the battery access door, the latch will lock when completely
closed.
"ATTERY
#AREFULLYPLACE
THEBATTERYINTO
THECOMPARTMENT
TOFIT
'ENTLYPLUG
THE"ATTERYCABLE
INTOTHECONNECTOR
0USHTHE
LATCHTO
OPEN
THE"ATTERY
$OOR
WARNING: Do not use batteries other than the included
battery pack with the SX7P. Using any other batteries may
result in fire and/or other damage to the unit.
2. Insert Battery
Getting started

www.telular.com
Telular SX7P 11
3. Charging the BatteryThe SX7P phone is equipped with a rechargeable sealed Ni-MH battery.
New batteries are shipped partially charged and should be cycled for best
performance. “Cycling” is fully discharging and then fully charging the
battery to obtain full capacity.
1.To fully discharge the battery, turn the phone on without connecting AC
power and use until “Low Battery” is indicated in the display.
2.Connect AC power, Refer to Page 15, section 6. Connect the SX7P to
AC Power for instructions on connecting power.
3.Charge battery for at least 24 hours before using SX7P on battery
power the first time. The battery icon will flash while battery is charging.
4.The power supply can stay connected to the phone after charging has
completed. The phone will recharge the battery when necessary.
The display will show “Full Charge” and the battery icon will stop flashing
when charging has completed.
Note: If you experience frequent power outages, a recharge cycle can be
interrupted leaving the battery in a state of partial charge. It is recom-
mended to follow steps above to restore the optimum performance of the
battery if this should occur.
Getting started
www.telular.com
Telular SX7P
12
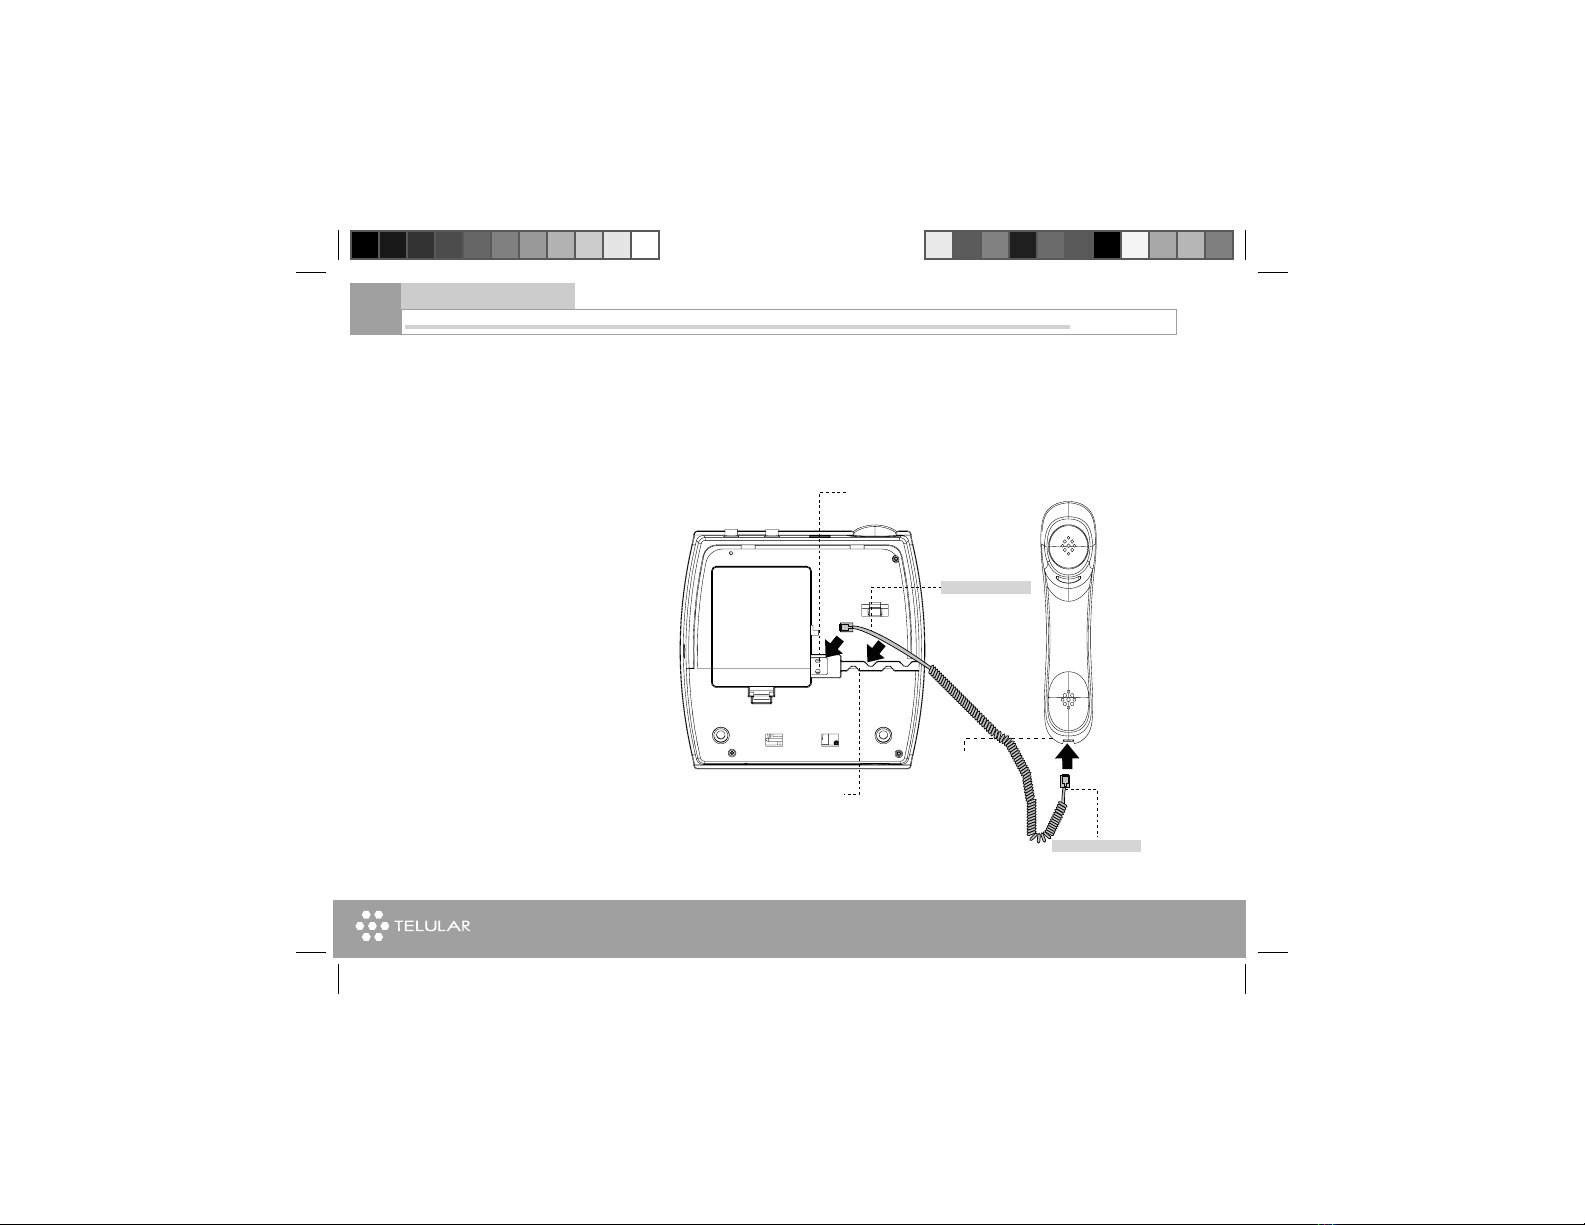
4. Connect the Handset
0LUGTHELOGNERENDOFTHE
PHONECABLEINTHEJACK
&ITTHECABLEINTHECHANNELTO
HOLDITINPOSITION
0LUGTHE
OTHERENDOFTHE
CABLEINTHE
BOTTOMOFTHE
HANDSET
,ONGERENDOFTHECABLE
3HORTERENDOFTHECABLE
Before you can use the SX7P, you must connect the handset cable.
(1). Connect the longer end of the handset cable to the phone jack on the
bottom of the phone;
(2). Gently fit the straight section of the cord in the snake-shaped channel
to keep it in position;
(3). Connect the other end of handset cable to the handset.
Getting started
www.telular.com
Telular SX7P
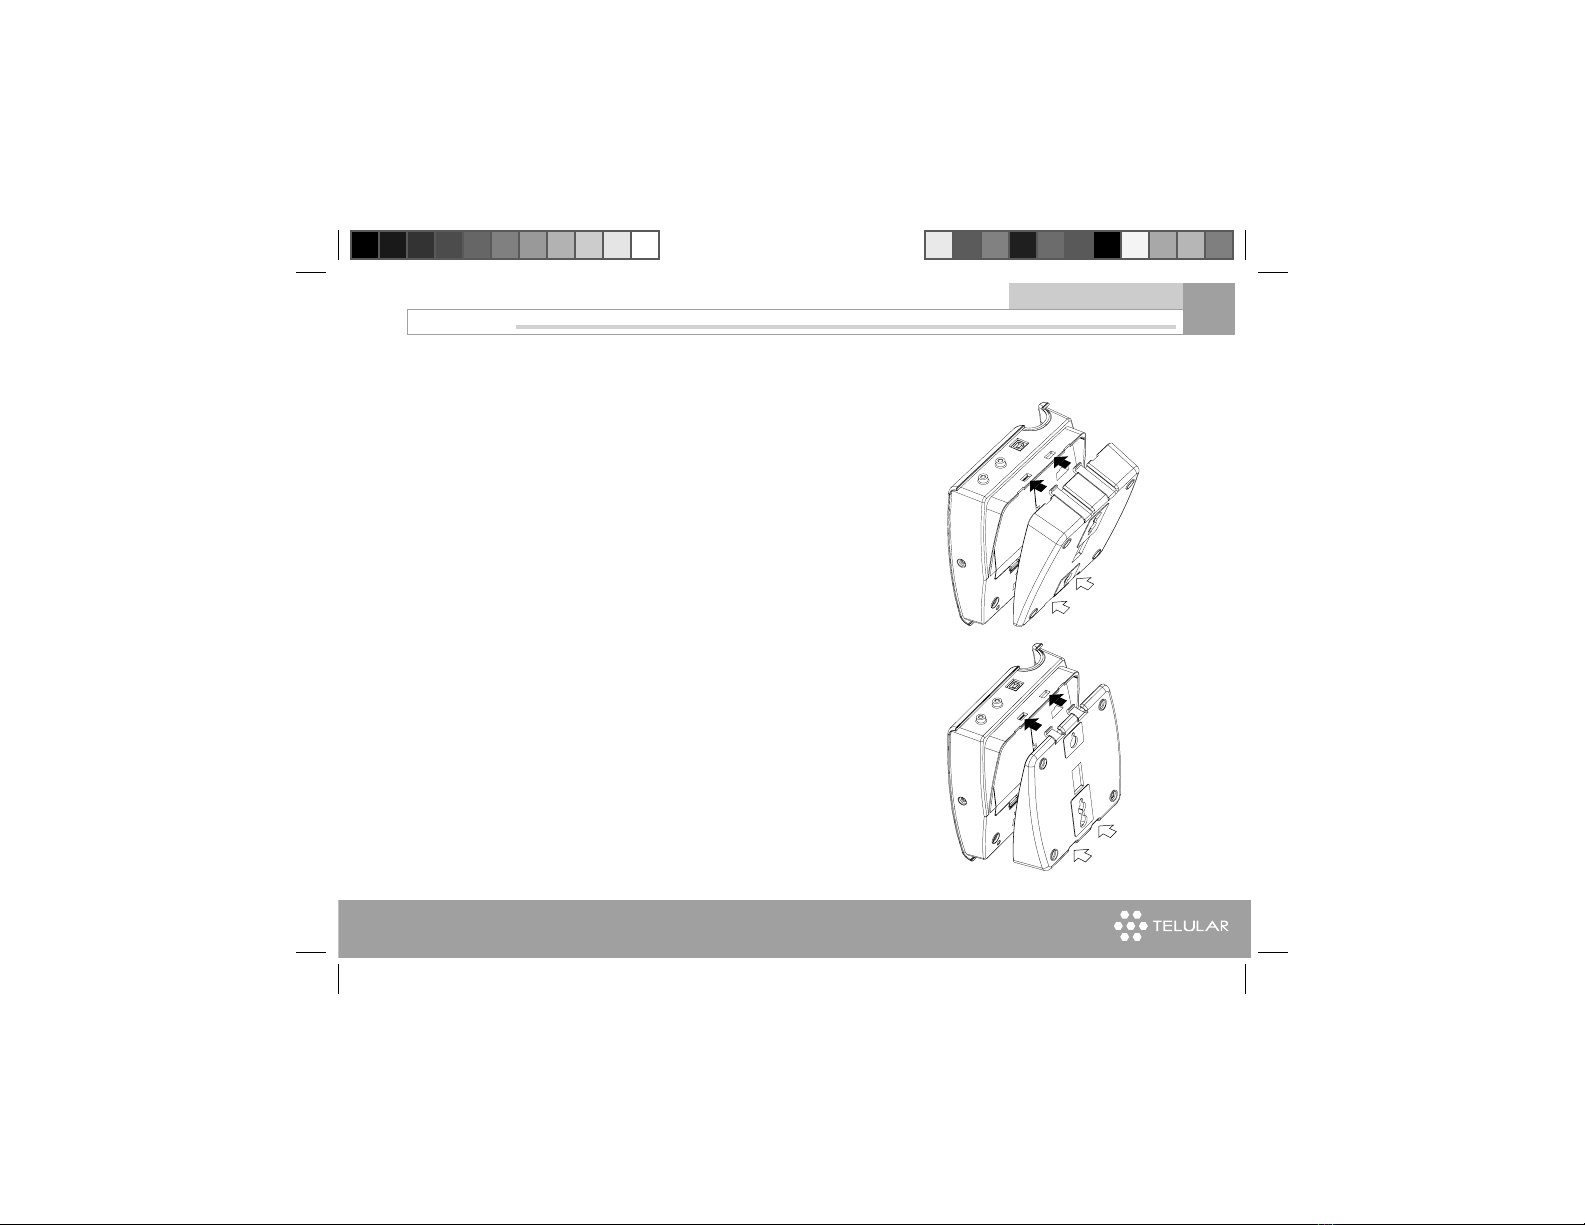
5. Desktop Mounting and Wall
Mounting
(1) Desktop Mounting
Install the mounting bracket as shown on the right to form an extra angle
to hold the phone to the best position.
(2) Wall Mounting
I. Install the mounting bracket as shown on the right to form an 0° angle in
order to hold the phone up-right on the wall.
13
Getting started
www.telular.com
Telular SX7P
II. Remove the mounting clip from the cradle and re-insert it with the tab
pointing up
III. Mark two hole locations 83 mm (3-1/4 inches), or 100 mm (4 inches)
vertically apart and drill two holes into the wall.
IV. Install the screws (not supplied) into the wall, leaving a gap of approxi-
mately 3 mm (1/8 inches) between the screw head and the wall.
V. Align the mounting holes with the screws and mount the SX7P onto the
screws
14
-OUNTING
(OLES
MMINCHES
MMINCHES
2EMOVETHE-OUNTING
#LIPFROMTHECRADDLE
2EINSERTTHE-OUNTING
#LIPWITHTHETABPOINTING
UP
Getting started
www.telular.com
Telular SX7P
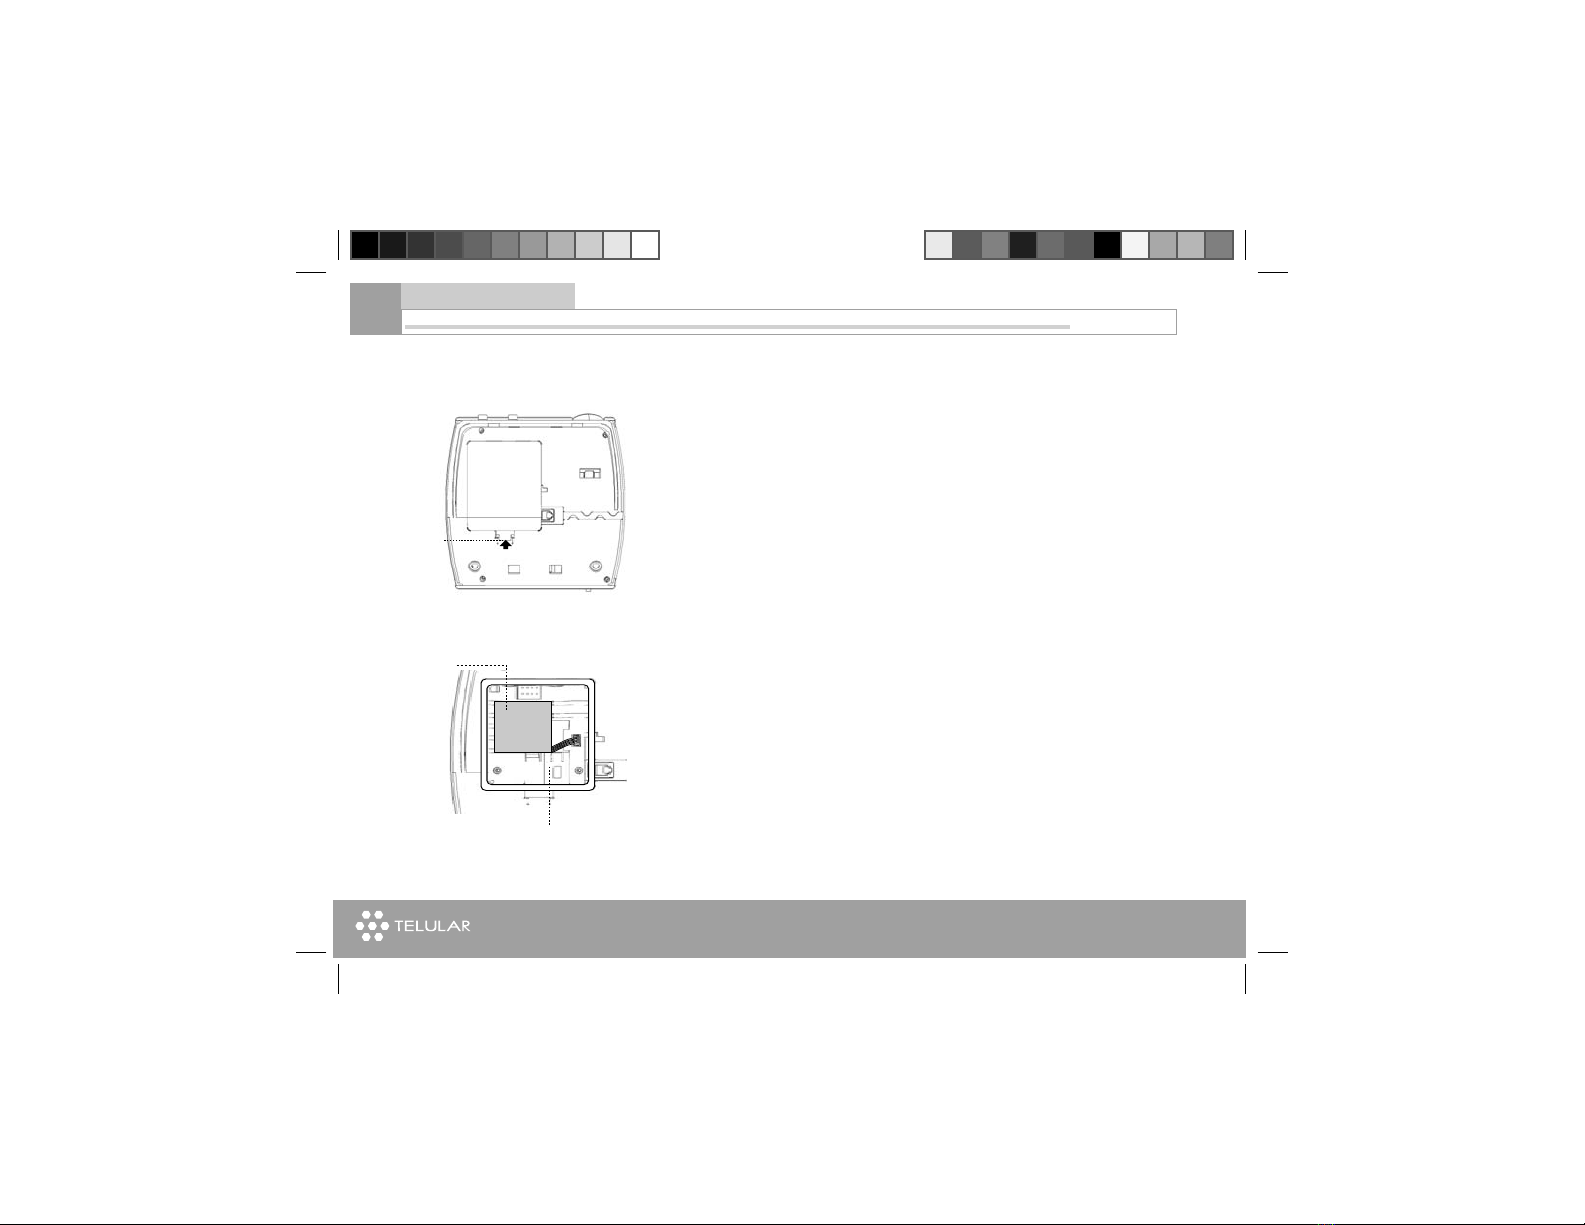
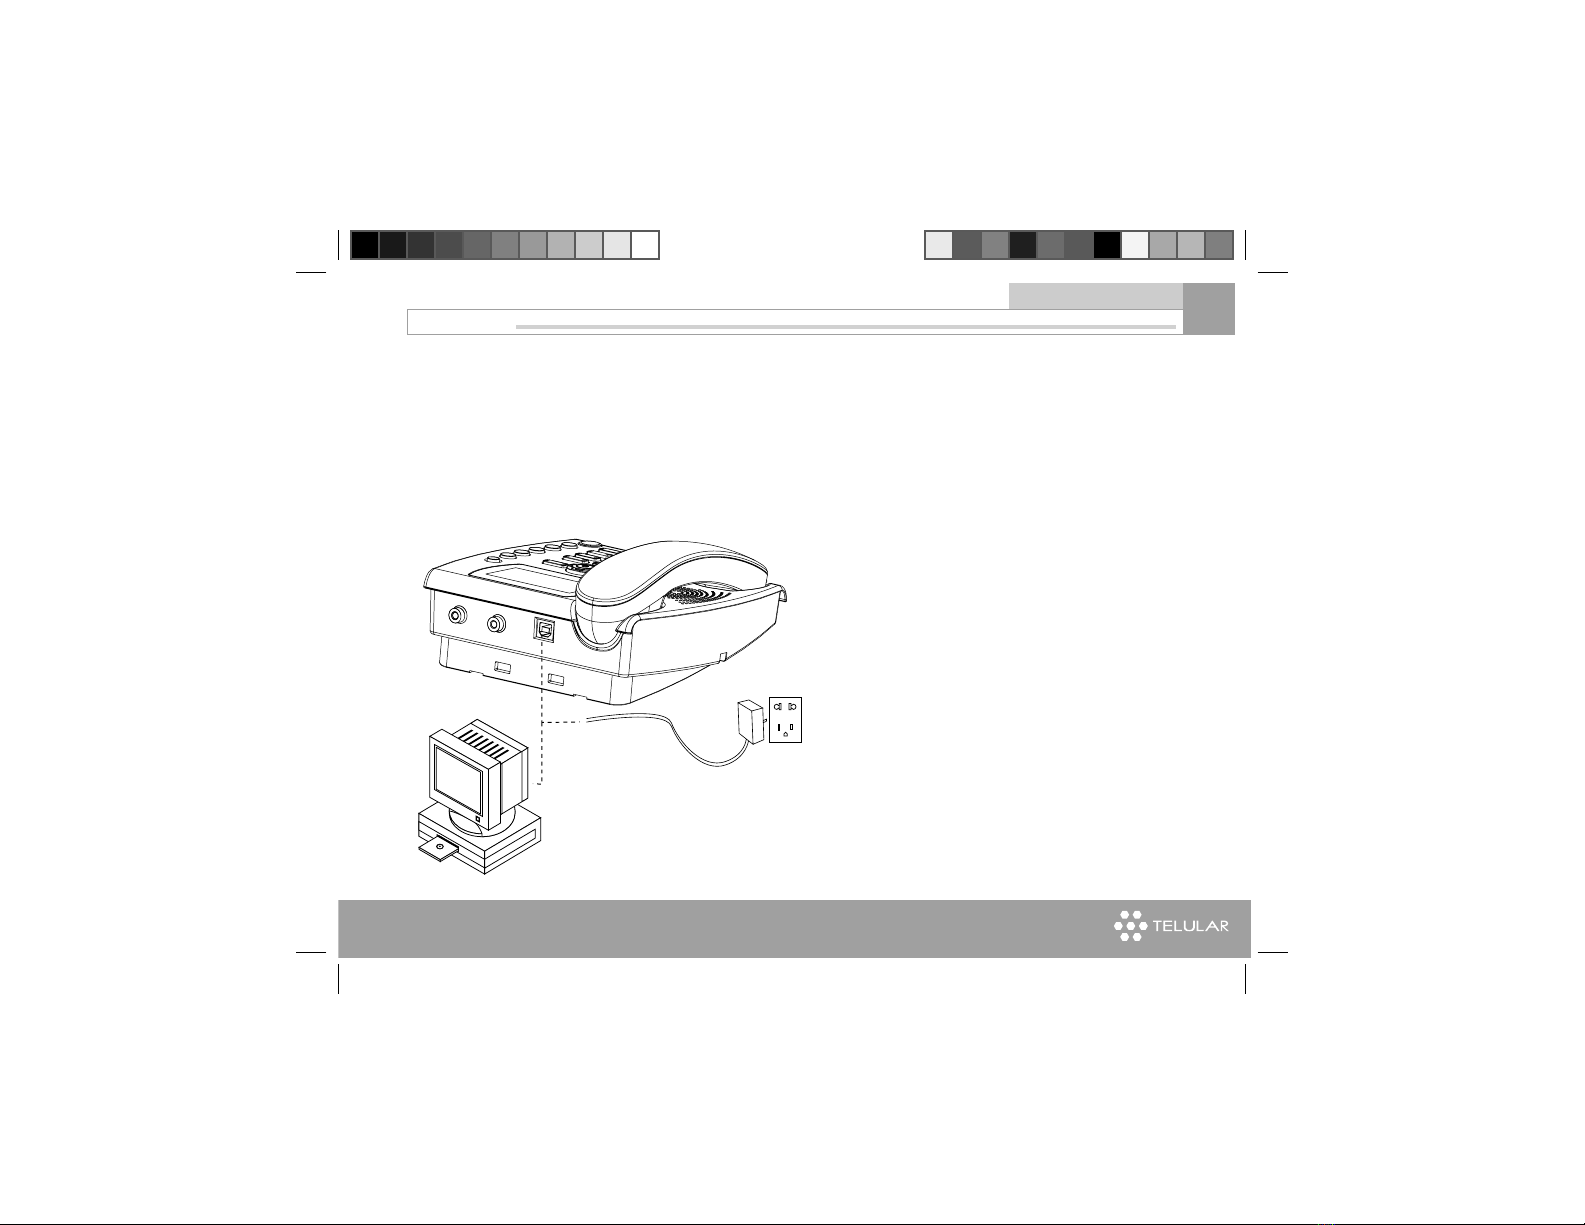
(1). Connect the USB Type B connector of the power supply to the AC
power input on the rear panel of the SX7P. Do Not Twist the Connector.
(2). Plug the AC power cube into the wall socket.
(3). Press and hold the ON/OFF button for 3 to 5 seconds.
(4). Check the cellular signal strength and move the unit until the best sig-
nal possible is achieved. Note: Select a location that is above ground and
as close to windows (or exterior walls) as possible to get the best signal.
Please read the“Service Indication” section for more information.
0LUGINTHE0OWER
SUPPLYHERE
/RPLUGINTHECOMPUTERDATACORDFORPOWERSUPPLY
ORDATADOWNLOADINGDATAFUNCTIONISAVAILABLEON
3803ERIESONLY
.OTE4HECOMPUTERDATACORDISNOTINCLUDEDINTHEPACKAGE
6. Connect the SX7P to AC
Power
15
Getting started

www.telular.com
Telular SX7P
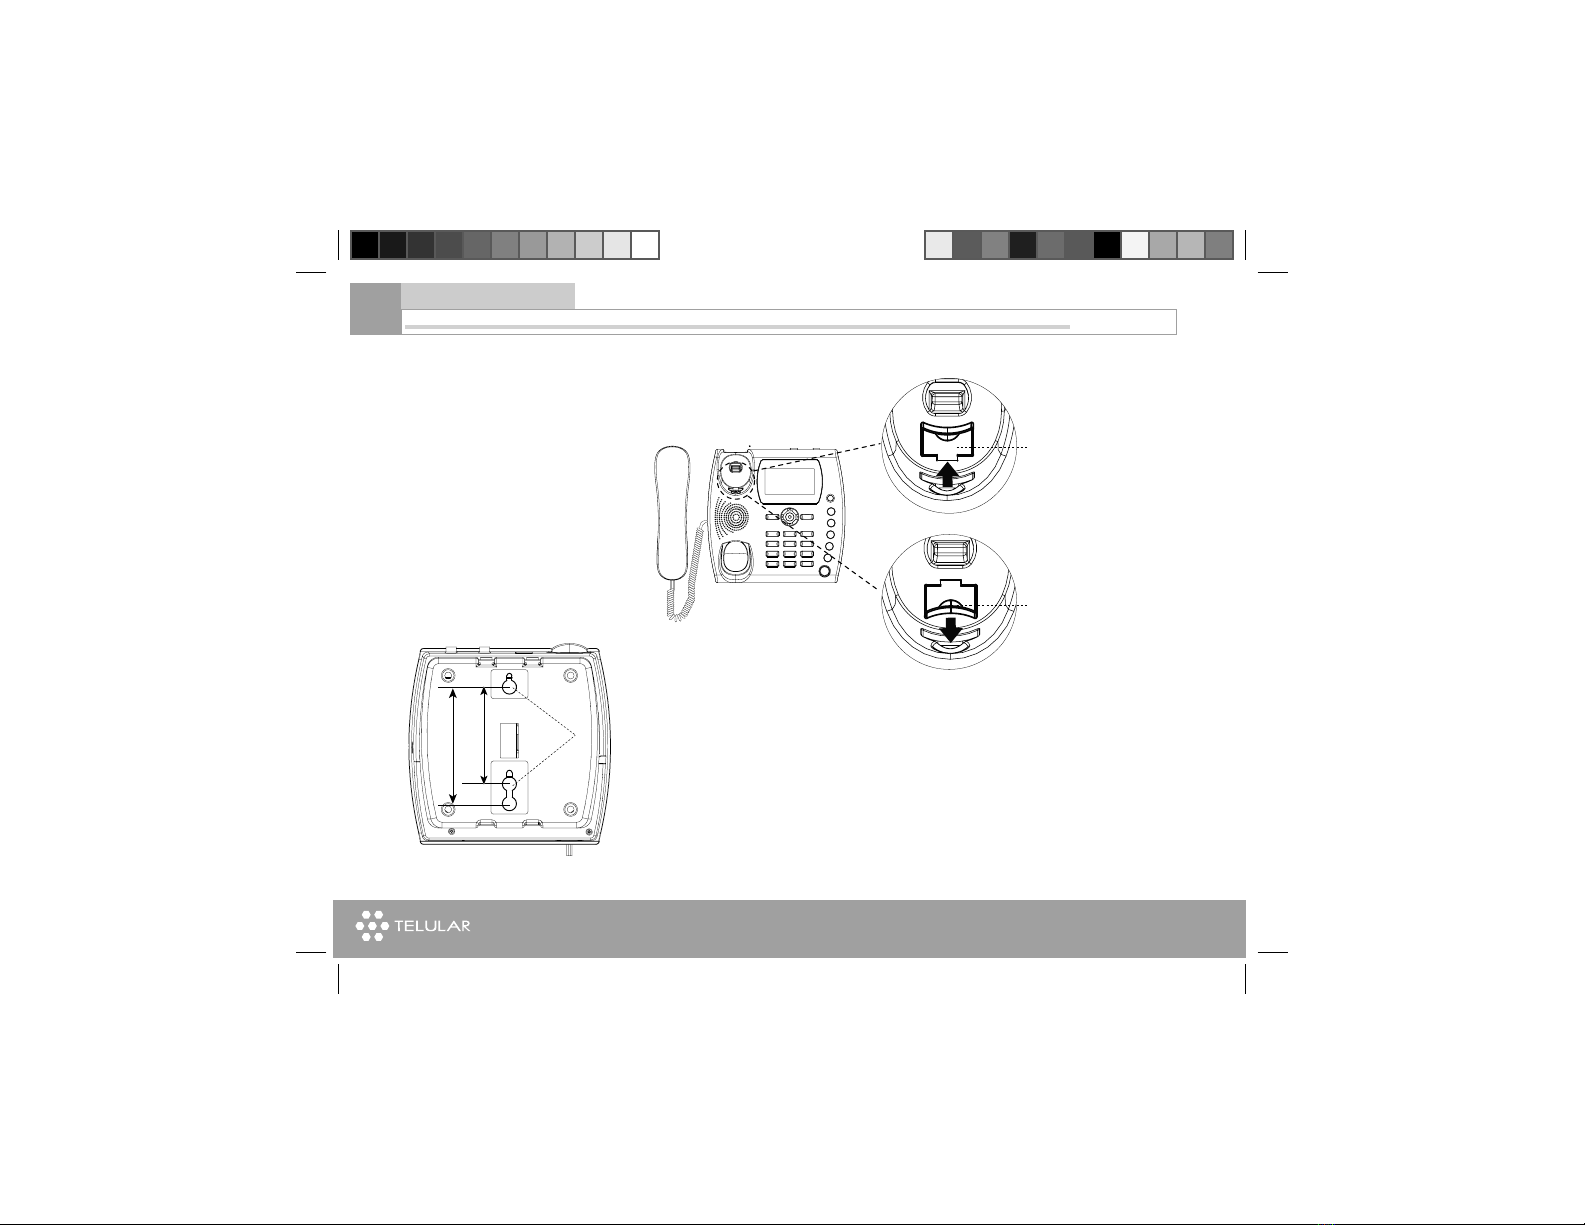
7. Phone Features
,#$DISPLAY
53"4YPE"#ONNECTOR
(ANDSET
7AY.AVIGATION"UTTON
3OFT+EYS
#ENTER"UTTON
-ICROPHONE
(EADSET*ACK
3PEAKER
&UNCTION
"UTTONS
16
Getting started

www.telular.com
Telular SX7P
See Illustration on the left:
• USB type B Connector
On the back side of the phone. AC power input and (SX7P-300 Series)optional data connection
• Handset
• LCD (Liquid Crystal Display)
Displays icons, information, and menu options necessaryto operate the SX7P.
• Center Button
Shortcut to FM Radio, and selects highlighted menu item.
• 4-Way Navigation Buttons
Help scrolling up and down Menu
Shortcuts to Call History, Keypad and Ring Tone Setting, Messages, and Phone Book.
• Soft Keys
Provide access to the SX7P menu options and features.
• Function Buttons
See next page for function button discriptions.
• Headset Jack
The jack to plug in the headset that enables hands-free calling.
• Microphone
• Speaker
17
Getting started

www.telular.com
Telular SX7P
8. Function Buttons • On/Off Button
Used to power unit On and Off, and also used as “Back” key
• Message Button
This key is used to access voicemail or to send an SMS
• Hot Message Button
This feature allows a pre-programmed SMS message to be
sent. * The SMS message is not user programmable.
• Redial Button
Dials the last number called from the SX7P.
• Flash Button
Allows answering of call waiting, connecting Conference calls, and putting an
active call on hold to make another call. Also can be used to skip Dial Delay time
(quick dial).
• Mute Button
Prevents the party on the other end of a call from hearing any sound from the
SX7P.
• Speaker Button
Engages the speakerphone feature.
18
Getting started

www.telular.com
Telular SX7P
9. LCD Screen Icons
2ECEIVED3IGNAL
3TRENGTH
)NDICATESTHESTRENGTH
OFTHECURRENTSIGNAL
4HEMOREBARSTHE
STRONGERTHESIGNAL
-ESSAGE
$ISPLAYSWHENANEWTEXT
MESSAGEHASBEENRECEIVED
6OICE-AIL
$ISPLAYSWHENANEWVOICEMAIL
MESSAGEHASBEENRECEIVED
#ALL$IVERTING
)NDICATESTHATTHECALLDIVERTING
FUNCTIONISACTIVATED
!LARM
)NDICATESTHATTHEALARM
FEATUREHASBEENSET
3PEAKER
)NDICATESSPEAKER
PHONEISACTIVATED
3ILENT
)NDICATESTHATTHE
PHONEISSETTOSILENTMODE
"ATTERY
)NDICATESTHELEVEL
OFBATTERYPOWER
4HEMOREBARS
THEMOREPOWER
'023$ATA
)NDICATESTHATTHE
'023$ATASERVICE
ISATTACHED
+EY,OCK
)NDICATESTHATTHE
KEYPADISLOCKED
#ALL
)NDICATESTHAT
THEHANDSETIS
OFFHOOK
,#$3OFT+EY,ABELS
0ROVIDEACCESSTOFEATURESWITHINTHE
SUBMENUSOFTHE380,ABELSCHANGE
ACCORDINGTOTHESELECTEDSUBMENU
(OT,INE
!LLOWSTHEPHONE
TOCALLAPREPRO
GRAMMEDNUMBER
AUTOMATICALLY
19
Getting started

www.telular.com
Telular SX7P
20
• Full Service
When powered on, the SX7P will display a wakeup banner (the SX7P-
300 Series models LCD screen and keypad backlight will also light). After
a few seconds, the greeting and mobile carrier will display.
If service is available, the antenna icon will display indicator bars. The
number and height of the indicator bars increases as the signal grows
stronger (the more bars, the better the signal).
• No Service
When no service is available, the antenna icon will not display any bars.
Contact your service provider to verify cellular service is activated. No
calls can be made in this condition.
• Limited Service
If there is a signal, but full service with the system is blocked, only
emergency calls will be allowed. Contact your service provider for more
information.
• Network Registration
If the home network is unavailable, but there is another network available
(either another frequency or system), the SX7P will attempt to register to
that system. If there is more than one
system, a list of available systems will display.
1. Use the arrow keys to highlight a network from the list.
2. Press the Select. If the selected network cannot be accessed, the list
of available networks will be updated and a different network must be
selected.
10. Service Indication
Getting started
This manual suits for next models
1
Table of contents
Other Telular Telephone manuals


