tempio HY 312 User manual

HY 312 Black Round
Wi-Fi Digital Heating Thermostat User Manual
Search for " Smart Life” Download the Wifi
App with the following icon.
*Turn on the thermostat, long press “ ” for -5
seconds, the “OFF” and “ ” will flashing in the same
time, short press “ ” for pairing thermostat with APP.
*The App advanced password is 12 456
Product Specifications
☆ Power: 200-240Vac 50/60HZ ☆ Range of temperature display::0~70°C
☆ Display accuracy::0.5°C ☆ Insulating condition: Normal environment
☆ Probe sensor::NTC (10k)1% ☆ Running program: Set per 1 week as a cycle
☆ Contact capacity::A/250V(WW);16A/250V(WE) ☆ Output: Switch relay
☆ Working environment temperature::0~90°C ☆ Installation: Wall mounted or on battery seat
☆ Range of temperature adjustment::5~ 5°C ☆ Size(mm):86*86* 0
Before wiring and installing
1. Read these instructions carefully. Failure to follow them could damage the product or cause a
hazardous condition.
2. Check the ratings given in the instructions and on the product to make sure the produce is suitable
for your application.
. Installer must be a trained experienced service technician.
4. After installation is complete. Check and follow the operation sequence as provided
CAUTION
Electrical shock or equipment Damage Hazard. or short equipment circuitr .
Disconnect power suppl before installation
Wiring Diagram
Electric heating wiring diagram Water heating wiring diagram
(do not connect terminal "close 4" of electric valve)
Water heating and gas wall-hung boiler heating,
no contact wiring diagram, (disconnection when electric valve close)
Note:3 & 4 connect with power, 5 & connect with gas boiler,
1& 2 connect with thermal actuator, please do not connect
1&2 to gas boiler, this may cause boiler board damaged.
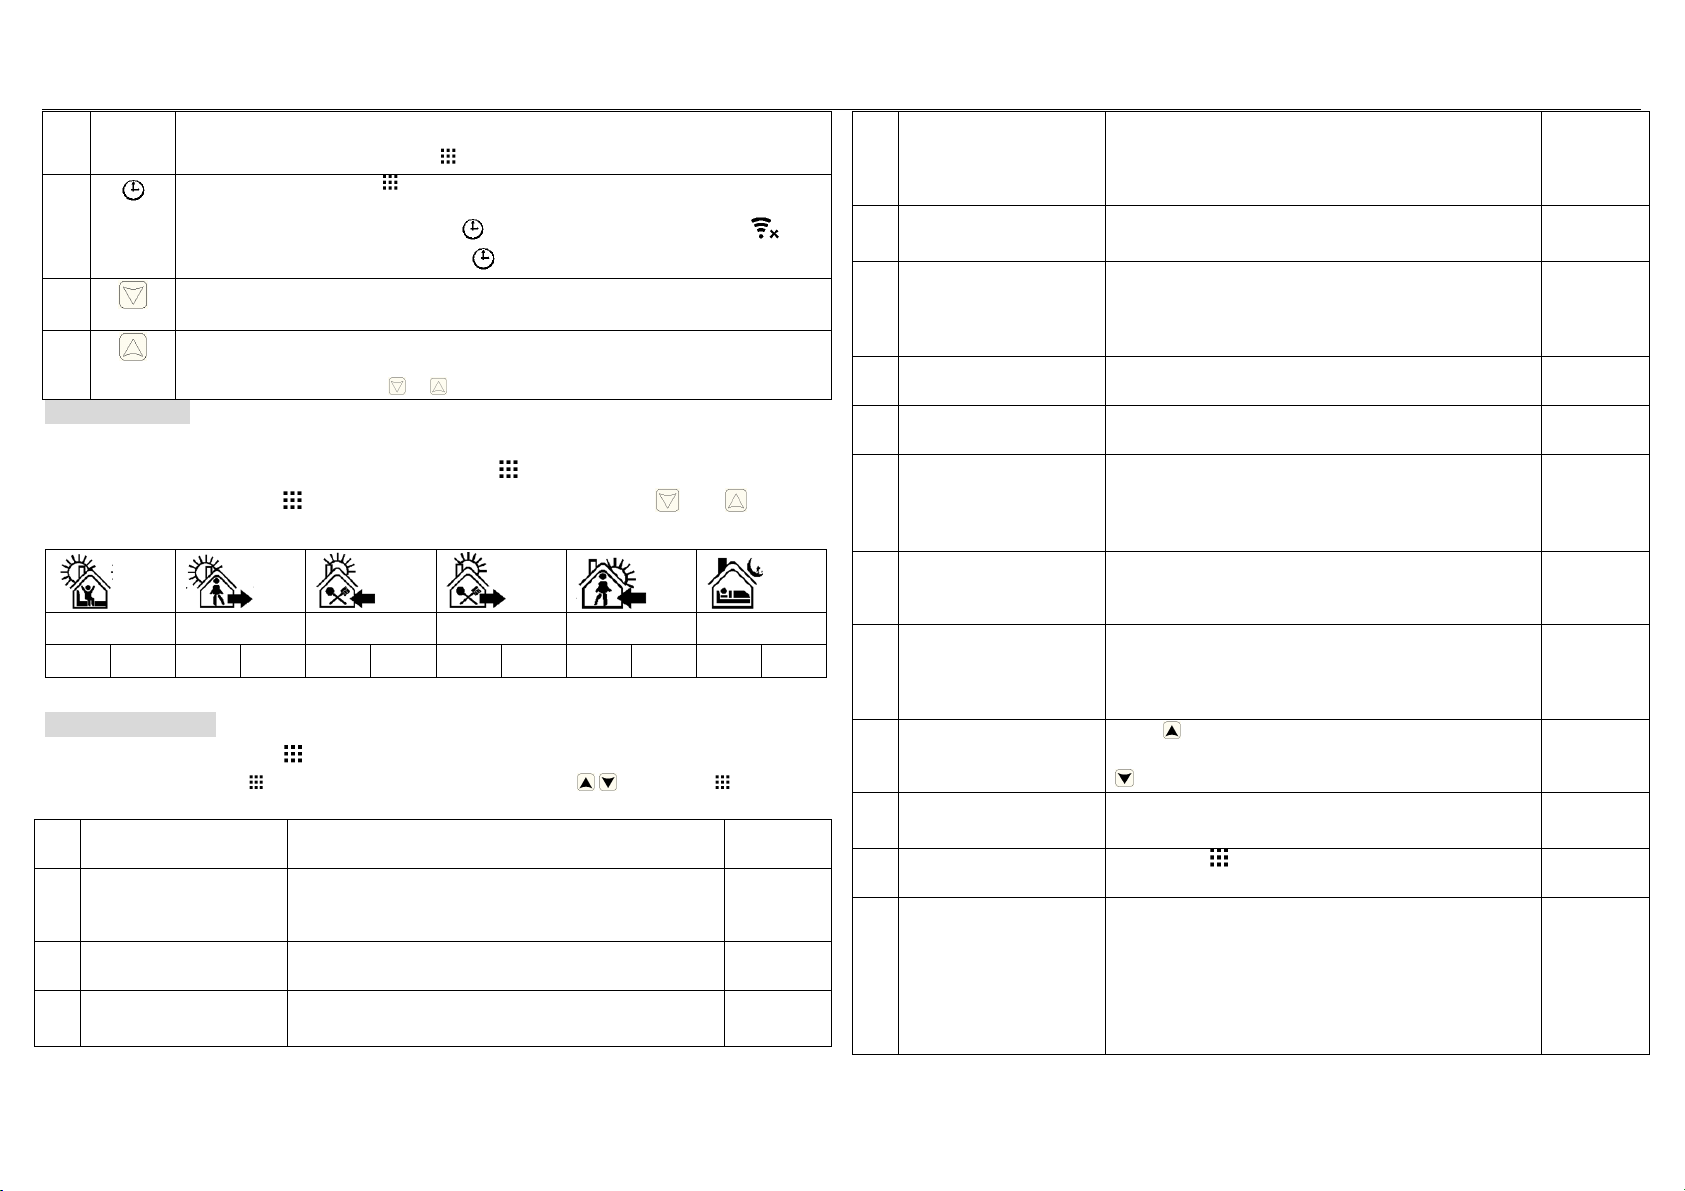
Displays
Description of icon
Auto mode; run preset program Manual mode
Temporary manual mode Clock
Holiday mode, Holiday days and temperature can be set to run in countdown mode
Heating, icon disappears to stop heating External NTC sensor
WIFI connection, flashing EZ distribution mode(see Wi-Fi pairing step4)
Wifi status: Disconnection Child lock
Cloud icon: flashing AP distribution network mode( see Wi-Fi pairing step5)
Operation key
NO
s mbols
represent
A
Turn ON/OFF: Short press to turn on/ turn off
B
1 Short press
to switch automatic mode and manual mode
2 Turn on thermostat, long press for -5 seconds to enter into programmable
=
=
setting
. Turn off thermostat, long press for -5 seconds to enter into advanced setting
C
1 Confirm key: use it with
key
2 Only short press it to set time
Turn on thermostat,
long press
“
”
for -5seconds, the “OFF” and “ ” will
flashing in the same time, short press “ ” to holiday mode
.
B
1 Decrease key
2 Long press to lock /unlock
D
1 Increase key
2 Long press to inquire external sensor temperature
In the Auto model, press or
enter to
temporary manual mode
Programmable
5+2 (factory default),6+1 and 7 models 6 times period setting for user choose. In the advanced options
choose model of you need, under power on state, long press for -5 seconds enter into programming
mode setting, then short press choose: hour, minute, time period, and press and to adjust
data, finished setting, about 10 seconds will automatic save and exist.
Wake up
Out door Back home Out door Back home Sleep
6:00 20℃ 8:00 15℃ 11:0 15℃ 1 :0 15℃ 17:00 15℃ 22:00 15℃
The optimum comfort temperature is 18℃-22℃.
Advanced options
Under turn off state, long press for -5 seconds to access advanced setting.
From A1 to AE, short press to choose the option, and adjust data by , , short press to switch
next option. Remain about 5 seconds after finish setting will quit setting.
NO Setting Options Data Setting Function Factor
Default
A1 Measure Temperature
Calibration -9-+9℃
0.5℃
Accuracy
Calibration
A2 Temperature control
return difference setting
0.5-2.5℃ 1℃
A3 Children lock setting 0:half lock 1:full lock
0:half lock
A4
Power with memory
function
0:Power with memory function
1:Shutdown power after power off
2:Shutdown power after power on
0
A5 Backlight Sleep time
time 5- 0 Sec 10 Sec
A6
Weekly programming
selection
0: 5+2
1: 6+1
2: 7
0
A7 Setting temperature
lowest limit
1-10℃ 5℃
A8 Setting temperature
highest Limit
20-70℃ 5℃
A9
Limit value of low
temperature for external
sensor(anti-freeze
protection)
1. 1-10℃
2. Exceed 10℃, screen display【--】, Low temperature
protection was cancelled.
5℃
AA
Limit value of high
temperature for external
sensor
1. 5℃-70℃
2. Under 5℃, screen display【--】, high temperature
protection was cancelled
45℃
AB
External sensors limit
temperature control
return difference
1-9℃
2℃
AC
Window ventilation
function setting
Press ,display 10℃,when temperature 10℃ turn on
window ventilation function, stop heating mode, press
display -- , turn off Window ventilation
Disabled ---
AD Window ventilation
running time
10-20 mins
15mins
AE Restore factory defaults Long press key ,Display A , press OK key whole
show
BN
Options of sensor
control
N1:Built-in sensor (high temperature protection close)
N2:External sensor (high temperature protection
close)
N :Built-in sensor control temperature ,external
sensor limit temperature (external sensor detect the
N1
temperature is higher than highest temperature of
external sensor, thermostat will disconnect relay,turn
off load)
BC Descaling function
0:Close descaling function
1:Open descaling function ( valve is continuously
closed over 100 hours,it will be opened for minutes
automatically)
0
Return difference
:
Max-limit value of external sensor is 45℃ for factory default (A6),value of external
sensor control return difference (AB) is 2℃. when temperature rise to 45℃, the relay stop working and
trigger high temperature alarm. If temperature drop to 4 ℃ then relay continue to work and heating
alarm will go off. (on that event the operation of heating resume only when indoor temperature is lower
than setting temperature i-e heat demand)
Sensor fault display: Please ensure to have correct way of working for built-in and external sensor, if
connect wrongly or sensor fault (breakdown), “E1” or “E2” will be displayed on the screen. Thermostat
will stop heating until the fault is eliminated.
Warranty:
We offer operation warranty of 18 months, from date of sales to cover any issue due to quality and
workmanship defect.
WIFI APP Download,
Sign up and Pair, Router with thermostat
You will need a 4G mobile phone and wireless router. Connect the wireless router to the mobile phone
and record the WIFI password [you will need it when the thermostat is paired with the Wifi].
Step 1 Download our app
Android users can search “Smart life” or ” Smart RM” on Google Play, iPhone users can search “Smart life”
or ” Smart RM” in the App Store.
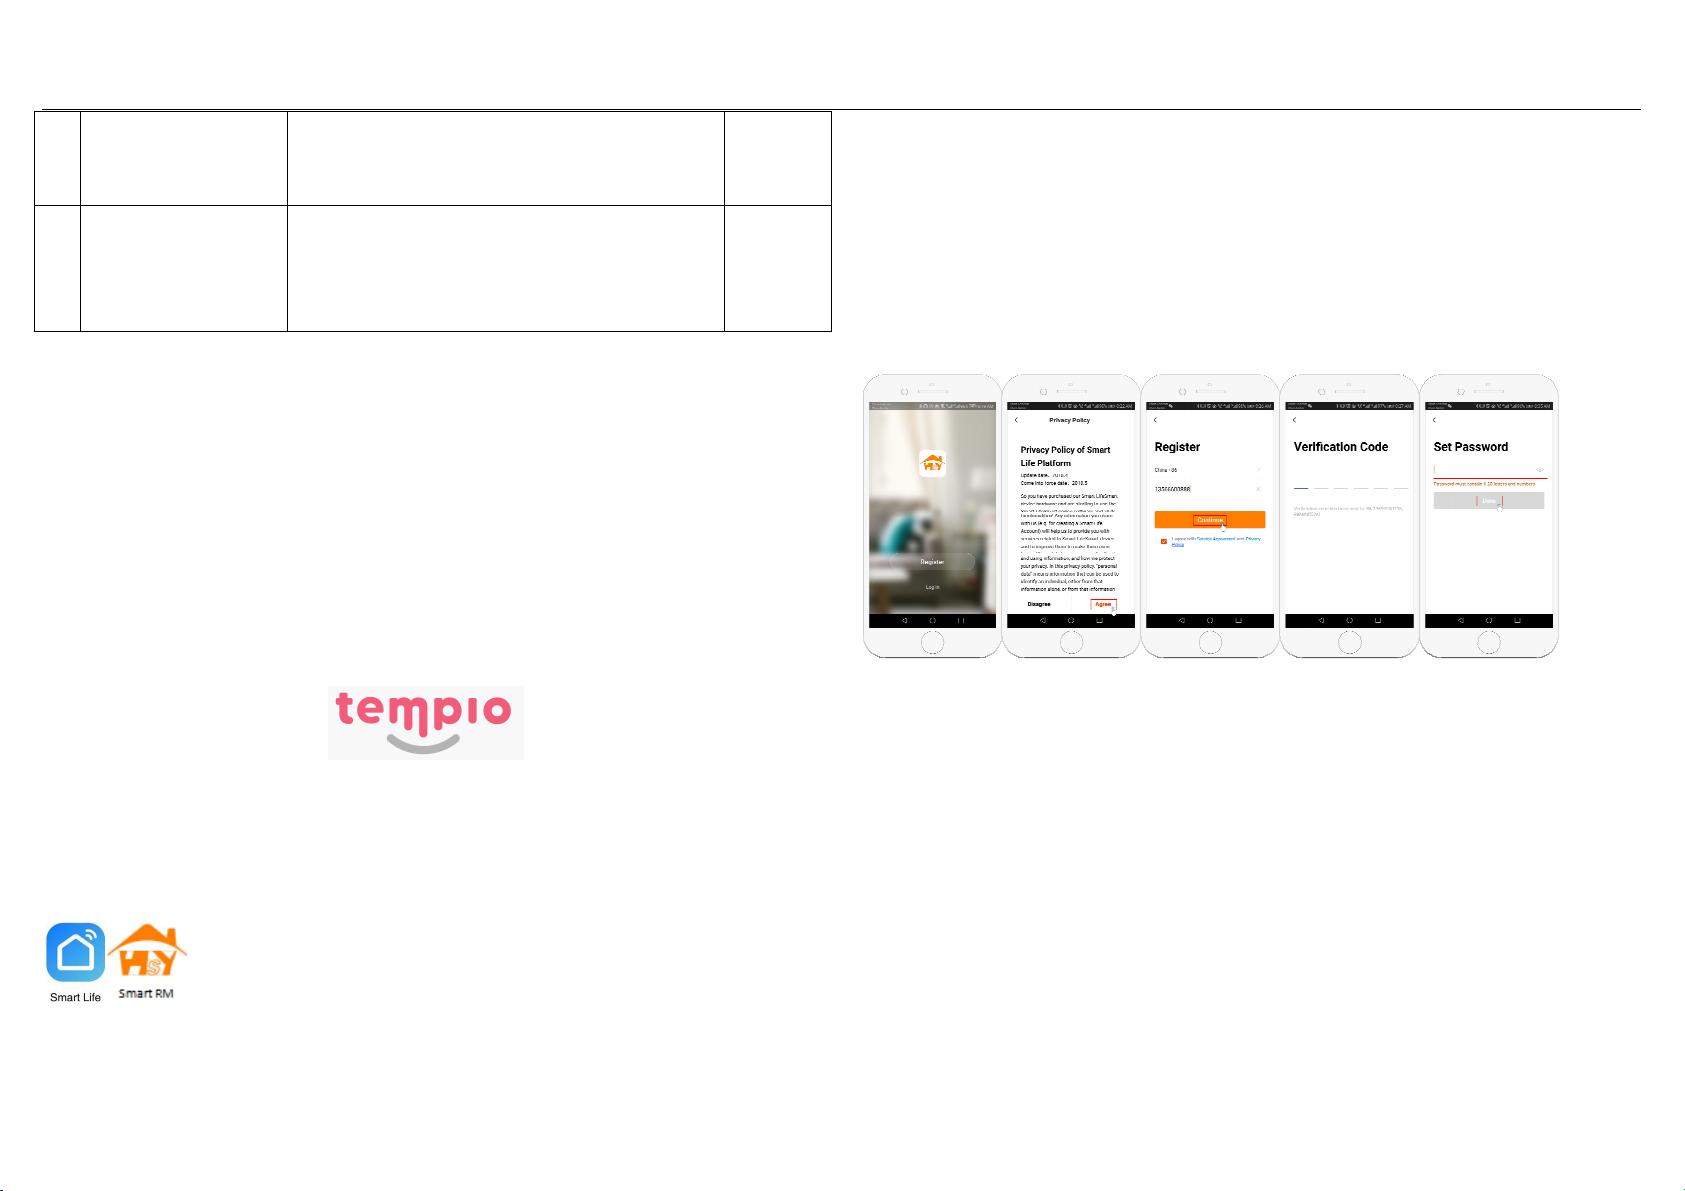
Step 2 Register our account
After install APP, click “register” (Fig 2-1)
Please read the Privacy Policy and press Agree to proceed to the next step. (Fig 2-2)
Registration account name uses your available Email Or mobile phone number, and please select
Region, then click “Continue” (Fig 2-3)
You will receive a 6-digit verification code from your email or SMS, enter this on your phone (Fig 2-4)
Please set the account password, Password must contain 6-20 letters and numbers.
click “Done” (Fig 2-5)
Fig 2-1 Fig 2-2 Fig 2-3 Fig 2-4 Fig 2-5
Step 3 Create famil information (Fig 3-1)
1. Fill in the family name (Fig 3-2).
2. Select or add a room (Fig 3-2).
3. Set location (Fig 3-4).

Fig 3-1 Fig 3-2 Fig3-3 Fig 3-4
Step 4 Connect our Wi-Fi signal (
EZ distribution mode)
In the power-on state, long press “ ” for -5seconds, the “OFF” and “ ” will flashing in the same time,
short press “ ” to indicate the EZ distribution mode, the icon flashes to indicate the AP
distribution mode, the icon indicates that the phone has been disconnected with the device.
Press "Add Device" or "+" in the upper right corner to add the device (Fig 4-1) and select the device type
"Thermostat"(Fig 4-2)
On your thermostat, Click Confirm icon rapidly blink. then select your network and back to your app to
enter the password of your wireless router(fig 4-4)and confirm. The app will connect automatically
(Fig 4-5)This may typically take up to 5~90 seconds to complete. This is Ez mode which provides fast
network connection between your app and your device.
Your room name could be edited when the device is connected, and you can choose the corresponding
room location. For example, bedroom, kitchen, living room, etc
Fig 4-1 Fig 4-2 Fig 4-3 Fig 4-4
Fig 4-5 Fig 4-6 Fig 4-7
Step 5 AP distribution mode
If your router doesn’t support it or your wifi signal is weak or you cannot connect by EZ mode, press the
AP Mode on the upper right corner in
(Fig 5-1)
If you have connected your thermostat successfully, please
ignore the app setting as blow On your thermostat.
Click Confirm icon rapidly blink then select your network and back to your app to enter the password
of your wireless router(fig 4-4)and confirm. The app will go into the page in (Fig 5-2)
Press Connect now to select the Wi-Fi signal Smart life-XXXX of your thermostat(Fig 5-3)
Go back to your app and click Connect now then the app will connect automatically(Fig 4-5)
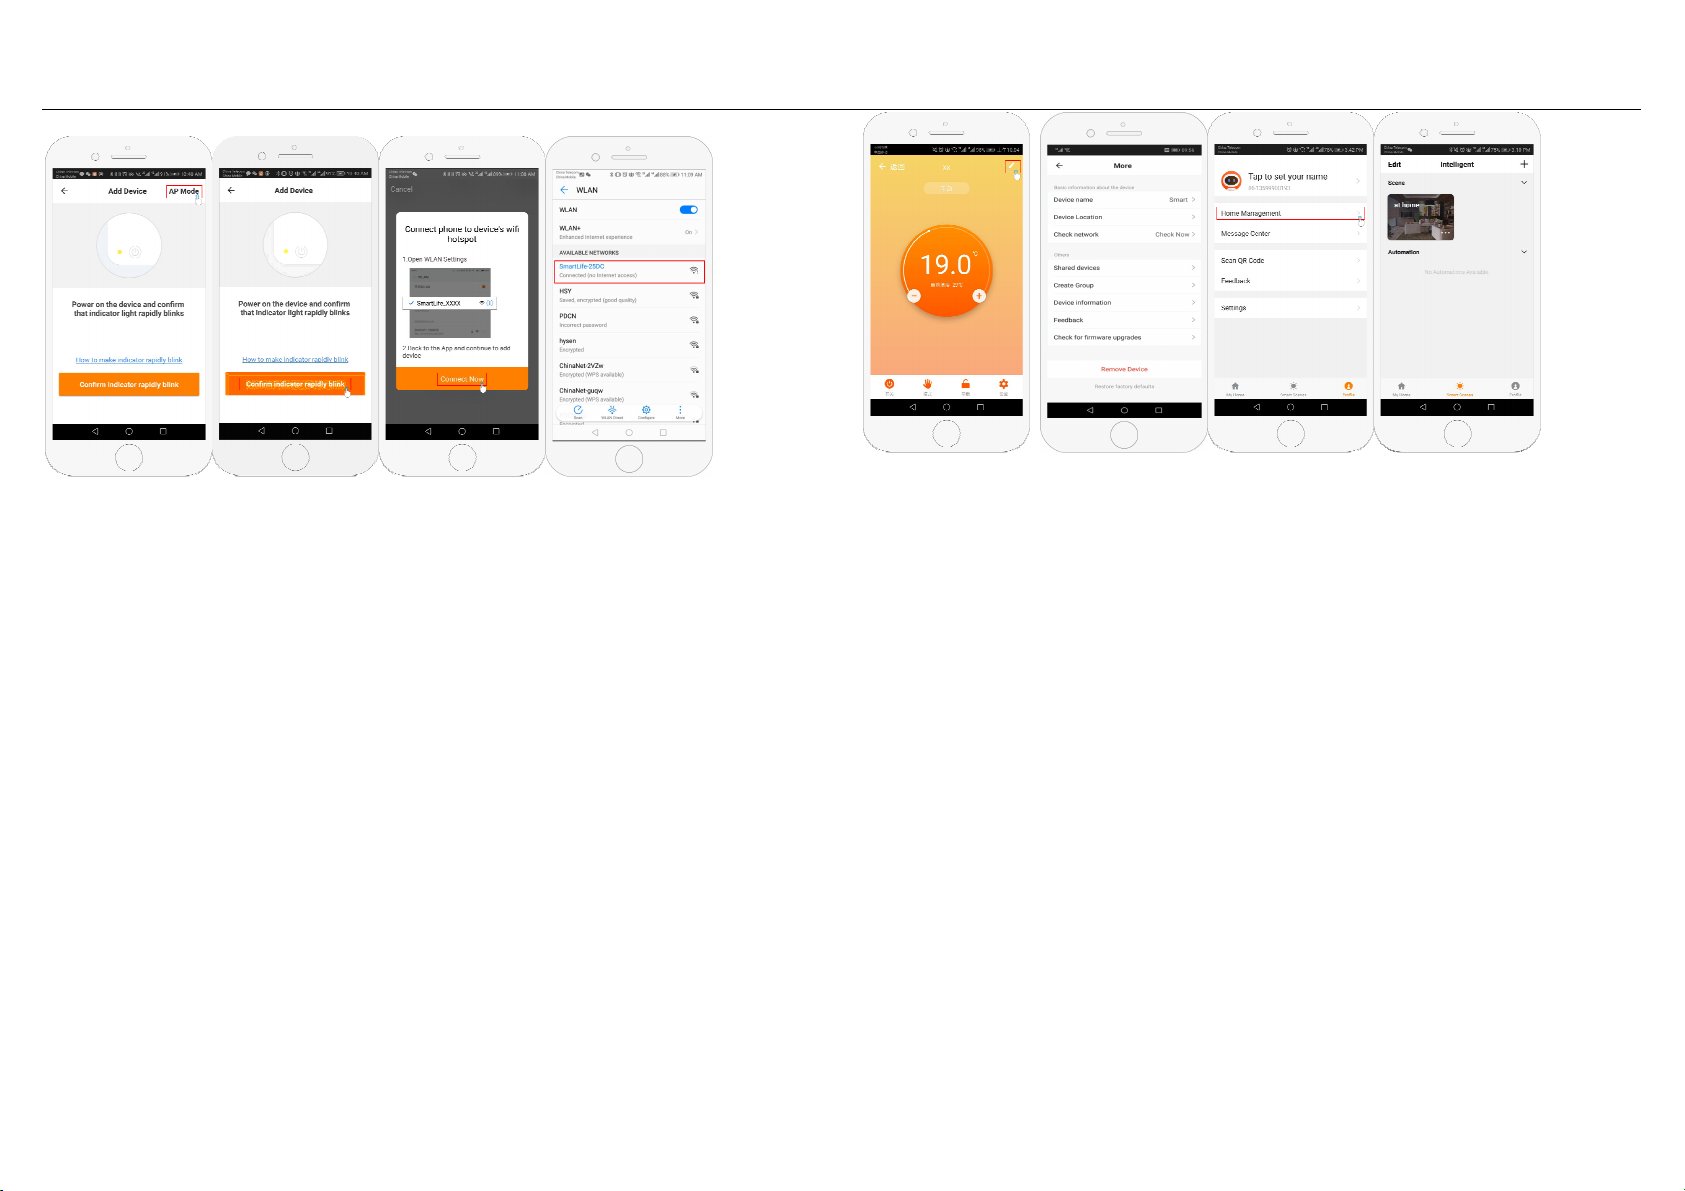
This may typically take up to 5~90 seconds to complete.
Fig 5-1 Fig 5-2 Fig 5-3 Fig 5-4
Step 6 APP Device interface operation and How to create a group
1. Power on/off button
2. Mode key: Manual mode, Auto mode, Holiday mode.
. Child lock: After the child lock turned on, the APP cannot be operated.
4. Set key: After clicking on, you can select the programmed mode (5+2, 61, 7 days) and set the
temperature and time for the six periods of the weekday and weekend.
5. Basic information page(Fig 6-1、Fig6-2)
Device name: The device name can be modified according to your demand.
Share device: Share the device to the mobile phone or email account of the registered family
member
Create Group: Add all the devices which need to operate at the same time to the created group
for convenient operation.
Device information;Contains virtual ID;IP address;Mac address;Device time zone
Remove device: After deleting the device, you need to reconnect the network if you want to use
it.
Third-party controls supported: amazon Alexa/google assistant, click to enter, you will see the
steps
Fig 6-1 Fig6-2 Fig6-3 Fig6-4
Step 7 Famil management(Fig6-3)
Add family: Family naming; family location setting; select room name, you can also add room name, upon
completion, it will enter the Home Setting interface.
Step 8
What is your Smart Scene and How to use it? (Fig 6-4)
set your home to automatically turn on thermostat on when you back home Fig 6-4)
Press + button into the setting
Step 1: You can set a condition for task like Temperature below 21 degree, then click save,
(condition:temp.,Humidity,weather,PM2.5,Air Quality, Sunrise/Sunset, Device)
Step 2: Add a task. Press + to Select Device (Power, Set Temp , Lock
Mode) to act, then Save. If you want to delete the scene, you can press
delete in the end.
NOTE: The room sound could be turned on/off in PROFILE-SETTING-
SOUND. The sound is matched with the default of your system.
Table of contents
Other tempio Thermostat manuals


Popular Thermostat manuals by other brands


Creda
Creda CUF3TS Installation and operating instructions

Hunter
Hunter HUNTER 42203 owner's manual

Ariston
Ariston Chaffoteaux 3318594 Assembly and operation instructions

Broan
Broan VTTOUCHW Installation and user guide

Honeywell
Honeywell CT3611 owner's guide

Siemens
Siemens EcoView installation instructions


