AURATON Libra User manual
26/10/21, 3:08 μ.μ.
AURATON Libra – AURATON manuals
https://manuals.auraton.pl/en/manuals/auraton-libra-en/
1/39
AURATON Libra
PDF
Weekly, wired thermostat
Description of the AURATON Libra
Turning AURATON Libra on for the first time
Introduction to programming
Programming
Manual control
Anti-freezing temperature
Resetting AURATON Libra
Master reset of AURATON Libra
Configuration settings
PWM operating mode
Additional remarks
The AURATON Libra connection schematics
Cleaning and maintenance
Technical specifications
Disposing of the devices
Download

26/10/21, 3:08 μ.μ.
AURATON Libra – AURATON manuals
https://manuals.auraton.pl/en/manuals/auraton-libra-en/
2/39
User manual ver. 202000822
The document presents collected information on safety, assembly and use of
AURATON Libra.
Weekly, wired thermostat
AURATON Libra is a weekly, wired thermostat designed to work with a gas or electric
heating device.
U3 independently adjustable temperatures
Day, night, anti-freezing.
&9 independent temperature programs
Including 6 user-modifiable programs.
LCD Backlit LCD display
The backlit display allows you to supervise the operation of the device
even in poorly lit rooms.
Description of the AURATON Libra
Weekly, wired thermostat
Description of the AURATON Libra
Turning AURATON Libra on for the first time
Introduction to programming
Programming
Manual control
Anti-freezing temperature
Resetting AURATON Libra
Master reset of AURATON Libra
Configuration settings
PWM operating mode
Additional remarks
The AURATON Libra connection schematics
Cleaning and maintenance
Technical specifications
Disposing of the devices
Download

26/10/21, 3:08 μ.μ.
AURATON Libra – AURATON manuals
https://manuals.auraton.pl/en/manuals/auraton-libra-en/
3/39
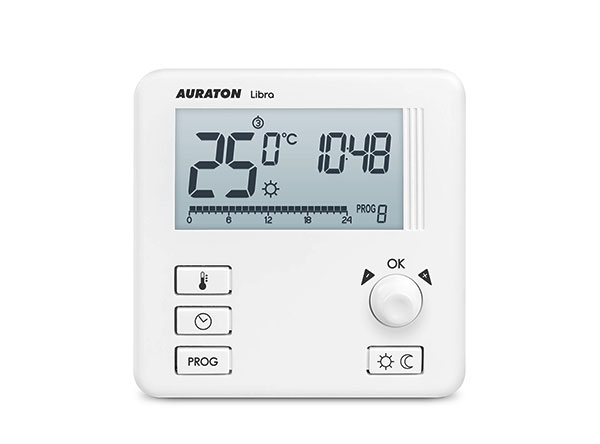
Weekly, wired thermostat
There is a backlit LCD display, four function buttons and a temperature setting knob
with an OK button on the front part of the regulator’s casing.
1 – LCD display
2 – setting knob with integrated ( button
3 – mode selection buttons:
S – day mode – comfort,
Weekly, wired thermostat
Description of the AURATON Libra
Turning AURATON Libra on for the first time
Introduction to programming
Programming
Manual control
Anti-freezing temperature
Resetting AURATON Libra
Master reset of AURATON Libra
Configuration settings
PWM operating mode
Additional remarks
The AURATON Libra connection schematics
Cleaning and maintenance
Technical specifications
Disposing of the devices
Download

26/10/21, 3:08 μ.μ.
AURATON Libra – AURATON manuals
https://manuals.auraton.pl/en/manuals/auraton-libra-en/
4/39
T – night mode – economic
4 – selection button
5 – date/time/day of week setting button
6 – temperature setting button
Display
1. Day of the week (8) – Indicates what day of the week it is. Each day is
assigned a number.
Weekly, wired thermostat
Description of the AURATON Libra
Turning AURATON Libra on for the first time
Introduction to programming
Programming
Manual control
Anti-freezing temperature
Resetting AURATON Libra
Master reset of AURATON Libra
Configuration settings
PWM operating mode
Additional remarks
The AURATON Libra connection schematics
Cleaning and maintenance
Technical specifications
Disposing of the devices
Download

26/10/21, 3:08 μ.μ.
AURATON Libra – AURATON manuals
https://manuals.auraton.pl/en/manuals/auraton-libra-en/
5/39
2. Temperature – AURATON Libra displays the temperature of the room in which it is
installed in normal operation mode.
3. Temperature unit – tells you that the temperature is displayed in Celsius degrees
(°C).
4. Clock
Time is displayed in a 24-hour system.
5. Timeline
Program progress indicator. The timeline is divided into 24 segments, each of which
corresponds to one hour. It shows how a given program is implemented. (see
chapter “Timeline”)
6. Day mode indicator (S)
Indicates that AURATON Libra is operating in the day mode. (see chapter
“Temperature programming”)
7. Night mode indicator (T)
Indicates that AURATON Libra is operating in the night mode. (see chapter
“Temperature programming”)
8. Anti-freezing mode indicator (U)
Indicates that AURATON Libra is operating in the anti-freezing mode. (see chapter
“Anti-freeze mode”)
9. Manual control indicator (V)
Appears when no program is used. (see chapter “Manual control mode”)
10. AURATON Libra activation indicator (Y)
Segment giving information about the operating status of AURATON Libra. Visible
when the regulator is turned on.
Weekly, wired thermostat
Description of the AURATON Libra
Turning AURATON Libra on for the first time
Introduction to programming
Programming
Manual control
Anti-freezing temperature
Resetting AURATON Libra
Master reset of AURATON Libra
Configuration settings
PWM operating mode
Additional remarks
The AURATON Libra connection schematics
Cleaning and maintenance
Technical specifications
Disposing of the devices
Download

26/10/21, 3:08 μ.μ.
AURATON Libra – AURATON manuals
https://manuals.auraton.pl/en/manuals/auraton-libra-en/
6/39
11. Program number
Indicates the number of the currently running program. (see chapters “Factory
programs” and “Weekly programming”)
12. Dead batteries (X)
The indicator is visible when the minimum permissible battery voltage level is
exceeded. The batteries need to be replaced as soon as possible.
IMPORTANT:
In order to maintain any programmed parameters, the battery replacement
operation should not exceed 30 seconds.
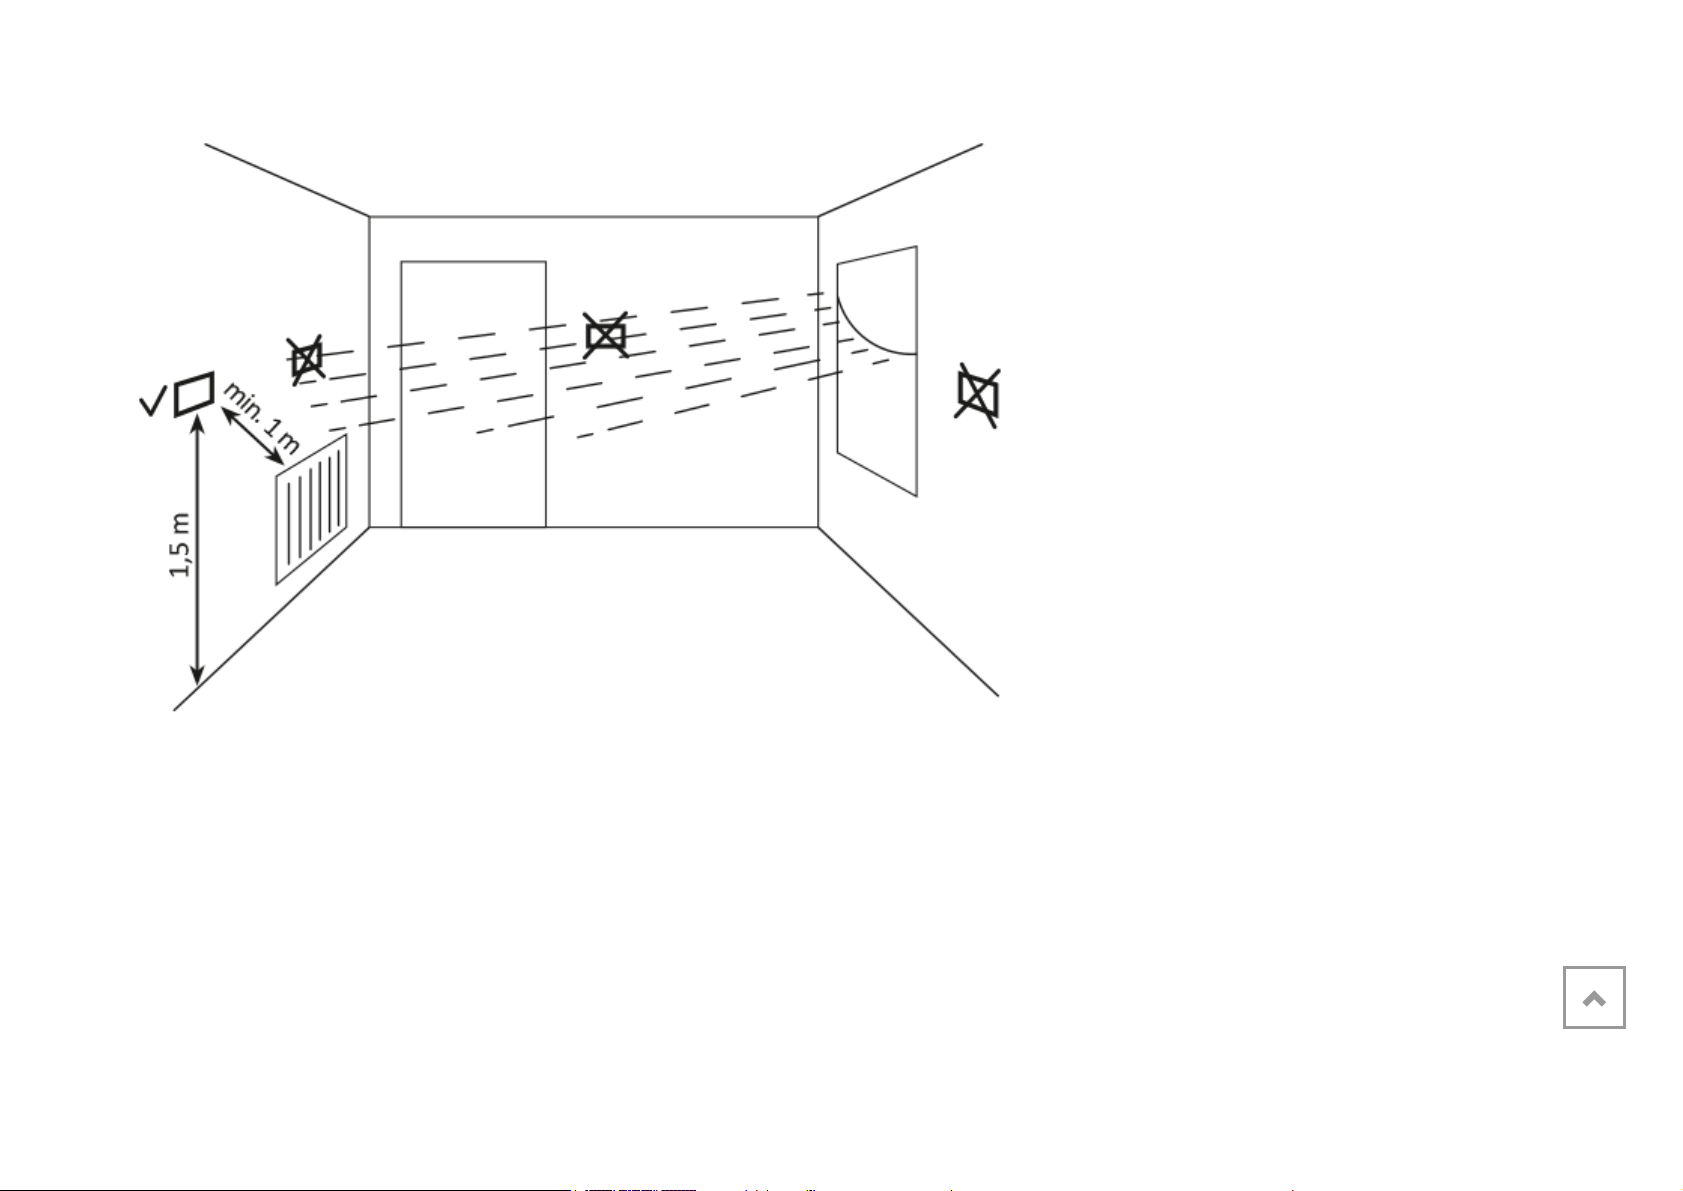
Choosing the right location for AURATON Libra
Weekly, wired thermostat
Description of the AURATON Libra
Turning AURATON Libra on for the first time
Introduction to programming
Programming
Manual control
Anti-freezing temperature
Resetting AURATON Libra
Master reset of AURATON Libra
Configuration settings
PWM operating mode
Additional remarks
The AURATON Libra connection schematics
Cleaning and maintenance
Technical specifications
Disposing of the devices
Download
26/10/21, 3:08 μ.μ.
AURATON Libra – AURATON manuals
https://manuals.auraton.pl/en/manuals/auraton-libra-en/
7/39
The correct operation of AURATON Libra is largely influenced by its location. Using the
device in a place with no air circulation or a place with direct sunlight may result in
incorrect temperature control. AURATON Libra should be installed on the internal wall
of a building (a partition wall), in an environment with free air circulation. You should
avoid proximity to heat-emitting devices (TV, heaters, refrigerators) or locations
exposed to direct sunlight. The vicinity of doors and exposing AURATON Libra to
possible vibrations may also cause problems with proper operation of the device.
Weekly, wired thermostat
Description of the AURATON Libra
Turning AURATON Libra on for the first time
Introduction to programming
Programming
Manual control
Anti-freezing temperature
Resetting AURATON Libra
Master reset of AURATON Libra
Configuration settings
PWM operating mode
Additional remarks
The AURATON Libra connection schematics
Cleaning and maintenance
Technical specifications
Disposing of the devices
Download

26/10/21, 3:08 μ.μ.
AURATON Libra – AURATON manuals
https://manuals.auraton.pl/en/manuals/auraton-libra-en/
8/39
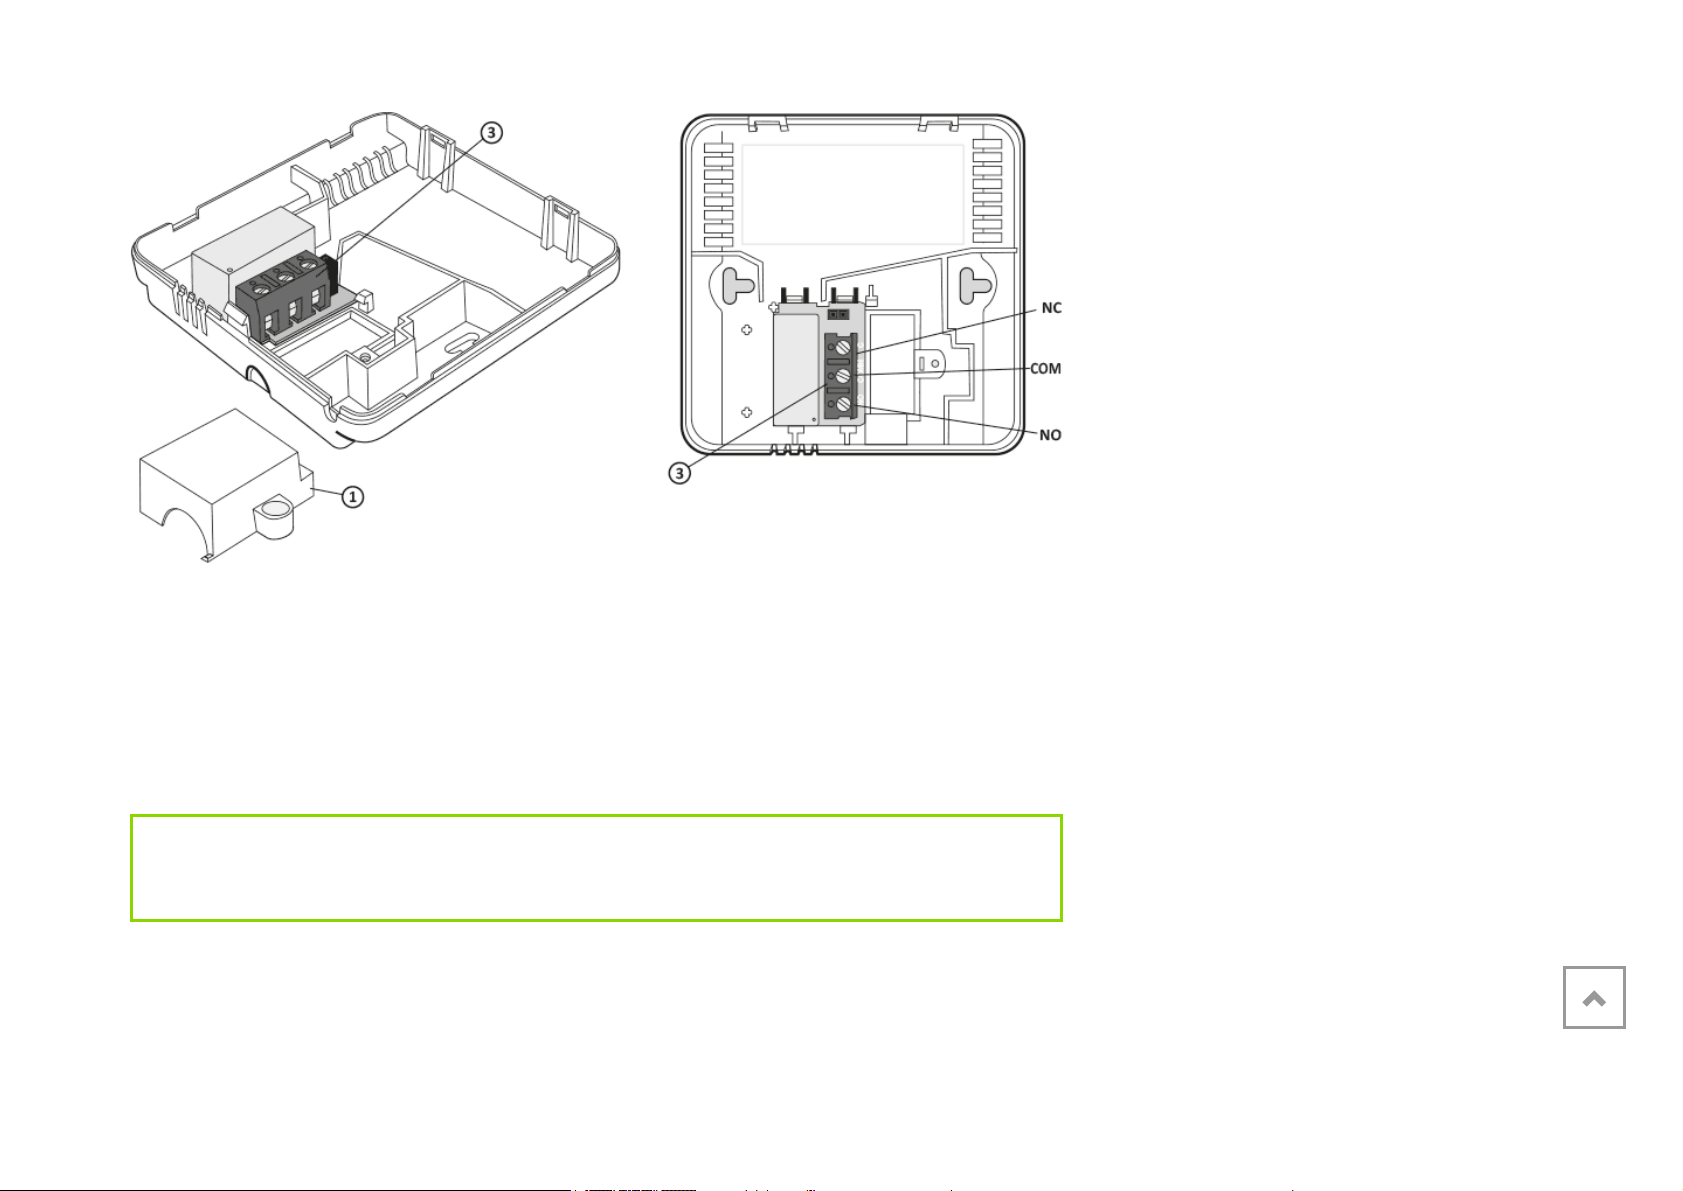
Connecting cables to AURATON Libra
To connect the wires, remove the casing as shown below:
The terminals are located on the back of AURATON Libra, under the plastic casing.
Weekly, wired thermostat
Description of the AURATON Libra
Turning AURATON Libra on for the first time
Introduction to programming
Programming
Manual control
Anti-freezing temperature
Resetting AURATON Libra
Master reset of AURATON Libra
Configuration settings
PWM operating mode
Additional remarks
The AURATON Libra connection schematics
Cleaning and maintenance
Technical specifications
Disposing of the devices
Download
26/10/21, 3:08 μ.μ.
AURATON Libra – AURATON manuals
https://manuals.auraton.pl/en/manuals/auraton-libra-en/
9/39
1 – cover
2 – screw
3 – wire terminals
It is a typical single-pole double-throw relay. In most cases, the NC terminal is not used.
IMPORTANT:
After connecting the wires, place the plastic casing back on.
Battery replacement
Weekly, wired thermostat
Description of the AURATON Libra
Turning AURATON Libra on for the first time
Introduction to programming
Programming
Manual control
Anti-freezing temperature
Resetting AURATON Libra
Master reset of AURATON Libra
Configuration settings
PWM operating mode
Additional remarks
The AURATON Libra connection schematics
Cleaning and maintenance
Technical specifications
Disposing of the devices
Download

26/10/21, 3:08 μ.μ.
AURATON Libra – AURATON manuals
https://manuals.auraton.pl/en/manuals/auraton-libra-en/
10/39
The battery compartment is located inside AURATON Libra in the front of the casing. To
install the batteries, remove the casing of AURATON Libra as shown in the figure
below:
IMPORTANT:
We recommend using alkaline batteries to power AURATON regulators. Do not use
“rechargeable batteries” because their rated voltage is too low.
Weekly, wired thermostat
Description of the AURATON Libra
Turning AURATON Libra on for the first time
Introduction to programming
Programming
Manual control
Anti-freezing temperature
Resetting AURATON Libra
Master reset of AURATON Libra
Configuration settings
PWM operating mode
Additional remarks
The AURATON Libra connection schematics
Cleaning and maintenance
Technical specifications
Disposing of the devices
Download
Other manuals for Libra
1
Table of contents
Other AURATON Thermostat manuals

AURATON
AURATON T-1 RT User manual

AURATON
AURATON 2100 TX User manual

AURATON
AURATON Libra User manual

AURATON
AURATON 2020 User manual

AURATON
AURATON 1300 User manual

AURATON
AURATON 200 RTH User manual

AURATON
AURATON R30 RT User manual

AURATON
AURATON S03 RTH User manual

AURATON
AURATON 2005 TX User manual

AURATON
AURATON Tucana User manual


Popular Thermostat manuals by other brands


Saswell
Saswell SAS920XWHB-7-S-RF User manual and warranty card

Aircalo
Aircalo TFP1-ET85P2 operating manual

Honeywell
Honeywell CM721 user manual

Carrier
Carrier DEBONAIR 33CS Installation and operating instructions

Lennox
Lennox iHarmony Zone Thermostat Installation and setup guide

Gemtech
Gemtech GT7000 Operation


