TERMA AQUAPRO WIFI 30 User manual

AQUAPRO WIFI
User manual
Storage Electric Water Heater
DOUBLE TANK TECHNOLOGY

2
Uputstva za sastavljanje
2
CONTENTS
1. Safety instructions............................................................................. 3
2. Specications.................................................................................... 5
3. Product overview............................................................................... 6
4. Quick start guide................................................................................ 8
5. Product installation............................................................................ 8
6. Operation instructions......................................................................13
7. Cleaning and maintenance.............................................................. 15
8. Troubleshooting............................................................................... 16
9. Warranty statement......................................................................... 17
10. Disposal and recycling.................................................................. 17
11. Data protection notice.................................................................. 18
Thank you for choosing Terma! Before using your new Terma product,
please read this manual thoroughly to ensure that you know how to operate
the features and functions that your new appliance offers in a safe way.

3
Uputstva za sastavljanje
3
1. SAFETY INSTRUCTIONS
CAUTION: Risk of injury!
The following safety guidelines are intended to prevent unforeseen risks or
damage from unsafe or incorrect operation of the appliance. Please check
the packaging and appliance on arrival to make sure everything is intact to
ensure safe operation. If you nd any damage, please contact the retailer
or dealer. Please note modications or alterations to the appliance are not
allowed for your safety concern. Unintended use may cause
hazards and loss of warranty claims.
Before installing this water heater,check and conrm that the earthing on
the supply socket is reliably grounded. Otherwise, the electrical water
heater can not be installed and used. Do not use extension boards.
Incorrect installation and use of this electrical water heater may result in
serious injuries and loss of property.
Intended Use
Explanation of Symbols:
Warning
The signal word indicates a hazard with a medium
level of risk which, if not avoided, may result in death
or serious injury.
Attention The signal word indicates important information (e.g.
damage toproperty), but not danger.
Caution
The signal word indicates a hazard with a low degree
of risk which, if not avoided, may result in minor or
moderate injury.
Read these operating instructions carefully and attentively before using /
commissioning the unit and keep them in the immediate vicinity of the installation
site or unit for later use!
User manual EN

4
Navodila za uporabo
4
SI
Special Cautions
• The supply socket must be earthed reliably. The rated current of the
socket shall not be lower than 16A. The socket and plug shall be kept dry
to prevent electrical leakage.
• The pressure relief valve attached with the heater must be installed at
the cold water inlet of this heater(see Fig.1), It is forbidden to block the
pressure relief hole, otherwise it will lead to safety hazard due to failure of
pressure relief.
During heating, there may be drops of water dripping from the pressure
release hole of the pressure relief valve. This is a normal phenomenon.
If there is a large amount of water leak, please contact customer
care center for repair. This pressure release hole shall, under no
circumstances, be blocked; otherwise, the heater may be damaged,
even resulting in accidents.
The drainage pipe connected to the pressure release hole must be kept
sloping downwards. Since the water temperature inside the heater can
reach up to 75°C, the hot water must not be exposed to human bodies
when it is initially used. Adjust the water temperature to a suitable
temperature to avoid scalding.
Sl 1.
•
•
Hot water Cold water
Pressure of valve

5
Navodila za uporabo
5
If the exible power supply cord is damaged, the special supply cord
provided by the manufacturer must be selected, and replaced by the
professional maintenance personnel.
If the exible power supply cord is damaged, the special supply cord
provided by the manufacturer must be selected, and replaced by the
professional maintenance personnel.
If any parts and components of this electrical water heater are damaged
please contact customer care center for repair.
This appliance is not intended for use by persons (including children) with
reduced physical, sensory or mental capabilities, or lack of experience
and knowledge, unless they have been given supervision or instruction
concerning use of the appliance by a person responsible for their safety.
Children should be supervised to ensure that they do not play with the
appliance.
The maximum inlet water pressure is 0.5MPa; the minimum inlet water
pressure is 0.1MPa, if this is necessary for the correct operation of the
appliance.
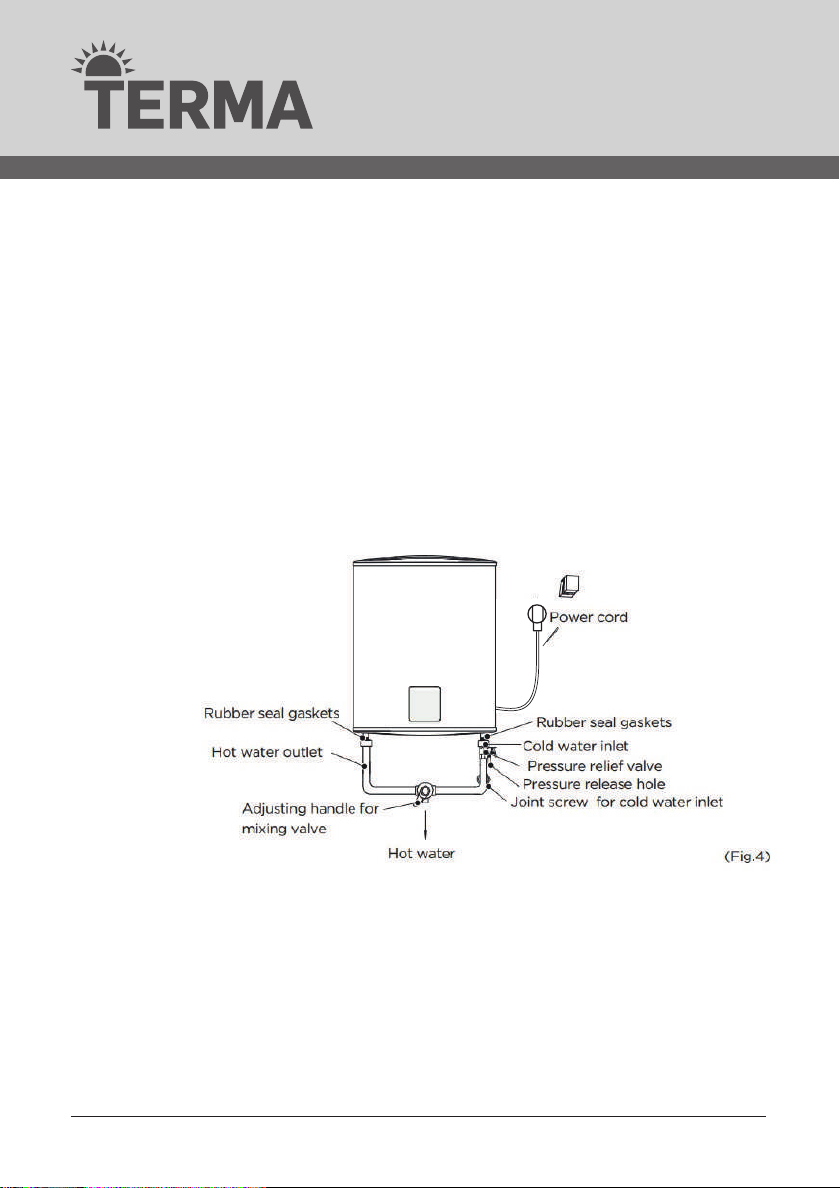
The water may drip from the discharge pipe of the pressure-relief device
and that this pipe must be left open to the atmosphere; The pressure-
relief device is to be operated regularly to remove lime deposits and to
verify that it is not blocked.
•
•
•
•
•
•
•
Product Model Aquapro
Wifi 30
Aquapro
Wifi 50
Aquapro
Wifi 80
Aquapro
Wifi 100
Volume(L) 30 50 80 100
Rated Power(W) 2000 2000 2000 2000
Rated Voltage(ACV) 220-240V 220-240V 220-240V 220-240V
Rated Pressure(MPa) 0,75 0,75 0,75 0,75
Max Of 75 75 75 75
ProtectionClass I I I I
Water Proof Class IPX4 IPX4 IPX4 IPX4
Upute za korištenje
Navodila za uporabo SI
2. SPECIFICATIONS
User manual EN

6
Navodila za uporabo
6
SI
3. PRODUCT OVERVIEW
(Note: All dimensions are in mm)
A
B
C
D
E
F
Product
Aquapro Wifi 30 Aquapro Wifi 50 Aquapro Wifi 80 Aquapro Wifi 100
469 469 569 569
589 875 902 1087
245 245 295 295
355 355 415 415
183 183 265 265
302 470 365 550

7
Navodila za uporabo
7
Navodila za uporabo
Upute za korištenje
Internal Wire Diagram
Accessories
Upute za korištenje
Navodila za uporabo SI
User manual EN
Thermal Cut Out
Heating element
Transformer
Control panel
Temp.
sensor
Relay
Power panel
Brown
L
E
N
N
Q Q
Blue
Yellow/Green
WIRING DIAGRAM

8
Navodila za uporabo
8
SI
Before First Use
Installation Instruction
4. QUICK START GUIDE
5. PRODUCT INSTALLATION
CAUTION: Fill the inner tank with water before use.
This electrical water heater shall be installed on a solid wall. If the
strength of the wall cannot bear the load equal to two times of the total
weight of the heater lled fully with water, it is then necessary to install a
special support. Incase of hollow bricks wall, ensure to ll it with cement
concrete completely.
1.

9
Navodila za uporabo
9
After selecting a proper location, determine the positons of the two install
holes used for expansion bolts with hook (200mm), Make two holes in
the wall with the corresponding depth by using a chopping bit with the
size matching the expansion bolts attached with the machine, insert the
screws, make the hook upwards, tighten the nuts to x rmly, and then
hang the electrical water heater on it (see Fig.2).
Install the supply socket in the wall. The requirements for the socket are
as follows: 250V/10A, single phase, three electrodes. It is recommended
to placed the socket on the right above the heater. The height of the
socket to the ground shall not be less than 1.8m (see Fig.3).If there is fault
on power cable, it should be replaced by the manufacturers, agencies or
qualied person who is able to do this so as to ensure the safety.
If the bathroom is too small, the heater can be installed at another place.
However, in order to reduce the pipeline heat losses, the installation
position of the heater shall be closed to the location shall be as near as
possible to the heater.
2.
3.
4.
Navodila za uporabo
Upute za korištenje
Navodila za uporabo SI
User manual EN

10
Navodila za uporabo
10
SI
The dimension of each pipe part is G1/2” ; The massive pressure of inlet
should use Pa as the unit; The minimum pressure of inlet should use Pa
as the unit.
Connection of pressure relief valve with the heater on the inlet of the
water heater.
In order to avoid leakage when connecting the pipelines, the rubber seal
gaskets provided with the heater must be added at the end of the threads
to ensure leak proof joints (see Fig.4).
If the users want to realize a multi-way supply system, refer to the method
shown in g.5 and g.6 for connection of the pipelines.
1.
2.
3.
4.
Pipelines Connection

11
Navodila za uporaboNavodila za uporabo
Upute za korištenje
11
Navodila za uporabo SI
User manual EN

12
Uputstva za sastavljanje
Note:
Please be sure to use the accessories provided by our company to install
this electric water heater. This electric water heater can not be hung on the
support until it has been conrmed to be rm and reliable. Otherwise, the
electric water heater may drop off from the wall, resulting in damage of the
heater, even serious accidents of injury. When determining the locations
of the bolt holes, it shall be ensured that there is a clearance not less than
0.2m on the right side of the electric heater, to convenient the maintenance
of the heater, if necessary.
Installation, piping works and wiring works or electrical construction
should comply to relevant laws and follow the installation instruction. If
fail to comply, leakage or electricity may lead to re or electric shock.
Do not install this electric water heater outside, indoor use only. It may
result re or electric shock.
Do not place ammable materials or Gases near to the Electric water
heater. It may result re or explosion.
Metal hoses should not be used to connect electric water heaters. This
can cause an electric shock.
After the water heater is installed, do not touch the switch to turn on the
electric water heater before it is lled with water, otherwise the water
shortage of the electric water heater will lead to dry burning.
•
•
•
•
•
12

13
Uputstva za sastavljanje
6. OPERATION INSTRUCTIONS
Methods of using
First, open any one of the outlet valves at the outlet of the water heater,
then, open the inlet valve. The water heater gets lled with water. When
water ows out of the outlet pipe it implies that the heater has been lled
fully with water, and the outlet valve can be closed.
Insert the supply plug into the supply socket, the indicator will light up
this time.
The thermostat will automatically control the temperature. When the
water temperature inside the heater has reached the set temperature, it
will switch off automatically,
When the water temperature falls below the set point the heater will be
turned on automatically to restore the heating.
Do not open Front cover.This may cause electric shock.
Do not spray water directly into the power cord or body of the heater to
avoid moisture.
Do not touch the plug or socket with wet hands. This can cause an
electric shock.
1.
2.
3.
4.
5.
6.
7.
Note:
During normal operation, the inlet valve shall be always kept open.
Navodila za uporabo
Upute za korištenje
13
Navodila za uporabo SI
User manual EN

14
Uputstva za sastavljanje
“4”is the appointment heating key. When you touch the key “4”, the
display “6” will turn into 55 °C and “6 ”will ash. Press “ ”“V”to set the
time (press “ ”“V”1 hour for each time). The time range is 2-23, and there
is no action in 5S or click“ 4” again to conrm.
At this time, the time has been conrmed and “6”will start ashing. Press
“ ”“V” to set the temperature, There is no action in 5S or click “4”again to
conrm the completion. After the completion of the whole operation,the
reservation setting is completed.
“5” is the mode key. When touching 5, if the icon 8 lights up, it means
that the single tank mode is entered. At this time, only one tank is heated.
Touch the key 5. If the icon 9 lights up, it means that the high temperature
bacteriostasis mode is entered. At this time, the default temperature is 80
°C, and the temperature cannot be adjusted; After heating for 5 minutes,
it will automatically return to double tank heating mode.
Touch the key 5, if the icon 10 lights up, it means that the intelligent
learning mode is entered.
At this time, the default temperature is 75 °C; After one week of use, the
product enters memory water mode.
In the power on state, long press the switch “5” to connect the product
and WiFi. At this time, the icon “7” starts to ash. After the connection is
successful, the icon lights up.
“1”is the key to turn on or off the product by touching the switch 1;
“2”“3” is the temperature control key; Touch “ ”“V”to adjust the
temperature of the water heater. Each time you click the “ ”“V”key, set
the temperature to increase / decrease by 1°C. If you press this key for a
long time, it will increase / decrease at the rate of 5°C / s.
1.
2.
3.
4.
5.
6.
7.
(Fig. 7)
Operating Of The Unit
V
V
V
V
V

15
Uputstva za sastavljanje
Error code for serviceman’s use
E2: Dry Ashing---Top up with water and re-heat.
E3: Overheating---Check the heating system or replace it.
E4: Sensor Fault---Check the sensor or replace it.
7. CLEANING AND MAINTENANCE
Methods of using
Temperature limiter cut off electricty if water heater is overheated or
thermostat damages.Manual resetting is needed. Ressetting knob is as
follows (see Fig.8).
Check the power supply plug and socket frequently to make sure
that they have good, reliable contact and are well grounded without
overheating phenomenon.
If the heater is not used for a long time, especially in the regions with
low atmospheric temperature(lower than 0℃), the water inside the heater
shall be drained away. This will prevent the damage to the heater due to
water freezing in the inner container, (Refer Cautions in this manual for the
method to drain away the water from the inner container).
In order to ensure that the water heater operates efciently for a long
time, it is recommended to clean the inner container and the deposits on
the electrical heating components periodically.
It is recommended to examine the magnesium anode protection materials
every six months or so. If all the material has been consumed, please
replace with the new material.
(Fig.8)
Non-professionals are not allowed to disassemble the thermal switch to reset.
Please contact prefessionals to maintain. Otherwise our company will not take
responsiblity if any quality accident happens because of this.
Do cut off power supply before maintenance, to avoid danger like electric shock.
1.
2.
3.
4.
5.
Upute za korištenjeUpute za korištenje
Navodila za uporabo SI
User manual EN
Manual reset button

16
Uputstva za sastavljanje
8.TROUBLESHOOTING
Failures Reasons Treatment
The heating
indicator
light is off.
Failures of the
temperature
controller.
Contact with the professional
personnel for repair.
No water coming
out of the hot
water outlet.
1. The running water
supply is cut off. 1. Wait for the restoration of
running water supply.
2. The hydraulic pressure
is too low. 2. Use the heater again when the
hydraulic pressure is increased.
3. The inlet valve of
running water is not open. 3. Open the inlet valve of
running water.
The water
temperature
is too high.
Failures of the
tempereature control
system.
Contact with the professional
personnel for repair.
Water leak. Seal problem of the joint
of each pipe. Seal up the joints.
Note:
This products are not equipped with plug. Please contact prefessionals to
purchase and install plug. Parts illustrated in this use and care manual are
indicative only, parts provided with the product may differ with illustrations.
This product is intended for household use only. Specications are subject
to change without notice.

17
Uputstva za sastavljanje
WARRANTY STATEMENT
DISPOSAL AND RECYCLING
The product has all prescribed and declared properties. All mechanical
parts have a 2-year warranty, electric components and electric heaters 1
year, while following the rules from the instructions. The warranty card is
valid with the attached invoice. During the warranty period, everything will
be removed free of charge, meaning defects resulting from poor material,
workmanship, defect or deciency. We reserve the right to repair or replace
the entire product. No warranty covers damages caused by improper use,
normal wear and tear and errors that do not affect the value, functionality
and safety of the device. The warranty ceases to be valid if the repair
is carried out by an unauthorized person or if no original replacement
parts were used during the repair. Cleaning of scale deposits resulting
from “hard” water is not covered by the warranty and is not considered a
manufacturing fault of the product. For reex damage (DAMNUM EXTRA
REM), for actual property damage or loss prot that could occur due to the
use or lack of the product, we take no responsibility. We also do not accept
installation costs and dismantling and any other indirect or direct costs,
Important instructions for environment
Compliance with the WEEE Directive and Disposing of the Waster Product:
This product complies with EU WEEE Directive (2012/19/EU). This product
bears aclassication symbol for waster electrical and electronic equipment
(WEEE).
This symbol indicates that this product shall not be disposed with other
household wastes at the end of its service life. Used device must be
returned to ofcial collection point for recycling of electrical electronic
devices. To nd these collection systems please contact to your local
authorities or retailer where the product was purchased. Each household
performs important role in recovering and recycling of old appliance.
Appropriate disposal of used appliance helps prevent potential negative
consequences for the environment and human health.
Upute za korištenje
Navodila za uporabo SI
User manual EN

18
Uputstva za sastavljanje
Compliance with RoHS Directive
The product you have purchased complies with EU RoHS Directive
(2011/65/EU). It does not contain harmful and prohibited materials specied
in the Directive.
Package information
Packaging materials of the product are manufactured from recyclable
materials in accordance with our National Environment Regulations. Do
not dispose of the packaging materials together with the domestic or other
wastes. Take them to the packaging material collection points designated
by the local authorities.
DATA PROTECTION NOTICE
For the provision of the services agreed with the customer, we agree to
comply without restriction with all stipulations of applicable data protection
law, in line with agreed countries within which services to the customer will
be delivered, as well as, where applicable, the EU General Data Protection
Regulation (GDPR). Generally, our data processing is to full our obligation
under contract with you and for product safety reasons, to safeguard your
rights in connection with warranty and product registration questions. In
some cases, but only if appropriate data protection is ensured, personal
data might be transferred to recipients located outside of the European
Economic Area.
18

19
Uputstva za sastavljanje
Gospodarska 17, Donji Stupnik, Zagreb
Web:
www.fero-term.hr
E-mail:
Made for: Fero-Term d.o.o.
Upute za korištenje
Navodila za uporabo SI
User manual EN

20
Uputstva za sastavljanje
This manual suits for next models
3
Table of contents
Languages:
Other TERMA Water Heater manuals
Popular Water Heater manuals by other brands

Galmet
Galmet SGWK 300/80 user guide

A.O. Smith
A.O. Smith TC-049-R2 Service handbook

Zip
Zip InLine ES3 Installation instructions & user manual

emmeti
emmeti Tank in Tank Series Installation and use manual

Smartgen
Smartgen HT SERIES user manual

Bradford White
Bradford White RE2H50R10-1NCWW Owner's Manual & Installation Instructions