Termal TMCZ 105 F User manual

- 1 -
USER’S MANUAL
MOBILE TYPE AIR CONDITIONER
WITH OZONE-FRIENDLY R410A REFRIGERANT
TMCZ 105 F
WARNING!
PLEASE READ CAREFULLY THIS MANUAL BEFORE OPERATING YOUR NEW AIR CONDITIONER.
ErP Model


- 3 -
Table of Contents
GENERAL INFORMATION...................................................................................................... 4
SAFETY PRECAUTIONS ........................................................................................................ 6
NAME OF THE COMPONENTS .............................................................................................. 9
OPERATING PANEL.............................................................................................................. 10
IR REMOTE CONTROL......................................................................................................... 13
COOLING MODE ................................................................................................................... 14
HEATING EFFECT................................................................................................................. 16
DEHUMIDIFY MODE ............................................................................................................. 18
CLEANING & MAINTENANCE OF AIR CONDITIONER ...................................................... 19
TROUBLESHOOTING ........................................................................................................... 20

- 4 -
Congratulations for purchasing new Mobile type Air Conditioner TMCZ 105 F.
Your Mobile type Air Conditioner has been developed and manufactured in accordance with
standards of the state of the art technology.
Three operating modes are available: Cooling, Deumidify and Heating.
In Cooling & Heating modes, both indoor operation and outdoor operation are possible.
Please read carefully the following operating istructions before connecting your Unit to the power
supply, in order to prevent damage from improper use.
Pay special attention to Safety Precautions.
If you pass this Unit on to a thirdy party, you must also include these operating instructions. Please
keep these operating instructions in a safe place for any questions which may arise in future.
We hope you enjoy a pleasant room climate with your Mobile Air Conditioner TMCZ 105 Z.
INTRODUCTION / TECHNICAL DATA
GENERAL INFORMATION
The Unit can be moved easily on rollers from room to room.
If Unit is moved after it has been operating for a certain period, pay attention as condensate
water could have formed inside its tank, therefore leakages of water may occur. We
recommend to move the Air Conditioner carefully.
The air quantity can be adjusted up to three ventilation levels.
Installation by a specialist is not required.
Sinply plug into a normal household socket with an operating voltage of 220-240V / 50Hz.
The extract air hose can be stored in the Unit for transport and when not in use.
EASY TO OPERATE AND EASY TO MOVE AROUND
1 x Unit
1 x Remote Control
1 x Air hose150 cm
1 x Air hose connector
COMPONENTS PROVIDED
1 x Bracket air hose (optional)
1x Top Filter
1 x Bottom Filter
1 x User’s Manual
1 x Drainage hose 50 cm
2 x Sealing plug
•
•
•
•
•
•

- 5 -
To avoid damage, place the Unit in upright position for at least 24 hours before operating it.
Release the holder air hose in the Unit and take out the extract air hose.
Fasten the air hose before operating the Unit.
BEFORE OPERATING THE UNIT
GENERAL INFORMATIONS
Turn the extract air hose in the direction of the arrow 1 shown in below Figure and remove
it from the Unit.
Turn the extract air hose in the direction of the arrow 2 shown in below Figure and connect
it to the Unit.
Plug the power plug into a socket. Never take the plug out of the socket by pulling the
connection line. This can damage the power cable.
wall (Fig. 1).
Despite the splash water protection, you should not operate the Unit in moist areas, such
as e.g. swimming baths or similar areas.
The colour of the Unit can change slightly due to direct solar radiation.
The Mobile Air Conditioner TMCZ 105 F is equipped with a special thermal deactivation.
This protects the Unit from overheating in extreme ambient conditions.
Please place the Unit so that the air inlet is not impeded, e.g. by furniture or curtains, since
this can negatively effect the capacity.
Do not expose the Air Conditioner to direct sunlight, since the appliance may overheat and
automatically deactivate on account of the thermal deactivation.
1.
2.
3.
4.
5.
6.
7.
8.
9.
10.
11.
12.
1 2

- 6 -
SAFETY PRECAUTIONS
•To take best advantage from your new air conditioner and for correct operation, please
read carefully this Manual.
• Hazard and safety levels are shown via warning and alert signs as listed below.
Warning
!
Caution
!
May result in life-threatening danger or severe injury if
operated incorrectly.
May result in injury or damages to property and assets if
operated incorrectly.
This symbol indicates prohibitive.
This symbol indicates please follow the instructions.
• In this Manual, the meaning of each symbol is as follows:
!
This symbol indicates to disconnect the power plug.
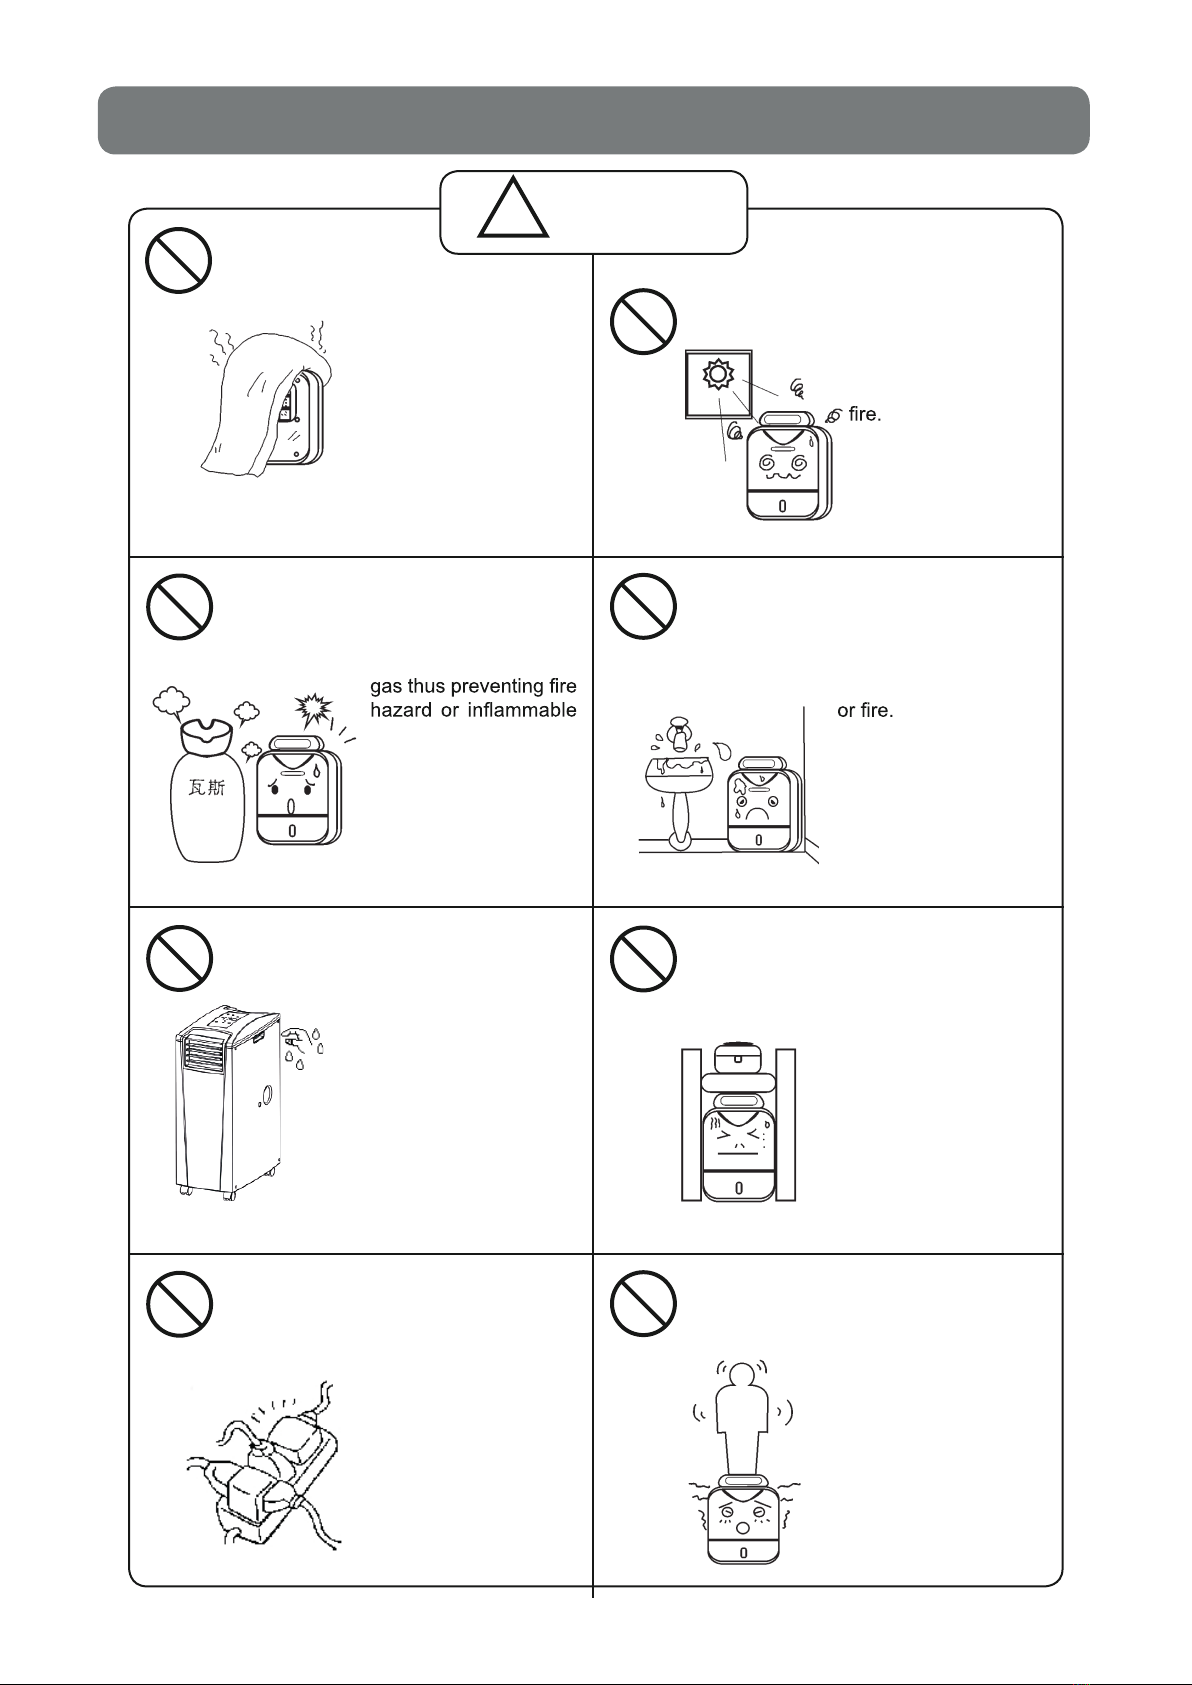
Caution
!
•When moving the Unit,
make sure to turn off the
power as water spilled
from the water tank may
lead to hazards such as
!
!
!
!
!
!
•If you choose the
continuous drainage
option (see further on)
please check the drain
hose is properly placed
to avoid any leakage.
•Before cleaning the
unit, turn it off and
disconnect the power
plug as the fan rotation
may result in safety
hazard.
•If the room temperature
falls below 0°C, the drain
hose may freeze; this
may result in water
leakage and damages
to the furniture.
•Locate the Unit on
a horizontally-leveled
surface to avoid water
leakage or hazard such
•In case of extended
idle, please remove the
power plug from the
power outlet to prevent
- 7 -
SAFETY PRECAUTUIONS
Caution
!
•Never block t h e
blowout vent or intake
vent with clothing or
rags.
•Do not place the Unit
near fuel or combustible
gas leakage.
•The air conditioner
is designed for indoor
use; exposure to direct
sunlight or rain may
cause electroshock or
•Do not expose the Unit
to moisture as this may
lead to electroshock
•Do not spurt water
on the Unit as this may
cause electroshock.
Never touch the air
conditioner with wet
hands.
•Never install the Unit
in narrow spaces.
•Do not extend or
shorten the power cord.
•Never attempt to sit
or ride on the Unit as
this may lead to injury
through accidental fall.
- 8 -
SAFETY PRECAUTIONS
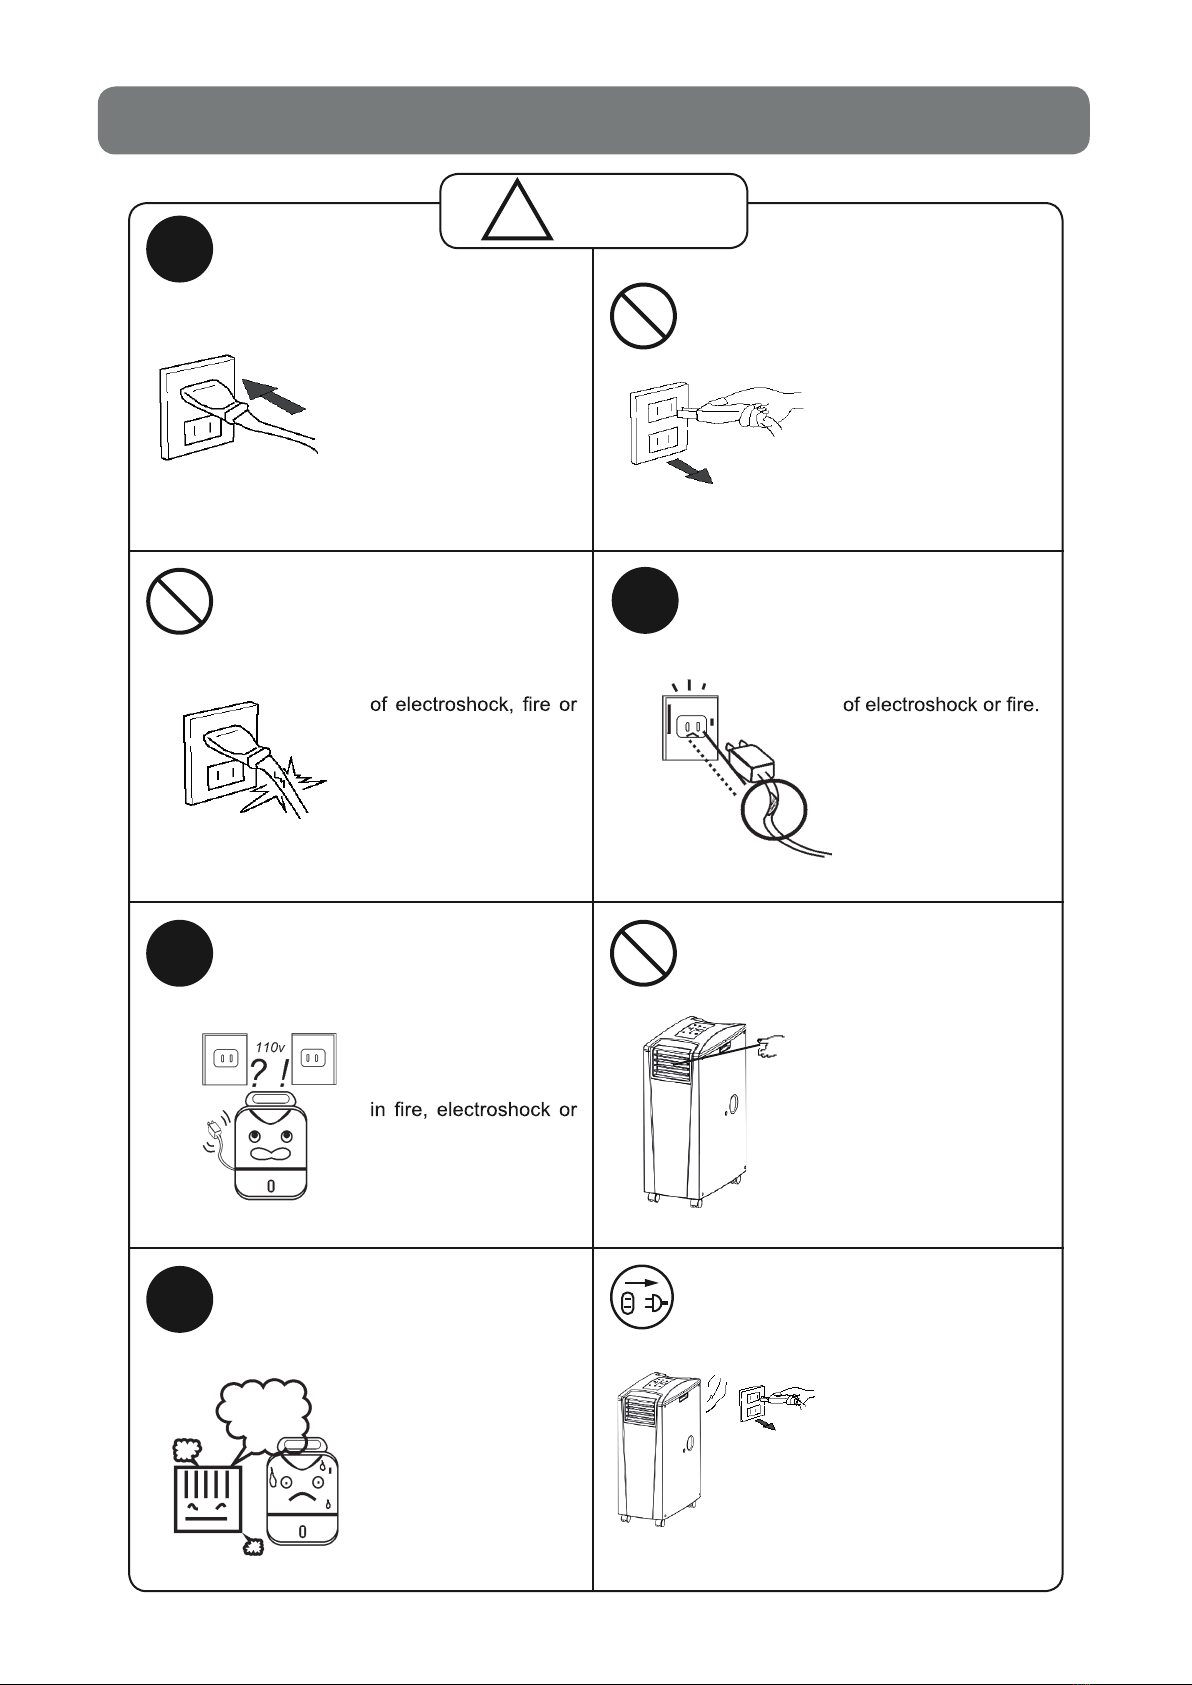
Warning
!
•Keep the power plug
clean from dust and
make sure it is securely
inserted into the wall
receptacle.
•Do not extend or
overload the power
cord to avoid hazards
overheating.
•Never turn on and off
the air conditioner by
plugging and unplugging
the power tap from the
wall receptacle.
•Avoid the power cord
to get overheated, as
this may result in hazard
•rewopehterusekaM
value on t he wall
receptacle is correct
(220V).
If not so, this may result
severe damage to the
Unit.
•Do not insert any
sharp objects into the
intake or blowout vent
as the fan rotating at
high speed may cause
injuries to people and
short circuiting on the
Unit.
•Keep the Unit away
from heating appliances
as this may cause
melting or combustion
of the plastic shield.
•renoitidnocriaehtfI
should emit any burning
smells, immediately
stop it; disconnect the
power plug from the
wall receptacle and
contact your dealer or
the nearest Authorized
Service Center.
!
!
!
!
- 9 -
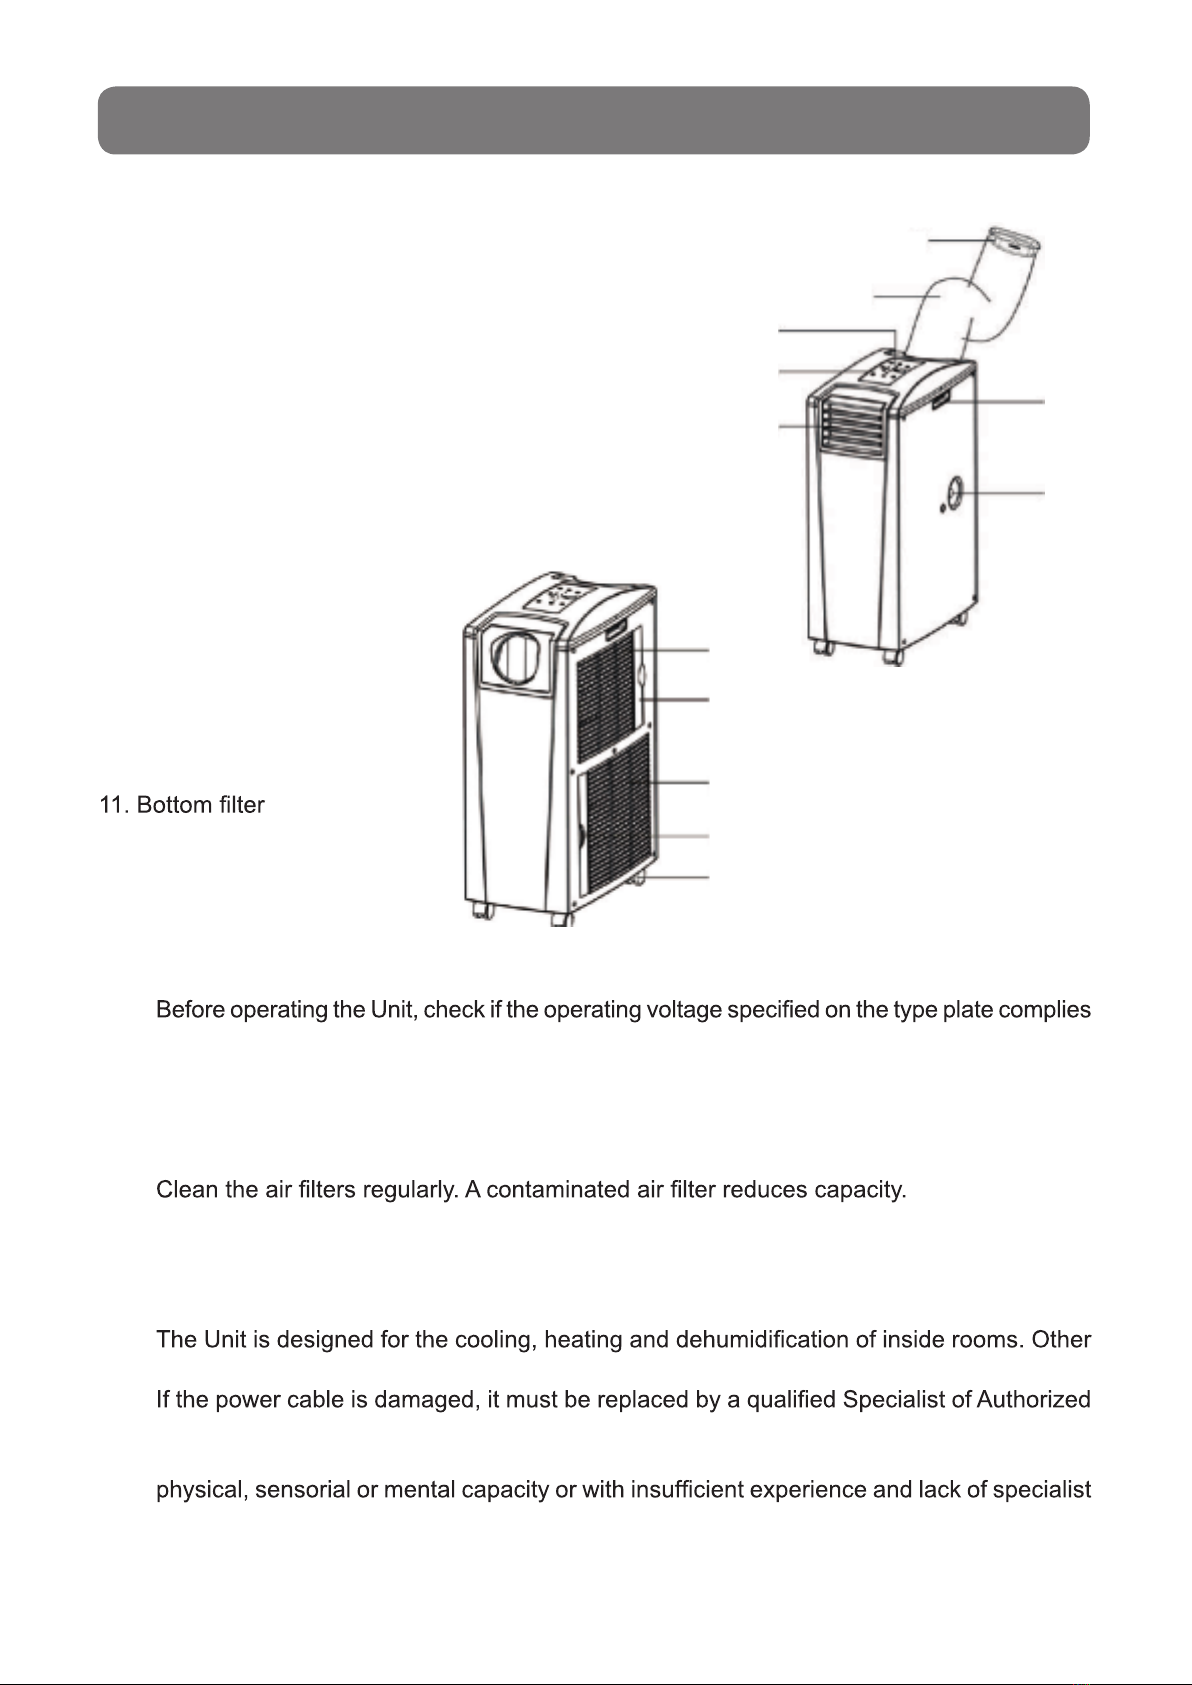
1. Operating panel
2. Control lamp
3. Air outlet grid
4. Air hose connection piece
5. Air hose
6. Upper condensation water outlet with rubber
plug
7. Carrier handles
NAME OF THE COMPONENTS
8. Air inlet
9. Top Filter
10. Air inlet
12. Bottom condensation
water outlet with rubber plug
with the local network voltage.
DO NOT BLOCK THE VENTILATION. Make sure that the air outlet and air inlet are never
blocked.
Only operate the Unit on a horizontal surface to ensure no water leakes out.
The Unit must not be operated in an area with explosive and caustic substances.
Please wait at least 5 minutes after switching off the Unit before switching it back on, to
ensure the compressor is not damaged.
The compressor has a power demand of at least 7 amps. Do not use any extension cable
with this Unit.
use is excluded.
Technical Service for safety reasons.
CAUTION!This Unit can only be used by persons (including children) with reduced
know-how, if such persons are supervised by a person responsible for their safety or who
has been trained in the use of the Unit. Children should be supervised to ensure they do
not play with the Unit.
IMPORTANT INSTRUCTIONS
1.
2.
3.
4.
5.
6.
7.
8.
9.
10.
1
2
3
4
5
6
7
8
9
10
11
12
OUTLINE OF MOBILE AIR CONDITIONER TMCZ 105 F

- 10 -
OPERATING PANEL
[POWER]
Press this button to switch on/off the Unit.
DESCRIPTION OF FUNCTIONS
[FUNC]
Press this button to select the functions “Cooling” , “Heating” or “Dehumidify”.
[TEMP+]
In “Cooling” mode, every time the button is pressed, temperature rises by 1°C, up to a
maximum value of 30°C.
In “Heating” mode, every time the button is pressed, temperature rises by 1°C, up to a
maximum value of 25°C.
[TEMP-]
In “Cooling” mode, every time the button is pressed, temperature lowers by 1°C, up to a
minimum value of 17°C.
In “Heating” mode, every time the button is pressed, temperature lowers by 1°C, up to a
minimum vaue of 15°C.
LED DISPLAY
The display shows room temperature.
If you press [TEMP+] button or [TEMP-]
displayed.
If you press [TIMER]
(automatic start of air conditioner) or deactivation (automatic stop of air conditioner).
After each manual setting, the display automatically shows the ambient temperature.
DH” is shown in the display.
Error messages are also shown in the display.
1.
2.
3.
4.
5.
- 11 -
OPERATING PANEL
[SPEED]
Press this button to set the ventilation speed to “LOW”, “MID” (“Middle”), “HI” (“High”) or
“AUTO”.
If “AUTO” is selected, the fan operates at “HI” speed (top speed) if the difference between
ambient temperature and set temperature is larger than 9°C. If the difference between
ambient temperature and set temperature is smaller than 4°C, the fan switches to middle
blower position “MID”.
If the difference between temperatures reduces further until the target temperature, the
fan switches to the lowest blower position “LOW”.
[TIMER]
Button for selecting programmable automatic start/stop of Mobile Air Conditioner
TMCZ 105 F.
Time interval for automatic start: This function is used for automatic start of Unit at the
end of set time interval. Proceed in the following way:
i) When Unit is powered but not in operation, press [TIMER] button twice to select time
interval (number of hours) at the end of which Unit will automatically start operation.
temperature.
iii) As soon as set time interval (number of hours) has expired, Unit automatically starts
operation.
If [POWER]button is pressed before set time interval has expired, TIMER setting is
cancelled. Unit starts and can run according to the desired operating mode.
Time interval for automatic stop: This function is used for automatic stop of Unit at the
end of set time interval. Proceed in the following way:
i) During Unit’s operation, press [TIMER] button to select time interval (number of hours)
at the end of which Unit will automatically stop operation.
iii) As soon as set time interval (number of hours) has expired, Unit automatically stops
operation.
If [POWER]button is pressed before set time interval has expired, TIMER setting is
cancelled and Unit switches off.
6.
7.

- 12 -
OPERATING PANEL
[SLEEP]
Press this button to select “Sleep” function.
The microprocessor integrated in the Unit will raise the pre-set temperature by 2°C per
hour up to a maximum of 4°C after 2 hours. Then temperature will be kept steady up to
the end of set time interval.
Method of “Sleep” function: set the desired time interval (number of hours) for the duration
of “Sleep” function by following the directions described at the previous page in “[TIMER]”:
“Time interval for automatic stop” and “Time interval for automatic start”.
Press [TIMER] button until the desired time interval is displayed. After the hour display,
the display switches automatically to the previous ambient temperature.
To change the temperature, press [TEMP+] button or [TEMP-] button. At each press,
temperature increases or decreases by 1°C.
8.
- 13 -
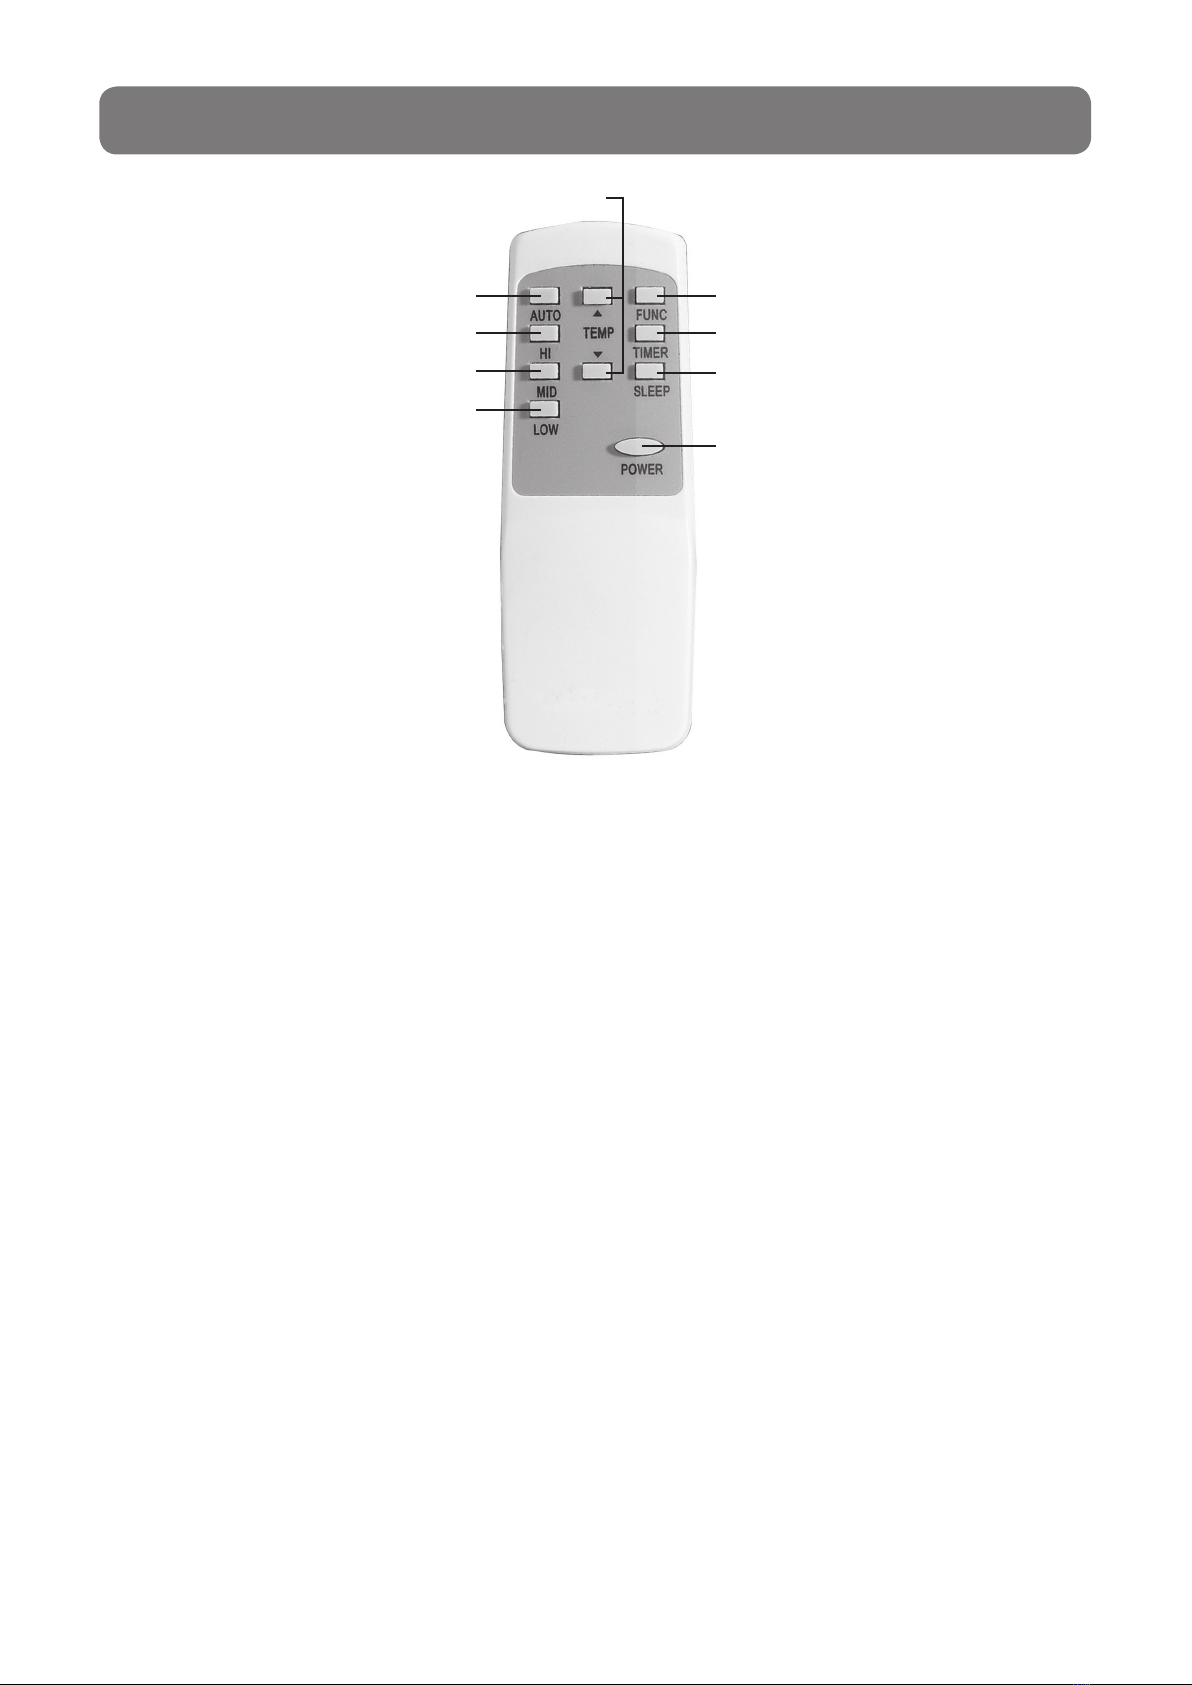
IR REMOTE CONTROL
1
2
3
4
5
6
7
7
8
[POWER]
Press this button to start/stop the Unit.
1.
2. [FUNC]
Press this button to select the functions “Cooling”, “Heating” or “Dehumidify”.
3. [TIMER]
For programming automatic start/stop of the Air Conditioner.
4. [AUTO]
Automatic fan speed.
5. [HI]
High fan speed.
6. [MID]
Middle fan speed.
7. [LOW]
Low fan speed.
8. [SLEEP]
For selecting “Sleep” mode.
9. [TEMP]
For setting the desired temperature.

- 14 -
COOLING MODE
In the summertime, it is recommended to start the Unit early on hot days, thus avoiding
heating up of the room.
This Unit has a self-evaporating function for condensation water, so that it is normally
not necessary to empty the water tank in “Cooling” mode. The drainage hose need not to
be connected. Please make sure that bottom condensation water outlet is closed with the
rubber cap during operation.
(This does not apply in the case of high air humidity: if the Unit operates in “Cooling” mode for a long period
and especially at a time of year with high air humidity, the bottom condensation tank mau be full. The control
lamp lights up to remind you to empty; the display shows Error Code E4. In such a case, empty the water
tank through the bottom condensation outlet.
If there is always high humidity inside the room, it is recommended to use the mode of continuous drainage,
by conveying the condensate water to an external container. In this case, remove the rubber cap from upper
condensation outlet and attach to it an end of the drain hose. Then insert the other end of drain hose in an
•
•
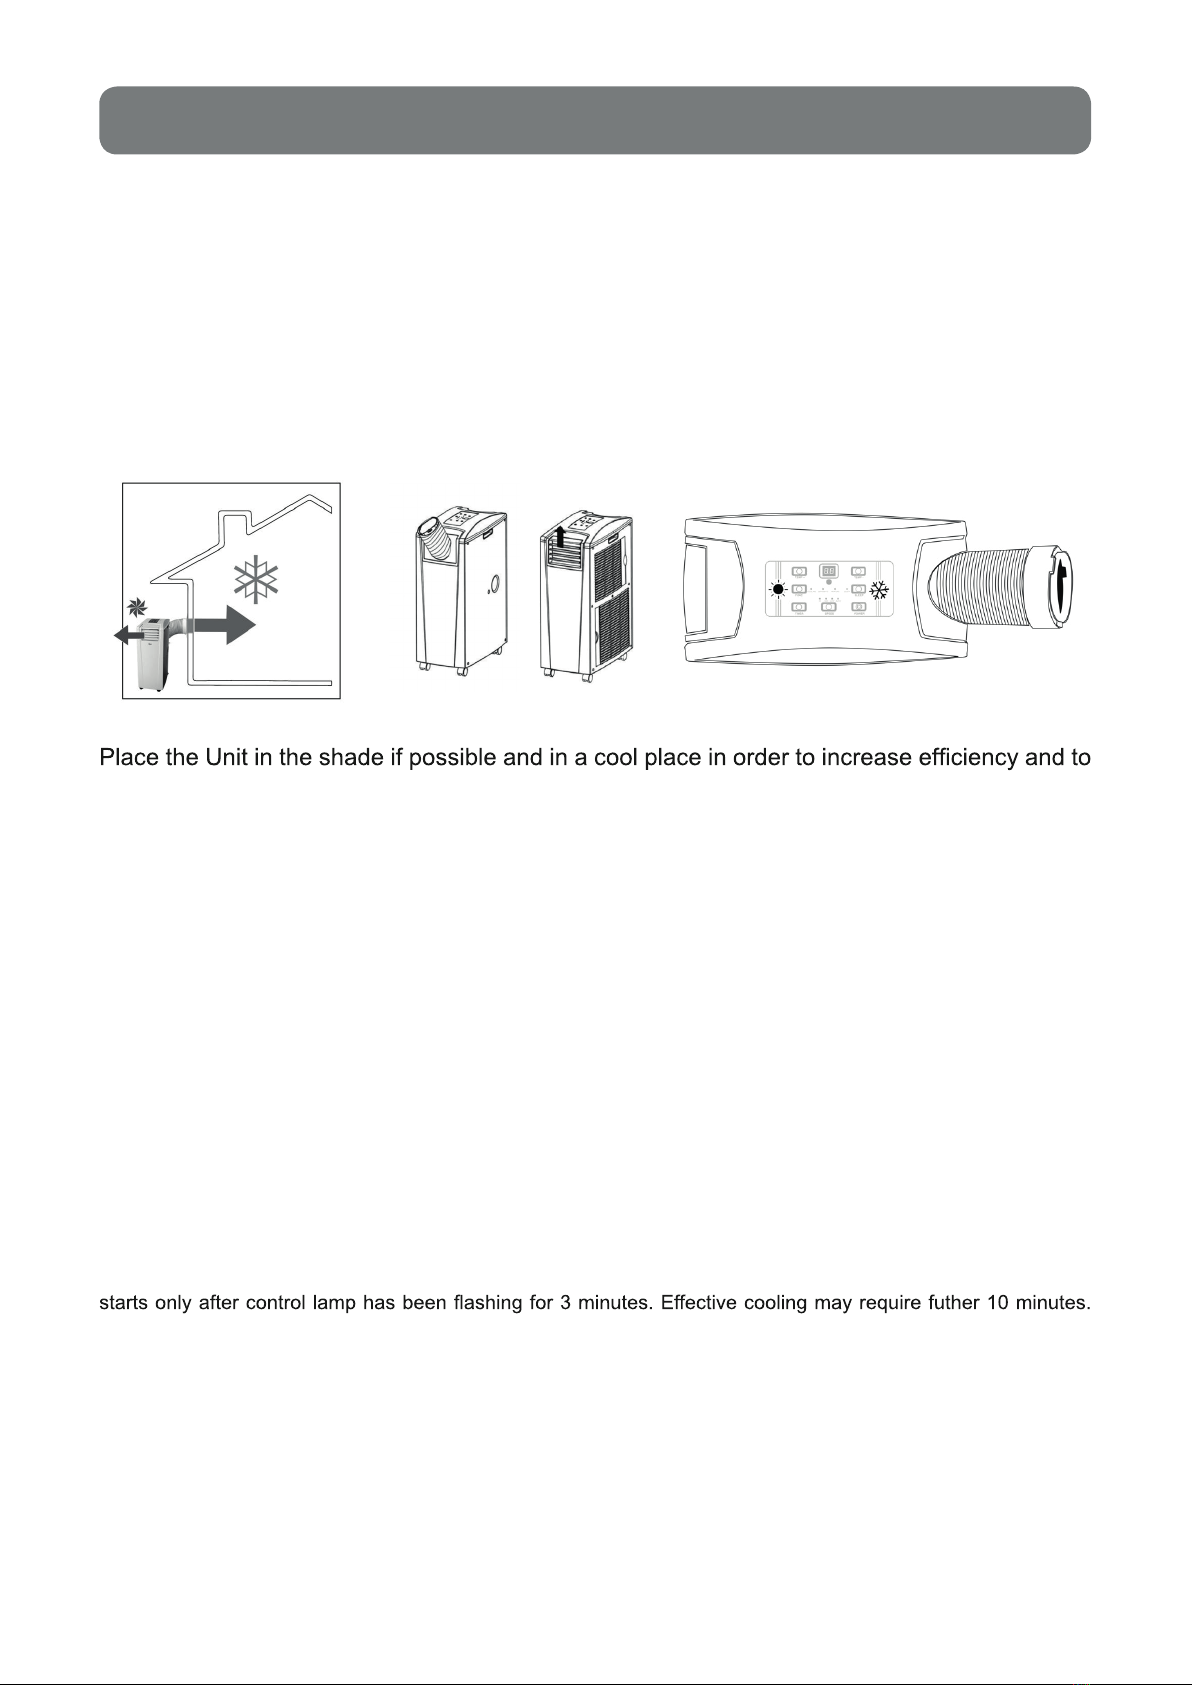
COOLING IN INDOOR OPERATION
The Unit stands in the room to be cooled.
Connect the air hose and the air outlet grid to the Unit as displayed in the illustration; the air
hose connection piece and air outlet grid need to be exchanged according to the position of the
Unit (indoor operation or outdoor operation).
For cooling in indoor operation, the position of air hose and air outlet grid is shown in the
following Figures:
The warm extract air must be emitted from the room through the air hose. This can be executed
e.g. by a tilted window, a door or wall aperture. Make sure that no warm outside air can enter the
room. For cooling the room in optimal way, we recommend our selection of various accessories
which reduce or prevent entry of warm air into the room.
Select “COOLING” function. Select your desired temperature: the settable temperature range is
between 17°C and 30°C. The Unit must only be used in an ambient temperature of maximum
32°C.
Note: After starting the Unit, or after switching over from a mode to another mode, the fan operates, but compressor
Further information are available in the Chapter “Troubleshooting”.
COOLING MODE
- 15 -
COOLING MODE
COOLING IN OUTDOOR OPERATION
The Unit is outside the room to be cooled.
Connect the air hose and the air outlet grid to the Unit as displayed in the illustration; the air
hose connection piece and air outlet grid need to be exchanged according to the position of the
Unit (indoor operation or outdoor operation).
For cooling in outdoor operation, the position of air hose and air outlet grid is shown in the
following Figures:
avoid overheating. If outdoor temperature is higher than 32°C, Unit may deactivate. If this occurs
continuously, we recommend you to temporarily use the INDOOR OPERATION of the Unit.
It is also recommended to connect the drainage hose for discharging condensation water.
Select “COOLING” function. Select your desired temperature: the settable temperature range
is between 17°C and 30°C.
The air with high oxygen content cooled by the Unit is fed into the room through the air hose.
This can be executed e.g. by a tilted window, a door or wall aperture. Make sure that no warm
outside air can enter the room.
Note: After starting the Unit, or after switching over from a mode to another mode, the fan operates, but compressor
Further information are available in the Chapter “Troubleshooting”.

- 16 -
HEATING EFFECT
HEATING EFFECT
In the wintertime, on cold days, it is recommended to start the Unit early in order to avoid
intensive cooling of the room.
For the heating function, to improve the heating effect and avoid lower temperatures
(lower than 17°C), we recommend you to remove the rubber cap from the upper water
condensation outlet, thus allowing the condensation water to leak out of the Unit through
the drainage hose.
However, as in “Heating effect” function it is not necessary to connect the drain hose,
please check that in such a case the upper water condensation outlet is closed by the
and display shows the Error Code E4), empty the condensation water tank at the bottom
of the Unit, by removing the rubber cap.
The Heating effect function of the Unit must not be operated at a room temperature of
more than 23°C or less than 7°C.
The Unit can be operated with Heating function if the outside temperature is lower than 7°C.
However, you must then ensure that the Unit is operated inside and that room temperature
is at least 7°C.
•
•
Caution!
In “Heating” mode (“Heating effect”), it is not possible to select fan speed, as the
fan automatically operates at “HI” speed, in order to avoid overheating of the Unit.
•
HEATING EFFECT IN INDOOR OPERATION
The Unit stands in the room to be heated.
Connect the air hose and the air outlet grid to the Unit as displayed in the illustration; the air
hose connection piece and air outlet grid need to be exchanged according to the position of the
Unit (indoor operation or outdoor operation).
For heating in indoor operation, the position of air hose and air outlet grid is shown in the
following Figures:
The cold extract air has to be discharged out of the room through the air hose. This can be
executed e.g. by a tilted window, a door or wall aperture. Make sure that no cold outside air can
enter the room. For heating the room in optimal way, we recommend our selection of various
accessories which reduce or prevent entry of cold air into the room.
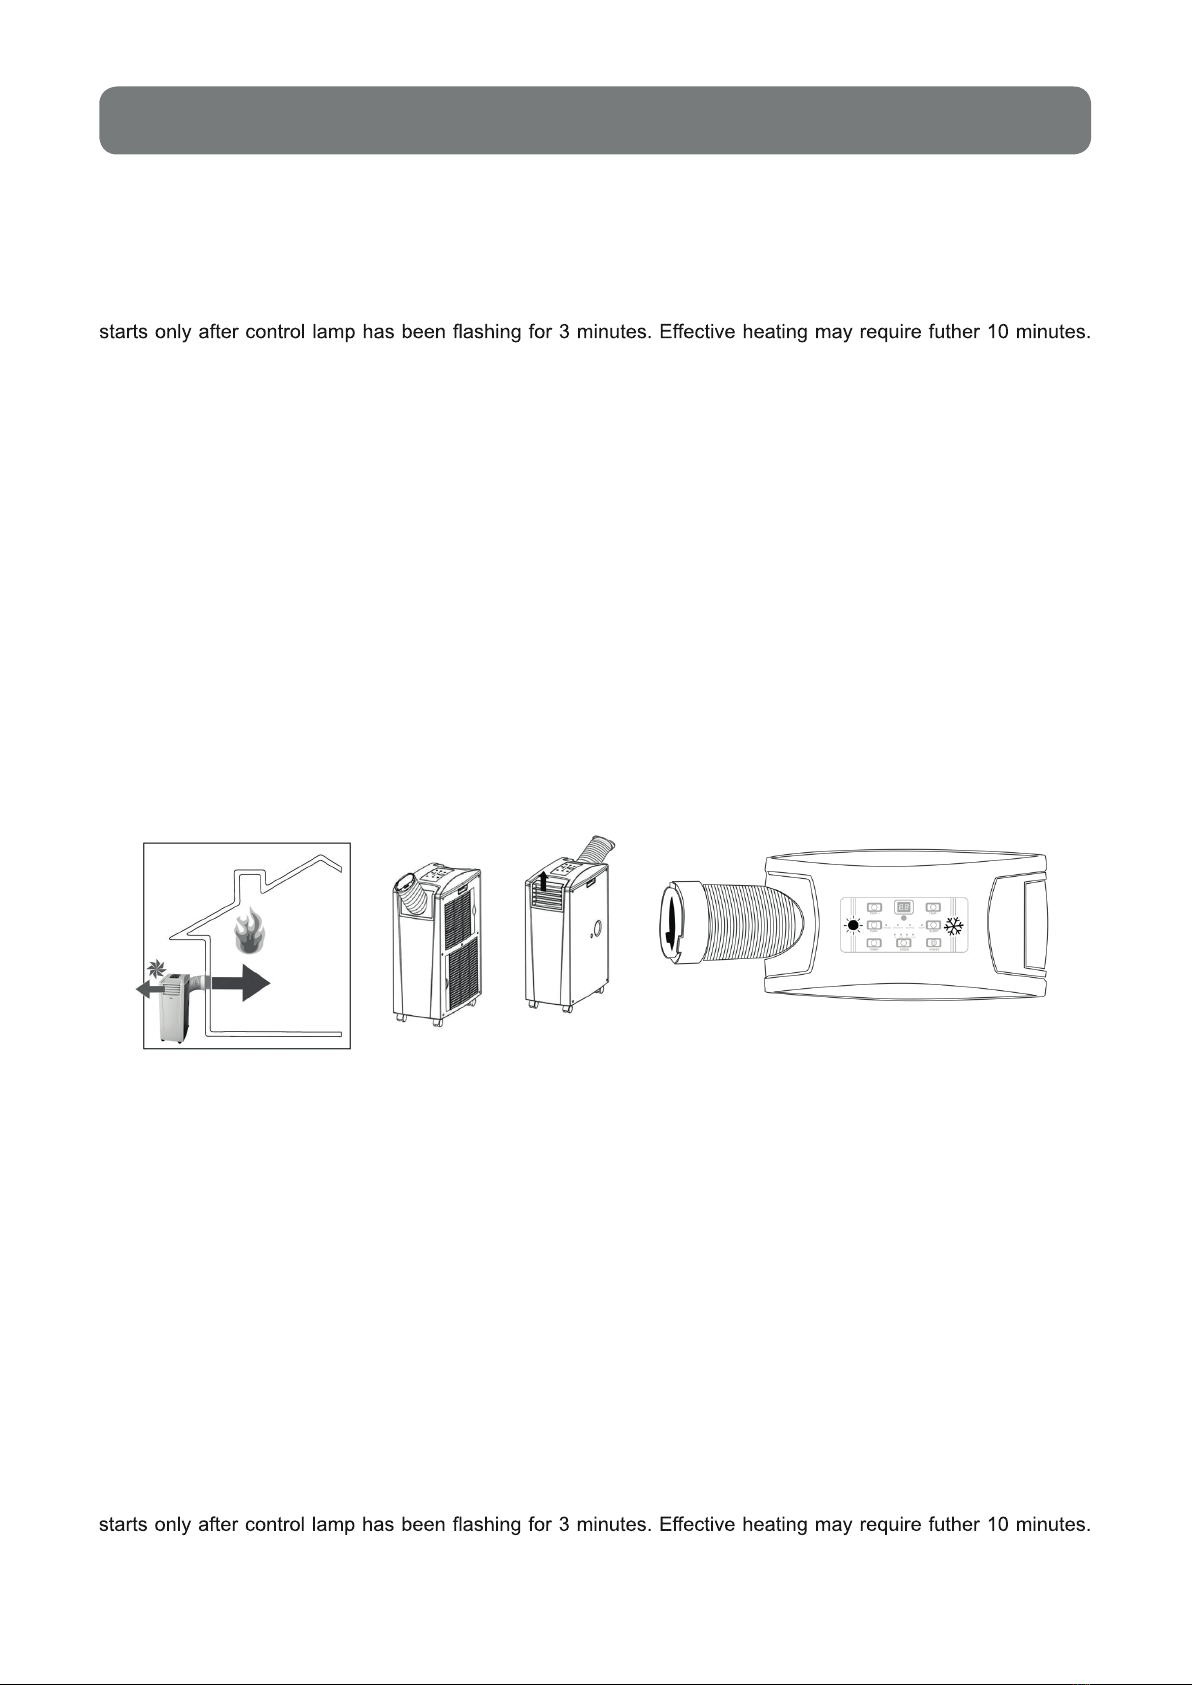
- 17 -
HEATING EFFECT
Select “HEATING” function (“Heating effect”). Select your desired temperature: the settable
temperature range is between 15°C and 25°C.
Note: After starting the Unit, or after switching over from a mode to another mode, the fan operates, but compressor
Further information are available in the Chapter “Troubleshooting”.
HEATING EFFFECT IN OUTDOOR OPERATION
The Unit is ourside the room to be heated.
Outdoor operation is ideal for the transition period in which outside temperatures do not fall below
7°C (if the outside temperature should however fall below 7°C continuously, we recommend
indoor operation).
Connect the air hose and the air outlet grid to the Unit as displayed in the illustration; the air
hose connection piece and air outlet grid need to be exchanged according to the position of the
Unit (indoor operation or outdoor operation).
For heating in indoor operation, the position of air hose and air outlet grid is shown in the
following Figures:
Select “HEATING” function (“Heating effect”). Select your desired temperature: the settable
temperature range is between 15°C and 25°C.
The air with high oxygen content heated by the Unit is fed into the room through the air hose.
This can be executed e.g. by a tilted window, a door or wall aperture. Make sure that no cold
outside air can enter the room.
Note: After starting the Unit, or after switching over from a mode to another mode, the fan operates, but compressor
Further information are available in the Chapter “Troubleshooting”.
- 18 -
DEHUMIDIFY MODE
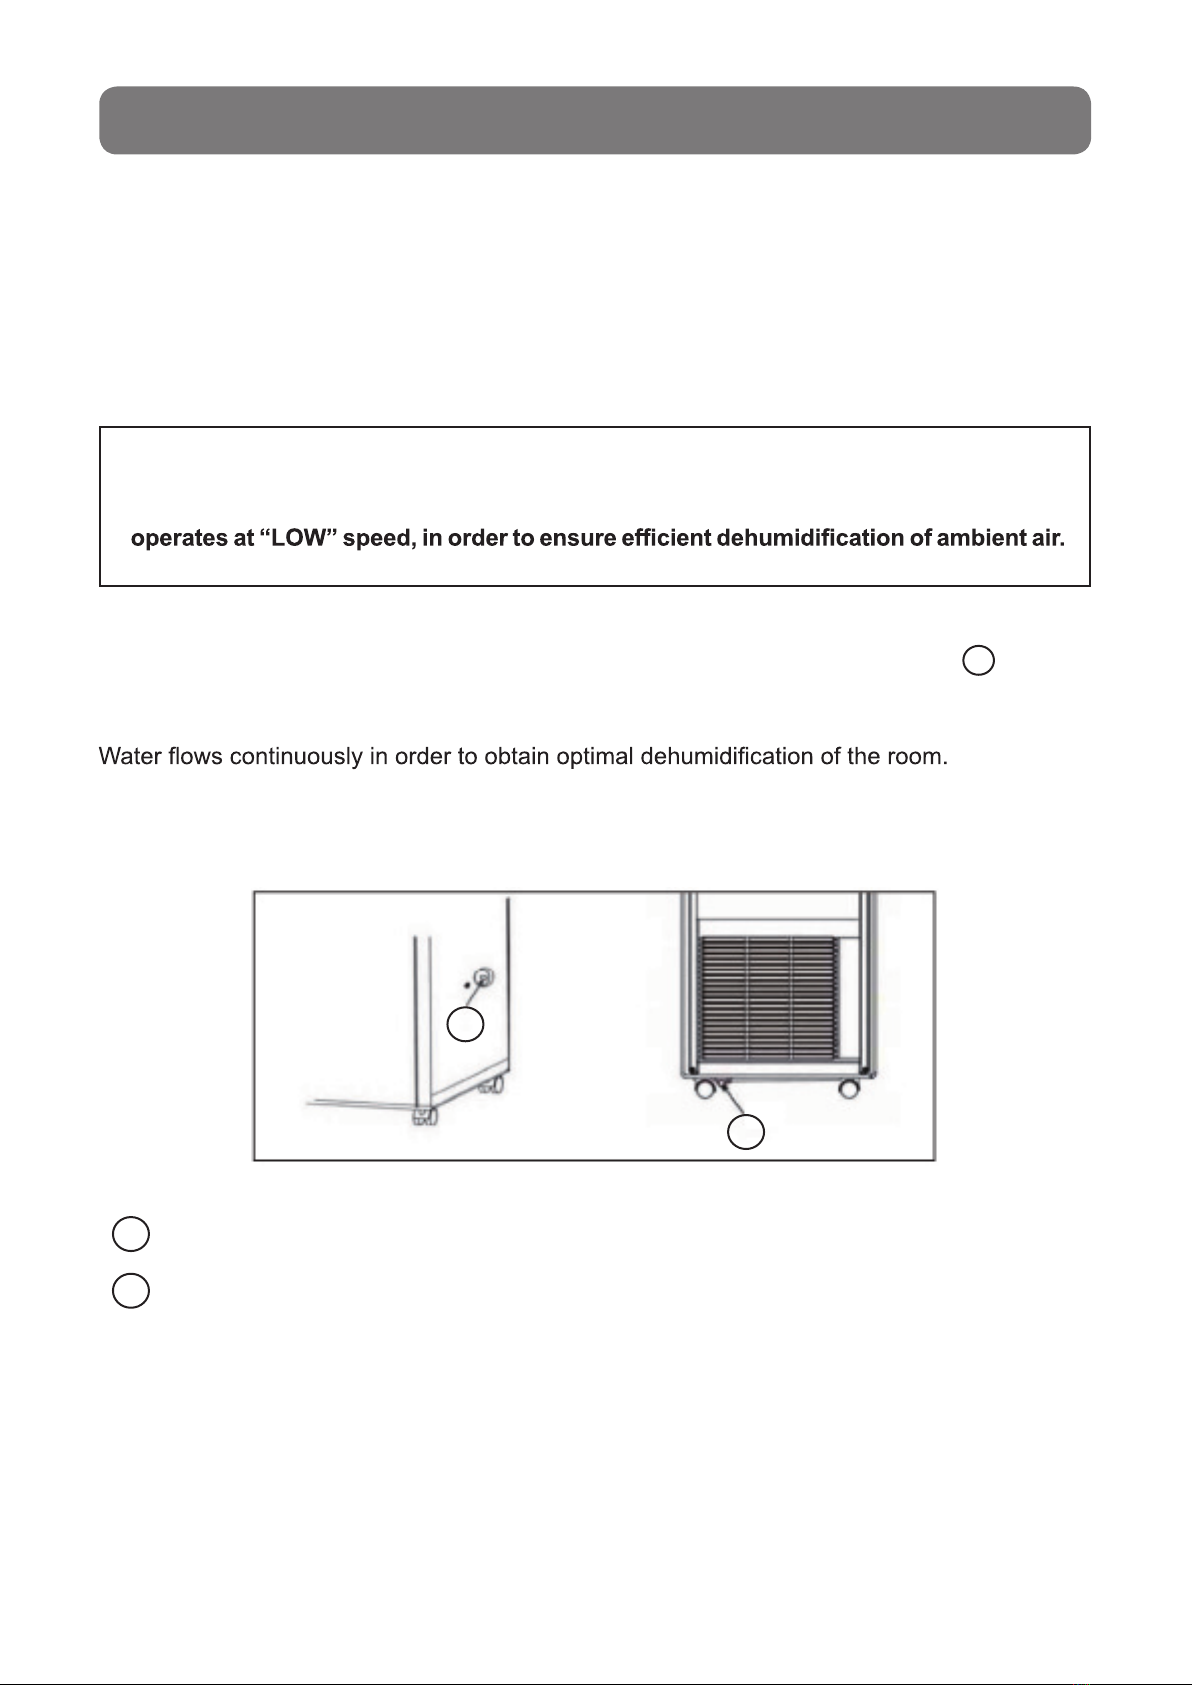
DEHUMIDIFY MODE
Humidity is extracted from the air, collected in the water tank and discharged through the
condensation water outlet.
Only air the room if the humidity of the outside air is lower than humidity inside the room.
Select “DEHUMIDIFY” function.
Caution!
In “Dehumidify” mode, it is not possible to select fan speed, as the fan automatically
Remove the rubber cap on upper condensate water outlet (see the Figure below, 1 ). Attach
an end of the drain hose to the outlet and insert the other end in an external container - for
exemple a bucket -, so that water may reach the container.
In “Dehumidify” mode, Unit and air hose have always to be placed inside the room (only indoor
operation is possible).
1
2
Upper outlet for drain hose.
Bottom outlet for discharging of condensate water collected in bottom water tank (remove the
rubber cap to empty the tank if the Unit’s display shows the Error Code “E4”).
1
2

- 19 -
simply removed by pulling the frame sidewards.
tepid water (max 40°).
CLEANING & MAINTENANCE OF AIR CONDITIONER
MAINTENANCE
Before performing any maintenance operation, check that the power plug is disconnected from
the wall power socket.
Please follow the instructions below:
1. Cleaning the outside of the air conditioner
Clean the outside of the Unit by using a dry soft cloth.
Do not use any solvent, by-products of oil, abrasive
powders or chemical products in general in order to
avoid damaging the plastic external surfaces.
use of air conditioner and then at regular
intervals, every two weeks.

- 20 -
TROUBLESHOOTING
ERROR MESSAGES
Caution!
Mobile type Air Conditioner TMCZ 105 F is equipped with a 3-minutes
compressor-delay system which means the compressor needs 3 minutes to start.
Consequently, when Unit is started (POWER button), or in case of switching over from
one function to another one (e.g. from Dehumidify to Cooling or Heating), it is necessary
to wait for 3 minutes before the compressor starts.
Is it possible to switch the
Unit on immediately after
unpacking it?
ERROR/
PROBLEM SUGGESTED REMEDY
CAUSE
No.
The Unit must be placed upwards for at least
24 hours after every transport. Otherwise,
the compressor may be damaged and there
is no capacity.
When switching on the Unit,
a strange smell comes out
of it.
Production-related
cause or incorrect
storage of Unit, e.g.
in dusty areas.
and after a long period of non-use by storing
the Unit in unsuitable areas (e.g. dusty
areas).
Run the Unit for 12 hours. The smell will
disappear after a while. In case of intensive
odour development, air the room.
Is it possible to operate the
Unit WITHOUT the extract
air hose?
No.
To achieve temperature adjustments, surplus
heat or coldness must be discharged.
Is it possible to increase the
External circumstances exist which may
impact the efficiency of the Unit. Room
insulation, use of wall/window adapter,
solar radiation, operation of eletrical units
in the room, presence of several persons
in the room may decrease the appliance’s
of the Unit accordingly by adjusting such
circumstances.
Seemingly, the compressor
does not activate.
The Air Conditioner takes approx. 10
minutes before supplying full capacity.
Unit deactivates.
On reaching the set required temperature,
the Unit switches off automatically. Check
manual setting of the required temperature
and eventually if TIMER has been set.
Before starting real troubleshooting procedures, compare the malfunction with those listed in the following
table. You could easily solve the problem by yourself.
Table of contents
Other Termal Air Conditioner manuals


Popular Air Conditioner manuals by other brands


AHRI
AHRI SUPERIOR Series Installation, operation & service manual

Johnson Controls
Johnson Controls York VIR 40A installation instructions

GE
GE AGE07 Owner's manual and installation instructions
 instruction manual")
Hitachi
Hitachi RAS-10NHZ4(H) instruction manual

Carrier
Carrier DB-O Series Use and maintenance

Gree
Gree GSW12-22L/B Technical & service manual

Dimplex
Dimplex DCES09 manual

Mitsubishi
Mitsubishi PQHY-P200YGM-A installation manual

Sharp
Sharp CVP12PX - Ha Sh 11500 Btu Portable Air... Installation and operation manual

LG
LG MT11AH installation manual

Mitsubishi Electric
Mitsubishi Electric CITY MULTI PKFY-P-VBM-E installation manual

dirna Bergstrom
dirna Bergstrom bycool green Series Troubleshooting