Terracom IPSM-2C20 User manual


2
© 2022 Enter your company name
Table of Contents
Foreword 0
Part I About This Manual 4
................................................................................................................................... 41 Safety Instructions & Declaration
................................................................................................................................... 52 Notice Sign
................................................................................................................................... 53 Copyright
Part II System Overview 5
................................................................................................................................... 61 Quick Start
Part III Hardware Installation 8
................................................................................................................................... 81 IPSM-2C20/IPSM-2C20M
.......................................................................................................................................................... 10Front Panel
.......................................................................................................................................................... 11Rear Panel
................................................................................................................................... 122 IPBX-2C20/IPBX-2C20M
.......................................................................................................................................................... 13Front Panel
.......................................................................................................................................................... 14Rear Panel
................................................................................................................................... 143 Bridge Amp Output
Part IV Configuration-Web Browser 15
................................................................................................................................... 151 Getting Started
................................................................................................................................... 162 IP & Network
.......................................................................................................................................................... 16IP Information
.......................................................................................................................................................... 16IP Address
.......................................................................................................................................................... 17Network Bandwidth And Bitrate
................................................................................................................................... 183 Login/Logout
................................................................................................................................... 194 Setup
.......................................................................................................................................................... 19Basic Setting
.......................................................................................................................................................... 23Device
.......................................................................................................................................................... 26Function Libraries
......................................................................................................................................................... 26Commend (String)
......................................................................................................................................................... 27DSPElement Adjust
......................................................................................................................................................... 29DSPElement Read
......................................................................................................................................................... 30Contact Out
......................................................................................................................................................... 32User Fault
......................................................................................................................................................... 33Rocord
......................................................................................................................................................... 33Multi Function
.......................................................................................................................................................... 34Audio Matrix
......................................................................................................................................................... 36How -to: Use RAC for music/source selection and level control
.......................................................................................................................................................... 38Media Setting
......................................................................................................................................................... 38Management
......................................................................................................................................................... 40Record
......................................................................................................................................................... 42Background Music
......................................................................................................................................................... 43Add Audio Files/Creat playlist for BGM

3Contents
3
© 2022 Enter your company name
.......................................................................................................................................................... 44I/O Control
......................................................................................................................................................... 45Call/Hang Up
......................................................................................................................................................... 46Message Call
......................................................................................................................................................... 46Message Play/Stop
......................................................................................................................................................... 47Contact Out
......................................................................................................................................................... 47Command(String)
......................................................................................................................................................... 47Multi Function
......................................................................................................................................................... 48Record
......................................................................................................................................................... 48User Fault
......................................................................................................................................................... 49DSPElement Adjust
......................................................................................................................................................... 49Music Play/Stop
.......................................................................................................................................................... 49Account Manager
.......................................................................................................................................................... 51Third Party
......................................................................................................................................................... 52Call/Hang Up
......................................................................................................................................................... 52DSPElement Adjust
......................................................................................................................................................... 53DSPElement Read
......................................................................................................................................................... 53Net StreamSelect
......................................................................................................................................................... 54Record
.......................................................................................................................................................... 55Scheduler
......................................................................................................................................................... 55Add/Edit/Delete
................................................................................................................................... 585 Update
.......................................................................................................................................................... 58Firmware
.......................................................................................................................................................... 58Configuration
.......................................................................................................................................................... 58Reboot
................................................................................................................................... 596 Status
.......................................................................................................................................................... 59TERRA System
.......................................................................................................................................................... 59Control Calibrate
.......................................................................................................................................................... 60Log File
................................................................................................................................... 617 DSP Function
.......................................................................................................................................................... 62Input
.......................................................................................................................................................... 63Hi/Lo Pass PEQ 8 Band
.......................................................................................................................................................... 64Major Audio Matrix
.......................................................................................................................................................... 64Ducker
.......................................................................................................................................................... 65Selector
.......................................................................................................................................................... 66Comp/Limiter
.......................................................................................................................................................... 67Output
................................................................................................................................... 688 About-Copy Right
Part V Techinical Data 68
................................................................................................................................... 681 IPSM-2C20/IPSM-2C20M
................................................................................................................................... 692 IPBX-2C20/IPBX-2C20M
................................................................................................................................... 703 YMC0101-005 MIC capsule
Index 0

4
© 2022 Enter your company name
1 About This Manual
This user manual will explicitly describe the hardware installation and the software configuration,
provides installers and users the necessary information to setup and configure the system.
Firmware version:
Model
Version
IPSM-2C20, IPBX-2C20
v0.0.0.1
1.1 Safety Instructions & Declaration
Do not expose the device to extreme temperatures, direct sunlight, humidity, or dust, which could
cause fire or electrical shock hazard.
Keep away water or other liquids from the device. Otherwise fire or electrical shock may result.
Connect the power cord only to an AC outlet of the type stated in this owner's manual or as marked
on the unit. Otherwise fire and electrical shock hazard results.
Avoid touching power plugs with wet hands. Doing so is a potential electrical shock hazard.
Take care for correct polarity when operating the device from a DC power source. Reversed polarity
may cause damage to the unit or the batteries.
Avoid placing heavy objects on power cords. A damaged power cord is a fire and electrical shock
hazard.
Do not cut, scratch, bend, twist, pull, or heat the power cord. A damaged power cord is a fire and
electrical shock hazard. Ask your TERRACOM dealer for replacement.
Turn off immediately the unit, remove the power cord from the AC outlet and consult your TERRACOM
dealer in any of the following circumstances:
oSmoke, odor, or noise getting out of the unit.
oForeign objects or liquids get inside the device.
oThe unit has been dropped or the shell is damaged.
oThe power cord is damaged.
oIf you continue using the device, fire and electrical shock may result.
Do not drop or insert metallic objects or flammable materials into the unit as this may result in fire and
electrical shock.
Do not remove the device's cover, as there are exposed parts inside carrying high voltages that may
cause an electrical shock. Contact your TERRACOM dealer if internal inspection, maintenance, or
repair is necessary.
Do not try to make any modifications to the device. This is a potential fire and electrical shock hazard.
Avoid the device's ventilation slots to be blocked. Blocking the ventilation slots is a potential fire
hazard.
To prevent the unit from falling down and causing personal injury and/or property damage, avoid
installing or mounting the unit in unstable locations.
Leave enough space above and below the unit to provide good ventilation of the device. If the airflow is

About This Manual 5
© 2022 Enter your company name
not adequate, the device will heat up inside and may cause a fire.
Operate the device in an environment with a free-air temperature of between -5ºC ~ 55ºC (23ºF ~
131ºF).
Turn off all audio equipment when making any connections to the device, and make sure to use
adequate cables.
Do not use benzene, thinner, or chemicals to clean the device. Use only a soft, dry cloth.
If the device is moved from a cold place (e.g., overnight in a car) to a warmer environment,
condensation may form inside the unit, which may affect performance. Allow the device to acclimatize
for about one hour before use.
1.2 Notice Sign
There are two types of signs can be used in this manual. The type is closely related to the effect that
may be caused if it is not observed.
Note: Containing additional information.
Caution: The equipment or the property can be damaged, or persons can be lightly injured if the
alert is not observed.
1.3 Copyright
All rights reserved. No part of this document may be reproduced or transmitted in any form by any
means, electronic, mechanical, photocopying, or otherwise, without the prior written permission of the
publisher. The content and illustrations are subject to change without prior notice.
2 System Overview
IPSM-2C20/ IPBX-2C20 application in system
The TERRACOM IP speaker can be utilized within a variety of applications for real time
broadcasting, intercommunication, music playback etc. In addition, IPSM-2C20/ IPBX-2C20
supports user to control power switch of light, door, curtain and air condition.
System diagram

6
© 2022 Enter your company name
2.1 Quick Start
Power connection
The IP speaker can be powered by PoE+ switch via CAT5/6 cable, or/and the IP speaker can also
be powered by an external power supply adapter like PSU65-27 or PSU36-24.
Network connection
Use a straight CAT5/6 cable to link your PC network card to the IP speaker. Open your favorite web

System Overview 7
© 2022 Enter your company name
browser (we recommend Google Chrome or Mozilla Firefox). Each IP speaker is shipped from the
factory with a default IP address of 192.168.100.49, type the default IP address into the address bar.
Login
You will be asked for a login (By default: admin). After login, you can start to program the settings of
IP speaker.
Assign IP address to IP speaker
Change the IP address of your device at "
Machine > Setting > IP". After the settings have
been saved, please plug out & plug in the
Ethernet cable of IP speaker to reboot the IP
setting.
You might need to change the IP settings of your PC network card to be in the same network mask
as the new IP address of your IP speaker. To avoid the conflict issues when connecting multiple IP
speakers with the same IP address, be sure to only connect one IP speaker at a time to the
Ethernet switch when assigning IP addresses.
SIP Setting

8
© 2022 Enter your company name
With SIP server
The audio streaming can be done using a SIP
Server. Go to "Machine > Setting > SIP" and
enter the settings of your SIP server.
Without SIP server
If you don’t have a SIP server, please follow
the settings as below,
oFirewall Traversal Mode: TERRA Net
oSIP Port: 5060
oRTP Port: 6912
3 Hardware Installation
3.1 IPSM-2C20/IPSM-2C20M
Front panel
Rear panel
Modules of IPSM-2C20 are equipped with 1 channel in 2 channels in 20W with 8 ohm loudspeaker, and
PoE+ power (If PoE+ is not available, 24VDC power adapter will supply higher power). With Power over
Ethernet (PoE+), both audio control and power can be flowed over the standard female RJ45 Ethernet

Hardware Installation 9
© 2022 Enter your company name
connector, giving a cost effective way to used as the SIP endpoint of paging, intercom, mass notification
system and minimizing the number of cables. The IPSM-2C20 is designed to embed in TERRACOM's IP
speaker. To fulfill hands-free intercom and monitoring, the IPSM-2C20M is equipped with a built-in
microphone interface. The YMC0101-005 mic capsule could be connected to this microphone interface.
The IPSM have 3 control inputs for level control and source selection using the RAC 5/8 controller, 1
relay contact output can be programmed to control an external device via TerraManager. To configure,
control, monitor the IP speakers in real-time, this can be easily done through your favorite web browser
interface, making the management even the most complex environments simpler than ever. The
remarkable features include event management, volume control, paging, intercom, music streaming,
routing, logic control, 3rd party control, DSP control, monitoring, etc.
The 20W x 2CH amp output is applied for 8 ohm speaker. However, it can be bridged to 1 channel
40W for 4 ohm speaker by hand making.
See the following table listed the supported audio codec by IPSM-2C20
Function
Supported Audio Encoders/ Decoders
SIP
G.711 ulaw, G.711 alaw, G.722, G.726-32, G.727-32,
PCM16K, WAVE(decode only), MP3(decode only)
SHOUTcast/ Icecast
(decode only)
AAC, AAC+, MP3
Stream
G.711 ulaw, G.711 alaw, G.722, PCM16K, WAVE, MP3
Record
(encode only)
WAVE, MP3
Ordering information
Models
Model Description
IPSM-2C20
IP Speaker Module/2 ch/20W w/PoE+
IPSM-2C20M
IP Speaker Module/2 ch/20W w/mic in w/PoE+
IPSM-2C20P36
IP Speaker Module/2 ch/20W w/PSU36-24
IPSM-2C20P65
IP Speaker Module/2 ch/20W w/PSU65-27
IPSM-2C20MP36
IP Speaker Module/2 ch/20W w/mic in w/PSU36-24
IPSM-2C20MP65
IP Speaker Module/2 ch/20W w/mic-in w/PSU65-27
YMC0101-005
Mic Capsule w/40cm lead & connector
All IPSM-2C20 models are not shipped with the mic capsule, please order YMC0101-005 mic
capsule if necessary.

10
© 2022 Enter your company name
3.1.1 Front Panel
1. Ethernet POE+ port
Connect the IP speaker to Ethernet network via RJ45 plug, CAT5/6 cable, allowing the system to
be configured, controlled and monitored via web browser.
In addition, the IP speaker can use the power(20W) from PoE+ (PoE+ switch is required).
2. LED power light
Display the power of IPSM-2C20 is on or off.
3. Power Input
If the IP speaker require higher power or PoE+ power isn't available, external PSU power adapter
(24VDC/ 2A) can supply power.
External power adapter ordering information: "PSU65-27" supplies 65W and "PSU36-24"
supplies 36W for IP speaker.
4. Micro SD card interface:
Micro SD Card interface and internal 200MB storage of IPSM-2C20 are for music message/recording
storage.
The micro SD card must be formatted to FAT32 to read (max. 512GB)

Hardware Installation 11
© 2022 Enter your company name
3.1.2 Rear Panel
Euro-style Terminal Block
5. Amp output
20W x 2 channel for 8 ohm speaker or can be bridged to 1 channel with 40W for 4 ohm speaker.
6. Microphone input
To fulfill hands-free intercom and monitoring, the IPSM-2C20M module is equipped with a
microphone input. The YMC0101-005 mic capsule could be connected to this microphone input.
This mic input provides DC 2.5V phantom power for microphone.
7. Contact output
1 relay contact output can be programmed to control an external device.
8. Logic contact inputs
3 supervised control inputs are designed to work with a simple contact such as RAC 5/RAC 8
programmable source selector and volume control remote or a push button for two-state logic
control.
9. LED status controller interface (3.3V@10 mA)
For safety and emergency alerting.
Euro-style terminal block
It is embed on the board and can be wired directly by screwdriver for easy operation and saving
place.

12
© 2022 Enter your company name
3.2 IPBX-2C20/IPBX-2C20M
Front panel
Rear panel
Modules of IPBX-2C20 are equipped with 1 channel in 2 channels in 20W with 8 ohm loudspeaker, and
PoE+ power (If PoE+ is not available, 24VDC power adapter will supply higher power). With Power over
Ethernet (PoE+), both audio control and power can be flowed over the standard female RJ45 Ethernet
connector, giving a cost effective way to used as the SIP endpoint of paging, intercom, mass notification
system and minimizing the number of cables. The IPBX-2C20 is with a outside box as an external
connection for general speakers. To fulfill hands-free intercom and monitoring, the IPBX-2C20M is
equipped with a built-in microphone interface. The YMC0101-005 mic capsule could be connected to this
microphone interface.
The IPBX have 3 control inputs for level control and source selection using the RAC 5/8 controller, 1
relay contact output can be programmed to control an external device via TerraManager. To configure,
control, monitor the IP speakers in real-time, this can be easily done through your favorite web browser
interface, making the management even the most complex environments simpler than ever. The
remarkable features include event management, volume control, paging, intercom, music streaming,
routing, logic control, 3rd party control, DSP control, monitoring, etc.
The 20W x 2CH amp output is applied for 8 ohm speaker. However, it can be bridged to 1 channel
40W for 4 ohm speaker by hand making.
See the following table listed the supported audio codec by IPBX-2C20
Function
Supported Audio Encoders/ Decoders
SIP
G.711 ulaw, G.711 alaw, G.722, G.726-32, G.727-32,
PCM16K, WAVE(decode only), MP3(decode only)
SHOUTcast/ Icecast
(decode only)
AAC, AAC+, MP3
Stream
G.711 ulaw, G.711 alaw, G.722, PCM16K, WAVE, MP3
Record
(encode only)
WAVE, MP3
Ordering information

Hardware Installation 13
© 2022 Enter your company name
Models
Model Description
IPBX-2C20
IP Speaker Box/2 ch/20W w/PoE+
IPBX-2C20M
IP Speaker Box/2 ch/20W w/mic in w/PoE+
IPBX-2C20P36
IP Speaker Box/2 ch/20W w/PSU36-24
IPBX-2C20P65
IP Speaker Box/2 ch/20W w/PSU65-27
IPBX-2C20MP36
IP Speaker Box/2 ch/20W w/mic in w/PSU36-24
IPBX-2C20MP65
IP Speaker Box/2 ch/20W w/mic-in w/PSU65-27
YMC0101-005
Mic Capsule w/40cm lead & connector
All IPBX-2C20 models are not shipped with the mic capsule, please order YMC0101-005 mic capsule
if necessary.
3.2.1 Front Panel
1. Ethernet POE+ port
Connect the IP speaker to Ethernet network via RJ45 plug, CAT5/6 cable, allowing the system to
be configured, controlled and monitored via web browser.
In addition, the IP speaker can use the power(20W) from PoE+ (PoE+ switch is required).
2. LED power light
Display the power of IPSM-2C20 is on or off.
3. Power Input
If the IP speaker require higher power or PoE+ power isn't available, external PSU power adapter
(24VDC/ 2A) can supply power.
External power adapter ordering information: "PSU65-27" supplies 65W and "PSU36-24"
supplies 36W for IP speaker.
4. Micro SD card interface
Micro SD Card interface and internal 200MB storage of IPSM-2C20 are for music message/recording
storage.
14
© 2022 Enter your company name
The micro SD card must be formatted to FAT32 to read (max. 512GB)
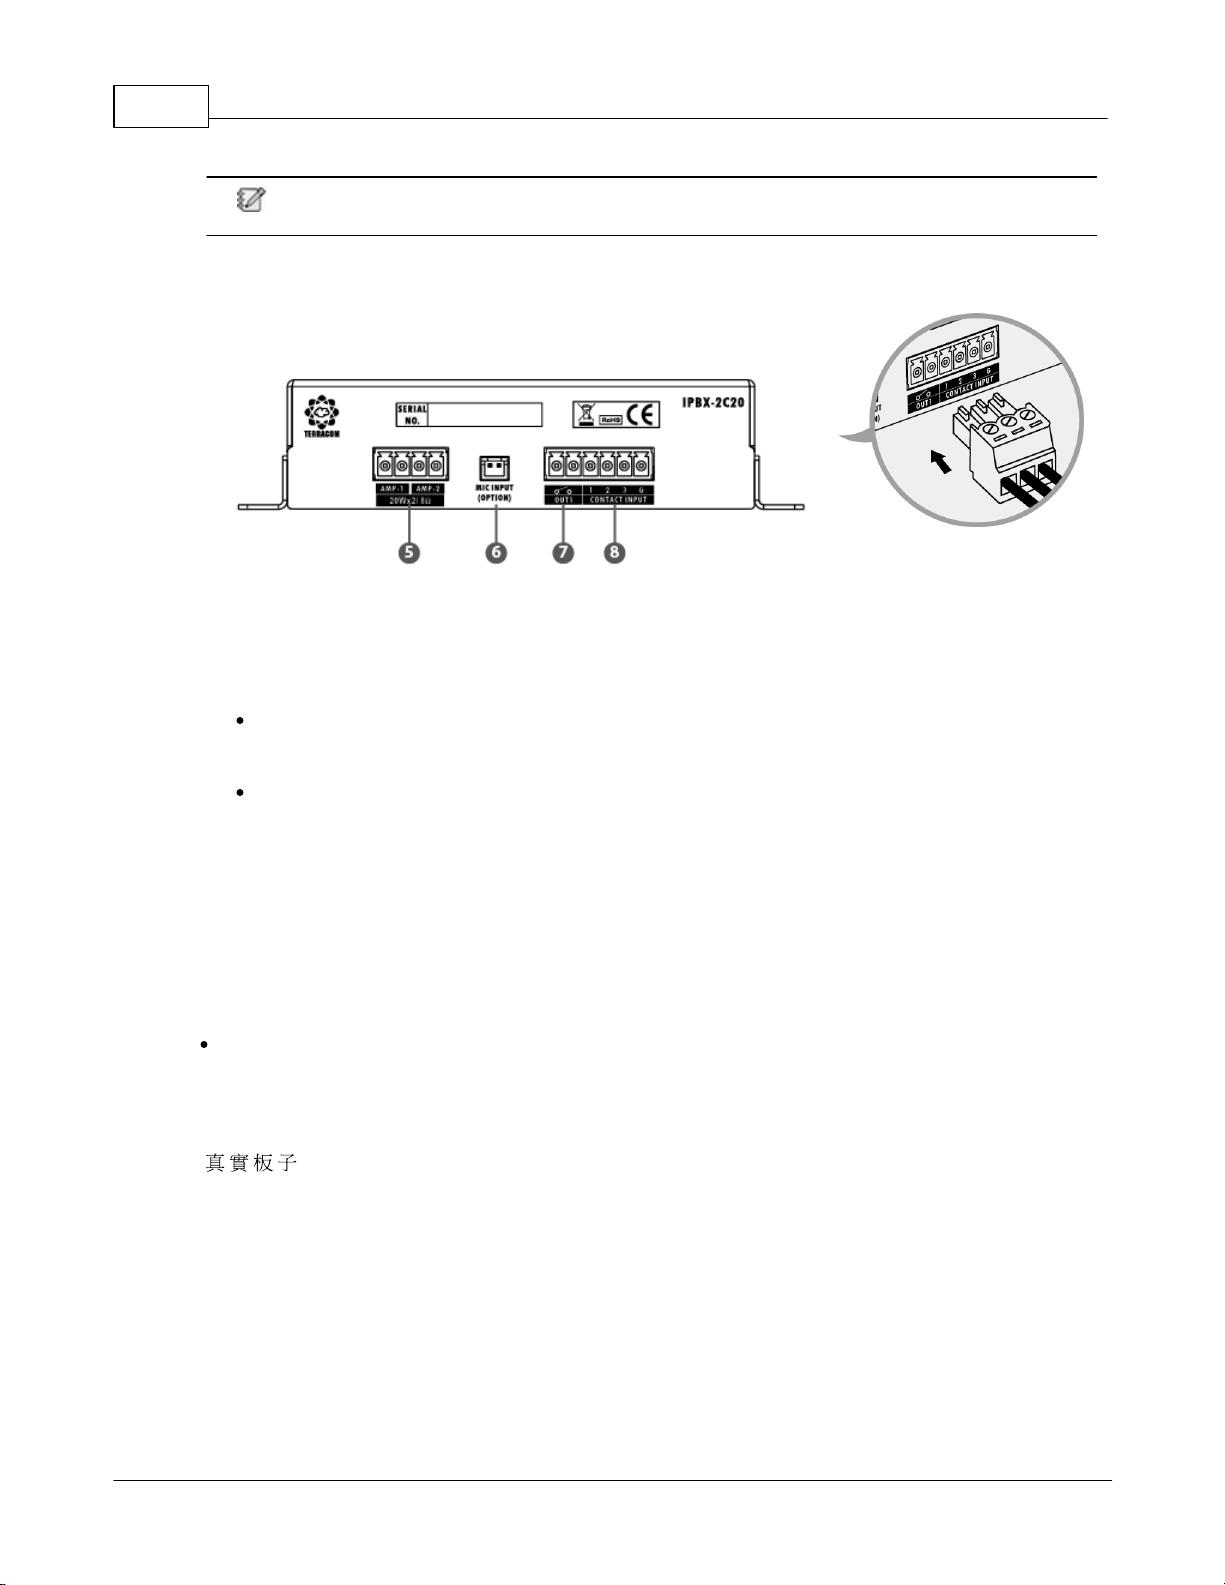
3.2.2 Rear Panel
Euro-style terminal block
5. Amp output:
20W x 2 channel for 8 ohm speaker or can be bridged to 1 channel with 40W for 4 ohm speaker.
6. Microphone input:
To fulfill hands-free intercom and monitoring, the IPSM-2C20M module is equipped with a
microphone input. The YMC0101-005 mic capsule could be connected to this microphone input.
This mic input provides DC 2.5V phantom power for microphone.
7. Contact output:
1 relay contact output can be programmed to control an external device.
8. Logic contact inputs:
3 supervised control inputs are designed to work with a simple contact such as RAC 5/RAC 8
programmable source selector and volume control remote or a push button for two-state logic
control.
Euro-style terminal block
Euro-style terminal block of IPBX-2C20 is pluggable for assembling easily.
3.3 Bridge Amp Output
[ ]
2 CH 20W amp broad can be bridged to 1 CH 40W by hand making. The jumper position is at the
bottom, please do the bridge operation from there.
Relocate jumpers from A to B and set amplifier output on product web browser.

Hardware Installation 15
© 2022 Enter your company name
Two jumpers must relocate
simultaneously.
The user must go setting the option of amplifier power on the webpage because the incorrect
power setting may damage the speaker. Check out the web browser topic
4 Configuration-Web Browser
4.1 Getting Started
Connect the IPSM/IPBX-2C20 to network switch.
Open the web browser on your PC/laptop. The IPSM/IPBX-2C20 device is compatible with and
optimized for the latest version of these web browsers:
oChrome (we recommend to use it)
oSafari
oFirefox
oOpera
oEdge
Internet Explorer is not supported.
Enter the default IP address into the address bar, then you can open the webpages of IPSM/IPBX
device.
Default setting
Web browser
IP address
192.168.100.1
Subnet Mask
255.255.255.0
Gateway
192.168.100.254

16
© 2022 Enter your company name
4.2 IP & Network
4.2.1 IP Information
The TERRACOM products are using the following Multicast address (IGMP)
o239.211.34.48: for ATEIS-NET status display
o239.211.34.45~49: for IDA8 or BOUTIQUE IGMP address
o239.240.38.25, Port 9000/9002: for Machines status
o239.240.38.25, Port 8998: for Paging control
o239.240.38.25, Port 8995: for Machines display status
o239.241.100.0 ~ 239.241.100.255, Ports 2000 ~ 3000: for Audio steam
o239.240.38.25, Port 9002: for BOUTIQUE protocol
The Local Host Ports of TERRACOM products
o20: File Sync
o21: File Sync
o20: Web Server
o80: website
o123, 14500, 4096: NTP Server
o161: SNMP protocol
o5060: SIP call
o6912: RTP address
o8010: Third Party commands
o26570: Remote Control
o19760: for IDA8
o19761: 3rd party control
o19762: for IDA8
o19770: for IDA8
o19780: for IDA8
o19781: for IDA8
o19782: for IDA8
o9002: BOUTIQUE
o9999: TerraServer File Access
4.2.2 IP Address
If user lose the IP address of IPSM/IPBX-2C20, please check the following instruction.

Configuration-Web Browser 17
© 2022 Enter your company name
With only one device
Read Out the IP Address
Use the tool to push reset button of device bottom (long push over 10 sec will reboot the device), and
it will read out the IP address via the connected loudspeakers. Please make sure the loudspeakers
is connected to the amplifier outputs of IPSM/IPBX-2C20.
Using Packet Analyzer software
Download the free Packet Analyzer software such as Wireshark and set the filter as "ip.addr ==
239.240.38.25", a list of all TERRACOM units connecting to your LAN will be displayed.
4.2.3 Network Bandwidth And Bitrate
The data rate over the network is calculated as below
oAudio Streams: It is based on the number of audio stream channels and the audio format.
oControl Streams: Each TERRACOM device is estimated at 28kbps.
The total bit rate is calculated using the formula (in kbps) as below
((number of products)* 28kbps) + ((number of streams) * stream bitrate)
The example below is using 8 Terra-FDX units + 2 TerraManager, and altogether use 10 channels
audio streams (MP3 format) at same time.
((8+2) * 28) + (10 * 150) = 1780Kbps.
Audio Stream Format
Mono:

18
© 2022 Enter your company name
oMP3: 150kbps
oG.722: 90kbps
oG.711ulaw: 90kbps
oG.722alaw: 90kbps
oPCM16k: 280kbps
oWAVE: 780kbps
Stereo:
oMP3: 150kbps
oWAVE: 1560kbps
4.3 Login/Logout
Login/logout from IPSM/IPBX-2C20 web browser
1. Enter a valid user name and password.
2. To logout, click the [Logout] button located on the upper tab
Forget Password
1. Click [Forget PW] button if users forget the password, but you need to enter the user name first.
2. Then a [pwd.] file will be downloaded into your PC/laptop, please send this [pwd.] file to our
technical team to retrieve the password.

Configuration-Web Browser 19
© 2022 Enter your company name
4.4 Setup
4.4.1 Basic Setting
Network
DHCP: Enable/disable the DHCP (Dynamic Host Configuration Protocol).
oIP Address: Click to change the IP address to fit your network.
oSubnet Mask: Depend on the LAN where the IPSM/IPBX-2C20 is located.
oGateway Server: The IP address of the gateway server.
oDNS: Tick the checkbox to enable the DNS server and set the IP address.
System Time
NTP Client Server: Enable the NTP setting. If the NTP is activated, the system date/time of IPSM/
IPBX-2C20 will be synchronized by NTP server.
o+ Timezone: The timezone of user's country.
o+ NTP Server IP: Set the IP address of NTP Server.
o+ Retrieve Internal: Set the internal to update the system time.
Date/Time : If the NTP Client Server is disabled, user shall manually set the time and the timezone
of your IPSM/IPBX-2C20.
If the IPSM/IPBX-2C20 is not powered for a period of time (approx. 23 days), the internal battery
will be under low voltage, and result in incorrect system time of IPSM/IPBX-2C20. Should the
system time is incorrect, please connect the power supply of IPSM/IPBX-2C20, and set the
system setting or enable the NTP setting on its web browser again.
The changes in [System Time] will also affect the Scheduler function on web browser.
Daylight Saving Time: Enable/disable the Daylight Saving Time function on IPSM/IPBX-2C20.
o+ Time difference: Define the time to be an hour/a minute earlier or more.
o+ Type: Choose [Date] or [Week] option to define the period of Daylight Saving Time.
o++ Start Date / ++ End Date: Set the start/end date of Daylight Saving Time.

20
© 2022 Enter your company name
o++ Start Time / ++ End Time: Set the start/end time of Daylight Saving Time.
Third Party Control
Network Control Service: Enable/disable the Network Controls Service.
oNetwork Port: Set the local network port.
oNetwork IGMP Enable: Enable/disable to use IGMP address, the default network port is 8010.
oNetwork IGMP Address: Set the IGMP address.
AMP
Total Output Channel: Number of available output channel. Two channels of amp output can be
bridged to one which with 40W output, and it must be supplied by DC power.
Power Supply: Options of power supply.
Amplifier Output Power: Options of output power
oThere is four application of amp output power:
Please make the accurate setting before connecting to the loudspeakers to avoid the situation of
"overload power failure".
oAmplifier Output Power: xW & xΩ indicates power supplying(Watts) and connecting how much
ohm loudspeaker.
This manual suits for next models
3
Table of contents
Other Terracom Speakers manuals


