TerraTec n=NOXON M740 User manual

Media Player
NOXON M740
Manual
Version 2.0 - 06/2011

2
M740
3
CE/FCC declaration
TERRATEC Electronic GmbH · Herrenpfad 38 · 41334 Nettetal · Germany
hereby declare that the product:
NOXON M740 (Full HD Network Multimedia Player)
to which this declaration refers is in compliance with the following standards or standard-
izing documents:
• EN 55022:1998 + A1:2000 + A2:2003, CLASS B
• EN 55024: 1998 + A1:2001 + A2:2003
• EN 61000-3-2:2000, Class A
• EN 61000-3-3:1995+A1:2001
• IEC 61000-4-2:2001
• IEC 61000-4-3:2002+A1:2002
• IEC 61000-4-4:2004
• IEC 61000-4-5:2001
• IEC 61000-4-6:2003+A1:2004
• IEC 61000-4-8:2001
• IEC 61000-4-11:2004
This device may only be used in the following environments and operating conditions:
residential, commercial and industrial environments, as well as small businesses. The
basic protective requirements of EMC Directive 89/336/EEC are thus fullled.
CE conformity has been demonstrated. As stipulated in R&TTE Directive (1999/5/EC),
this device corresponds to a Class 1 radio system (Commission Decision 2000/299/EC).
The device also complies with FCC Part 15, Subpart B, Class B, and ANSI C63.4:2003.
This declaration is based on:
• Test report(s) of the ADT Corp. testing laboratory

2
3
Index
CE/FCC declaration..........................................................2
Important safety information....................................................4
Welcome!..................................................................5
Scope of delivery ............................................................5
Overview . . . . . . . . . . . . . . . . . . . . . . . . . . . . . . . . . . . . . . . . . . . . . . . . . . . . . . . . . . . . . . . . . . . . . 6
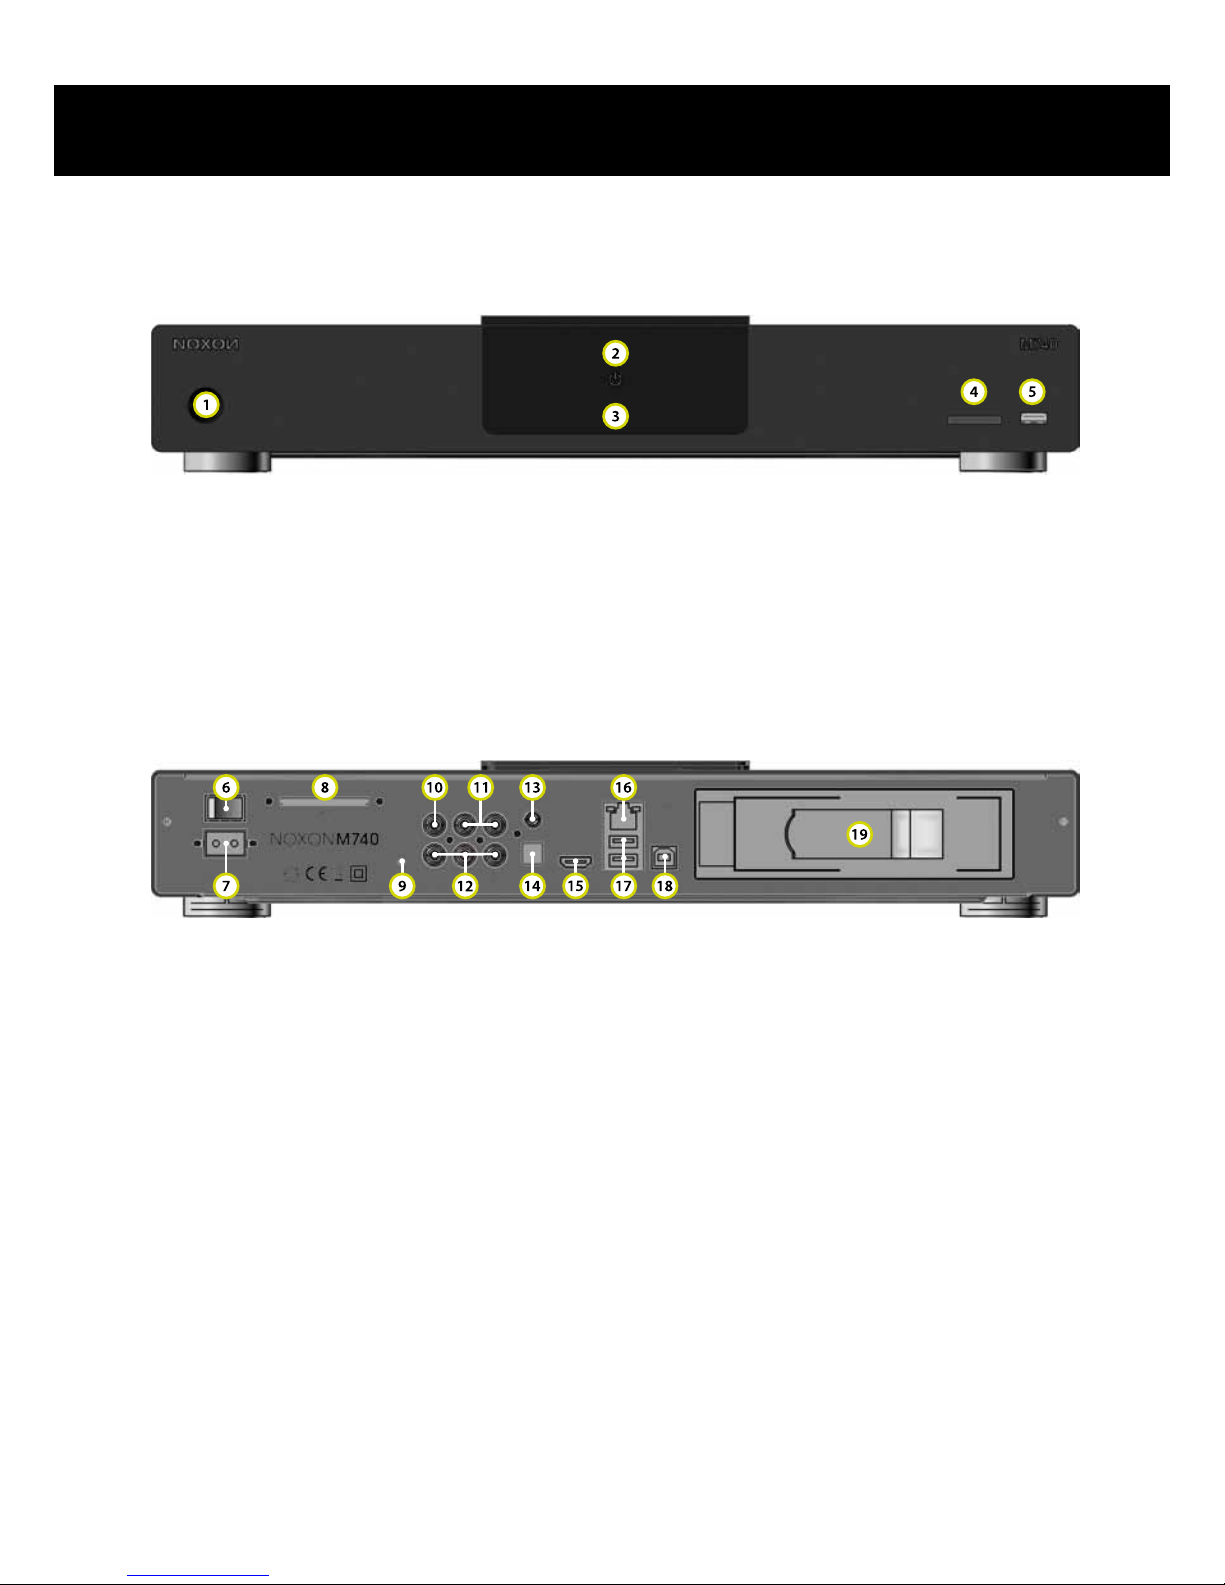
Front......................................................................6
Back......................................................................6
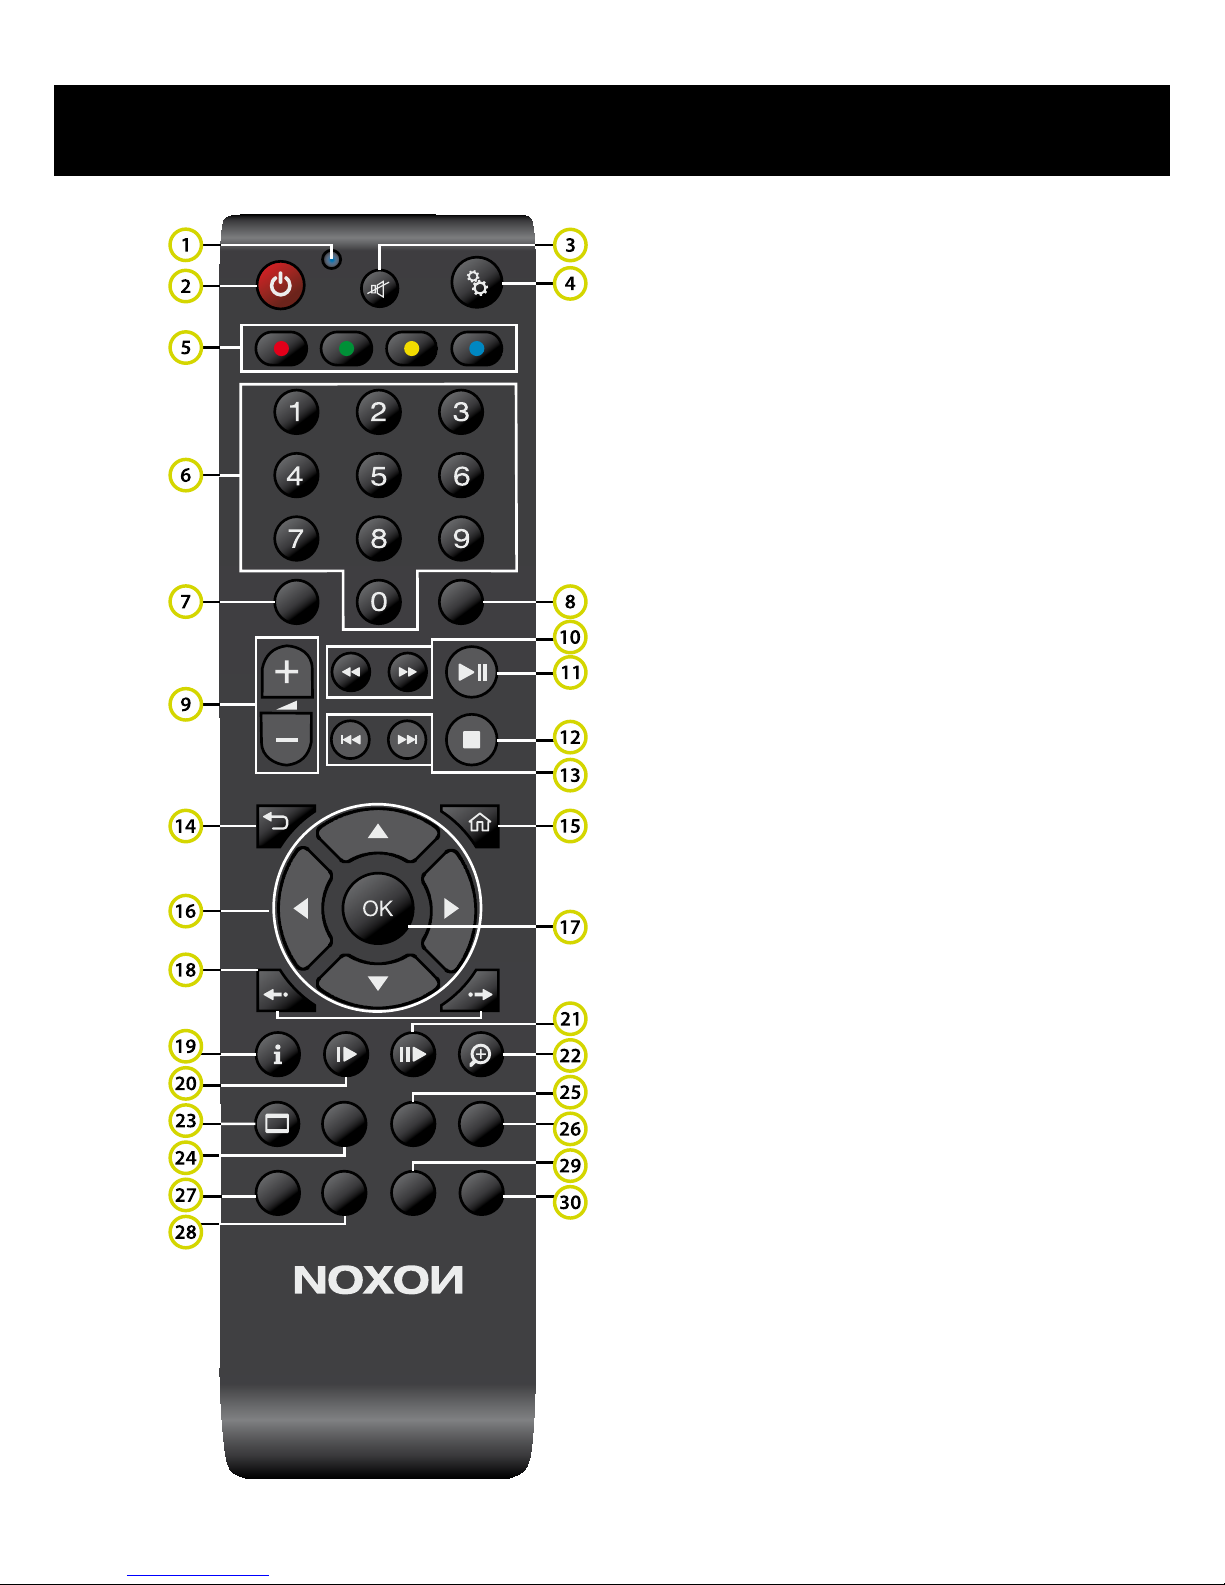
Remote control..............................................................9
Connection ..................................................................14
Power supply ..............................................................14
Video ....................................................................14
Audio ....................................................................14
Wired network (LAN) ........................................................15
Wireless network (WLAN) ....................................................15
Memory cards .............................................................15
External storage devices (USB)................................................15
External hard disk (SATA) ....................................................15
Internal hard disk (SATA).....................................................15
PC/Mac (USB) .............................................................16
Setup .......................................................................17
Setup assistant.............................................................17
UPnP server...............................................................17
The M740 in server mode ....................................................18
The M740 in client mode .....................................................20
Handling ....................................................................22
Typical applications .........................................................22
Main menu................................................................23
Media menu...............................................................24
Movies menu ..............................................................25
Music menu ...............................................................25
Photo menu ...............................................................25
Data menu ................................................................25
Setup menu ...............................................................26
Appendix ....................................................................34
Technical specications ......................................................34
License information .........................................................34

4
M740
5
Important safety information
This device has been developed and manufactured so that it does not endanger person-
al safety. Improper use can cause electric shock or re. The safety features integrated
into this device can protect you only if you observe the following instructions for installa-
tion, use and maintenance:
• Please read this operating manual in its entirety.
• Observe all warnings and instructions.
• Do not use the device close to water.
• Clean it using a dry cloth only. Do not use any liquids!
• Do not cover up any ventilation openings. Install the device according to the instruc-
tions in this manual.
• Do not install the device in the immediate vicinity of heat sources such as radiators,
ovens or other devices that give off a great deal of heat.
• Route all cables so that no one can step on them and they are not pinched, especially
not on the connector, on the power outlet or at the location where the network cable
exits the device.
• Unplug the power cable from the socket during electrical storms or when the device will
not be used for a long time.
• All maintenance work may be carried out by qualied service technicians only. Main-
tenance work is required whenever the device has been damaged in any way, e.g. if
power cables or connectors are damaged, liquid gets into the device or objects fall into
it, if it has been exposed to rain or moisture, if it no longer functions normally or has
fallen down.
• The device may be operated at ambient temperatures of 5 °C to 35 °C (41 °F to 95
°F) only.
• Do not drop the device or expose it to mechanical shock!
• Do not move the device as long as it is switched on.
• Place the device on a level, dry surface to prevent re and electrical shock hazards as
well as possible damage to the player itself.
• Do not place objects lled with liquid such as vases or bottles on the device.
• If the device has been exposed to extreme differences in temperature, allow it to adjust
to the room temperature for one hour before plugging it in. Condensation may have
formed inside the device, which impairs its functionality or can cause damage to the
device itself.

4
5
Welcome!
Thank you very much for choosing a NOXON product!
Your NOXON M740 offers everything you need to play back your media collection on
your big-screen TV in brilliant (HD) resolution of up to 1080p. The great number of con-
nectors offered make for an easy and exible combination with your other entertainment
devices.
You can play back movies and music from a large number of diverse sources:
• USB memory sticks, USB hard disks and CD/DVD drives
• SD/MMC memory cards
• Internal SATA hard disk*
• External SATA hard disk*
• Wired networks (LAN)
• Wireless networks (with the NOXON WLAN stick*)
* The NOXON WLAN stick, external and internal SATA hard disks as well as other stor-
age devices are optional additions for your M740. They are not included in the scope of
delivery.
Scope of delivery
Please start by making sure that the contents of the package are complete:
• NOXON M740 media player
• Power cable
• HDMI cable
• A/V cable
• RGB cable
• SATA cable
• Remote control with battery
• Manual (EN/DE)
• Quick start guide (EN/DE/FR/IT/ES/NL)
• Service request form
Enjoy your new NOXON M740!

6
M740
7
Overview
Front
1. On/Off button
2. Operating status display
3. Infrared receiver
4. SD/MMC card slot
5. Front USB port for external storage devices
Back
6. On/Off switch
7. Connection socket for power cable
8. SATA port
9. Reset button
10. Composite video output
11. Stereo audio outputs
12. Component video outputs
13. Coaxial S/PDIF audio output
14. Optical S/PDIF audio output
15. HDMI 1.3 interface
16. Network port (RJ-45)
17. USB ports for external storage devices
18. USB port for connection to a PC/Mac
19. 3.5“ SATA hard disk drive bay

6
7
1. On/Off button
Activates the M740 or switches it into standby mode.
2. Operating status display
This LED lights up red in standby mode, while in active mode it shines blue.
3. Infrared receiver
Receives signals from the wireless infrared remote control. Please do not cover this
sensor.
4. SD/MMC card slot
Play back movies, photos, music etc. from cards placed into this slot. The card reader
supports the following le formats: SD, SD-HC, MMC, MS and MS Pro.
5. Front USB port for external storage devices
Media les can also be accessed from external USB storage devices like hard disks and
memory sticks (USB 1.0, 1.1 and 2.0 up to 480 Mbit/s).
6. On/Off switch
Deactivating the M740 by this switch will completely disconnect it from mains and stop
any energy consumption of the unit. However, the media player cannot be activated by
the remote control or the On/Off button on the front panel in this mode.
7. Connection socket for power cable
Please only use the included cable for connecting your M740 to mains. Please make
sure that this cable shows no sign of wear or any defects.
8. SATA port
Use the supplied cable to connect a SATA hard disk (not eSATA). Once it has been con-
nected to this port, you can play back audio and video data from the external drive.
9. Reset button
On rare occasions (e.g. after updating the rmware) it can happen that the M740 freezes
so that it does not react to commands anymore. This situation requires a reset. Please
switch the media player off with the On/Off switch on the back panel. Then use a ball pen
tip or something similar to push the reset button and hold it for ve seconds while switch-
ing the M740 back on again.
10. Composite video output
This yellow RCA connector carries an analogue video signal without sound. Please note
that the image quality of the other video outputs is superior to the quality of the composite
output. Therefore you should only use this option if the others cannot be used for your
purposes.

8
M740
9
11. Stereo audio outputs
These two RCA outputs carry the analogue audio signal (the left channel coming from
the white connector, the right channel from the red one).
12. Component video outputs
As a better alternative to the composite output you can connect your TV set and the
M740 via the component video output using the supplied cable. Please note that also in
this case the output does not carry an additional audio signal. The colour codes of the
corresponding RCA connectors are red, green and blue (RGB).
13. Coaxial S/PDIF audio output
This yellow RCA connectors carries the audio signal(s) in the digital S/PDIF format. The
digital signal transfer is lossless and, depending on the source le, audio will be available
in mono, stereo or surround.
14. Optical S/PDIF audio output
The digital audio signals can alternatively be transferred through a light wave cable ac-
cording to the TOSLINK standard. If you are using this type of cable, please avoid bend-
ing it too much.
15. HDMI 1.3 interface
This interface grants the best video and audio quality by transferring digital signals from
your M740 to your TV through the supplied cable. If your TV set has an HDMI connector,
please make sure to use it instead of the other video connectors in order to enjoy the best
playback quality your media player can offer (up to 1080p 60Hz).
16. Network port (RJ-45)
This LAN/Ethernet connector lets you integrate the M740 into your cable home network
at 10 or 100 MBit speed. Please use a standard network cable with RJ45 connectors. A
green LED located at this port indicates a proper connection on both ends of the cable.
17. USB ports for external storage devices
In addition to the corresponding port on the front panel these connectors can be used to
access media data from external USB storage devices like hard disks and memory sticks
(USB 1.0, 1.1 and 2.0 up to 480 Mbit/s).
18. USB port for connection to a PC/Mac
If you have tted an internal SATA hard disk into your M740 you can use this port to con-
nect it with your PC or Mac. Your NOXON will be recognized as an external hard disk
device without the need to install any drivers rst. This way you can transfer movies,
music and photos to your M740 fast and conveniently.
19. 3.5“ SATA hard disk drive bay
You can upgrade your M740 with an internal 3.5” SATA hard disk (not included). Please

8
9
make sure to deactivate the media player by the power switch on the back panel before
opening this bay. We suggest to use a hard disk with 5,400 RPM because of the lower
noise oor this type of HDD usually produces.
Remote control
The supplied infrared remote control is the exclusive command centre for your M740.
Please insert the supplied battery before rst use:
• Open the battery cover on the rear side of the remote control.
• Insert the battery into the battery compartment as indicated by the + and - symbols.
• Close the battery compartment again with its cover.
Please follow this common advice when handling batteries:
• If the remote control does not function properly or the range is no longer adequate,
replace the battery with a new one.
• Remove batteries when they are completely empty or if the remote control will not be
used for an extended period. This prevents leaky batteries from damaging your remote
control.
• Never throw batteries into a re!
• Ensure that you use alkaline batteries or, even better, rechargeable batteries.
• Dispose of used batteries at the appropriate disposal facilities.
• Always dispose of batteries in compliance with legal regulations. This helps to protect
the environment.

10
M740
11
1. Activity monitor LED
2. Standby
3. Mute
4. Settings
5. Options
6. Keypad
7. Repeat
8. Goto
9. Volume Up/Down
10. Fast Backward/Forward
11. Play/Pause
12. Stop
13. Skip Back/Forth
14. Before
15. Main Menu
16. Navigation
17. OK
18. Time Leap Back/Forth
19. Option
20. Slow
21. Step
22. Zoom
23. 16:9
24. Angle
25. Menu
26. Title
27. TV Mode
28. A-B
29. Audio
30. Subtitle

10
11
1. Activity monitor LED
Lights up when one of the knobs is pressed. Please replace the battery if this should not
be the case.
2. Standby
Switches your M740 on – please note that this can take a short while. A second press will
switch the media player into standby or into server mode respectively.
3. Mute
Mutes the audio playback. A second press will return to normal audio playback at the
volume which had been set before.
4. Settings
This opens the “Setup“ menu of your M740. Here you can adapt the behaviour of your
media player according to your individual wishes.
5. Options
These buttons activate additional options. The On-Screen-Menu will show you when and
which specic options are available.
6. Keypad
You can enter the number 0 to 9 by using this keypad.
7. Repeat
Repeats single tracks/chapters or complete playlists. A second press will return to normal
playback mode.
8. Goto
Depending on the current le format, this function lets you chose a specic track, chapter
or point in time for playback.
9. Volume Up/Down
Increases or decreases the volume of the audio playback. Please be careful, as continu-
ously high volumes can permanently damage your hearing.
10. Fast Backward/Forward
Increases the playback speed towards the beginning or the end of a track or a chapter.
Repeated pressing will increase the speed of the accelerated playback.
11. Play/Pause
This button starts the playback of a media le. A second press will pause and another
one will continue the playback again.

12
M740
13
12. Stop
The Stop button interrupts all playback and search functions of the M740.
13. Skip Back/Forth
Jumps towards the next or the previous track or chapter and continues playback there.
14. Before
Returns from the current window to the one you were before: back to the movie, back to
the previous menu - exactly the place were you had been before the actual one.
15. Main Menu
Jumps into the main menu.
16. Navigation
Use these buttons to navigate through the menus of your media player – up, down, left
and right.
17. OK
OK conrms your entries, selects folders, chooses storage devices or starts playing back
selected media les.
18. Time Leap Back/Forth
Jumps back in 15 second steps and forth in 30 second steps during playback. Just press
and hold the button for a sequence of leaps.
19. Option
Displays information like le size, playing time, subtitles or video/audio resolution during
playback. A second press will close the corresponding window.
20. Slow
Some le formats allow the slowed down playback of a movie. Repeated pressing will
lower the playback speed further.
21. Step
Shows continuous still images of a movie. Each press of this button will jump to the next
picture/frame, while holding the button will automatically show one picture after the other.
22. Zoom
Zooms into the display window. Repeated pressing will change the zoom factor: 1x, 2x,
3x, 4x and 8x. The image centre moved with the navigation keys in zoom mode.
23. 16:9
Depending on the movie and television format, you can use this button to switch between
the 4:3 Letterbox, 4:3 Pan/Scan, 16:9 and 16:10 formats.

12
13
24. Angle
Some movies support views from different camera angles. If your movie supports this
function, you can use this button to switch between several angles.
25. Menu
Press this button to call up the menu within a movie. However, please do not mistake this
for the separate button for the main menu of the M740.
26. Title
Takes you back to the title menu of your movie.
27. TV Mode
Depending on which screen resolution your TV set supports, you can choose the opti-
mum setting for your device here. You can choose from PAL(576i), NTSC(480i), 480P,
576P, 720P at 50 Hz, 720P at 60 Hz, 1080i at 50 Hz, 1080i at 60 Hz, 1080p at 50 Hz and
1080P at 60 Hz.
28. A-B
To repeat a certain passage of a movie, press A-B once at the desired starting position.
If you press the button again, the “playback loop” starts at the point you marked with A
and ends at the point where you pressed the button again. Pressing the button a third
time ends the playback loop.
29. Audio
If a movie offers multiple audio tracks (e.g. different languages) you can select one of
them by repeatedly pressing this knob.
30. Subtitle
Pressing this button once opens the subtitle menu, which allows you to playback subtitle
les that are included in the movie or in the same folder along with the movie. You can
congure settings for subtitle display as desired using the menu. If you press this button
again, available subtitles are displayed or disabled automatically in sequence.

14
M740
15
Connection
Start by connecting your M740 to mains, then establish a video and audio connection to
your TV set and/or your hi- system. Now you can integrate your media player into your
wired or wireless network and nally add external and internal storage devices carrying
movies, music and pictures. The following details will help you getting started.
Power supply
Plug the provided cable into the corresponding connector (7) on the back panel. Please
do not use power cables which you suspect to be damaged. Now set the switch (6) to “I”
in order to feed the player with power.
Video
HDMI
If your TV set features a HDMI connector, you should make use of it instead of the other
video connection options. This way you will benet from maximum video and audio qual-
ity (up to 1080p/60Hz) via digital signal transfer. Use the supplied cable to connect the
HDMI interfaces of your M740 and your TV - this will transfer both video and audio sig-
nals through one single cable.
Component
If your TV set does not have an HDMI interface, but a Component input consisting of
three coloured RCA connectors (12), you should use this option to transfer your video
signals. Connect the red, green and blue RCA connectors on your NOXON and your
TV with the provided cable. Please note that this will only transfer video signals, which
requires an additional connection for audio.
Composite
The yellow RCA connector also carries a video signal which can be sent to the corre-
sponding input of your TV with the supplied cable. However, the other video connectors
of the M740 offer a better signal quality. This is why you should use this option only in
case the others do not work for you. Also in this case, audio is not transferred together
with the video signal, which requires a separate audio connection.
Audio
Analog
If you’re not using the HDMI interface of your M740, you can send an analogue stereo
audio signal from these two RCA (11) connectors to your TV set or hi- system (the left
audio channel is coded white, the right one is red). Please note that surround audio sig-
nals can only be sent via the digital S/PDIF connectors or HDMI.
Coaxial S/PDIF
This yellow coded RCA connector (13) carries an audio signal in the digital S/PDIF for-
mat. Please use a standard RCA cable (not included) to establish the connection with

14
15
your TV or hi- receiver. Depending on the source le, audio is being transferred without
loss in mono, stereo or surround.
Optical S/PDIF
Alternatively, the digital audio signal can be transferred via a light wave cable (not includ-
ed) according to the TOSLINK standard. Should you use this connection, please make
sure to plug in (14) and treat the cable with a certain care so it is not being bent too much.
Wired network (LAN)
Use a standard CAT 5 cable or similar (not included) for integrating your M740 into your
home network. Plug one of the RJ45 connectors into the corresponding port (16) on your
M740 and the other one into your router, switch or hub. A green LED located at this port
indicates a proper connection on both ends of the cable.
Wireless network (WLAN)
If you prefer to integrate the M740 into a wireless network, you can do so by using the
optional NOXON WLAN stick which uses the very fast 802.11n standard, featuring data
transfer rates of up to 300 MBit/s. It is fast enough to transfer even HD movies without
dropping frames. Of course the NOXON WLAN stick also supports the 802.11b and
802.11g standards as well as the WEP, TKZP, AES, WPA, WPA2 encryption/security
standards.
Memory cards
The front panel of the M740 features a reader (4) for standard memory cards. You can
playback movies, music and pictures from cards which have been inserted into this slot.
The card reader supports SD, SD-HC, MMC, MS and MS Pro cards which can also be
inserted during operation.
External storage devices (USB)
Your M740 features a total of three USB ports for connecting external storage devices
like hard disks and memory sticks – one on the front (5) and two on the back panel (17).
The media content of the storage devices connected to these ports can be accessed
from the specic menus of your M740. Initialising a new device connected here might
take a few seconds.
External hard disk (SATA)
Use the supplied cable to connect a SATA hard disk (not eSATA). Once it has been con-
nected to this port (8), you can play back audio and video data from the external drive.
The cable transfers your media data and the power the HDD requires at the same time.
Internal hard disk (SATA)
In addition or as an alternative to an external hard disk you can also retrot an HDD di-
rectly into your media player. Please use a 3,5” SATA standard model, preferably with a

16
M740
17
speed of 5,400 RPM in order to keep the noise level as low as possible. Before installing
the hard disk, please make sure to disconnect your media player from mains. Now open
the SATA bay (19) located on the back panel and insert the HDD carefully with the con-
nectors showing towards the bay and the label showing up. Please make sure not to re-
tain the cover while doing so. After noticing a soft click you can close the cover of the bay.
PC/Mac (USB)
If you have retrotted your M740 with an internal SATA hard disk as described above, you
can establish a connection between your PC/Mac and your media player by inserting a
standard USB cable (not included) into the corresponding port (18). Your computer will
recognize the NOXON as an external hard disk without the need to install any drivers at
all. This is the fastest of several options to transfer media data like movies, music and
images to your M740.

16
17
Setup
Setup assistant
When you power up the M740 for the rst time, a setup assistant will help you to make
the most basic settings. You can always execute this assistant anew by going to „Op-
tions“ > “System“ > “Default“.
Start by choosing the language for the user interface with the Up/Down navigation and
the “OK” button.
The network conguration comes next. If you own a DSL router with an integrated DHCP
server, choose “DHCP IP (Auto)“ and conrm with “OK”. After conrming the question if
you want to save this conguration, your NOXON will automatically connect itself with
your network. Advanced users can also run a manual setup by using a static IP address.
You’ll nd more info on this in the “Network options” chapter.
UPnP server
UPnP means „Universal Plug and Play“. The M740 features an integrated UPnP server
which makes it possible to make the media data like movies, music, and pictures stored
on its internal HDD available to other UPnP capable devices in the same network.
But the M740 does not only act as a server, but it can also be a client and access/play
back media data provided by other UPnP capable devices in the same network.

18
M740
19
The M740 in server mode
When used as a server, the M740 provides its media data via UPnP in the network it is
connected to. These les can be accessed by additional players (clients) connected to
the same network.
Which requirements must be met for UPnP server operation?
• Min. rmware version 1.2.3.5
• Retrotted internal 3,5“ SATA hard disk
• Hard disk must have been formatted with the M740
• Additional software packages must be installed
• Options in the “System“ menu must be changed accordingly
How to activate the UPnP server?
The following is a step-by-step explanation about how to congure the UPnP server func-
tion on your NOXON M740.
Please make sure to use the latest Firmware version from our website:
http://www.terratec.net/en/drivers-and-support.html
Step 1: Firmware check/update
Use the navigation and “OK” buttons of your remote control to select the folder “Options”
> “System”. The sub item “System Reinstall” shows the version of the rmware which is
just running on your device. This this version number is lower than 1.2.3.5, you will need
to install a new rmware before proceeding.
Please follow these steps to do so:
• Download the latest rmware for your M740 from the following website:
http://www.terratec.net/en/drivers-and-support.html
• Copy the le “install.img” into the main directory of a USB memory stick
• Connect this memory stick to one of the USB ports of your M740
• Select “System Reinstall“ and conrm with “OK”
• Important: Do not switch the unit off while the rmware update is in progress!
Step 2: Install an internal hard disk
Please use a 3,5” SATA standard model, preferably with a speed of 5,400 RPM in order
to keep the noise level as low as possible. Before installing the hard disk, please make
sure to disconnect your media player from mains. Now open the SATA bay (19) located
on the back panel and insert the HDD carefully with the connectors showing towards the
bay and the label showing up. Please make sure not to retain the cover while doing so.
After noticing a soft click you can close the cover of the bay.
Step 3: Format the hard disk
In this next step the hard disk will be formatted and prepared for the UPnP server mode.

18
19
To start formatting, please select „Setup“, „Options“ and „HDD Format“ in the main menu.
A sub-menu will open in which you can select the specic hard disk to be formatted. In
our example it is called „HDD1“. A warning will appear.
ATTENTION: Formatting your HDD will delete all les stored on it. Please make sure to
backup existing les to another storage device if you will need them in the future.
Next you will be asked for conrmation once more. Select “Format” if you are sure you
want to proceed.
Step 4: Installing the required software
The required software packages for the UPnP server mode will be installed automatically
after your NOXON has nished formatting the inserted hard disk. Once the installation
has been completed, push “OK” in order to re-boot your media player.
Step 5: Activating the UPnP server mode
Finally, the UPnP server mode needs to be activated. In order to do so, please navigate
to „System“ > “RC Power Key Function“. Then press the power button on your remote
control to activate the UPnP server.
Note: After pressing the power button on your remote control you have the opportunity to
cancel the activation process by pressing the button again. Your NOXON will enter the
standby mode without activating the UPnP server mode.
A successful UPnP activation will show a “UPnP Server is active“ message on your TV

20
M740
21
screen. Now are the media les in the folders „image“, „movie“ and „music“ on your hard
disk are shared in the network. Other UPnP clients in the same network (e.g. NOXON
iRadio) will now show the entry “NOXON M740“ in their UPnP server list. This might
show up on the clients only after a slight delay.
For advanced users: You can also activate the UPnP server mode while the device is
running by pressing the blue button on your remote control. However, this may reduce
the performance of your NOXON M740 and the UPnP client.
Adding new media les
You can transfer videos, pictures or audio les from your USB sticks, hard disks or mem-
ory cards to your M740 with the integrated le manager. You can also connect your
NOXON M740 to your computer via the USB connector (18) on the back of your device
and use it as an external hard disk. If the UPnP server mode is activated, les can also
be transferred from a device in the same network the NOXON M740 is located in, for
example by inserting the IP address of your M740 (e.g. \\192.168.1.19) in the address
bar of the Windows Explorer.
ATTENTION: To access your les via the UPnP server please make sure to place them
into the correct corresponding folders. In other words, copy your video, picture, and mu-
sic les into the folders “movies”, “images” and “music“. The UPnP database will update
itself every 60 minutes. This may result in a delayed availability of your newly added les.
To shorten this process you can restart your media player after adding new les.
How to access the provided les
Once the M740 is set to server mode, external UPnP capable clients can access the les
located on its internal HDD. For example, on a connected Windows PC you will nd the
M740 as a new device in the network environment. On a Mac you can nd the M740 in
the “Shared” tab of the Finder.
The M740 in client mode
When used as a so called client, the M740 can access and play back media data which
are hosted by another device via UPnP in the same network. Please make sure to run the
M740 in standard and not in server mode if you want to use it as a client. Of course, you
need at least one additional UPnP device acting as the server in this scenario.
Microsoft Windows
Windows Media Player (Version 11 or 12) is the simplest way to add such a server, since
it already has this service built in. Via the “Stream” menu item, select the “Enable media
streaming” function.
In the following dialogue you now have to enable this service explicitly and then activate
the corresponding devices, if you have multiple receivers. Now the NOXON can access
the music data in your library.
This manual suits for next models
1
Table of contents
Other TerraTec Media Player manuals