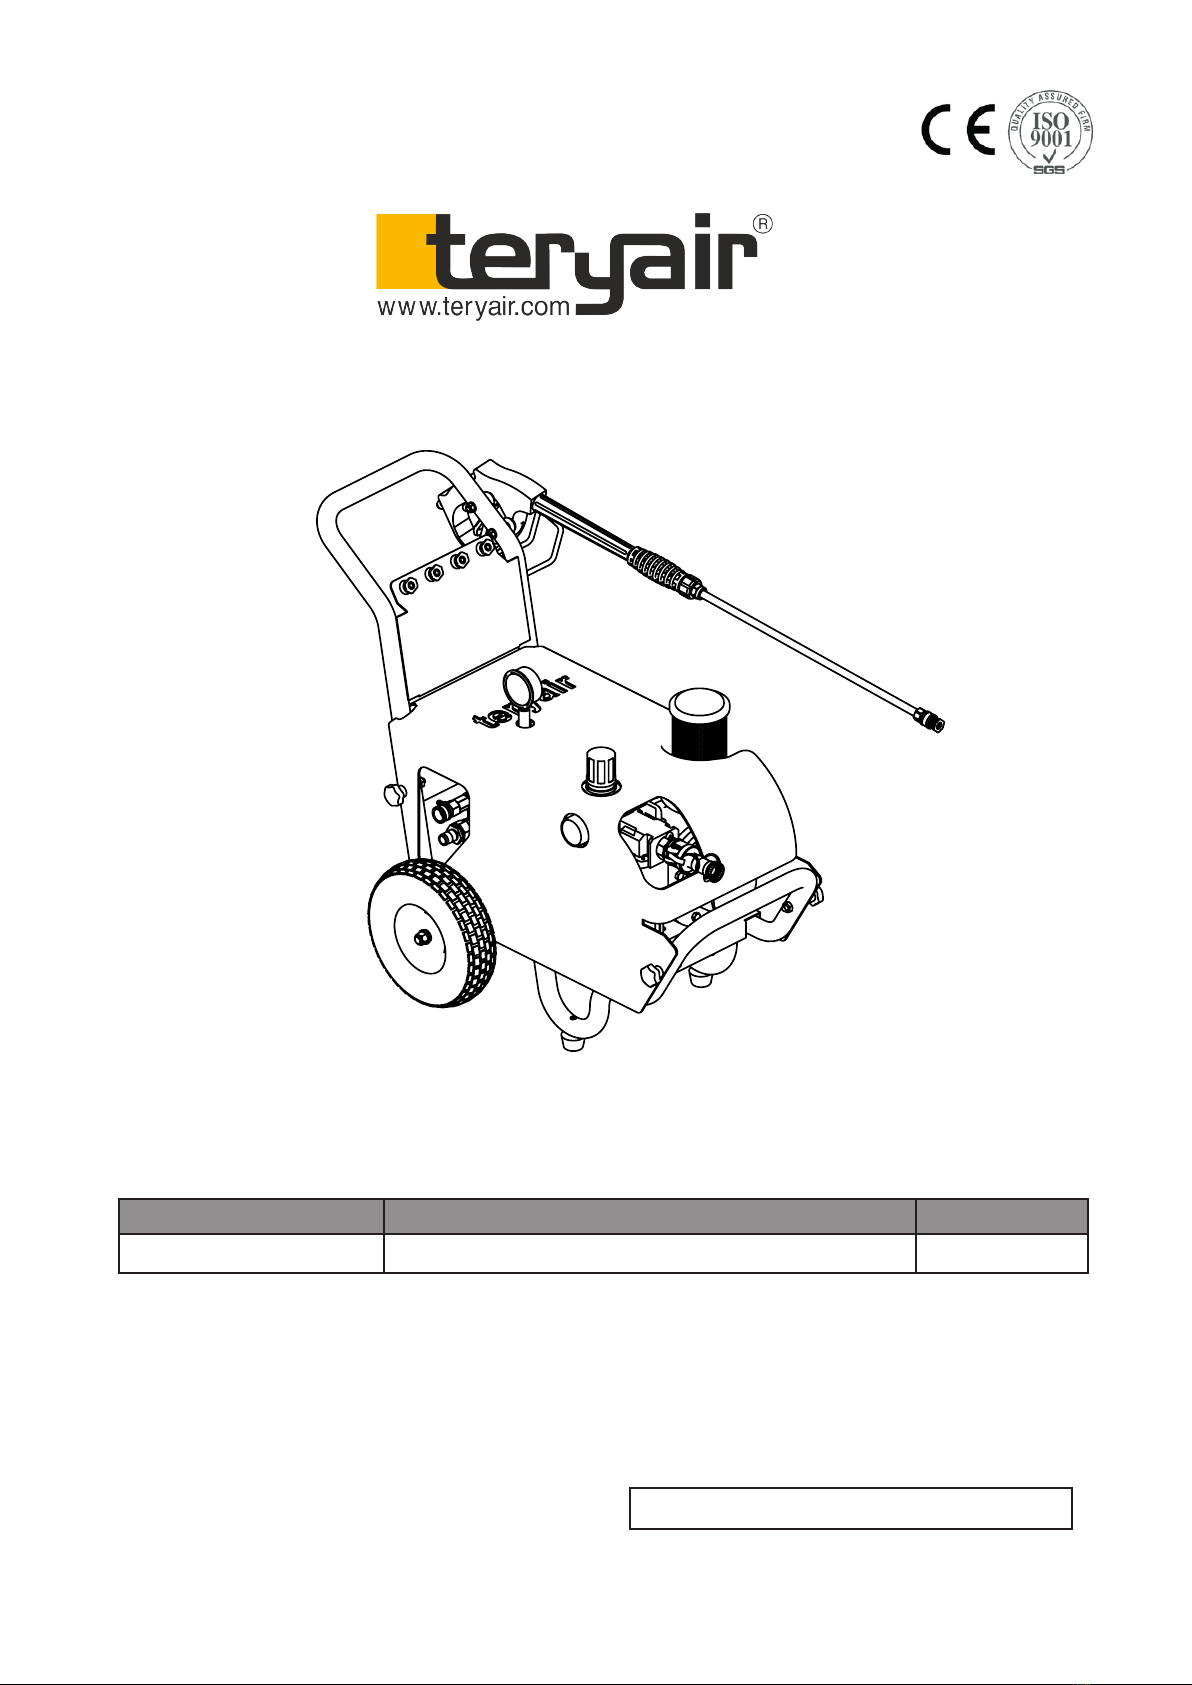
Teryair PW-200 Instruction Manual
Models Descriptions IMPA Number
PW-200 Pneumatic Pressure Washer - 200 Bar 59 08 51
PW - 200
Read this manual carefully before installing, operating or servicing this equipment. It’s the responsi-
bility of the employer to ensure this manual is read by the operator. Please preserve this manual.
is document is issued with Product Serial No
Operation and Maintenance Guide

FF-MM-311-REV - 01
Page 2
Operation and Maintenance Guide Pneumatic Pressure Washer
Table of Contents
3 Introducon
3 Technical Data
3 OperangInstrucons
5 UnPacking
6 Assembly&Diassembly
7 SafetychecksbeforeandaeroperangtheHighPressureWasher
9 Troubleshoong
10 Maintenance
11 DiassemblyandRe-assemblyforPW-200
12 BillofMaterialsforPW-200
13 ExplodedViewforPW-200
16 ExplodedViewpfHighPr.PumpPW200Bar
17 TestCercateOfMaterials,Performance
18 EuDeclaraonOfConformity
19 WarrantyCercate

FF-MM-311-REV - 01
Page 3
Operation and Maintenance Guide Pneumatic Pressure Washer
Introduction
Teryair Pneumatically Operated High Pressure Cleaners are designed for heavy duty cleaning
operations in hazardous environments. ese Pneumatic High Pressure Cleaners ensure safe
cleaning of hazardous areas where inammable gases & liquid exists. ese heavy duty high
pressure cleaners are used for removing Dirt, salt, rust deposits from Ship Decks / oors, Paint &
grati o walls, Oil & Grease o engines.
Technical Data
Model Pneumatic Motor Water Pressure
generated
Water Flow
rate
Air supply
recommended
Dimensions
L X W X H Weight
HP kW Speed PSI Bar Gpm LPM Bar PSI mm Kgs
PW-200 9 6.6 1500 2900 200 3.3 15 7 100 1000x520x750 75
Intended Use
• Biological growth from concrete or steel
constructions
• Hard caked mud from construction
machinery like dozer tracks.
• Paint, dirt, mud from walls and oors
• Oil and grease from High Pressure Washer.
• Dirt, paint from sea going vessels.
Prohibitive use
• Any use in an explosive atmosphere is
prohibited
• Use on materials containing asbestos is
prohibited
• Use by an underage, untrained or
operator who is under the inuence of
drugs or alcohol.
• Use with non genuine spare parts or
accessories is prohibited
• Use with safety devices un functional or in
need of service is prohibited
• Do not use with hot water, this High
Pressure Washer is for use with cold water.
Operating Instructions
Warning
is manual must be read and the operating
instructions carefully followed, because of the
high pressure developed, severe injuries can be
caused by negligent operation
Warning
Do not run the high pressure washer without
a proper and adequate supply of potable water
connected. Insucient water supply will cause
damage to the seals in a few minutes of use.
Caution
Operators under 18 not allowed to operate
this Pneumatic Needle Scaler. Operators must
be made familiar with the instructions in
this
Warning
Operators under 18 not allowed to operate this
High Pressure Washer. Operators must be made
familiar with the instructions in this manual
before attempting to operate the High Pressure
Washer. Ensure that job site is clear of bystand-
ers. e high pressure jets are capable of causing
serious injury do not direct spray on people or
animals. Do not spray electried equipment.
Caution
Use only genuine Teryair or Teryair approved
accessories.
Following symbols are used through out this
manual.
FF-MM-311-REV - 01
Page 4
Operation and Maintenance Guide Pneumatic Pressure Washer
Warning
Use only for high pressure cleaning, do not use
for any other application.
Warning
Safety and protective clothing, eyewear, head-
gear, ear protection, gloves and footwear to be
worn during operation of this High Pressure
Washer. Please see Table C at end of this section.
Warning
While starting operation and also during opera-
tion there is a considerable kickback force from
the lance due to the high energy generated, be
aware of this at all times and keep a rm con-
trol on the direction of the spray jet. Always use
both hands to operate the gun.
Warning
is High Pressure Washer is not designed for
use in an explosive environment.
Warning
Medical attention
Personnel who sustain injuries caused by high
pressure jets MUST be given immediate hospital
attention. It’s important to apprise the medical
attendants of the manner in which the injury
has been caused, namely a high pressure jet.
Caution
Keep the gun trigger locked when not operating.
Warning
Completely turn o the machine and disconnect
air supply line before attempting any service.
Read Assembly and Dis assembly instructions.
Warning
Take care not to exceed the maximum 7 bar
(100 psi) supply air pressure. Use a lter and
regulator and lubricator as close to the equip-
ment inlet as operation will allow to ensure a
clean and regulated and lubricated air ow.
Safety wear mandatory while operating high
pressure washer
Warning
Eye and face and ear protection must be worn at
all times during operation of the High Pressure
Washer. ere is a chance of ying debris from
the jobsite and the quality of wear should be
such to protect against such ying debris such as
akes of the removed layer.
Warning
Eye and face and ear protection must be worn at
all times during operation of the High Pressure
Washer. ere is a chance of ying debris from
the jobsite and the quality of wear should be
such to protect against such ying debris such as
akes of the removed layer.
Warning
Suitable heavy duty gloves must be worn at all
times during operation.
Warning
Suitable heavy duty gloves must be worn at all
times during operation.

FF-MM-311-REV - 01
Page 5
Operation and Maintenance Guide Pneumatic Pressure Washer
Un Packing
Identify all the components as shown earlier, contact your supplier if any parts are missing or dam-
aged.
Be aware that minor visual dierences may be noticed between actual motor/frame/pump and High
pressure hoses because this components vary depending on the model ordered. is illustration is for
identication only.
Unless specially requested the motor, pump and frame are factory tted to each other.
Spray Tip detail
Gun Hook
Lance
Gun
Pressure Gauge
Handle with Nozzels
High Pr. Pump + Stand with
Wheel + FRl + Pneumatic motor
High Pressure Hose
Cleaning Fluid Hose

FF-MM-311-REV - 01
Page 6
Operation and Maintenance Guide Pneumatic Pressure Washer
Fill lubricating oil
Make Sure that the tted oil plug is removed. Fill lubricating oil 10W15 up to half way mark of Oil
Indicating Glass window.
And Fit Breathing cap provided with pump. Do not t Oil Plug.
Caution – a) If oil plug tted aer lling oil instead of breathing cap- Pump will over heat during use
and will damage all internal parts of pump and machine will stop working / developing pressure.
b) If oil is lled fully in pump up to top / maximum level of Oil indicating window, there will be no
space for breathing of oil during use and pump will be over heated which will damage pump internal
parts.
Ok Level
Make Sure to ll Oil in the pump as shown below befor start.
Plug (Red Colour) For Transportation
Purpose Only To Replace With
Breathing Cap (Shown As Above)
Breathing Cap
Excess Oil Level Low Oil Level

FF-MM-311-REV - 01
Page 7
Operation and Maintenance Guide Pneumatic Pressure Washer
Safety checks before and after operating the High Pressure Washer
Air Supply.
• Ensure that an adequate pressured air supply is
available at 6 bar and at least 250 cfm.
• PW200 is supplied with a FRL unit. Always make
sure to top up lubricator with specied oil grade __.
Failed to do so will cause pre-mature failure of air
motor.
Lubrication.
• e oil sump in the Pump unit should contain
SAE15W40 grade oil.
• Ensure that the oil is at the half level by looking at
the transparent window.
• If the number of hours has crossed y, drain out
the oil by opening the Oil drain plug (4) at the side
of the pump housing. Re x the plug and open the
Vented oil cap (4) to top up oil to the correct level
(Refer g on page 11). ereaer repeat aer every
500 hours of use or whenever the level of oil has
dropped or looks contaminated.
Check list before starting the High Pressure
Washer.
• Check safety wear mentioned earlier in warnings.
• Check the hoses, especially the high pressure hoses
for damage or leaks.
• Make sure that the air supply is maintain by a pres-
sure regulator.
• Make sure that pneumatic hoses are not damaged
and all the connectors between gun, lance, hoses
and pump are secure.
• Make sure that the lter cone on the water supply
in in place.
• Turn on the water supply.
Starting the High Pressure Washer
• Hold the gun securely with both hands, ( the gun
will kick back when rst started )
• start the air supply, and depress trigger of the gun
to start the jetting.
• Adjust the output pressure as required by the pres-
sure regulator.
Warning
keep distance from gun tip to job at
least 8 inches.
Warning
is high pressure washer is a high powered
High Pressure Washer and it is imperative that
it must be operated by a competent and trained
operator. See warnings.
Warning
e high pressure washer needs a constant sup-
ply of water during operation, any starvation of
water to the High Pressure Washer will result in
overheating and quick damage to High Pressure
Washer.
Warning
With the motor running and the jetting o, the
high pressure water circulates in the circuit. DO
NOT pause jetting for more than TWO minutes.
Instead shut down the high pressure washer see
“Shutting down” later in this section
Changing spray nozzle tips
• Choose appropriate nozzle.
• Engage the trigger lock
• Pull back the collar
• Remove spray tip
• Install desired tip,
• Release collar
• Tug on tip to ensure proper seat
Cleaning solution injection
All Teryair high pressure washers have a fa-
cility of injection of Cleaning Fluids to aid in
the cleaning process.ere are several brands
& types of cleaning solutions available in the
market today. Whichever you choose make sure
it designed for use in high pressure washer. It
should say so on the level, if it does not say it,
don’t use it.
Warning: Never use bleach or bleach based
products as they can damage the pump.
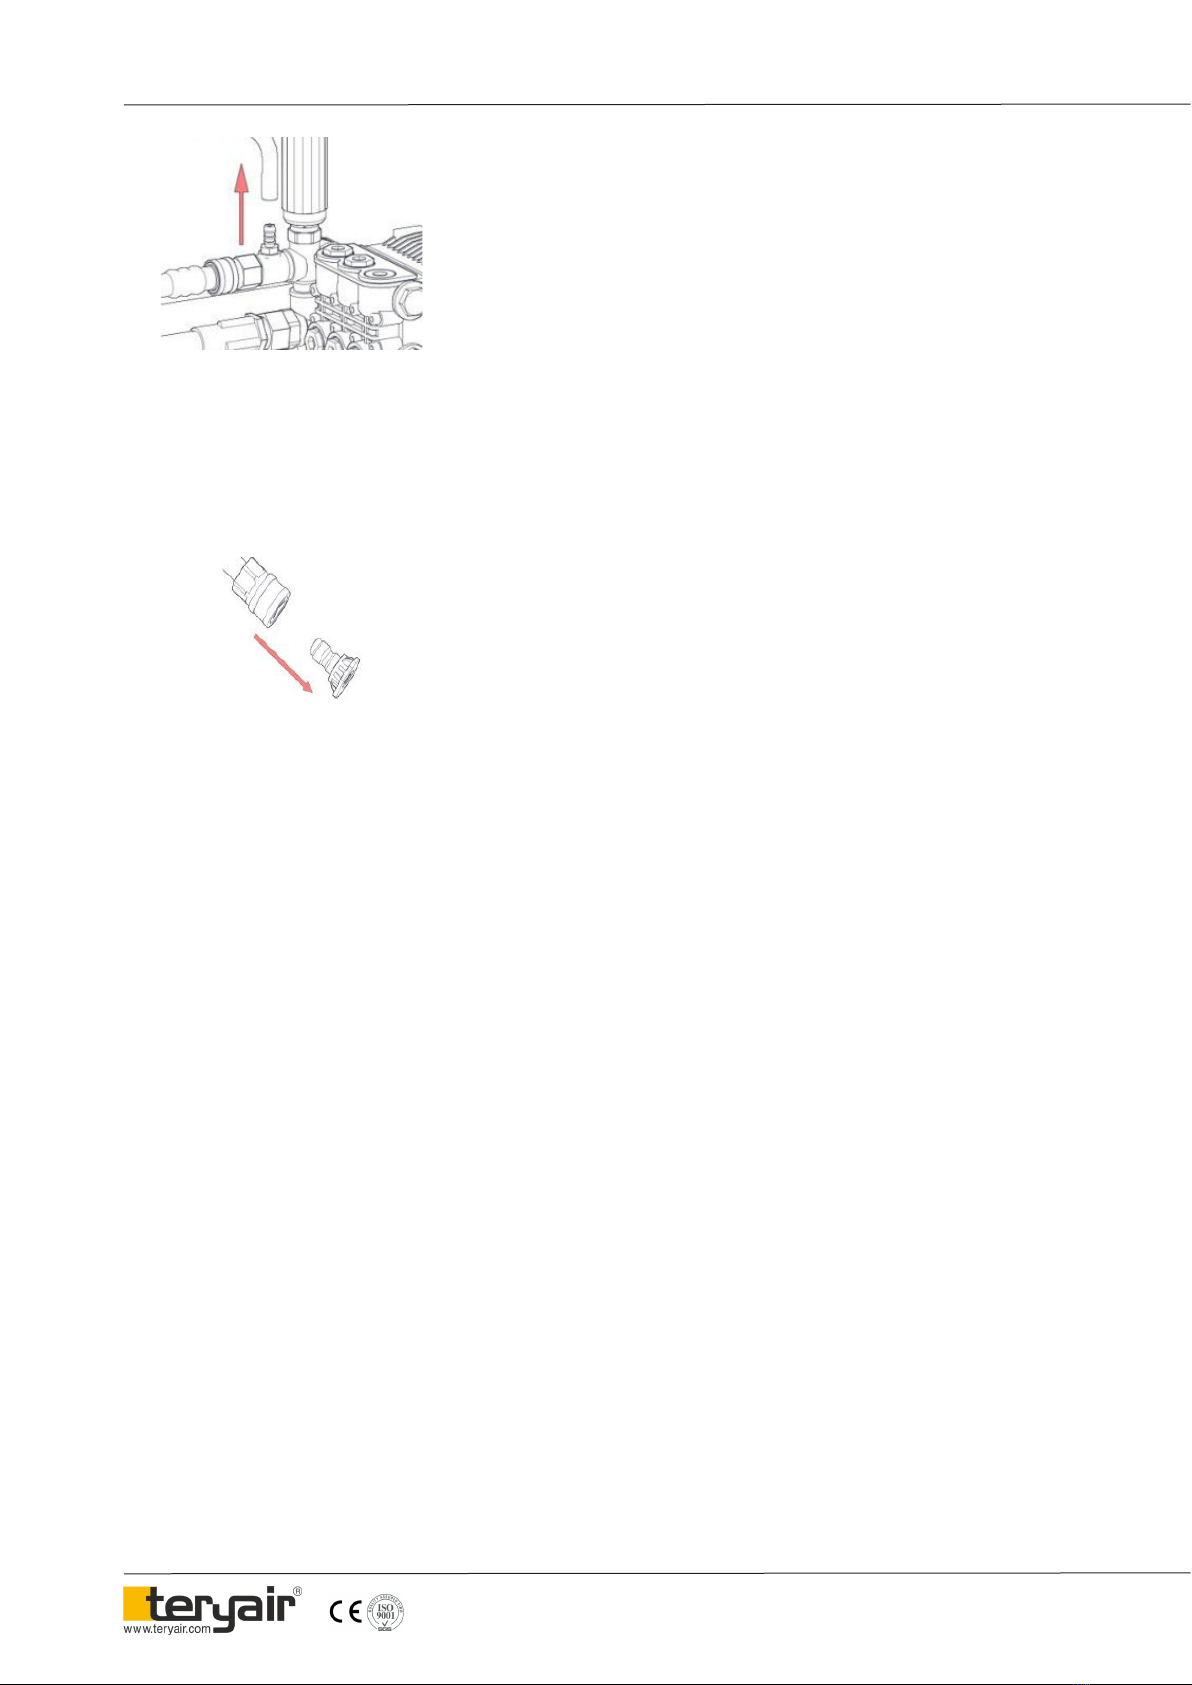
• Once you have your cleaning solution is
ready to go, check to make sure that injec-
tor tube is securely attached to the pump as
shown.
FF-MM-311-REV - 01
Page 8
Operation and Maintenance Guide Pneumatic Pressure Washer
• en insert the other end into the cleaning
solution.
• A pressure washer will only siphon clean-
ing solution when in low pressure mode.
So a lowpressure soap nozzle must be use
on the gun + lance ( Refer Spray tip detail).
• Caution
Aer cleaning Fluid application it is recom-
mended to disconnect the injection system to
allow clean water to rinse through the system
for few minutes.
Shutting down
• DO NOT turn o water source before
switching o the motor.
• Switch o the air supply and disconnect
the air hose.
• Turn o the water source.
• Pull the lance trigger to relieve any residu-
al water pressure.
Storage
• Disconnect the gun from the high pressure hose
and the hose from the pump.
• Hold gun vertically and depress trigger to re-
move all residual water from the gun and lance.
• Drain the hose too in a similar way.
• Remove the water supply hose and drain.
• Run the pump for ten seconds to eject any resid-
ual water that may have remained in.
• Store in a clean and dry place.
• Store under a tarpaulin is recommended.

FF-MM-311-REV - 01
Page 9
Operation and Maintenance Guide Pneumatic Pressure Washer
Troubleshooting
Serial No Causes Remedial Action
1e motor does not turn aer energizing A loose connection
Check connections and retry
2e motor hums but does not turn
Low voltage
Check voltage and verify correct and re try
Pump is stuck
Service Pump see Maintenance section
3Pump is noisy
Pump is sucking air along with water
Check hose ttings
Valves are tight
Service pump
Bearings worn
Service Pump
4 Low pressure when new
Water supply not adequate
20 litres per min at 20 PSI recommended
Leak in high pressure hose tting
Check use sealant tape if needed.
Nozzle obstructed
Clean Nozzles, see maintenance section
Water lter is clogged
Clean and ensure clean supply
Defective un loader valve
Service Pump
Air in hose
Switch o motor, disconnect water hose from pump inlet
and allow water to ow removing air bubbles, reconnect.
5Cleaning solution not getting sucked
Cleaning solution lter clogged
Clean or replace
Wrong Cleaning uids
See section
Cleaning solution residue clogging the pump
Service pump
6Low pressure aer normal use Pump needs service
Service Pump
7Water leaking at Gun Check hose ttings
Use sealant tape or replace ttings
8Water leaking at Pump
Check ttings
Use sealant tape or replace ttings
If not solved
Service Pump
9Oil Leaking at Pump Seals or O rings worn
Service Pump
10 Pump pulsates Clogged nozzle
Clear nozzle
FF-MM-311-REV - 01
Page 10
Operation and Maintenance Guide Pneumatic Pressure Washer
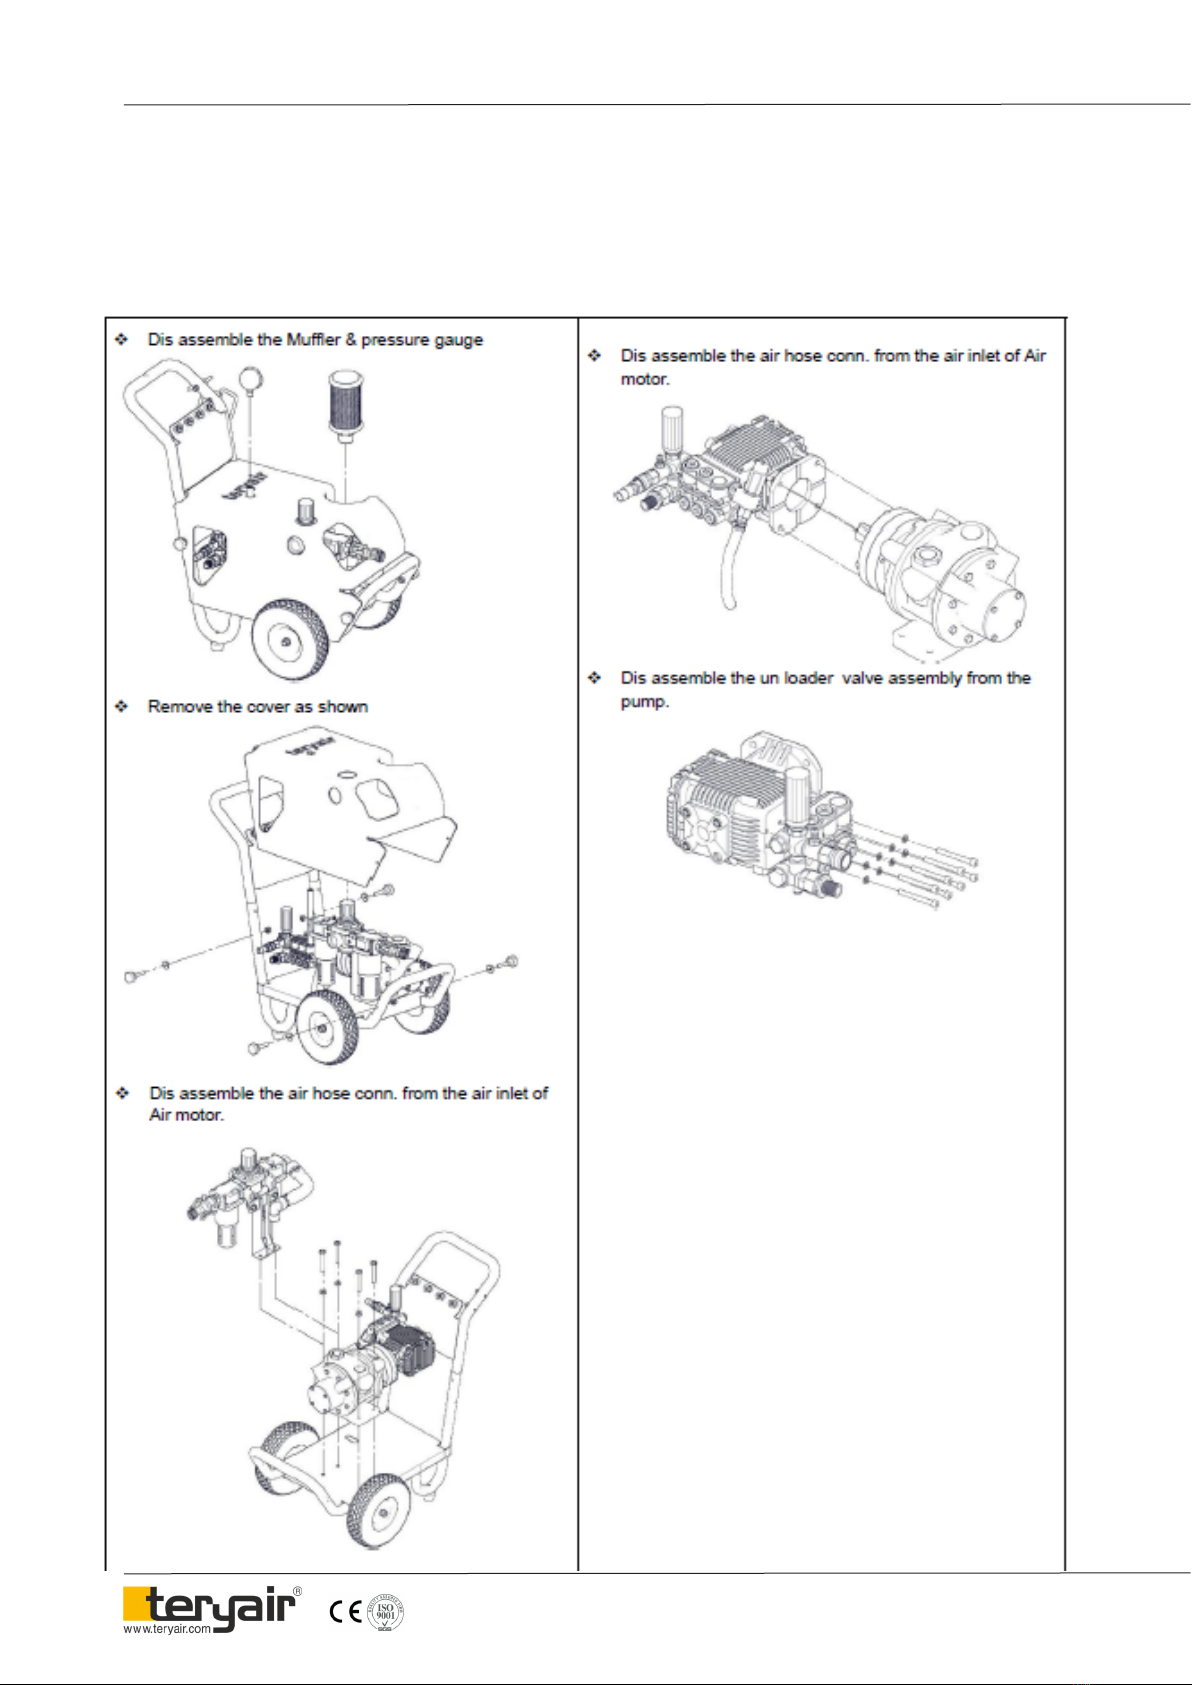
Maintenance
Servicing the Pump
Follow instructions in “Shutting Down” section earlier in the manual.
Dis assemble the hoses and the air hose from the High Pressure Washer and Air motor respectively.

FF-MM-311-REV - 01
Page 11
Operation and Maintenance Guide Pneumatic Pressure Washer
Diassembly and Re-assembly for PW-200
a. Shut o air supply and allow residual Pres-
sure to bleed o.
b. Unscrew Camlock Coupling (33) from FRL
Unit (10) & unscrew Inlet Filter with Pipe
(23) & Discharge Hose (24) from High pres-
sure pump (3).
c. Take out Nozzle (5) from Gun (25) to re-
place it with new one. (If found damaged/
worn-out)
d. Unscrew High Pressure Gauge (22) from
Extension Pipe (21) & unscrew Muer (9)
from Air Motor (2).
e. Unscrew Knobs (27) with Washers (29) on
Cover (26) & remove the cover (26) from
Trolley (1).
f. Loosen Jubilee clips (32) to remove Hose
(11) from Hose Nipples (31) & Unscrew
Elbow (7) from FRL Unit (10) then unscrew
Hose Nipple (31) from Elbow (7)
g. Unscrew Hex bolt (17) with Washer (18)
from Bracket for FRL (8) to remove FRL
Unit (10).
h. Unscrew Hex bolt (19) and Hex bolt (20)
with Washer (18) from Air Motor (2) & re-
move Air motor and High pressure pump
assembly from Trolley (1)
i. Unscrew Extension pipe (21) & Unloader
Valve Kit (34) from High Pressure pump
(3) & Loosen Jubilee Clip (36) to remove
Hose (37) from Unloader Valve Kit (34).
j. Unscrew Allen bolt (13) with Spring
Washer (12) from High Pressure pump (3)
to replace it with new one. (If found dam-
aged/worn-out)
k. Unscrew CSK Screw (13) & Allen Bolt (15)
from coupling (4) & unscrew Allen Bolt
(15) with Spring Washer (35) from Cou-
pling for motor (5) to replace it with new
one. (If found damaged/worn-out)
High Pressure Pump:
a. Replacement of Seal Kit:
• Unscrew Allen Bolts (13) with Washers (12)
from Pump Housing (10) & remove Pump
Housing assembly from Pump Body (1).
• Remove Seal Kits (17) from Pump Housing
(10) and replace it with new one.
b. Replacement of Valve Kit:
• Unscrew Plug (14) (3nos on front side &
3 on top side) from Pump Housing (10) &
remove Valve kit (15) from Pump Housing
(10) and replace it with new one.
c. Examine for any wear or damage to compo-
nents and replace it if required. Now follow
the above steps in reverse manner to reas-
semble the PW200.

FF-MM-311-REV - 01
Page 12
Operation and Maintenance Guide Pneumatic Pressure Washer
Bill of Materials for PW-200
Illustration
Number Part Number Description PW-200
1 637 98 11 TROLLEY COMPLETE 1
2 637 98 24 AIR MOTOR 1
3 637 98 25 HIGH PRESSURE UNIT 1
4 637 21 04-R COUPLING 1
5 637 21 03 COUPLING ON MOTOR 1
6 637 25 33 ADAPTOR 1
7 637 25 08 BRASS ELBOW 2
8 637 31 12 BRACKET FOR FRL UNIT 1
9 637 40 30 MUFFLER 1
10 FRL-25 FRL UNIT ASSLY. 1
11 637 40 14 HOSE 1
12 637 27 67S SPRING WASHER 4
13 637 27 68S ALLEN BOLT 4
14 637 27 19S ALLEN BOLT 8
15 637 90 18 CSK SCREW 4
16 637 27 69S HEX NUT 6
17 637 27 70S HEX HEAD BOLT 2
18 637 27 71S PLAIN WASHER 12
19 637 27 72S HEX HEAD BOLT 2
20 637 27 73S HEX HEAD BOLT 2
21 637 23 06 EXTENSION PIPE 1
22 637 90 17 HIGH PRESSURE GAUGE 1
23 637 97 26 INLET FILTER WITH PIPE 1
24 637 97 38 DISCHARGE HOSE 1
25 637 97 61 GUN 1
26 637 40 35 COVER 1
27 637 08 02 KNOB 4
28 637 27 74S HEX NUT FOR KNOB 4
29 637 27 37S WASHER FOR KNOB 4
30 637 97 60 QUICK CONNECT NOZZLE (5 PIECE SET) 1
31 637 25 34 HOSE NIPPLE 2
32 637 27 63S JUBILEE CLIP 3
33 637 97 64 CAMLOCK COUPLING 1
34 637 97 62 UNLOADER VALVE KIT 1
35 637 27 75S M10 SPRING WASHER 4
36 637 27 65S JUBILEE CLIP 1
37 637 40 66 HOSE FOR UNLOADER VALVE KIT 1
FF-MM-311-REV - 01
Page 13
Operation and Maintenance Guide Pneumatic Pressure Washer
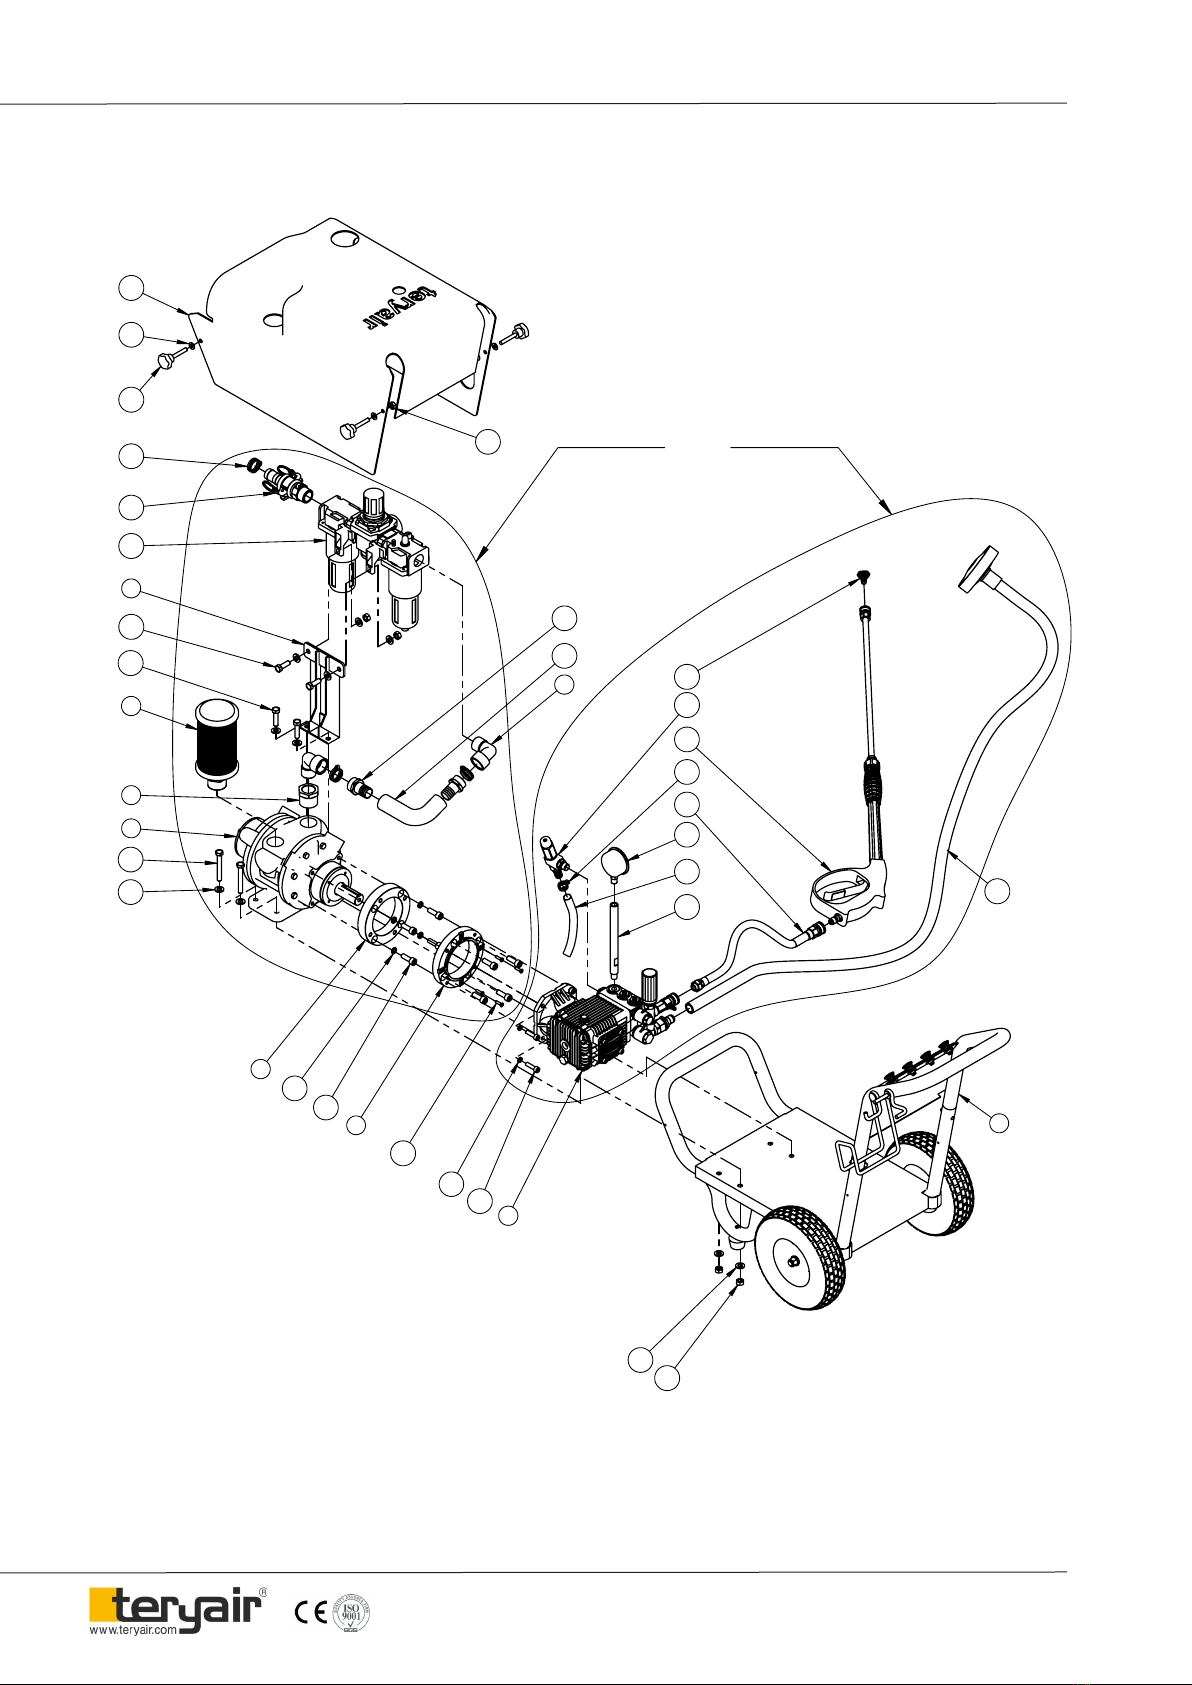
Exploded View for PW-200
1
2
20
18
10
19
17
8
9
33
32
27
29
26
28
7
6
5
35
14
4
15
12
13
16
18
3
23
24
25
30
21
22
37
34
11
31
36
DETAIL A DETAIL B
FF-MM-311-REV - 01
Page 14
Operation and Maintenance Guide Pneumatic Pressure Washer
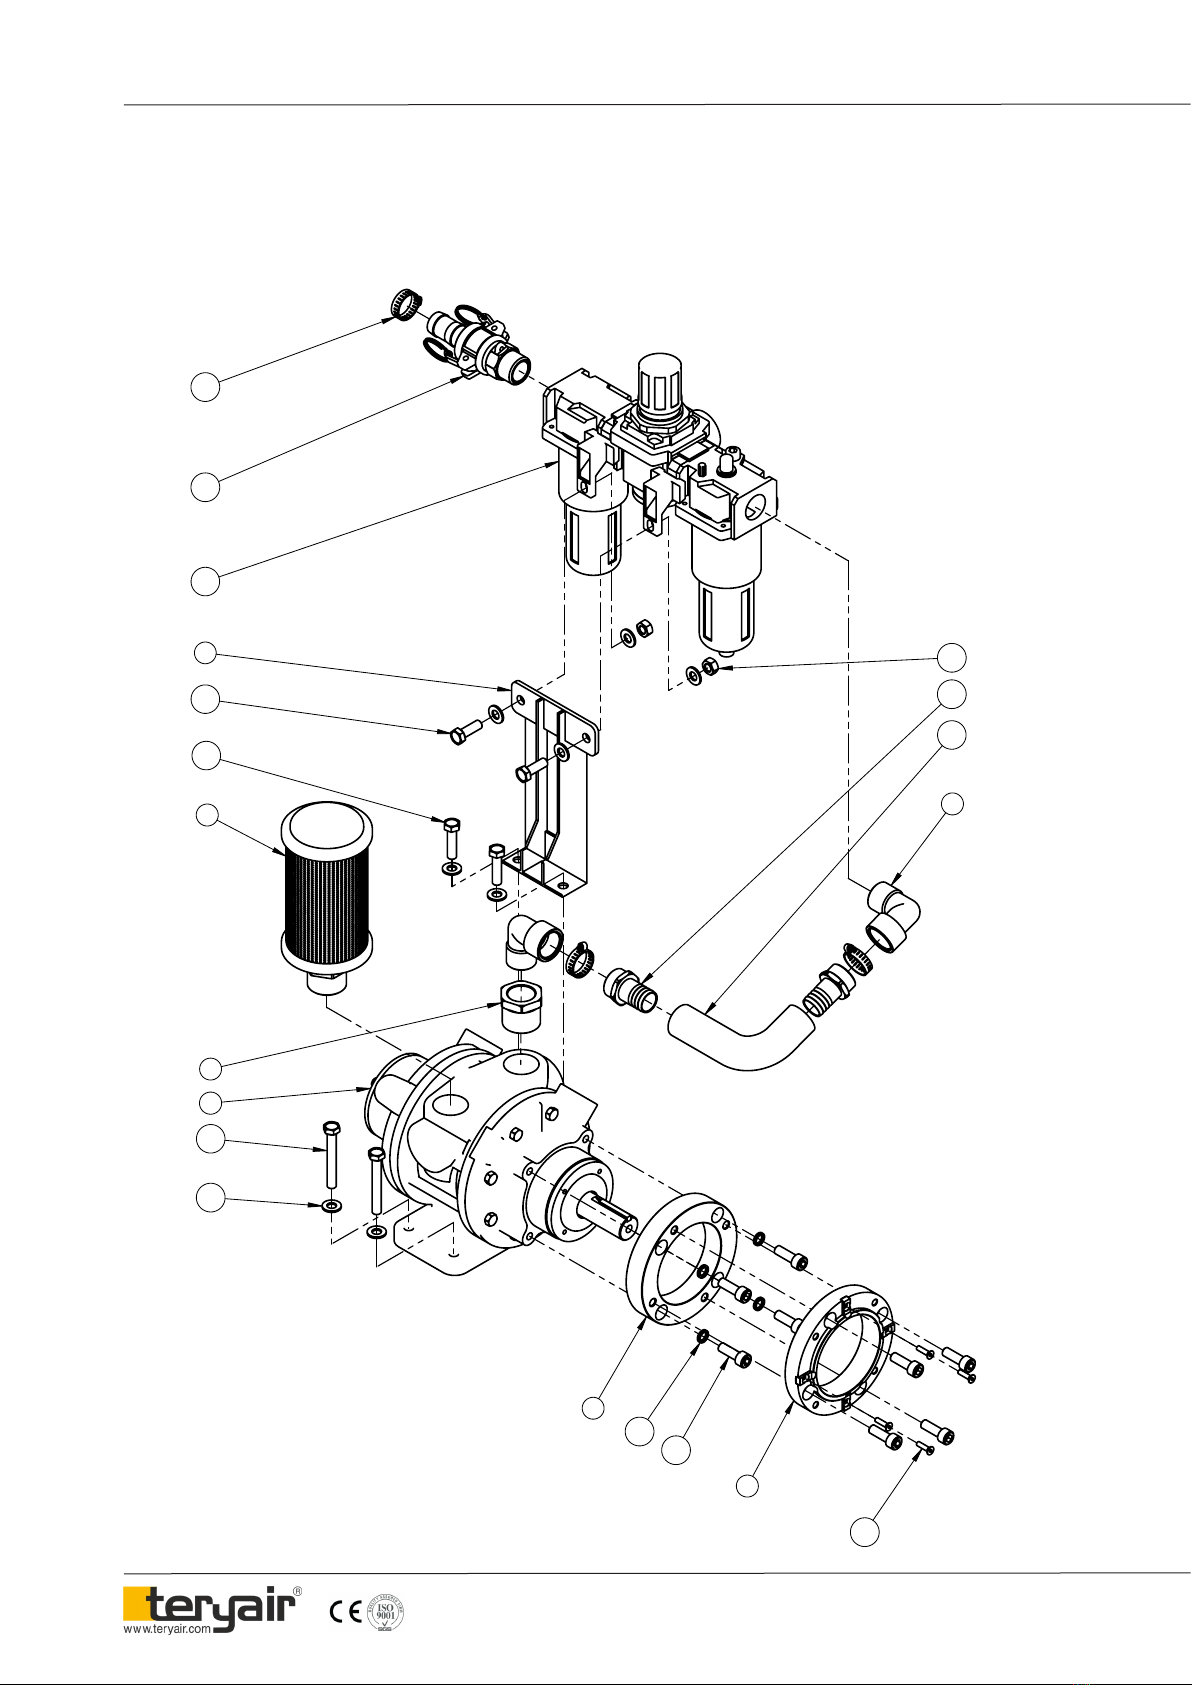
Exploded View Detail-A for PW-200
31
11
7
10
19
17
8
9
32
33
6
18
20
2
5
35
14
4
15
16
DETAIL A

FF-MM-311-REV - 01
Page 15
Operation and Maintenance Guide Pneumatic Pressure Washer
Exploded View Detail-B for PW-200
23
3
12 13
24
25
30
21
22
37
34
36
DETAIL B
FF-MM-311-REV - 01
Page 16
Operation and Maintenance Guide Pneumatic Pressure Washer
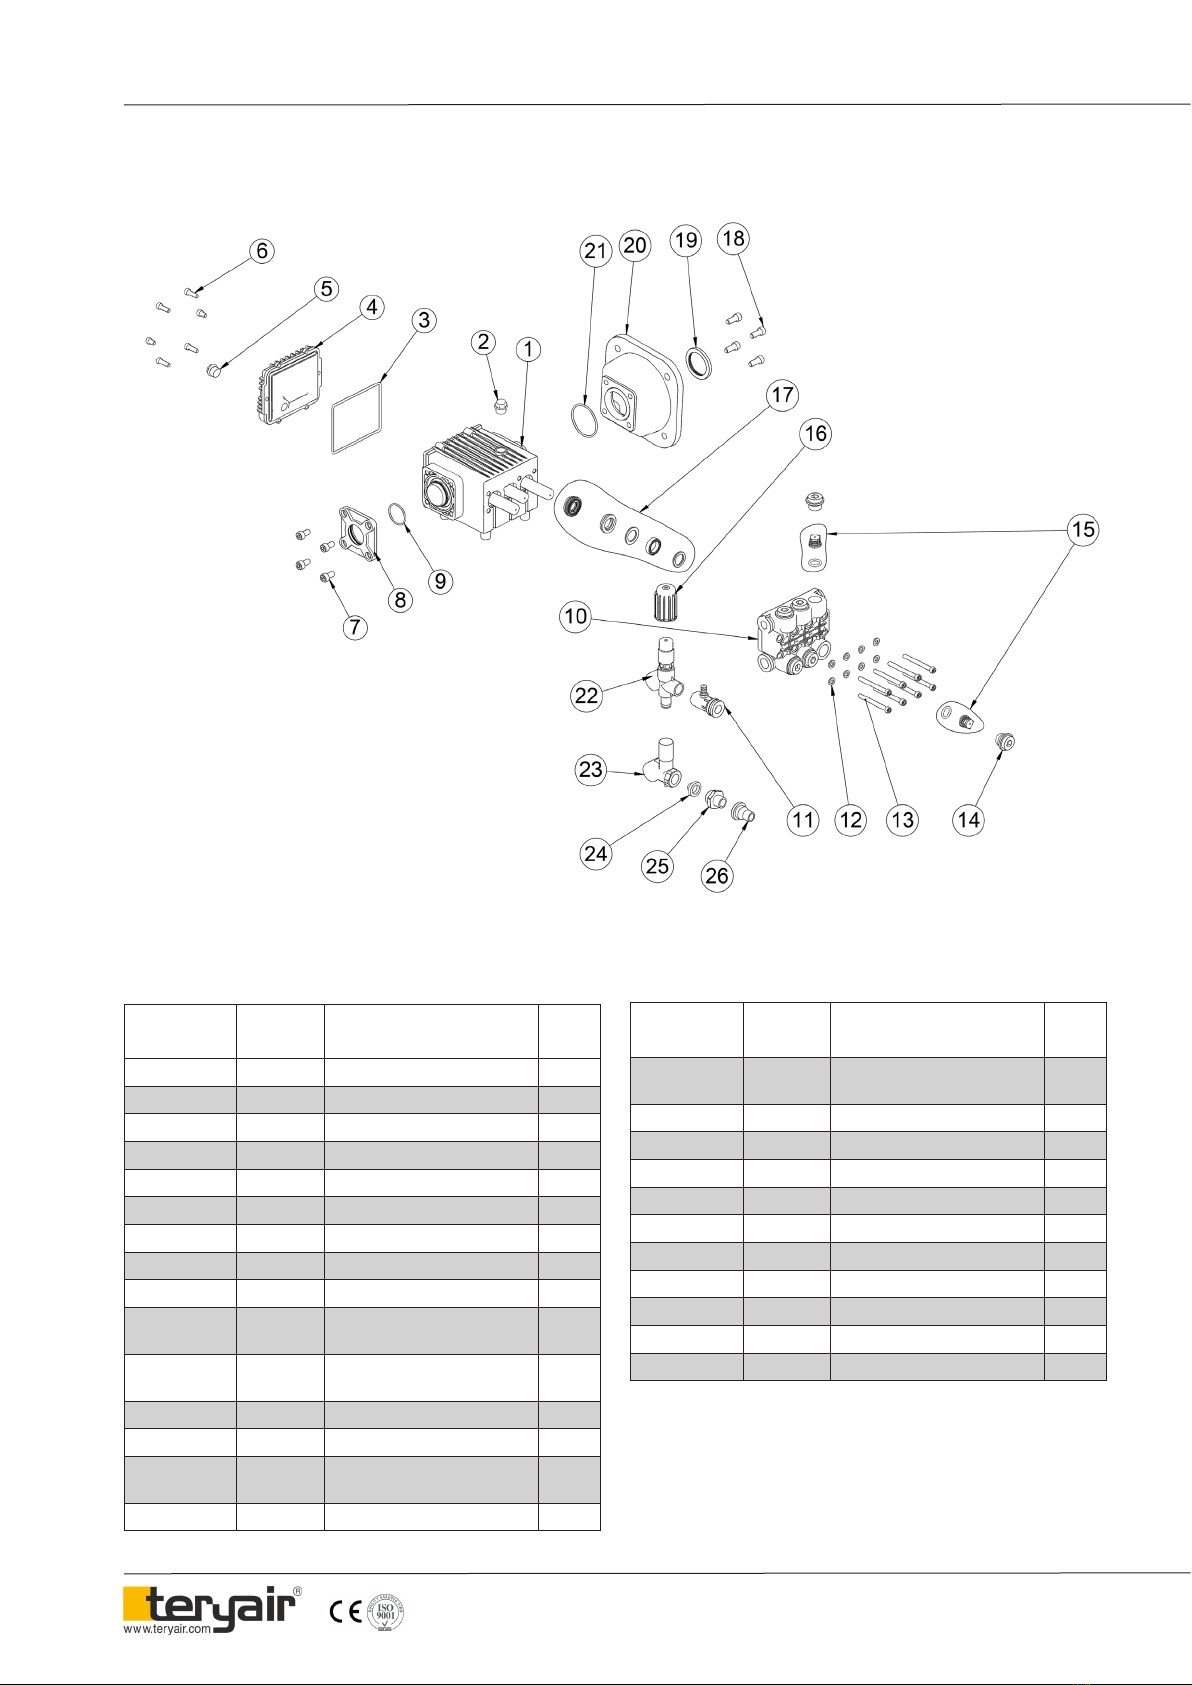
Exploded View pf High Pr. Pump PW200 Bar
Bill Of Material High Pressure Pump - PW200 Bar
Illustration
Number
Part
Number Description Qty
1 6429501 PUMP BODY 1
2 6429502 PLUG (RED) WITH O-RING 1
3 6429503 O- RING FOR END COVER 1
4 6429504 END COVER 1
5 6429505 DRAIN PLUG 1
6 6429506 BOLT FOR END COVER 4
7 6429507 BOLT FOR SAID COVER 4
8 6429508 SAID COVER 1
9 6429509 O-RING SAID COVER 1
10 6429510 PUMP HOUSING (BRASS)
110BAR 1
11 6429511 QC WITH CHEMICAL
INJECTOR 1
12 6429512 WASHER FOR PUMP HSG. 8
13 6429513 BOLT FOR PUMP HSG. 8
14 6429514 PLUG WITH O-RING
FOR PUMP HSG 6
15 6429743 VALVE REPLACEMENT KIT 6
Illustration
Number
Part
Number Description Qty
16 6429515 CAP FOR PRESSURE
REGULATOR 1
17 6429742 SEAL REPLACEMENT KIT 3
18 6429516 BOLT FOR FLANGE 4
19 6429517 OIL SEAL FOR FLANGE 1
20 6429518 FLANGE 1
21 6429519 O-RING FOR FLANGE 1
22 6429520 UNLOADER VALVE ASSY 1
23 6429521 INLET ASSY 1
24 6429522 INLET STRAINER 1
25 6429523 INLET ADOPTER 1
26 6429524 INLET NIPPLE 1
FF-MM-311-REV - 01
Page 17
Operation and Maintenance Guide Pneumatic Pressure Washer
TEST CERTIFICATE OF MATERIALS, PERFORMANCE
DATE :
MODEL NUMBER :
PART DESCRIPTION & S.NO. :
We Hereby Certify at e Above Referenced Product Has Tested And Inspected In Accordance With Our Standard Test Pro-
cedures And Meets e Specications For Material And Performance Values As Published In Our Literature. We Further Certify
at e Product Has Been Given Our Standard Factory Test. is Product Is Certied To Be Produced In Our Factory, And Is
Of Current Production. It Has Been Produced In A Workmanlike Manner And Meets All Quality And Performance Standards
Established By e Company
Authorised Signatory
Q.A Manager
Place - Vasai, Maharastra

FF-MM-311-REV - 01
Page 18
Operation and Maintenance Guide Pneumatic Pressure Washer
EU DECLARATION OF CONFORMITY
We hereby certify that the Listed Product stipulated below comply with all relevant provisions of the machinery direc-
tive (2006/42/EC) and the national laws and regulations adopting this directive.
Description :
Model Number :
Date :
Serial Number :
Is in conformity with the provisions of the following European Directives: (2006/42/EC) Machinery Safety and
Harmonized standards
ISO 12100-1: 2010: Safety of Machinery –general Principles for Design –Risk Assessment and Risk Reduction.
Registered Oce : 416 Gundecha Industrial Complex, Akuril Road,
Kandivali East, Mumbai – 400101, Maharashtra, India.
Web site : www.teryair.com
Works : A-1, Tirupati Udyog Nagar, Sativali Road, Vasai East,
Palghar – 401208, Maharashtra, India.
CE certication registration no – C E 16832
Issued by – BMQR Certications Pvt Ltd.
www.cemarking-india.com
Valid Till – 03/11/2021
Signed for and on behalf of
TERYAIR EQUIPMENT PVT. LTD. Place of Issue:
Date:

FF-MM-311-REV - 01
Page 19
Operation and Maintenance Guide Pneumatic Pressure Washer
Warranty Certificate
Every product manufactured by Teryair
is built to meet the highest standards of quality.
Teryair warrants that the Products, accessories and parts manufactured or supplied
by the company be free from defects in material and workmanship for a period of six
months from date of Teryair authorized dealer invoice to customer, or one year from
date of Teryair invoice to dealer, whichever is earlier. Failure due to normal wear,
misapplication, or abuse is, of course, excluded from this warranty.
Since the use of Teryair products and parts is beyond our control, Teryair cannot
guarantee the suitability of any product or part for a particular application and Teryair
shall not be liable for any consequential damage or expense arising from the use or
misuse of its products on any application. Teryair does not warranty bought out
products or components such as electric motors and hardware but will assist in
directing warranty queries to the dealer/manufacturer responsible. Teryair
responsibility is limited solely to replacement or repair of defective Teryair products
or components.
Dealer/End User shall have no right or remedy and Teryair shall have no liability or obligation under the warranty, if:
(i) a Product is altered, changed, modified or tampered with in any way, (ii) a Product is damaged after deposit with the
transporter for shipment; (iii) a Product is not properly preserved, packaged, stored, processed or handled after receipt; (iv) a
Product is not used and maintained in accordance with Teryair's recommended operating and maintenance manuals,
instructions and procedures, if any; (v) a Product is not properly incorporated or installed in, or not properly combined with, an
Other Product; (vi) the issue with a Product is directly or indirectly attributable to, or directly or indirectly results from or arises
out of, a failure, substandard performance or other issue with another product, material, component or part not supplied by
Teryair; (vii) the issue with a Product is directly or indirectly attributable to, or directly or indirectly results from or arises out of,
compliance with any design, specification or other specific requirement of Dealer/End User; (viii) a Product is used in a manner,
with a substance or for a purpose other than the normal manner, substance and purpose for which it is intended or is otherwise
subjected to abnormal use or service; (ix) a Product is subjected to a power surge, brown out or other similar occurrence; (x)
the issue with a Product is directly or indirectly attributable to, or directly or indirectly results from or arises out of, normal wear
and tear of such Product (including, without limitation, things such as worn seals, diaphragms, balls, O rings, gaskets, chisels,
cutters, hoses and other such wearing components; (xi) the issue with a Product is directly or indirectly.
Dated :
Product Model Number :
Product Serial Numbar : Ajay Bhagat, Q.A. Manager
(Company Seal)
Other manuals for PW-200
1
This manual suits for next models
1
Table of contents
Other Teryair Pressure Washer manuals


