Tesco T7PDVD113 User manual

T7PDVD113
7” Portable DVD Player
User Guide

1
Read these instructions.
Keep these instructions.
Heed all warnings.
Follow all instructions.
Do not use this apparatus near water.
Clean only with a slightly damp cloth.
Do not block any ventilation openings.
Install in accordance with the manufacturer’s
instructions.
Do not install or operate near any heat sources such as
radiators, stoves, or other apparatus that produce heat.
Unplug this apparatus during lightning storms or when
unused for long periods of time.
Referallservicing toqualiedservice personnel.Servicing
is required when the apparatus has been damaged
in any way, such as the power-supply cord or plug is
damaged, liquid has been spilled or objects have fallen
into the apparatus, the apparatus has been exposed to
rain or moisture, does not operate normally, or has been
dropped.
Warning: To reduce the risk of re or electrical shock, do
not expose this product to rain or moisture. The product
must not be exposed to dripping and splashing and no
object lled with liquids such as a vase of owers should
be placed on the product.
No naked ame sources such as candles should be
placed on the product.
Caution: Changes or modications not expressly
approved by the manufacturer could void the user’s
authority to operate this device.
Caution: Usage of controls or adjustments or performance
ofproceduresotherthanthosespeciedhereinmayresult
in hazardous exposure.
IMPORTANT
This equipment generates, uses and can radiate radio
frequency energy and, if not installed and used in
accordance with the instructions, may cause harmful
interference to radio communication. However, this is no
guarantee that interference will not occur in a particular
installation. If this equipment does cause harmful
interference to radio or television reception, which can
be determined by turning the equipment o and on, the
user is encouraged to try to correct the interference by
one of the following measures:
Reorient or relocate the receiving antenna.•
Increase the separation between the equipment and•
receiver.
Connect the equipment into an outlet on a•
circuit dierent from that to which the receiver is
connected.
Consult the dealer or an experienced radio/TV•
technician for help.
This symbol indicates that there are
important operating and maintenance
instructions in the literature
accompanying this unit.
This symbol indicates that dangerous
voltage constituting a risk of electric
shock is present within this unit.
IMPORTANT SAFETY INFORMATION
These labels tell you that the unit contains a Laser
component. Do not stare at the laser lens.
When the disc tray is open a safety interlock disconnects
power to the laser. Do not defeat this safety interlock.
CAUTION!
RISK OF ELECTRIC SHOCK
DO NOT OPEN
TO REDUCE THE RISK OF ELECTRIC SHOCK
DO NOT REMOVE COVER (OR BACK)

2
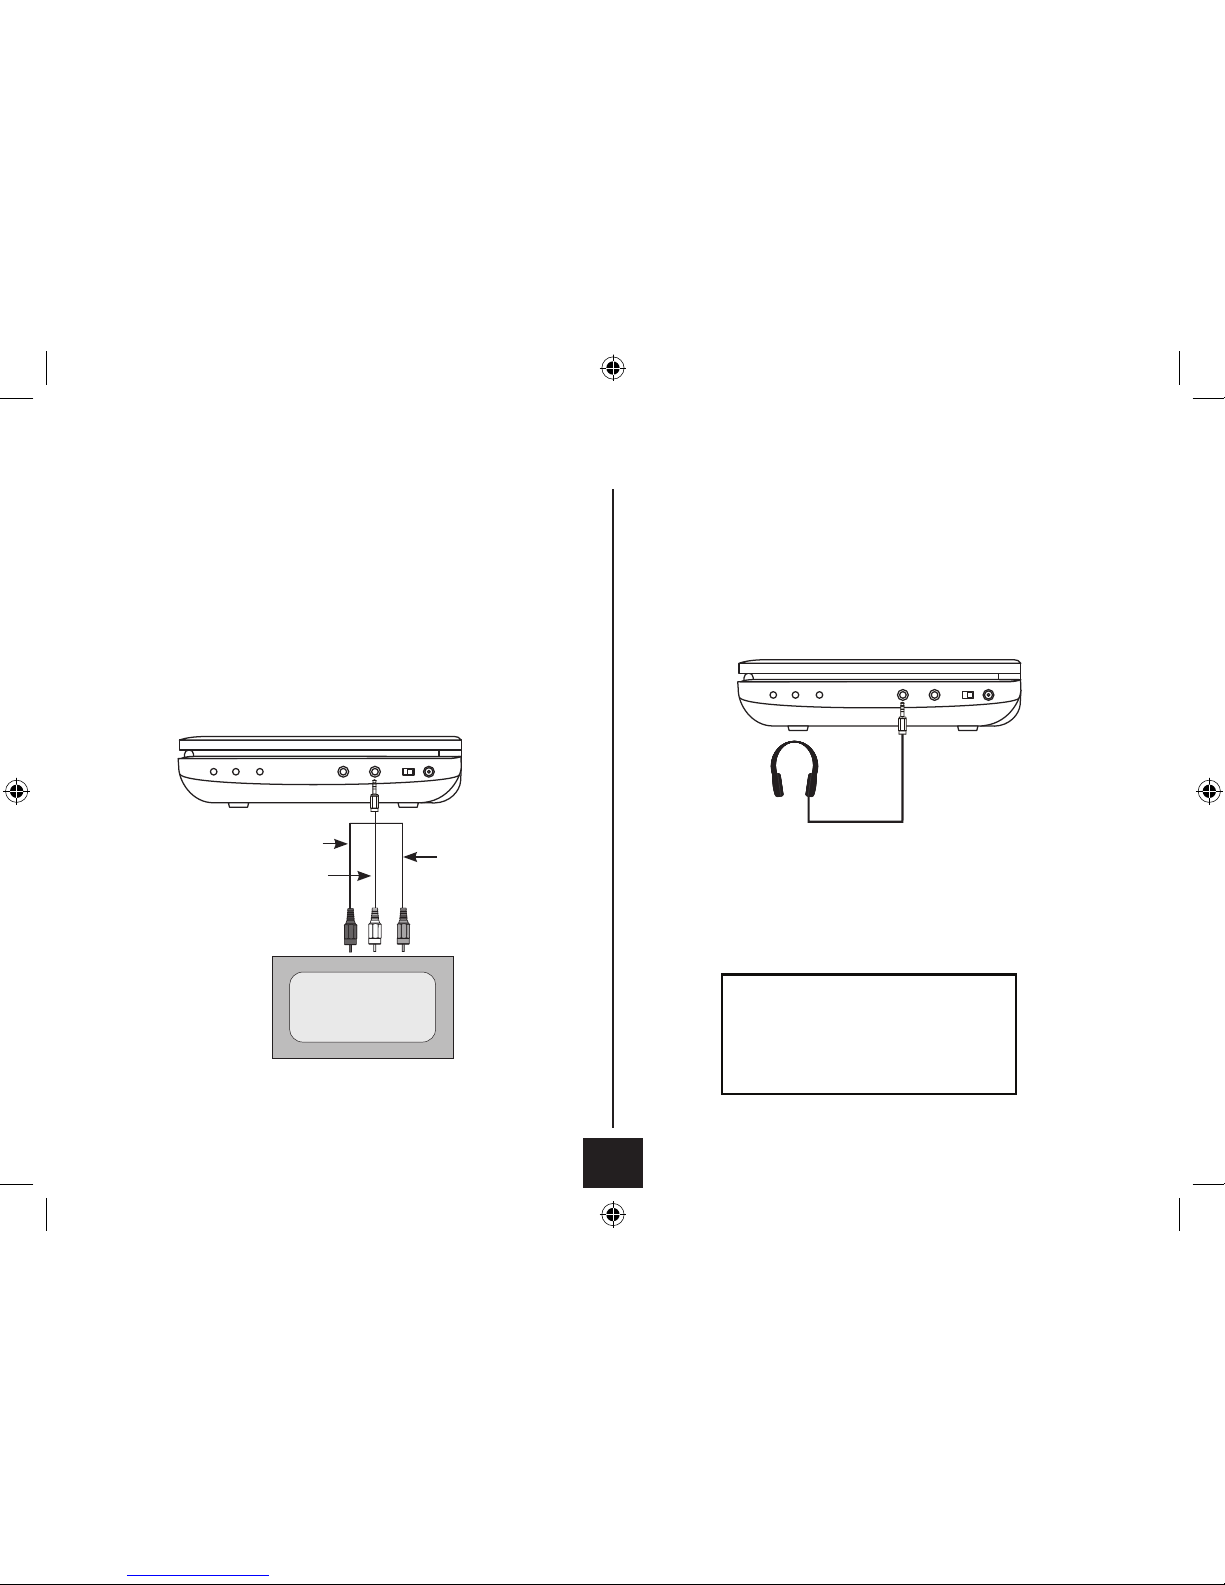
ELECTRICAL INFORMATION
Use this appliance only with the supplied AC Adaptor or
in-car charger. Using non-approved power supplies will
void the warranty.
Mains Supply: The mains operating voltage of the AC
Adaptor is marked on a rating plate on the AC Adaptor.
The means of disconnecting this appliance from the
mains supply is the AC adaptor/mains plug. This should
be unobstructed and readily operable at all times.
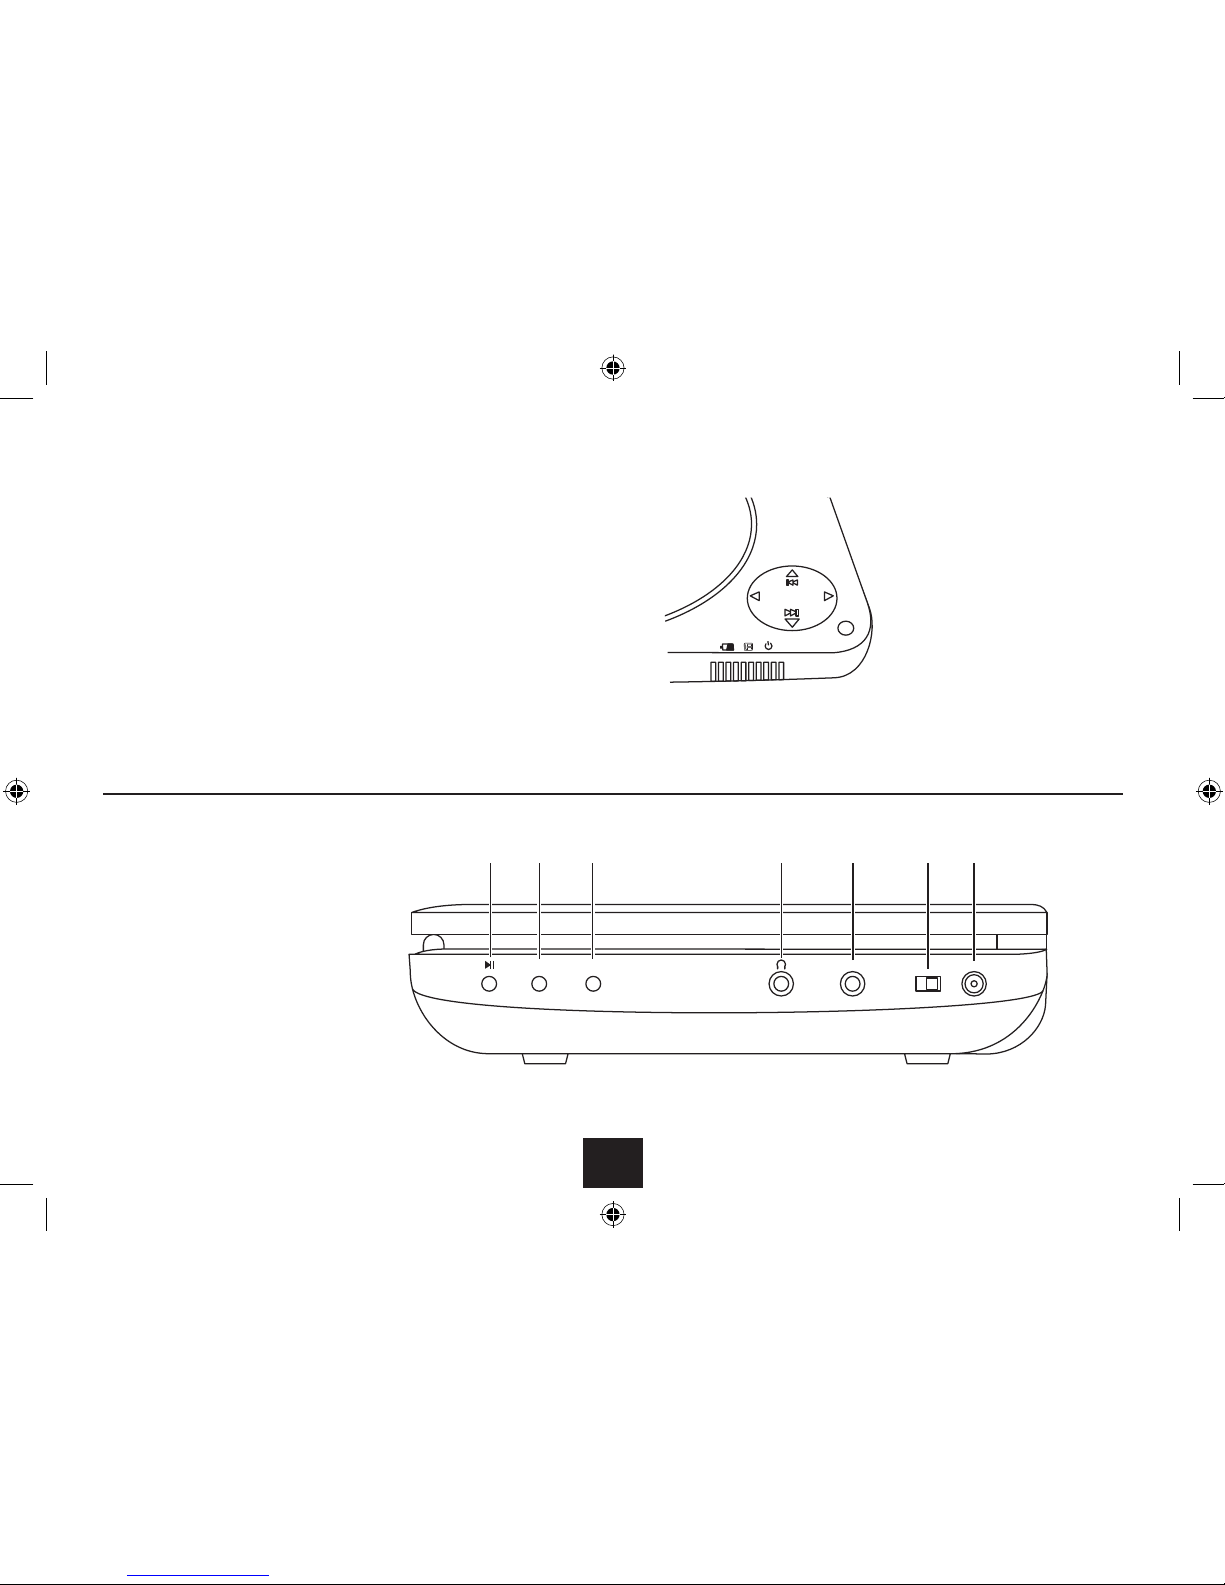
GENERAL CAUTIONS
CAUTION: During playback, the disc spins at high speed,
do not lift or move the player, doing so may damage the
disc.
CAUTION: When the player is stopped the disc is still
rotating at a very high speed. Leave the disc to come to
a rest before removing it. Stopping a disc manually could
damage both the disc and the player
CAUTION: Never press down on the disc compartment lid
especially when a disc is playing.
To prevent possible hearing damage,
do not listen at high volumes for long
periods.
BATTERY WARNINGS
The DVD player and the handset use batteries. There is a
risk of re and burns if batteries are handled improperly.
Do not disassemble, crush, puncture, short external
contacts, or dispose of in re or water.
Do not service the internal player battery. Have it
examined (and replaced if needed) by a competent
service centre.
Replace the handset battery only with a battery of the
same voltage and type.
Discard used batteries in accordance with recycling
regulations in force in your area.
BATTERY NOTES
The player’s internal Lithium-Polymer battery has no
Memory Eect and can be recharged safely whether it is
fully or partially discharged. DO NOT charge a battery for
longer than 6 hours. A fully charged battery will power
the player for about 2 hours. During charging the red light
will be on. The light will turn green when the battery is
fully charged. Do NOT charge the battery in excessively
hot, cold or humid conditions.
CARE OF DISCS
DVD discs are fragile. Treat them with care. Always store
them upright in their packing; away from direct sunlight,
heat and damp.
When handling discs, hold the disc’s outer edge and/or
the centre spindle hole. Do not touch the disc surface.
Never bend or ex a disc.
Clean the disc surface with a soft, dry cloth. Wipe the
disc surface gently, radially, from centre toward the outer
edge. Never apply solvents to the surface of a disc.
PARENTAL CONTROL
This player includes parental control settings to restrict
viewing of adult rated movies.
Thesettingispasswordprotected.Changingthepassword
from the factory default is highly recommended. Keep the
password secret at all times.
The parental control restriction system relies on a disc
including a correct parental rating. If the disc does not
includea parental rating, thentheparental controlsystem
may not restrict viewing.
The factory default setting is‘Adult’, unrestricted.

3
INTRODUCTION
Read this manual before using your player.
The Player is set to play Region 2 discs.
Theplayerwillacceptthefollowingformats(amongothers):DVD,DVD+R,DVD+RW,
DVD-R, DVD-RW, CD-DA, CD, CD-R, CD-RW, Picture CD,
The following formats are not acceptable:
DVD discs with other region codes.
Improperly formatted recordable discs. This may include discs which are not
nalised.
Theplayerhasbuiltincopyrightprotectiontechnology.If avideorecorderisconnected
to the player, the video output image may be distorted during recording.
UNPACKING
The carton should contain:
The DVD Player•
Remote Control and Battery•
External Mains Power Adapter•
12VDCVehicle accessory (Cigarette lighter) adapter•
Operating Manual.•
If any items are missing or damaged, contact your nearestTESCO store for a replacement.
Have your receipt ready when you call. Retain the packaging. If you dispose of it, do so
having regard to any recycling regulations in your area.
INDEX
Safety information and cautions........................................................................................ 1
Introduction ........................................................................................................................ 3
Player features..................................................................................................................... 4
Controls and connections................................................................................................... 5
External connections ......................................................................................................... 7
Adjusting the screen........................................................................................................... 8
Remote control handset .....................................................................................................9
Connecting power ............................................................................................................11
Portable operation............................................................................................................11
Initial language setting.....................................................................................................12
Loading/Removing a disc.................................................................................................12
Playing a DVD ................................................................................................................... 13
Playing an audio CD .........................................................................................................15
Playing media les ...........................................................................................................16
Setting up the player........................................................................................................20
Troubleshooting................................................................................................................ 25
Specications....................................................................................................................26
Warranty ........................................................................................................................... 26

4
PLAYER FEATURES
DVD, CD, CD-R, CD-RW DVD+R, DVD+RW, DVD-R, DVD-
RW capable
TV format: PAL
Video: CompositeVideo output
Audio: Stereo analogue output
DVD features:
Multi Subtitle select
Multi Language select
Multi Angle select
Other features:
On screen display menu
Multi-level zooming
Parental control
DVD REGION CODES
DVD discs and players are covered by a worldwide
agreement which limits playback of DVD discs to specic
regions as determined by the software manufacturer.
Most DVDs come marked with a region coding. A disc
specied as playable in one region may not play on a
player designed for a dierent region. A disc specied
as universal or with no region coding (Code 0) may be
played in any region.
The regions are:
Region 1: Canada, USA
Region 2: Europe, Japan, Mid. East, South Africa
Region 3: South-East Asia
Region 4: Australia, Caribbean, Central & South
America, New Zealand
Region 5: Africa, Former Soviet Union, India,
North Korea, Pakistan
Region 6: China
THIS PLAYER PLAYS REGION 2 AND REGION FREE ,
UNIVERSAL (0) DISCS.
IMPORTANT NOTE
DVD discs contain various features. Many features are
determined by the program or software content on the
DVD disc itself. Some procedures in this manual cannot
be performed if the disc does not support the feature.
Also, some discs may need special settings which are
unsupported by the player.
The player has built in copyright protection technology
that prevents copying from a DVD disc to any media.
If a video recorder is connected to the player, the video
output image will be distorted.
NOTICES
Thisproductincorporatescopyrightprotectiontechnology
that is protected by U.S. patents and other intellectual
property rights. Use of this copyright protection
technology must be authorized by Rovi Corporation, and
is intended for home and other limited viewing uses only
unless otherwise authorized by Rovi Corporation.
Reverse engineering or disassembly is prohibited.
Manufactured under license from Dolby Laboratories.
Dolby and the double-D symbol are trade marks of Dolby
Laboratories.

5
CONTROLS AND CONNECTIONS
FRONTVIEW
Navigation buttons (more details on the next page)1.
Standby indicator2.
Remote control sensor3.
Battery charge indicator4.
Disc loading door5.
Disc loading door open button6.
VOL+VOL-
b
a
c
d
fe

6
CONTROLS AND CONNECTIONS
NAVIGATION CONTROLS
PLAY MODE
Volume up button1.
Play/pause button (on side)2.
Previous button3.
Volume down button4.
Next button5.
MENU MODE
Cursor right button1.
Select button2.
Cursor down button3.
Cursor left button4.
Cursor up button5.
CONTROLS AND CONNECTIONS
SIDEVIEW
Play/Pause/Select button1.
SET|UP| button2.
OSD button3.
Headphone jack4.
AV out jack5.
Power switch6.
DC In jack7.
VOL+VOL-
AV OUT ON OFF DC IN 9-12V
SETUP OSD
ab cdefg

7
EXTERNAL AUDIO VISUAL CONNECTIONS
TV (AUDIO/VISUAL) CONNECTION
You can view and listen to the DVD player on theTV.
You will need to purchase an interconnect with a three pole 3.5mm jack at one end
and three RCA phono plugs on the other. This interconnect is often used for connecting
Camcorders and games consoles.
Connect the jack plug to the Player AV OUT socket. Connect the YELLOW plug to the
CompositeVideo input of theTV.
Connect theWHITE and RED plugs to the Audio inputs of theTV.
IMPORTANT
BEFORE CONNECTING ANY EQUIPMENT
ENSURE IT IS SAFELY SWITCHED OFF AND
DISCONNECTED FROM THE MAINS SUPPLY.
HEADPHONE CONNECTION
Connect a pair of headphones as shown.
This connection disconnects the internal speakers of the
DVD player.
WARNING: Listening at loud volumes can damage your
hearing!
RED (right audio)
WHITE (left audio)
YELLOW (Video)

8
ADJUSTING THE PLAYER SCREEN
Place the player on a rm level surface
Lift up the player lid. Remove any plastic lm•
covering the screen.To do this hold the tab at the
lower right edge of the lm and peel the lm o
carefully.
ROTATING THE SCREEN
In addition to tilting the screen, you can also rotate it
in a clockwise direction.
To rotate the screen, set the screen in a vertical
position and gently turn it clockwise (1). You can
rotate it by a maximum of 180° (2) so that the screen
faces behind the player (3).
To operate the player with the screen facing
upwards:
Rotate the screen fully 180°.•
Carefully lay the screen onto the player (4).•
NOTE:When adjusting the screen do so slowly. NEVER
force the screen when tilting or rotating.
a
dc
b
180°

9
Mute b1. utton
On-screen display button2.
Step button3.
Audio button4.
Menu button5.
Stop button6.
Play/pause button7.
Right cursor button8.
Return button9.
Volume down button10.
Volume up button11.
Previous button12.
Next button13.
Fast search back button14.
Fast search forward button15.
Program button16.
Display button17.
Repeat button18.
Repeat A-B button19.
Setup button20.
Down cursor button21.
REMOTE CONTROL
ZOOM SEARCH MUTE OSD
STEP
09
87
65
4
3
2
1
10+
MENU
AUDIO
ANGLE
SUBTITLE
TITLE
SETUP
REPEAT AB
DISPLAY
PROGRAM
RETURN
VOL- VOL+
ENTER
a
b
c
d
e
f
g
h
i
1)
1!
1@
1#
1$
1%
2*
2&
2^
2%
2$
2#
2@
2!
2)
1(
1*
1&
1^
3)
2(
Left cursor button22.
Enter button23.
Title button24.
Up cursor button25.
Subtitle button26.
Angle button27.
Numeric keypad28.
Zoom button29.
Search button30.

10
HANDSET PREPARATION
Remove the safety strip from the battery compartment.
The handset is now ready for use.
USING THE REMOTE HANDSET
Point the handset at the infrared receiving window of the
player, located next to the power and charge indicators.
The handset must be no more than 3 metres from the
player and at an angle of no more than 30º for reliable
operation. If handset operation is erratic in sunlight,
move the player into the shade.
BATTERY REPLACEMENT
If the handset behaves erratically or fails to operate the
battery should be replaced.
Press the catch at the side of the battery1.
compartment.
Slide out the battery cage2.
Remove the old battery.3.
Place a new battery in the cage with the polarity as4.
shown.
Close the cage.5.
Observe all battery cautions in the Battery Warning
section of this manual.

11
PORTABLE OPERATION
If you want to use the player without external power you
will need to charge the battery. The battery will charge
whenever a power source is available.
The amount of time taken to charge the battery depends
on the amount of residual charge remaining but it could
take several hours.
When the battery is charging the light at the front of the
player will glow red.When the battery is fully charged the
light will change to green. You may now disconnect the
mains adaptor.
DURING BATTERY OPERATION:
If there is no display when the player is turned on:
This is not a fault condition but due to a at battery.
Switchtheplayero,connectthechargerasdescribed•
above and charge the battery for six hours.
When the battery is running out:
The player will display a“Low Battery” warning.•
After a short period the player will shut down.•
You must charge the battery as soon as possible.•
To conserve power:
Alwaysswitch the playerowhen it is not connected•
to the adaptor or you will drain the battery.
POWER CONNECTION
Your DVD player may be powered by the internal
rechargeable battery for portable operation, from the AC
mains via an AC adaptor or from the 12V DC outlet in a
car via the DC adaptor. The internal battery can also be
charged from either the AC or DC adaptor.
CAUTION: Use only the AC and DC adaptors supplied with
the unit.
CONNECTING THE AC OR DC ADAPTOR
Connect the DC plug of the supplied adaptor (mains or
vehicle) into the DC-In jack on the side of the player.
Plug the Adaptor into the mains point (or vehicle
accessory point) and switch on the power. The player is
now ready for use.
POWER CONTROL
Switching on the player:
Slide the power switch to the‘ON’position.•
The player will switch on and the screen will light. If a
disc is loaded, it will start to play automatically.
Switching o the player:
Slide the power switch to the‘OFF’position.•
The player will switch o.
Auto Standby:
The player includes a power saving Auto Standby feature.
If Auto Standby is enabled, the player will automatically
set to Standby after the period you have set.
To re-start the player after auto-standby has set,•
slide the power switch to the ‘OFF’, then to the ‘ON’
position.
NOTE: Auto Standby settings can be found in the setup
menu on page 23.
AC mains connection
Vehicle 12VDC connection

12
LANGUAGE SETTING
Your DVD player features on-screen information displays
and setup screens.
When powering up for the rst time you may want to
change the language setting. The OSD button is set up
as a hot-key to easily enable you to select the on-screen
menu language.
To change the on-screen menu language:
Press the OSD button repeatedly.•
The on-screen language options will be shown.
Stop pressing when the language you want is•
displayed.
LOADING/REMOVING A DISC
Loading a disc
Press the• button to open the disc lid.
Holding the disc by the edges, place the disc on the•
turntable in the centre of the loading bay with the
label uppermost. Press the centre of the disc into
place on the turntable with a click.
Close the disc lid. The disc will now load. Some formats take
more time to load than others.
DVD discs will display the ROOT or TITLE menu. The ROOT
menu is the basic menu of a DVD disc and contains all the
information relating to the disc. If there is one title and
nothing else the disc may play.
Removing a disc
Press the• .button twice to stop the disc if it is
playing.
Press the• button to open the disc lid.
Lift the disc from the front left corner, remove it from•
the player and return it to the case.
PLAYING A DVD DISC
Load the disc and wait for the title menu to appear.•
Navigate to the menu option to play the movie with•
the buttons.
Press ENTER to select this option.•
The movie will begin to play.
PLAYBACK CONTROL
Play Pause (still frame):
Press the• /, button at any time to pause the movie
and display a still-frame.
Whilst paused, press the STEP button to step to the•
next still-frame.
Press the• /, button again to return to play the
movie.
To set the volume:
Press the VOL+ or VOL- button to turn the volume•
up or down.
The volume level will be displayed briey.

13
To change chapter:
Most DVD movie discs are divided into chapters so you
can skip to convenient points within the movie.
Press the• }or {button to skip to the next or
previous chapter.
Numeric selection of a chapter:
You can jump directly to a chapter using the number
buttons.
Press a number button.•
After a short delay, play will jump to the selected chapter.
NOTE: If you want to jump to a chapter number higher
than 9, press the 10+ button to add 10 to the chapter
count, then press one of the number buttons to add the
second digit.
Fast picture search:
Press the• ]or [button on the remote control
repeatedly to fast search forward or backward
through the movie.
Each time you press the button, the speed will change 2X
g4X g8X g20X g32X gNormal
Press• /, to resume play.
Repeat chapter
Repeat title
Repeat all
Repeat o
To stop the disc:
Press the• .button.
Play will stop, holding at the point you stopped the disc.
To resume playing the disc from the point where you•
stopped, press the /, button.
To completely stop the disc:
Press the• .button twice.
The disc will stop.
Repeat play:
Press the REPEAT button repeatedly to step through•
the repeat mode options.
Repeat A-B:
You can mark two points in a movie and play repeatedly
between them.
Play a movie.•
Press the AB button to mark the start of the section•
you want to repeat.
Press the AB button again to mark the end of the•
section.
The player will continually repeat this section.
Press the AB button again to clear AB repeat and•
continue playing normally.
NOTE: You can repeat a section that includes several
chapters.
Zoom and pan:
Press ZOOM repeatedly to zoom into the picture, then•
zoom out.
The zoom settings are -• 2X g3X g4X g1/2X
g1/3X g1/4X gNormal
When zoom is set you can press the•
buttons to pan the zoomed area around the picture.

14
Root and title menus:
Press MENU to display the Root menu from the disc.•
All the user choices available on the disc are driven from
this menu.
PressTITLE to display theTitle menu.•
The title menu may contain one or several titles.
NOTE: On many DVD discs theTITLE and ROOT menus are
the same.
Selecting items from the menus:
Navigate to the item with the• buttons.
Press ENTER.•
On-screen display:
An On Screen Display (OSD) disc status indicator will be
displayed at the top of the screen when certain functions
are executed, or when the DISPLAY button on the handset
is pressed.When dierent discs are loaded the indicators
may change.
To change the on-screen display:
Press the DISPLAY button repeatedly.•
The display modes will change on the screen.
To switch o the on-screen display:
Press the DISPLAY button repeatedly until you reach•
the‘DISPLAY OFF’option.
The On-screen display will switch o.
Changing the audio settings of a DVD:
The player allows you to select a preferred language, TV
and audio format from those included on the DVD video
disc.
Press the AUDIO button repeatedly.•
The choices available depend on the disc and may include
dierent audio formats and languages.
NOTE: The player will support Stereo and Dolby 5.1
formats but will down-mix all program material to
2-channel.
Selecting subtitles
Press the SUBTITLE button repeatedly.•
The choices available depend on the disc.
To cancel the subtitle display, press the SUBTITLE•
button repeatedly until‘Subtitle o’is displayed.
Changing the camera angle:
Some discs contain views for certain scenes from multiple
camera angles.
Press ANGLE repeatedly to select the camera angle.•
A DVD disc may contain up to 9 angles.
Muting the sound:
Press the MUTE button to mute and un-mute the•
sound from the speakers.
Search function:
You can use the search function to jump to a title, chapter
or time within a DVD.

15
PLAYING AN AUDIO CD
Load an Audio CD into the player.•
The player will read the disc. Most CDs will start playing
automatically. A track list and the elapsed playing time will
be displayed.
Play Pause:
Press the• /, button at any time to pause playback.
Press the• /, button again to continue to play the
disc.
To change track:
Press the• }or {button to skip to the next or
previous track.
Direct access track selection:
You can jump to a track number by entering the track•
number using the numeric keypad.
Fast search:
Press the• ]or [button on the remote control
repeatedly to fast search forward or backward
through the CD.
Each time you press the button, the speed will change 2X
g4X g8X g20X gNormal
Press• /, to resume play.
To set the volume:
Press the VOL+ or VOL- button to turn the volume•
up or down.
The volume level will be displayed briey.
To stop the disc:
Press the• .button.
Play will stop, holding at the point you stopped the disc.
To resume playing the disc from the point where you•
stopped, press the /, button.
To completely stop the disc:
Press the• .button twice.
The disc will stop.
Repeat play:
Press the REPEAT button repeatedly to step through•
the repeat mode options.
Repeat 1 (repeat the current track)
Repeat all (repeat the disc)
Repeat o
Repeat A-B:
You can mark two points on a CD and play repeatedly
between them.
Play a CD.•
Press the AB button to mark the start of the section•
you want to repeat.
Press the AB button again to mark the end of the•
section.
The player will continually repeat this section.
Press the AB button again to clear AB repeat and•
continue playing normally.
NOTE: You can repeat a section that includes several
tracks.
Audio CD display:
Press the DISPLAY button repeatedly to switch the CD
information display on or o.

16
PLAYING MEDIA FILES
Your DVD player can also play the following media les -
Music - .WAV les.
JPEG (photos) - .JPG, .BMP les.
Videos - .MP2, .MP4, .AVI.
E-Books - .TXT les.
You can save a mix of any of the above media les to a CD-ROM or DVD-ROM.The les can
be organised in folders or placed in the‘root’folder of the disc.
Loading a media disc:
The folders and les on the disc
will now be displayed.
NOTE: Only les of your chosen
media type (and folders
containing these) will be
displayed.
Load your media disc in the•
same way as a CD or DVD.
The Audio menu screen will be
displayed.
Selecting the type of media you want to play:
Press• or (or theVOL+/VOL- buttons on the top panel) repeatedly to change
the media type between Audio, JPEG (photos),Videos or E-books.
Press the ENTER button (or• /, on the side panel) to select the displayed media
type.
Returning to the media menu:
To return to the media menu at any time when playing a le -
Press RETURN repeatedly to step up the menu screens to the Media menu.•

17
Playing music or movie les:
If you have selected music or movie les -
Use• //ENTER to navigate through the folders on the disc until you reach the
music or movie le you want to play.
To move up the folder‘tree’, select the top folder marked‘• ..’
Press OK to select and play a le.•
Fast Search:
To fast search forward or backward, press• ]or [repeatedly to set the search speed
you want in the range 2x 4x 8x 20x.
Press once more to return to normal play.•
Stop:
Press the• .button to stop playback.
File information:
Press DISPLAY during playback to display more information about the le playing.•
Zoom and pan (movie les):
Press ZOOM repeatedly to zoom into the picture, then zoom out.•
The zoom settings are -• 2X g3X g4X g1/2X g1/3X g1/4X gNormal
When zoom is set you can press the• buttons to pan the zoomed area
around the picture.
Repeat:
Press the REPEAT button repeatedly to step through the repeat mode options for the•
les.
The le will play. The screen
will display information about
the le playing (audio screen
shown in the example). If the
le is in a folder with other les
(for example, an album of music
tracks or a folder of movies) play
will continue through the other
les in the folder.
Play/Pause:
To switch between play and pause modes, press the• /, button repeatedly. When
you pause a movie a still-frame will be displayed.
Skip:
To select the next or previous item, press• }or {.
Repeat 1 (repeat the current le)
Repeat dir (repeat the folder)
Repeat all (repeat all les on the disc)
Repeat o

18
Viewing photos:
If you have selected JPEG (photo) les -
Use• //ENTER to navigate through the folders on the disc until you reach the
photo les you want to view.
To move up the folder‘tree’, select the top folder marked‘• ..’
Skip:
To skip to the next or previous photo, press• }or {.
The photo will be displayed and the slideshow will pause.
Press• /, twice to re-start the slideshow.
File information:
Press DISPLAY during playback to display more information about the le playing.•
Zoom and pan:
Press ZOOM repeatedly to zoom into the photo, then zoom out.•
The zoom settings are -• 2X g3X g4X g1/2X g1/3X g1/4X gNormal
When zoom is set you can press the• buttons to pan the zoomed area
around the photo.
Slideshow repeat:
Press the REPEAT button repeatedly to step through the repeat mode options for the•
slideshow.
When you reach a folder of
photos, a preview screen will
be displayed with a list of photo
les.
Press• /to browse the photos in the folder.
Press OK to select and view the highlighted photo full-screen.•
The photo will be displayed.
Photo slideshow:
If there are more photo les in the folder, a slideshow will start of the photos in the
folder.
Press• /, to pause the slideshow.
Press• /, to re-start the slideshow.
Press the• .button to stop the slideshow and return to the preview screen.
Repeat 1 (repeat the current photo)
Repeat dir (repeat the folder)
Repeat all (repeat all les on the disc)
Repeat o

19
Reading E-Books:
If you have selected e-book text les -
Use• //ENTER to navigate through the folders on the disc until you reach the
E-book le you want to play.
To move up the folder‘tree’, select the top folder marked‘• ..’
Press OK to select and read•
a book.
The rst page of the book will be displayed.
Changing pages:
Press• or to change to the next or previous page.
Changing book:
To change to the next or previous book, press• }or {.
Press OK.•
The selected e-book will load and open automatically.
Table of contents