Tesla WT10H90M User manual

Product images are for illustrative purposes only and may differ from the actual product.
TUMBLE
DRYER
WT10H90M
User Manual
BG HUGR RO SRBENG

2
ENG
SAFETY INSTRUCTIONS
Intended use
• This heat pump dryer is intended for drying typical amounts of household laundry, which have been
washed with water. It has been designed solely for private use and is not suitable for commercial or shared
use (i.e. by several families in an apartment building).
• Use this appliance only as described in this user manual.
• This appliance is for indoor use only.
• Any other use is deemed improper and may result in damage to property or even personal injury.
• The manufacturer accepts no liability for damage caused by improper use.
Safety Instructions
• The appliance corresponds to protection class I and may only be connected to a plug with a protective
conductor that has been installed properly. When connecting the appliance to the mains, make sure that
the mains voltage is correct. You can find more information about this on the rating plate.
• The electrical safety of this tumble dryer can only be guaranteed when correctly earthed. It is essential that
• this standard safety requirement is met. If in any doubt, please have the household wiring system tested
by a qualified electrician. The manufacturer cannot be held liable for the consequences of an inadequate
earthing system (e.g. electric shock).
WARNING!
Electric shock hazard
• Before connecting the tumble dryer, ensure that the connection parameter on the rating plate (fuse rating,
voltage and frequency) match the mains electricity supply. If in any doubt, consult a qualified electrician.
• The electrical safety of this tumble dryer can only be guaranteed when correctly earthed. It is essential that
this standard safety requirement is met. If in any doubt, please have the household wiring system tested
by a qualified electrician. The manufacturer cannot be held liable for the consequences of an inadequate
earthing system (e.g. electric shock).
• Do not pull the power cord forcefully. Please grasp the mains plug instead
• Do not plug/draw the mains plug with wet hands.
• Do not bend, clamp or damage the power cord and the power plug.
• If the power cable is damaged, it must be replaced by the manufacturer, its service agent or similarly
qualified persons in order to avoid a hazard.
• Warning: The appliance must not be supplied through an external switching device, such as a timer, or
connected to a circuit that is regularly switched on and off by a utility.
• Do not connect the appliance to the mains electricity supply by an extension lead, multi-socket adapter or
similar.
• The accessibility of the plug must always be ensured, in order to disconnect the tumble dryer from the
mains.
• If the appliance appear high temperature abnormally, please draw the mail plug immediately.
Injury danger
• The appliance must not be installed behind a lockable door, a sliding door or a door with a hinge on the
opposite side to that of the tumble dryer, in such a way that a full opening of the tumble dryer door is
restricted.
• Do not disassemble or install the dryer without any instruction or supervision.
• Do not stack this dryer on washing machine without stacking kits. (If you want to stack this dryer on a
washing machine, please purchase the independent parts.
• Installation shall be done by the manufacturer, its service agent or similarly qualified persons to avoid any
hazards.)
CAUTION: RISK OF FIRE!
To prevent any damages to your and others’ life or property, you have to follow the
safety notes.
WARNING!

3
ENG
• Do not lean on the opened door of the dryer.
• Condensed water is not drinking water. It can cause health problems in both people and animals if
consumed.
Damage danger
• Do not put more load than rated in this user manual. See the related chapter in the user manual.
• Do not operate the dryer without the door filter and base filter.
• Do not dry the clothes before being spun.
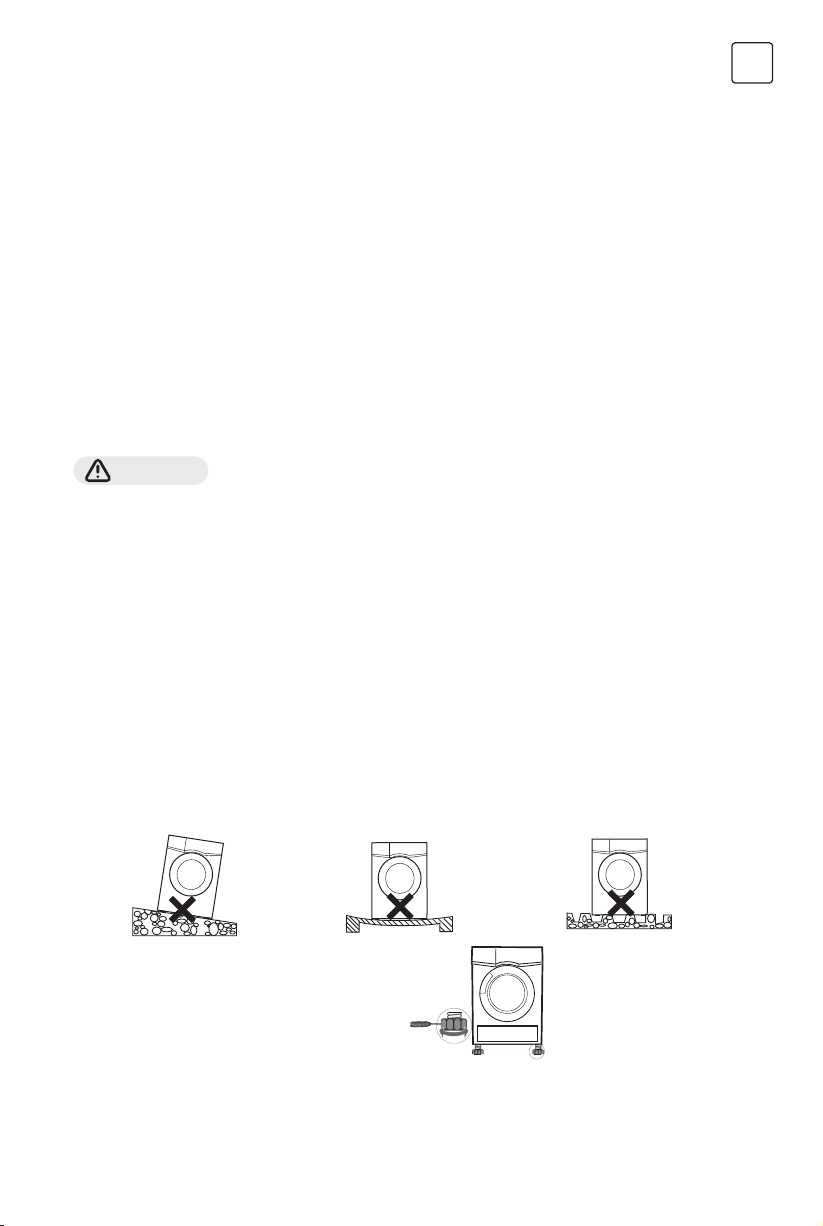
• Do not expose the dryer directly under the sun.
• Do not install the dryer in humid and drenching environment.
• While cleaning and maintenance, please do remember to pull out the power plug and do not directly
spray the dryer with water.
• The appliance should not be overturned during normal use or maintenance.
CAUTION: RISK OF FIRE!
Explosion & Fire danger
• Please do not dry the clothes with any flammable substances such as kerosene or alcohol. Otherwise,
there may be explosion.
• The appliance contains an environmentally friendly but flammable R290 refrigerant. Keep away from open
flame and other sources of ignition.
• The tumble dryer is not to be used if industrial chemicals have been used for cleaning.
• Do not dry unwashed items in the tumble dryer.
• Items that have been soiled with substances such as cooking oil, acetone, alcohol, petrol, kerosene, spot
removers, turpentine, waxes and wax removers should be washed in hot water with an extra amount of
detergent before being dried in the tumble dryer.
• Items such as foam rubber (latex foam), shower caps, waterproof textiles, rubber backed articles and
clothes or pillows fitted with foam rubber pads should not be dried in the tumble dryer.
• Fabric softeners, or similar products, should be used as specified by the fabric softener instructions.
• Oil-affected items can ignite spontaneously, especially when exposed to heat sources such as in a tumble
dryer.
• The items become warm, causing an oxidation reaction in the oil. Oxidation creates heat. If the heat cannot
escape, the items can become hot enough to catch fire. Piling, stacking or storing oil-affected items can
prevent heat from escaping and so create a fire hazard.
• Remove all objects from pockets such as lighters and matches.
• If it is unavoidable that fabrics that contain vegetable or cooking oil or have been contaminated by hair
care products be placed in a tumble dryer they should first be washed in hot water with extra detergent.
This will reduce, but not eliminate, the hazard.
• WARNING: Never stop a tumble dryer before the end of the drying cycle unless all items are quickly
removed and spread out so that the heat is dissipated.
• Openings must not be obstructed.
• The lint trap has to be cleaned frequently.
• Lint must not to be allowed to accumulate around the tumble dryer.
Safety with children
• This appliance can be used by children aged from 8 years and above and persons with reduced physical,
sensory or mental capabilities or lack of experience and knowledge if they have been given supervision or
instruction concerning use of the appliance in a safe way and understand the hazards involved. Children
shall not play with the appliance.
Cleaning and user maintenance shall not be done by children without supervision.
• Children should be supervised to ensure that they do not play with the appliance.
• Children of less than 3 years should be kept away unless continuously supervised.
• Always close the door after use. In this way you will avoid the danger of:
1. Children climbing onto or into the dryer or hiding things in it.
2. Pets or other small animals climbing into it.

4
ENG
INSTALLATION
Product Description
NOTE
Note: The actual model you purchased might differ. Please see the product you purchased in kind prevail.
Power cord
Top board
Control panel
Door
Air inlet
Base filter
Maintenance cover
Water container
Drum
Door filter
Remove the drain
hose from the
housing drawer.
Insert the drain
hose and the
external drainage
hose into the
connector.
Put the hose holder on the washing basin or any other sink.
Accessories
The following parts are optional for specific models.
If your dryer has following parts, please wear gloves and install them as per the instruction below.
Installation
Hose holder
Condensing drain hose
Connector

5
ENG
Transport
Move cautiously. Do not grasp any salient parts of machine. The machine door cannot be used as the handle
for transport. If the dryer can’t be transported erectly, the dryer can be tilted to right less than 30°.
Risk of injury and damage!
Improper handling of the appliance may result in injury.
• The appliance is very heavy. Never transport or carry the appliance alone; always with the assistance of
another person.
• Remove all obstacles on the transport route and from the installation location, e.g. open doors and clear
away objects lying on the floor.
• Do not use the open door as a handhold.
• Remove all package material before using the appliance.
• Before setting up the tumble dryer, check it for any externally visible damage.
Do not install or use a damaged tumble dryer.
• Do not install the tumble dryer in a room where there is a risk of frost occurring.
At temperatures around freezing point the tumble dryer may not be able to operate properly. There is a
risk of damage if the condensed water is allowed to freeze in the pump and hoses.
Installation Position
WARNING!
• Children can become entangled in the packaging film or swallow small parts and suffocate. Do not allow
children to play with the packaging.
• The appliance must not be installed behind a lockable door, a sliding door or a door with a hinge on the
opposite side to that of the tumble dryer, in such a way that a full opening of the tumble dryer door is
restricted.
• Do not restrict the floor clearance through deep pile carpets, strips of wood or similar. This might cause
heat built-up which would interfere with the operation of the appliance.
1. It is recommended that, for your convenience, the machine is positioned close to your washing machine.
2. Do not stack this dryer on washing machine without stacking kits. If you want to stack this dryer on a
washing machine, please purchase the independent parts.
Installation shall be done by the manufacturer, its service agent or similarly qualified persons to avoid
any hazards.
3. The tumble dryer must be installed in a clean place, where dirt does not accumulate.
Air must be able to circulate freely around the appliance. Do not obstruct the front air inlet or the air
intake grilles at the back of the machine.
4. To keep vibration and noise within minimum level when the dryer is in use, it must be placed on a firm
and level surface.
5. The feet must never be removed.
Power Supply Connection
1. Make sure that the voltage of the power supply is the same as the electric specification of the dryer.
2. Do not connect the dryer with the power connection board, the universal plug or socket, do not use
multi-plug adapters and extension cables.
Level Adjusting
Once in its permanent operating position,
check that the dryer is absolutely level with the aid
of a spirit level. If it is not, adjust the feet with a tool.

6
ENG
Plug in
On Select program Select function
or default
Start
Load Close the door
Before using, please make sure it’s installed properly.
OPERATIONS
Quick start
Drying
NOTE
Open the door and
take out laundry
Buzzer beep or “0:00”on display.
Pull out the
container
Pour out
condensate water
Clean the filter Power off
After Drying
NOTE If use the socket with a switch, please press the switch to turn off the power directly.
Before Each Drying
NOTE
• Leave it to stand for 2 hours after transporting. Before first use, please use the soft fabric to clean the inside
drum.
1. Put some clean rags into the drum.
2. Plug the power, press
3. Select the Programme, press button.
4. After finishing this programme, please follow the “cleaning and care” to clean the filter door.
• During drying, the compressor and the water will generate some noise which is entirely normal.

7
ENG
1. Before drying, thoroughly spin the laundry in washing machine. High spin speed shortens the drying
time and saves energy.
2. For uniform drying result, sort the laundry according to fabric type and select the appropriate drying
programme.
3. Before drying, please close zips, hooks and eyelets, button, tie fabric belts, etc.
4. Remove all objects from pockets such as lighters and matches.
5. Sew in or remove underwiring from bras.
6. Close duvet covers and pillow cases to prevent small items from being rolled up inside them.
7. Leave jackets open and undo any long zips so that textiles dry evenly.
8. Do not over dry the clothes, because over dried clothes can easily get creases.
9. Do not dry the articles containing rubber or similar elastic materials.
10. Keep the area around the tumble dryer clean. Coal dust or flour may cause an explosion.
11. The door shall be opened only after the programme of the tumble dryer is finished to avoid being
scalded by hot steam or over heated drying machine.
12. Clean the lint filter and empty water container after each use to avoid extension of drying time and
increase of energy consumption.
13. Do not dry clothes after dry-clean process.
Sweater
(mixed 800g)
Jacket
(cotton 800g)
Jeans
(800g)
Bath Towel
(cotton 900g)
Single bedsheet
(cotton 600g)
Work clothes
(1120g)
Pyjamas
(200g)
Shirt
(cotton 300g)
T-Shirt
(cotton 180g)
Underwear
(cotton 70g)
Socks
(mixed-weave 50g)
The reference weight of dry clothes (weight per item)
NOTE • Do not put more load than rated.
• Do not dry dripping wet laundry. The dryer might get damaged
Only dry laundry suitable for tumble drying. Regard the laundry care labels:
Suitable for tumble drying
Normal drying process: Drying in the tumbler is possible under normal load and
temperature 80°.
Mild drying process: Caution is appropriate when tumble drying. Select mild process with
reduced thermal action.
Do not tumble dry: Articles unsuitable for drying in the tumbler.

8
ENG
Control Panel
1. On/Off
Product is on/off.
2. Start/Pause
Press the button to start or pause the drying
cycle.
3. Option
These buttons are used for setting additional
functions.
4. Display
The display shows the setting, estimated
program time remaining and status messages
of your dryer.
5. Programmes
Different drying cycles can be selected
according to the users need and the type of
laundry to be dried.
WT10H90M
Option
Delay
This function is used for delaying the start of the drying programme up to 12 hours.
When the delayed programme starts, the time starts to countdown on the display and the delay icon
blinks.
1. Load your laundry and make sure the machine door is closed.
2. Press the button,then use the programme selector knob to select the desired
programme.
3. Press the button.
4. Repeatedly press the button to select the desired delay time.
5. After the button is pressed, the Dryer is at the running condition. The drying
procedure will be automatically performed when the delay time is over.
6. If you press the button again, the delay function will be paused.
7. If you want to cancel the “Delay” function, please press the button.
Anti-Crease
At the end of the drying cycle, the anti-crease time is 60 minutes (default) or 30minutes and
90minutes(selected).
This function prevents the laundry from creases.The laundry can be removed during the anti-crease
phase. Except and , all the other programmes have this function.
Silence Dry
Rotate speed of the drum will drop down to reduce the noise of the dryer,but the drying time will
extend.
Delay
Anti-
Crease
Silence
Dry

9
ENG
Intensity
You can adjust the dryness level of the laundry by pressing the button.
There are four grades.
1. The intensity function can be activated only before the programme starts.
2. Press the button repeatedly to select the drying grade.
3. Except the , , , programme, all the other programmes can be
adjusted with the function.
Time
When the or programme is selected, the button can be used to adjust
the drying time in 10 min. steps.
Lamp
The drum light will be on for 3 minutes when the button is pressed or 1 minute when the door is
open.
Signal
Set the buzzer on or off. In default condition, the buzzer is on.
When the buzzer is on:
1. The dryer will affirm pressed function button by a sound.
2. If the programme knob is rotated during the dryer is running, the buzzer will remind the user
that this is an invalid operation.
3. When the drying programme is done, the buzzer will beep.
Clean & Safe
After selecting the program, you can choose the “Clean & Safe” function according to your needs.
Press to select this function.
Press it again to cancel. After selecting the “Clean & Safe” function, the clothes are sterilized during
the drying process, making the clothes cleaner and safer.
Use this function with caution for light, thin or delicate laundry.
Intensity
Time
Lamp
Signal
Clean &
Safe
Child Lock
1. This machine incorporates a special child safety lock, which can prevent children from carelessly
pressing buttons or making the faulty operation.
2. When the drying cycle is running, press the and buttons at the same time for 3
seconds to start child lock function.
3. When child lock function is set, the display will show Child lock icon and all button are
deactivated, except button.
4. To deactivate the child lock function, the and buttons shall be pressed at the same
time for 3 seconds.
Child
Lock

10
ENG
Cotton
Synthetics
Child lock
Remaining Time indicator/Error message
Cycle phase status
Clean filters (warning)
Empty water container (warning)
Intensity (dry level)
Lamp
Signal
My Cycle
Silence Dry
Clean & Safe
Time
The wool drying cycle of this machine has been approved by The Woolmark
Company for the drying of machine dryable wool products provided that the
products are dried according to the instructions on the garment label and those
issued by the manufacturer of this tumble dryer. M2120
Display
Program selector
1. When the LED display screen brightens up, rotate the programme knob to select the desired
programme.
2. Select the , , , , , , or
functions for additional options.
3. Press the button.
4. Press the button after the programme has comlpeted.
Program start
The drum will rotate after the programme starts. The cycle phase LED in the display will light up and the
remaining programme time will be displayed.
Program end
1. The drum will stop rotating after the programme ends. The display will show “0:00”, also the cycle phase
LED showing “End” and related LED will illuminate. The dryer will start function if user doesn’t
remove the load.
Programmes

11
ENG
After the load is removed, press to switch off if the display is on. Drying is complete, please
unplug.
2. Deal with the problems according to “Trouble Shooting” section, if there is an unexpected stop during
the drying procedure or the dryer shows an Error Code
Program Max
Load Application/Properties Delay Time
Cotton
For cottons and coloureds made of cotton or linen.
Y N
Extra
10.0kg
For single or multi-layer cotton laundry to be dried completely
for direct storage.
Standard
Iron For single layer cotton laundry to remain damp for ironing.
Mix Mix 4.0kg For mixed fabrics from cotton and synthetics. Y N
Synthetics
Extra
4.0kg
For thick or multi-layer synthetic fabrics to be dried
completely.
Y N
Standard To dry thin synthetic textiles, which are not ironed,
such as easy care shirts, baby cloths or socks.
Wool 1.0kg
Gentle drying for machine washable wool items. The
final moisture content will depend on the load size
and the moisture content after spinning.
Y N
My Cycle —Define and save your favourite programme. Y —
Bed Linen 5.0kg To dry bed linen, bed sheets or other large items. Y N
Baby Care 1.0kg To dry small amount of baby clothing. Y N
Shirts 1.0kg
For easy care laundry, such as shirts and blouses
equipped with anti-crease functionality to minimize
the ironing effort.
Place clothes loosely in the dryer. Once dried,
remove quickly and hang it on a clothes hanger.
Y N
Outdoor 3.0kg To dry sportswear and thin fabrics from polyesther,
which are not ironed. Y N
Time
Time Dry 3.0kg
To dry individual items or complete the drying process of multi-
layer fabrics with different drying behavior, such as jackets,
pillows or voluminous items. Min 10 min. to max. 180 min.
(in 10 min.steps) Y N
Refresh 1.0kg To refresh clothes or to remove odors.
Min. 20 min to max. 150 min.(in 10 min. steps)
Drying Programs Table
Note for Test Institutes:
• Test programme in accordance with Regulation 392/2012/EU for energy labelling, measured in
accordance with EN 61121 and suitable for drying normal cotton load at rated load capacity.
This programme is suitable for drying normal wet cotton laundry and it is the most efficient programme in
terms of energy consumption for cotton.
NOTE

12
ENG
Consumption Data
Program Capacity Spin Speed /
Residual Humidity
Drying
Time
Energy
Consumption
Cotton Standard 10kg 1000rpm / 60% 190min 1.76kWh
Cotton Standard 5kg 1000rpm / 60% 112min 0.94kWh
Synthetic Standard 4kg 800rpm / 40% 60min 0.61kWh
• Thick or multi-layered fabrics, e.g. jackets etc., are not easy to dry. You had better choose Cotton Extra
programme.
• As uneven material, thick and multi-layered clothes are not easy to dry, it is better to choose the
appropriate time drying programme to completely dry them if some parts of the clothes are still damp
after programme finishes.
All data are measured in accordance with EN 61121. The actual consumption may differ from the values
given in the table, depending on the amount of the laundry, type of fabric, residual moisture and any
additional functions selected.
NOTE
MAINTENANCE
Cleaning and Care
Empty the water container
1. Pull out and hold the water container with two hands.
2. Tilt the water container, pour out the condensate water into
the basin.
3. Install the water container.
WARNING!
• Empty the water container after each use. Once the water
container is filled completely, the programme will be paused
and the ” ” icon will light. After the container is emptied, the
dryer can be restarted by pressing button.
• Do not drink the condensate water.
Clean the filters
Clean the filter door
This dryer has a primary door lint filter and a base filter in front of the heat exchanger for additional
protection. Make sure you clean the door filter after each cycle. The base filter need to be cleaned after each
fifth drying programme.
1. Open the door.
2. Take out the door filter.
3. Open the filter and remove the fluff on the
filter, you can clean it in running water.
4. Dry the door filter thoroughly before installing
it back.
NOTE Take notice of the correct orientation
before to insert the door filter.
Door Filter

13
ENG
Clean the filter base
1. Open the cover.
2. Unlock three locking levers and grasp the filter handle.
3. Remove the base filter and clean it. If there is too much lint on the filter,
clean it in water. Dry the filter thoroughly before installing it back.
4. Clean the rubber sealing, both at the filter and handle.
5. Re-insert the filter.
6. Lock three locking levers and make sure that the levers are in correct lock
position.
7. Close the cover until there is a click sound.
Base Filter
NOTE
• The fluff accumulated on the filter will block the air circulation. Not cleaning
the filter regularly will increase drying time and energy consumption.
• Disconnect the power cord before cleaning!
• Do not operate the dryer without the filter!
• Clean the base filter after each fifth cycle to prevent fluff accumulation
inside the dryer.
• As necessary, approx. once every 6 months, remove the fluff from
the heat exchanger using a vacuum cleaner with a dusting brush
attached.
• Clean the heat exchanger without applying any pressure.
Otherwise the heat exchanger could be damaged.The dryer will
not dry if the cooling fins are damaged or bent.
Clean heat exchanger
Do not touch the heat exchanger with your hand,
which may cause an injury.
WARNING!
• Prepare a wet cloth damped by clean water.
• Clean the door, especially the inside window.
• Clean the sealing around the door opening.
• Clean the humidity sensor inside the drum.
• Take out all the filters, clean the sealing and air flow
openings.
• Before starting the dryer, dry all parts with a soft
cloth.
• Disconnect the power cord before cleaning!
• Clean the dryer with a wet cloth which is only damped by clean water.
• Do not use solvents, abrasive cleaners, glass cleaners or all-purpose cleaners. These could damage plastic
surfaces and other parts.
• Please wear gloves when cleaning.
Clean Tumble dryer
WARNING!

14
ENG
Many malfunctions and faults that might occur in daily operation can be easily remedied. Time and money
will be saved because a service call won’t be needed.
The following guide may help you to find the reason for a malfunction and correct it.
TROUBLESHOOTING
Display Reason Solutions
“E32” Humidity sensor error
Please contact your local service center if the
problem occurs.
“E33” Temperature sensor error
“E64” BLDC motor communication error
“E82” PCB communication error
“ “
Water pump failure or water level
sensor failure
Container is full Empty container
WARNING! • Only authorised technicians can carry out repairs.
• If the LED displays other prompt and the dryer does not work, please call the
service.
Problem Solution
Display is not on
• Check if the power supply works.
• Check if the mains plug is inserted.
• Check the selected programme .
• Press the button.
“ ” is lighting
• Check the water container. If it’s full, please pour out the condensate
water and restart the dryer.
• If the container is not full, please restart the dryer directly.
• If the “ ” icon is still lighting after you have finished the first two
steps, please call the service.
“ ”is lighting • Clear lint filter.
Dryer does not start
• Connect the tumble dryer to the mains.
• Turn on the tumble dryer.
• Check the the door is closed.
• Check the programme is set.
• Press the button.
Degree of dryness was not
reached or drying time too long
• Clean lint filter and heat exchanger.
• Empty the water container.
• Check the drain hose.
• Check installation place is appropriate.
• Keep the air inlet clean.
• Use higher drying intensity level programme or time programme.
There are humming noises • The compressor is operating. These noises are quite normal and do
not indicate a fault.
The dryer switches off at the
end of the programme
• The dryer switches off automatically for energy saving. This is not an
error but a normal function.
NOTE Before you call the service, please check if you have dealt with the problems yourself
consulting the user instructions.

15
ENG
WARNING!
If you cannot deal with the problems by yourself and need help:
• Press the button.
• Pull out the mains plug and call the service.
Technical Specifications
Dimension (LxWxH) 640*595*845(mm)
Ambient temperature + 5°C ~ +35°C
Rated input power 750W
Rated voltage 220-240V~
Rated frequency 50Hz
Refrigerant R290
Weight of product 53kg
Rated capacity 10.0kg
GWP 3
CO 2 - eq 0.00T
Quantity of refrigerant 140g
• The rated capacity is the maximum capacity to be dried at one time. Make sure that the dry clothes which
are loaded into the appliance do not exceed the rated capacity.
• Do not install the tumble dryer in a room when there is a risk of frost occurring. At temperatures around
freezing point the tumble dryer may not be able to operate properly.
• There is a risk of damage if the condensate water is allowed to freeze in the pump, hoses and / or
condensate water container.
NOTE
Contains fluorinated greenhouse gases covered by the Kyoto Protocol.
Hermetically sealed.
This marking indicates that this product should not be disposed with other household wastes
throughout the EU. To prevent possible harm to the environment or human health from
uncontrolled waste disposal, recycle it responsibly to promote the sustainable reuse of material
resources. To return your used device, please use the return and collection systems or contact
the retailer where the product was purchased. They can take this product for environmental safe
recycling.
The packaging is designed to protect the appliance from damage during transportation. The packaging
materials are environmentally friendly and should be recycled. Recycling the packaging can reduce the use
of raw materials in the manufacturing process and the amount of waste in landfill sites.
Correct Disposal of this product:
Disposal of packaging material

16
ENG

17
ENG

18
BG
ИНСТРУКЦИИ ЗА БЕЗОПАСНОСТ
Предвидена употреба
• Тази сушилня с термопомпа е предназначена за сушене на обичайни количества битово пране,
което е било изпрано с вода. Тя е проектирана единствено за лична употреба и не е подходяща за
търговска или колективна употреба (т.е. от няколко семейства в жилищна сграда).
• Използвайте този уред само съгласно описаното в това ръководство.
• Този уред е предназначен само за употреба на закрито.
• Всяка друга употреба се счита за неправилна и може да доведе до материални щети или дори
телесни наранявания.
• Производителят не носи отговорност за щети, причинени от неправилна употреба.
Инструкции за безопасност
• Устройството отговаря на клас на защита I и може да се свързва само към щепсел с правилно
инсталиран защитен проводник. Когато свързвате уреда към електрическата мрежа се уверете, че
мрежовото напрежение е правилно. Повече информация за това можете да намерите на табелката
с данни.
• Електрическата безопасност на тази сушилня може да бъде гарантирана само ако е правилно
заземена. От съществено значение е това стандартно
• изискване за безопасност да бъде изпълнено. Ако имате някакви съмнения относно
електрическата инсталация в дома Ви, проверете системата с квалифициран електротехник.
Производителят не носи отговорност за последствията, причинени поради неадекватна
заземителна система (например токов удар).
ПРЕДУПРЕЖДЕНИЕ!
Опасност от токов удар.
• Преди да свържете сушилнята се уверете, че параметрите на свързване, посочени на табелката
с данни (номинален предпазител, напрежение и честота), са съвместими с електрическото
захранване. Ако имате някакви съмнения - консултирайте се с квалифициран електротехник.
• Електрическата безопасност на тази сушилня може да бъде гарантирана само ако е правилно
заземена. От съществено значение е това стандартно изискване за безопасност да бъде
изпълнено. Ако имате някакви съмнения относно електрическата инсталация в дома Ви, проверете
системата с квалифициран електротехник. Производителят не носи отговорност за последствията,
причинени поради неадекватна заземителна система (например токов удар).
• Не издърпвайте захранващия кабел със сила. Вместо това хванете щепсела.
• Не включвайте/изключвайте щепсела от контакта с мокри ръце.
• Не огъвайте, прищипвайте и не повреждайте захранващия кабел или щепсела.
• Ако захранващият кабел е повреден, той трябва да бъде заменен от производителя, негов
сервизен агент или от лица с подобна квалификация, за да се избегне опасност.
• Предупреждение: Уредът не трябва да бъде захранван от външно превключващо устройство като
таймер или да е свързан към верига, която периодично се включва и изключва от доставчика на
комунални услуги.
• Не свързвайте уреда към електрическата мрежа с помощта на удължител, разклонител с много
гнезда или подобни.
• Щепселът трябва винаги да е достъпен, за да можете да изключите сушилнята от електрическата
мрежа.
• Ако уредът достигне необичайно висока температура, незабавно го изключете от контакта.
ВНИМАНИЕ: ОПАСНОСТ ОТ ПОЖАР!
За да предотвратите какъвто и да било риск за собствения си
живот и живота на други хора или увреждане на Вашето и чуждо
имущество, трябва да се придържате към инструкциите за
безопасност.
ПРЕДУПРЕЖДЕНИЕ!

19
BG
Опасност от нараняване
• Уредът не трябва да се монтира зад заключваща се врата, плъзгаща се врата или врата с панта от
противоположната страна на тази на сушилнята по начин, който да ограничи пълното отваряне на
вратата на сушилнята.
• Не разглобявайте и не монтирайте сушилнята без инструкции или надзор.
• Не поставяйте тази сушилня върху пералня ако няма оборудване, което да ги поддържа една
върху друга. (Ако желаете да поставите тази сушилня върху пералня, необходимо е да закупите
съответните части.
• Монтажът трябва да се извършва само от производителя, негов сервизен техник или лица с
подобна квалификация, за да се избегне опасност.
• Не се облягайте на отворената врата на сушилнята.
• Кондензната вода не става за пиене. Ако бъде консумирана, може да причини здравословни
проблеми както при хората, така и при животните.
Опасност от щети
• Не поставяйте повече пране от указаното в това ръководство за потребителя. Вижте съответната
глава в ръководството за потребителя.
• Не включвайте сушилнята, ако не е инсталиран филтърът, разположен във вратата и основния
филтър.
• Не сушете пране, което не е било предварително центрофугирано.
• Не излагайте сушилнята на пряка слънчева светлина.
• Не поставяйте сушилнята във влажни и мокри помещения.
• Когато почиствате и поддържате, не забравяйте да изключите захранващия кабел и не измивайте
директно сушилнята с вода.
• По време на нормална употреба или поддръжка устройството не трябва да се преобръща.
ВНИМАНИЕ: ОПАСНОСТ ОТ ПОЖАР!
Опасност от експлозия и пожар
• Не сушете пране, което преди това е било в контакт с запалими вещества, като керосин и алкохол.
В противен случай може да възникне експлозия.
• Устройството съдържа екологично чист, но запалим хладилен агент R290. Да се пази от открит огън
и други източници на възпламеняване.
• Сушилнята не трябва да се използва, ако за почистване са използвани промишлени химикали.
• Не сушете пране в сушилнята, което преди това не е било изпрано.
• Преди сушене в машината, прането, замърсено с вещества като хранителни масла, ацетон,
алкохол, бензин, керосин, препарати за отстраняване на петна, терпентин, восък и препарати за
отстраняване на восък, трябва да бъде изпрано в гореща вода с повече препарат.
• Предмети като дунапренова гума (латексoва пяна), шапки за баня, водоустойчив текстил, изделия
с гумена подплата и дрехи или възглавници, снабдени с подложки от пяна, не трябва да се сушат в
сушилнята.
• Омекотителите за тъкани и подобни продукти трябва да се използват според указанията на
опаковката.
• Предмети, които са били в контакт с масло, могат да се възпламенят спонтанно, особено ако са
изложени на източници на топлина, като барабанна сушилня.
• Прането се загрява, което води до окислителна реакция в маслото. Окисляването създава топлина.
Ако топлината не може да излезе, прането може да достигне достатъчно висока температура, за
да се запали. Натрупването, подреждането или съхраняването на пране, което е било в контакт с
масло може да се задържи топлината, създавайки опасност от пожар.
• Извадете от джобовете си всички предмети като запалки и кибрит.
• Ако тъкани, които са замърсени с растително или хранително масло или продукти за грижа за
косата, трябва да се поставят в сушилнята, те първо трябва да се измият в гореща вода с повече
препарат. Това ще намали риска, макар и да не го елиминира напълно.
• ПРЕДУПРЕЖДЕНИЕ: Никога не спирайте сушилнята преди края на цикъла на сушене, освен ако
всички дрехи не бъдат отстранени бързо и прострени, така че да се охладят.
• Отворите не трябва да бъдат запушени.
• Уловителят за мъх трябва да се почиства често.
• Не трябва да се оставя мъхът да се натрупва в сушилнята.

20
BG
МОНТИРАНЕ
Описание на уреда
ЗАБЕЛЕЖКА
Действителният модел, който сте закупили, може да се различава. Вижте продукта, който сте
закупили за справка.
Захранващ кабел
Горен плот
Контролен панел
Врата
Вход за въздух
Основен филтър
Капак за поддръжка
Контейнер за вода
Барабанен
Филтър
Аксесоари
Следните части са незадължителни за определени модели.
Ако сушилнята ви се доставя със следните части, сложете ръкавици и ги монтирайте, като следвате
инструкциите по-долу.
Държач за маркуч
Маркуч за източване на кондензата
Конектор
Безопасност за деца
• Този уред може да се използва от деца на възраст от 8 и повече години и лица с намалени
физически, сетивни или психически способности или с недостатъчно опит и познания, ако те са под
наблюдение или са инструктирани относно използването на уреда по безопасен начин и осъзнават
опасностите, свързани неговата експлоатация. Децата не трябва да си играят с уреда.
• Почистването и поддръжката не следва да се извършват от децата без надзор.
• Децата трябва да бъдат наблюдавани, за да се уверите, че те не си играят с уреда.
• Деца под 3-годишна възраст трябва да се държат далеч от устройството, освен ако не са под
постоянен надзор.
• Винаги затваряйте вратата след употреба. По този начин ще избегнете опасността от:
1. Деца, които се катерят върху или влизат в сушилнята или крият неща в нея.
2. Домашни любимци или други малки животни, които се крият в нея.
Table of contents
Languages:
Other Tesla Dryer manuals
Popular Dryer manuals by other brands

Andrew Barton
Andrew Barton SALON PRO-DRY 5568ABBU manual

Bosch
Bosch WTW85439GR Installation and operating instructions

Trotec
Trotec DH 25 S Original instructions

Whirlpool
Whirlpool LER5624BN0 Top and console parts

Logic
Logic LHP8W18 Instruction & installation manual

American Dryer Corp.
American Dryer Corp. Phase 7 / OPL ensor Activated Fire Extinguishing System... installation manual