Tesla Smart Camera 360 4G Battery User manual

1
USER MANUAL
TESLA
SMART CAMERA 360
4G BATTERY
EN
CZ
SK
PL
HU
SL
DE

2
WHAT‘S IN THE BOX
• TESLA Smart Camera 360 4G Battery
• Screw package
• SIM ejection pin
• User manual
• USB-C power cable
Microphone
Lens
SIM/SD tray
ejection button
SIM/SD Slot
Speaker
ON/OFF Button
USB-C Port
RESET Button
Status light
PIR Sensor
Charging port DC 5 V / 1 A
ON/OFF Button Press the button for 5 seconds to turn on/off the
camera.
Status light • The camera is connection to the 4G network:
Flashing red (500 ms).
• Pairing with app: After successfully loading the SIM
and connection to the 4G network, status light flashes
blue (500 ms) and camera is ready for pairing with app.
• Camera error: Status light is flashing red/blue.
• FW updating: Flashing blue (250 ms).
SD Card slot Support local SD Card storage (Max.128 GB)
Reset button Press and hold on for 5 seconds to reset the camera.
Battery 9600mAh rechargeable Li battery

3
INSTALLATION
CAMERA INSTALLATION
1) Mark screws position with bracket
2) Drill screw holes with a power drill
3) Install expansion screws (with a hammer)
4) Use screws to fix the bracket on the wall
30~40MM
6MM
Before installation, please check that the installa-
tion positions will not affect the connection and
usage, especially to ensure that the solar panel
can be fully illuminated, and the camera is in good
coverage of mobile data signal.

4
SIM/SD CARD INSTALLATION
1. Insert the SIM card first to the SD card slot, so that the
camera can connect to 4G Internet.
2. Then insert SD card for data storage.
SD card
SIM card

5
CONNECTION
Download
Tesla Smart is available for both iOS and
Android OS. Search the name ‚Tesla
Smart‘ in App Store or Android Market, or
scan the QR-Code to download the App.
REGISTRATION PROCESS
Step 1 Open the Tesla Smart App, click „Register“, read the
„Privacy Policy“ and click „Agree“ .
Step 2 Input a legal and valid Mobile number or Email address
and click „Continue“. Input Verification Code, then log in the
app.
QR CODE CONFIGURATION
1. Open the Tesla Smart App, click „Create family“, and you can
customize the Family name and related settings.
2. Continue to click „+“ >> „Scan QR Code“.
3. Make sure the LED is blinking blue (500 ms) and scan the QR
code, fount on the top of the camera. The connection usually
takes a few seconds.
SETTINGS
In „Smart Camera“ interface,click „ “, you can set the camera
common functions.

6
FREQUENTLY ASKED QUESTIONS
Q: Why isn‘t the camera displaying correctly?
A: Check whether the network is connected. Place the camera
close to the router, and if it’s still not working, it is recommended
to reset the device and add it again.
Q: Why is it still in the list of devices after resetting?
A: Device resetting can only reset the network settings but can-
not change the camera settings on the App. If you need to delete
the camera, you must delete it in the App.
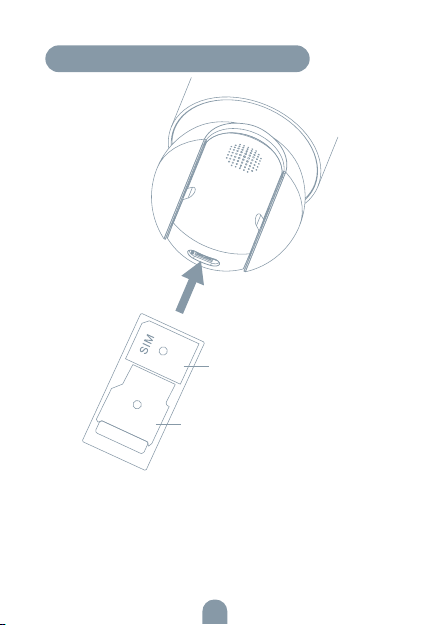
Q: Why doesn‘t the device identify the TF (Micro SD) card?
A: It is recommended to insert TF (Micro SD) card with device
powered off. Confirm whether the TF (Micro SD) card is normally
available and the format is FAT32.
Q: Why cannot the device recognize Sim card?
A: Check if the SIM card functions properly. Check if the SIM is
active and has a data plan available. Check if it is inserted proper-
ly, if it is not damaged and if the cellular coverage is good.
Q: Why I can‘t get the notifications through the App?
A: Please confirm that the App has been running on the phone,
and the relevant reminder function has been configured. To
turn on notifications in the App, click the Settings icon and tap
the Notification button to turn on. You will also need to turn on
notifications in your phone settings.

7
Product name Tesla Smart Camera 360 4G Battery
Resolution 2304 x 1296
Power 5V/1A, 9600 mAh Lithium battery
Image Sensor 1/2.8" 3 Mpx
Night Vision Up to 10 m
Lens [email protected]
Dimensions 158 × 103 × 200 mm
Storage MicroSD Card (max. 128GB), Cloud storage
(optional)
Operating temperature -20° to 50°
App Tesla Smart for Android and iOS
Connectivity 4G LTE/3G GSM
Model TSL-CAM-19TG
TECHNICAL SPECIFICATION

8
EU DECLARATION OF CONFORMITY
Hereby, Tesla Global Limited declares that the radio equipment typeTSL-
-CAM-19TG is in compliance with Directive 2014/53/EU. The full text of the
EU declaration of conformity is available at the following internet address:
tsl.sh/doc
Connectivity: GSM - 4G/LTE
Frequency band: 890 - 2500 MHz
Max. radio-frequency power (EIRP): < 20 dBm
Manufacturer
Tesla Global Limited
Far East Consortium Building
121 Des Voeux Road Central
Hong Kong
www.teslasmart.com
This product is marked with the symbol for separate collection. The product
must be disposed of in accordance with the regulations for disposal of
electrical and electronic equipment (Directive 2012/19/EU on waste electrical
and electronic equipment). Disposal together with regular municipal waste
is prohibited. Dispose of all electrical and electronic products in accordance
with all local and European regulations at the designated collection points
which hold the appropriate authorization and certification in line with the local
and legislative regulations. Correct disposal and recycling help to minimize
impacts on the environment and human health. Further information regarding
disposal can be obtained from the vendor, authorized service center or local
authorities.
INFORMATION ABOUT DISPOSAL AND RECYCLING

BENUTZERHANDBUCH
EN
CZ
SK
PL
HU
SL
DE
TESLA
SMART CAMERA 360
4G BATTERY

10
WAS IST IN DER SCHACHTEL ZU FINDEN
• TESLA Smart Camera 360 4G Battery
• Schraubensatz
• SIM-Karten-Auswurfstift
• Benutzerhandbuch
• USB-C-Netzkabel
Mikrofon
Objektiv
SIM/SD
-Auswurftaste
SIM/SD-Steckplatz
Lautsprecher
Ein/Aus-Taste
USB-C-Anschluss
Reset-Taste
Statusleuchte
PIR-Sensor
Anschluss zum Laden DC 5 V / 1 A
Ein/Aus-Taste Halten Sie die Taste 5 Sekunden lang gedrückt, um das Gerät ein-/
auszuschalten.
Statusanzeigeleuchte • Die Kamera ist mit einem 4G-Netzwerk verbunden: Rotes Blinken
(500 ms).
• App-Kopplung: Nachdem die SIM-Karte erfolgreich eingelegt und
mit dem 4G-Netzwerk verbunden wurde, blinkt die Statusanzeige
blau (500 ms), dann ist die Kamera bereit für die Kopplung mit
der App.
• Kamerafehler: Die Statusanzeige blinkt rot/blau.
• Software-Update: Blau blinkend (250 ms).
SD-Kartensteckplatz Unterstützt lokale SD-Karten (max. 128 GB)
Reset-Taste Halten Sie die Taste 5 Sekunden lang gedrückt, um das Gerät neu
zu starten.
Batterie Lithiumbatterie 9600 mAh

11
INSTALLATION
MONTAGE DER KAMERA
1) Markieren Sie die Positon der
Schrauben mit der Halterung
2) Bohren Sie die Löcher für die
Schrauben mit einem Bohrer
3) Setzen Sie die Schrauben ein (mit einem Hammer)
4) Befestigen Sie die Halterung mit den Schrauben an
der Wand
30~40MM
6MM
Vergewissern Sie sich vor der Installation der
Kamera, dass die Position des Geräts die Verbin-
dung und den Betrieb nicht beeinträchtigt. Stellen
Sie insbesondere sicher, dass das Solarpanel
ausreichend Licht erhält und dass sich die Kamera
innerhalb des Abdeckungsbereichs eines mobilen
Datensignals befindet.

12
EINLEGEN DER SIM/SD-KARTE
1) Setzen Sie zunächst die SIM-Karte in den SIM/
SD-Kartensteckplatz ein, damit das Gerät eine
Verbindung zum 4G-Netz herstellen kann.
2. Legen Sie anschließend die SD-Karte zur Datenspei-
cherung ein.
SD-Karte
SIM-Karte

13
ANSCHLUSS
Herunterladen
Die App Tesla Smart steht für Systeme iOS
und Android OS zur Verfügung. In Apple App
Store oder Google Play Store suchen Sie
„Tesla Smart“ heraus oder scannen Sie den
QR-Code und laden Sie die App herunter.
REGISTRATIONSPROZESS
Schritt 1: Öffnen Sie die App Tesla Smart, klicken Sie auf „Regis-
trieren“, lesen Sie die „Grundsätze des Personendatenschutzes“
und klicken Sie auf „Einverstanden“.
Schritt 2: Geben Sie die gültige Telefonnummer oder die
E-Mail-Adresse ein und klicken sie auf „Fortsetzen“. Geben
Sie den Überprüfungscode ein und melden Sie sich in die App
an.
KONFIGURATION MITTELS DES QR-CODES
1. Öffnen Sie die Tesla Smart App, klicken Sie auf „Haus
erstellen“, wo Sie den Namen des Hauses und die zugehörigen
Parameter konfigurieren können.
2. Klicken Sie anschließend auf „+“ >> „QR-Code scannen“.
3. Vergewissern Sie sich, dass die LED blau blinkt (500 ms),
und scannen Sie den QR-Code, der sich auf der Oberseite des
Geräts befindet. Der Verbindungsaufbau dauert in der Regel ein
paar Sekunden.geben Sie das Passwort Ihres Wi-Fi-Netzes ein.
In der Schnittstelle „Smart Kamera“ klicken Sie auf „ “ und
stellen Sie übliche Funktionen der Kamera ein.
EINSTELLUNG

14
OFT GESTELLTE FRAGEN
Frage: Die Einrichtung kann nicht abgebildet werden.
Antwort: Überprüfen Sie den Netzanschluss und versuchen
Sie, die Kamera näher zum Router anzubringen. Wenn es nicht
hilft, empfehlen wir, die Einrichtung zurückzusetzen und erneut
hinzuzugeben.
Frage: Warum ist sie nach dem Zurücksetzen immer im
Verzeichnis der Einrichtungen?
Antwort: Das Zurücksetzen der Einrichtung setzt nur die
Konfiguration des Netzes der Kamera zurück, es ändert die Kon-
figuration der App nicht. Beseitigen Sie die Kamera und löschen
Sie sie in der App.
Frage: Warum kann die Einrichtung die SD-Karte nicht
erkennen?
Antwort: Es wird empfohlen, die TF (Micro SD)-Speicherkarte
bei ausgeschaltetem Gerät einzulegen. Vergewissern Sie sich,
dass die TF (Micro SD)-Karte funktioniert und das FAT32-Format
unterstützt.
Frage: Warum erkennt das Gerät die SIM-Karte nicht?
Antwort: Vergewissern Sie sich, dass die SIM-Karte richtig
installiert ist. Prüfen Sie, ob die SIM-Karte aktiviert ist und der
Tarifplan aktiviert ist. Vergewissern Sie sich, dass die Karte
ordnungsgemäß installiert und nicht beschädigt ist und eine gute
Mobilfunknetzabdeckung hat.
Frage: Warum bekomme ich auf mein Handy die Hinweise
derApp nicht?
Antwort: Überprüfen Sie, ob die App in Ihrem Handy gestartet
ist und ob die entsprechende Funktion der Hinweise genehmigt
wurde und ob im Handy die SMS-Anzeige und die Berechtigun-
gen genehmigt wurden.

15
TECHNISCHE DATEN
Produktname Tesla Smart Camera 360 4G Battery
Videoaufnahmeau-
flösung 2304 x 1296
Volt 5V/1A, 9600 mAh Lithium Batterie
Sensor 1/2,8" 3 Megapixel
Infrarot Nachtsicht Bis 10 m
Linse [email protected]
Produktabmessungen 158 × 103 × 200 mm
Speicherplätze Micro SD Karte (max. 128GB), Cloud (Optional)
Operating temperature -20° bis 50°
App Tesla Smart für Android und iOS
Konnektivität 4G LTE/3G GSM
Model TSL-CAM-19TG

16
Dieses Produkt ist mit einem Symbol für die getrennte Sammlung ge-
kennzeichnet. Das Produkt muss im Einklang mit den Vorschriften für die
Entsorgung von elektrischen und elektronischen Geräten (Richtlinie 2012/19/
EU über elektrische und elektronische Geräteabfälle) entsorgt werden. Eine
Entsorgung über den normalen Hausmüll ist unzulässig. Alle elektrischen
und elektronischen Produkte müssen im Einklang mit allen örtlichen und
europäischen Vorschriften an dafür vorgesehenen Sammelstellen, die über
eine entsprechende Genehmigung und Zertifizierung gemäß den örtlichen
und legislativen Vorschriften verfügen entsorgt werden. Die richtige Entsor-
gung und Wiederverwertung hilft dabei die Auswirkungen auf die Umwelt
und die menschliche Gesundheit zu minimieren. Weitere Informationen zur
Entsorgung erhalten Sie von Ihrem Verkäufer, der autorisierten Servicestelle
oder bei den örtlichen Ämtern.
EU-KONFORMITÄTSERKLÄRUNG
INFORMATIONEN ÜBER DIE ENTSORGUNG UND
WIEDERVERWERTUNG
Hiermit erklärt Tesla Global Llimited, dass der Funkanlagentyp TSL-CAM-
-19TG der Richtlinie 2014/53/EU entspricht. Der vollständige Text der
EU-Konformitätserklärung ist unter der folgenden Internetadresse verfügbar:
tsl.sh/doc
Konnektivität: GSM - 4G/LTE
Frequenzband: 890 - 2500 MHz
Max. Sendeleistung. (EIRP): < 20 dBm
Produzent
Tesla Global Limited
Far East Consortium Building
121 Des Voeux Road Central
Hong Kong
www.teslasmart.com

UŽIVATELSKÁ
PŘÍRUČKA
EN
CZ
SK
PL
HU
SL
DE
TESLA
SMART CAMERA 360
4G BATTERY

18
OBSAH BALENÍ
• TESLA Smart Camera 360 4G Battery
• Spojovací materiál
• Nástroj pro vysunutí SIM karty
• Manuál
• Napájecí kabel USB-C
Mikrofon
Objektiv
Tlačítko vyjmutí
SIM/SD karty
Slot SIM/SD karty
Reproduktor
Tlačítko zapnutí
/ vypnutí
USB-C konektor
Tlačítko RESET
Kontrolka stavu
PIR senzor
Napájecí port DC 5 V / 1 A
Tlačítko zapnu-
tí/vypnutí Stisknutím a podržením tlačítka po dobu 5 sekund
Stavová
kontrolka • Kamera se připojuje ke 4G síti: Bliká červeně (500
ms).
• Spárování s aplikací: Po úspěšném načtení SIM
a připojení ke 4G síti kontrolka kamery bliká modře
(500 ms) a kamera je připravena k párování.
• Chyba kamery: Střídavě bliká modře a červeně.
• Aktualizace: Bliká modře (250 ms).
Slot pro SD kartu Podpora paměťové karty MicroSD (max. 128 G)
Tlačítko Reset Stisknutím a podržením tlačítka po dobu 5 sekund
resetujete kameru.
Baterie Dobíjecí lithiová baterie 9 600 mAh

19
INSTALACE
INSTALACE KAMERY
1) Přiložte držák ke zdi a vyznačte si polohu šroubů.
2) Pomocí vrtačky vyvrtejte otvory pro šrouby.
3) Vložte hmoždinky a zatlučte je kladívkem.
4) Pomocí šroubů připevněte držák ke zdi.
30~40MM
6MM
Před instalací zkontrolujte, zda zvolená montážní
poloha neovlivní připojení a používání kamery.
Zejména se ujistěte, že na solární panel může
dopadat přímé sluneční světlo a že kamera je v
místě s dobrým pokrytím mobilním signálem.

20
INSTALACE SIM/SD KARTY
1. Nejprve do slotu vložte SIM kartu a nechte kameru
připojit ke 4G síti.
2. Poté můžete vložit SD kartu.
SD karta
SIM karta
This manual suits for next models
1
Table of contents
Languages:
Other Tesla Security Camera manuals
Popular Security Camera manuals by other brands

Vista
Vista VVRD4V9DN Installation instructions manual

ZEPCAM
ZEPCAM T2 Series instruction manual

Ava
Ava QUAD Mounting guide

Vava
Vava Cam Pro quick start guide

Dahua Technology
Dahua Technology N28BL7Z quick start guide

Moog Videolarm
Moog Videolarm Stainless Steel Dome SERIES Installation and operation instructions

Burg Wächter
Burg Wächter BWFC-260KEIF Quick installation guide

Viakom
Viakom VDA110HQX-VFA49LIR instruction manual

Dante
Dante DLV1331WA35-21V Installation and operation manual

LTV
LTV SUPER DNR3 HIGH RESOLUTION owner's manual

Honeywell
Honeywell HD3USX Configuration guide

Transcend
Transcend DrivePro Body 30 user manual