Teufel CoreStation Parts list manual
Technical description and instruction manual
Ultra-compact 5.1 AV Receiver with Wireless Technology
CoreStation

2• CoreStation
Contents
General Notes and Information ................................ 3
Notice.....................................................................3
Trademarks ...........................................................3
Original packaging.................................................3
Complaints............................................................. 3
Contact...................................................................3
Proper use ............................................................. 3
For Your Safety........................................................... 4
Please Read...........................................................4
Caution items ........................................................4
Notes on Safe Use & Maintenance ......................4
Explanation of Symbols............................................. 6
Overview ..................................................................... 7
Unpacking ..............................................................7
Product contents ...................................................7
Checking the delivery ............................................7
Optional accessories.............................................7
Operational Controls and Connections.................... 8
CoreStation back side...........................................8
CoreStation front side ...........................................9
Remote control RC 1 .............................................9
Setup / Mounting .................................................... 10
Setup location......................................................10
Location tips ................................................10
Mounting behind a TV set...................................10
Connecting............................................................... 12
FM antenna .........................................................12
Inputs for source devices....................................12
HDMI 1, 2, 3 and 4......................................12
OPTICAL 1 and 2 .........................................13
COAXIAL .......................................................13
AUX 1, 2 and 3.............................................13
Outputs ................................................................13
Speaker outputs ..........................................13
Subwoofer ....................................................14
Pre Out .........................................................14
TV set ...........................................................15
Headphones ................................................15
Connecting to power ...................................15
Remote control ........................................................ 16
Inserting/changing the battery...........................16
Functionality ........................................................16
Pairing the remote control ..................................16
Basic functions ........................................................ 17
Activating and deactivating.................................17
Selecting a source...............................................17
Setting the volume ..............................................18
Mute .....................................................................18
Adjusting the sound ............................................18
Surround mode selection....................................18
Menu functions ........................................................ 19
“Tuner” menu.......................................................19
Presets .........................................................19
Frequency.....................................................19
Mode ............................................................19
Memory Store ..............................................19
Memory Erase..............................................19
“Surround” menu ................................................20
“Tone Control” menu...........................................20
TONE ............................................................20
Mode ............................................................20
Equalizer.......................................................20
“Speaker Levels” menu.......................................20
“Source Levels” menu.........................................20
“Audio Mapping” menu.......................................20
“Speaker Setup” menu .......................................20
Speaker Size ................................................20
Crossover .....................................................21
Phase Sub....................................................21
Lip Sync........................................................21
Distance.......................................................21
“System Setup” menu.........................................21
Special Keys ................................................21
HDMI ............................................................21
Auto-off.........................................................21
Power On Level ............................................21
Wireless .......................................................21
3.1/5.1.........................................................22
D/E ...............................................................22
System Reset...............................................22
Bluetooth Playback ................................................. 23
Pairing ..........................................................23
Playback.......................................................23
Radio Playback ........................................................ 24
Setting the radio stations ...................................24
Stereo/Mono ...............................................24
Station memory slots ..........................................24
Saving stations ............................................24
Selecting stations from the memory ..........24
Clearing station memory slots ....................24
Software Update ...................................................... 25
Installing new software .......................................25
Cleaning & Maintenance ........................................ 25
Troubleshooting ....................................................... 26
Technical Data ......................................................... 27

3• CoreStation
Notice
The information in this document may change without
prior notice and in no way constitutes any liability on
the part of Lautsprecher Teufel GmbH.
No part of these instructions may be reproduced in
any form or be broadcasted in any way electronically,
mechanically, by photocopy or recording without the
written permission of Lautsprecher Teufel GmbH.
© Lautsprecher Teufel GmbH
Version 2.0
February 2016
Trademarks
® All trademarks are the property of their respective
owners.
Manufactured under license from
Dolby Laboratories. “Dolby”, “Pro
Logic” and the double D symbol are
trademarks of Dolby Laboratories.
Manufactured under license un-
der U.S. Patent Nos: 5,956,674;
5,974,380; 6,487,535 & other U.S. and worldwide
patents issued & pending. DTS, the Symbol, & DTS
and the Symbol together are registered trademarks
& DTS Digital Surround and the DTS logos are trade-
marks of DTS, Inc. Product includes software. © DTS,
Inc. All Rights Reserved.
The HDMI and High-Definition
Multimedia Interface symbols
as well as the HDMI logo are trademarks or registered
trademarks of HDMI Licensing LLC in the USA and
other countries.
The Bluetooth® word mark and
logos are registered trademarks
owned by Bluetooth SIG, Inc. and any use of such
marks by Lautsprecher Teufel GmbH is under license.
Other trademarks and trade names are those of their
respective owners.
© 2013 CSR plc and its group com-
panies.
The aptX®mark and the aptX logo
are trademarks of CSR plc or one of
its group companies and may be registered in one or
more jurisdictions.
General Notes and Information
Original packaging
If you wish to exercise your eight-week right of re-
turn, we ask that you be absolutely sure to hold onto
the packaging. We can only accept the return of the
speakers WITH THE ORIGINAL PACKAGING.
Empty boxes are not available!
Complaints
In case of complaint we will need the following infor-
mation to process your enquiry:
1. Invoice number
Can be found on the sales slip (enclosed with the
product) or on the order confirmation received as a
PDF document, e.g. 4322543
2. Serial number or batch number
Located on the back of the device,
e.g. serial no.: KB20240129A-123.
Thank-you for your support!
Contact
Please contact our customer service with any ques-
tions, suggestions or criticism:
Lautsprecher Teufel GmbH
Bikini Berlin
Budapester Str. 44
10787 Berlin
Phone 00800 - 200 300 40 (toll-free)
Fax: +49 (0)30 / 300 930 930
E-Mail: service@teufelaudio.com
www.teufelaudio.com
Proper use
Only use the CoreStation as described in these oper-
ating instructions. Any other use will be deemed as
not in accordance with the instructions and may lead
to damage of property or even persons.
The manufacturer accepts no liability for damage
caused by use not in accordance with the instruc-
tions.
The CoreStation is intended for domestic use.
4• CoreStation
For Your Safety
Please Read
Before operating the CoreStation, please first
read the safety notes and instruction manual
carefully. Only in this way, can you ensure that
all functions are used in a safe and reliable manner.
Store the instruction manual in a safe place and also
be sure to pass it on to any subsequent owner.
Caution items
You can find the following caution items in these
instructions:
WARNING
This caution item indicates a moderate risk, which, if
not avoided, may result in death or to high injury.
CAUTION
This caution item indicates a low risk, which, if not
avoided, may result in minor or moderate injury.
NOTE
This caution item warns you of potential damage.
Notes on Safe Use & Maintenance
WARNING
Improper electrical installation or excessive mains
voltage may result in an electrical shock.
• The device is suitable for a mains voltage of 230 V ~
/ 50 Hz. When connecting the device, make sure
that the correct voltage is present. You can find more
information in this respect on the nameplate.
• Check the device regularly for damage.
Immediately disconnect the mains plug and do not
operate the device if its housing or mains cable is
defective or exhibits other visible damages.
• This device is disconnected from the grid only by
pulling the mains plug. Thus, make sure that the mains
plug is always easily accessible.
• If the device emits smoke, smells of burning or pro-
duces unusual sounds, immediately pull the mains
plug and do not operate it further.
• Never open the device housing.
Only parts which confirm with the original device
specifications may be used for repairs.
• Only use the accessory products specified by the
manufacturer.
• Only use the device in indoor areas.
• Do not operate the device in wet rooms and protect
it from dripping and splash water.
Make sure that no vases or other containers filled
with liquid are located on the device or nearby in or-
der to prevent liquid from penetrating the housing.
If water or other foreign objects end up penetrating
the housing, immediately pull the mains plug and
take out any batteries. Then send the device to our
service address.
• Never touch the mains plug with wet hands.
Children can become trapped in the packing film
when playing and suffocate.
• Do not allow children to play with the device or the
packing film. Danger of suffocation.
• Ensure that children do not remove small parts
from the device or take them off of the device (e.g.
control knobs or plug adapters). They could swallow
the parts and choke.
• Never let children use electrical equipment unsu-
pervised.
Swallowing the remote control’s battery may result
in severe internal injury or even death.
• Store both new and used batteries so that they are
not accessible to children.
• If it is no longer possible to safely close the battery
compartment, stop using the product and store it
so that it is not accessible for children.
• If you suspect that a battery has been swallowed or
otherwise incorporated, promptly consult a physi-
cian.
Leaking battery acid may lead to chemical burns.
• Do not allow battery acid to come into contact with
skin, eyes or mucus membranes. In the event of
contact with acid, immediately flush the applicable
areas with plenty of clean water and consult a phy-
sician if necessary.
Batteries (particularly lithium batteries) can ex-
plode if used improperly.
• Never attempt to recharge batteries.
• Only use batteries of the same or equivalent type.
• You may not heat or short circuit batteries and stor-
age batteries or dispose of them in fire.
• Do not expose batteries and storage batteries to
direct sunlight.

5• CoreStation
Extended listening at high volumes may
lead to hearing loss.
• To avoid damage to health, avoid extended listening
at high volumes.
• When the volume is set high, always keep a certain
distance from the device and never place your ear
directly on the speaker.
• If a speaker is set to full volume, this may produce
very high sound pressure. This may have psycholog-
ical consequences and also cause physical injury.
Children and pets are particularly at risk. Set your
signal source device volume control to a low setting
before turning on the power.
CAUTION
An unsuitable setup location could lead to
damage.
• If the CoreStation and the speakers are not secure-
ly mounted, do not use them in vehicles, in unsta-
ble locations, on wobbly tripods or furniture, on
underdimensioned brackets etc. The CoreStation or
the speakers may tip or fall over and cause injury to
persons or be damaged themselves.
• Only mount the CoreStation on a solid base with
sufficient carrying capacity.
• Place the CoreStation in such a way that it cannot
be knocked over inadvertently and make sure that
the cables do not pose a trip hazard.
• Carefully follow the instruction manual.
• When storing the CoreStation, make sure that it is
in a stable position and that there is no risk of it
falling or being pulled down.
NOTE
External influences may damage or destroy the
device.
• If the device is to be left unattended for a prolonged
period of time (e.g. during a vacation) or if a thun-
derstorm is forecast, pull the mains plug out of the
socket. Otherwise, sudden overvoltage could cause
the device to become defective.
• In the event of prolonged absence, remove the
batteries from the remote control. Leaked batteries
may damage the remote control.
• If the device is subjected to warm temperatures
after being cold (e.g. after transport), condensation
may occur inside of it. In this case, wait at least 2
hours before you connect and activate it.
Improper use may lead to damage or fire.
• Do not place open flames such as burning candles
or similar on the device.
• Ensure sufficient ventilation.
• Do not place the device in direct sunlight.
6• CoreStation
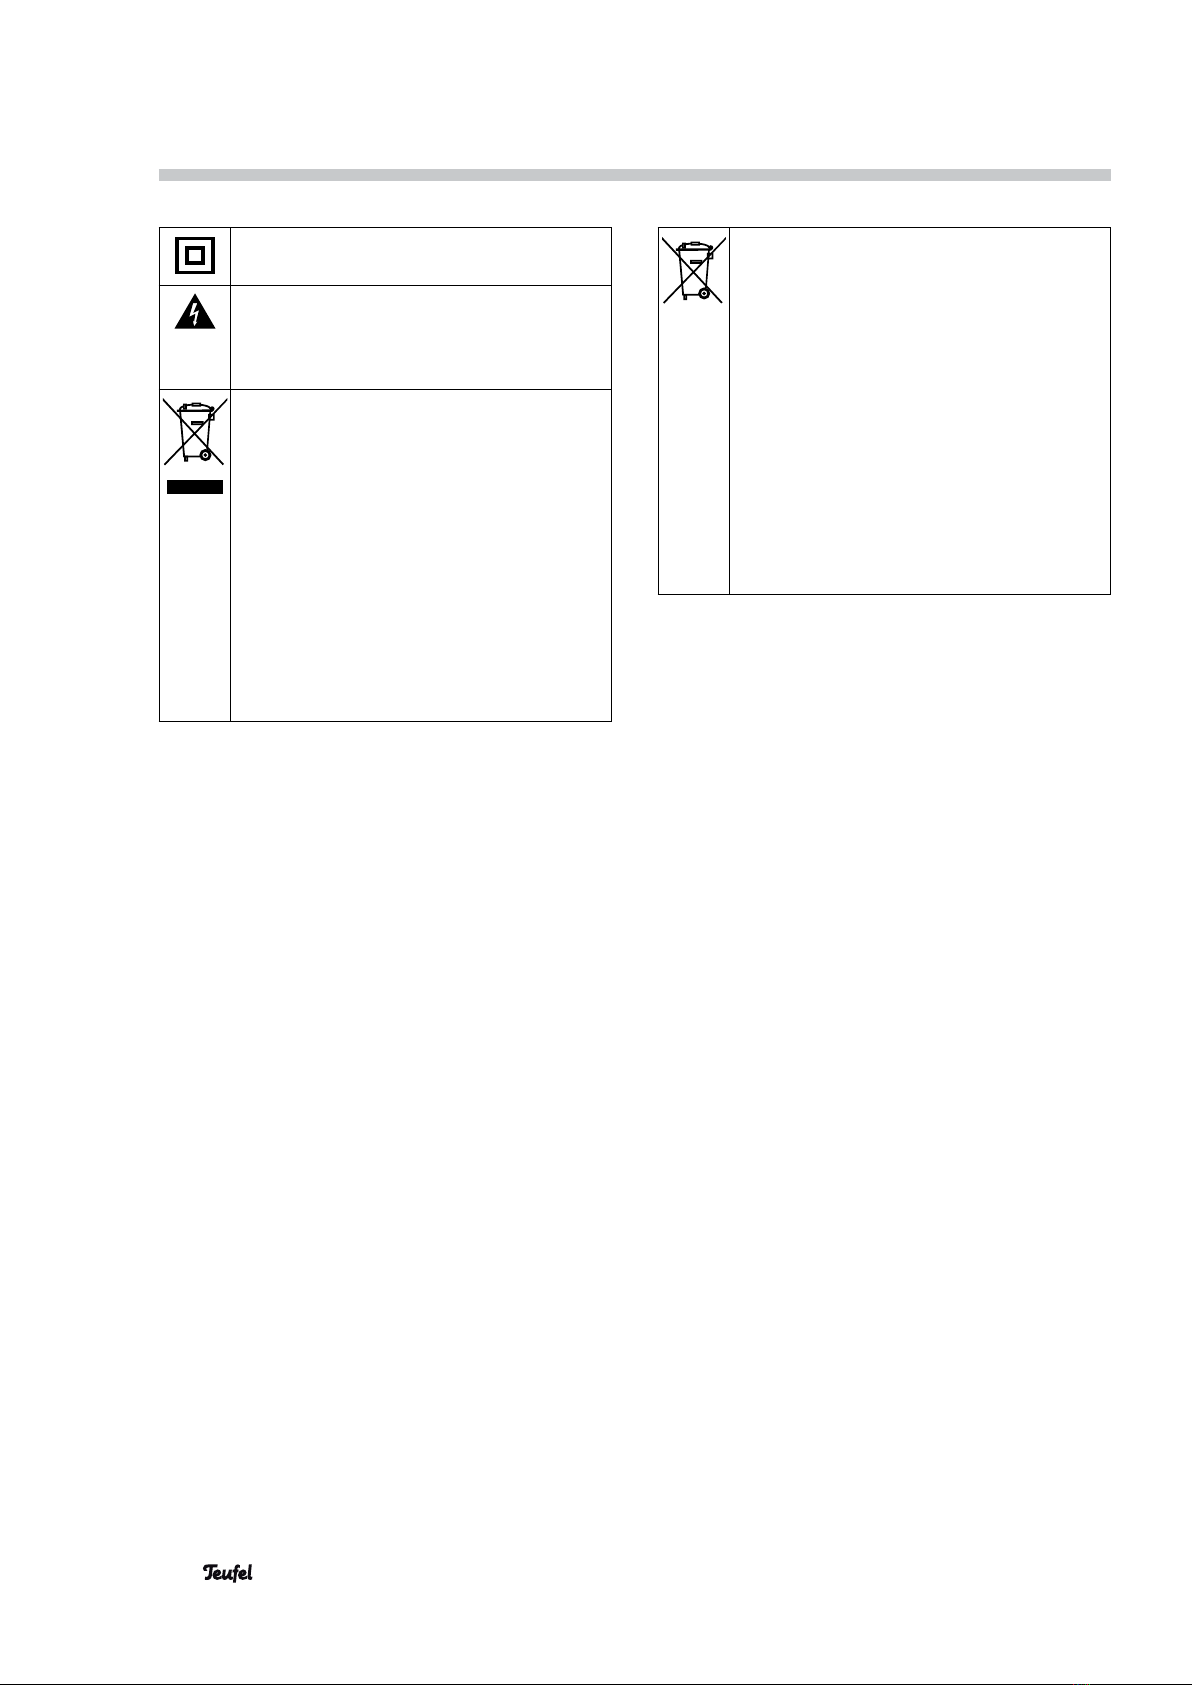
Explanation of Symbols
Protection class II
Dual insulation
Risk of electrical shock – do not open the
housing.
Disconnect the mains cable before chang-
ing a fuse.
Old devices must not be disposed of
with household waste!
If the device is no longer operational, every
consumer is required by law to dispose
of old devices separately from household
waste, e.g. at a collection point run by
the communal authority/boroughs. This
ensures that old devices are recycled in
a professional manner and also rules out
negative consequences for the environ-
ment.
For this reason, electrical equipment is
marked with this symbol.
Batteries and storage batteries do not
belong in the household garbage!
Every consumer is required by law to bring
all batteries and storage batteries, regard-
less whether they contain harmful sub-
stances*) or not, to a collection point run
by the communal authority or borough or to
a retailer, so that they can be disposed of
in an environmentally friendly manner.
Please only turn in batteries and storage
batteries which are empty!
*) labelled with: Cd = cadmium, Hg = mer-
cury, Pb = lead

7• CoreStation
Overview
Unpacking
• Carefully open the box and carefully lift the
CoreStation and accessories out of the box.
Product contents
1x CoreStation
1x mains cable for the CoreStation
1x remote control RC 1
1x button cell for
1x FM throw-out antenna
1x system plug for speaker connection
2x mounting brackets
8x screws for the mounting brackets
4x washers for the mounting brackets
Instruction manual
Checking the delivery
• Check that all items have been delivered and that
nothing is damaged.
• If the delivery is incomplete or exhibits transport
damages, please contact our service team (see
page 3).
• Do not in any case operate the device if it is dam-
aged.
Optional accessories
• Optionally, you can purchase the Teufel Puck Con-
trol – an innovative remote control for controlling
volume, muting and selecting input sources – from
www.teufelaudio.com.
• You can also use the Teufel RearStation to con-
figure the rearward surround speakers for wireless
operation in 5.1 mode. A 3.5 mm jack to stereo
RCA adapter can also be optionally purchased for
this. You can purchase both from www.teufelaudio.
com.

101112131416 151718
51 643 7 8 92
8• CoreStation
Operational Controls and Connections
CoreStation back side
Item Name Description
1—
Connector jack for mains cable
2 HDMI IN 1–4
Inputs for external HDMI source devices
3 HDMI TV
HDMI output to the TV set
4LINK
Connector jack for additional expansions
5 POWER
Power LED
6—
Button for switching the device on / to standby.
7 HEADPHONE
Connector jack for headphones
8 SERVICE
USB port (for service only)
9 SPEAKER SYS-
TEM PLUG
Connector for speaker system plug
10 SPEAKER OUT
4-8 OHM
Clamps for speakers
11 PRE OUT
Analogue audio output
3.1 mode: Stereo downmix
5.1 mode: Surround channels
12 SUB PRE OUT
Line output for the subwoofer
13 OPTICAL 1–2
Digital audio input jacks for optical cables
14 COAXIAL
Digital audio input jack for coaxial cable
15 AUX 3
Analogue audio input jacks (RCA)
16 AUX 1–2
Analogue audio input jack (3.5 mm phone jack)
17 SYSTEM
CONNECTOR
Connector jack for additional expansions
18 FM ANTENNA
Connection for FM antenna

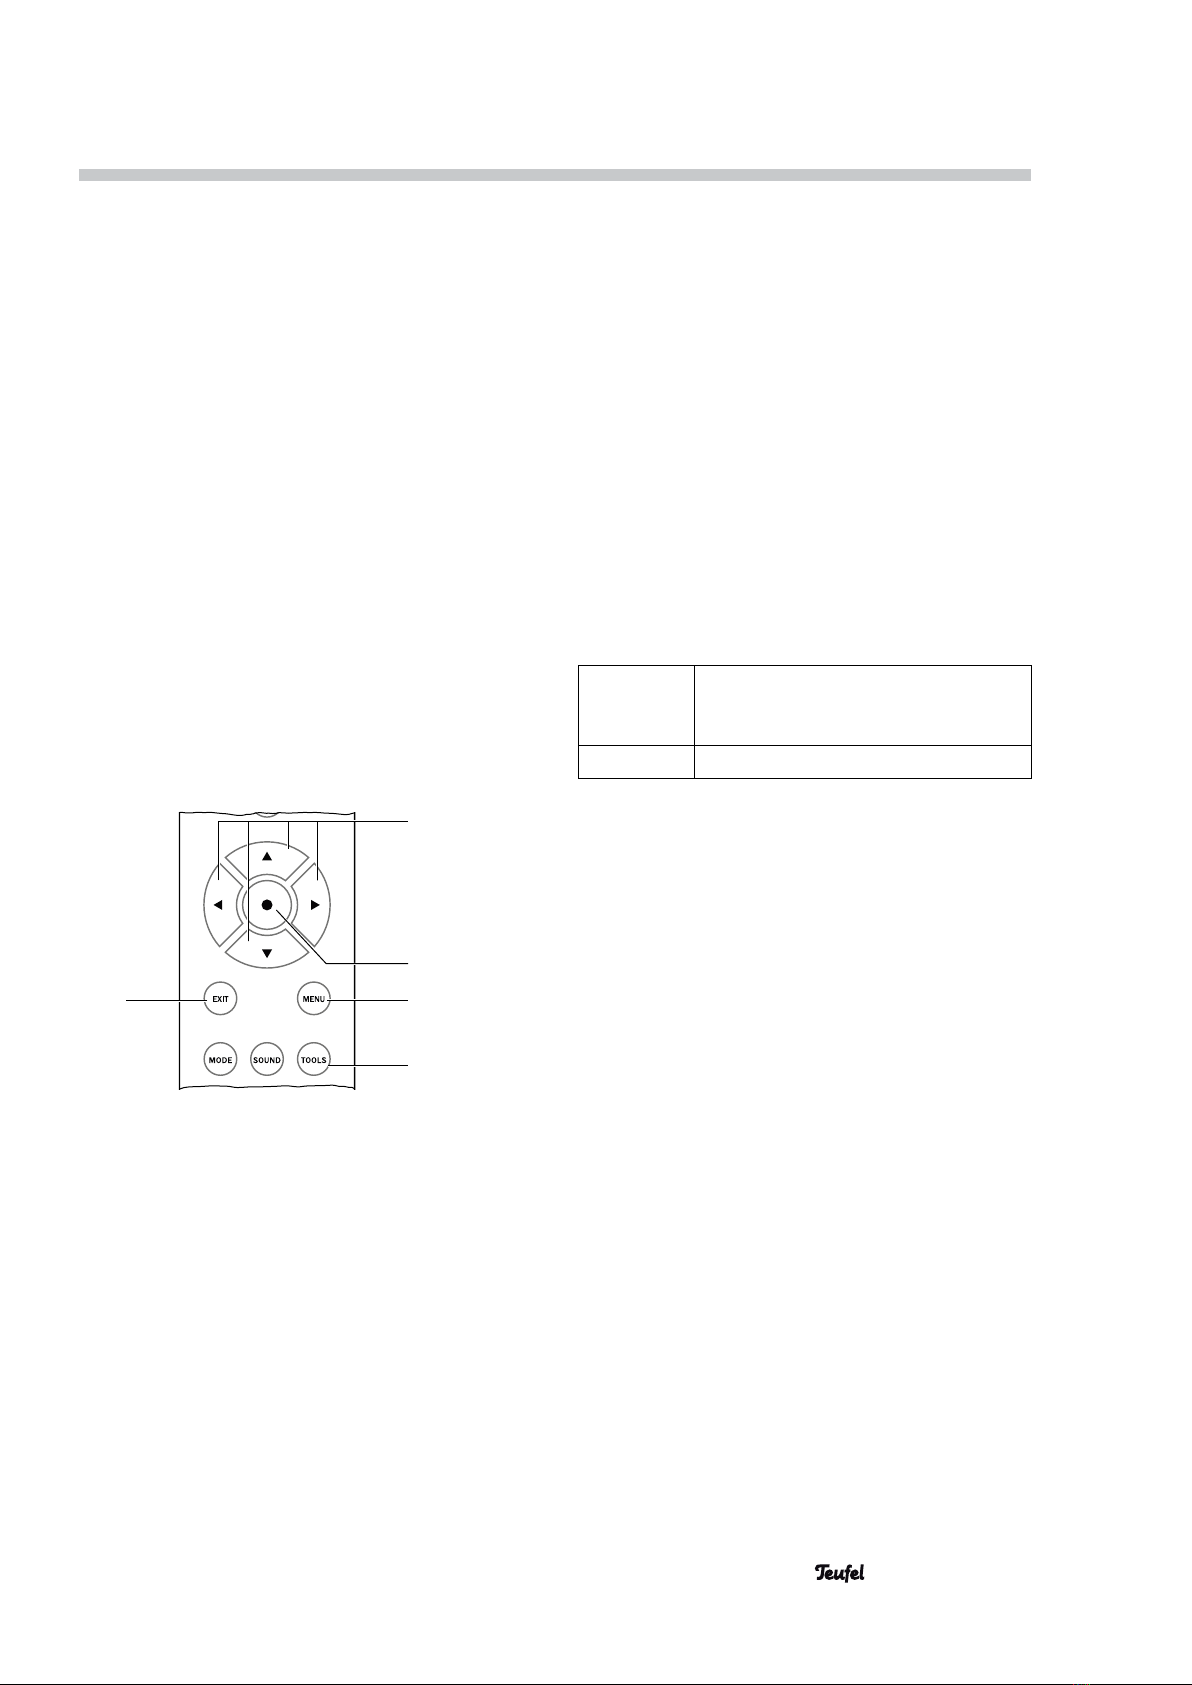
Item Name Description
20
Mute (turn sound on or off)
21 VOLUME
+/–
Increase (+) / decrease (–) the volume
22
◄►▲▼
Set buttons
23 •
Enter button
24 MENU
Access the main menu
25 SOUND
Access the sound setting
26 TOOLS
Access the “System Setup” menu
27 TV, BT, FM
Select source device TV, Bluetooth or
radio directly
28 AV, 1, 2, 3, 4
Programmable source device buttons
29 MODE
Toggle the surround mode
30 EXIT
Exit the menu
31 —
Indicator LED (blinks every time a com-
mand is successful received from the
remote control)
32
Switch the device on / to standby
Remote control RC 1
32
31
30
29
20
21
22
23
24
25
26
27
28
19
9• CoreStation
CoreStation front side
Item Name Description
19 —
Function LED
10 • CoreStation
Setup / Mounting
Setup location
You can set up the CoreStation in a concealed loca-
tion as the remote control operates with radio signals.
When setting the device up in a cabinet, make sure
that it is adequately ventilated and aerated to prevent
the CoreStation from overheating.
Location tips
• Select a stable, level base whose carrying capacity
is sufficient for the CoreStation and TV set.
• Make sure that the environment is clean and free
from dust.
• Select a location away from heat sources and direct
sunlight.
• Lay the connector cables so that they do not pose a
tripping hazard.
• Do not place any heavy objects on the cables.
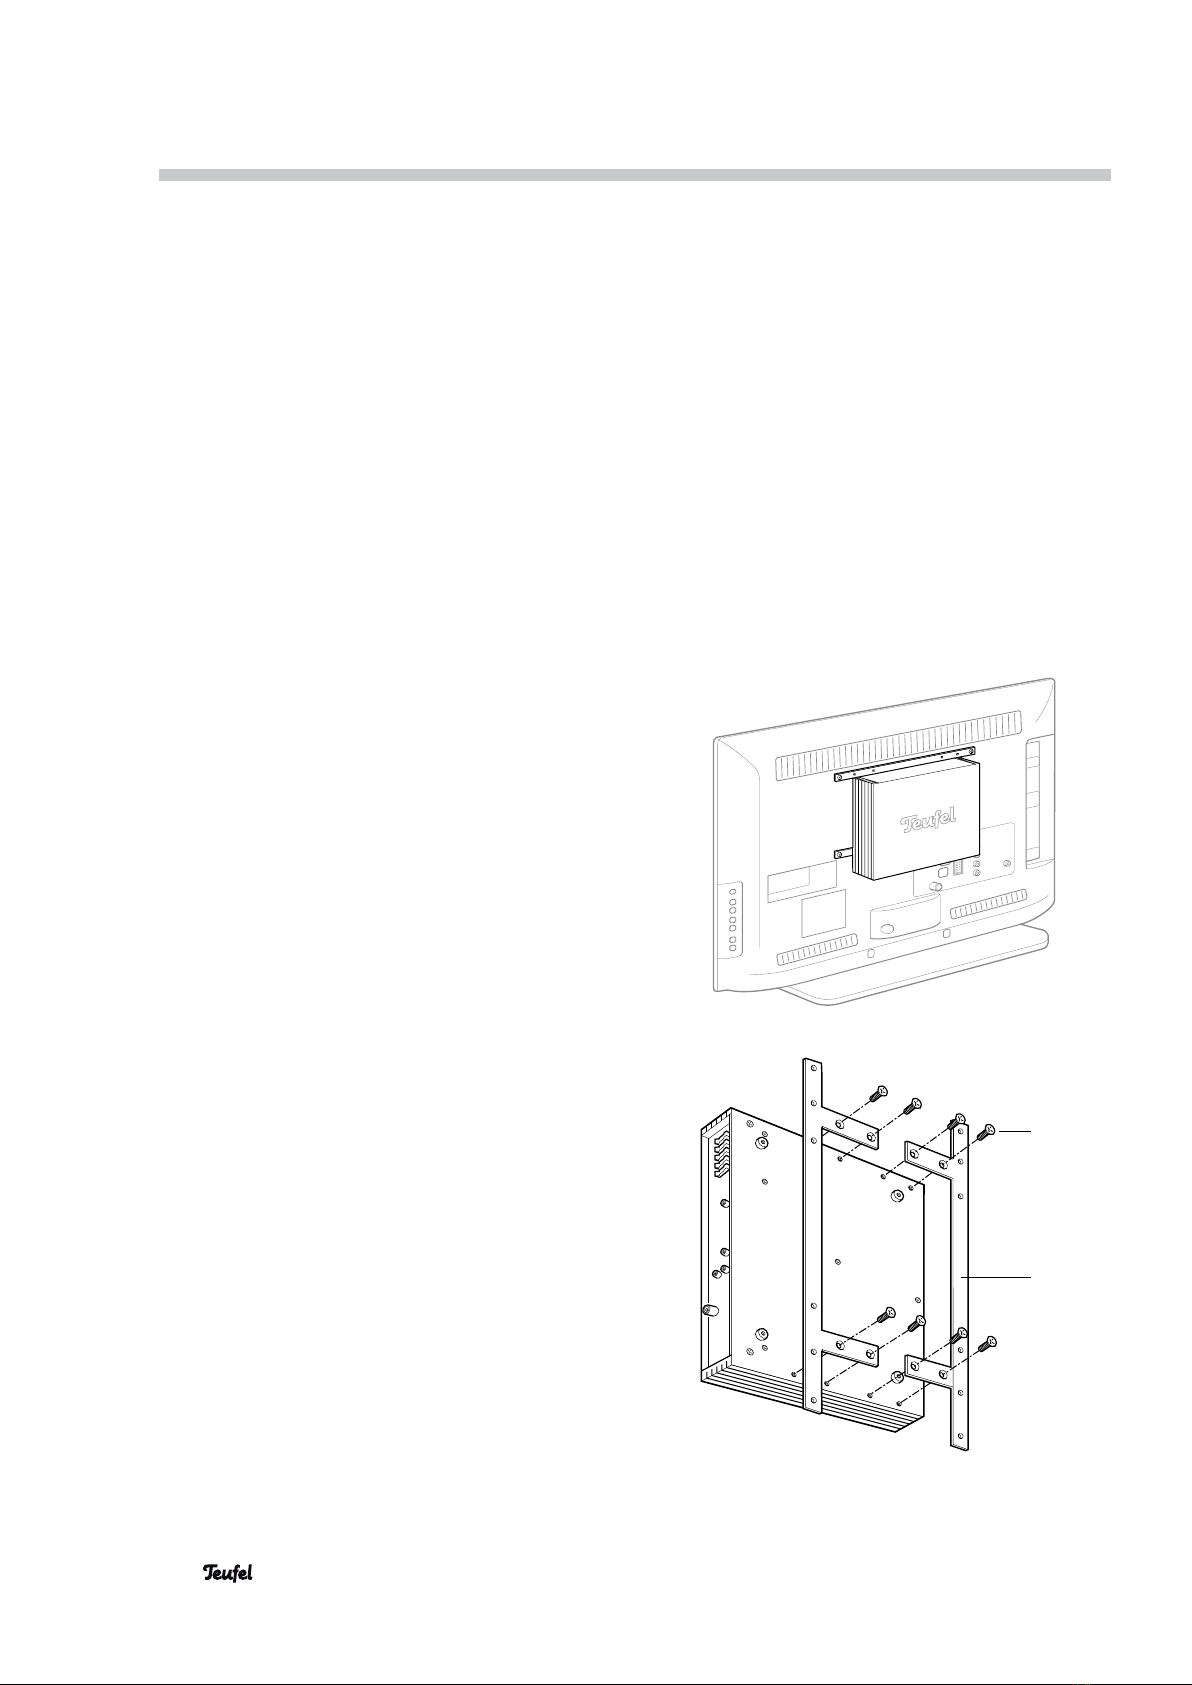
Mounting behind a TV set
You can also mount the CoreStation behind a suitable
flatscreen TV using the enclosed mounting brackets :
• The TV set must be in a stable position and may not
be secured with a wall bracket.
• It must be prepared for a wall bracket in accord-
ance with VESA MIS-E or MIS-F. TV sets of this type
have a stable mounting frame under the rear panel.
Only the outside holes 200 mm (VESA MIS-E) or
400 mm apart (MIS-F) are visible from the outside.
Please refer to the instruction manual for your TV
set.
You will still need two or four screws that fit the VESA
holder on your TV set. For this, be absolutely sure to
observe the notes in the instruction manual of your
TV set. These screws may not be too long and are not
part of the product contents of the CoreStation.
1. Use the enclosed eight screws to the screw the
two mounting brackets onto the bottom of the
CoreStation as shown in the figure.

A
B
11• CoreStation
2. Mount the CoreStation depending on how the
top two VESA mounting points on your TV set are
spaced:
Spaced at 400 mm:
Mount the CoreStation in a lateral position (with the
connections facing down — see Fig. A).
Spaced at 200 mm:
Mount the CoreStation in an upright position (with
the connections pointing to the left or right — see
Fig. B)
3. If necessary, place the washers under the
mounting brackets as a spacer.
4. Begin by only screwing the top of the CoreStation
into place.
5. If the bottom bore holes of the mounting brackets
match up with the bottom VESA fasteners, screw
the CoreStation into place on the bottom as well.
Otherwise, it is sufficient if the CoreStation is se-
cured along the top with two screws.

18
2
13
12 • CoreStation
Connecting
WARNING
Risk of injury/damage!
Lay the cables so that they do not pose a tripping
hazard.
FM antenna
WARNING
Risk associated with lightning strike!
If you are using outdoor or roof antennas, be abso-
lutely sure that the antenna has lightning protection.
To receive FM stations, connect the antenna to the
FM ANTENNA jack (18). This may be a roof/outside
antenna, but also a cable television connection. You
will need a coaxial connector cable for this.
If no antenna connection is available at the set-up
location, you can use the enclosed throw-out anten-
na. Push the antenna plug into the FM ANTENNA
jack (18) and adjust the position of the throw-out
antenna for best reception. Then fix the antenna in
place.
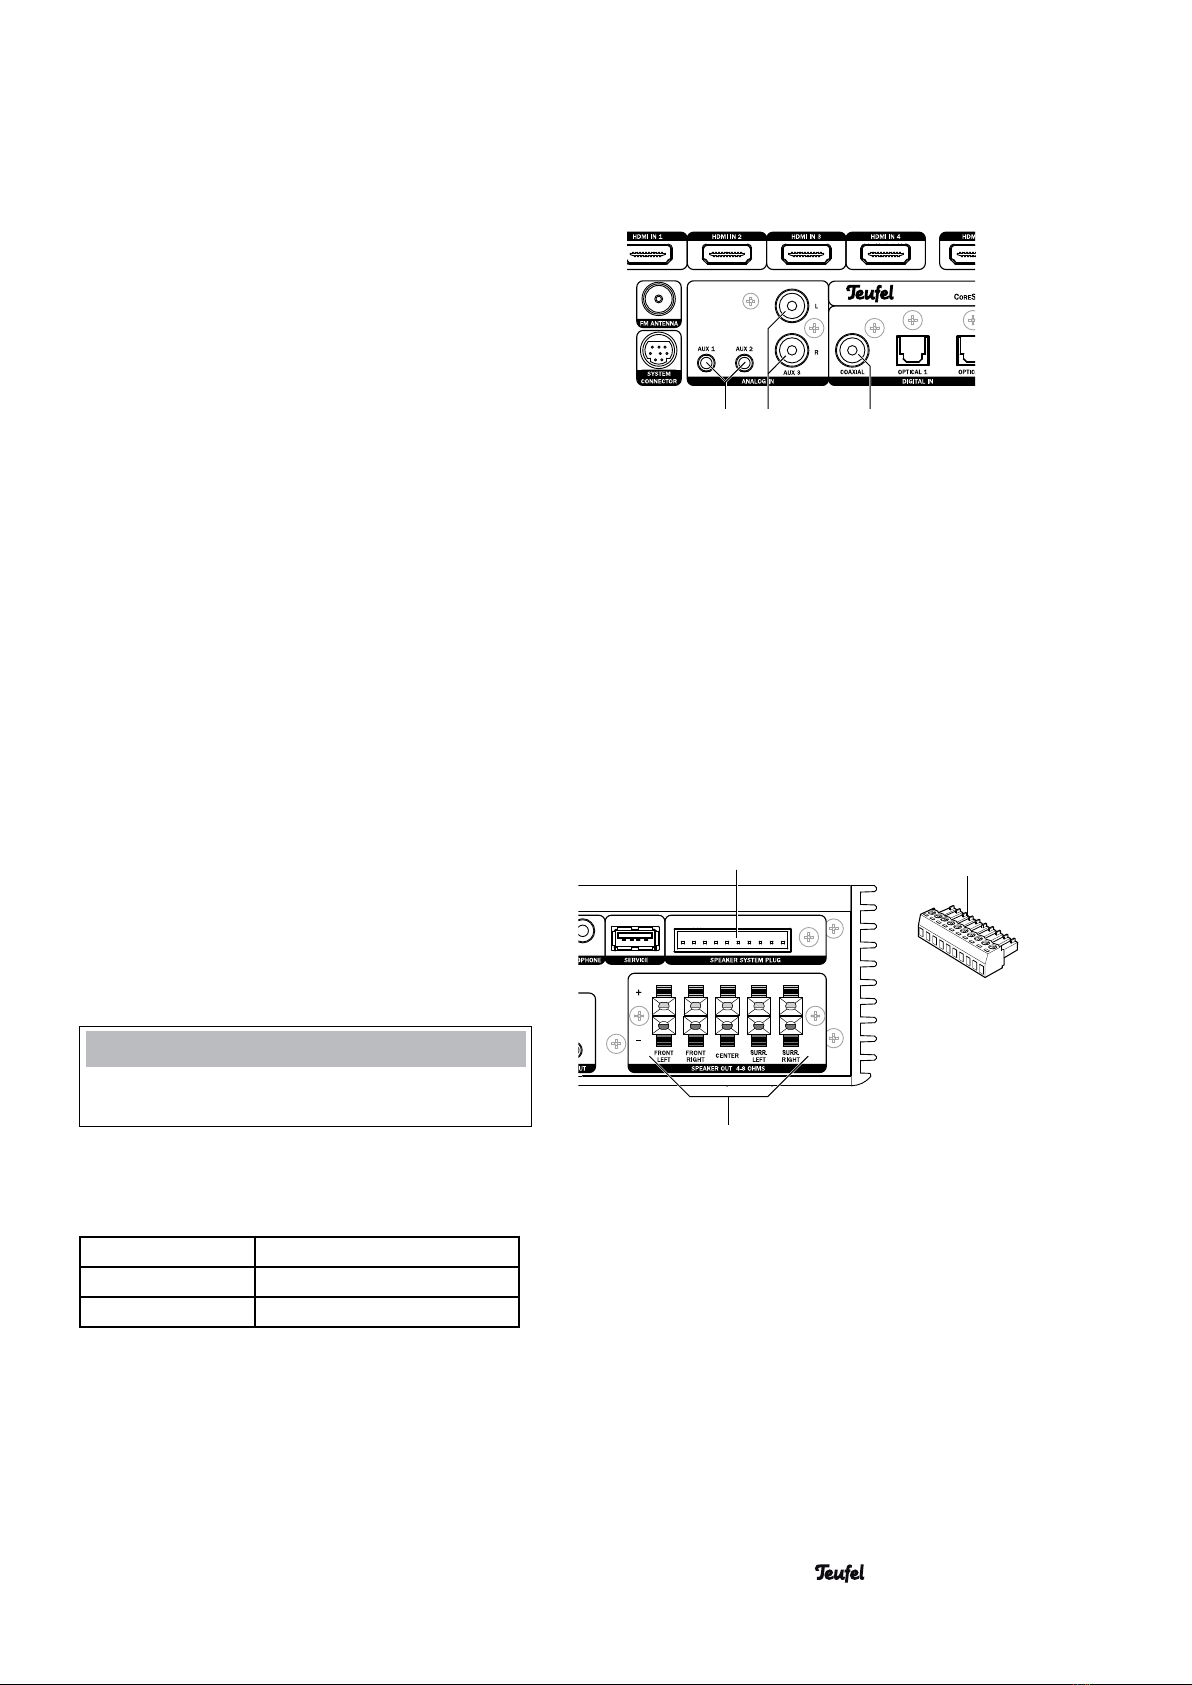
Inputs for source devices
The CoreStation offers 4 HDMI inputs for digital
audio/video signals (HDMI 1, 2, 3 and 4), three
analogue audio inputs (AUX 1, 2 and 3) as well as one
coaxial and two optical digital audio inputs.
HDMI 1, 2, 3 and 4
You can connect a HDMI source device with a digital
video and audio signal to each of the jacks (2) (e.g.
PC, Blu-ray player or game console). For this, you will
need one HDMI cable per device.
If a device does not transfer the audio via HDMI, you
can assign one of the audio inputs of the CoreSta-
tion to this device in the “Audio Mapping” menu (see
page20).
NOTE
The functions CEC and ARC are deactivated to save
energy when the product is delivered. If necessary,
please activate these functions via the menu (see
“HDMI” on page 21).
141516
9
10
13• CoreStation
OPTICAL 1 and 2
You can connect the optical digital audio outputs of
two source devices to the OPTICAL jacks (13). You will
need an optical cable with a TOSLINK plug for this.
COAXIAL
You can connect the coaxial digital audio output of a
source device to the COAXIAL jack (14). You will need
a coaxial cable with RCA plugs to do so.
AUX 1, 2 and 3
You can connect source devices with analogue audio
to the jacks (15) and (16). The AUX 3 jacks (15) are
RCA jacks for connecting e.g. a cassette or tape
recorder. The AUX 1 and AUX 2 jacks are each 3.5 mm
jack plugs for connecting e.g. an MP3 player.
Outputs
Speaker outputs
The CoreStation has power amplifiers for 5 speak-
ers – only the active subwoofer is connected via RCA
cable or radio signal.
If possible, use high-quality, twin-core speaker single
wire with a diameter of at least 1 mm2to connect the
speakers. You can order such cables in our webshop
(www.teufelaudio.com) in the “Accessories” area.
Connect the speakers to the SPEAKER OUT connector
terminal (10). The system plug and the SPEAKER
SYSTEM PLUG connector (9) are only intended for
commercial applications.
NOTE
To avoid damage to the device, never use both connec-
tors (9) and (10) at the same time!
Connect the speakers as follows to the SPEAKER OUT
connector terminal (10):
FRONT LEFT/RIGHT Front left/right channels
CENTER Mid-channel
SURR. LEFT/RIGHT Rear left/right channels
The terminals are each marked red (+) and black (-).
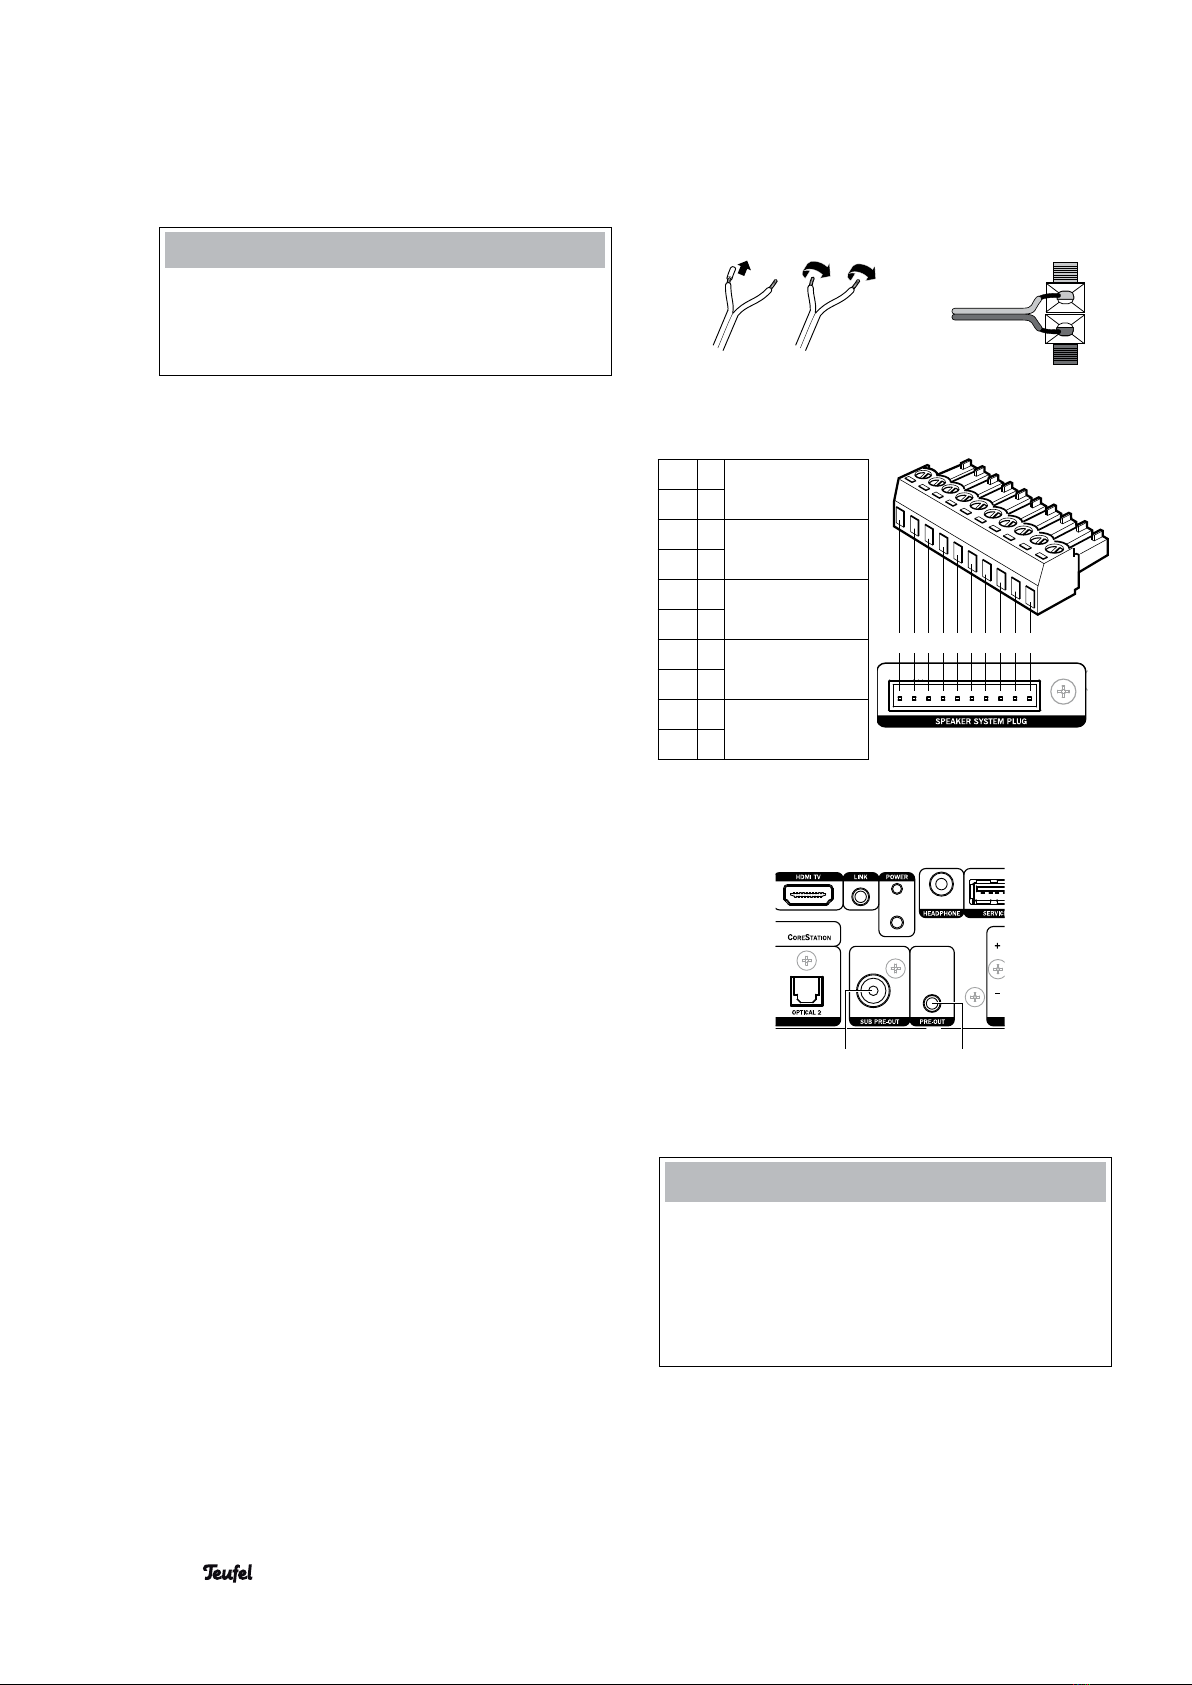
1 2 3 4 5 6 7 8 910
1+
Front left chan-
nel
2–
3+
Front right chan-
nel
4–
5+
Mid-channel
6–
7+
Rear left chan-
nel
8–
9+
Rear right chan-
nel
10 –
1112
14 • CoreStation
NOTE
Make sure the polarity is correct!
Connect the like coloured terminals. Otherwise, the
sound quality will suffer. The strands of the speaker
cables are marked with different colours or shapes.
• Split the single wire down to approximately 30 mm
and remove approximately 10 mm of the insulation
on each strand. Twist the single wire so that no
strands are protruding. Tin coating is not neces-
sary.
• Push down the respective clamp lever and insert
the end of the cable in the corresponding opening.
Releasing the lever will clamp the cable in place.
Use the system plug to connect the speakers ac-
cording to the table:
• Split the single wire down to approximately 20 mm
and remove approximately 6 – 7 mm of the insu-
lation from each strand. Twist the single wire so
that no strands are protruding. Tin coating is not
necessary.
• Insert the cable end in the corresponding opening
and screw it in place.
• Once you have connected all cables, push the sys-
tem plug into the SPEAKER SYSTEM PLUG jack
(9) up to the stop.
Subwoofer
You can connect an active subwoofer to the SUB PRE
OUT jack (12) with an RCA cable.
If you use an active subwoofer with a radio connec-
tion, activate the connection in the
“System Setup”
menu (see “Wireless” on page 21).
Pre Out
You can set the function of the analogue PRE OUT out-
put (11) in the “System Setup” menu (see “3.1/5.1”
on page 22):
3.1 mode: Convert the 5.1 audio signal to 2 stereo
channels (2.0) (downmix), e.g. for relay-
ing the audio signal to a second room.
5.1 mode Output of the rear channels (surround
channels).
NOTE
You can connect an amplifier or active speaker
set, but also a wireless transmission system (e.g.
Teufel RearStation 4) to these jacks. You will need
a stereo cable with a 3.5 mm jack plug to do so
.
You can purchase accessory cables directly via
www.teufelaudio.com.

15• CoreStation
TV set
Connect your TV set or your video projector to the
HDMI TV jack (3). You will need a HDMI cable for this.
If your TV set does not transfer audio via HDMI ARC,
you can assign one of the audio inputs of the CoreSt-
ation to the TV set in the “Audio Mapping” menu (see
page 20).
The functions CEC and ARC are deactivated to save
energy when the product is delivered. If necessary,
please activate these functions via the menu (see
“HDMI” on page 21).
Headphones
You can connect Stereo headphones to the HEAD-
PHONE jack (7) with a 3.5 mm jack.
The speakers and the outputs of the power amplifiers
(11) and (12) will be automatically deactivated when
you connect the headphones.
WARNING
Risk of injury/damage!
Lower the volume before you pull out the headphone
plug out again; otherwise, the speakers may un-
expectedly “blare out” very loud sound. This could
injure your hearing or damage the device.
Connecting to power
1. Make sure that your active subwoofer and/or the
active speakers are switched off.
2. Insert the IEC power plug of the mains cable into
the jack (1).
3. Insert the mains plug into a mains power socket
(230 V ~ / 50 Hz).
73
1112
1

28
31
16 • CoreStation
WARNING
Batteries (particularly lithium batteries) can explode
if used improperly.
• Never attempt to charge the battery.
• Only insert a battery of the same or an equivalent
type (CR2025H or CR2032H button cell).
• You may not heat or short circuit batteries and
storage batteries or dispose of them in fire.
• Do not expose batteries and storage batteries to
direct sunlight.
WARNING
Swallowing the product battery may result in severe
internal injury or even death.
• Store both new and used batteries so that they
are not accessible to children.
• If it is no longer possible to safely close the
battery compartment, stop using the product and
store it so that it is not accessible for children.
• If you suspect that a battery has been swallowed
or otherwise incorporated, promptly consult a
physician.
Leaking battery acid may lead to chemical burns.
• Do not allow battery acid to come into contact
with skin, eyes or mucus membranes. In the
event of contact with acid, immediately flush the
applicable areas with plenty of clean water and
consult a physician if necessary.
Remote control
Inserting/changing the battery
You should change the battery, if the remote control
stops working properly or after 2 years at the latest.
Battery type: CR2025H or CR2032H button cell.
1. Remove the two screws on the battery compart-
ment.
2. Pull the battery compartment out of the remote
control.
3. Remove the old battery and insert the new one with
the positive pole +facing down into the battery
compartment. Observe the notes for disposing the
old battery on page 6.
4. Push the battery compartment back into the remote
control and tighten the two screws.
Functionality
The remote control transmits radio control signals
and has a range of approximately 10 metres. Objects,
walls and other wireless signal sources (e.g. phones,
Wi-Fi) may restrict the range.
As the control signals are transmitted wirelessly, the
remote control does not have to be pointed at the
CoreStation; the CoreStation can also be mounted in
a concealed location behind the TV or in a cabinet.
If the CoreStation receives commands from the re-
mote control, the function LED (19) on the main unit
will quickly blink in white.
Pairing the remote control
The remote control must be paired with the CoreSta-
tion before you can use it.
For this, hold the remote control close to the CoreSt-
ation and push the special function buttons “1” and
“4” (28) until the indicator LED (31) blinks three
times.
If the indicator LED (31) blinks ten times, an error has
occurred. Repeat the process.
Note: The LED (31) on the remote control only lights
up after it has been paired with the CoreStation.

32
27
28
19
256
17• CoreStation
Basic functions
Activating and deactivating
• You can switch the CoreStation on by briefly push-
ing the button (6) on the back of the device or
(32).
The function LED (19) will briefly light up in white
during start-up.
• You can switch the CoreStation to standby by
pushing and holding the button (6) or (32) for
approximately one second. The LED POWER (5) will
continuously light up in red during standby.
• If the TV that is connected via HDMI is CEC-capable,
the CoreStation will be switched on and to standby
together with the TV set (see “CEC” on page 21).
• If a CEC-capable HDMI device is connected to one
of the HDMI IN connections (2), the CoreStation
and the TV set will also be activated when the
HDMI device is turned on.
• If the CoreStation does not receive any signal for
more than 30 or 60 minutes, it will automatically
switch to standby (see “Auto-off” on page 21).
In standby the function LED (19) will illuminate in red.
The CoreStation is not disconnected from the mains
in standby mode. Pull the mains plug out of the mains
socket to completely deactivate it.
Selecting a source
Use the buttons (27) on the remote control to select
the most important source devices:
• TV TV set
• BT Bluetooth device (see page 23)
• FM Radio mode
You can use the special function buttons (28) to
select the other sources; the buttons are assigned as
follows by default:
But-
ton
Push 1 x Push 2 x
AV HDMI 1 HDMI 2
1 AUX 1 AUX 2
2 OPTICAL 1 OPTICAL 2
3 COAX AUX 3
4 HDMI 3 HDMI 4
You can change the assignment of the buttons (28) in
the “Special Function Buttons” menu (see page 21).

30
29
20
21
22
25
19
18 • CoreStation
Setting the volume
You can change the volume with the VOLUME +/– but-
tons (21).
Mute
By pushing the button (20), you can turn the sound
off and on again.
During muting, the power LED (19) will slowly pulse in
white and the message “Mute: On” will appear on the
connected TV set.
Adjusting the sound
Use the SOUND button (25) to adjust the sound.
1. Select the desired frequency range by repeatedly
pushing the SOUND button (25):
• Bass – low tones
• Treble – high tones
2. Use the set buttons ▲/▼(22) to adjust the select-
ed frequency band from “–10” (decrease) to “+10”
(increase).
3. Finish the setting with the EXIT button (30).
Surround mode selection
Use the MODE button (29) to toggle the surround
mode for stereo sources in this order:
2.1 Stereo Stereo only via front left/right
and subwoofer
5.1 Stereo Stereo via all channels (up-
mix)
Dolby PLII Movie Dolby ProLogic II for movies
Dolby PLII Music Dolby ProLogic II for music
Dolby Digital and DTS
Surround mode is locked for the playback of Dolby
Digital or DTS-coded multichannel tracks; thus the
MODE button (29) is not functional when such signals
are present.
19• CoreStation
Operate functions of the CoreStation via the main
menu. To use the menu:
1. Switch the CoreStation and your TV on.
2. On the TV set, select the CoreStation as a source.
3. Push the MENU button (24).
The main menu will appear on the connected TV
set.
4. Select the desired submenu with the set buttons
▲/▼(22).
5. Push the • button (23).
The submenu will open and you can select the next
submenu or change the values with the set buttons
▲/▼(22).
6. You accept the setting by briefly pushing the •
button (23).
• With the EXIT button (30) you end or abort the
respective function.
• Push the MENU button (24) to leave the menu at
any time.
• With the TOOLS button (26) you can access the
system configuration menu directly.
30
22
23
24
26
If the menu is in German, you can switch the language
for the screen menu to English as follows:
1. Push the TOOLS button (26).
2. Select the item “D/E”.
3. Select the item “English”.
The onscreen menu will now switch to English.
4. Push the MENU button (24).
The menu will disappear.
In the following sections, the English menu title will
be specified followed by the German menu title in
brackets.
Menu functions
“Tuner” menu
This menu is only available in radio mode (FM).
Presets
Here, you can switch the station memory slots with
the set buttons ▲/▼(22).
Frequency
To set the tuning frequency, push the set buttons
▲/▼(22) to scan through the stations in the desired
direction; the scan will stop as soon as a station with
sufficient signal strength is found.
Mode
With stereo stations with a weak signal, a bothersome
noise may be heard; you can eliminate it by switching
to mono.
Auto Stereo If there is sufficient signal strength,
the device will automatically switch to
stereo.
Mono Continuous mono reception.
Memory Store
Current Frequency
Will save the current station to the next free station
memory slot.
APS
With this, you can automatically scan through the
FM frequency and store all available stations to the
station memory slots. Respond to the prompt “OK?”
by briefly pushing the • button (23). The device will
automatically save the first 30 stations. Already occu-
pied memory slots will be deleted in the process.
Memory Erase
• Select “Current Slot?” to erase only the currently
selected station memory slot.
• Select “All Slots” to erase all station memory slots.
Push the • button (23) to erase or the EXIT button
(30) to cancel.
20 • CoreStation
“Surround” menu
Use the set keys ▲/▼(22) to toggle surround mode
for stereo sources in the following order:
2.1 Stereo Stereo only via front left/right
and subwoofer
5.1 Stereo Stereo via all channels (up-
mix)
Dolby PLII Movie Dolby ProLogic II for movies
Dolby PLII Music Dolby ProLogic II for music
Dolby Digital and DTS
Surround mode is predefined for playback of Dolby
Digital or DTS coded multi-channel audio tracks; thus
when playing back such audio formats this menu is
disabled.
“Tone Control” menu
TONE
Here you can set the sound (high tones and bass
tones). Possible values: from –10 dB (decrease) to
+10 dB (increase).
Mode
Dynamic Comp.
Dynamic compensation regulates volume differences
between individual tracks on CDs or other digital au-
dio sources and ensures that playback is neither too
loud nor too quiet. Possible settings: On, Off, Auto.
Cinema EQ
This function reduces the level of high tones from the
original movie sound mix to perfectly adapt the sound
to the typical acoustics of a living room. Possible
setting: On or Off.
Equalizer
With this function, very fine adjustments within nine
frequency ranges are available. Possible values: from
–20 dB (decrease) to +6 dB (increase) each.
The “Reset” menu item resets all frequency bands for
the selected channel to zero (neutral).
Note: The equalizer is inactive with some high-defini-
tion formats.
“Speaker Levels” menu
Here, you can set the relative volume within a range
from “–10” (decrease) to “+10” (increase) for each
speaker.
The rear speakers (“Surr.”) are not available in 3.1
mode.
With “Test Sound”, you can activate and deactivate
pink noise as a neutral test sound.
“Source Levels” menu
Here, you can set the relative volume within a range
from “–10” (decrease) to “+10” (increase) for each
audio source.
“Audio Mapping” menu
Here, you can assign an audio output to each of the
four HDMI inputs and the TV set.
Example: You would like to connect a PC without
HDMI output. With a DVI to HDMI adapter, you trans-
mit the video signal while the audio signal is present
at one of the analogue inputs (AUX) via an RCA cable.
If the HDMI-ARC function is activated for the TV set,
the menu item “TV” will not be available.
“Speaker Setup” menu
Speaker Size
You can set the size of the speakers according to
your speaker system. There are five configurations to
choose from:
SSS1 All speakers are small,
subwoofer present.
LSS1 Large front speakers, small center and sur-
round speakers, subwoofer present.
LSS0 Large front speakers, small center and sur-
round speakers, no subwoofer.
LLL1 All speakers are large,
subwoofer present.
The letters represent the speakers: Front left/right,
center, surround left/right. In this context, S stands
for small and L for large speakers. The last number
stands for the subwoofer (1 = present, 0 = not pres-
ent).
In 3.1 mode, a 0 stands for “not present” concerning
surround (3rd position).
Table of contents
Other Teufel Stereo Receiver manuals


