Tevion DR2502 User manual

INSTRUCTION MANUAL
DVD Home Theatre System
DR2502

1
To ensure proper use of this product, please read this owner manual carefully and retain for future
reference. Should the unit require maintenance, contact an authorized service location.
SAFETY

2
IMPORTANT SAFETY INSTRUCTIONS
WARNING! Do not remove any cover.
WARNING! No objects filled with liquid, such as vases, shall be placed on this equipment or in any position where
liquid may fall into this equipment or any other electrical apparatus.
WARNING! Do not insert any objects into any openings of this equipment or any other electrical apparatus.
WARNING! Do not use this apparatus near water. To avoid the risk of fire or electric shock, do not expose this
apparatus to rain or moisture. The apparatus shall not be exposed to dripping or splashes and is strictly for indoor use
only.
WARNING! Do not immerse in any liquid whilst in use or cleaning. Clean only with a damp cloth, dry with a dry towel.
Do not use harsh abrasives as these may damage the plastic parts.
WARNING! DO NOT block any ventilation openings. Keep away from curtains, newspapers and restricted areas.
Install in accordance with any specific manufacturer’s instructions. Always allow a sufficient gap around the
apparatus to avoid overheating.
WARNING! Do not install near any heat sources such as radiators, gas heaters, stoves or other apparatus (including
amplifiers) that produce heat. Do not leave in direct sunlight.
WARNING! Do not place any naked flame source, such as lighted candles on any electrical apparatus.
WARNING! Connect to a suitable 230-240 ~ 50 Hz power supply only.
WARNING! Keep out of reach of young children. This apparatus is not suitable for use by young children or infirm
persons without supervision. Young children must be supervised to ensure that they do not play with the apparatus.
Ensure young children have enough knowledge to operate the equipment safely if they do have access to this
equipment.
WARNING! Do not abuse or damage a power cord. If any power cord is damaged, it must be replaced by the
manufacturer, its service agent or a similarly qualified person in order to avoid a hazard. A replaceable cord must be
replaced with an authorised replacement from an authorised service agent only.
WARNING! Only use attachments/accessories specified by the manufacturer.
WARNING! Unplug this apparatus completely from the power source during lightening storms or when unused for
long periods of time.
WARNING! Attention is drawn to the environmental aspects of disposing of any battery.
WARNING! Refer all servicing to qualified personnel. Servicing is required when the apparatus has been damaged
in any way, such as when the power supply cord or plug is damaged, liquid has been spilled or objects have fallen
into the apparatus, the apparatus has been exposed to rain or moisture, does not operate normally, or has been
dropped.
WARNING! For household use only, this apparatus is not intended for commercial use.
WARNING! If this apparatus is to be used by a third party, please supply these instructions with it.
WARNING! No liability will be accepted for any personal injury or damage caused by failure to follow these
instructions.

3
INTRODUCTION
Safety ............................................................................................................................................................................ 1
Important Safety Instructions ...................................................................................................................................... 2
Content........................................................................................................................................................................... 3
Package ......................................................................................................................................................................... 3
Player Zones, Anti-copy Disc Protection .................................................................................................................. 4
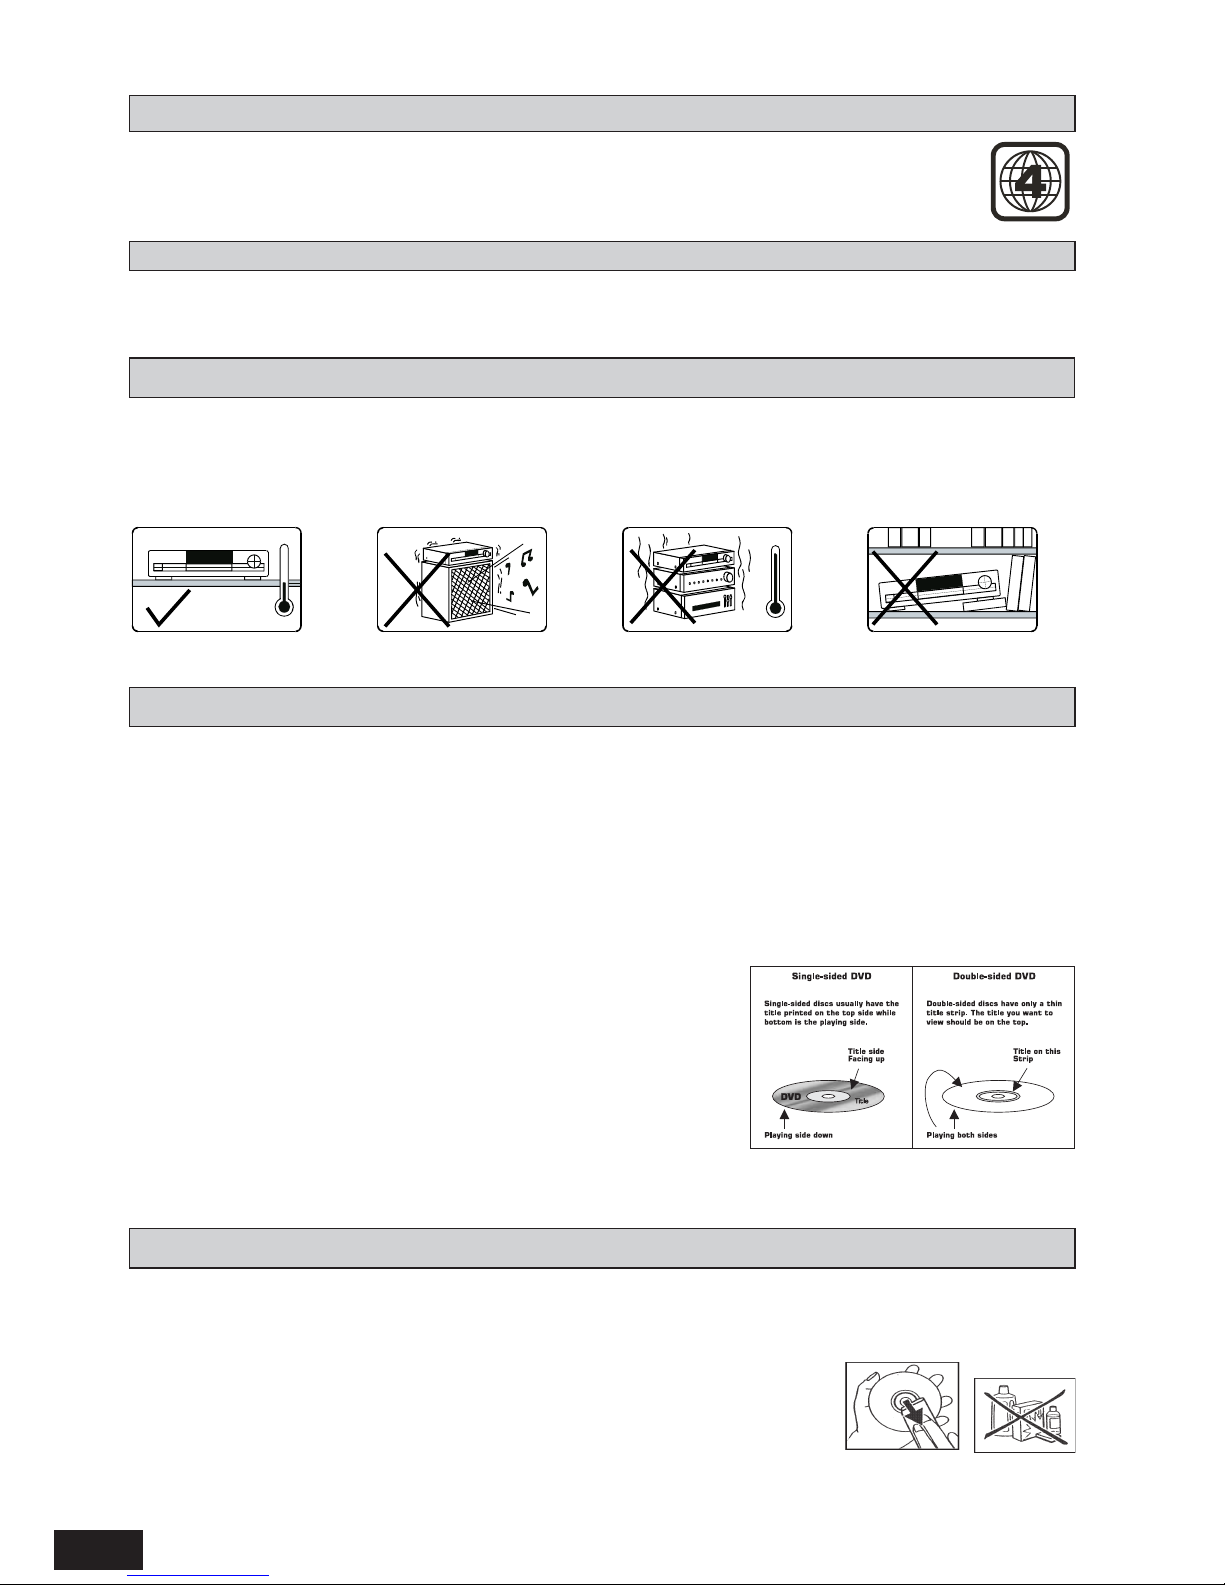
Installation ...................................................................................................................................................................... 4
DVD Discs, Cleaning DVD Discs............................................................................................................................... 4
Remote Control ............................................................................................................................................................. 5
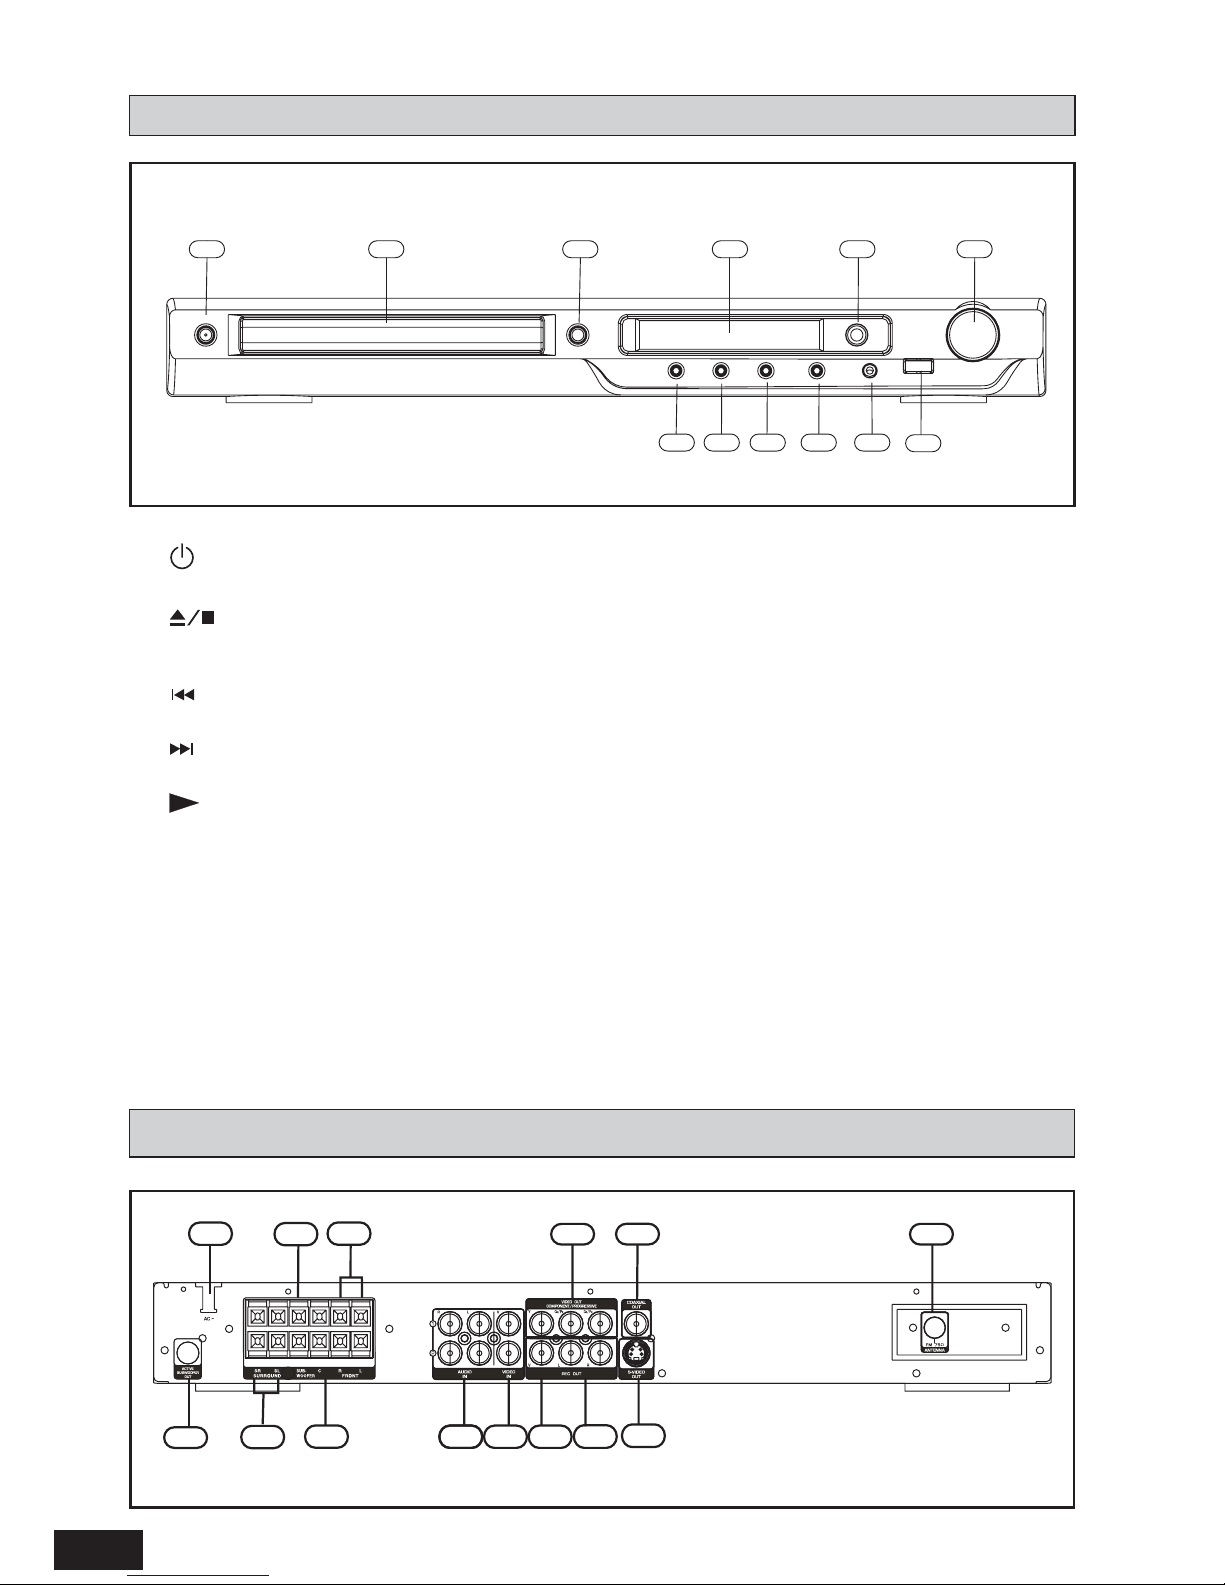
Front Panel ..................................................................................................................................................................... 6
Rear Panel...................................................................................................................................................................... 6
INSTALLATION CONNECTIONS
Speaker Connections .................................................................................................................................................... 8
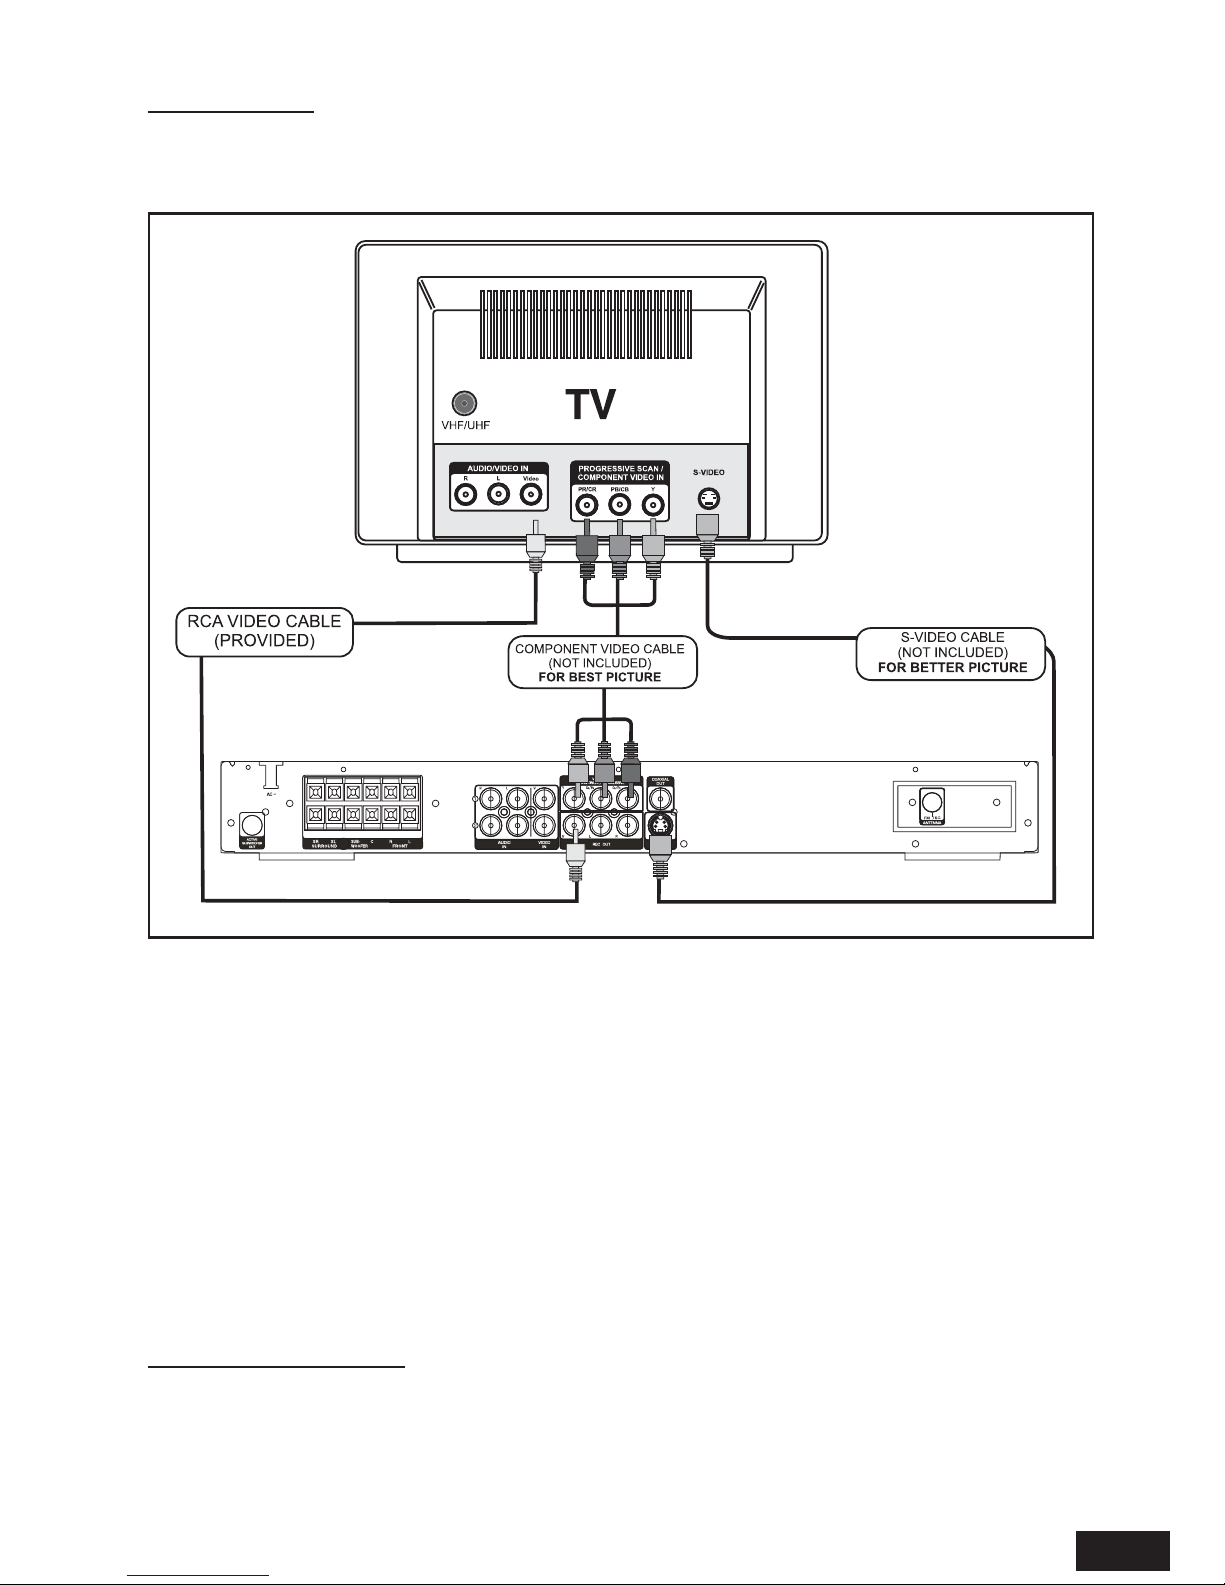
Connecting TV ............................................................................................................................................................... 9
Connecting Additional Device ....................................................................................................................................... 1 0
Speaker Placement ....................................................................................................................................................... 1 1
Getting Started............................................................................................................................................................... 1 1
BASIC SETUP
Basic Operation.............................................................................................................................................................. 1 2
System Setup................................................................................................................................................................ 1 2
Language Setup ............................................................................................................................................................. 1 3
Audio Setup .................................................................................................................................................................... 1 4
Video Setup .................................................................................................................................................................... 1 5
Speaker Setup ............................................................................................................................................................... 1 6
PLAYING A DISC
Playing DVD/CD/VCD Disc ......................................................................................................................................... 1 7
Advanced Playback Function ....................................................................................................................................... 1 9
Playing MP3/JPEG/MPEG 4 ......................................................................................................................................... 2 3
Listening to the raido.................................................................................................................................................... 2 5
TROUBLESHOOTING
Playable Discs.............................................................................................................................................................. 2 6
Problems? ...................................................................................................................................................................... 2 8
Specification ................................................................................................................................................................. 2 9
CONTENT
PACKAGE
Consumers should note that not all high definition television sets are fully compatible
with this product and may cause artifacts to be displayed in the picture. In case of
525 or 625 Progressive Scan picture problems, it is recommended that the user
switch the connection to the “standard definition” output. If there are questions
regarding our TV set compatibility with this model 525p and 625p DVD player,
please contact our customer service centre.
This product incorporates copyright protection technology that is protected by method
claims of certain U.S. patents and other intellectual property rights owned by
Macrovision Corporation and other rights owners. Use of this copyright protection
technology must be authorized by Macrovision Corporation, and is intended for home
and other limited viewing uses only unless otherwise authorized by Macrovision
Corporation. Reverse engineering or disassembly is prohibited.
Manufactured under license from Dolby Laboratories. “Dolby”, “Pro Logic” and the
double-D symbol are trademarks of Dolby Laboratories.
U.S. Patent Nos. 4,631,603; 4,819,098; 4,907,093; 5,315,448;and 6,516,132.
Examine the contents of the box for your DVD Home theatre. There should be the following:
• DVD Home Theatre System with attached power cord
• Remote Control
• 2 AAA batteries
• Instruction Manual
• AV Cable
• 2 Rear Speaker Stands
• FM antenna
• Subwoofer with wire
• 2 Front speakers with wire
• Centre speaker with wire
• 2 Rear speakers with wire
NOTE:
ThisequipmenthasbeentestedandfoundtocomplywiththelimitsforaClassBdigitaldevice,pursuanttopart15oftheFCCRules.Theselimits
aredesignedtoprovidereasonableprotectionagainstharmfulinterferenceinaresidentialinstallation.Thisequipmentgenerates,usesandcan
radiateradiofrequency energy and, ifnotinstalledand used in accordancewiththeinstructions, may cause harmfulinterferencetoradio
communications.However,thereisnoguaranteethatinterferencewillnotoccurinaparticularinstallation.Ifthisequipment doescauseharmful
interferencetoradioortelevisionreception,whichcanbedeterminedbyturningtheequipmentoffandon,theuserisencouragedtotrytocorrect
theinterferencebyoneormoreof thefollowing measures:
—Reorient orrelocatethereceivingantenna.
—Increasetheseparationbetweentheequipmentandreceiver.
—Connecttheequipmenttoasupplyoutletdifferentfromthattowhichthereceiverisconnected.
—Consult thedealeror anexperiencedradio/TVtechnicianfor help.

4
Some DVD discs have been protected by Macrovision. With these discs the playback on a Television are copyright
protected, however you will not be able to record this signal on a VCR.
Install your unit on a stable flat surface. There must be sufficient room in front of the unit for the drawer to be opened
and the unit should be positioned so that it can see the remote control.
Do not expose your unit to extremes of temperature or humidity. Avoid standing it on a hot surface such as on top
of other hot running equipment and ensure that there is adequate ventilation to the unit.
* Caution: Do not install this equipment in a confined space such as a book case or similar unit!
ANTI-COPY DISC PROTECTION
INSTALLATION
DVD DISCS
There are several types of DVD Disc.
Single sided discs. They play for approximately 2HOURS
Single sided two layer discs. They play for approximately 4HOURS
Double sided discs. They play for approximately 4HOURS
Double sided with 2 layers on both sides. They play for approximately 8HOURS
DVD discs have Titles and Chapters. There can be several Titles on one disc and each Title can contain several
Chapters. Titles and Chapters are numbered, e.g. Title 1, Title 2 etc. & Chapter 1,2,3 etc.
Usually Title one will show the disc publisher and studio logos. The next Title will be the film. Other Titles contain
trailers for other films, production notes, or alternative endings for the
film. There are many possibilities with Digital Versatile Discs. Chapters
within the main Title allow you to search quickly for a specific point on the
disc. Many discs have a Chapter Menu sometimes called Scene Index or
Scene Menu that displays the first shot from each Chapter, which allows
you to select a shot and play the disc from that point onwards. DVD discs
can be PAL or NTSC. This recorder can play both types (if the recorder
zone is correct). DVD discs allow up to 8 Languages and 32 subtitles on a
single disc. You can select and change the language and subtitle to suit
yourself and play the whole disc or just part of it and view it from different
angles.
DVD discs are programmed with region numbers indicating countries in which they can played. The
region number of this unit is 4. If the DVD disc is marked with a different region number, it cannot be
played on this unit.
PLAYER ZONES
CLEANING DVD DISCS
Picture freezing & sound skipping or repeating can occur if the disc inside the recorder is dirty.
• When a disc becomes dirty, clean it with a cleaning cloth. Wipe the disc from the centre out.
• Do not wipe in a circular motion. Circular scratches can cause picture distortion
or render the disc unplayable.
CAUTION - Do not use solvents, commercially viable cleaners, or antistatic spray
intended for analog discs.

5
REMOTE CONTROL
1. STANDBY/ON SwitchesunitbetweenOperating
and Standby mode.
2. GOTO Displays INFO Menu. Direct key in the
specific location on a disc to play.
3. BOOKMARK Opens Bookmark Menu.
4. V-SELECT Switches among the different video
outputs.
5. SUBTITLE Selects subtitle languages.
6. A-B Sets the repeat A-B playback, or clears the
programmed repeat playback.
7. PLAYMODE Displays Playmode Menu for
different play modes operation.
8. ZOOM/CLEAR 1) Selects different zoom sizes
by pressing this button repeatedly. 2) Clears the
information you input in other setup menus.
9. ANGLE/PBC 1) Selects viewing angles if present
on disc. 2) Turns PBC ON/OFF for VCD/SVCD
discs.
10. Skips backward / forward to the previous
or next chapter / track.
11. Stops playing.
12. Starts playing.
13. 1) Active Navigation Keys
navigate in indicated directions for
making selections in menus.
2) Tuning Keys (In Tuner Mode)
UP/DOWNto changeradiofrequencies.
LEFT/ RIGHTtochange radio channel.
14. DVD 1) Selects DVD mode. 2) If the USB device
is connected to the USB jack on the front panel,
press this button and use Active Navigation keys
to select USB mode.
15. TUNER/AV Toggles amongAV 1, AV 2 and Tuner
mode by pressing repeatedly.
16. SURROUND Selects different surround sound
effects among STEREO, PROLOGIC II MOVIE,
PROLOGIC II MUSIC, CONCERT, CHURCH,
PASSIVE, WIDE and LIVE.
Note: Surround Sound Effect (DSP) is available
only for STEREO contents (2 channels). DSP
cannot be selected while playing back a DVD with
multichannel audio content like Dolby Digital 5.1.
17. SLEEP Activates the sleep timer for the unit to
switch to standby mode automatically.
18. TONE Selects EQ modes among FLAT, ROCK,
POP, CLASSIC and JAZZ.
19. SETUP / EXIT Press to enter or exit the SYSTEM
SETUPMenu.
20. MENU Enters the Disc Contents Menu in DVD
mode or returns to the disc menu for VCD/SVCD
disc with PCB ON mode.
21. EX BASS Turns EX BASS to Soft Bass, Balance
Bass or Powerful Bass.
22. OK Confirms the selection and input.
23. Freezes picture and sound during playback.
24. Starts backward / forward search.
25. TITLE / ROTATE 1) Displays the Title Menu if
present on disc (DVD mode only).
2) Rotates picture when playing picture CDs.
26. - VOL + Increase or decrease the volume.
27. AUDIO/FM ST 1) Changes audio stream of disc.
2) Selects Mono / Stereo in Tuner mode.
28. INFO Displays current setting information of the
playing disc.
29. 0 - 9 (Numeric Keys) 1) In DVD mode, they are
used for direct key in selections of title, chapter,
track and time search input. 2) In tuner mode,
they are used to direct key in a preset station.
30. OPEN/CLOSE Opens or closes the disc tray.
31. MUTE Mutes and unmutes the sound output
from the speakers.
1
2
3
4
5
6
7
10
13
16
17
15
14
8
9
11
12
27
18
19
21
20
22
24
23
25
28
26
30
31
29

6
REAR PANEL
FRONT PANEL
4
6
1 2 3 5
79
810
12
11
1. STANDBY/ON - press to turn your home theatre on or to standby mode.
2. Disc Tray - place a DVD or CD, label side up, into this tray.
3. - opens or closes the disc loading tray in Stop or No Disc mode; Stops playing.
4. VFD Display Area - displays status messages.
5. Infra-Red Receiver - receives the signal from the remote control.
6. 1) press to skip to the previous chapter/track in DVD mode.
2) Skips to the previous FM preset channel number in tuner mode.
7. 1) press to skip to the next chapter/track in DVD mode.
2) Skips to the next FM preset channel number in tuner mode.
8. PLAY 1) Starts playing in DVD/CD mode. 2) Saves a preset channel in tuner mode.
9. SOURCE - Switches between AUX1, AUX2, Tuner mode and DVD mode.
10. PHONES - plug standard headphones into this jack.
11. USB Jack - plug standard USB device into this jack.
12. VOLUME Adjust the master volume. Turn clockwise to increase the volume and counter-clockwise to
decrease the volume.
Warning: excessive sound pressure from earphones and headphones can cause hearing loss.
13
7
1
235
6
48
10
14
11
12
9

7
IMPORTANT!
Connect the AC cord only after the speakers, antenna and all optional equipment have been connected.
Never make or change any connections with the power switched on.
The rating plate is located at the rear panel of the system.
1. FM Antenna Input Connections
For FM reception, connect the FM antenna to the FM jack. Move the antenna in various directions until the
clearest signal is received.
Note: Position the antenna as far away as possible from a TV, VCR or other radiation source.
2. Audio inputs
Connect audio (Left and Right) cables from a VCR, TV or satellite receiver to play them through this home
theatre system. These connections are labelled AUX1 and AUX2 and are selected by using the SOURCE
button on the front panel or TUNER/AUX button on the remote control.
3. Video inputs
Connect video cables from the corresponding video output jacks on a TV, VCR, or satellite receiver to play
them through this home theatre system. These connections are labelled AUX1 and AUX2 and are selected by
using the SOURCE button on the front panel or TUNER/AUX button on the remote control.
4. Video output - REC
Connect to the Video Input of a television or you can also connect a VCR or other recording device to this
jack. Most DVDs cannot be recorded, however you can use this connection to record from the auxiliary
inputs such as recording from the satellite receiver.
5. Audio outputs - REC
Connect to the Audio Input of a television or you can also connect audio (Left and Right) cables to external
recording devices such as a VCR or cassette recorder.
6. Component video and progressive outputs
Connect a television that has component video input. Use a component video cable (not supplied).
7. Digital coaxial output
Connect an external device that has a digital audio input jack.
8. S - Video output
Connect to the S-VIDEO IN jack on the television using an S-Video cable. This type of connection provides
superior picture quality to the Composite (yellow) Video Output.
Note: Your television must be equipped with an S-Video input jack.
9. Surround speaker
Connect the left surround speaker to the SL terminals and right surround speaker to the SR terminasl.
Connect the coloured wire to the same coloured terminal and black wire to the black terminal.
10. Subwoofer speaker
Connect the supplied (passive) subwoofer, with the coloured wire attached to the purple terminal and the
black wire attached to the black terminal.
11. Centre speaker
Connect the centre speaker, with the coloured wire attached to the green terminal and the black wire attached
to the black terminal.
12. Front speaker
Connect the left front speaker to the Lterminals and right front speaker to the Rterminals. Connect the
coloured wire to the same coloured terminal and black wire to the black terminal.
13. Active subwoofer out
If connecting an active subwoofer (not supplied) connect to this socket.
14. Power Cord
Plug into a household electrical outlet corresponding to the voltage listed on the Rating Label.

8
CONNECTIONS
The following connections show the different video and audio connections to TV, VCR or CD Recorder.
Important : Make sure that the AC Voltage matches your local voltage.
Connect the AC cord only after the speakers, antenna, and all optional equipment have been connected.
(1) Speaker Connections
Note:
–This DVD Receiver is designed to reproduce optimum sound quality when the supplied speakers are used. If
you wish to connect other speakers to the system instead of the supplied speakers, they should be 6 ohms
impedance for the speakers, and 3 ohms impedance for the subwoofer.
–Ensure correct polarity when connecting speakers (coloured wire for matched colour terminal clip).
–To prevent damage to circuits, never short-circuit the positive and negative speaker output terminals.
Press the speaker terminal clip down and insert the wire, then release the clip.
Connect all speakers in the same manner.
Note:
• Do not remove excessive amount of insulation on the wire cords, to avoid the stripped portion from touching
each other. The optimal length for the stripped part should be around 1/3 inch (or 1cm).
• Do not push the stripped part too far into the speaker connectors.
• Do not connect more than one speaker to any one pair of speaker terminals.
• Do not connect speakers with an impedance lower than the speakers supplied.
1
FRONT LEFT
SPEAKER
2
FRONT RIGHT
SPEAKER
4
SURROUND
LEFT SPEAKER (Rear)
5
SURROUND
RIGHT SPEAKER (Rear)
3
CENTRE
SPEAKER (Front)
SUBWOOFER
(Can be placed
anywhere in the room)
Coloured Wire
Black Wire

9
– If your TV has only a single video input jack, typically a yellow-coloured socket, you will use the composite
video output of your DVD Home Theatre for the video connection.
Use the RCA Video Cable (yellow-provided) to connect the VIDEO OUTPUT jack of this unit to Video In jack
of your TV.
– If your TV has an S-Video input, it is recommended that you use this video connection. The S-Video
connector is distinguishable by its 4 pins. S-Video separates brightness and colour signals, resulting in a
higher video quality than standard composite video.
Use the S-Video Cable (not included) to connect the S-VIDEO OUT jack of DVD receiver to S-Video Input
jack of your TV.
– If your TV has component video-in jacks, you can optionally connect your DVD receiver to the TV using the
component video-in jacks. The advantage here is an optimal picture quality.
Use the component video cables (not included) to connect Y Cb/Pb Cr/Pr jacks at the back of the DVD
receiver to the corresponding component video jacks on the TV .
Notes on Progressive Scan:
1. The Progressive scan video quality is only possible when using Y Pb Pr (Component Video) and a progressive
scan TV is required.
2. Once connected, press V-SELECT to select “P-SCAN YPBPR” to activate the feature.
3. Your TV may need adjustment to accept Progressive Scan video.
(2) Connecting TV
IMPORTANT!
--You only need to make one video connection from the following options, depending on the capabilities of your TV.
--S-Video or Component video connection provides higher picture quality. These options must be available on your
TV.

10
(3) Connecting Additional Devices
This allows you to connect your DVD Receiver to other additional devices and view or record their outputs.
1. Listening to the Playback
To listen to the sound from your VCR, TV or Satellite Receiver through the speakers of this unit, only connect
the Left / Right audio output of these equipments to the Left / Right audio input jack of this unit.
2. Record DVD Playback
• To record the sound of your DVD, connect this units audio Left / Right output jacks to the audio Left / Right
input jacks on the VCR or Tape Recorder.
• To record the video of your DVD, connect this units video output jack to the video input jack on the VCR or
Tape Recorder.
3. If you have an external Dolby Digital or DTS decoder and desire to playback your DVD through the external
Dolby Digital or DTS decoder, only connect the digital coaxial output jack to the digital coaxial input jack of
your decoder. The digital coaxial audio connection cable is not included.
play
1
2
3
Video cable
VCR, TV or Satellite Receiver
Record
Video cable
Audio cable
Audio cable
Digital coaxial Audio cable
VCR or Tape Recorder

11
Placement of speakers plays an important role in the reproduction
of surround sound effect.
Particular attention should be taken when designing the speaker
layout.For thebestsurround effects,all speakersshould beinstalled.
1) Please place the front left and right speakers to the left hand
side and right hand side of your TV.
2) Place the centre speaker above the TV so that the centre
channel sound is localised.
3) Place the surround left and surround right speakers in line
with your listening position or behind your listening position.
Ideally they should be placed slightly above your ear level
while you sit in your normal listening location.
4) The subwoofer can be installed for powerful bass sounds
when it is placed on the floor. Place the subwoofer on the
floor near the TV.
5) All speakers should approximately be at the same distance
from your listening position and must be visible.
SPEAKER PLACEMENT
GETTING STARTTED
Before Beginning
• Finish the connection for the DVD Home Theatre System as shown in the previous section.
• Connect Power to the DVD Home Theatre System.
• Turn on the TV and set to the correct video-in channel.
• Insert the batteries in the remote control.
Start Playback
• Press the key (either on the unit front panel or the remote control). The unit VFD display should light.
After a few seconds the panel will show [NO DISC].
• Press on the front panel or on the remote control. The disc tray will open. Place a DVD in the disc
tray and press on the front panel or on the remote control (same as disc tray open operation). The
disc tray will be closed. The unit will start reading the disc and start playing it. Before the movie starts to
play, a menu will be displayed. You need to select the item [PLAY MOVIE] and press OK to start the movie
playback.
• Although you can watch a movie immediately, to get the best result from this unit, you are suggested to
proceed for the Basic setup options first. Detailed description is on the following pages. This will set up all
the functions on your unit. You only need to do it once when you first install your Home Theatre System.
TV
Front
speaker
(left)
Front
speaker
( right )
VIEWING AREA
Subwoofer
Centre Speaker
Rear speaker
( right surround )
Rear speaker
( left surround )
TV
Front
speaker
( left )
Front
speaker
( right )
DIM L
Subwoofer
Centre Speaker
Rear speaker
( right surround )
Rear speaker
( left surround )
DIM C
DIM R
DIM RSDIM LS

12
1. Press SETUP / EXIT button on the remote control to enter the
System Setup Menu in stop mode. To exit the System Setup
Menu, press SETUP / EXIT again.
2. Press or to navigate different Setup Menus: System
Setup, Language Setup, Audio Setup, Video Setup or Speaker
Setup.
3. When any Setup Menu is highlighted, use or to select
different items under the setup menu. Then different options
for each item will appear on the right column.
4. Use the or OK to enter into the right column. Then use
or to select a new setting. Press OK to confirm the new
setting.
5. Repeat steps 2 to 4 to change the other settings. For details,
please refer to the corresponding chapters under Setting
Details Section described below.
6. If you have finished the changes, highlight the selection EXIT
SETUP and press OK.
-OR-
Press SETUP / EXIT again to exit Setup Menu.
1. SYSTEM SETUP
1.1 SCREEN SAVER
Use this setting to turn the screen saver option ON or OFF. If you
turn the screen saver ON, the screen saver image appears when
you leave the system in pause or stop mode more than 5 minutes.
This saver can protect the TV screen from being damaged.
BASIC SETUP
This chapter explains how to use the SETUP MENU to adjust various functions and controls. We have preset all of
the functions and controls of this system at our factory to the preferred setting for this system to be used. In most
cases the original default setting should not be changed.
However you may want to change certain default setting such as the language for the audio, the on screen displays,
the subtitles, the parental control level, etc. Follow the instruction in this chapter to change these settings.
At the same time, proper setup of the unit will let you enjoy better sound and picture quality as well as many useful
features. When the selected setup menu is opened, use the Active Navigation keys to “highlight” one of the settings
on the setup menu. The options for the ”highlight” setting will appear in the right column. One of those options will
already be “highlighted” . This is the factory default setting.
Note: If the disc loaded does not have this units default option then the discs own default setting should be used.
Basic Operation
Setting Details
SYSTEM SETUP
SCREEN SAVER
PASSWORD
RATING
SOURCE
EXIT SETUP
SYSTEM SETUP
PASSWORD OFF
RATING
SOURCE
EXIT SETUP
SCREEN SAVER ON

13
1.2 PASSWORD and RATING
Many DVD movie discs contain Motion Picture Assertion rating
codes. This Home Theatre System will recognize the codes on
these discs. The unit provides a method for you to prevent children
from viewing films that are not suitable or objectionable.
1 Kid safe: Suitable for all audiences
2 G: Suitable for general audiences
3 PG: Parental guidance suggested
4 PG13: Parental guidance suggested, unsuitable for
children under 13
5 PG-R: Parental guidance recommended - implications
or very brief discreet language or situations
6 R: Restricted - violence, adult language and situation
unsuitable for young viewers
7 NC 17: Adult theme or content, not suitable for children
under 17
8 Adult: Adult themes, language and nudity. No parental
control.
1. In SYSTEM SETUP menu, press or to highlight Rating,
then press .
2. Press or to highlight a rating level for the disc inserted
and press OK.
3. Press or to highlight Password and press OK. Use the
numeric key (0-9) to enter the four-digit password.
If you make a mistake before pressing OK, press the CLEAR
button and enter your 4-digit security code again.
DVD discs that are rated above the level you selected will not play
unless you enter the correct four-digit password.
Indicates Parental lock is NOT active.
The Parental lock is active.
Note:
•The rating levels are only functional when the parental lock is
active.
•The rating levels can only be changed when the parental lock
is not active.
1.3SOURCE
Select the source files that you want to play between Disc and
USB. To access files in the USB device, make sure your USB
device is connected to the USB jack on the front panel.
Note:
•This unit can not support NTFS format. If the USB flash drive
does not work on it, please check the USB flash drive file
system and format it with FAT or FAT 32.
•Not all MPEG 4 files can be played through the USB jack due
to the limited transmission speed.
2. LANGUAGE SETUP
You can select different languages for the On Screen Display
(OSD) shown on the TV screen. You can also select different
languages for Audio, Subtitle and Disc menu which are recorded on
the DVD disc.
OSD LANG: Select the Setup Menu language.
AUDIO LANG: Select the audible language to play.
SUBTITLE LANG: Select the subtitle displayed on the TV screen.
DISC MENU: Select the disc menu language.
Note:
If the selected language is not recorded on the disc, the disc’s
default language is selected automatically.
LANGUAGE SETUP
OSD LANG
AUDIO LANG
SUBTITLE LANG
DISC MENU
EXIT SETUP
SYSTEM SETUP
SCREEN SAVER
RATING
SOURCE
EXIT SETUP
PASSWORD ----
SYSTEM SETUP
SCREEN SAVER 1 KID SAFE
PASSWORD 2 G
3PG
SOURCE 4 PG13
5 PG-R
6R
7 NC-17
EXIT SETUP
RATING
8 ADULT
SYSTEM SETUP
SCREEN SAVER
PASSWORD
RATING
USB
EXIT SETUP
SOURCE DISC

14
3. AUDIO SETUP
3.1 VOLUME SETUP
•Once you select the Volume Setup and press OK, you will
hear the calibrating sound from the front left speaker for a
few seconds. Then this sound will move from speaker to
speaker as follows: Front Left -> Centre -> Front Right ->
Subwoofer -> Rear Right -> Rear Left. If the calibrating
sound is either too small or too loud, exit the Volume Setup
and then adjust the volume control until the calibrating sound
is clearer. Let the calibrating sound cycle through all the
speakers at least once.
•If the calibrating sound level from all speakers is
approximately the same, no further adjustment is necessary.
•If any speaker sound level appears unbalanced to the rest,
you can increase or decrease the level of the speaker by
pressing or to increase or decrease the speaker level
when that speaker is highlighted.
•When you have completed the level adjustments, press OK
to exit the Volume Setup and return to the previous menu.
3.2 DYNAMIC RANGE
Dynamic Range Control enables you to control the dynamic range
so as to achieve a suitable sound for your equipment.
ON: Loud sound such as explosion is toned down slightly when
playback.
OFF: The unit plays back at the recording level on the disc.
3.3 DIGITAL OUTPUT
For an A/V receiver or amplifier connected to the DVD Home
theatre’s “COAXIAL” socket, you can select from the following
settings:
SPDIF/RAW: Dolby Digital signals are fed unaltered to the digital
output. Generally, this setting is used with receivers capable of
Dolby Digital 5.1 channel decoding.
SPDIF/PCM: Dolby Digital and MPEG 2 multi-channel signals are
convertedtoPCM (Pulse CodeModulation).This setting issuitable
for amplifiers or receivers without digital multi-channel sound
decoders.
3.4 PROLOGIC II
The Dolby Pro Logic II Surround System is a specially encoded 2
channel analog format that will reproduce 5 channel output when a
Dolby Pro Logic II Decoder is used.
MOVIE MODE: The Movie mode is for use with stereo television
shows and all programs encoded in Dolby Surround. The result is
enhanced soundfield directionality.
MUSIC MODE: The Music mode is for use with any stereo music
recordings,and provides awideand deep soundspace. The Music
mode includes different controls that allow the sound to be tailored
to individual listening preference.
AUDIO SETUP
VOLUME SETUP
ON
DIGITAL OUTPUT
PROLOGIC II
EXIT SETUP
DYNAMIC RANGE
OFF
AUDIO SETUP
VOLUME SETUP
DYNAMIC RANGE
PROLOGIC II SPDIF/PCM
EXIT SETUP
DIGITAL OUTPUT SPDIF/RAW
AUDIO SETUP
VOLUME SETUP
DYNAMIC RANGE
DIGITAL OUTPUT
MOVIE MODE
MUSIC MODE
EXIT SETUP
PORLOGIC II
OFF
AUDIO SETUP
DYNAMIC RANGE
DIGITAL OUTPUT
PROLOGIC II
FRONT RIGHT
5dB
EXIT SETUP
VOLUME SETUP

15
3.5 PANORAMA / CENTRE WIDTH / DIMENSION
The following options are available only when the player is in Music
Mode.These options letyoucustomize the ProLogicII Music Mode
Sound Effect.
PANORAMA: Extendsthe frontstereoimagetoincludethesurround
speakers for an exciting “wraparound” effect with sidewall imaging.
CENTRE WIDTH: WithPro Logicdecoding, dominantcentre signals
come from the centre speaker. If no centre speaker is present, the
decodersplits thecentre signalsequally totheleftandrightspeakers
to create a “phantom” centre image. The Centre Width allows
variable adjustment of the centre image so it may be heard only
from the centre speaker; only from the left/right speakers as a
phantomimage;or from allthreefront speakers tovaryingdegrees.
DIMENSION: A simple control that alters the ratio of L+R to L-R
for the two-channel input signals. It allows the user to gradually
adjust the sound field either towards the front or towards the rear.
If a recording is too spacious or strong from the surrounds, it can
be adjusted “forward” to get a better balance. Likewise, if a stereo
recording is somewhat too “mono” or “narrow” sounding, it can be
adjusted toward the rear to get a more enveloping, immersing
result.
4. VIDEO SETUP
4.1 TV SYSTEM
This player supports differentTV outputs, including NTSC and PAL
system. You may change the setting of the unit to match your TV.
NTSC: Select this if your TV supports NTSC colour system.
PAL: Select this if your TV supports PAL colour system.
Note: If your TV supports only NTSC or PAL and had you
inadvertentlyselected thewrong TVtype,theTVscreen willbecome
flickering and/or black-and-white.
AUDIO SETUP
VOLUME SETUP
DYNAMIC RANGE
DIGITAL OUTPUT
PROLOGIC II
ON
CENTER WIDTH
DIMENSION
EXIT SETUP
PANORAMA
OFF
AUDIO SETUP
VOLUME SETUP
DYNAMIC RANGE
DIGITAL OUTPUT
PROLOGIC II
PANORAMA
DIMENSION
CENTER WIDTH
90
69
54
28
0EXIT SETUP
AUDIO SETUP
VOLUME SETUP
DYNAMIC RANGE
DIGITAL OUTPUT
PROLOGIC II
PANORAMA
CENTER WIDTH
DIMENSION
+3
+1
-1
-3EXIT SETUP
AUDIO SETUP
VOLUME SETUP
DYNAMIC RANGE
DIGITAL OUTPUT
MOVIE MODE
OFF
EXIT SETUP
PROLOGIC II
MUSIC MODE
VIDEO SETUP
NTSC
VIDEO
TV TYPE
EXIT SETUP
TV SYSTEM
PAL

16
5. SPEAKER SETUP
•If the Centre speaker is placed closer to the listening position
than the Front speakers, choose CENTER DIST. to set the
Centre distance value minimum to achieve the best listening
effect.
•If the Surround speakers are placed closer to the listening
position than the Front speakers, choose REAR DIST. to set
the Rear distance value larger to achieve the best listening
effect.
4.2 VIDEO
Choose the type of video output that matches the video connection
between this unit and TV.
S-VIDEO: Select this if you have connected this unit to your TV
using the S-Video jack or Composite (yellow) Video jack.
INTERLACE-YUV: Selects the component video output, if you
have connected the unit to your TV by using the Y, Cb, Cr video
jacks.
P-SCAN YPBPR: Selects the Progressive Scan component video
output if you have connected the unit to your TV by using the Y,
Pb, Pr video jacks. This selection can only be used with a TV that
can accept a Progressive Scan signal.
4.3 TV TYPE
• 4:3 PS This is selected when the unit is connected with a
normal TV. Wide-screen images are shown on the screen,
but with some parts cut automatically.
•4:3 LB This is selected when the unit is connected with a
normal TV. Wide-screen images are shown on screen, with
black belts on the top and bottom
•16:9 This is selected when the unit is connected with a wide-
screen TV.
Note:
•Some discs may not be able to be played according to your
selection, due to the format that has been recorded onto the
DVD Disc.
•For discs recorded in 4:3 mode, the disc will only be played in
4:3.
•The TV TYPE should be set correspondingly with the TV
screen.
4:3 PS
4:3 LB
16:9
VIDEO SETUP
TV SYSTEM
TV TYPE
EXIT SETUP
VIDEO S-VIDEO
INTERLACE-YUV
P-SCAN YPBPR
VIDEO SETUP
TV SYSTEM
VIDEO
4:3 PS
4:3 LB
16:9
EXIT SETUP
TV TYPE
SPEAKER SETUP
REAR DIST.
EXIT SETUP
CENTER DIST. +
1.5 M
0.5 M
0M
SPEAKER SETUP
REAR DIST.
EXIT SETUP
CENTER DIST. +
1.5 M
0.5 M
0M
SPEAKER SETUP
REAR DIST.
EXIT SETUP
CENTER DIST. +
1.5 M
0.5 M
0M
SPEAKER SETUP
CENTER DIST.
EXIT SETUP
REAR DIST. +
4M
2M
0M
SPEAKER SETUP
CENTER DIST.
EXIT SETUP
REAR DIST. +
4M
2M
0M
SPEAKER SETUP
CENTER DIST.
EXIT SETUP
REAR DIST. +
4M
2M
0M

17
PLAYING DVD/CD/VCD DISC
1. (Open / Close)
• Press to open the disc tray.
Note: Load the disc on the disc tray with disc label face upward.
• Press again to close the disc tray. Playback will start
automatically
2. (Play)
• Press to start playback.
3. (Pause / Frame-by-Frame Advance)
You can freeze the image and advance frame by frame.
• For CD, press to pause the playback. Press again or
press to resume the normal playback.
• For DVD / VCD, press to pause the playback. Press
again to go to STEP mode. Each press of the button will
advance the frame in STEP mode.
Press to resume the normal playback.
4. (Backward / Forward Search, Slow Motion)
• Press to search backward or forward. Pressing will
resume the normal playback.
Each time when or button is pressed, the speed of
backward / forward search changes accordingly.
• In “pause” mode, press to start forward or backward
slow motion play. Press to resume normal playback.
Each time when or button is pressed, the speed of
slow-motion playback changes accordingly.
Note: Slow motion step by step is not applicable to CD
Playback. Backward slow motion is not applicable to VCD
playback.
5. (Skip to the Beginning of a Chapter / Track)
When a disc is playing, you can skip backward / forward a
chapter / track.
• Press the button to skip to the beginning of the previous
chapter or track.
• Press the button to skip to the beginning of the next
chapter or track.
• For audio CD discs, use the numeric buttons (0 - 9 on the
remote control only) to directly jump to a track number.
6. (Stop)
• Press once to stop the current playback instantly and
enter the Resume Play mode.
Press again to resume playback from the point at which
you last stopped the disc.
• Press twice to stop playback completely. Resume
playback will be cancelled.
Press again to start playback from the beginning of the
disc.
7. MENU
• Press to display the Disc Menu.
Note: 1) Playback will be stopped to display the menu. 2) For
CD, no function. 3) For VCD, it is only available when PBC is
set to ON.
8. TITLE
• Press to display the Title Menu if present on disc (DVD only).
11
54
3
1
10
6
2
8
9
12
7

18
9. ZOOM (To Zoom In the Image)
You can magnify pictures during playback.
• When a disc is playing, press the ZOOM/CLEAR button.
Each time ZOOM/CLEAR button is pressed, the ZOOM
settings will be changed as follows:
ZOOM 2 --> ZOOM 3 --> ZOOM 4 --> ZOOM 3/4 --> ZOOM 2/
3 --> ZOOM 1/2 --> ZOOM : OFF
• While an image is magnified, you can use , , and
keys to shift the image for viewing.
• Toreturn to the original normal view, press the ZOOM/CLEAR
key until the ZOOM : OFF shows. The screen will return to
normal.
• When you reach the edge of the image, the display will not
shift anymore in that direction.
10. ANGLE (To change the Viewing Angle in DVD mode)
You can select different viewing angles when playing a DVD video
disc that contains scenes recorded from multiple angles.
•Press ANGLE/PBC repeatedly to select different viewing
angles if available on the disc.
Note:
This function is only available when the scenes shot from multiple
angleshavebeen recorded on theDVD disc. If multi-angle viewing
is not available, OFF is displayed.
11. AUDIO / FM ST (To Change the Audio LanguageAvailable
on the Disc)
During playback, you can change the audio language or audio
output.
•When a disc is playing, press AUDIO / FM ST to show the
current playback audio track number.
•Press repeatedly to select the desired audio track.
Note:
• If there is only one audio track available on the disc, the
number does not change.
• Therewillbe no soundoutputif a DTSaudioformat is selected
when playing the DTS disc.
12. SUBTITLE (For DVD)
During playback, you can change the subtitle language or disable
the subtitle function.
•When a disc is playing, press SUBTITLE to show the current
playback language subtitle.
•Press repeatedly to select the desired subtitle language.
Note:
• This function can only be used for discs on which different
subtitle languages have been recorded.
• Thenumber oflanguages recordedmaybedifferentdepending
on the disc.
: [ 1 2CH ]
: [ 3 ENGLISH ]

19
DVD
7/36
1/41
00:03:12
TT
CH
Disc format
Title
Current title
Total title
Chapter
Current chapter
Total chapter
Elapsed time
1. INFO Function
While the disc is playing, press INFO to display playback
information present on the disc.
For DVD:
• Press INFO once to display the playback information
and playing time of current chapter;
• Press INFO twice to check the remaining time of current
chapter.
• Press INFO three times to check the playing time of
current title.
• Press INFO four times to check the remaining time of
current title.
• Press INFO five times to further display more playback
information;
For CD/VCD:
• Press INFO once to display the playback information
and playing time of current track.
• Press INFO twice to check the remaining time of current
track.
• Press INFO three times to check the playing time of
current disc.
• Press INFO four times to check the remaining time of
current disc.
1.1 TT (Title Info)
• Displays the Title Number being played and the Total
Number of Titles recorded on the disc.
1.2 CH (Chapter Info)
• Displays the Chapter Number being played and the
Total Number of Chapters recorded on the disc.
1.3 Elapsed time
• Displays the elapsed time from the beginning of the
title/chapter/disc/track being played.
Note: If there is a “-” displayed in front of the time, then
thetimewill be theremaining time ofcurrenttitle/chapter/
disc/track.
1.4 Audio
• Displays the audio track currently selected.
1.5 Language (Subtitle)
• Displays the subtitle language currently selected.
1.6 Angle
• Displays the viewing angle currently selected. When a
disc without multi-angle is played, OFF is displayed.
1.7 TRK (Track Info)
• Displays the Track Number being played and the Total
Number of Tracks recorded on the disc.
1.8 Unmute Icon
• Displays when the sound is unmuted.
1.9 Repeat Mode
• Displays any repeat mode set.
Note: After checking the settings, press INFO again to turn
off the display.
Audio Subtitle
Angle
1/4
5.1CH
OFF
ENG
1/2ENG
---
Disc format
Track
Cuttent track
Total track
Speaker Repeat mode
Elapsed Time
VCD
PBC
00:03:12
TRK
2/2
PBC status
CD
00:03:12
TRK
2/2
Disc format
Track
Repeat mode
Speaker
Cuttent track
Total track
Elapsed Time
ADVANCED PLAYBACK FUNCTION
Table of contents
Other Tevion Home Theater System manuals