Texas 1600-35 User manual

6096-211018 2
1. Indholdsfortegnelse
BETJENINGSVEJLEDNING
Elektrisk motorsav
Model 1600-35
Model 1800-40
Dansk
Texas A/S
Knullen 2 - 5260 Odense S - Danmark
2. Sikkerhedsforskrifter 3
3. Montering af sværd og kæde 5
4. Kædeolie 5
5. Start / stop 5
6. Kædebremse 6
7. Vedligeholdelse 6
8. Specifikationer 7
9. EU-overensstemmelseserklæring 8
Reservedele
Reservedelstegning over det pågældende produkt findes
på vores hjemmeside www.texas.dk
Finder du selv varenumre, giver det en hurtigere ekspedition.
For køb af reservedele, kontakt venligst din nærmeste forhandler.
Du finder forhandlerliste på Texas' hjemmeside

3
- Læs denne betjeningsvejledning grundigt, dermed du forstår og kan følge alle
sikkerhedsforskrifter og betjeningsfunktioner fuldstændigt, før du går i gang
med at arbejde med maskinen.
- Børn må ikke bruge saven.
- Hvis du føler dig syg, træt, eller har indtaget alkohol eller medicin, må du ikke
arbejde med motorsaven.
- Brug altid sikkerhedsfodtøj, sikkerhedsbukser, beskyttelsesbriller, høreværn
samt sikkerhedshjelm.
- Sørg for at eventuelle tilskuere er mindst 10 meter fra det sted, hvor du starter /
arbejder med kædesaven.
- Begynd aldrig at save før: - Arbejdsområdet er ryddet.
- Du har sikkert fodfæste.
- Du har vurderet hvor træet vil falde hen.
- Hold om kædesavens håndtag med begge hænder og med tommelfingeren
under forreste bøjle.
- Hold kædesaven væk fra kroppen.
- Før du starter kædesaven, skal du kontrollere, at kæden ikke er i kontakt med
noget.
- Stop altid motoren når du stiller kædesaven fra dig. Sørg for at sværd og kæde
vender bagud, når du bærer maskinen.
- Undersøg din kædesav for slidte, løstsiddende eller ødelagte dele, spænd bolte
og møtrikker efter. Maskinen bør ikke anvendes før den er i korrekt og sikker-
hedsmæssig stand.
- Vær ekstra forsigtig når du saver i buske og små træer. Små grene kan gribe
fat i kæden og blive slynget imod dig eller få dig til at miste balancen.
- Sørg for at håndtagene er rene, og at der ikke er rester af olie.
- Arbejd kun med kædesaven udendørs.
- Arbejd kun med træfældning, hvis du er specielt uddannet til det.
- Alle reparationer, som ikke er beskrevet i denne betjeningsvejledning, må kun
udføres af specieluddannet personale på et autoriseret serviceværksted. Brug
af forkert værktøj kan ødelægge din kædesav.
2. Sikkerhedsforskrifter
- Kædebremsen er monteret for at beskytte mod "kast", som er en hurtig
opadgående bevægelse i sværdet. Dette kan forekomme, hvis sværdspidsen
rammer fremmedlegemer. Det er derfor vigtigt, at du er opmærksom på, at
kædebremsen virker korrekt.
- Hold kædesaven fast med begge hænder, og hold den så tæt ind til dig, at du
hele tiden har kontrol over den.
- Lad motorkroppen ligge mod træet, mens du saver.
- Undgå at save med sværdspidsen og kontroller at sværdspidsen ikke rammer
noget, mens du saver.
- Sav ikke med kædesaven over skulderhøjde.
- Følg instruktionerne for filning og vedligeholdelse i denne betjeningsvejledning.
4

Fig. 3C
D
1. Afmonter sidedækslet.
2. Læg kæden rundt om næsehjulet på
sværdet. Når kæden har godt fat i næse-
hjulet sættes sværdet ind på motoren-
heden, og kæden lægges i sværdet. Fig
3D
3. Vær opmærksom på at kæden vender
den rigtige vej. Fig 3C
4. Monter sidedækslet. Fig. 3E
5. Spænd møtrikkerne til med fingerne.
6. Løft i sværdspidsen, og stram kæden op
ved hjælp af strammerbolten. Kæden skal
være så stram, at man lige netop kan løfte
drivleddet fri af sporet i sværdet. Fig 5B
7. Spænd sværd og sidedæksel forsvarligt
til. Fig 5A
Næsehjul findes kun på model 1800-40
3. Montering af sværd og kæde
4. Kædeolie
Brug altid kædeolie til smøring af sværd og kæde.
Almindelig motorolie er ikke egnet hertil.
Vi anbefaler Texas Klingetex 125.
For yderligere smøring kan man benytte smørehul-
let på sværdets spids. Brug en engangssprøjte og
kom olie i smørehullet, samtidig med at man
trækker i kæden.
Sørg altid for at strømmen er frakoblet og at kæde-
bremsen er deaktiveret.
Næsehjul findes kun på model 1800-40
5. Start / stop
1. Saven startes ved at aktivere "start" kontakten.
2. Kontakten på håndtagets venstre side skal
holdes inde, før saven kan startes.
3. Ligeledes stoppes saven ved at frigive kontak-
ten.
5
Test kædebremsen på følgende måde.
1. Placer saven på et fast underlag.
2. Start motoren.
3. Hold med højre hånd på bagerste hånd-
tag.
4. Hold med venstre hånd på forreste hånd-
tag.
5. Giv gas og aktiver kædebremsen
6. Kæden skal øjeblikkeligt stoppe. Når den stopper, frigiv gassen.
7. Hvis kædebremsen virker, stop maskinen og placer kædebremsehåndtaget i
deaktiveret position.
6. Kædebremse
7. Vedligeholdelse
Smørehul. Afmonter sværd og kontroller om smørehullet er stoppet med savsmuld
eller snavs.
Sværd. Rens næsehjul og løbegang for
snavs. Vend evt. sværdet for at fordele slid-
det. Et slidt sværd kan være farligt at
anvende og bør derfor udskiftes. Kun model
1800-40.
Kæde. Kæden bør files jævnligt for at opnå
det bedste resultat samt for at nedsætte slid-
tage på el-motoren.
1. Sørg for at sværdet er spændt godt fast.
2. Brug en 4 mm fil.
3. Fil alle tænderne og dybdegrænserne
indefra, som vist på tegningen.
4. Det er nødvendigt jævnligt at efterse høj-
den af tænderne, hvis de er for høje, bør
de files ned.
Hvis du er i tvivl, bør du kontakte din Texas
forhandler.
Brug kun originale reservedele
6
Fig. 3D Fig. 3E
F
GH
Fig. 3C Fig. 3C
AG
Fig. 6
Fig. 14
Påfyld olie
her
START
Fig. 9A Fig. 9B
Fig. 14 Fig. 15
Fig. 25 Fig. 26
Fig. 24
Efter hver Hver 10 Hver20
Del brug køretime køretime
Skruer / bolte Tjek / stram X
Olieniveau Tjek X
Kædebremse Tjek X
Udskift Hvis nødvendigt
B

9. EU overensstemmelseserklæring
8
EU-importør Texas Andreas Petersen A/S
Erklærer herved at materiel:
•El-kædesav AC211116TD (Kædesav 1800-40) 1800 watt
•El-kædesav AC211014TD (Kædesav 1600-35) 1600 watt
er fremstillet i overensstemmelse med følgende direktiver:
98/37/EC Maskindirektivet
73/23/EEC Lavspændingsdirektivet
89/336/EEC EMC direktivet
Materiellet er udført i henhold til følgende standarder:
EN 50144, EN 55014-1, EN 55014-2, HD 400.3, EN 61000-3-2, EN 61000-3-3
Texas Andreas Petersen A/S
Knullen 2
5260 Odense S
Verner Hansen
Administrerende direktør
16.08.2004
8. Specifikationer
Model Kædesav 1600-35 Kædesav 1800-40
Motoreffekt 230 V, 1600 Watt 230 V, 1800 Watt
Omdrejninger 6.000 - 7.000 / min 6.000 - 7.000 / min
Tankindhold 200 ml 200 ml
Smøring Automatisk Automatisk
Anti-vibration Ja Ja
Vægt 4,3 kg 4,4 kg
Sværdtype 14"/35 cm 16"/40 cm, næsehjul
Kædebremse Ja Ja
Håndskærm Ja Ja
Barksted Ja Ja
Kæde 49 led 55 led
Varenummer 40-109 40-260
7

10
8
BRUKSANVISNING
Elektrisk kedjesåg
Model 1600-35
Model 1800-40
Svenska
Texas A/S
Knullen 2 - DK-5260 Odense S - Danmark
Tel. +45 63 95 55 55 - [email protected]
1. Innehåll
2. Säkerhetsföreskrifter 11
3. Montering av svärd och kedja 13
4. Kedjeolja 13
5. Start/stopp 13
6. Kedjebroms 14
7. Underhåll 14
8. Specifikationer 15
9. EC Överenskommelseförklaring 16

- Håll motorsågen i ett fast grepp med båda händerna, och håll den på ett lagom
nära avstånd, så att du alltid har kontroll över den.
- Låt motorkroppen ligga an mot träet medan du sågar
- Såga inte med svärdsspetsen, och kontrollera att svärdsspetsen inte träffar
något medan du sågar.
- Såga inte med motorsågen högre än axelhöjd.
- Följ anvisningarna om filning och underhåll i den här bruksanvisningen.
1211
2. Säkerhetsföreskrifter
- Läs den här bruksanvisningen noggrant, så du förstår och kan följa alla säker-
hetsföreskrifter och användningsinstruktioner fullständigt, innan du börjar arbeta
med maskinen.
- Barn får inte använda sågen.
- Om du känner dig sjuk, trött eller om du har förtärt alkohol eller medicin ska du
inte använda motorsågen.
- Använd alltid skyddsskor, skyddsbyxor, skyddsglasögon, hörselskydd samt
hjälm.
- Tillse att alla andra personer befinner sig minst 10 meter från den plats där du
startar / arbetar med motorsågen.
- Börja aldrig såga förrän: - Arbetsområdet är rensat.
- Du har säkert fotfäste.
- Du har planerade flyktvägar från fallande träd.
- Håll motorsågens handtag med båda händerna med tummen under den främre
bygeln.
- Håll motorsågen riktad bort från kroppen.
- Innan du startar motorsågen - kontrollera att kedjan inte är i kontakt med något.
- Stäng alltid av motorn när du ställer ifrån dig motorsågen. Håll alltid svärdet och
kedjan riktade bakåt när du bär maskinen.
- Kontrollera att motorsågen inte har några slitna, löst sittande eller trasiga delar,
dra sedan åt skruvar och muttrar. Maskinen ska inte användas förrän den är i
korrekt och säkerhetsmässigt skick.
- Var extra försiktig när du sågar i buskar och småträd. Små grenar kan fastna i
kedjan och kastas emot dig, eller få dig att tappa balansen.
- Kontrollera att handtagen är rena och att det inte finns några oljerester.
- Arbeta bara utomhus med motorsågen.
- Om du ska arbeta med trädfällning måste du ha särskild utbildning till det.
- Reparationer som inte finns beskrivna i bruksanvisningen måste alltid utföras av
specialutbildad personal på en auktoriserad serviceverkstad. Användning av
felaktigt verktyg kan förstöra motorsågen.
- Kedjebromsen är monterad för att skydda mot "kast", d.v.s. en snabbt uppåtrik-
tad rörelse i svärdet. Detta kan inträffa om svärdsspetsen träffar något främ-
mande föremål. Det är därför mycket viktigt att du alltid ser till att kedjebromsen
fungerar korrekt.

Testa kedjebromsen så här:
1. Ställ sågen på ett fast underlag.
2. Starta motorn.
3. Håll höger hand på det bakre handtaget.
4. Håll vänster hand på det främre hand-
taget.
5. Gasa och aktivera kedjebromsen.
6. Kedjan ska stanna omedelbart. Släpp gasen när den stannar.
7. Om kedjebromsen fungerar, stoppa maskinen och ställ kedjebromshandtaget i
inaktiverat läge.
6. Kedjebroms
7. Underhåll
Smörjhål. Demontera svärdet och kontrollera om smörjhålet är igensatt med
sågspån eller smuts.
Svärd. Rengör noshjulet och löpskenan så
att det inte sitter kvar någon smuts.
Eventuellt kan svärdet behöva vändas för att
slitaget ska fördelas. Ett slitet svärd kan vara
farligt att använda, och bör därför bytas ut.
Kun model 1800-40.
Kedja. Kedjan bör filas med jämna mellan-
rum för att man ska få bästa resultat.
1. Kontrollera att svärdet är ordentligt fast-
spänt.
2. Använd en 4 mm fil.
3. Fila alla tänderna och djupgränserna
inifrån, så som figuren visar.
4. Man måste kontrollera tandhöjden med
jämna mellanrum. Om de är för höga ska
de filas ner.
Om du är tveksam om något bör du kontakta din Texas-återförsäljare.
Använd endast originalreservdelar
14
Fig. 9A Fig. 9B
Fig. 14 Fig. 15
Fig. 25 Fig. 26
Fig. 24
Efter varje Var 10:e Var 10:e
Del användning körtimme körtimme
Skruvar / bultar Kontrollera / spänn X
Oljenivå Kontrollera X
Kedjebroms Kontrollera X
Byt ut Vid behov
Fig. 3C
D
1. Demontera sidoskyddet.
2. Lägg kedjan runt om kedjehjulet på
svärdet. När kedjan har greppat kedje-
hjulet riktigt sätter du in svärdet i motoren-
heten, och lägger på kedjan på svärdet.
Fig. 3D
3. Var noga med att kedjan vänds på rätt
håll. Fig. 3C
4. Montera sidoskyddet. Fig. 3E
5. Spänn muttrarna med fingrarna.
6. Lyft i svärdsspetsen, och spänn kedjan
med hjälp av spännskruven. Kedjan ska
vara så spänd att man bara precis kan
lyfta kedjelederna av spåret på svärdet.
Fig. 5B
7. Dra åt svärdet och sidoskyddet ordentligt.
Fig. 5A
Noshjul findes kun i model 1800-40
3. Montering av svärd och kedja
4. Kedjeolja
Använd alltid kedjeolja för att smörja svärd och
kedja. Vanlig motorolja är inte lämplig för detta.
Använd TEXAS Klingetex 125.
Vid ytterligare smörjning kan man använda smör-
jhålet på svärdsspetsen. Använd en engångsspruta
och lägg olja i smörjhålet samtidigt som du drar i
kedjan.
Se alltid till att strömmen är urkopplad och att kedje-
bromsen är avstängd.
Noshjul findes kun i model 1800-40
5. Start/stopp
1. Starta sågen genom att aktivera "start"-omkop-
plaren.
2. Omkopplaren på handtagets vänstra sida ska
hållas inne innan det går att starta sågen.
3. På motsvarande sätt stoppar du sågen genom
att släppa omkopplaren. 13
Fig. 3D Fig. 3E
F
GH
Fig. 3C Fig. 3C
AG
Fig. 6
Fig. 14
Påfyld olie
her
START
B

9. EC Överenskommelseförklaring
16
EU-importør Texas Andreas Petersen A/S
Undertecknad förklarar på företagets vägnar att:
•El-kædesav AC211116TD (Kedjesåg 1800-40) 1800 watt
•El-kædesav AC211014TD (Kedjesåg 1600-35) 1600 watt
Uppfyller EU - direktiver:
98/37/EC Maskindirektiv
73/23/EEC lågspänningsdirektiv
89/336/EEC EMC direktiv
Materiellet er udført i henhold til følgende standarder:
EN 50144, EN 55014-1, EN 55014-2, HD 400.3, EN 61000-3-2, EN 61000-3-3
Texas Andreas Petersen A/S
Knullen 2
5260 Odense S
Danmark
Verner Hansen
Adm. Direktør
16.08.2004
8. Specifikationer
Modell Kedjesåg 1600-35 Kedjesåg 1800-40
Motoreffekt 230 V, 1600 watt 230 V, 1800 watt
Varvtal 6 000 - 7 000 / min 6 000 - 7 000 / min
Tanken rymmer 200 ml 200 ml
Smörjning Automatisk Automatisk
Vibrationsskydd Ja Ja
Vikt 4,3 kg 4,4 kg
Svärdstyp 14 tum/35 cm 16 tum/40 cm, noshjul
Kedjebroms Ja Ja
Handskärm Ja Ja
Barkstopp Ja Ja
Kedja 49 leder 55 leder
Artikelnummer 40-109 40-260
15

17
GENERALSAFETY RULES
WARNING! When using electric tools, basic safety precautions, including the following, should always be followed to
reduce the risk of fire, electric shock and personal injury.
Read all these instructions before operating this product and save these instructions.
Meaning of symbols marked on the product
Read the user manual before using the machine
Whenever the machine is in use, safety goggles
must be worn to safeguard against flaying object,
as must ear protectors, such as a soundproof hel-
met, in order to protect the operator’s hearing. If the
operator is working in an area where there is a risk
of falling objects, a safety helmet must also be
worn.
Warning! Danger
Wear gloves to protect your hands Wear safety boots to protect against electric shock
Do not expose to rain
Remove plug from the mains immediately if cable is
damaged or cut
1. Keep work area clean
Cluttered areas invite injuries. Do not start cutting
until you have a clear work area, secure footing, and
a planned retreat path from the falling tree.
2. Consider work area environment
Use extreme caution when cutting small sized brush
and sapling, as slender material may catch the saw
chain and be whipped toward you or pull you off bal-
ance. Do not operate a chain saw in a tree unless you
are specifically trained to do so. When cutting a limb
that is under tension, be alert for spring back so that
you will not be struck when the tension in the wood
fibers is released. Do not expose the chain saw to
rain. Do not use the chain saw in damp or wet loca-
tions. Do not use the chain saw in the presence of
flammable liquids or gases.
3. Store idle chain saw
When not in use, tools should be stored in a dry, high
or locked up place, out of reach of children.
4. Do not force the chain saw
The chain saw will do a better and safer job when
used at the rate for which it was intended.
5. Use the right tool
Cut wood only. Do not use the chain saw for purpos-
es for which it was not intended. For example, do not
use the chain saw for cutting plastic, masonry, or
non-building materials.
6. Dress properly
Do not wear loose clothing or jewelry, as they can get
caught in moving parts. Non-skid footwear is recom-
mended when working outdoors. Wear protective hair
covering to contain long hair.
7. Use safety gear
Use safety glasses, safety footwear, snug fitting
clothing, protective gloves, and protective hearing
and head gear.
8. Carrying the saw
Carry the saw by the front handle with the saw
stopped. Keep your finger off the switch, and make
sure that the guide bar and saw chain are to the rear.
9. Do not abuse the cord
Never carry the tool by the cord or yank it to discon-
nect it from the socket. Keep the cord away from
heat, oil and sharp edges.
10. Secure work
Use clamps or a vice to hold the work.
11. Do not overreach
Keep proper footing and balance at all times.
12. Maintain the chain saw with care
Inspect the chain saw cords periodically and, if dam-
aged, have them repaired by an authorized service
facility. Keep the cord clear of the chain and operator
at all times. Never carry the saw by the cord or pull it
to disconnect from receptacle. Keep the cord from oil
and sharp edges. Inspect the extension cords period-
ically and replace if damaged. Keep tools sharp and
clean for better and safer performance. Follow
instructions for lubricating and changing acces-
sories. Keep handles dry, clean and free from oil and
grease.
13. Disconnect the chain saw
Disconnect the chain saw when not in use, before
servicing, and when changing accessories and
attachments such as saw chain and guard.
14. Remove adjusting keys and wrenches
Form the habit of checking to see that keys and
adjusting wrenches are removed from the tool before
turning it on.
15. Avoid unintentional starting
Do not carry a plugged-in tool with a finger on the
switch. Ensure switch is off when plugging in.
16. Use outdoor extension leads
Use only extension cords that are intended for out-
door use and which are so marked.
17. Stay alert
Watch what you are doing. Use common sense. Do
not operate the chain saw when you are tired. Keep
all parts of your body away from the saw chain when
the motor is operating. Before you start the saw,
make sure the saw chain is not contacting anything.
18
USER MANUAL
Electric Chain Saw
Model 1600-35
Model 1800-40
English
Texas A/S
Knullen 2 - 5260 Odense S - Danmark

19 20
Model BASIC 1600-35 EXTRA 1800-40
Motor 230 V, 1600 watt 230 V, 1800 watt
No Load Speed 6.000 - 7.000 / min 6.000 - 7.000 / min
Oil Capacity 200 ml 200 ml
Cutting Speed 12 m/sec 12 m/sec
Net Weight 4,3 kg 4,4 kg
Cutting Length 14”/35cm 16”/40cm
Barking Time 0.1s 0.1s
Vibration < 12.1 m/s2< 12.1 m/s2
Sound Power Level 107.0 dB(A) 107.0 dB(A)
18. Check damaged parts
Before further use of the tool, a guard or other part
that is damaged should be carefully checked to deter-
mine that it will operate properly and perform its
intended function. Check for alignment of moving
parts, free running of moving parts, breakage of
parts, mounting and any other conditions that may
affect its operation. A guard or other part that is dam-
aged should be properly repaired or replaced by an
authorized service centre unless otherwise indicated
in this instruction manual. Have defective switches
replaced by an authorized service facility. Do not use
the tool if the switch does not turn it on and off.
19. Warning!
The use of any accessory or attachment, other than
those recommended in this instruction manual, may
present a risk of personal injury.
20. Have your tool repaired by a qualified person
This electric tool is in accordance with the relevant
safety requirements. Repairs should only be carried
out by qualified persons using original spare parts,
otherwise this may result in considerable danger to
the user.
21. Guard against KICKBACK
A. GRIP SAW FIRMLY: Hold the chain saw firmly
with both hands when the motor is running.
Keep a good firm grip on the saw with both
hands, the right hand on the rear handle, and the
left hand on the front handle.
B. Do not over reach.
C. Keep proper footing and balance at all times.
D. Do not let the nose of the guide bar contact a
log, branch, ground or other obstruction.
E. Do not cut above shoulder height.
F. Use devices, such as low-kickback chain, guide
bar nose guards, chain brakes and special guide
bars, which reduce the risks associated with
kickback.
G. Use only replacement bars and chains
specified by the manufacturer or the equivalent.
H. There are no other replacement components for
achieving kickback protection in accordance
with CSA Z62.3.
22. Power supply
Connect the chain saw to correct voltage; be sure
that the voltage supplied is the same as that specified
on the nameplate of the tool.
23. DO NOT operate a chain saw that is damaged,
improperly adjusted, or not completely and securely
assembled. Be sure that the saw chain stops moving
when the trigger is released.
24. DO NOT attempt operations beyond your capacity or
experience.
25. DO NOT operate a chain saw with one hand! Serious
injury to the operator, helpers, or bystanders may
result from one-handed operation. A chain saw is
intended for two-handed use.
26. TO REDUCE potential for electric shock, do not
operate the saw on wet or slippery surfaces, or dur-
ing snow storms, rain storms, and other adverse
weather conditions.
27. Keep the handles dry, clean, and free of oil or grease.
28. DO NOT allow dirt, debris or sawdust to build up on
the motor or outside air vents.
29. Follow the manufacturer’s sharpening and mainte-
nance instructions for the saw chain.
30. Cut at high motor speeds.
31. Operation of a chain saw should be restricted to
mature, properly instructed individuals.
32. Your chain saw is intended for occasional
homeowner use. It is not made for heavy continuous
use.
33. DO NOT FORCE a small saw to do a job requiring a
heavier duty unit.
34. Examine the electrical switches. Do not use the
chain saw if the switches do not properly turn on and
off. Do not attempt to make any repairs to the electric
switches. Take your saw to a Texas Authorized
Service Center.
35. Maintain extension cords Inspect the extension
cords periodically and replace if damaged. Only use
power cords that are suitably marked for outdoor use.
36. DO NOT operate your chain saw near or around
flammable liquids or gases, whether in or out of
doors. An explosion and/or fire may result.
37. All chain saw service, other than the items listed in
the user manual safety and maintenance
instructions, should be performed by competent
chain saw personnel. Do not attempt to repair it your-
self; there are no user serviceable parts inside.
38. NEVER REMOVE, modify or make inoperative any
safety device furnished with your unit. The CHAIN
BRAKE®/Hand Guard is a major safety feature. The
saw will not run when the CHAIN BRAKE®is tripped.
39. It is intended for infrequent use by homeowner’s, cot-
tagers and campers, and for such general applica-
tions such as clearing, pruning, cutting firewood, etc.
It is not intended for prolonged use. If the intended
use involves prolonged periods of operation, this may
cause circulatory problems in the user’s hands due to
vibration. It may be appropriate to use a saw having
an anti-vibration feature.
40. Safety clothing required by your safety organizations,
government regulations, or your employer should be
used; otherwise, snug fitting clothing, safety footwear,
and hand and ear protection should be worn.
41. When felling, keep at least 2 tree lengths between
yourself and your fellow workers.
42. Keep everyone, especially children and pets, away
from the area of operation. Never allow children to
operate the appliance. Turn off unit immediately if you
are approached.
WARNING: Kickback may occur when the
nose or tip of the guide bar touches an
object, or when the wood closes in and
pinches the saw chain in the cut. Tip contact
in some cases may cause a lightning-fast
reverse action, kicking the guide bar rapidly
back towards the operator. Pinching the saw
chain along the top of the guide bar may
push the guide bar rapidly back towards the
operator. Either of these reactions may cause
you to lose control of the saw, which could
result in serious injury to the user. The fol-
lowing precautions should be followed to
minimize kickback.
SPECIFICATIONS
IMPORTANT SAFETY
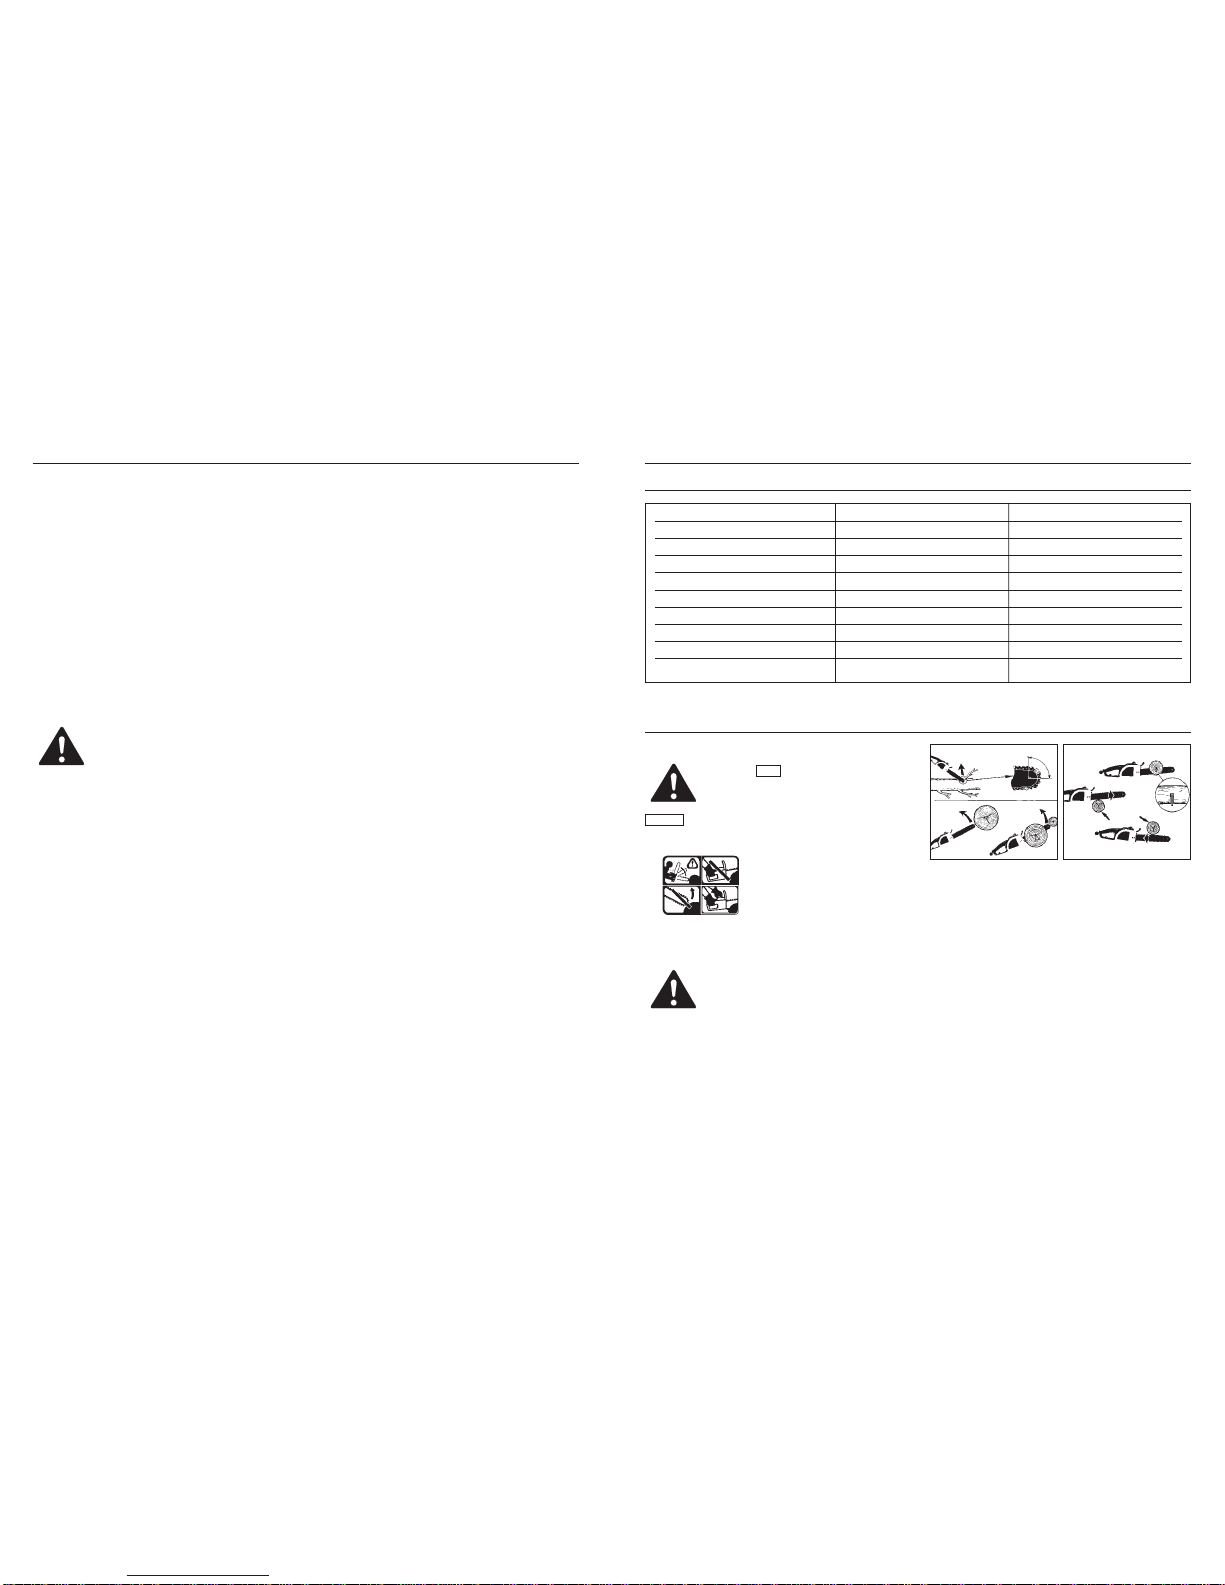
•How to read symbols and colors (Fig. 1)
GREEN RECOMMENDED
Recommended cutting procedure.
WARNING
1. Beware of kick back.
2. Do not attempt to hold saw
with one hand.
3. Avoid bar nose contact.
RECOMMENDED
4. Hold Saw properly with both
hands.
•DANGER! BEWARE OF KICKBACK!
BEWARE OF: ROTATIONAL KICKBACK
(Fig. 2A)
A=Kickback path
B = Kickback reaction zone
THE PUSH (PINCH KICKBACK) AND PULL REAC-
TIONS (Fig. 2B)
A=Pull
B = Solid objects
C = Push
KICKBACK may occur when the NOSE or TIP of the guide
bar touches an object, or when wood closes in and pinch-
es the saw chain in the cut.
Tip contact in some cases may cause a lightning-fast
reverse reaction, kicking the guide bar up and back
toward the operator.
PINCHING the saw chain along the BOTTOM of the guide
bar may PULL the saw forward, away from the operator.
PINCHING the saw chain along the TOP of the guide bar
may PUSH the guide bar rapidly back toward the opera-
tor.
Any of these reactions may cause you to lose control of
the saw, which could result in serious personal injury.
WARNING: RED Used to warn that an
unsafe procedure should not be performed.
1
3
2
4
Fig. 1
WARNING: Kickback can lead to dangerous
loss of control of the chain saw and result in
serious or fatal injury to the saw operator or
to anyone standing close by. Always be alert
because rotational kickback and pinch kick-
back are major chain saw operational dan-
gers and the leading cause of most acci-
dents.
Fig. 2A Fig. 2B
A
A
B
A
A
B
B
C

ASSEMBLY INSTRUCTIONS
21 22
INTRODUCTION
This unit is designed for occasional homeowner use and
should not be used for commercial purposes or subjected
to heavy continuous use.
Your new chain saw can by used for a variety of projects
such as cutting firewood, making fence posts, felling small
trees, limbing, pruning at ground level, and light carpentry.
Cut only wood or wood products with your saw.
TOOLS FOR ASSEMBLY
Your User’s Kit may contain a combination wrench/screw-
driver (wrench) and is the only tool you will need to
assemble your unit and to adjust the saw chain tension.
ASSEMBLY REQUIREMENTS
Your new chain saw may require installation of the guide
bar, saw chain, sprocket cover, adjustment of chain, and
filling the oil tank with lubricating oil, before the unit is
ready for operation. Do not start the saw motor until the
unit is properly assembled. Read all instructions carefully.
Do not install any other size bar and chain than what is
recommended for your model.
•GUIDE BAR/SAW CHAIN INSTALLATION
To Install Guide Bar
1. Place power unit on flat surface and remove bar bolt
nuts and sprocket cover.
2. Using a straight screwdriver or the scrench, if provid-
ed in your User’s Kit, turn the chain adjustment screw
(A) counterclockwise as far left as it will go, or until
the Tang (B) (projecting prong) is to the end of its
travel. (See Fig. 3A)
3. Place the slotted end of the guide bar over the bar
bolts so the Tang (B) fits into the lower hole C) in the
guide bar (D). (See Fig. 3B)
To Install Saw Chain
1. Spread the chain out with
the cutting edges (E) of the
chain pointing in the DIREC-
TION OF ROTATION. (See
Fig. 3C)
2. Place the chain over the
sprocket (F) with drive links
fitting between sprocket
teeth. Guide the chain links
into the groove (G) on the top side of the guide bar
and around the nose. The saw chain will droop slight-
ly on the lower part of the guide bar. (See Fig. 3D)
3. Install the sprocket cover (H). Place the cover over
the 2 bar bolts. Thread the retaining nuts (J) FINGER
TIGHT ONLY. (See Fig. 3E)
•SAW CHAIN TENSION ADJUSTMENT
Proper tension of the saw chain is extremely important
and must be checked before starting, as well as during,
any cutting operation. Taking the time to make needed
adjustments to the saw chain will result in improved cut-
ting performance and prolonged chain life.
NOTE: Anew chain and bar will need readjustment after
as few as 5 cuts. This is normal during the break-in peri-
od, and the interval between future adjustments will
lengthen quickly (Fig. 4).
To Adjust Saw Chain Tension:
1. Loosen the bar retaining nuts (J) so they are hand
tight. (See Fig. 3A)
2. Holding the nose of the bar up, use the screwdriver or
wrench if provided in your User’s Kit to turn the guide
bar adjustment screw (F) (Fig. 3B) clockwise to tight-
en the chain. Turning the screw COUNTERCLOCK-
WISE LOOSENS THE CHAIN on the guide bar.
3. After adjustment and while wearing heavy duty work
gloves, move the saw chain back and forth on the
guide bar to be sure the chain moves freely and is in
proper mesh with sprocket.
Fig. 3A
A
D
Fig. 3B
C
B
B
WARNING: Whenever handling the saw
chain, wear work gloves for protection
against sharp cutting edges.
Fig. 3C
E
Fig. 3D
F
Fig. 3E
H
G
CAUTION: If a chain is TOO LOOSE or TOO
TIGHT, the bar chain and saw bearings will
wear more rapidly. Study Fig. 4 for informa-
tion concerning correct cold tension (A), cor-
rect warm tension (B), and as a guide for
when saw chain needs adjustment (C).
CAUTION: If the chain is too loose, more
than 3mm after applying down force with fin-
ger, as shown in Fig. 4. It needs to be adjust-
ed, otherwise the stopping time might be over
the limit.
Fig.4
ABC
2mm < 2mm
NOTE : IF the chain is difficult to rotate or if it binds on the
guide bar, too much tension has been applied and must
be adjusted. To decrease tension, turn the adjustment
screw counterclockwise slowly. Move the chain back and
forth until it moves freely.
4. Holding the nose in upper position, securely tighten
the bar retaining nuts (70 inch lbs.)
•FILLING OIL TANK
Using a funnel, fill oil tank with Texas Chain, Bar and
Sprocket oil. Wipe up any spills. Make sure no dirt gets
into the oil tank.
The saw chain requires lubrication while in use to mini-
mize friction with the guide bar. The oil tank holds 200ml
of oil, enough to lubricate the chain for 15-20 minutes of
sawing.
We recommend using Texas Chain, Bar and Sprocket Oil,
which contains additives to reduce friction wear and
reduce resin residue formations.
NOTE: Your chain saw is equipped with an Automatic
Oiler system and is the ONLY source of lubrication for the
bar and chain (Fig. 6)
Fig. 5A
C
Fig. 5B
A
B
CAUTION: The oil tank level should be fre-
quently checked during operation to avoid
starving the bar and chain of lubrication.
Fig. 6
Oil Cap
Oil Tank Inspection Slot
OPERATION INSTRUCTIONS
•TOSTART SAW
1. Make sure the chain brake IS DISENGAGED. The
motor will not start if the chain brake is in the
ENGAGED position. Disengage the chain brake by
pulling backward toward the motor (Fig. 7A).
2. An extension cord retainer is built into the switch han-
dle that prevents the extension cord from pulling out of
the handle. To use this feature, simply double the
extension cord, about a foot from the end, and insert it
into the end of the handle. Hook the loop formed by
doubling the cord over the tab. Gently tug on the cord
to ensure that it is firmly retained in the saws handle.
Plug the receptacle end of the extension cord into the
tool;s power supply cord. (Fig. 7B)
3. Grip the saw with both hands, left hand holding the
front /handle (DO NOT HOLD CHAIN BRAKE ) and the
right hand holding the rear handle. Thumbs and fingers
should encircle both handles (Fig. 7C).
4. With your RIGHT THUMB, push the LOCK/OFF button
(C) forward at end the top of the rear handle, and at the
same time squeeze the trigger. To stop the saw,
release the trigger (Fig. 7D).
NOTE: It is not necessary to maintain pressure on the
LOCK/OFF button once the trigger is squeezed and the
motor is running. The LOCK/OFF button is a safety device
to avoid accidental starting.
•TOSTOP MOTOR
The saw motor will automatically stop when the trigger is
released. The LOCK/OFF button will have to be
depressed and the trigger squeezed to restart the motor.
•CHAIN AND BAR LUBRICATION
Adequate lubrication of the saw
chain during cutting operations is
essential to minimize friction with
the guide bar.
Your chain saw is equipped with
an automatic oiler system. The
oiler automatically delivers the
proper amount of oil to the bar
and chain. There is no flow
adjustment.
The oil tank level can be checked in the inspection win-
dow (A) provided on the right side of the saw. Tank is full
when oil is at the top of the slot (Fig. 8).
WARNING: Ensure the extension cord is of
the proper size and type for your saw.
Fig. 7C
C
Fig. 7D
Fig. 7A A
Fig. 7B
Fig. 8
A

23
NOTE: The saw chain stretches during use, particularly
when it is new, and occasional adjustment will be needed.
Anew chain requires more frequent adjustment during the
break-in period. This is normal. See Section for Saw
Chain Tension Adjustment instructions.
•CHAIN BRAKE / HAND GUARD
All Texas chain saws are equipped with a Chain brake
/Hand guard which stops a moving chain in milliseconds,
helping to reduce the hazard of kickback, a fast upward
motion of the guide bar which occurs when the saw chain
at the nose of the bar accidentally strikes an object or is
pinched in the cut.
The Hand Guard also protects your left hand in the event
it slips off the front handle.
The chain brake is a safety feature which is activated if
pressure is applied against the guard or when, in the
event of kickback, the operator’s hand strikes the lever.
When the chain brake is activated, chain movement
abruptly stops and the power supply to the motor is imme-
diately cut off.
The purpose of the chain brake is to reduce the possibili-
ty of injury due to kickback. The chain brake cannot,
however, provide the measure of intended protection if the
saw is carelessly operated.
The chain brake is disengaged (chain can move) when
the brake is pulled back and locked. This is the normal
running position (Fig. 9A).
The chain brake is engaged (chain cannot move) when
the brake is in forward position (Fig. 9B).
NOTE: The motor will not start if the chain brake is in the
engaged position.
CHAIN BRAKE TEST
Before cutting with your saw, the chain brake should be
tested as follows:
A. Make sure the chain brake is disengaged (Fig. 9A).
B. Place the saw on a firm, flat, dry surface that is clear
of any debris. Do not let the saw come in contact
with any objects.
C. Plug the unit into the power source.
D. Grasp the front handle (not the Chain Brake / Hand
Guard Lever) with your left hand. Thumb and fingers
should encircle the handle.
E. Grasp the rear handle with your right hand. Thumb
and fingers should encircle the handle.
F. Depress the LOCK/OFF button with your right thumb.
Squeeze the trigger with your index finger. (Fig. 7D.)
G. While the motor is running, activate the chain brake
by rolling your left hand forward against the lever.
H. Chain and motor should stop abruptly.
CAUTION: Never starve the bar and chain of
lubrication oil. Running the saw DRY or with
TOO LITTLE OIL will decrease cutting effi-
ciency, shorten chain saw life, and cause
rapid dulling of the chain and excessive wear
of the bar from overheating. Too little is evi-
denced by smoke or bar discoloration.
CAUTION:Aloose chain can jump off the bar
while you are cutting, as well as wear the bar
and chain. A chain that is too tight can dam-
age the saw. Either situation, chain too loose
or too tight, could cause serious personal
injury.
Fig. 9A
CAUTION: The chain brake should not be
used for starting and stopping the saw during
normal operation.
Fig. 9B
WARNING: If the chain and motor fail to
stop when the chain brake is engaged, take
the saw to the nearest professional Service
Center. Do not use the saw if the chain
brake is not in proper working order.
GENERAL CUTTING INSTRUCTIONS
• FELLING
Felling is the term for cutting down a tree. Small trees up
to 15-18cm in diameter are usually cut in a single cut.
Larger trees require notch cuts. Notch cuts determine the
direction the tree will fall.
FELLING A TREE:
NOTE: Direction of fall (B) is
controlled by the notching cut.
Before any cuts are made,
consider the location of larger
branches and natural lean of
the tree to determine the way
the tree will fall.
WARNING: A retreat path (A) should be
planned and cleared as necessary before cuts
are started. The retreat path should extend
back and diagonally to the rear of the expect-
ed line of fall, as illustrated in Fig. 10.
CAUTION: If felling a tree on sloping ground,
the chain saw operator should keep on the
uphill side of the terrain, as the tree is likely
to roll or slide downhill after it is felled.
Fig. 10A
A
B
WARNING: Do not cut down a tree during
high or changing winds or if there is a danger
to properly. Consult a tree professional. Do
not cut down a tree if there is a danger of
striking utility wires; notify the utility company
before making any cuts.
•GENERAL GUIDELINES FOR FELLING TREES:
Normally felling consists of 2 main cutting operations,
notching (C) and making the felling cut (D).
Start making the upper notch cut (C) on the side of the
tree facing the felling direction (E). Be sure you don’t
make the lower cut too deep into the trunk.
The notch (C) should be deep enough to create a hinge
(F) of sufficient width and strength. The notch should be
wide enough to direct the fall of the tree for as long as
possible.
Never saw completely through the trunk. Always leave a
hinge. The hinge guides the tree. If the trunk is complete-
ly cut through, control over the felling direction is lost.
Insert a wedge or felling lever in the cut well before the
tree becomes unstable and starts to move. This will pre-
vent the guide bar from binding in the felling cut if you
have misjudged the falling direction. Make sure no
bystanders have entered the range of the falling tree
before you push it over.
FELLING CUT:
1. Use wooden or plastic wedges (G) to prevent binding
the bar or chain (H) in the cut. Wedges also control
felling (Fig. 10C).
2. When diameter of wood being cut is greater than the
bar length, make 2 cuts as shown (Fig. 10D).
• LIMBING
Limbing a tree is the process of removing the branches
from a fallen tree. Do not remove supporting limbs (A)
until after the log is bucked (cut) into lengths (Fig. 11).
Branches under tension should be cut from the bottom up
to avoid binding the chain saw.
•BUCKING
Bucking is cutting a fallen log into lengths. Make sure you
have a good footing and stand uphill of the log when cut-
ting on sloping ground. If possible, the log should be sup-
ported so that the end to be cut off is not resting on the
ground. If the log is supported at both ends and you must
cut in the middle, make a downward cut halfway through
the log and then make the undercut. This will prevent the
log from pinching the bar and chain. Be careful that the
chain does not cut into the ground when bucking as this
causes rapid dulling of the chain.
When bucking on a slope, always stand on the uphill side.
1. Log supported along entire length: Cut from top
(overbuck), being careful to avoid cutting into the
ground (Fig. 12A).
2. Log supported on 1 end: First, cut from bottom
(underbuck) 1/3 diameter of log to avoid splintering.
Second, cut from above (overbuck) to meet first cut
and avoid pinching (Fig. 12B).
3. Log supported on both ends: First, overbuck 1/3
diameter of log to avoid splintering. Second, under-
buck to meet first cut and avoid pinching (Fig.
12C).
NOTE: The best way to hold a log while bucking is to use
a sawhorse. When this is not possible, the log should be
raised and supported by the limb stumps or by using sup-
porting logs. Be sure the log being cut is securely sup-
ported.
•BUCKING USING A SAWHORSE
For personal safety and ease of cutting, the correct posi-
tion for vertical bucking is essential (Fig. 13).
VERTICAL CUTTING:
A. Hold the saw firmly with both hands and keep the saw
to the right of your body while cutting.
B Keep the left arm as straight as possible.
C. Keep weight on both feet.
24
F
C
1/4
3/4
D
3.5cm
E
Fig. 10B
WARNING:
Never walk in front of a tree that
has been notched. Make the felling cut (D)
from the other side of the tree and 3-5cm
above the edge of the notch (C) (Fig. 10B).
WARNING:
As the felling cut gets close to the
hinge, the tree should begin to fall. When tree
begins to fall, remove saw from cut, unplug,
put chain saw down, and leave area along
retreat path (Fig. 10A).
Fig. 10C Fig. 10D
G
H
WARNING:
Never cut tree limbs while stand-
ing on tree trunk.
Fig. 11 Fig. 12A
Fig. 12B Fig. 12C
A
2
12
1

•BUCKING USING A SAWHORSE
For personal safety and ease of cutting, the correct posi-
tion for vertical bucking is essential (Fig. 13).
VERTICAL CUTTING:
A. Hold the saw firmly with both hands and keep the saw
to the right of your body while cutting.
B Keep the left arm as straight as possible.
C. Keep weight on both feet.
25
OIL PASSAGES - Oil passages at bar pad should be
cleaned to ensure proper lubrication of the bar and chain
during operation. This can be done using a soft wire small
enough to insert into the oil discharge hole.
NOTE: The condition of the oil passages can be easily
checked. If the passages are clear, the chain will auto-
matically give off a spray of oil within seconds of starting
the saw. Your saw is equipped with an automatic oiler sys-
tem.
•
CHAIN MAINTENANCE INSTRUCTIONS
WARNING:
Unless you have experience and specialized training for
dealing with kickback (see Safety Precautions), always
use a low-kickback saw chain, which significantly reduces
the danger of kickback. Low-kickback saw chain does not
completely eliminate kickback. A low-kickback or “safety
chain”, should never be regarded as total protection
against injury.
Alow-kickback saw chain should always be used in con-
junction with other kickback protection devices such as
the chain brake / Hand Guard furnished with your unit.
Always use a replacement saw chain designed as “low-
kickback” or a saw chain which meets the low-kickback
performance.
Astandard saw chain (a chain which does not have the
kickback reducing guard links) should only be used by an
experienced professional chain saw operator.
•What is a Low-Kickback Saw Chain?
Alow-kickback saw chain is a chain which has met the
kickback performance requirements of ISO 9518.
By keeping the chain brake and saw chain in good work-
ing condition and correctly serviced as recommended in
this manual, you will be able to maintain the safety system
of your chain saw over the life of the product.
•
CHAIN TENSION:
Check the chain tension frequently and adjust as often as
necessary to keep the chain snug on the bar, but loose
enough to be pulled around by hand. (See Section SAW
CHAIN TENSION ADJUSTMENT).
•BREAKING IN A NEW SAW CHAIN
Anew chain and bar will need readjustment after as few
as 5 cuts. This is normal during the break-in period, and
the interval between future adjustments will begin to
lengthen quickly.
Over a period of time, however, the moving parts of the
saw chain will become worn, resulting in what is called
CHAIN STRETCH. This is normal. When it is no longer
possible to obtain correct chain tension adjustment, a link
will have to be removed to shorten the chain. See your
Texas Authorized Service Center to have this repair per-
formed.
•CHAIN LUBRICATION:
Always make sure the automatic oiler system is working
properly. Keep the oil tank filled with Texas Chain, Bar and
Sprocket Oil.
Adequate lubrication of the bar and chain during cutting
operations is essential to minimize friction with the guide
bar.
Never starve the bar and chain of lubricating oil. Running
the saw dry or with too little oil will decrease rapid cutting
efficiency, shorten saw chain life, cause rapid dulling of
the chain, and lead to excessive wear of the bar from
overheating. Too little oil is evidenced by smoke or bar
discoloration.
•
PREVENTATIVE MAINTENANCE
SERVICING A DOUBLE INSULATED APPLIANCE
In this double insulated appliance, 2 systems of insulation,
instead of grounding, are provided. No grounding means
is provided on a double insulated appliance, nor should a
means for grounding be added to the appliance. No serv-
iceable parts are inside. A double insulated appliance is
marked with the words, “DOUBLE INSULATION” or
“DOUBLE INSULATED”. The symbol (square within a
square) may also be
marked on the appliance.
1. Place switch in OFF position and unplug the power
supply before the appliance is serviced, cleaned, or
maintenance is performed.
2. Keep the air intake clean and air vents free of debris
to avoid overheating the motor.
3. Clean with a damp sponge and mild soap. Do not
squirt with a water hose or douse with water or other
liquids.
4. Inspect the saw chain for proper tension before each
use and frequently during cutting. Sharpen as
required.
5. Clean the guide bar and bar pad to ensure free path
for oil.
6. Turn the bar over after each use to achieve even
wear.
7. No motor lubrication is necessary. The motor is
equipped with lifetime lubricated bearings.
8. If the saw does not operate, turn switch to OFF posi-
tion and disconnect the extension cord, first from the
power supply, then from the saw. Check the power
supply for blown fuses or tripped circuit breakers. If it
still does not operate, contact the Texas Product
Service Department, through the toll-free number list-
ed on the back cover of this manual, for service infor-
mation. Do not attempt to repair it yourself. No serv-
iceable parts are inside.
26
Fig. 13
A
B
C
CAUTION: While the saw is cutting, be sure
the chain and bar are being properly lubri-
cated.
BAR/CHAIN MANTENANCE
•GUIDE BAR MAINTENANCE
Proper maintenance of the guide bar, as explained in
this section, is essential to keep your saw in good
working order.
SPROCKET TIP LUBRICATION:
(For units supplied with sprocket tip guide bars only.)
Lubrication of the sprocket tip is recommended after each
saw use. Always thoroughly clean the guide bar sprocket
tip before lubrication.
Tool for lubrication: Texas Lube Gun (disposable)
This grease gun is designed to fit the small lubrication
point on the guide bar.
The disposable Lube Gun is packed with grease.
To Lubricate Sprocket Tip:
1. Unplug the chain saw from the power source.
NOTE: It is not necessary to remove the saw chain to
lubricate the guide bar sprocket tip. Lubrication can be
done on the job.
2. Clean the guide bar sprocket tip.
3. Using disposable Lube gun, insert needle nose into
the lubrication hole and inject grease until it appears
at the outside edge of the sprocket tip (Fig.14).
4. Make sure that the chain brake is deactivated. Rotate
the saw chain by hand. Repeat the lubrication proce-
dure until the entire sprocket tip has been greased.
To Clean Guide Bar Rails:
1. Remove sprocket cover, bar and chain.
2. Using a screwdriver, putty knife, wire brush or other
similar instrument, clear residue from the rails on the
guide bar. This will keep the oil passages open to pro-
vide proper lubrication to the bar and chain. (Fig. 15)
3. Reinstall the bar, chain, sprocket cover and bar bolt
retaining nuts. (See Section GUIDE BAR / SAW
CHAIN INSTALLATION).
•GUIDE BAR MAINTENANCE
Most guide bar problems can be prevented merely by
keeping the chain saw well maintained.
Incorrect filing and non-uniform cutter and depth gauge
settings cause most guide bar problems, primarily result-
ing in uneven bar wear. As the bar wears unevenly, the
rails widen, which may cause chain clatter and diffi-
culty in making straight cuts.
Insufficient guide bar lubrication and operating the saw
with a chain that is TOO TIGHTwill contribute to rapid bar
wear (see Section CHAIN MAINTENANCE INSTRUC-
TIONS).
To help minimize bar wear, the following guide bar main-
tenance is recommended.
BAR WEAR - Turn guide bar frequently at regular inter-
vals (for example, after 5 hours of use), to ensure even
wear on top and bottom of bar.
BAR GROOVES - Bar grooves (or rails which support and
carry the chain) should be cleaned if the saw has been
heavily used or if the saw chain appears dirty. Rails should
always be cleaned every time the saw chain is removed.
WARNING:
Ensure that the power cord is dis-
connected before performing any mainte-
nance on your saw.
CAUTION: Failure to lubricate the guide bar
sprocket tip as explained below will result in
poor performance and seizure, voiding the
manufacturer’s warranty.
WARNING:
Wear heavy duty work gloves
when performing this application to reduce
risk of personal injury.
Fig. 14 Fig. 15
WARNING:
Never remove, modify or make
inoperative any safety device furnished with
your unit. The Chain Brake/Hand Guard and
low-kickback saw chain are major safety fea-
tures provided for your protection.
WARNING:
Always wear heavy duty protec-
tion work gloves and disconnect the exten-
sion cord when working on the saw chain.
WARNING:
Never have more than 3 links
removed from a loop of chain this could
cause damage to the sprocket.
This manual suits for next models
1
Table of contents
Other Texas Saw manuals
Popular Saw manuals by other brands

SawStop
SawStop Jobsite Saw Getting started

Wen
Wen 3630 manual

Wuyi Guanxin Machinery
Wuyi Guanxin Machinery GX-MC010A-1 instruction manual

Central Machinery
Central Machinery 93012 Assembly and operating instructions

Hilti
Hilti WSC 7.25-S Original operating instructions

Bosch
Bosch PTS 10 Original instructions