Texol Midgeater Max User manual
TEX0000203969 REV A0

-
2
-
List of Contents
1 Introduction
2 Safety Precautions
3 Bait Information
4 Customer Assembly of Weather Cover
5 Operating Instructions
6 Machine Placement
7 Troubleshooting Guide
8 Cleaning Instructions
9 Maintenance and Service Chart
10 Winter Storage Instructions
11 Frequently Asked Questions
12 Warranty Information
13 Spare Parts List & Prices
14 Technical Data
15 Contact Details

-
3
-
1. Introduction
Dear customer,
You have purchased a new MidgeaterMax insect catching device. We
want to thank you for the trust that you have put in our quality products
and hope that you gain much benefit from its operation. The materials
and workmanship have been used to ensure that no functional defects
occur provided the MidgeaterMax is used for its designed purpose only.
Before putting the MidgeaterMax into use for the first time, please
familiarise yourself with the contents of this instruction booklet.
Due to ongoing improvements of the product the information contained in
this booklet is subject to alterations without the manufacturer being
obliged to notify or update under the provision that the essential
properties for safety and operation do not change. In cases of doubt
please do not hesitate to contact your retailer.
Please visit the Texol website for the latest information on our products.
www.texol.co.uk

-
4
-
2. Safety Precautions
•The MidgeaterMax is designed for outdoor use only.
•The MidgeaterMax should only be used for insect capture.
•Carefully supervise children and animals when the
MidgeaterMax is in use.
•Please remember there are no “safe slopes”. Position the
MidgeaterMax on level ground.
•In an emergency or if there is a smell of gas present always turn
off the gas supply at the regulator. Do not use until the source of
gas escape has been repaired by a competent person.
•Attention should be made to ensure the gas hose is not bent or
buckled. The hose should be checked every time the cylinder is
changed for cracking and damage. If hose needs changing use
an approved hose BS3212 Type 2.
•Repairs and maintenance on the gas components should only be
carried out by a qualified specialist.
•Use only the specified gas type.
•For cylinder gas delivery call Calor Gas Direct on 0800 662 663

-
5
-
We would point out that we are not liable according to the product
liability act for damage caused by our machine as a result of: -
a) improper repairs not carried out by authorised service engineers.
b) or if ORIGINAL SPARE PARTS are not used as replacement
parts.
c) this product has been safety tested as is, any alterations to the
MidgeaterMax will nullify your warranty.
Precautions for Handling Bait Sachet
The bait is harmful if swallowed, absorbed through skin or inhaled.
Avoid skin, mouth and eye contact with the tablet. Wash thoroughly
with soap and water after handling. Avoid inhalation.
Statement of Practical Treatment
If inhaled – move to fresh air.
If on skin – wash affected area with soap and water.
If in eyes – flush with plenty of water. Call a physician if irritation
develops.
Disposal of Used Bait
Wrap used sachet in plastic bag and discard into rubbish bin.
-
6
-
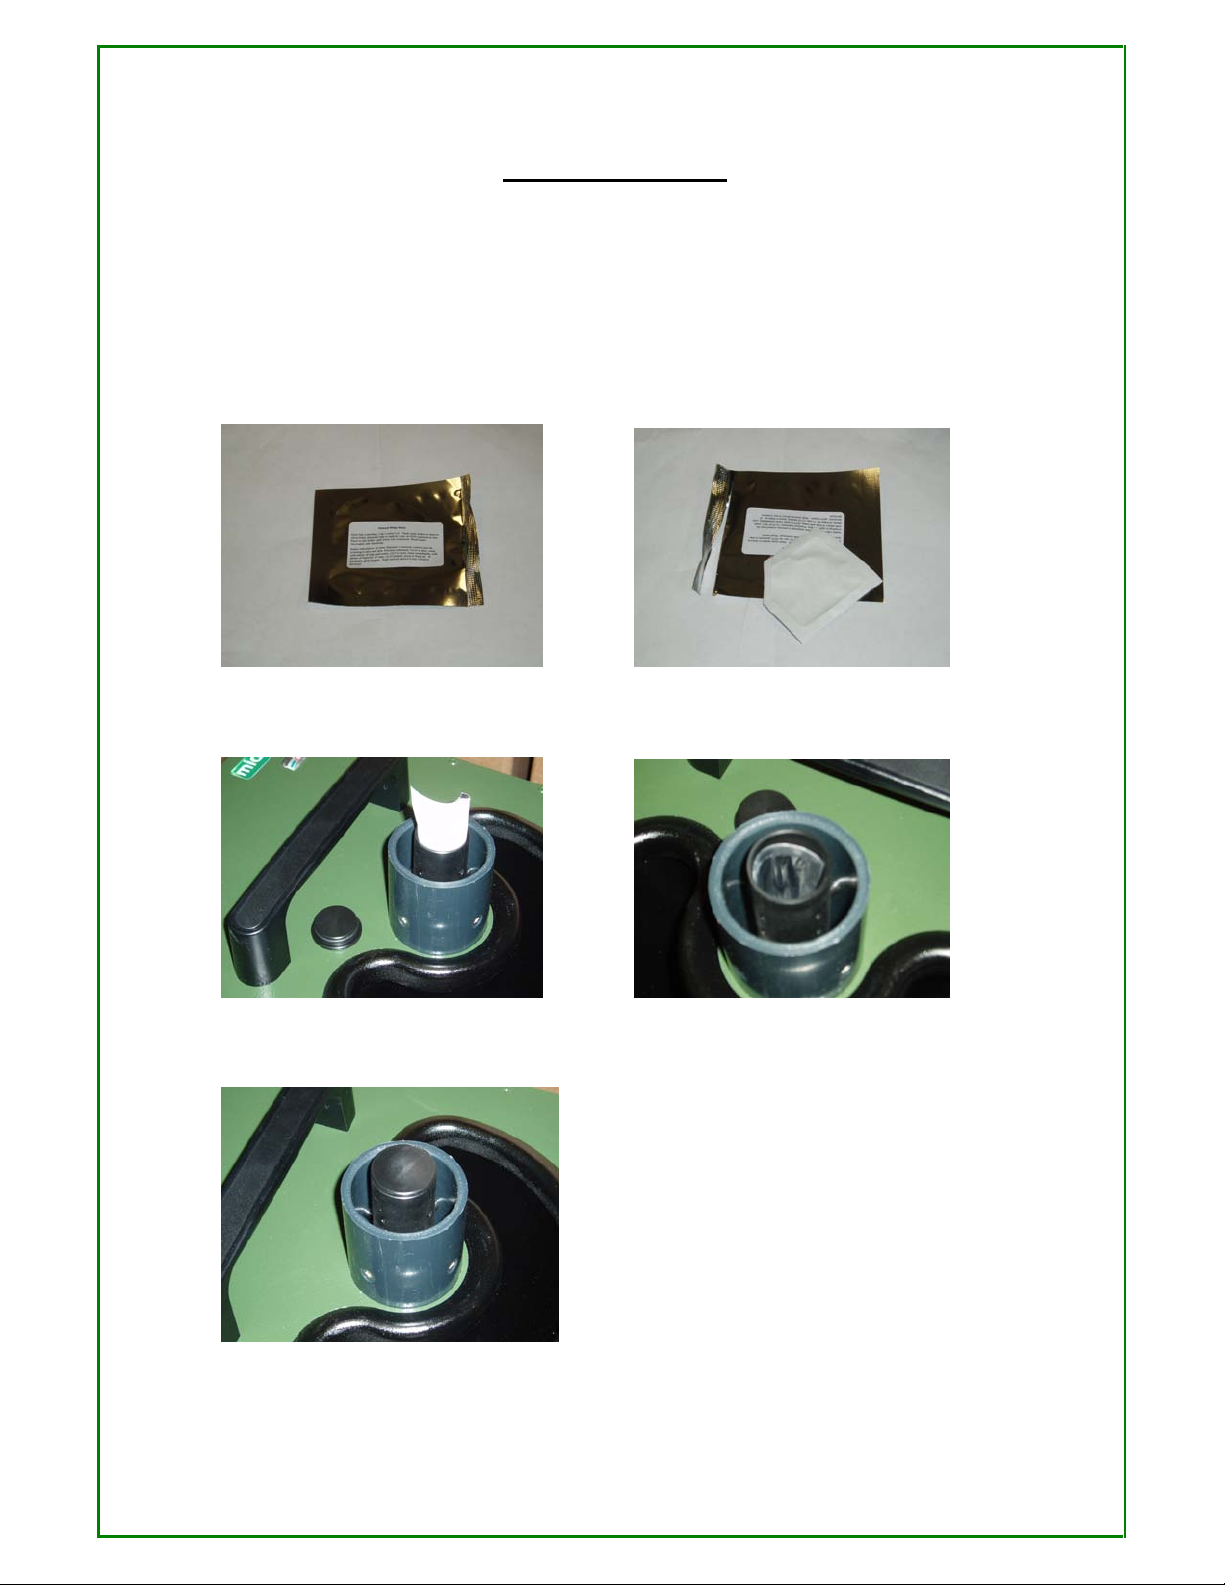
3. Bait Information
The bait/attractant should be placed in the bait holder, as per the
following diagrams.
a. open bait packaging b. remove sachet from foil
c. roll into holder d. place bait into holder as below
e. replace bait holder cap
-
7
-
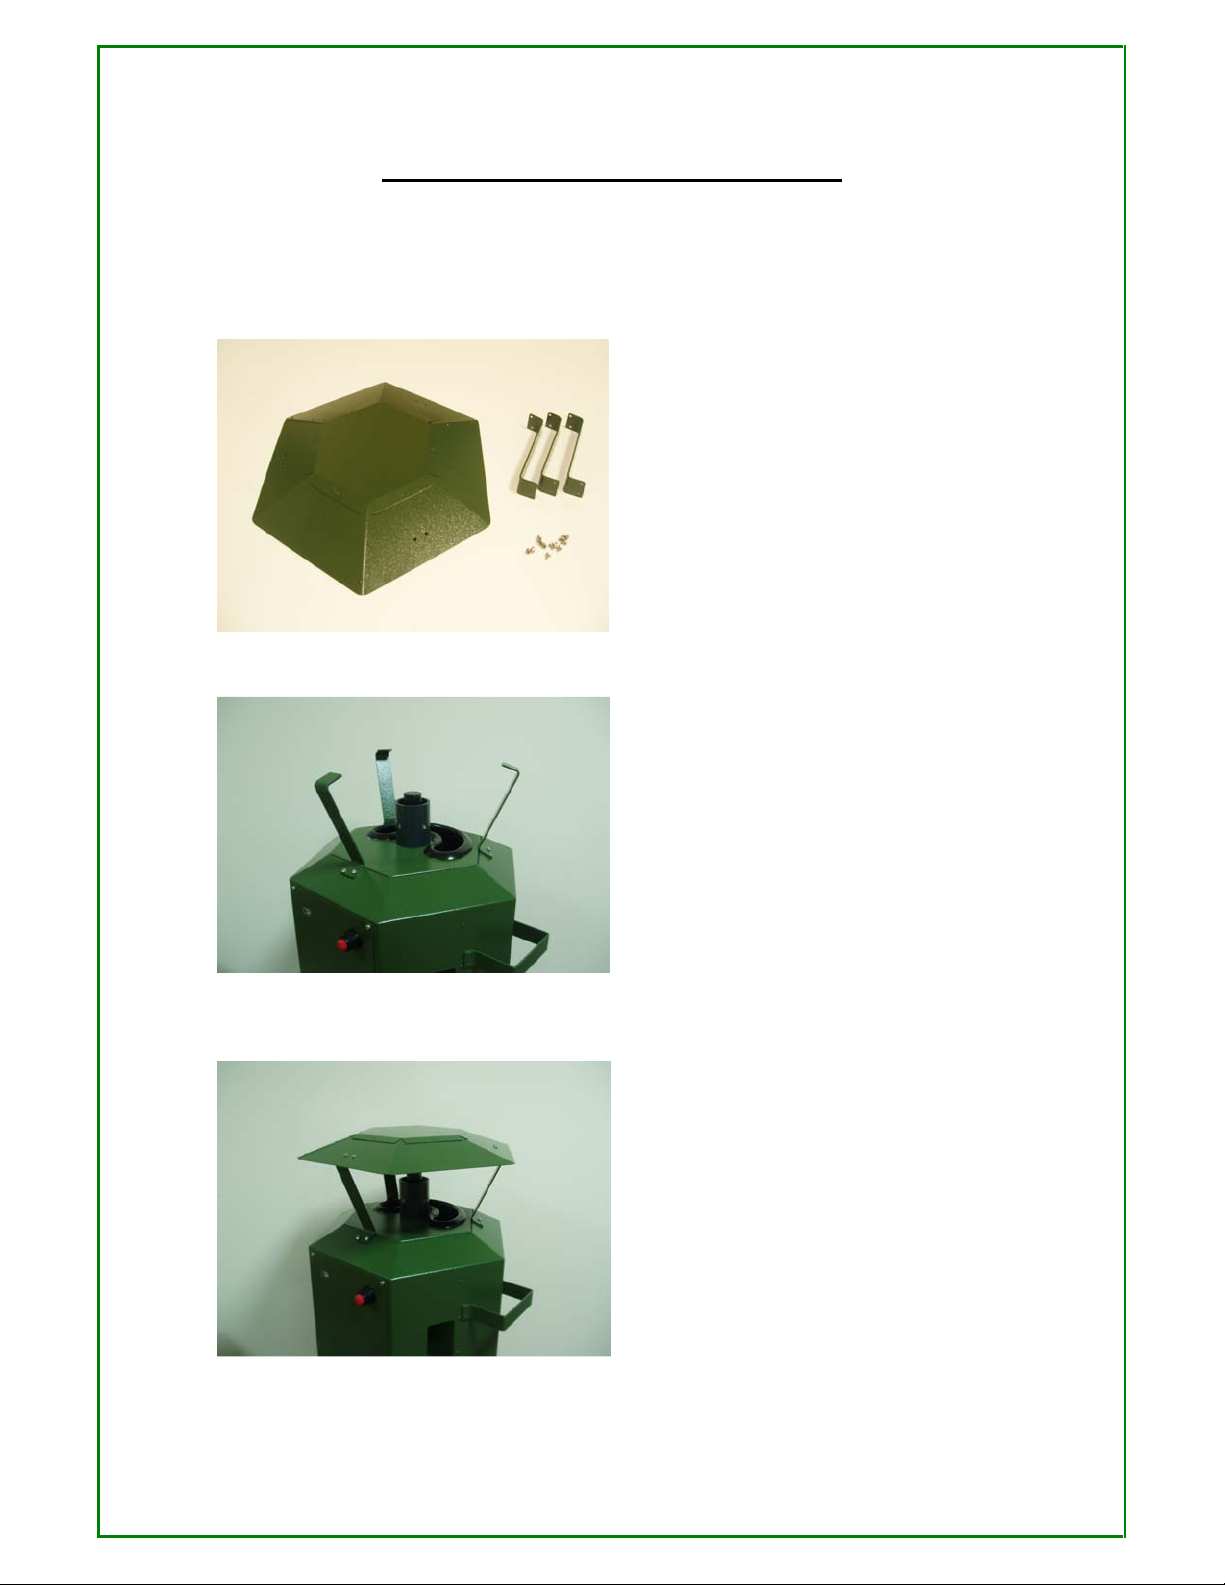
4. Customer Assembly of Weather Cover
REMOVE CUSTOMER PACK FROM GAS BOTTLE COMPARTMENT.
A POZI SCREWDRIVER IS REQUIRED FOR THIS ASSEMBLY:
Fig 1
Fig 2
Fig 3
THE PARTS YOU WILL HAVE ARE:
1 x HOOD
3 x STRUTS
12 x M4 SCREWS
SECURE THE 3 STRUTS TO THE
CHASSIS USING 6 SCREWS IN THE
ORIENTATION SHOWN IN Fig 2.
ATTACH THE HOOD TO THE STRUTS
USING 6 SCREWS IN THE
ORIENTATION SHOWN IN Fig 3.
-
8
-
5. Operating Instructions
1. Place MidgeaterMax in desired position on level ground.
2. The bait/attractant should then be placed in the bait holder, ensuring
that the bait holder cap is replaced.
3. Connect the click/on regulator to patio gas bottle.
4. Place gas bottle inside the MidgeaterMax.
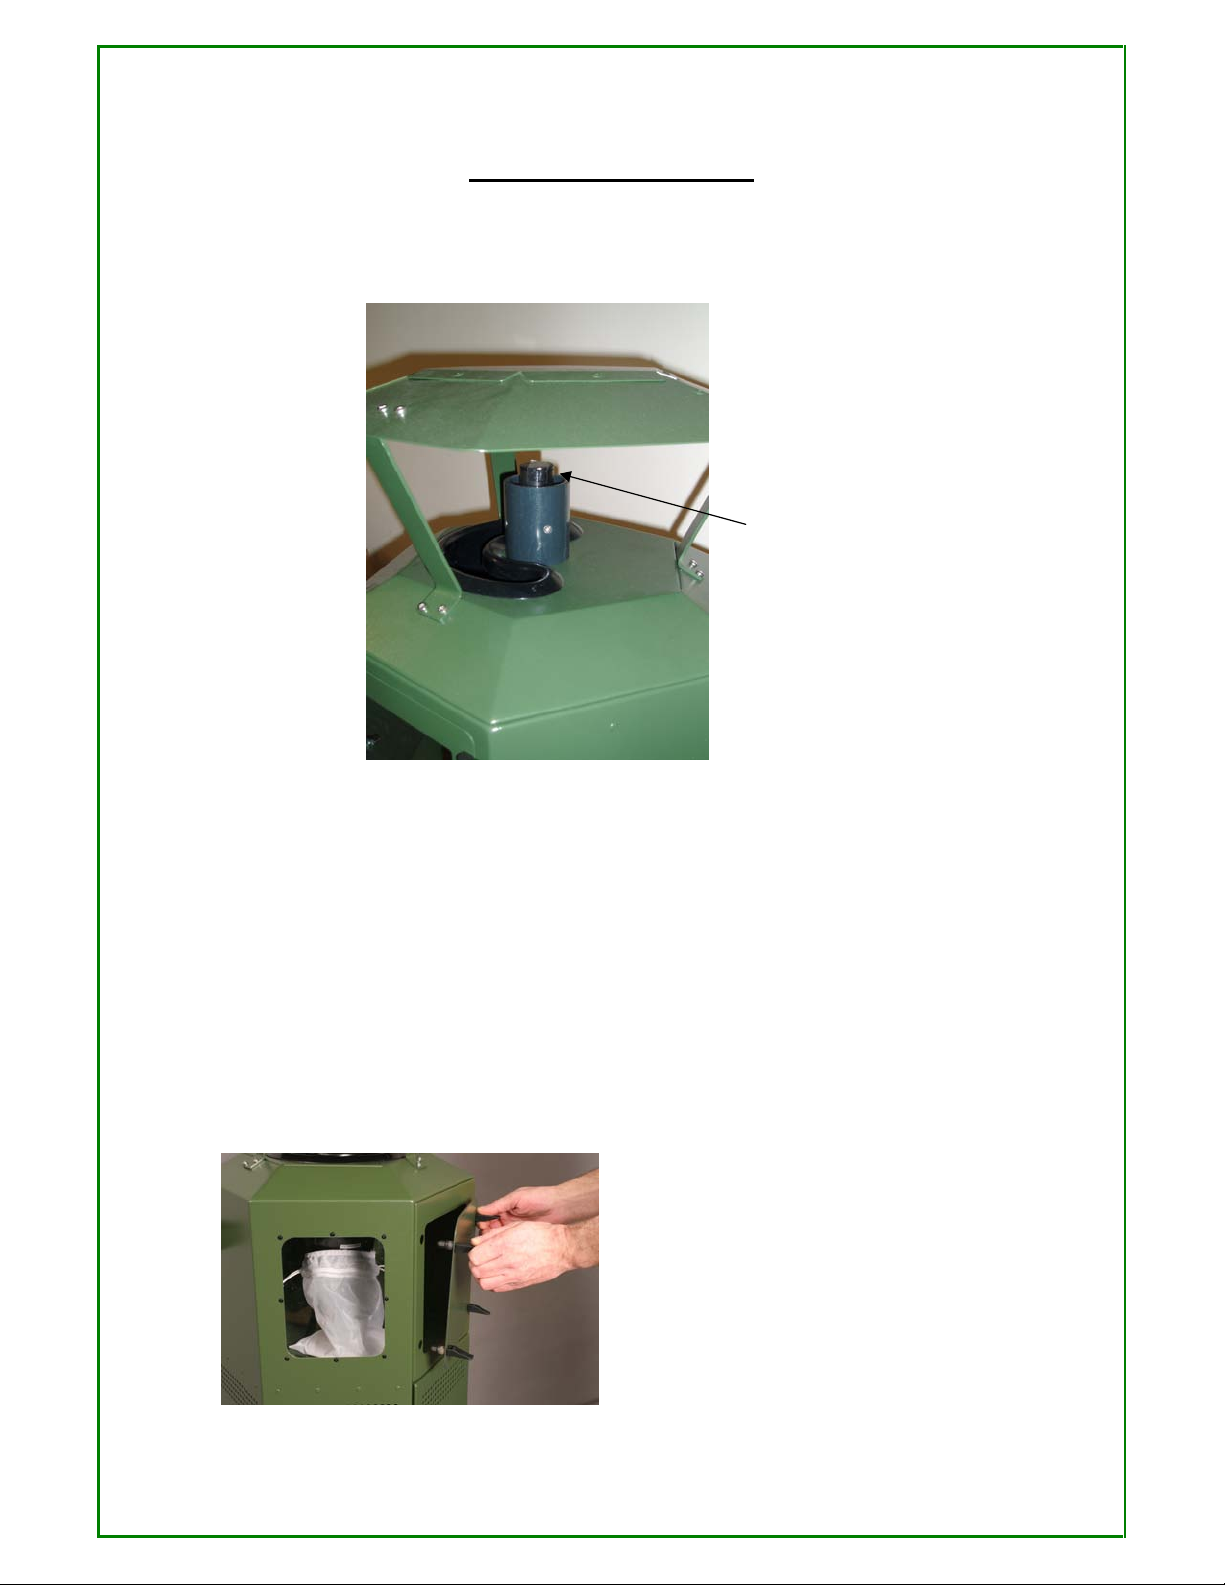
5. Fit midge capture bag in vacuum chamber. (see below)
Remove Cap
Place Bait
Replace Cap
-
9
-
6. Ensure vacuum chamber door is closed.
7. Ensure that the grey lever on the click/on regulator is in the
vertical position (on) and gas bottle chamber door is closed.
8. When starting from cold the system will have to be primed i.e. hold
black button in for approx. 15 seconds. This lets the gas flow through
the hose.
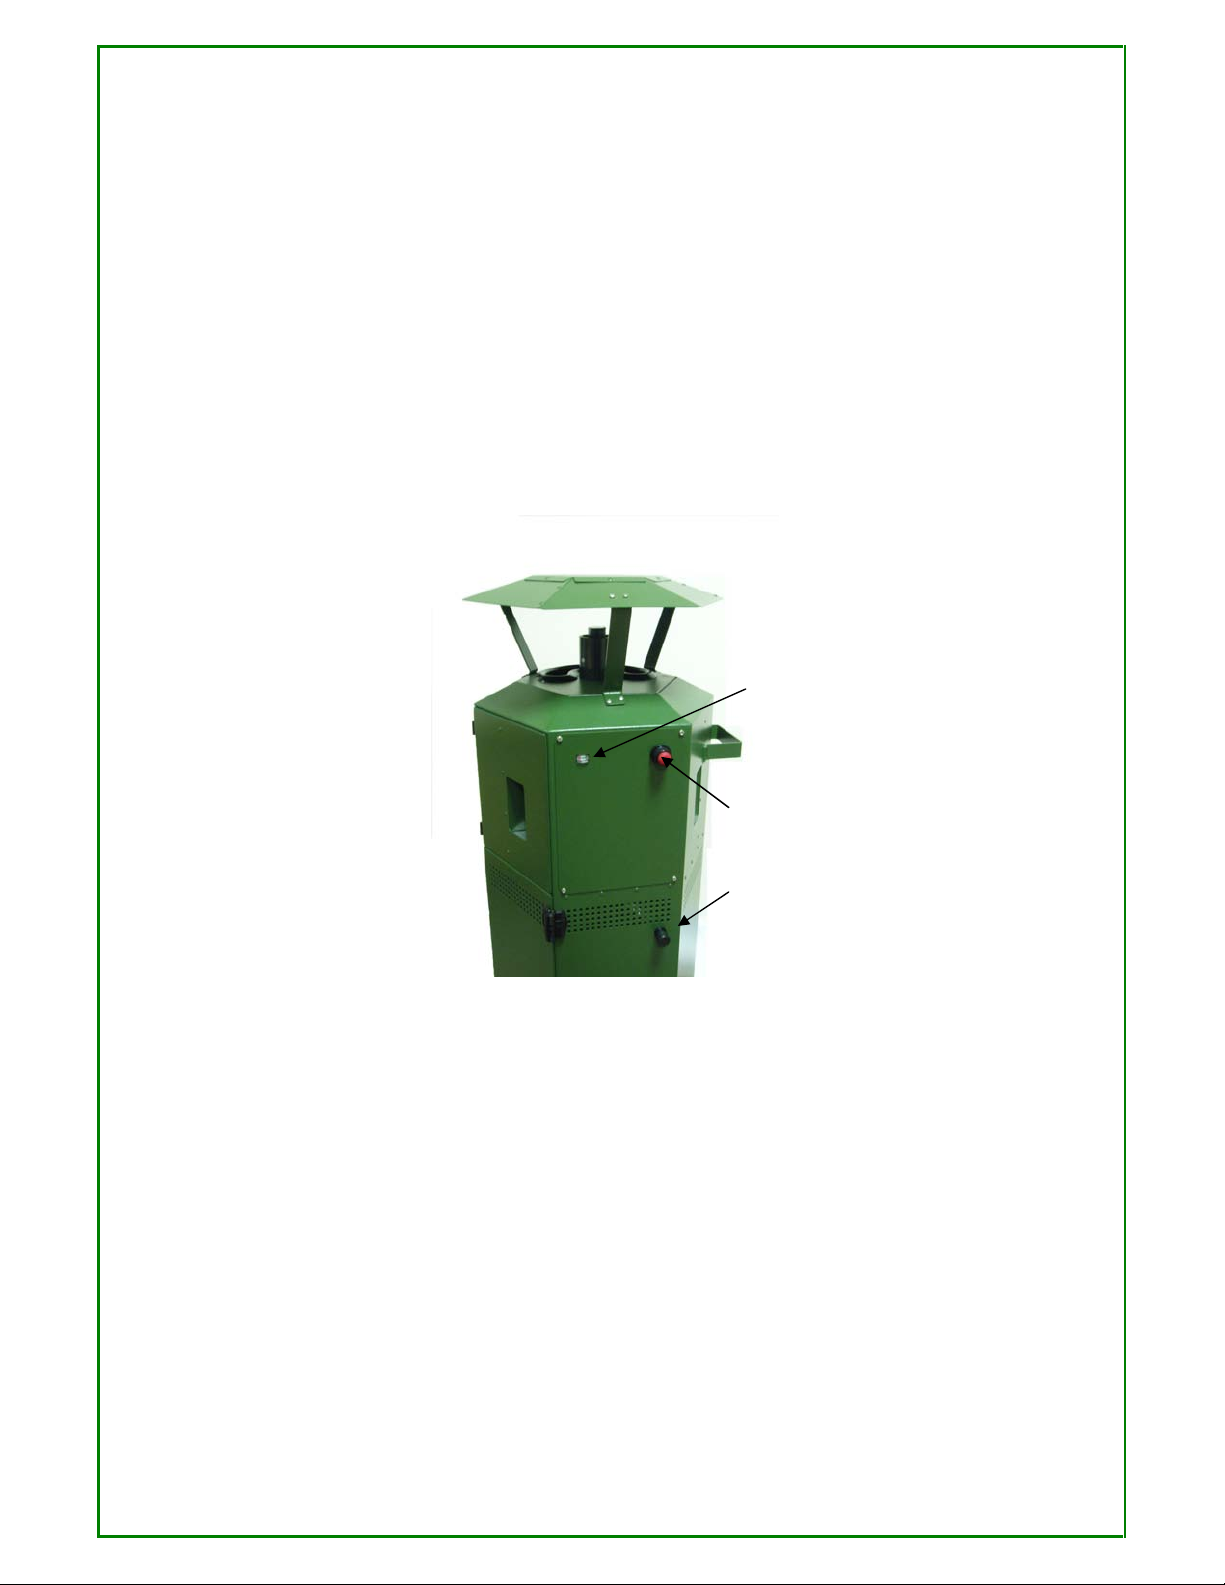
9. Press black button and hold in position.
10. After 5 seconds press red igniter button (keeping the black button held
down) until a pop is heard, the gas has now ignited.
11. Keep the black button held down until the power indicator needle has
moved between the red and the green section. This should take
approximately 90 seconds (please note that if the black button is
Safety
Button
(black)
Igniter
Button
(red)
Power
Indicator

-
10
-
released at any time during the above operation, you must repeat the
process from step 9).
12. After releasing the black button the needle on the power indicator
should continue to rise into the green section.
13. Your MidgeaterMax should now be operational.
A 13kg patio gas bottle should last 24 to 28 days. This only applies
if the MidgeaterMax is left to run continuously, for which purpose it has
been designed and tested. Continuous use is recommended for best
results.

-
11
-
6. Machine Placement
As midges are attracted to any warm CO2 producing source
(including people and animals) the machine should be sited away from
where people congregate. Ideally the midges should reach the
MidgeaterMax before they reach the people.
It may be worth trying several locations to identify which is the
most effective for your MidgeaterMax. Furthermore, changes in wind
direction could alter the midges’ behaviour so it may be necessary to
move the trap from one location to another throughout the season.

-
12
-
7. Trouble-Shooting Guide
Below is a list of problems that we believe that our customers may be
able to solve themselves when the unit fails to operate correctly. If you are
unsure about carrying out any of these tasks, please call our technical help
line (01382 618444) for assistance.
GAS CONNECTION: Ensure that the Quick-On gas regulator is fitted to
the gas bottle correctly. The regulator is pushed on in position which
allows the grey switch to turn.
IGNITION PROBLEMS: Firstly check the igniter button. You should
hear a clicking noise when the red button is depressed. If the clicking
noise cannot be heard, unscrew the red button Cap and replace the AA
battery. Screw the cap back on and retry. If there is still no clicking,
remove the service panel as shown in figures 1, 2 & 3.
Fig 1 Fig 2 Fig 3

-
13
-
STEP 1 Remove the four screws as shown in fig 1 using a Phillips head
screwdriver.
STEP 2 Let the service panel hang down as shown in fig 2.
STEP 3 You can now check the wire connection from the igniter to the
spark tip.
STEP 4 Replace the service panel as shown in fig 3 and retry.
** NEVER TRY TO IGNITE THE MIDGEATER WHEN THE
SERVICE PANEL ** IS REMOVED AS IN FIG 2.
STEP 5 If the problem persists a Texol engineer should be called to
rectify the fault.
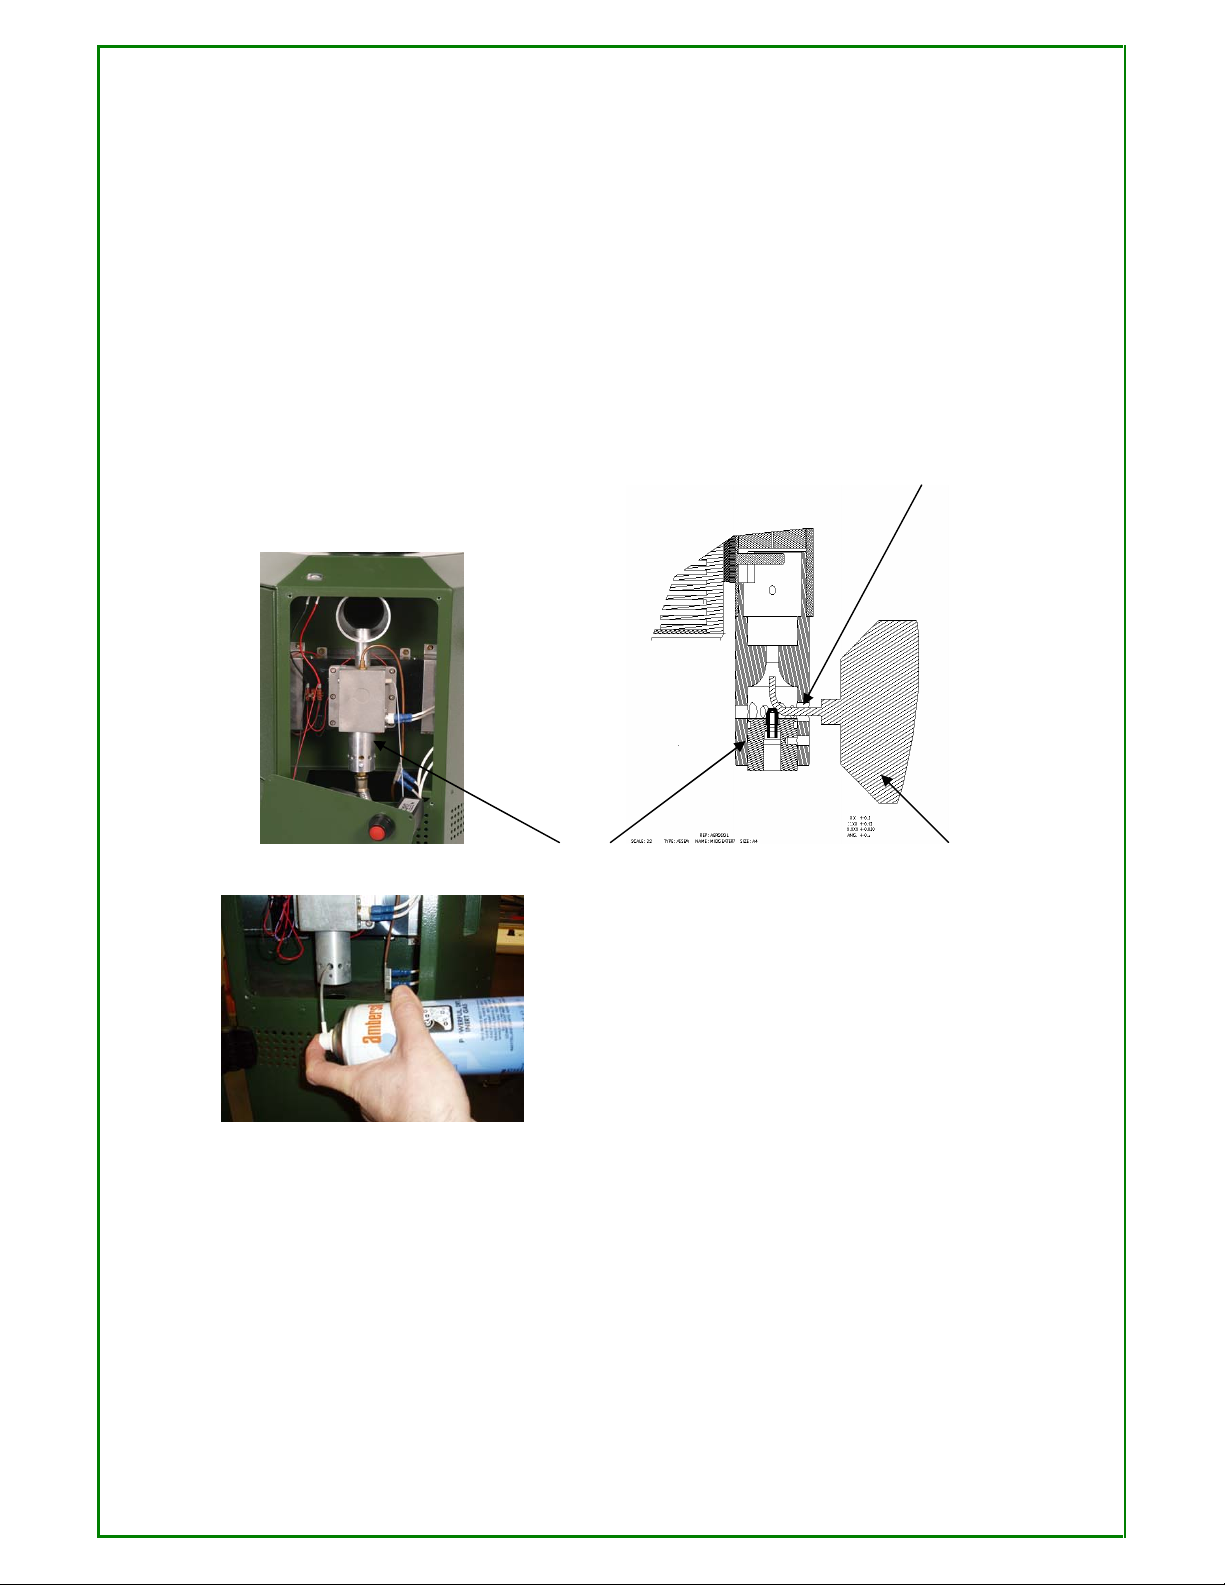
NOZZLE HOUSING BLOCKAGE: Assuming that the regulator is fitted
properly and the igniter is sparking, the next check is the Nozzle
Housing. This can become blocked due to spiders casting a web inside
the housing, this restricts the gas flow which does not allow the
combustion process to occur. See figure 4 below.
The nozzle housing can be cleared with the use of an air duster aerosol
dispenser (supplied in customer kit). Firstly remove service panel as
before, then using the tube attachment on the air duster, insert the tube
into the nozzle housing through the air vents. Try to get the tube pointing
-
14
-
up towards the combustion chamber area and disperse the air duster to
clear any blockages. See fig 5 & 6 below. It is important to ensure that
the nozzle housing and the chimney area are kept clear. Replace the
service panel and repeat the ignition process
Fig 4 CHIMNEY AREA Fig 5
AEROSOL TUBE
NOZZLE HOUSING AIR DUSTER AEROSOL
Fig 6

-
15
-
POWER INDICATOR: If your MidgeaterMax has ignited but the power
indicator needle does not move from the red area, check that the fan in
the midge capture chamber is working. If the fan is working, the
MidgeaterMax can still be used even though the power gauge is not
operational. A new gauge can be ordered by calling the helpline.
FAN FAILURE: If your MidgeaterMax starts up but the fan fails to
operate, turn the gas off. A new fan can be ordered by calling the
helpline.
MIDGEATER CUTTING OUT: Your MidgeaterMax is operational but
after a short period of time the MidgeaterMax cuts out. This fault may be
caused by a problem with the bi-metallic switch which is located on the
engine. A new switch can be ordered by calling the helpline.
If you have problems with any of the trouble-shooting guides, please do
not hesitate to call the Midgeater Helpline 01382 618444. When no one
is available to take your call please leave a message with your name and
contact Number where you can be reached. We will make every effort to
reply to your call within the working day.

-
16
-
8. Cleaning Instructions
Tools required for cleaning are, a Philips screwdriver and a vacuum
cleaner with crevice attachment.
1. Remove midge capture bag
2. Clean midge capture chamber with a damp cloth or vacuum cleaner
3. Remove service panel by removing 4 screws as per Fig 7.
4. Carefully allow service panel to hang down, the service panel being
held by the connecting wires as in Fig 8.
5. Clean out the chimney/ flue area using a vacuum crevice tool or
similar as per Fig 9.
6. Vacuum out the nozzle housing ensuring that the air holes are clear,
again using crevice tool or similar (Fig 10). You can also use the
aerosol duster to clear the holes (Fig 11).
7. Remove gas bottle and thoroughly clean gas bottle chamber with
damp cloth.

-
17
-
Fig 7 Fig 8
Fig 9 Fig 10
Fig 11
-
18
-
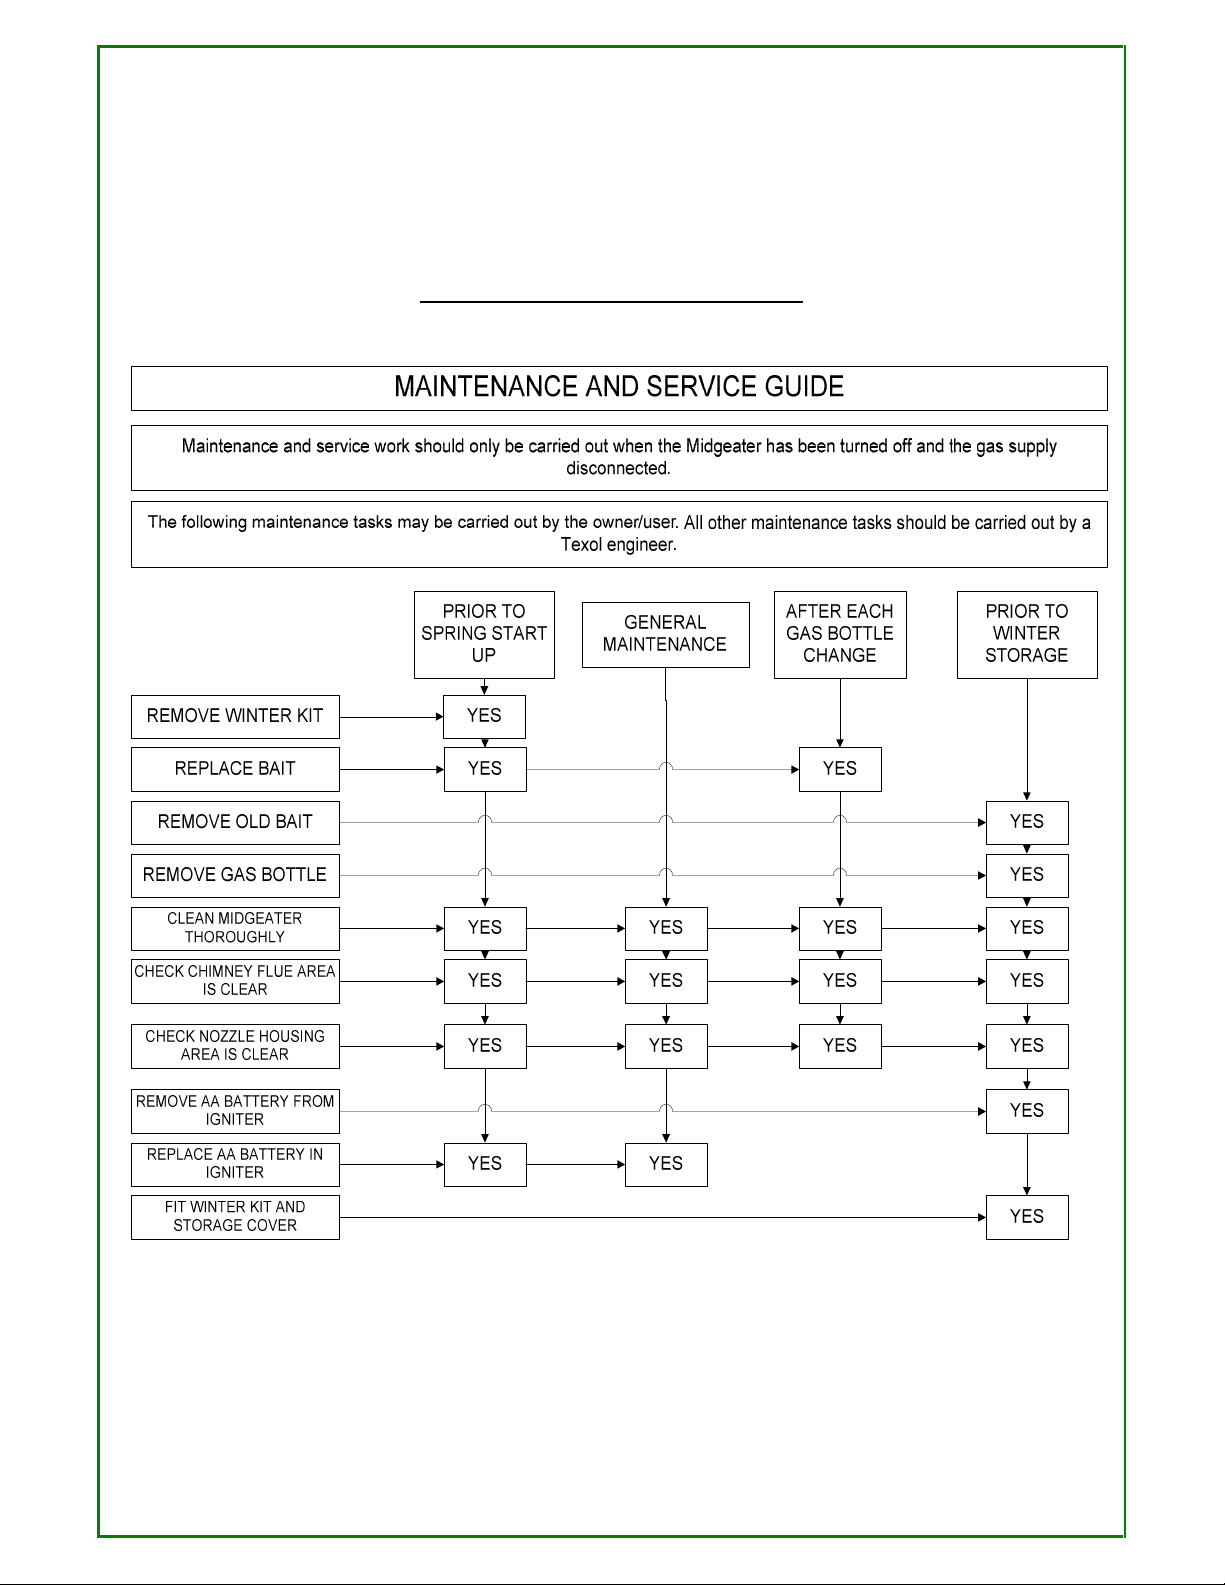
9. Maintenance and Service Chart

-
19
-
10. Winter Storage Instructions
We strongly recommend that your MidgeaterMax is thoroughly cleaned
as per the cleaning instructions previous and also by using the supplied
winter kit (contact helpline if winter kit is required) before winter storage.
By following the instructions below, this should help to prevent any
future problems arising on start-up next season.
Insert cork supplied
Apply Velcro supplied
1. After removal of service panel, insert the cork into the exhaust
chimney and apply the Velcro strip to cover the combustion unit air
holes.
2. Remove any remaining bait sachets from bait holder.
3. Cover MidgeaterMax, preferably with a MidgeaterMax storage cover.
(see www.texol.co.uk or contact distributor) and store in a dry place,
i.e. garage or garden shed.
NOTE: *WINTER KIT TO BE REMOVED PROIR TO SPRING START-UP*

-
20
-
11. Frequently Asked Questions.
Q. How does the MidgeaterMax work?
A. The MidgeaterMax draws insects towards it by emitting a plume of
harmless carbon dioxide. This is produced as a by-product of burning
propane through catalytic conversion, which also produces warmth and
moisture. These attractants combined with a bait tablet provide the
formulae to which insects are attracted. When they fly towards the
machine they are expecting a tasty blood meal. The MidgeaterMax then
sucks them into a disposable bag. No insecticides are used.
Q. How long should my gas bottle last?
A. Approx 24 – 28 days (when the MidgeaterMax is running 24/7).
Q. When should I replace the bait tablet?
A. The bait tablet should be replaced at same time as a gas bottle change
over.
Q. Should I switch my MidgeaterMax off during the day?
A. No. MidgeaterMax has been designed to be kept running 24/7, it
should be noted that if the MidgeaterMax is switched off any captured
midge will escape from the capture bag.
Q. Where can I buy MidgeaterMax spares bags & bait tablets?
A. You should be able to purchase these from the retailer that you
purchased your MidgeaterMax from.
Table of contents
Other Texol Lawn And Garden Equipment manuals

Popular Lawn And Garden Equipment manuals by other brands


Echo
Echo 90096 MUFFLER KIT CS-330T installation instructions

Yardmaster
Yardmaster 104 PZ Assembly instructions

juwel
juwel Ergoline 20479 Mounting instructions

FarmTek
FarmTek Growers Supply 112416S6X10 instruction manual

Snapper
Snapper Clean Sweep Triple Catcher Operator's manual

EarthQuake
EarthQuake 6015V Original operating instructions


