TGOOD E5T1132 User manual

ELECTRIC VEHICLE
CHARGING BOX

ELECTRIC VEHICLE
CHARGING BOX
User Manual

Preface.............................................................................
Safety precautions......................................................
1. Product introduction.............................................
2. Mechanical and electrical installation.............
2.1 Internalstructurediagram................................
2.2 Installation..............................................................
3. Charging Process....................................................
4. Warranty ....................................................................
01
02
03
04
04
04-05
06-08
09
Content

01
This product is designed and manufactured according to IEC61851 and SAEJ1772 international
standards.
Use limitations of the Electric Vehicle Charging box
This EV charging box is designed for use in the following conditions:
Sea level < 2000m
Surrounding Temperature -40℃~ 45℃
Relative humidity of < 85%.
More severe conditions require special instructions when ordering.
Precautions and dangers
Note: please follow the safe use instructions and legal notes.
The EV Charging Box must always be installed according to the legal requirements in the country
of installation.
Danger: voltage hazard
This product can cause serious injury if you come into contact with its internal parts during work.
Furthermore, please disconnect the power supply after use.
Repair:
Do not try to repair the product. In case of problems please contact the customer service.
Warning: opening the device without permission may cause danger
Opening the device without permission may cause harm to the user or cause signicant damage to
itself or the surroundings.
Note: unauthorized modication of the device will result in the loss of manufacturer's warranty
No unauthorized modification of the device is allowed, any attempt to do so and the
manufacturer's warranty will be revoked.
Preface

02
Do not put inammable, explosives, combustible materials, chemicals, combustible
steam and other dangerous articles near the charging pile.
Keep the charging connector head clean and dry. In case of dirt, wipe it with a clean
dry cloth. It is strictly prohibited to touch the core of the charging connector core
with your hand while it is charging.
It is strictly prohibited to use the EV Charging Box if there is visible damage, cracks,
abrasions or exposed metal in the connector or charging cable. In case of such,
please contact the After Sales Service.
Do not attempt to dismantle, repair or modify the EV Charging Box. If in need for
repair or modification, please contact the After Sales Service. Improper operation
may cause damage, water leakage, power leakage or other situations which can lead
to personal injury or product failure.
In case of rain and thunder, be cautions when charging.
Children are not allowed to approach or use the EV Charging Box during the
charging process in order to avoid injury.
Do not attempt to charge the vehicle when moving. The vehicle must be at a
complete stand still during the entire charging process.
1.
2.
3.
4.
5.
6.
7.
Safety Precautions

03
1.1 Product introduction
This product is a single-phase or three-phase EV Charging Box, solely used for ac
charging of electric vehicles. The equipment adopts industrial design principles.
The protection level of the EV Charging Box reaches IP55, with good dustproof and
waterproof functions, and can be operated and maintained safely outdoors. This series
Electric Vehicle Charging Box come in two version: the cable version and the socket
version.
1.Product Introduction
Type E5T1132/
E5T2132 E5T2332 E5T2232 E5T2432
AC power 1P+N+PE 3P+N+PE 1P+N+PE 3P+N+PE
Power supply
Voltage AC230~±10% AC400~±10% AC230~±10% AC400~±10%
Rated current 10-32A
Frequency 50-60Hz
Cable length 5m
Sockets/plugs type1/type2 type2 type2 type2
Weight 4.4kg 5.6kg 2.65kg 2.8kg
IP grade IP55
Environment
temperature -40℃~45℃
Humidity no condensation
Cooling way naturalcooling
RFID optional
Cable Socket
04
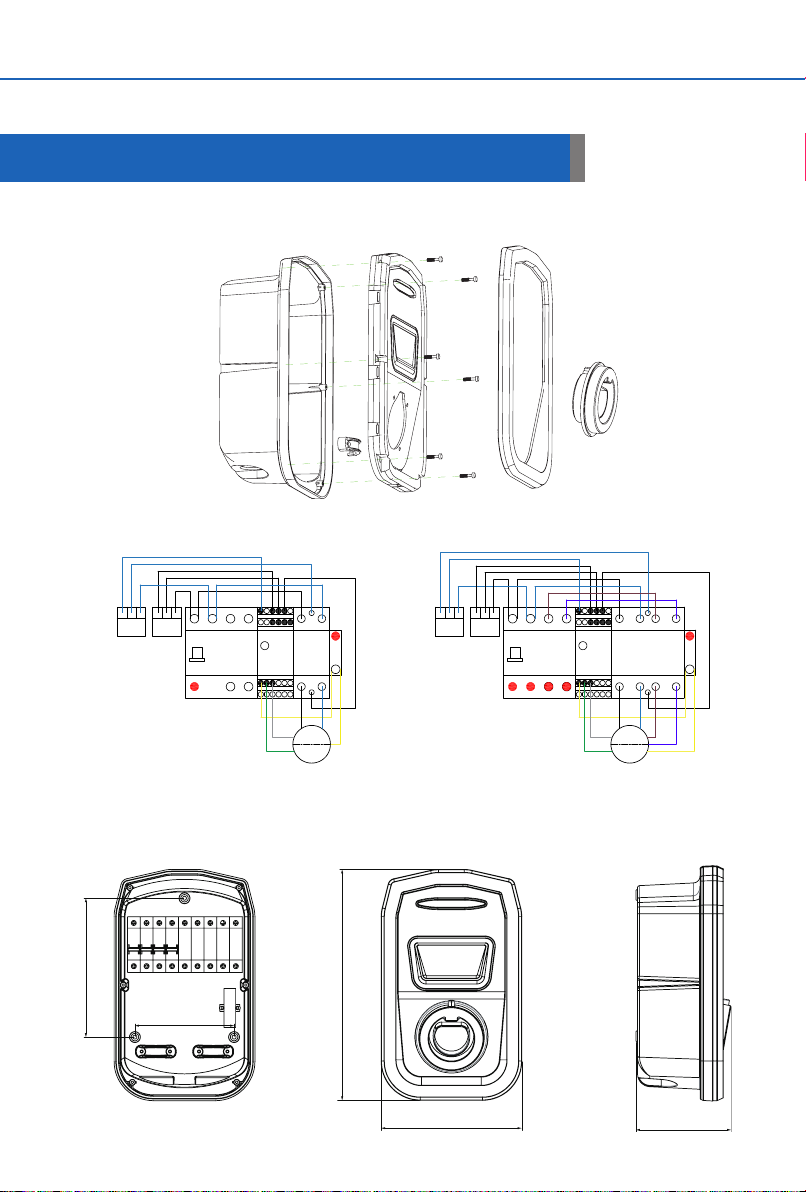
2.Mechanical And Electrical Installation
2.1 Internal Structure Drawing
2.2 Installation
1). Overall dimension and installation size (unit: mm)
196
140
199
326
132
LN
V0
P1 P2
GN
RD BLV0
CP CS
controller
TYPE B contact
PE
NL
plug
socket
LN
V0
P1 P2
GN
RD BLV0
CP CS
controller
TYPE B contact
PE
NL1
plug
socket
single phase three phases L2 L3
status status
D:\ZMWORKS\充电桩原理图\接线图.dwg, 2019/12/19 8:48:28, Microsoft Print to PDF

05
2). Make 3×35mm sink holes of installation hole size in the wall, insert the wall plug, and
then screw in M5X30 screws through the installation holes inside the EV Charging Box.
The power line is connected with a Type B Residual current circuit breaker, the single-
phase EV Charging Box is connected with N and L, and the three-phase EV Charging
Box is connected to N ,L1, L2 and L3. Ground wire (PE wire) is connected to the yellow
and green terminals.
4). Current option and setting by DIP switch
WARNING:Installation and AMP settings are only to the carried out by a trained and
authorized electrical installer.
The current of the device is set to 32Amp as default factory setting
However, the rating can be adjusted to 10, 16, 20, 25, 32A via built-in DIP switch of
protocol controller as user request.
DIP switch setting for RFID version :
A 10 16 20 25 32
mm² 2.5 2.5 4 4 6
DIP DIP DIP DIP DIP
3). Recommended cable section:
DIP switch setting for tethered cable and free/socket version :
LOST CARD RFID

06
3.1 Check before operation
Before operation, please carefully check and ensure the following items:
The installation position of the EV Charging Box should be convenient for operation
and maintenance. The EV Charging Box shall be properly installed using the
mounting bracket included in the accessories.
No external objects or parts are left on top of the EV Charging Box.
3.2 Power on the equipment
A. Confirm that all the above pre-operation inspection items meet the
requirements.
E . RFID version : after the self-test is completed ,the indicators blue stable .It will be
valid within 5 minutes if you do not connect the car. Otherwise, you need to swipe
the card again.
5 cards as standard.
D. Standard version: After the self-test is completed, the indicators blue light ashes
for cable version, the indicators blue steady light for free/socket version and the EV
Charging Box is ready for use and you can connect to you Electric Vehicle.
C. After the EV Charging Box is connected to the power supply, allow for 7 seconds
of startup self-test time, and the indicator light will be displayed switching between
red, blue and green.
B. Switch on the power supply inlet circuit breaker.
3.Charging Process

07
F. After connecting your EV Charging box to you Electric Vehicle, please refer to the
table below for the status of the charging process.
Modes Usage(Swipe) Action LED Indication Status
On Once Startup Green icker Charging
Timing
(2 minutes against
startup)
Startup + One
extra
Set to charge 1
hour
Blue once +
Green once
Charging for 1
hour
Startup + Two
extra
Set to charge 2
hours
Blue once +
Green twice
Charging for 2
hours
Startup + Three
extra
Set to charge 3
hours
Blue once +
Green triplex
Charging for 3
hours
o One Plus Stop Blue Stable Standby
Cable Version
LED Display Activity
No
Power
No
Light
Product not on
No Power
The EV Charging Box has malfunctioned
Blue Light
Flashing To be connected
Blue Stable
Connection OK – 1 sec stable blue before the charging process begins.
Upon completion of the charging process the light returns to stable blue.
Green Stable Charging
Red Stable Your Electric vehicles require heat dissipation, stop charging
Red Light
Flashing Failure, not charging

08
RFID Version
LED Display Activity
No
Power
No
Light
Product not on
No power
The EV Charging Box has malfunctioned
Blue Stable To be connected
Blue Light
Flashing Connection OK
Green Light
Flashing Charging
Green Stable Charging completed
Red Stable Electric vehicles require heat dissipation, stop charging
Red Light
Flashing Failure, not charging
Socket Version
LED Display Activity
No
Power
No
Light
Product not on
No power
The EV Charging Box has malfunctioned
Blue Stable To be connected
Blue Light
Flashing Connection OK
Green Stable Charging
Green Light
Flashing Charging completed
Red Stable Electric vehicles require heat dissipation, stop charging
Red Light
Flashing Failure, not charging

09
4.Warranty
4.1 The warranty period of this product is 18 months after the date of purchase. During
the warranty period, if handled properly and according to manual, if the product
becomes defect please contact our After Sales Service for assistance.
4.2 During the warranty period, a certain maintenance fee will be charged for damage
caused by the following reasons:
A. Damage caused by wrong use of the product and unauthorized repair and
modication.
B. Damage caused by abnormal fire, flood or other natural disasters and secondary
disasters.
C. Damage caused by dropping the unit or damage caused by transportation after the
purchase.
4.3 For After sales service, please call: 86-029-63364971-5062
4.4 TGOOD reserves the right to interpret this agreement.
This manual suits for next models
4
Table of contents


