Harken Hoister SUP User manual

7808: 45 lb (20 kg) System
SUP
SUP
SAVE TIME! READ THE ENTIRE MANUAL BEFORE BEGINNING HOISTER INSTALLATION.
Harken, Inc. • N15W24983 Bluemound Rd, Pewaukee, WI 53072-4974 • Tel: 262-691-3320 • Fax: 262-701-5780 • Email: hoister@hoister.com • Web: www.hoister.com
IMPORTANT SAFETY INFORMATION
• NEVER USE TO LIFT A PERSON.
• DISABLE AUTOMATIC GARAGE DOOR OPENER
when installing, raising, or lowering Hoister.
• READ ENTIRE MANUAL CAREFULLY BEFORE
starting installation. It will save you time.
• DO NOT UNTIE ANY ROPES
System comes ready to install.
Leave F, G and H together.
• DO NOT RAISE OR LOWER HOISTER
with anyone standing under object.
Welded screw eye
HCP1443
Pigtail lag screws
HCP1444
Drop black ropes
HCP1447/HCP1448
Rope Organizer Components
WARNING! Strictly follow all instructions to avoid an accident, damage to property,
personal injury or death. See www.harken.com/manuals for additional safety information.
WARNING! This product is not to be used for human suspension. Components may fail
causing person to fall, possibly resulting in serious injury or death.
DO NOT UNTIE
DO NOT UNTIE
(G1) Cleat
7758ASSY
224A
TOOLS
Drill Plumb line Safety glasses
Drill bits: 5/32" (4 mm)
7/32" (6 mm)
5/16" (8 mm
Pencil Tape measure
Stud finder Wrench (box end or
ratcheting) 7/16" (11 mm)
Stepladder
B
Pulleys
224A
D
A
Shackle
072
C
H
Lag bolts
HFS908
IOrganizer plates
H-28375A
K
Washers
HFS913
J
Organizer pulleys
H-52010
L
Webbing straps with buckles
HCP1459.SET
E
Single black/red hoisting rope
HCP1483
F
Block and tackle*
G
KIT INCLUDES
A1Welded screw eye
B4Pigtail lag screws
C1Shackle
D4Pulleys
E2Webbing straps with buckles
7' (2.13 m)
F1Single black/red hoisting rope
G1Block and tackle with
cleat (G1) and rope
H4Black drop ropes: 2 long, 2 short
I4Lag bolts 1/4" x 21/2" (6 x 63 mm)
J4Washers 1/4" (6 mm
K2Organizer plates
L2Organizer pulleys
PURCHASE SEPARATELY IF NEEDED –
See “Note” Step 1b
1Pine board (riser) (grade 2)
2" x 6" x 7" (50 mm x 152 mm
x 180 mm) Not used for rafters
running sideways
2Pine boards (grade 2) 2" x 6" x 6'
(50 mm x 152 mm x 1.83 m)
8Lag bolts and washers 5/16" x 4"
(8 x 100 mm)
PURCHASE ADDITIONAL FOR RAFTERS
RUNNING SIDEWAYS – See Step 2A
1Pine board (grade 2) 2" x 4" x 6'
(50 mm x 100 mm x 1.83 m)
2Lag bolts and washers 5/16" x 31/2"
(8 mm x 90 mm)

Pigtail
Lag Screw
(B)
Long Black
Drop Ropes
(H)
Short Black
Drop Ropes
(H)
Webbing Straps (E)
Pulley
(D)
Welded
Screw Eye
(A)
Rope
Organizer
Pulleys (L)
Plates (K)
Lag Bolts (I)
Washers (J)
Shackle
(C)
Single
Red/Black
Hoisting
Rope
(F)
Garage
Door
Front
Wall
Cleat
(G1)
Front
2" x 6"
Mounting Board
Back
2" x 6"
Mounting Board
Block and Tackle (G)
INSTALLATION OVERVIEW
STEP 1 DETERMINE HOISTER LOCATION
STEP 2 INSTALL MOUNTING BOARDS
STEP 3 INSTALL PIGTAIL LAG SCREWS
STEP 4 INSTALL ROPE ORGANIZER
STEP 5 ASSEMBLE HOISTER SYSTEM
STEP 6 OPERATING HOISTER SYSTEM
MAINTENANCE & WARRANTY
Top
View ORGANIZER
GARAGE DOOR
FRONT WALL
TOP PLATE
PIGTAIL
LAG SCREW
PIGTAIL
LAG SCREW
PIGTAIL
LAG SCREW
PIGTAIL
LAG SCREW
RAFTER
2" x 6" x 6' MOUNTING BOARD
2" x 6" x 7" RISER BOARD
Rafters run other way? See steps 1B and 2A.

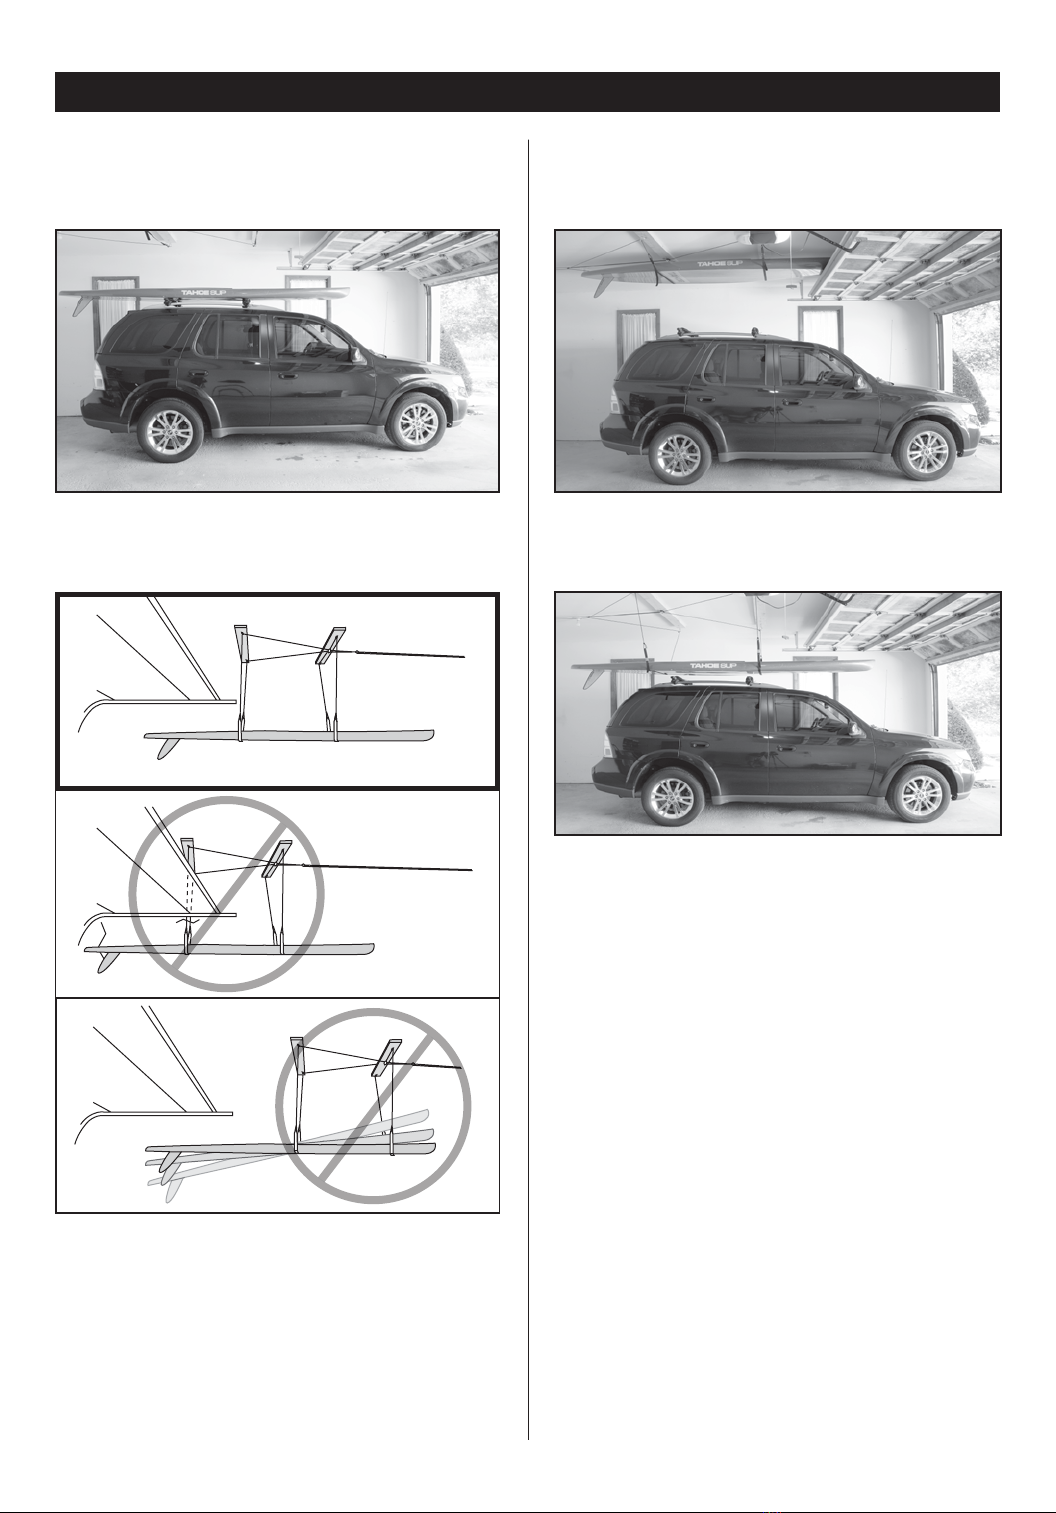
A. PLAN THE INSTALLATION
Pull car into garage with object on car rack.
Measure length of object. Position Hoister so garage
door can open with object lowered.
STEP 1: DETERMINE HOISTER LOCATION
OPTION 1. Above Garage Door: Clearance to lift and store
object above open garage door.
OPTION 2. Below Garage Door: Use if not enough clearance
for Above Garage Door Storage (Option 1). Object has
clearance to lift and store below open garage door.
STORAGE OPTIONS
Measure height of object. Make sure object can be
stored above or below the open garage door.
DIAGRAM 1. Position object above car with clearance to
open garage door. If Hoister is mounted too close to
garage door, there may not be clearance to open door.
Mounted too far forward, object may not balance or
lower onto car.
Opened
Garage Door
Opened
Garage Door
Opened
Garage Door
Opened
Garage Door

Garage
Door
STEP 1B
1) Measurement between
center points on
mounting boards _________
(Calculation above)
STEP 5A
2) Measurement from center
of front mounting board
to front wall _________
3) Measurement from front
mounting board to
lowest drop point _________
If measurement 2 is less than
measurement 3, refer to
Step 5A, Diagram 12.
Front
Wall
Step 1B
Mounting
Board
Placement
Step 5A
Welded
Eye Screw
Placement
Ceiling
Plan Location of Mounting Boards and Welded Eye Screw
2
3
1Front Mounting Board
Back Mounting Board
Top Plate
DIAGRAM 3. Distance of mounting boards from front wall is important, as it affects the position of the welded screw eye in Step 5A.
DIAGRAM 2. Center object under mounting points. Position
mounting boards far enough apart so object is stable.
STEP 1 CONTINUED: DETERMINE HOISTER LOCATION
WARNING! Do not screw into laminated rafters.
They are not intended to accept fasteners. Consult
rafter maker for recommendations. Screwing
into laminated rafters may considerably weaken
system, causing load to fall which may cause
an accident.
Garage
Door
Front
Wall
2
3
1
DIAGRAM 3a. Alternate position for rafters running sideways.
Check to make sure 6' (1.83 m) boards are long enough.
Alternate
position
B. PLAN LOCATION OF MOUNTING BOARDS
Mounting boards are used to position Hoister directly
above object to be lifted.
Note: Mounting boards may not be necessary for
nstallation in ceiling with exposed rafters. In ceilings
with exposed rafters, system can be installed on rafters.
Position Hoister directly above object to be lifted. If
installing without mounting boards, go to step 3.
DISTANCE BETWEEN MOUNTING BOARDS
Distance between mounting boards should be 1/3 of
object’s length.
Exception: Distance between mounting boards for long
SUPs will be less than 1/3 object’s length.
Calculate distance between mounting boards using
formula or chart below.
_________________ x .33 = _________________
Object length 33% Mounting distance
LOCATE CEILING MOUNTING BOARD POSITION

DIAGRAM 4. Mark center-to-center distance between rafters on mounting boards. Attach mounting boards to rafters.
Top
View
Rafters
Rafter
Center-to-Center
Distance
Rafter
Center-to-Center
Distance
Rafter
Center-to-Center
Distance
Mounting Boards
STEP 2: INSTALL MOUNTING BOARDS
DIAGRAM 4A. For Alternate Position attach board for mounting
organizer using 5/16" (8 mm) 31/2" (90 mm) lag bolts and
washers (not included). See Step 3a to determine distance
between mounting boards.
Top
View
Rafters Rafter
Center-to-Center
Distance
Mounting Boards
2" X 4" For Mounting Organizer – No Riser Board Used
Alternate Position for Rafters that Run Sideways
Front Wall
2" x 6"
A. DRILL CEILING RAFTER ATTACHMENT POINTS
LOCATE CEILING RAFTERS
Mounting boards must attach to ceiling rafters (see
diagram 4 and 4a). On finished ceilings, locate rafters
using stud finder. Follow manufacturer’s instructions.
Mark center of ceiling rafters. Drill 7/32" (5.5 mm) holes.
B. DRILL MOUNTING BOARD
Measure center-to-center distance between rafters.
Mark distance on mounting boards. Mark drill points
in the center of the board. Drill 5/16" (8 mm) holes
completely through the mounting boards.
C. ATTACH MOUNTING BOARDS TO CEILING
Attach mounting boards using 5/16" (8 mm) lag bolts
and washers (not included).
Do not over-tighten.

Pull vehicle into garage with object on car rack. Disconnect
automatic garage door.
SUP
2"
(50 mm) Object Width
2"
(50 mm)
Plumb Lines
CEILING
Front View
Plumb Lines
DIAGRAM 5. Mark object width on mounting boards.
DIAGRAM 6. Add 2" (50 mm) outside each mark. Drill a 7/32"
(5.5 mm) hole at each drill point on mounting boards
Object Width
Add 2" (50 mm) outside
Drill 7/32" (5.5 mm)
hole at each outside point
MOUNTING BOARD
2"
(50 mm)
2"
(50 mm)
Drill Hole
Point
Drill Hole
Point
Pigtail Lag Screw Holes
DIAGRAM 8. Install a Pigtail Lag Screw (B) in each hole.
Threads should just disappear into mounting board.
STEP 3: INSTALL PIGTAIL LAG SCREWS
Top
Thread
Top
Thread
Mounting Board
Mounting Board
Over-
Tightened
Past Top
Thread
Mounting Board
Top
Thread Top
Thread
Mounting Board Mounting Board
Over-
Tightened
Past Top
Thread
Mounting Board
Top
Thread
Top
Thread
Mounting Board
Mounting Board
Over-
Tightened
Past Top
Thread
Mounting Board
WARNING! Do not over-tighten Pigtail Lag Screw
past top thread. This can weaken fastener hold
which may considerably weaken system, causing
load to fall which may cause an accident.
INSTALL PIGTAIL LAG SCREWS
Top
View
Mounting Boards
2" x 6"
2" X 4" For Mounting Organizer – No Riser Board Used
Alternate Position for Rafters that Run Sideways
Pigtail Lag Screw Holes
Front Wall
DIAGRAM 7. If rafters run sideways, drill pigtail lag screw
holes on 2" x 6" as shown.
Rafters
A. DETERMINE PIGTAIL LAG SCREW (B) LOCATION
PULL VEHICLE INTO GARAGE
MARK LOCATION POINTS
Use plumb line to locate four lifting points on mounting
boards above vehicle.
DRILL 2 HOLES ON EACH MOUNTING BOARD

FRONT WALL
TOP PLATE
PIGTAIL LAG
SCREW
PIGTAIL LAG
SCREW
ROPE ORGANIZER
WELDED
SCREW EYE
FRONT MOUNTING BOARD
DIAGRAM 12. If distance to front wall is less than distance
needed to lift object, move the Welded Screw Eye (A)
along the front wall until distance 2 is equal to distance 3
(see Diagram 11).
Organizer
Plates
(K)
Organizer
Pulleys
(L)
Washer
(J)
Lag Bolt
(I)
Washer
(J)
Lag Bolt
(I)
DIAGRAM 10. Assemble Rope Organizer using Plate (K)
and Pulleys (L). Fasten to mounting board with
Lag Bolts (I) and Washers (J)
IMPORTANT! Do not over-tighten bolts. This can keep
Rope Organizer Pulleys (L) from turning properly.
STEP 4: INSTALL ROPE ORGANIZER
STEP 5: ASSEMBLE HOISTER SYSTEM
Garage
Door
Front
Wall
Ceiling
2
3
1
DIAGRAM 11. Distance 2 must be equal or somewhat greater
than distance 3. See chart below. For a larger view, see
Diagram 3.
MAXIMIZING LOWERING OF OBJECT
You may want to lower object to floor or sawhorses.
If distance 2 is much greater than 3, the amount object
can be lowered will be limited by length of supplied rope.
If Distance 2 is Distance 3 will be If Distance 2 is Distance 3 will be
10 10 14 6
11 915 5
12 816 4
13 717 3
Mount 2" x 6" x 7" riser board on front mounting board cen-
tered between the two Pigtail Lag Screws (B). Drill 5/32"
(4 mm) holes. Attach riser boards using two 1/4" (6 mm) Lag
Bolts (l) and Washers (J) (included). Do not over-tighten.
DIAGRAM 9. Hold Rope Organizer Plate (K) on riser board
near the side towards the front wall. Use Plate as template
to mark center holes. Drill two 5/32" (4 mm) holes.
A. MOUNT RISER BOARD AND DRILL HOLES
IMPORTANT! Use smaller drill bit in this step.
FRONT WALL
DIAGRAM 9
When distance 2 is much greater than 3, purchase
longer rope for drop ropes (H) to maximize distance
object can be lowered.
A. INSTALL WELDED SCREW EYE (A)
PLACEMENT ON FRONT WALL
B. ASSEMBLE ROPE ORGANIZER

TOP PLATE OF FRONT WALL
Front View
STUDS
DIAGRAM 14. Top plate of front wall.
STEP 5 CONTINUED: ASSEMBLE HOISTER SYSTEM
Front
Wall
Ceiling
DIAGRAM 13. Avoid installing Welded Screw Eye above tall
shelves. Rope must point down to lock.
B. ATTACH PULLEYS
Place one Pulley (D) on each Pigtail Lag Screw (B).
ATTACH BLOCK AND TACKLE (G)
Attach Block and Tackle system (G) to welded Screw
Eye (A) with Shackle (C). Remove ring from shackle
like a key ring. Put pin through top of Cleat (G1).
Put ring back on to secure Shackle (C).
INSTALL WELDED SCREW EYE (A) ON FRONT WALL
Use stud finder to locate solid wood of top plate. Drill
7/32" (5.5 mm) hole. Screw Welded Screw Eye (A) into
top plate of front wall (near top of ceiling).
DIAGRAM 15. Single black/red hoisting rope must face down.
*NOTE: Appearance of Cleat (G1) varies by system size.
Refer to system part number for specific Block and
Tackle Cleat.
Shackle (C)
Single Black/Red
Hoisting Rope (F)
Block and Tackle Cleat (G1)*
7808

DIAGRAM 19. Using free end of rope from Webbing Strap
eye, retrace original figure-eight knot in reverse.
Tightly cinch all four strands of rope exiting the knot.
Tighten knots. See www.harken.com/knots for further
knot tying resources.
DIAGRAM 20. Align Pigtail Lag Screws in direction of rope
running through Pulley.
DIAGRAM 18. Tie a Black Drop Rope to each Webbing Strap
(E) using a figure-eight knot. Pass free end of rope through
the sewn Webbing Strap eye.
Tie knots below top of object
so load can be lifted to ceiling.
SUP
CEILING
DIAGRAM 17. Tie knots below top of object so object can be
lifted to ceiling. Adjust strap length in buckle as needed.
1
2
3
4
5
6
7
Webbing Strap Eye
STEP 5 CONTINUED: ASSEMBLE HOISTER SYSTEM
Long
Drop
Rope
Long
Drop
Rope
Short Drop
Rope
Short Drop
Rope
PULLEYPULLEY
PULLEYPULLEY
BLOCK & TACKLE
FRONT WALL
GARAGE DOOR
TOP PLATE
ORGANIZER
DIAGRAM 16. Put all four Black Drop Ropes through
Organizer.
Put two shorter Black Drop Ropes through Pulleys (D) on
mounting board with Rope Organizer.
Put two longer Black Drop Ropes through Pulleys (D) on
remaining mounting board.
(D)
(D)
(D)
(D)
8
Webbing Strap Eye
9
10
11
12
13
14
15
C. INSTALL ROPE
D. ATTACH STRAPS TO ROPE
TIE ROPE TO WEBBING STRAPS
Keep knot as close to Webbing Strap (E) eye as possible.
POSITION WEBBING STRAPS
Place object in position under system. Place Webbing
Straps (E) under object to be lifted. Push buckles
together to lock.
E. ADJUSTING LIFTING SYSTEM
ALIGN SCREW EYES
LEVEL OBJECT
All webbing straps and ropes must have equal tension
to keep object level. Check by slowly pulling the Black/
Red Hoisting Rope (F).
To level object, adjust tension by moving knot or
adjusting webbing strap at buckle.

DIAGRAM 21. Locked (left): Single Black/Red Hoisting Rope
(F) pointed straight down locks cleat. Open (right): Angled
rope opens cleat. Larger system shown.
LOCKED:
Rope (F) down
OPEN:
Rope (F) angled
STEP 6: OPERATING HOISTER SYSTEM
LOCKED
LOWERING:
(Cleat Open)
Tip: Use gloves to protect hands.
WARNING! Disable garage door opener when
installing, raising, or lowering the Hoister. Do
not raise or lower with anyone standing under
object. Keep area below Hoister clear. If the
load falls it may cause an accident.
WARNING! Hang coiled rope where it will not
accidentally snag on persons or vehicle. Keep
coiled rope out of reach of children. Damage or
injury may result if rope is angled away from wall
with some tension; the object can come down
very quickly which may cause an accident.
WARNING! When operating system, make sure
area below object is clear of persons. If object
comes down too quickly this may cause an
accident.
WARNING! Stop pulling as soon as object
contacts ceiling or webbing strap knots stop at
pulley (D). Damage or injury may result from
forcing the system. If in doubt, stop hoisting,
allow cleat to lock by angling rope down. Stand
back to see if object is raised to the maximum
or if something is jamming rope or object.
CAUTION! Avoid injury, do not let rope slip
through hands. Angle rope to wall to lock rope.
WARNING! This product is not to be used for
human suspension. Components may fail
causing person to fall, possibly resulting
in serious injury or death.
With rope pointed down the cleat will lock the rope
and you can release it. Repeat until object is at
desired height.
A. RAISE OBJECT
Hoist in a series of pulls. Pull Single Black/Red Hoisting
Rope (F) straight down.
B. STORE OBJECT
With object in raised position make sure Single Black/
Red Hoisting Rope (F) is securely locked in cleat with rope
pointed down (see Diagram 21). Coil loose rope end.
Tip: For additional security, use two 5/16" (8 mm)
polyester safety ropes. Securely tie ends to pigtail lag
screws under object, parallel with Webbing Straps (E).
Remove safety ropes before lowering object.
C. LOWER OBJECT
Securely grip rope, apply tension and angle it away
from front wall. Bring arm up to let rope out and then
back towards the wall to lock the rope. Repeat until
object is at desired height.

WARRANTYMAINTENANCE
MAINTENANCE
Inspect rope (H and F), knots and straps (E) regularly
for signs of chafe, wearing or UV damage. Replace
immediately. Inspect knots for signs of slipping. When
attaching top, inspect webbing strap buckles (E) to
make sure spring clip functions properly. Replace rope
and hardware with Harken parts only.
WARRANTY
What Is Covered – This warranty covers defects in
materials or workmanship.
Who Is Covered – The original purchaser.
For How Long – Harken®products are warranted for
five (5) years from the date of purchase:
After the end of any specific warranty period noted
above, HARKEN®MAKES NO EXPRESS OR IMPLIED
WARRANTIES OF ANY KIND WITH RESPECT TO
THE PRODUCTS, INCLUDING ANY WARRANTY OF
MERCHANTABILITY OR FITNESS FOR A PARTICULAR
PURPOSE. Some states, or if you live outside the U.S.,
some countries, do not allow limitations on how long
an implied warranty lasts, so the above limitation may
not apply to you.
What Is Not Covered – This warranty does not cover
any product that was: improperly installed; inadequately
inspected after installation; improperly maintained; used
in any application for which it was not intended; used
under load conditions exceeding the rating or other
recommendation published in the Harken®catalog; or
subject to misuse, negligence, accident, or unauthorized
modification or repair. Ropes, buckles and webbing are
also not covered. Labor charges are also not covered.
Separate warranty provisions may be available from
vendors on some of the above products. Contact
Harken®for this warranty information.
CONSEQUENTIAL AND INCIDENTAL DAMAGES
ARE NOT RECOVERABLE UNDER THIS WARRANTY.
Some states do not allow the exclusion or limitation of
incidental damages, so the above limitation or exclusion
may not apply to you.
How To Get Service – If something goes wrong,
contact Harken®directly or your local Harken®dealer
to arrange for warranty assistance. Your dealer has
Harken®Warranty Return Guidelines that provide you
with exact return procedures depending on the product
involved. We will need, in writing, your name, address,
phone number, date of purchase, product involved,
application, an explanation of the defect and conditions
under which the product was used. We are fair and we
do care when Harken®products do not perform.

5050 10-13 Printed in USA
SELECT THE HARKEN HOISTER YOU NEED:
1. Determine maximum
weight you will lift and
select correct Hoister.
2. Standard Hoisters are designed for a maximum ceiling height of 10 ft (3 m). Contact Harken for taller ceilings that require a
lift greater than 10 ft (3 m).
3. Check distance between ceiling and top of garage door in open position. Will object fit in this space? If not, will object lift and
store under garage door in open position? If not, consider turning the object 90° and placing in the front of garage.
4. Hoisters 7801, 7802, 7803, 7806 and 7808 are designed to lift an object no wider than 5 ft (1.52 m). Width can increase if vertical
lift is lower or a taller ceiling model is used.
CEILING LEVEL STORAGE
Each Hoister kit is complete and simple to install.
Easy one-person operation with a single control rope.
Self-locking cleat grips instantly if accidentally released.
Do not use this product for human suspension.
Harken, Inc. • N15W24983 Bluemound Rd, Pewaukee, WI 53072-4974 • Tel: 262-691-3320
Fax: 262-701-5780 • Email: hoister@hoister.com • Web: www.hoister.com
Optional Supplies
Qty Description Size Length
2Pine Boards (Grade 2) 2 x 6 (50 mm x 152 mm) 6 ft (1.83 m)
1Pine Boards (Grade 2) 2 x 6 (50 mm x 152 mm) 7 in (180 mm)
8Lag Bolts/Washers
5
/
16
in (8 mm) 4 in (100 mm)
Rafters Running Sideways (Purchase Above Plus Following)
1Pine Boards (Grade 2) 2 x 4 (50 mm x 100 mm) 6 ft (1.83 m)
2Lag Bolts/Washers
5
/
16
in (8 mm) 3
1
/
2
in ( 90 mm)
Tools: Drill, Drill Bits:
5
/
32
in (4 mm),
7
/
32
in (6 mm),
5
/
16
in (8 mm), Plumb Line, Pencil, Stud Finder, Stepladder, Safety Glasses, Tape Measure,
Wrench:
7
/
16
in (11 mm) Box End or Ratcheting.
Lifting Weight
Part
No.
Storage
System (lb)
Mechanical
advantage
Min Max
lb kg lb kg
7801 60 3:1 15 760 27
7802 90 4:1 25 11 90 41
7803 145 6:1 45 20 145 66
7806 200 8:1 75 34 200 91
7808 45 2:1 10 4.5 45 20
ADDITIONAL
SYSTEMS
AVAILABLE
TO MAXIMIZE
STORAGE
SPACE
TRUCK CAP
SAILBOAT, CANOE,
KAYAK
LADDER
STORAGE
PLATFORM
Other manuals for SUP
1
This manual suits for next models
4
Table of contents
Other Harken Hoister Automobile Accessories manuals
Popular Automobile Accessories manuals by other brands

Mont Blanc
Mont Blanc FK225 Fitting instructions

EUFAB
EUFAB 16453 operating instructions

Curt Group
Curt Group 13387 installation instructions

Rear view safety
Rear view safety RVS-2CAM Product manual installation & instructions

DiscountRamps
DiscountRamps NDALR quick start guide

AmazonBasics
AmazonBasics B072ZHRDMZ manual