ThalesNano Energy H-Genie User manual

H-Genie™- High Pressure
Hydrogen Generator
User Manual
H-Genie-1.0

H-Genie™User Manual v. 1. 1. page:2 of 26
Contents
1. General Description.................................................................................................3
1.1. Introduction.......................................................................................................3
1.2. H-Genie™ System Overview............................................................................3
2. Overview of Parts....................................................................................................4
2.1. Touch-screen Interface.....................................................................................6
3. H-Genie™ Safety Features .....................................................................................9
4. Installation .............................................................................................................10
4.1. Delivery Content .............................................................................................10
4.2. Location ..........................................................................................................11
4.3. Installing the H-Genie™..................................................................................12
5. Performing a reaction with the H-Genie™ .............................................................14
5.1 Setting a BATCH reaction ...........................................................................16
5.2 Setting a FLOW reaction.............................................................................17
5.3 Setting a BALLOON reaction ......................................................................18
5.4. The Graph and Exporting the Experimental Data ...........................................19
5.5. Using and Changing a ScavCart™ .................................................................20
5.5. Turning off and shutting down the H-Genie.....................................................21
6Troubleshooting..............................................................................................23
7. Daily Maintenance Checks .............................................................................24
8Accessories ....................................................................................................24
9Technical Data................................................................................................25
10 Warranty Information ......................................................................................26
H-Genie™User Manual v. 1. 1. page:3 of 26
1. General Description
1.1. Introduction
The use of hydrogen gas in chemistry is limited due to the hazards associated with
utilizing compressed gas cylinders. The H-Genie™ is designed to overcome these
hazards, but also help the chemist in their chemistry too.
The main features include:
•On-demand generation of 4.0 purity hydrogen (at 100 bar) from water to make
use of hydrogen gas safer.
•A pressure range of 1-100 bar (14.5-1450 psi) to expand your chemistry
capabilities.
An accurate gas flow-rate range of 100-1000 NmL/min for connection with flow
reactors and to log how much hydrogen is consumed during a reaction.
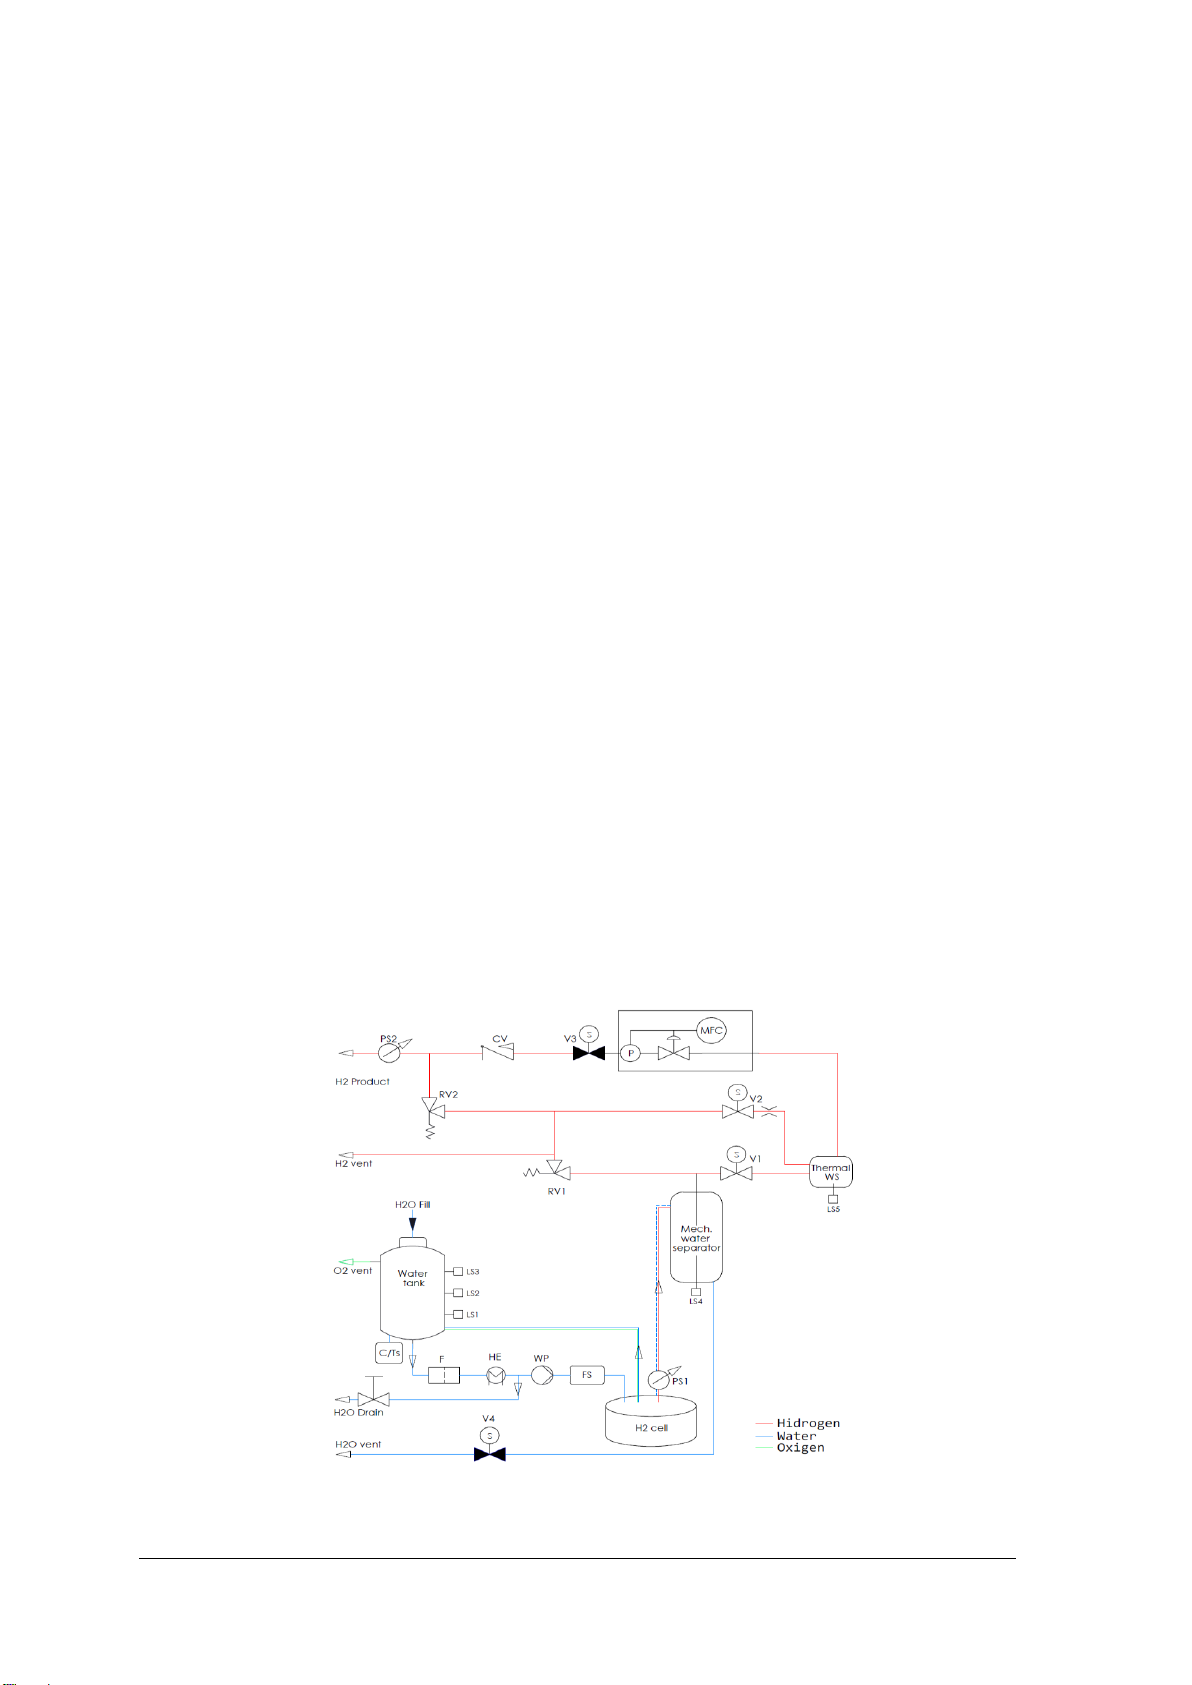
1.2. H-Genie™ System Overview
The H-Genie™high pressure hydrogen generator works by generating hydrogen gas
up to 4.0 purity from deionized water using a patented electrolytic cell. The hydrogen
gas is dried through a two-stage water separation system, mechanical separation and
thermal separation. The water removed is then drained through an external vent. The
now dry hydrogen gas enters the mass flow controller (MFC), which controls precisely
the flow rate of hydrogen out of the H-Genie™ between 100 and 1000 NmL/min. The
H-Genie™ generates hydrogen gas to the required pressure (up to 100 bar) by
continuously generating hydrogen until this pressure is reached. In flow mode, it will
do this internally first, before releasing the hydrogen at the set pressure. The
H-Genie™ will then continuously generate hydrogen to maintain that pressure.
Figure 1: Schematic design of the H-Genie™

H-Genie™User Manual v. 1. 1. page:4 of 26
2. Overview of Parts
Figure 2: Front view of H-Genie™
1. Air bubble tank decoration
2. Shutdown button
3. Hydrogen gas outlet
4. Touch-screen
5. Water tank cap
6. Oxygen gas outlet
3
2
1
5
4
6

H-Genie™User Manual v. 1. 1. page:5 of 26
Figure 3: Rear view of H-Genie™
7. USB port
8. Hydrogen vent
9. Main ON/OFF switch
10.Power cable socket
11.Fuse sockets
12.Cooling vent (1 of 3)
13.External CAN connector sockets (for service purposes only; max cable length
3m)
14.Water drain outlet
15.Water vent from the mechanical water separator
16.Water drain open-close hand operated ball valve (horizontally-opened,
vertically-closed)
17.RS-232 remote port (NON-DECOUPLED, max cable length 3m, user
recommended use THSE purchased optical isolator to function-contact THSE
for details)
18.Emergency Stop button connector socket (must use original THSE device)
9
17
18
10
12
13
7
8
11
14
15
16

H-Genie™User Manual v. 1. 1. page:6 of 26
2.1. Touch-screen Interface
The touch-screen interface consists of a series of windows that enable you to manually
control all aspects of operation.
After turning on the equipment, the main window features a number of different options.
Figure 4: The Main screen
From the main screen you can choose three different options to start a reaction:
•Batch: To supply hydrogen to a batch reactor.
•Flow: To supply hydrogen to a flow reactor.
•Balloon: To supply hydrogen to a balloon.
There are also other options available:
•Info Screen: Displays technical information and data about the H-Genie™.
The Info Screen may be accessed from any screen and under any status:

H-Genie™User Manual v. 1. 1. page:7 of 26
Figure 5: Info Screens
The information displayed is as follows:
oGas flow rate: The flow rate of hydrogen leaving the H-Genie™.
oOutput pressure: The pressure of hydrogen leaving the H-Genie™.
oH-cell pressure: The pressure of hydrogen inside the H-Genie™.
oH2feed volume: The amount hydrogen that has been released through
the MFC since the Start button was pressed.
oWater conductivity: States the purity of the water in the H-Genie™in
µS/cm. If water purity decreases to below 20 µS/cm, then the H-Genie
will not function until the water has been replaced.
oSystem performance: The software checks the hardware inside the
H-Genie™and determines the performance level of the system. This is
a value for a service engineer.
oWater temperature: Temperature of the internal water system.
oConsumed hydrogen: The amount of hydrogen consumed since the
batch reactor reached set pressure.
Additional parameters can be displayed with pressing the touch screen continuously
for 1s (for service purposes only):
oHydrogen cell voltage: Cell voltage measured in volts.
oHydrogen cell current: Cell current in amperes.
oCell usage time: The amount of time, in hours and minutes, the cell has
functioned.
oMWS frequency: Measured water level frequency of the mechanical
water separator.
oTWS frequency: Measured water level frequency of the thermal water
separator.
•The Graph Screen : displays H-Genie™ parameters in graph form over
time.
•Help Screen : Displays information of a descriptive nature about how the
H-Genie™ works, how to install and use it, and what to do if there’s a problem.
The Help Screen may be accessed from any screen and under any status.
The touch screen language can also be changed here.

H-Genie™User Manual v. 1. 1. page:8 of 26
Figure 6: The Help Screen
Status Bar: Displays the status of the H-Genie™, the water (H2O) level, and whether
there is a USB connected.
Figure 7: The Status Bar with disconnected and connected USB drives
The status messages are:
•Self-diagnostic: internal system check upon switching on.
•Ready: Ready to start generating hydrogen for a reaction.
•Preparation: Building hydrogen for the reaction.
•Running: Producing hydrogen for the reaction.
•Shutting down: Releasing internally stored hydrogen and shutting down the
system.
•Emergency shutdown: Releasing hydrogen and shutting down after an
emergency event is triggered.
•You can turn the device off: Ready to switch off.
•Poor water quality
•Too high external pressure
•Water level is too low

H-Genie™User Manual v. 1. 1. page:9 of 26
3. H-Genie™ Safety Features
The H-Genie™ has the following safety features to ensure safe and reliable
operation:
1. The H-Genie™is equipped with an internal hydrogen sensor, so in the unlikely
event of a hydrogen leak the system will automatically shut down.
2. If the H-Genie™ cannot generate hydrogen pressure internally, then the system
will automatically go into emergency shutdown mode.
3. Water leak detection at the base of the instrument.
4. The flow of air inside the H-Genie™ is enforced using 3 fans to ensure that the
temperature inside the unit does not rise excessively and to prevent any build
of hydrogen or oxygen in the event of a leak.
5. Upon power-up the H-Genie™ performs a self-check for internal leaks.
6. The hydrogen pressure inside the generator should only reach a maximum of
115 bar (1668 psi) and this is controlled electronically via a pressure sensor and
mechanically using a pressure relief valve (Fail Safe).
7. There is a water level detector to ensure that the cell never runs dry.
8. Water separator malfunctions are checked to avoid high water content in the
high-pressure system
9. Water purity is checked to avoid the degradation of the electrolytic cell
10.When the H-Genie™ is in emergency status the following occurs:
a. The current to the cell is stopped.
b. The internally stored hydrogen is evacuated into the fumehood.
c. An audible and visual alarm will be heard
H-Genie™User Manual v. 1. 1. page:10 of 26
4. Installation
4.1. Delivery Content
The H-Genie™delivery package includes the following items:
1 pc of H-Genie™- Generator _______________
1 pc of Emergency Button and cable
1 pc of Metal water tank cap
1 pc of water gas outlet tube (10mm OD) 2m length
1 pc of oxygen gas outlet tube (10mm OD) 2m length
1 pc of H-Genie™User Manual
1 pc of Declaration of Conformity
1 pc of H2 silencer assembly
1 pc of check valve
1 pc of power cable –check type EU UK CH USA
2 pcs of ss 1/8" tube, 0.1m and 1m lengths
1 pc of ss 1/8” to 1/16” reducer
1 pc of ss 1/16” tube (1m length)
2 pcs of ss 1/16” nuts with ferrules
1 pc of Vici PEEK finger tight 1/16” nut
1 pc of ScavCart™
Please ensure that all of the items listed above are present in the delivery package.
Check for any visible damage to H-Genie™components. Should any item be missing
or any parts visibly damaged, please contact your nearest ThalesNano representative

H-Genie™User Manual v. 1. 1. page:11 of 26
4.2. Location
•The H-Genie™ must be located on a flat, level surface inside a fully functional
ventilated cabinet or ventilated area, such as fumehood. This minimizes any risk
related to a hydrogen leak into the environment.
•The fumehood or ventilated cabinet must be equipped with a standard electrical
socket and a water hole.
•The oxygen and hydrogen vent tube outlets should be positioned as far apart
as possible within the fumehood.
•It is recommended that any objects be placed a minimum of 15 cm away from
the rear and the sides of the H-Genie™ to avoid any obstruction to the airflow
in the cabinet and to allow any warm air from within the generator to be released
freely into the environment. Ensure that none of the rear vents are obstructed.
Failure to ensure this may result in damage to the H-Genie™.
•Dimensions of the H-Genie™ can be found in the Technical Data section.
•Please adhere to the operating temperatures below:
oMinimum Operating Ambient Temperature: 10 °C (50 °F)
oMaximum Operating Ambient Temperature: 35 °C (95 °F)

H-Genie™User Manual v. 1. 1. page:12 of 26
4.3. Installing the H-Genie™
Open the packaging and remove all the contents.
4.3.1. Place the H-Genie™reactor box inside the selected fume hood cabinet.
4.3.2. Remove the temporary black water reservoir cap and fill the water reservoir with
high-purity de-ionized water. Cover the water reservoir hole with the metal cap
provided.
Attention
The H-Genie™generates hydrogen by in-situ high pressure water electrolysis.
The operation of high pressure cells requires high purity, de-ionized water.
Millipore Milli-Q®: <1µS/cm is strongly recommended!!!
Using low quality water can cause irreparable damage of the instrument.
The volume of the water reservoir is an approx. 3500 mL. Take care not to overfill.
The maximum water level should be 1 cm below the water tank neck.
Ensure the water tank is topped up every day before using H-Genie™.
4.3.3. Attach the oxygen gas outlet tube to the outlet at the top of the H-Genie™.
Ensure the other end is attached to the rear of the fume hood cabinet to ensure the
tube does not move when oxygen gas is released.
Do not impede or block the oxygen gas outlet at the top of the water
reservoir while the machine is switched on. Only use the cap provided
with the machine.
4.3.4. Insert the power cable into the rear of the H-Genie™ and connect it to the
mains power supply.
The electric cables must be guarded against moisture.
4.3.5. Connect one end of the water drain outlet tube to the water drain outlet and the
other end to a sink located in the fumehood.
4.3.6. Attach the hydrogen vent tubes and water vent tubes to their respective outlets
and the other ends to the rear of the fumehood and the fumehood sink

H-Genie™User Manual v. 1. 1. page:13 of 26
respectively. Please ensure the end of these tubes are fastened to avoid
movement when hydrogen gas is released.
Important! The hydrogen vent tube and the water vent tube will release
hydrogen into the fumehood. Please ensure that the ends of these pipes
are at least 1.5m away from the outlet of the oxygen outlet to ensure
hydrogen and oxygen do not mix or, if possible, in separate fumehoods.
4.3.7. Attach the emergency stop button to the connector at the rear of the H-Genie™
and ensure that the button is located in an easily accessible place.
4.3.8. Finally, switch the main On/Off switch, located at the rear of the H-Genie™ to
the on position.
H-Genie™User Manual v. 1. 1. page:14 of 26
5. Performing a reaction with the H-Genie™
Safety instructions:
Once the installation is complete, turn on the H-Genie™ using the „On” button on the
front of the system. The following screen will appear. Press „Ok” to begin the
H-Genie™’s selftest.
Figure 8: Selftest
During use the fume hood MUST be switched on, and the fume hood
door pulled down.
The H-Genie™ generates hydrogen internally. In normal
operation, hydrogen will be released from the rear ports. It is
essential that adequate precautions are taken to allow this to be
safely ventilated by a fume hood cabinet.
Ensure that the reactor vessel is connected to the H-Genie™ and
gas tight. Check to ensure that there are no leaks.
Please ensure the water reservoir is topped up at all times. It is
vital that the electrolysis cell membrane is kept constantly wet.
The cell must not be allowed to run dry or the cell will
immediately and irreversibly cease to function.

H-Genie™User Manual v. 1. 1. page:15 of 26
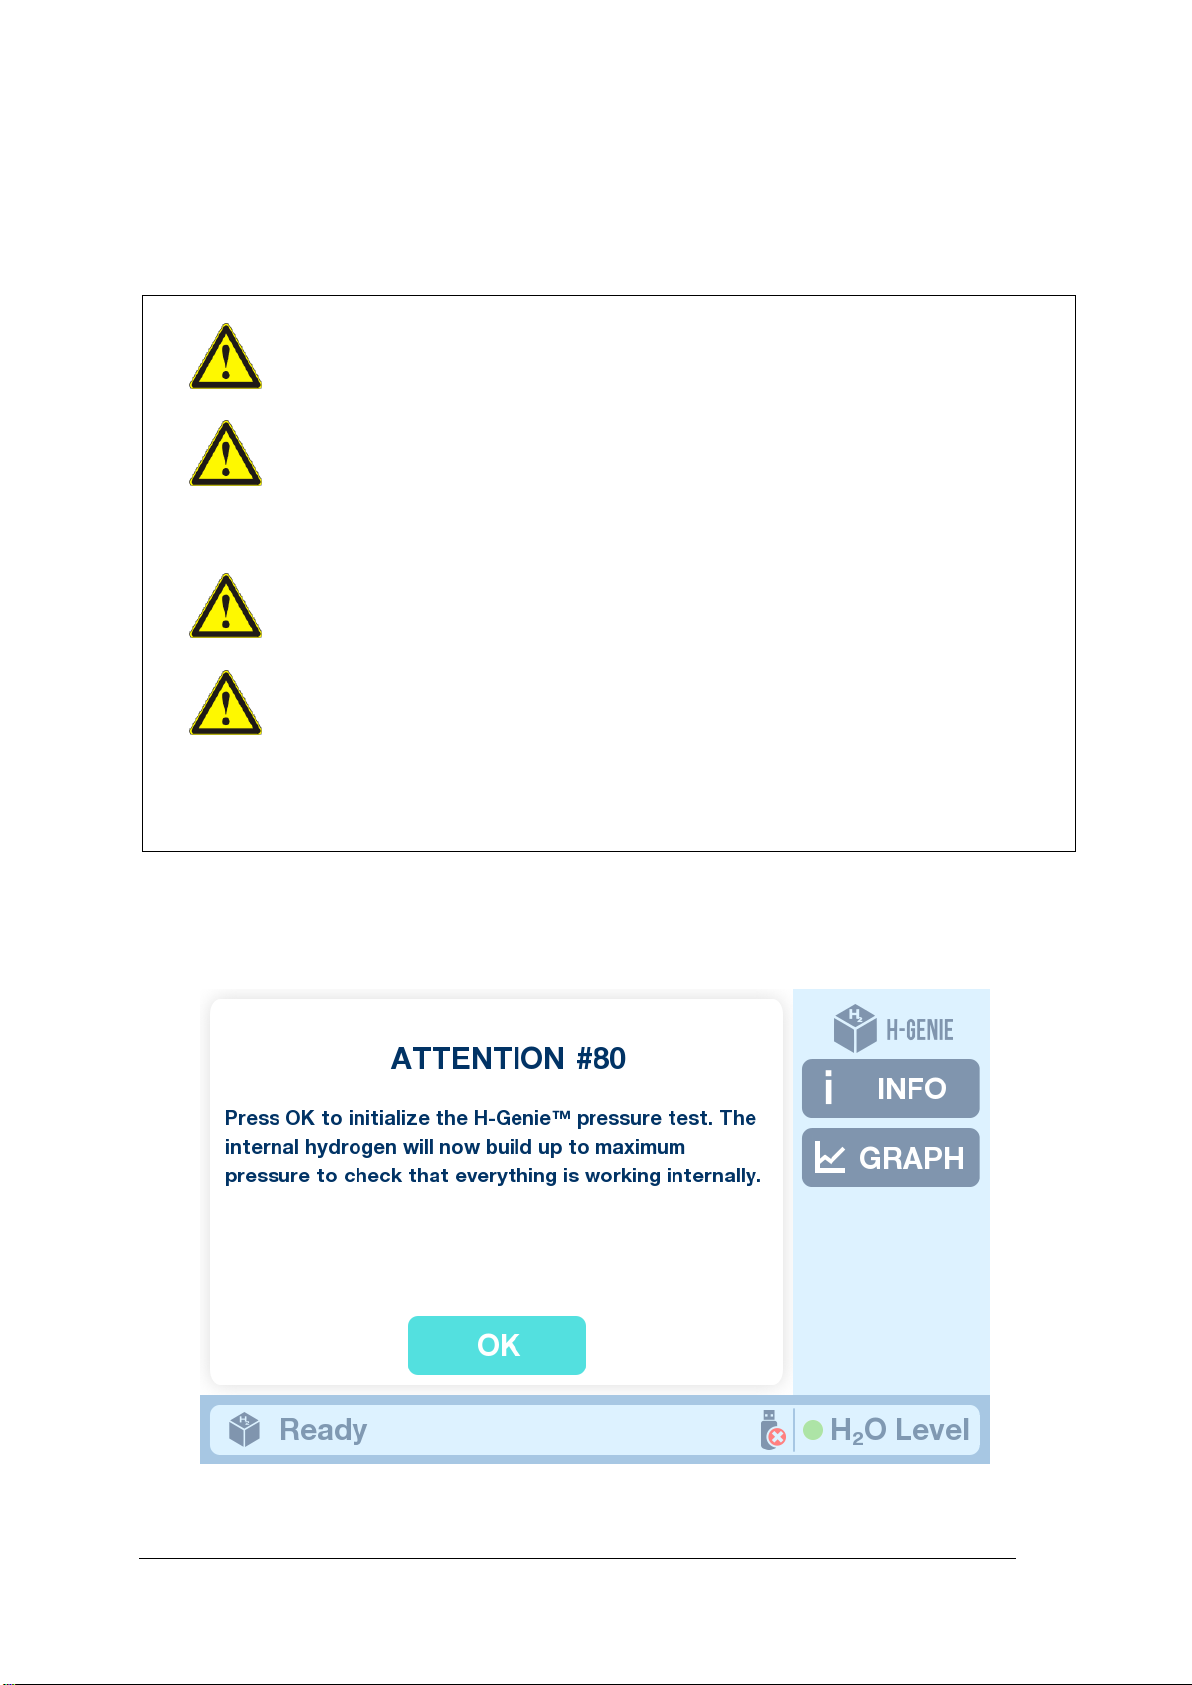
The screen will then change to the following, while the system will run through a self-
test in order to check that the internal H-Genie™ hydrogen system can build pressure
to the maximum settable limit. Do not switch the H-Genie™ while the system is
initializing.
Figure 9: Initialization screen and Ready screen.
Once the system has finished the self test and the initializing, the main screen will
appear and the term „Ready” will appear in the status bar. You’re ready to get
started.
Please note!
During hydrogen production, the H-Genie™will, from time to time, release the water
extracted from the hydrogen gas out the back of the system. A small amount of
hydrogen may also be released and make a noise. This is completely normal and you
shouldn’t be alarmed.
•The H-Genie™ is designed to run on a single tank of water for a minimum of 12
hours at maximum consumption. Before running out of water the below warning
screen will appear. Once the water level of the H-Genie™ reaches the critical
level, an error message will appear and the H-Genie™ will shutdown to ensure
the hydrogen generation cell is not harmed.
Figure 10: Warning and Emergency stop low water tank message

H-Genie™User Manual v. 1. 1. page:16 of 26
Please note!
The external vessel attached to the H-Genie™must be at 1 bar or the H-Genie™
will not allow the reaction to proceed.
5.1 Setting a BATCH reaction
5.1.1 Connect your batch reactor to the front of the H-Genie™ using the appropriate
tube and connection. Ensure there are no leaks and connections are tight.
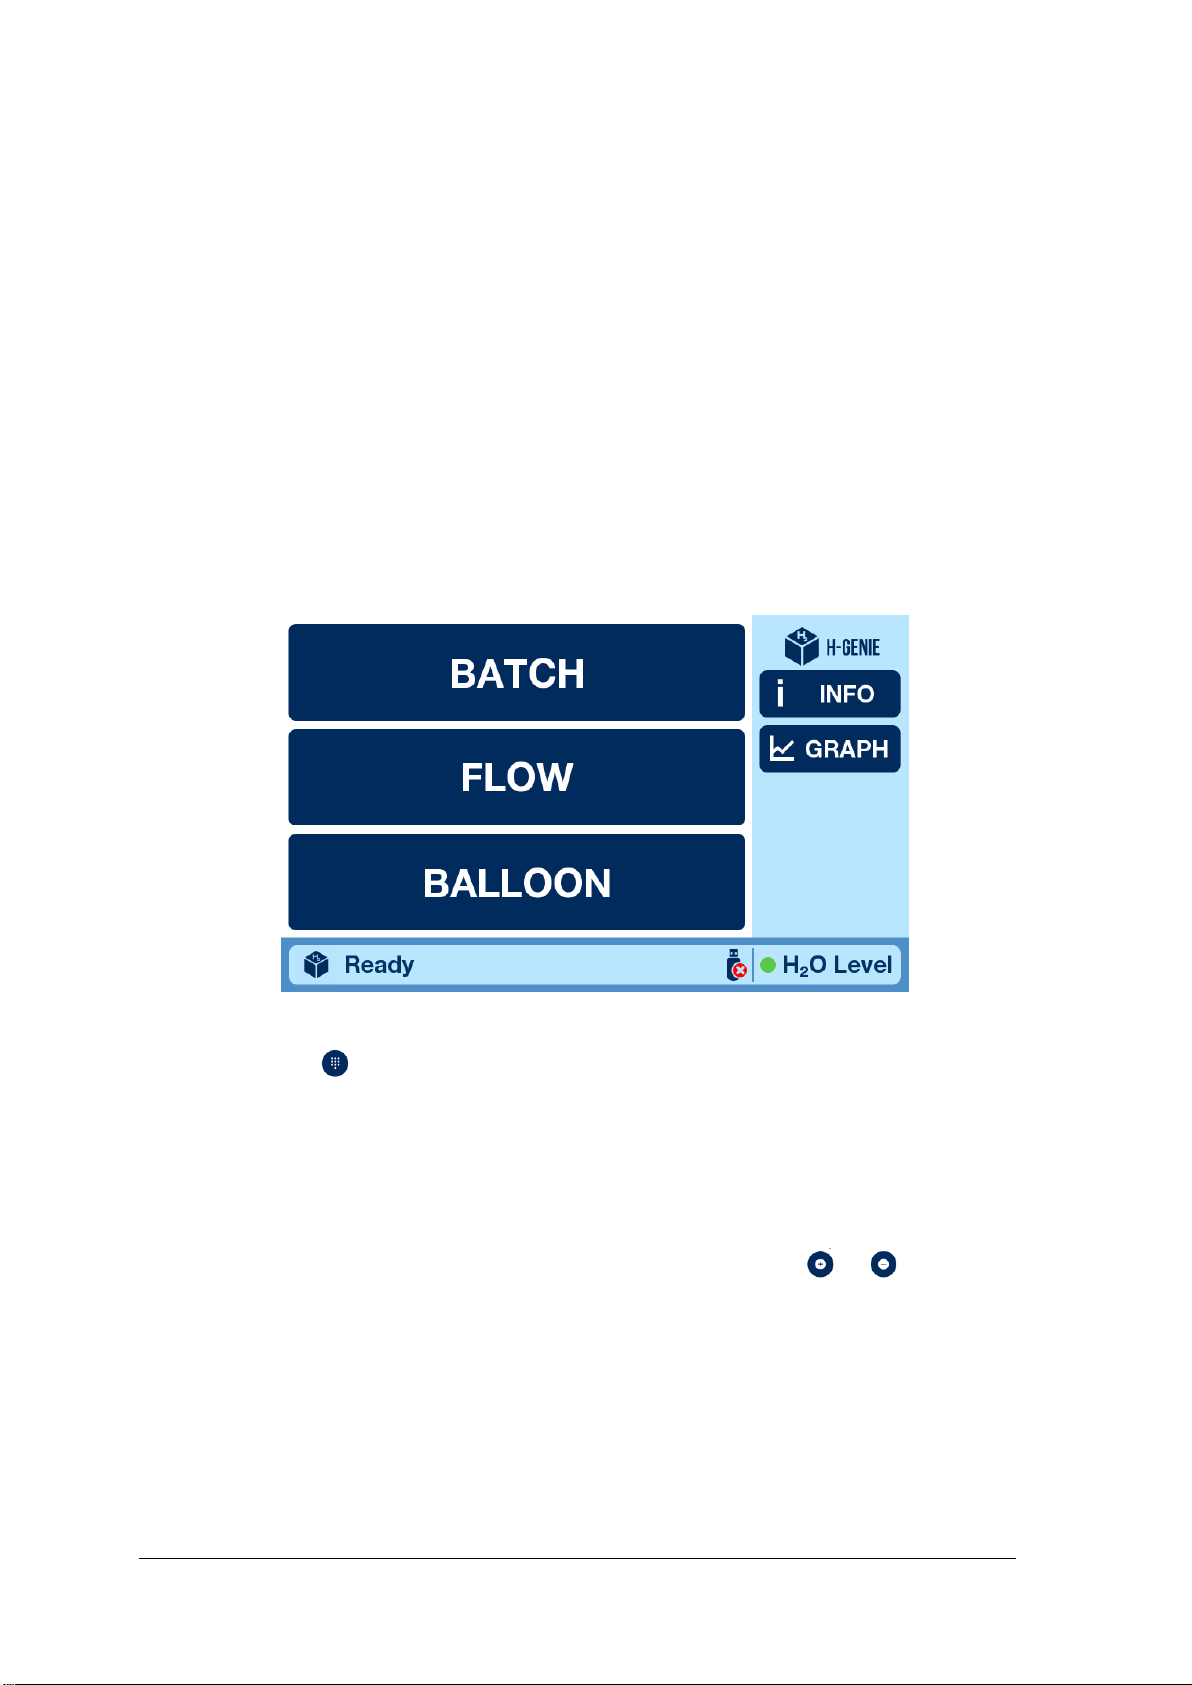
5.1.2 Press the BATCH function on the main screen.
Figure 11: Main Screen
5.1.3 Press the button to enter a reaction pressure and hydrogen gas flow rate
value. Press OK after you have set the appropriate value. The or
buttons may be used to raise the set value by + or –1 value.
Figure 12: Batch mode ready to start
H-Genie™User Manual v. 1. 1. page:17 of 26
5.1.4 Once all the parameters have been set, then press START.
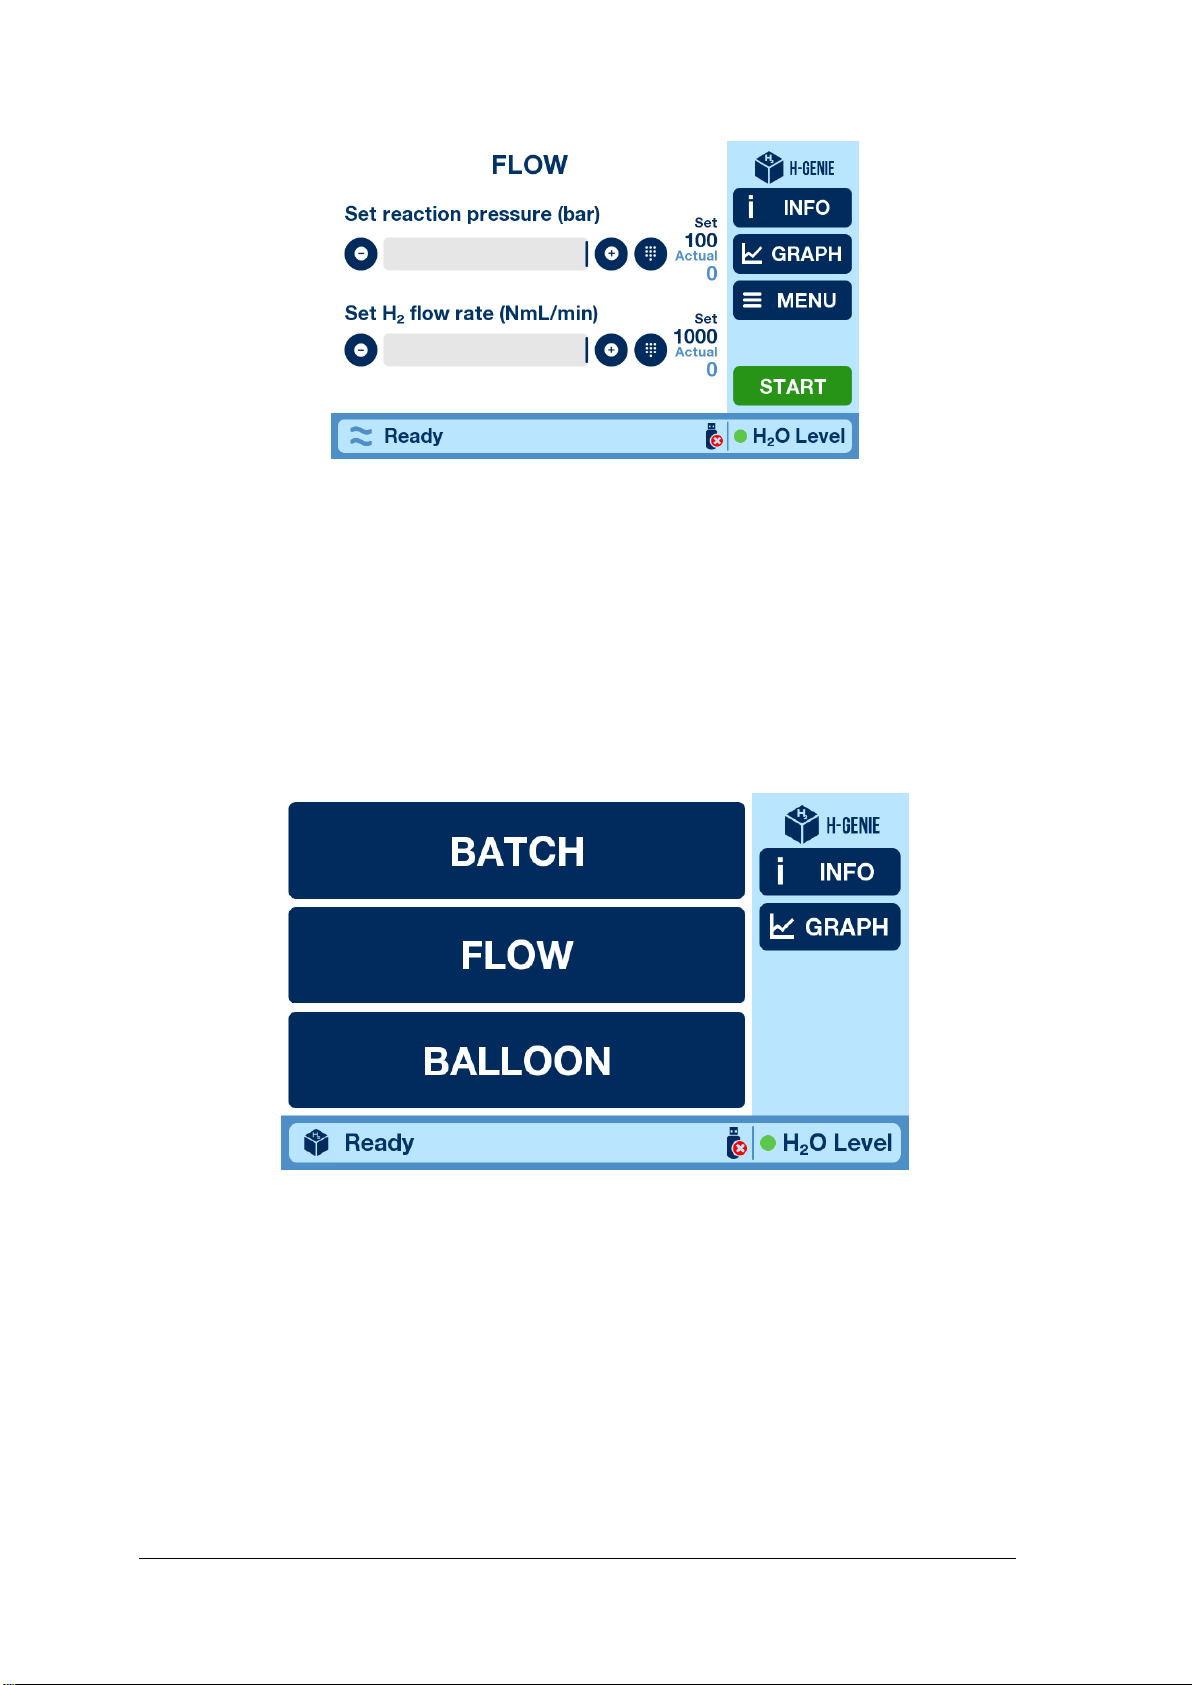
5.2 Setting a FLOW reaction
5.2.1 Connect the check-valve to the front of the H-Genie™. Ensure that the arrow
on the check-valve is pointing “out” from the H-Genie™. This is the
direction of the hydrogen flow.
5.2.2 Connect your flow reactor to the check-valve using the appropriate tube and
connection. Ensure there are no leaks and connections are tight.
5.2.3 Press the FLOW function on the main screen.
Figure 13: Main Screen
5.2.4 Press the button to enter a reaction pressure and hydrogen gas flow rate
value.
The set value should be 10 bar above your planned flow reaction pressure
to ensure a positive flow of hydrogen out of the H-Genie™ and into the
flow reactor.
5.2.5 Press OK after you have set the appropriate value. The or buttons may
be used to raise the set value by + or –1 value.
H-Genie™User Manual v. 1. 1. page:18 of 26
Figure 14: FLOW mode ready to start
5.2.6 Once all the parameters have been set, then press START.
5.2.7 Once the H-Genie™ has generated the set pressure and the hydrogen is
eluting from the system, pressurize your flow reactor.
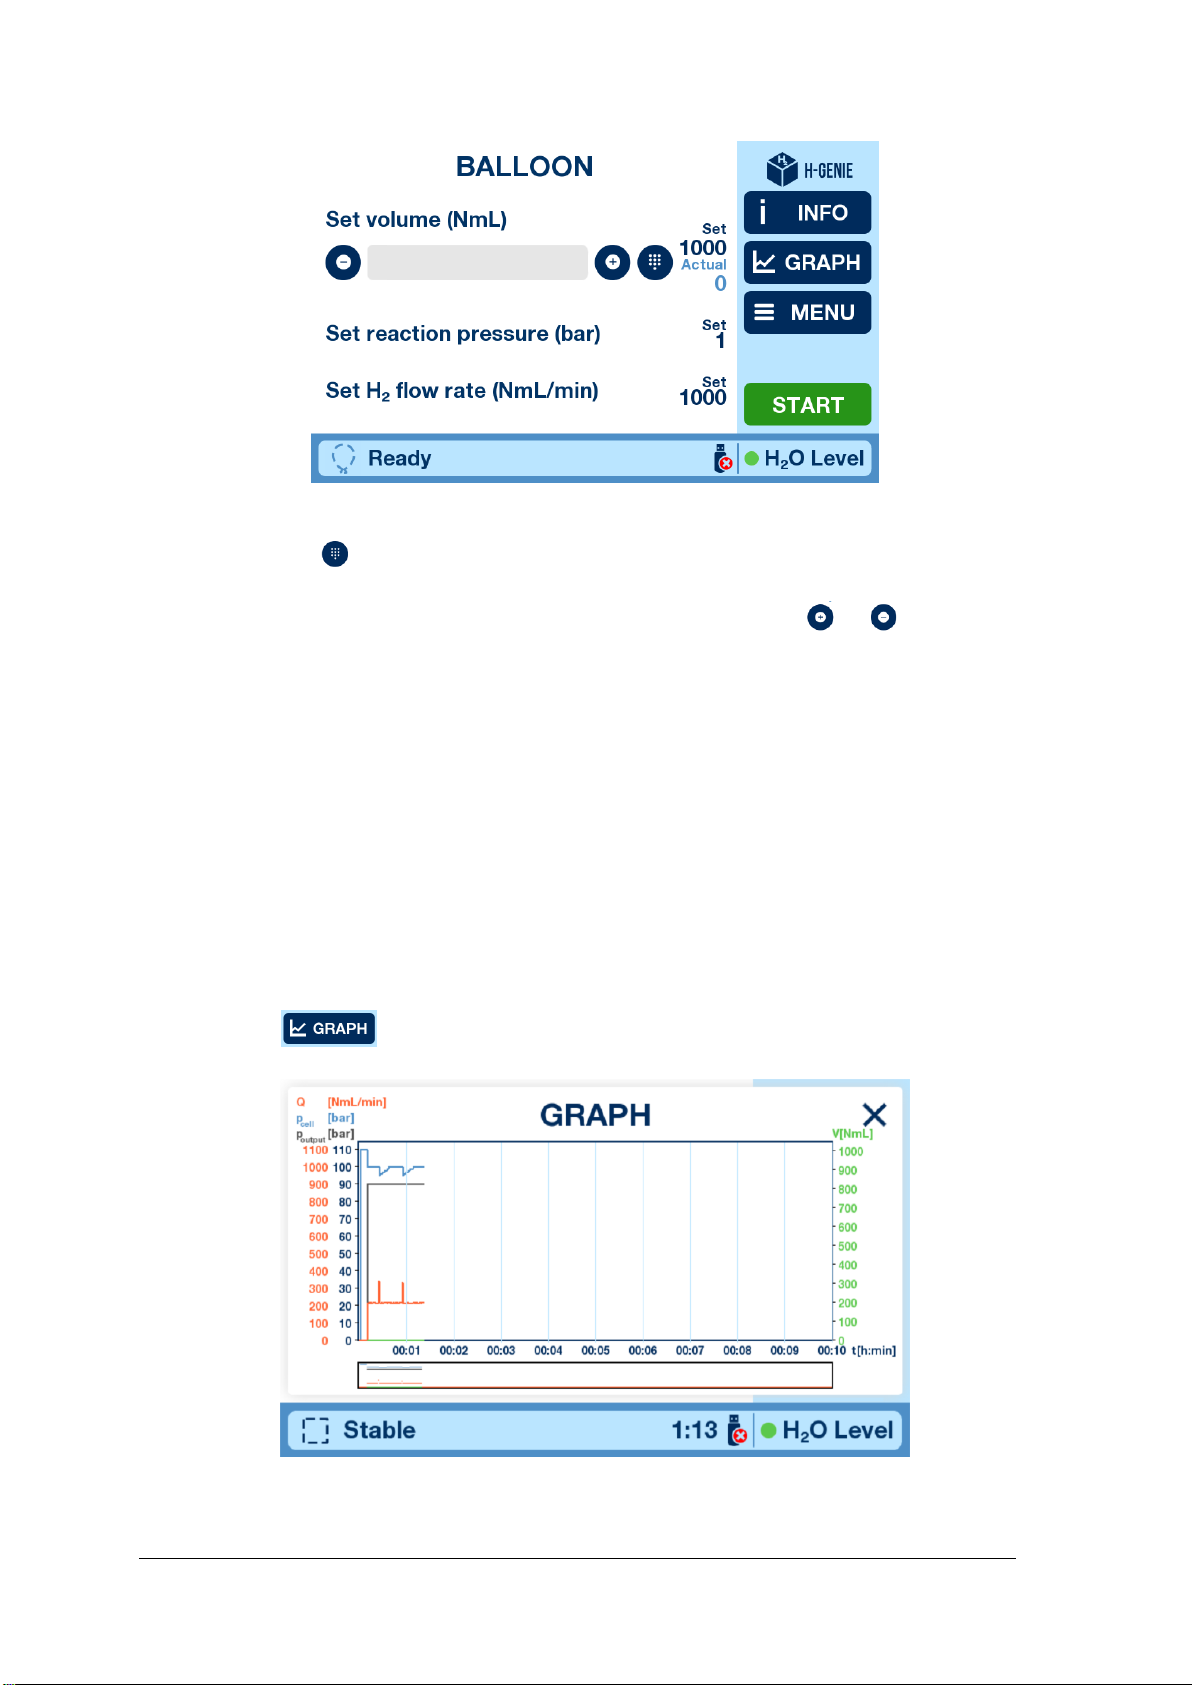
5.3 Setting a BALLOON reaction
5.3.1 Press the BALLOON function on the main screen.
Figure 15: Main Screen
5.3.2 For the BALLOON mode, the pressure is limited to 1 bar and the hydrogen
flow rate is set to maximum automatically (and cannot be changed). The user
need only set a balloon volume.
H-Genie™User Manual v. 1. 1. page:19 of 26
Figure 16: Balloon mode ready to start
5.3.3 Press the button to enter a balloon volume.
5.3.4 Press OK after you have set the appropriate value. The or buttons may
be used to raise the set value by + or –1 value.
5.3.5 Connect your balloon via a tube to the front of the H-Genie™.
5.3.6 Once all the parameters have been set, then press START.
5.4. The Graph and Exporting the Experimental Data
If you wish to export the data from the experiment, then please ensure that the USB
drive you wish to save the data to is plugged into the USB port at the rear of the
instrument. Once the USB drive is plugged in the place, the USB symbol in the status
bar will change from a red cross to a green tick.
Pressing the symbol opens the graph screen.
Figure 17: The graph screen

H-Genie™User Manual v. 1. 1. page:20 of 26
The graph screen will display the following data over time (hours and mins) for the
pressure of the cell (bar), the output pressure (bar), the flow rate of hydrogen
(NmL/min) out of the system, and the consumed hydrogen (NmL).
Once you have stopped the instrument, you can remove the USB drive. Please take
note of the Log.csv file name at the bottom right of the Info Screen. This will be the file
name for the experiment you have just run.
5.5. Using and Changing a ScavCart™
In order to maintain water purity at an acceptable level for the H-Genie™ and to ensure
a good hydrogen cell longevity, then it is mandatory to use a ScavCart™. The
ScavCart™ should be changed monthly. ScavCart™s can be ordered directly from
Warning!
Do not use your own resin as a water purity scavenger. Only use official
ThalesNano Energy certified products. Failure to do so will invalidate product
warranty. A special resin and particle size is used in ThalesNano Energy
ScavCart™s. Only use for a maximum of one month. Using ScavCart™s beyond
this timeframe may cause leaching of the resin into the water tank.
Figure 18: How to attach ScavCart™ to metal cap and how to install it in the
H-Genie™
To use the ScavCart™, take the plastic holder and screw it into the metal cap. Place
the ScavCart™into the H-Genie™ water tank. Please ensure water tank is full every
day before use.
Once the ScavCart™ has expired after a month, then dispose in solid waste or ship
back to ThalesNano Energy for recycling. Address is given below.
Other manuals for H-Genie
1
Table of contents
Other ThalesNano Energy Portable Generator manuals


