The Cool Tool PLAYMAT User manual

1Stichsäge
Sawing
Scier
4Drechseln
Wood turning
Tourner2Bohren
Drilling
Percer
3Schleifen
Sanding
Poncer
VS901200de/en/fr-Rev-19-07-18_03
Achtung!ELEKTRI-
SCHER ANTRIEB. Erstickungsgefahr
durch verschluckbare Kleinteile. Nicht
für Kinder unter 8 Jahren geeignet.
Schutzbrille verwenden. (nicht enthalten)
Attention!
MOTEUR ÉLECTRIQUE. Danger de
suffocation dû aux petits éléments
qu’on pourrait avaler. Pas adapté pour
enfants de moins de 8 ans. Utilisez les
lunettes protectrices. (non inclus)
Warning!CAUTION-
ELECTRIC TOY. Small parts can be
swallowed and cause risk of
suffocation or choking. Not recom-
mended for children under 8 years of
age. Use safety goggles. (not included)
4 MASCHINEN IN EINEM BAUKASTEN, BLITZSCHNELL UMGEBAUT
4 MACHINES IN ONE KIT, CONVERTIBLE WITHIN SECONDS
4 MACHINES EN UNE, INTERCHANGEABLES EN QUELQUES SECONDES
f
u
n
a
n
d
e
a
s
y
t
o
u
s
e
4in1 WORKSHOP
PRINTED IN AUSTRIA

WICHTIGE SICHERHEITSINFORMATIONEN
• Wir empfehlen während der Benutzung von
Playmat (art.nr.: 901200) den Gebrauch einer
Sicherheitsbrille.
• Dieses Produkt ist ein angetriebenes
Werkzeug. Besondere Sorgfalt und
Aufmerksamkeit sind somit angebracht.
• Vor Gebrauch des Playmat solltest du die
Bedienungsanleitung komplett durchlesen
und dich mit den verschiedenen Bauteilen
der Maschine vertraut machen. Beim
Zusammenbau der Werkzeuge folge Schritt
für Schritt der Bedienungsanleitung.
• Wenn zwischen den Werkzeugen gewech-
selt oder das Gerät gereinigt wird, achte
IMMER darauf den Stecker vom
Transformator abzuziehen.
• Playmat darf nur mit dem beigepackten
Transformator verwendet werden
• Der Transformer ist KEIN Spielzeug
• Playmat darf nur für beschriebene
Arbeitsvorgänge verwendet werden.
• Verwende für das Playmat nur Weichholz
(Balsa, Linde,…).
• Den Staub, der beim Verarbeiten des Holzes
anfällt, kannst du mit dem Staubsauger ent-
fernen.
ACHTUNG! BEINHALTET ZUBEHÖRTEILE MIT
SCHARFEN KANTEN. DARF NICHT IN DIE
REICHWEITE KLEINER KINDER (UNTER 36
MONATEN) GELANGEN. DARF NUR UNTER
AUFSICHT EINES ERWACHSENEN BEDIENT
WERDEN.
BEVOR DU DEIN PROJEKT UMSETZT,
SOLLTEST DU AN HOLZRESTEN ÜBEN. DAS
BRINGT DIR EIN BESSERES GEFÜHL BEIM
ARBEITEN MIT HOLZ UND FÜHRT ZU
BESSEREN ERGEBNISSEN.
LANGE SCHNUR. STRANGULATIONSGEFAHR.
IMPORTANT SAFETY INFORMATION
• We recommend the use of safety goggles at
all times when operating the Playmat (art.no.:
901200). Goggles must meet the requirements
of ANSI Z87.1.
• This product is a real power tool. Special
care and attention are required when using
power tools.
• Before using Playmat, read through the
entire instruction manual and familiarize
yourself with the parts of the product. Follow
all instructions and precautions carefully.
• Be sure to ALWAYS disconnect plug from the
adaptor when changing from one tool to the
next and cleaning with liquids. As with all
electric products, precausions should be
taken during handling and use to prevent
electric shock.
• Playmat must only be used with the included
transformer
• The transformer is NOT a toy
• Do not abuse Playmat or use it for tasks other
than the tasks described in this instruction
manual.
• Do not use Playmat with any material other
than wood.
• Keep Playmat in good working order by remo-
ving accumulated wood dust with a vacuum
cleaner.
CAUTION! NOT SUITABLE FOR
CHILDREN UNDER 36 MONTHS. LONG CORD,
STRANGULATION HAZARD. SHARP FUNCTIONAL
POINTS, CUTTING HAZARD and PUNCTURING
HAZARD. BE USED UNDER THE DIRECT
SUPERVISION OF AN ADULT.
YOU SHOULD PRACTICE WITH SCRAP PIECES OF
WOOD BEFORE STARTING A PROJECT. THIS WILL
HELP YOU GET THE FEEL OF WORKING WITH
WOOD AND BRING YOU BETTER RESULTS.
INFORMATIONS IMPORTANTES
CONCERNANT VOTRE SECURITE
• Nous vous recommandons de porter les
lunettes de sécurité lors de l´utilisation de
Playmat (art.no.: 901200).
• Ce produit est un outil puissant, c´est
pourquoi nous vous recommandons
prudence et attention lors de son utilisation.
• Avant d´utiliser Playmat assurez-vous d´avoir
lu entièrement la notice d´utilisation et de
vous être familiarisé avec les différentes par-
ties constituant la machine.
• Veillez par ailleurs à suivre toutes les
instructions à la lettre.
• TOUJOURS vérifiez que la prise du transfor-
mateur est débranchée lors des changements
d´outils et autres émontages et les nettoyez
avec des fluides.
• Playmat ne doit être utilisé qu'avec le trans-
formateur inclus.
• Ne pas sortir du cadre des utilisations pour
lesquelles Playmat est destiné.
• Nous vous rappelons que Playmat est exclusi-
vement destiné au travail du bois. Vous ne
devez pas utiliser d´autres matériaux.
• Poussière et copeaux de bois ne doivent pas
nuire au bon fonctionnement de Playmat, veil-
lez donc à les évacuer régulièrement avec le
moyen de votre choix
ATTENTION! NE CONVIENT PAS AUX
ENFANTS DE MOINS DE 36 MOIS. DANGER
D’ÉTOUFFEMENT. PRÉSENCE DE PETITES
PIÈCES SUSCEPTIBLES D’ÊTRE INGÉRÉES.
DANGER DE STRANGULATION. PRÉSENCE
D’UNE LONGUE CORDE. PRÉSENCE DE BORDS
FONCTIONNELS COUPANTS DANGEREUX.
PRÉSENCE DE POINTES FONCTIONNELLES
ACÉRÉES : À UTILISER SOUS LA SURVEILLANCE
TRÈS RAPPROCHÉE D’UN ADULTE !
NE PAS RESPECTER CES INSTRUCTIONS PEUT
EXPOSER LES UTILISATEURS À DES RISQUES
DE BLESSURES OU COUPURES.
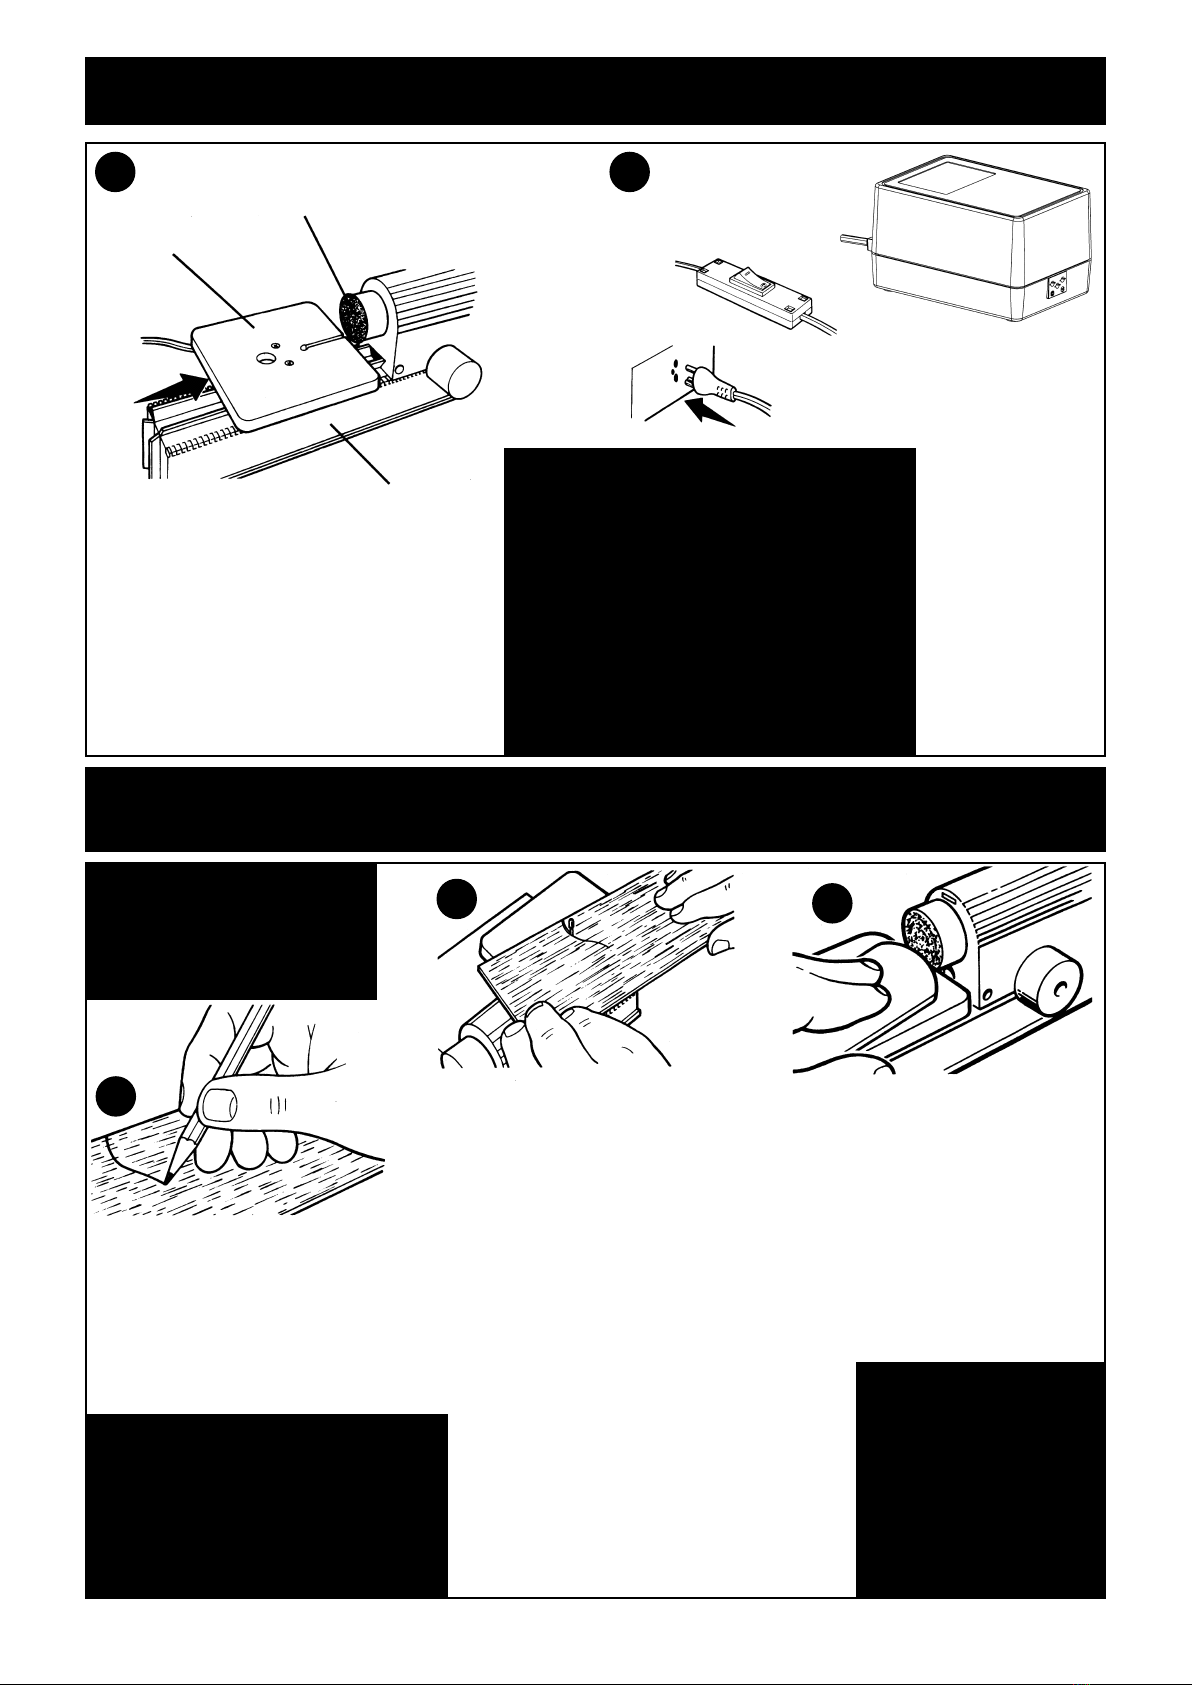
SCHRAUBE 3 x 45 mm
SCREW 3 x 45 mm
VIS 3 x 45 mm
HOLZPLATTE
WOODEN BOARD
PLAQUE
Ein oder beide Maschinenbetten mit 4
Schrauben durch die Öffnungen auf eine
Holzplatte fixieren und auf eine weiche
Unterlage (Filz, Weichgummi,…) stellen. Das
Playmat kann auch mit einer Zwinge fixiert
werden.
Fix one or both machine beds with 4 screws
through the holes onto a wooden board and
place onto a soft surface (felt, soft gum,…).
You can also secure Playmat with a clamp.
Fixez un ou deux bancs aves 4 vis sous les
trous dans une plaque de bois et placez sur
une surface douce (feutre, caoutchouc
doux,…). ou fixez Mon atelier d'ébéniste
avec un serre-joint.
Konformitätserklärung•Declaration of conformity•Déclaration de conformité: http://www.thecooltool.com/en/legal/
FIXIERUNG DER MASCHINE
FIXATION OF THE MACHINE • FIXATION DE LA MACHINE
ca. 20 x 30 x 2 cm
!

3
EINZELTEILE • MAJOR PARTS • PRINCIPAUX ELEMENTS
MASCHINENBETT (2)
TOOL BEDS (2)
BANCS DE MACHINES (2)
SPINDELSTOCK
HEADSTOCK
POUPEE FIXE
BOHR- UND SCHLEIFTISCH
DRILL TABLE/SANDING TABLE
TABLE DE PERCAGE ET PONCAGE
EXZENTER
ECCENTRIC PIECE
EXCENTRIQUE
REITSTOCK
TAILSTOCK
POUPEE MOBILE
MOTORSCHALTER
MOTOR SWITCH
COMMUTATEUR
TRANSFORMATOR
ADAPTOR
TRANSFORMATEUR
BOHRER
DRILL BIT
FORET
KREUZSCHLITTEN
TOOL REST
PORTE-OUTILS
SCHLEIFPAPIER (2)
SANDING DISK (2)
DISQUE DE PAPIER DE VERRE (2)
SÄGETISCH
SAW TABLE
TABLE DE LA SCIE
SÄGEGEHÄUSE
SAW BASE
EMBASE DE LA SCIE
RUNDHOLZ (4)
WOODEN DOWELS (4)
RONDIN DE BOIS (4)
ZENTRIERER
CENTER FINDER
CALIBRE DE CENTRAGE
MITNEHMER
LATHE DRIVER
ENTRAINEUR
DRECHSELMESSER
CHISEL
BURIN
WOOD PIECES (4)
SPERRHOLZPLATTEN (4)
PIECES EN BOIS (4)
STICHSÄGEBLATT (2)
JIGSAW BLADES (2)
LAMES DE SCIE (2)
45mm (4)
12mm (2)
SCHRAUBEN
SCREWS
VIS
SCHRAUBENZIEHER
SCREWDRIVER
TOURNEVIS
ABDECKUNG FÜR SCHLEIFPLATTE
SANDER COVER
CAPOT PROTECTEUR POUR PONCEUSE
nicht im Maßstab • not in scale • pas en échelle
Symbolfoto • symbol picture•
symbole photo

4
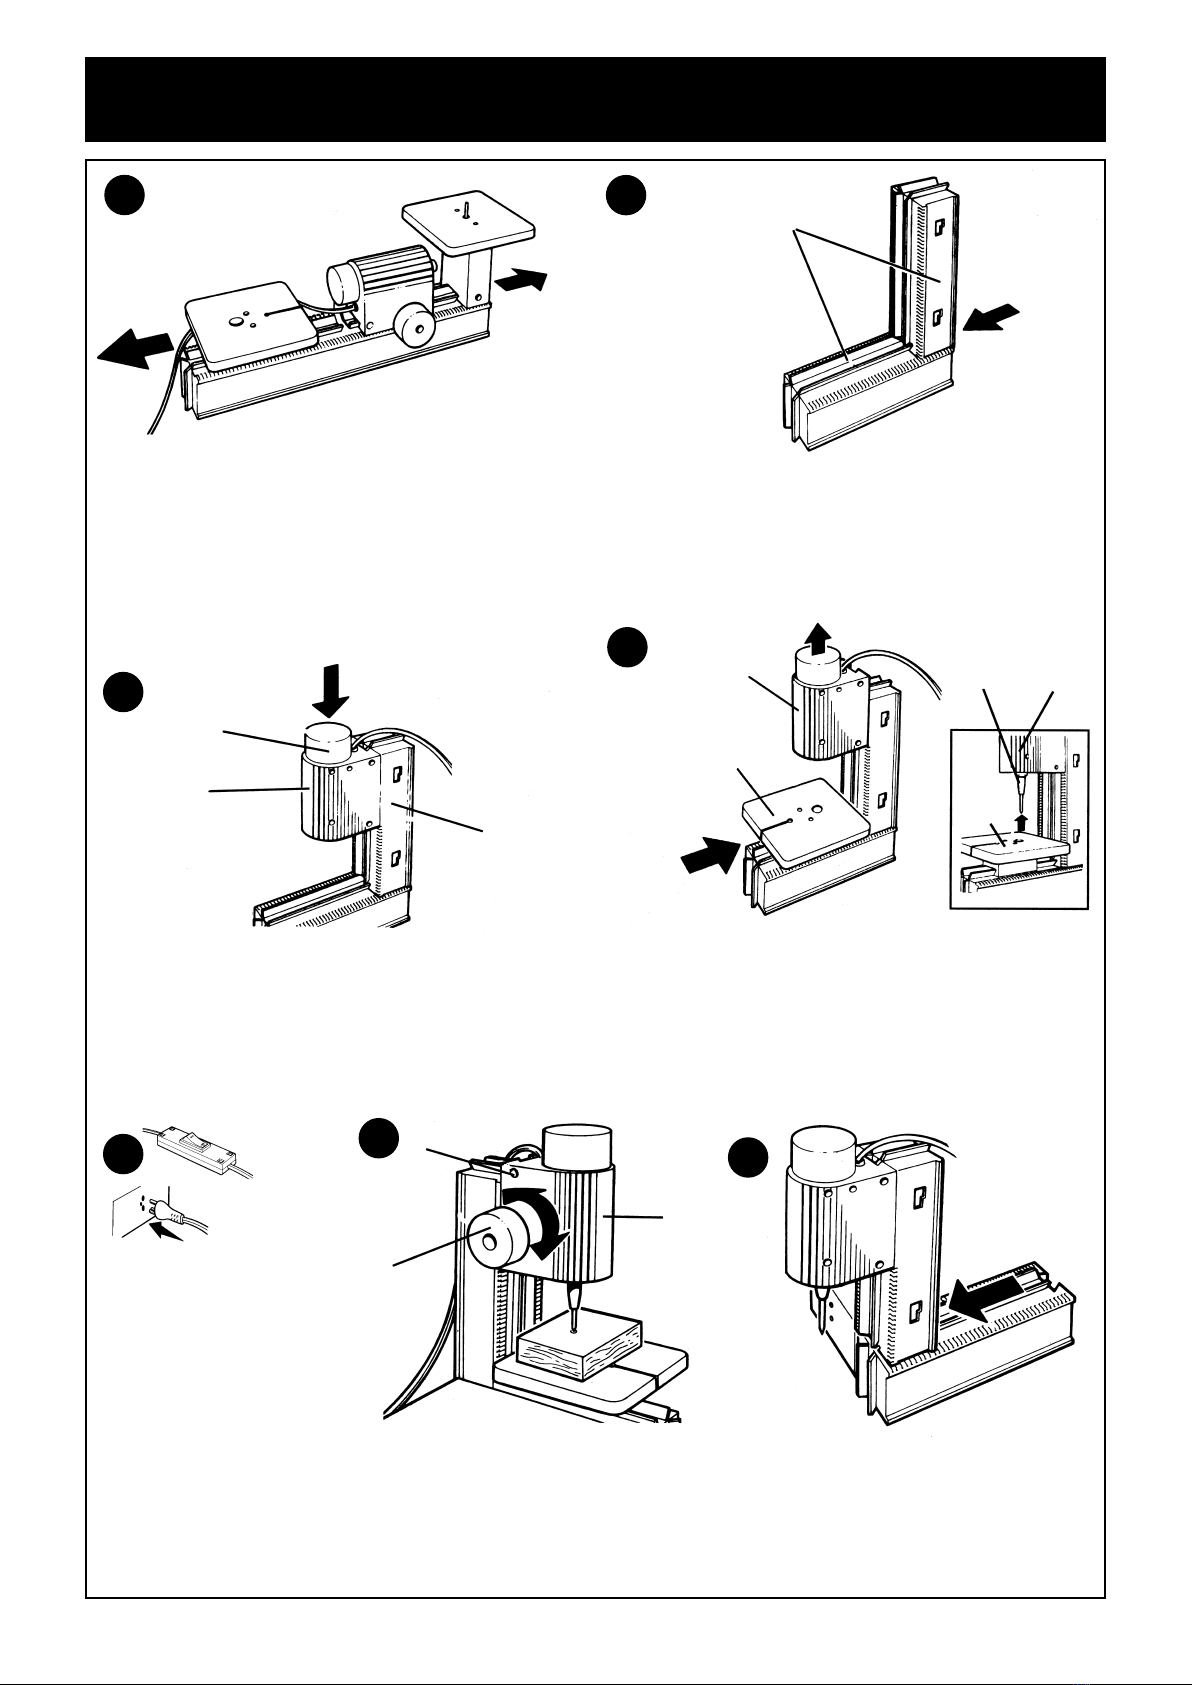
MONTAGEANLEITUNG FÜR STICHSÄGE UND SCHLEIFMASCHINE
Setze den Sägetisch auf das Sägegehäuse und befestige ihn, wie abgebildet mit
zwei 12 mm-Schrauben. Stelle sicher, dass die Schrauben in die Schraublöcher des
Sägegehäuses eingepasst wurden. Diese Teile müssen für den weiteren
Zusammenbau der Werkzeuge nicht mehr zerlegt werden. – Zum Auswechseln des
Stichsägeblattes musst du nur das stumpfe Blatt aus dem Halter nehmen und das
neue Blatt aufstecken. Der Packung ist ein Extra-Stichsägeblatt beigefügt.
Place saw table over saw base and secure with the two 12 mm screws as shown.
Make sure the screws fitt into the screw holes in the saw base. This is a one-time
assembly; there is no need to disassemble this piece when setting up the other tools.
– When jigsaw blade needs replacement, simply unscrew the screw at the base of
blade holder, remove blade and insert a new one. This set includes 1 extra jigsaw
blade.
Positionnez la table sur l´embase puis assemblez à l ´aide des deux vis de 12 mm
(voir dessin). Assurez-vous que les vis sont complètement encastrées dans les trous
de l ´embase prévus à cet effet. Cet assemblage n´aura lieu qu´une fois car il ne sera
jamais nécessaire par la suite de les démonter. – Lorsque vous voudrez changer de
lame, il suffira uniquement de dévisser légèrement la vis située à la base de son
support d´évacuer la lame défectueuse, puis de revisser après l´avoir remplacée.
Notre ensemble contient déjà une lame supplémentaire en cas de remplacement.
Schiebe den Spindelstock, wie abgebildet, mittels Drehknopf auf das Maschinenbett.
Stecke den Excenter auf die Spindel des Spindelstocks.
Slide headstock onto tool bed as shown, with the turning knob. Fit the eccentric
piece onto the shaft on right side of headstock.
Insérez la poupée fixe sur la crémaillère dentée et fixez alors la molette. Positionnez
le balourd (la pièce excentrique) sur la rainure et sur le bon côté de la poupée fixe
(voir flèche dessin).
Befestige die Stichsäge auf dem Maschinenbett und stecke den Excenter in die
Öffnung des Sägegehäuses. Um den Excenter richtig einrasten zu lassen, musst du
das Stichsägeblatt kurz anheben.
Slide jigsaw assembly onto tool bed, fitt the eccentric piece into slot on jigsaw
assembly. To fit correctly, the eccentric piece must be turned counter-clockwise as
shown and the jigsaw blade must be slightly lifted to allow the jigsaw assembly to
rest snugly against the headstock.
Encastrez la scie sur l´extrémité du banc et faites passer la lame de scie dans la
rainure de la table de la scie ainsi que la pièce excentrique dans l´ouverture du
support de la scie. Pour réaliser un assemblage correct l´excentrique doit être
tourné dans le sens anti-horaire comme sur le dessin et la lame de la scie doit être
légèrement soulevée.
Beachte: Es gibt nur eine
Möglichkeit für den
optimalen Sitz von Sägetisch
und Säge
gehäuse. Um diesen
zu gewähr
leisten, müssen
beide genau aufeinander
gesetzt werden.
Note: There is only one way
to correctly fit the saw table
onto the saw base. To be sure
that you are not assembling
the table
backwards, check to see that
the table and base line up
correctly where they meet.
Conseil: Il n´y a qu´une façon
correcte d´assembler la table
et la base de la scie. Pour ne
pas effectuer cet
assemblage à l´envers,
assurez-vous du bon
alignement des deux
éléments lors du montage.
Verbinde die beiden Maschinenbetten, indem die Feder des
einen Schienenendes in die Nut der anderen Schiene
gesteckt wird. Die beiden Maschinenbetten sind
austauschbar.
Connect the two tool beds together, sliding the tab extensions
on one bed into the slot on the other. The two beds are
interchangeable.
Assemblez les deux bancs en les emboîtant par leurs
extrémités ( pour cela faites glisser la queue d´aronde de l´un
des deux dans la rainure de l´autre).Les deux bancs sont
interchangeables.
MASCHINENBETTEN
TOOL BEDS
BANCS DE MACHINES
NUT
SLOT
QUEUE D´ARONDE
SPINDELSTOCK
HEADSTOCK
POUPEE FIXE
DREHKNOPF
TURNING KNOB
MOLETTE
EXCENTER
ECCENTRIC PIECE
EXCENTRIQUE
FEDER
TAB EXTENSIONS
RAINURE
EXCENTER DREHT ENTGEGEN DEM UHRZEIGERSINN
ECCENTRIC PIECE TURNES ANTICLOCKWISE
ROTATION ANTI-HORAIRE DE L´EXCENTRIQUE
EXCENTER
ECCENTRIC PIECE
EXCENTRIQUE
KERBE
SLOT
RAINURE
SPINDELSTOCK
HEADSTOCK
POUPEE FIXE
STICHSÄGEBLATT
JIGSAW BLADE
LAME
Mit dem Schraubenzieher
kannst du die Schrauben am
Boden des Spindelstocks und
der Stichsäge mit Gefühl
festziehen.
Use the screwdriver to tigh-
ten the screws located at the
bottom of the headstock and
jigsaw assembly softly to
secure the tools in place.
Utilisez un tournevis pour ser-
rer les vis situées à la base de
la poupée fixe et de la table
de la scie pour rendre les
outils stables et immobiles.
SCHRAUBENZIEHER
SCREWDRIVER
TOURNEVIS
STICHSÄGE
JIGSAW ASSEMBLY
SCIE SAUTEUSE
SPINDELSTOCK
HEADSTOCK
POUPEE FIXE
SCHRAUBEN
(12 mm)
SCREWS (12 mm)
VIS (12 mm)
HALTER FÜR DAS
STICHSÄGEBLATT
JIGSAW BLADE HOLDER
SUPPORT DE LAME
SCHRAUBEN ZUM BLATTWECHSEL (M2x8)
SCREW FOR BLADE REMOVAL (M2x8)
VIS DESTINEE AU CHANGEMENT DE LAME
(M2x8)
STICHSÄGEBLATT
JIGSAW BLADE
LAME
SÄGEGEHAUSE
SAW BASE
EMBASE
SÄGETISCH
SAW TABLE
TABLE
12
3
4
5
-+
5
JIGSAW/SANDER ASSEMBLY • MONTAGE DE LA SCIE/PONCEUSE
Entferne die Schleifplattenabdeckung auf der linken Seite des
Spindelstocks.SteckedenSchleiftischsoaufdieWerkzeugschiene,
dass sie zum Schleifpapier zeigt. Die Entfernung zwischen dem
Schleifpapier und dem Schleiftisch soll ca. 3 mm betragen.
Remove sander cover from left side of headstock. Slide sanding
table onto tool bed on the same side as the sanding disc. Do not
press table against sanding disc – keep about 1/8” space between
the two surfaces.
Ôtez le carter de protection sur le côté gauche de la poupée
mobile. Positionnez la table de ponçage sur la crémaillère de telle
manière qu´il y ait un écart de 3 mm entre celle-ci et le disque de
papier de verre.
Markiere mit dem Bleistift die Schnittstellen auf der
Holzplatte. Vorlagen findest du in unserem
WORKSHOP BUCH (Zubehörnr. VS 1603)
Use a pencil to mark your wood piece with the shape
you want to cut. You will find templates in our
WORKSHOP BOOKLET (Accessory # VS1603)
Utilisez un stylo pour tracer sur le bois les parties à
découper. Vous trouverez conseils techniques et
modèles dans notre WORKSHOP BOOKLET
(Accessoire # VS1603)
Verwende das Schleifpapier zum
Schleifen und Glätten der Schnittteile.
Use the sanding disc to sand and
smooth your cut design.
Utilisez le papier à poncer pour polir et
lisser vos pièces découpées.
Schiebe das Holz auf den Sägetisch, halte es nieder und
säge langsam entlang der Konturen auf dem Holz. Wenn du
einen Widerstand beim Sägen bemerkst, oder das Sägeblatt
stehen bleibt, nimm das Holz wieder etwas zurück vom
Sägeblatt und versuche es nochmals. Die Stichsäge soll das
Holz ohne zuviel Druck selbst schneiden. Du musst das Holz
nur leicht auf dem Sägetisch entlang der Konturen führen.
Achte bei Kurvenschnitten darauf, das Holz langsam gegen
das Sägeblatt zu bewegen und vermeide scharfe
Richtungsänderungen.
Hold the wood firmly down to the surface of the saw table
and slowly feed it into the saw blade. Do not force wood into
saw. If you meet resistance and the blade stops, back off the
blade and start again. Work slowly and firmly, letting the saw
do the work while you guide the wood. When making curve
cuts, once again slowly feed the wood into the saw and
avoid making sharp turns.
Faites glisser le bois sur la table de découpe tout en faisant
toujours attention d´aller doucement lors du contact avec la
lame et lors de la découpe (la durée de vie de votre appareil
et la qualité de découpe en dépendent). Lorsque vous sentez
une résistance dans le mouvement de la lame ou que celle-
ci s´arrête retirez la planche de bois de la lame et essayez à
nouveau. Ne pas effectuer de pression sur la lame travaillez
doucement et laisser la lame faire son travail en vous con-
tentant uniquement de guider la découpe. Ceci est d´autant
plus important lorsque vous réalisez des contours courbés
car le guidage des trajectoires courbes nécessite une extrê-
me douceur notamment afin d´éviter d´avoir des arrêtes lors
des changements de direction.
SCHLEIFPAPIER
SANDING DISC
DISQUE DE PAPIER DE VERRE
SCHLEIFTISCH
SANDING TABLE
TABLE DE PONCAGE
WERKZEUGSCHIENEN
TOOL BED
CREMAILLERE
Um das Gerät in Betrieb
nehmen zu können, musst
du den Stecker in den
Transformator einstek-
ken. Achte auf den kor-
rekten Sitz des Steckers.
Nun wird noch der
Motorschalter in die
Position „ON“ gebracht.
Connect plug on motor
switch to the adaptor out-
let. Be sure to connect
the plug into the correct
position. To operate,
press motor switch to
“ON” position.
Pour faire fonctionner
votre appareil vous devez
raccorder la prise au
transformateur. Prenez
garde à effectuer ce
branchement dans le bon
sens. Pour mettre sous
tension mettez le commu-
tateur du moteur sur sa
position «ON».
MOTORSCHALTER
MOTOR SWITCH
COMMUTATEUR
STECKER
PLUG
PRISE
TRANSFORMATOR
ADAPTOR
TRANSFORMATEUR
Transformator nicht im Freien betreiben! Vor Feuchtigkeit schützen!
Transformator an Ausgangsseite niemals mit anderen Transfor-
matoren parallel schalten! Bei Beschädigung an Anschlussleitung,
Stecker oder Gehäuse, darf der Transformator nicht mehr weiter
benutzt werden! Überprüfung und Anschluß der Geräte liegen in der
Verantwortung der Aufsichtspersonen!
Do not use adaptor outdoors! To be kept dry! Never connect the
transformer output in parallel with other transformers! If lead, plug or
case of the transformer is damaged discontinue using the
transformer immediately! The monitor bears the responsibility for
checking and hooking up the devices!
Ne doit pas être utilisé à l’extérieur. Le protéger contre l’humidité. La
sortie du transformateur ne doit jamais être branchée en parallèle
avec d’autres transformateurs. En cas d’endommagement du cordon
d’alimentation, de la fiche ou du boîtier, ne pas continuer à utiliser le
transformateur. Les personnes chargées de la surveillance sont
responsables de la vérification et du branchement des appareils.
Der Gebrauch einer Sicherheitsbrille wird
empfohlen.
It is recommended that you wear safety goggles
at all times when using machine.
Le port des lunettes de sécurité est recomman-
dé lors de toutes utilisations.
Zur Erinnerung: Übung macht den Meister, also übe erst
einmal an Holzresten. Schon bald wirst du ein Profi sein!
Remember: practice makes perfect, so practice with wood
scraps before undertaking a project. Before long, you’ll be a
pro!
Rappelez-vous, la perfection nécessite l´ entraînement,
commencerz donc par vous exercer sur des choses simples
en utilisant des chutes de bois avant de vous attaquer à plus
difficile. Quelques essais plus tard vous deviendrez
rapidement un pro !
Hinweis: Wenn das Schleifpapier
abgenutzt ist, kann es einfach abgezogen
und erneuert werden. Die Packung
beinhaltet ein Extra-Schleifpapier.
Note: When sanding disc becomes worn,
simply peel off and replace with a new
one. This set includes 1 extra sanding
disc.
Remarque: Lorsque le disque de ponçage
devient lisse ôtez-le et remplacez le tout
simplement par un autre. Ce paquet
contient un disque à poncer supplémen-
taire.
BEDIENUNGSANLEITUNG FÜR STICHSÄGE UND SCHLEIFMASCHINE
TO OPERATE JIGSAW/SANDER • LORS DE L´UTILISATION DE LA SCIE/PONCEUSE
Symbolfoto • symbol picture •
symbole photo
1
23
67
6
MONTAGEANLEITUNG FÜR BOHRMASCHINE
DRILL PRESS ASSEMBLY • NOTICE DE MONTAGE POUR PONCEUSE
Zuerst müssen die Teile der Stichsäge und der Schleifmaschine von der
Werkzeugschiene abgenommen und der Stecker herausgezogen werden. Um die
Stichsäge und das Schleifwerkzeug entfernen zu können, müssen die Schrauben am
Boden des Spindelstocks und des Sägegehäuses gelöst werden.
Starting from the jigsaw/sander assembly, remove all sections and disconnect plug
from adaptor. To remove the jigsaw and sander tool, you must loosen the screws
located at the bottom of the headstock and the saw base.
Tout d´abord les pièces utilisées pour la scie sauteuse et la ponceuse doivent être
ôtées du banc et de sa crémaillère et vous devez débrancher la prise de votre
appareil. Afin d´ôter la scie sauteuse et l´outil à poncer, n´oubliez pas de dévisser les
vis situées à la base de la poupée mobile et du support de la scie.
Stecke die Abdeckung auf die Schleifplatte und nimm den Excenter ab. Schiebe den
Spindelstock auf die senkrechte Werkzeugschiene, so dass die Schleifplatte nach
oben zeigt.
Place the protective cover over the sander tool and remove the eccentric piece from
the shaft on the other side. Slide the sander/headstock onto the vertical tool bed
with sander tool on top, facing up.
Remettez le capot protecteur sur l´outil à poncer et enlever la pièce excentrique.
Faites glisser la poupée fixe sur le banc vertical en positionnant l´outil à poncer vers
le haut face à vous.
Mit dem Knopf am Spindelstock kannst du den Bohrer rauf
und runter bewegen, aber Feststellschraube nicht zu fest
anziehen.
Simply turn the knob to raise or lower the drill bit. Do not
tighten screw on headstock assembly.
Avec la molette située en haut de la poupée fixe vous
pouvez ajuster la mèche en hauteur mais attention à ne
pas trop serrer celle-ci!
Wenn das Holzstück zu dick ist, kannst du die senkrechte
Werkzeugschiene, wie abgebildet, drehen und ohne Bohrtisch
bohren.
When wood pieces are too big for the regular set-up, you may
remove the table and reverse the “L” set-up as shown.
Si la pièce en bois est trop grosse vous pouvez inverser le côté
où est montée l´unité de perçage en la plaçant de l´autre côté
sans table de perçage en dessous comme on peut le voir sur le
dessin.
Setze den Bohrtisch auf die waagrechte Werkzeugschiene. Hebe den Spindelstock
an, damit du den Bohrer sicher im Schaft des Spindelstocks befestigen kannst.
Vergewissere Dich, dass die Spitze des Bohrers über dem Loch im Bohrtisch
befindet.
Slide drill table onto horizontal tool bed. Then securely attach drill bit to headstock
shaft. Make sure that the hole in the table lines up with the drill bit as shown.
Fixez la table à percer sur le banc horizontal. Soulevez alors la poupée mobile afin
de pouvoir plus facilement fixer la mèche dans celle ci. Assurez-vous que le trou
dans la table à percer est bien dans l´alignement vertical de la mèche (voir dessin)
une fois celle ci fixée.
Nimm dann die beiden Maschinenbetten auseinander und verwende eine Schiene
als Basis. Stecke die beiden Maschinenbetten, wie abgebildet, in L-Form zusammen.
Then take apart the two tool beds, leaving the one tool bed as a base. Slide the
second tool bed on top of the bottom tool bed, connecting the beds into an “L“
shape.
Défaire l´emboîtement qui lie les deux bancs et conserver l´un des deux comme une
base. Emboîtez alors les deux bancs en forme de « L » comme il est indiqué sur le
dessin.
MASCHINENBETTEN
TOOL BEDS
BANCS DE MACHINES
MASCHINENBETTEN
VERTICAL TOOL BED
BANCS DE MACHINE
BOHRTISCH
DRILL TABLE
TABLE DE PERCAGE
BOHRER
DRILL BIT
MECHE
SPINDELSTOCK
HEADSTOCK
POUPEE FIXE
SPINDELSTOCK
HEADSTOCK
POUPEE FIXE
LOCH
HOLE
TROU
ABDECKUNG FÜR SCHLEIFPLATTE
COVER
CAPOT PROTECTEUR
SPINDELSTOCK
HEADSTOCK
POUPEE FIXE
KNOPF
KNOB
MOLETTE
SPINDELSTOCK
HEADSTOCK
POUPEE FIXE
SCHRAUBE
SCREW
VIS
Um das Gerät in Betrieb nehmen
zu können, musst du den Stecker
in den Transformator einstecken.
Achte auf den korrekten Sitz des
Steckers. Nun wird noch der
Motorschalter in die Position
„ON“ gebracht.
Connect plug on motor switch to
the adaptor outlet. Be sure to
connect the plug into the correct
position. To operate, press motor
switch to “ON” position.
Pour faire fonctionner votre
appareil vous devez raccorder la
prise au transformateur. Prenez
garde à effectuer ce branche-
ment dans le bon sens. Pour
mettre sous tension mettre le
commutateur du moteur sur sa
position «ON».
MOTORSCHALTER
MOTOR SWITCH
COMMUTATEUR
STECKER
PLUG
PRISE
1 2
3
4
567
7
MONTAGEANLEITUNG FÜR DRECHSELMASCHINE
WOOD LATHE ASSEMBLY • NOTICE DE MONTAGE POUR LE TOUR
Schiebe den oberen Kreuzschlitten auf den unteren Teil. Schiebe dann den Reitstock
von rechts auf das Maschinenbett, wie abgebildet.
Slide top of tool rest onto bottom cross piece. Then slide tool rest assembly onto the
right side of the tool bed, with the assembly facing forwards as shown.
Faites glisser la partie supérieure du support en sur la partie inférieure. Maintenant
faites glisser la poupée mobile sur la crémaillère du banc par le côté droit (voir
dessin)
Setze den Reitstock von rechts auf die Werkzeugschiene und schraube ihn
vorsichtig fest. Nun noch den Stecker in den Transformator stecken und den
Motorschalter auf „ON“ stellen.
Attach the tailstock to the far right side of the tool bed as shown and use the
screwdriver to tighten the bottom screw softly and secure the tailstock in place.
To operate, connect plug to the adaptor and press motor switch to the “ON”
position.
Fixez la poupée mobile sur la crémaillère par le côté droit et vissez-la de façon à
ce qu´elle reste immobile mais faites attention à ne pas serrer trop fort. Branchez
la prise et placez le commutateur sur sa position «ON» pour faire fonctionner
Playmat.
Zerlege die Bohrmaschine und ziehe den Stecker vom Transformator ab.
Starting from the drill assembly, remove the drill bit from the headstock, then
remove all other sections as shown. Leave the tool as a building base. Disconnect plug
from the adaptor.
Démontez la mèche de la poupée mobile ainsi que les autres pièces constituant la
perceuse et ôtez la prise du transformateur.
Verbinde die beiden Maschinenbetten, wie abgebildet.
Connect the second tool bed to the first tool bed horizontally as shown.
Connectez les deux bancs de machine comme il l´est montré sur le dessin.
BOHRER
DRILL BIT
MECHE
Schiebe den Spindelstock von links auf das Maschinenbett. Befestige den
Mitnehmer auf der Spindel des Spindelstocks.
Slide headstock onto left side of tool bed assembly. Attach lathe driver to headstock
shaft.
Placez la poupée fixe sur la gauche du banc.. Fixez la contre-pointe sur la poupée
fixe.
MITNEHMER
LATHE DRIVER
CONTRE POINTE
MASCHINENBETTEN
TOOL BED
BANC DE MACHINE
KREUZSCHLITTEN
TOOL REST
SUPPORT DE TOURNAGE
DREHKNOPF
TURNING KNOB
MOLETTE
MOTORSCHALTER
MOTOR SWITCH
COMMUTATEUR
STECKER
PLUG
PRISE
SPINDELSTOCK
HEADSTOCK
POUPEE FIXE
SPINDELSTOCK
HEADSTOCK
POUPEE FIXE
MASCHINENBETTEN
TOOL BEDS
BANCS DE MACHINES
REITSTOCK
TAILSTOCK
POUPEE MOBILE
SCHRAUBE
SCREW
VIS
TRANSFORMATOR
ADAPTOR
TRANSFORMATEUR
Symbolfoto •
symbol picture •
symbole photo
12
3
4
56
8
BEDIENUNGSANLEITUNG FÜR DRECHSELMASCHINE
TO OPERATE WOOD LATHE • RECOMMANDATIONS POUR L´USAGE DU TOUR
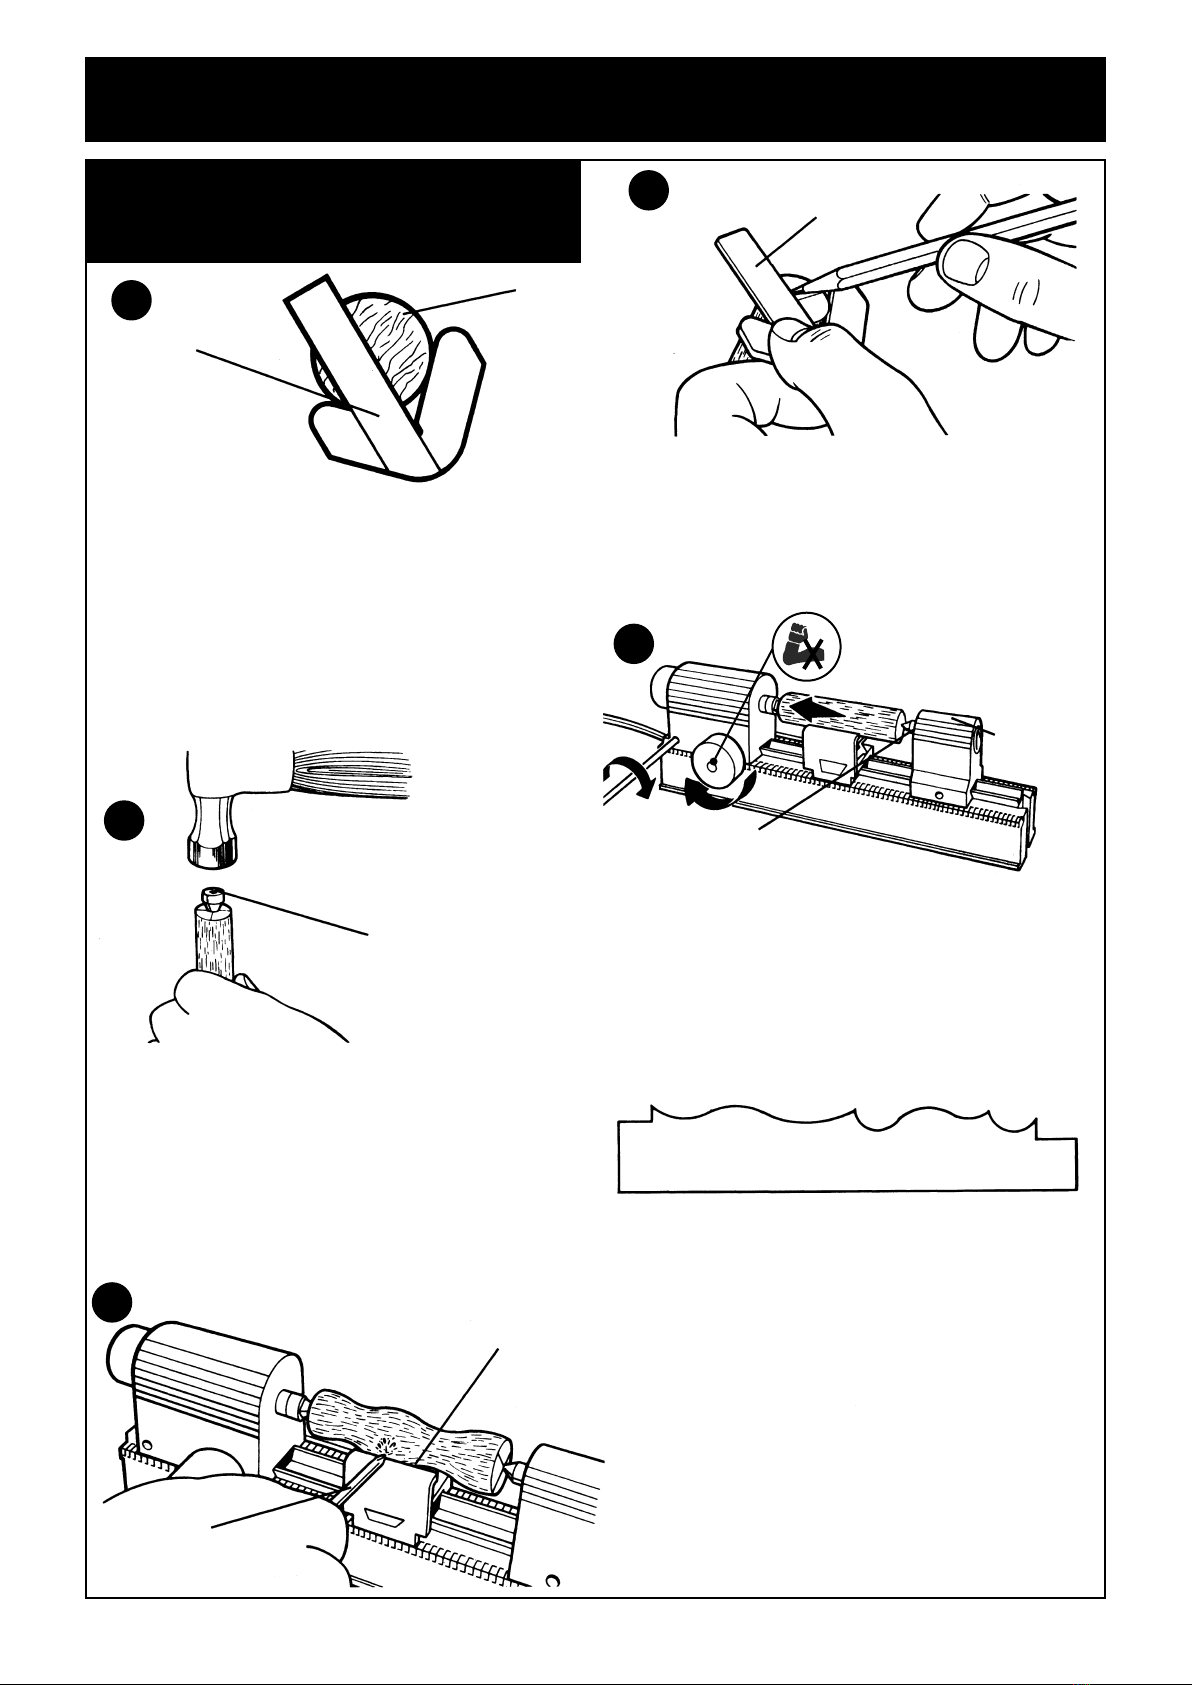
Verwende immer eine Schutzbrille beim Arbeiten mit Maschinen
Again, it is recommended that you wear safety goggles at all times when using machine.
A nouveau nous vous recommandons l´usage des lunettes de sécurité.
Nun kannst du die Drechselmaschine verwenden. Du kannst entweder quadratische
Holzstücke oder Rundhölzer drehen.
Um die Mitte des Rundholzes zu finden, setze das flache Ende des Rundholzes in den
Zentrierer und drücke den Rand, wie abgebildet, gegen die Seiten des Messgerätes.
You are now ready to use the wood lathe. You can turn either a squared wood piece
or a rounded dowel. To locate the center of a squared piece or a rounded dowel,
place the flat end of the wood in the center finder gauge as shown and press the
edges of the wood against the sides of the gauge.
Vous pouvez désormais utiliser convenablement le tour. Vous pouvez travailler aussi
bien des pièces de forme carrée que des pièces cylindriques en bois. Pour trouver
le centre du cylindre en bois, placez la surface plane en bout sur le calibre de
centrage comme cela est montré sur le dessin.
Nimm die Spitze des Mitnehmers vom Schaft des Spindelstocks und schlage die
Spitze mit einem Hammer in die markierte Mitte des Rundholzes. Mit einer kleinen
Vertiefung kannst du vermeiden, dass das Holz splittert. Stecke den Mitnehmer (inkl.
Holzstück) zurück auf den Schaft des Spindelstocks.
Remove the lathe driver from the headstock shaft and hammer the driver into the
located center hole at one end of wood piece. By doing so, you can avoid the wood
from splintering. Replace driver (with wood piece) on headstock shaft.
Ôtez la contre pointe de la poupée fixe (axiale) et enfoncez-la à l´aide d´un marteau
sur le centre du rondin précédemment tracé . En faisant cela , vous
empêchez le bois de « sauter » lors du tournage. Replacez alors l´ensemble sur la
poupée fixe.
Drehe den Knopf, um das Rundholz mit dem Reitstock zu verbinden. Achte darauf,
dass die Spitze des Reitstocks genau auf die markierte Mitte zeigt. Zum besseren
Gleiten kannst du etwas Öl verwenden.
Turn knob to connect the headstock and wood to the tailstock, placing the tailstock
point into the located center hole in the wood. For best results, put a couple of drops
of household oil (non-petroleum based) on the tailstock.
Tournez le bouton pour encastrer le cylindre en bois et la poupée mobile. Assurez-
vous que la pointe de la poupée mobile est en correspondance avec la marque du
centre. Pour un meilleur tournage, vous pouvez verser un peu d´huile.
Zeichne nun eine Linie entlang des Zentrierers ein. Drehe das Rundholz um 90° und
wiederhole das Ganze. Ebenso musst du es auf der anderen Seite des Holzes
machen.
Draw a line across the flat end of the wood against the cross slide of the finder as
shown. Turn 90° and repeat to find center. Do the same on the other side of the wood.
Tracez un trait. Tournerz la pièce de 90° et recommencerz la même opération. Bien
sur il faut réaliser cela de chaque coté du rondin de bois.
ZENTRIERER
CENTER FINDER
CALIBRE DE CENTRAGE
ZENTRIERER
CENTER FINDER
CALIBRE DE CENTRAGE
RUNDHOLZ
DOWEL
RONDIN
MITNEHMER
LATHE DRIVER
CONTRE POINTE
REITSTOCK
TAILSTOCK
POUPEE MOBILE
REITSTOCK-SPITZE
TAILSTOCK POINT
CONTRE-POINTE
DRECHSELMESSER
CHISEL
BURIN
ZUM KREUZSCHLITTEN 3 mm ABSTAND
AT LEAST 1/8” SPACE
3 MM D´ÉCART ENTRE LE SUPPORT ET LE BOIS
MUSTERVORLAGE
TEMPLATE
PATRON
Es muss ein Abstand von ungefähr 3 mm zwischen dem Holz und dem Kreuzschlitten
bestehen. Wähle ein Muster oder Design um das Holz zu drechseln; erstelle eine
Mustervorlage für das zu drechselnde Design. Schalte den Motor ein, lege das
Drechselmesser so auf den Kreuzschlitten, dass es knapp das Rundholz berührt. Die
nach innen gewölbte Seite der Drechselspitze sollte nach oben zeigen. Führe die
Drechselspitze ans Holz und drechsle langsam dein Muster ein. Übe auch hier erst
an Holzresten bevor du dein Vorhaben umsetzt. Schon bald wirst du ein geübter
Drechsler sein.
Check to make sure that there is at least 1/8“ (3 mm) between the wood and the tool
rest. Choose a pattern or design for turning the wood; make a template for the design
you want to make. Turn on the motor and rest the turning chisel against the tool rest
so that it barely touches the wood piece. The arched curve of the chisel should be
facing up. Feed the chisel into the wood very slowly, carving your design into the
wood. Once again, practice with scrap wood before starting a project. After a while,
you will become very skilled at carving the turning wood.
Il doit y avoir un écart de 3 mm entre le bois à tourner et le support de tournage.
Utilisez un patron ou une pièce déjà tournée au début. Imaginez à l´avance sur un
papier la meilleure façon de s´y prendre pour le futur tournage. Allumez le moteur,
positionnez l´outil à tourner sur le support de tournage de façon à ce que le côté
incurvé soit face à vous. Faites avancer l´outil sur le bois très doucement et guider
le tournage de l´échantillon très lentement. Commencez plutôt par vous entraîner
sur des chutes de bois.
1
2
3
4
5

9
Klebe das obere und das untere Vorderteil des Vogelhauses zusammen und die
Sitzstange etwa 15 mm unter dem Loch fest
To make the birdhouse hole: take the two pieces of the birdhouse front, line them up
as they will be assembled and trace an outline of the bird hole with 1/2“ of the hole
on the top piece and 1/2“ on the bottom piece. Cut out the bird hole with the jigsaw,
then use a wood glue (not included) to glue the two pieces of the birdhouse front
together. Place perch 1/2“ below hole in birdhouse front
Pour réaliser le trou du nichoir: Prenez les deux pièces de la face avant et alignez-
les ensemble comme si elles étaient assemblées (voir schéma) puis
tracez une esquisse du trou à cheval entre la pièce inférieure et la pièce
supérieure (moitié moitié). Découpez alors le trou à l´aide de la scie et utilisez de la
colle à bois pour coller les deux parties ensemble. Placez le perchoir à environ
15 mm en dessous du trou.
SITZSTANGE
PERCH
PERCHOIR
OBERE VORDERSEITE
FRONT TOP
PARTIE SUPÉRIEURE
UNTERE VORDERSEITE
FRONT BOTTOM
PARTIE INFÉRIEURE
DACHPLATTEN
ROOF PIECES
PARTIES DU TOIT
FIRST
TOP
ARRÊTE
BODEN
BOTTOM
SOL
RÜCKSEITE
BACK
FACE ARRIÈRE
VORDERSEITE
FRONT
FACE AVANT
SEITENTEILE
SIDES
PARTIES LATÉRALES
Die vier Dachplatten müssen so zusammengeklebt werden, dass sich die Kanten im
rechten Winkel treffen und das Dach an den Seiten übersteht.
Glue 4 roof pieces onto assembly so that they hang over the front and back as shown
at top of page. The two top pieces should meet at the top as shown.
Collez les quatre parties du toit ensemble de façon à ce qu´elles forment le bon
angle et que le toit dépasse de chaque côté.
Schleife die beiden oberen Dachkanten ab und klebe den First, wie abgebildet, fest.
Zum Schluss klebe das Vogelhaus auf die Bodenplatte.
Glue bottom piece onto assembly, lining up the edges. Finally, glue top piece of the
house as shown.
Collez la partie supérieure du toit sur l´ensemble, comme cela est montré sur le
dessin, après avoir poli l´arrête du toit afin de la rendre plane. Enfin fixez la base de
la maisonnette sur la plaque de fixation faisant office de sol.
Klebe nun die beiden Rückteile, wie abgebildet, zusammen. Mit etwas Leim auf der
Innenfläche der Rückseite und der Vorderseite kannst du die Seitenteile befestigen.
Glue the two back pieces together as shown. Apply glue to the insides of the front and
back pieces and join them to the sides. Make sure the edges line up, as shown above.
Collez les deux parties de la face arrière ensemble comme cela est montré.
Assemblez alors la face arrière avec les deux parties latérales comme sur le dessin.
BAUANLEITUNG VOGELHAUS
BIRDHOUSE ASSEMBLY
ASSEMBLAGE DU NICHOIR À OISEAUX
Für die Fertigstellung der Bausätze wird Holzleim benötigt (nicht enthalten). Bevor du zu bauen beginnst, teste die Funktionstüchtigkeit der
Maschinen mit Holzresten aus. Pause die Schablonen der folgenden Seiten auf die Holzplatte und säge sie anschließend mit der Stichsäge
aus und schleife sie mit der Schleifmaschine. Zeichne auch die gestrichelten Linien ein.
For finishing the projects you need wood glue (not included). Before you start, check the machine functions with scrap pieces of wood. Cut
out shapes on the following pages, trace onto wood and use the jigsaw to cut out the pieces. Draw the dotted lines on wood as indicated.
Pour la finition de ces différent projets vous aurez besoin de colle à bois (non incluse). Avant de commencer tester les différentes fonctions
de la machine avec des chutes de bois. Découpez les formes sur les pages suivantes et servez-vous en comme patrons pour les tracer sur le
bois avant de le découper à la scie sauteuse. Veuillez tracer ces traits comme cela est indiqué.
1
2
34

10
SCHABLONEN FÜR VOGELHAUS
BIRDHOUSE CUTOUTS • PATRONS DU NICHOIR À OISEAUX
DACHFIRST
TOP
PARTIE SUPÉRIEURE DU TOIT
SITZSTANGE
PERCH
PERCHOIR
UNTERE VORDERSEITE
FRONT BOTTOM
FACE AVANT INFÉRIEURE
OBERE VORDERSEITE
FRONT TOP
FACE AVANT SUPÉRIEURE
BODEN
BOTTOM
SOL
UNTERE RÜCKSEITE
BACK BOTTOM
FACE ARRIÈRE INFÉRIEURE
DACHTEILE (4)
ROOF SECTION (4)
PARTIES DU TOIT (4)
SEITENTEILE (2)
SIDES (2)
FACES LATÉRALES (2)
OBERE RÜCKSEITE
BACK TOP
FACE ARRIÈRE SUPÉRIEURE

11
BAUANLEITUNG KERZENSTÄNDER
CANDLE HOLDER ASSEMBLY • ASSEMBLAGE DU BOUGEOIR
Verwende die Mustervorlage zur Unterstützung für dein eigenes Design. Verwende
die Drechselmaschine, wie abgebildet, zum Drechseln des Rundholzes.
When you are ready to try this project, create a pattern for lathe cutting or use the
one provided on the cutouts page. Use the lathe to turn dowel as shown.
Quand vous serez prêt à réaliser ce projet, créez un patron pour le tournage selon
votre propre choix ou utilisez celui qui est donné dans les pages destinées aux
patrons. Utilisez le tour comme cela est montré pour tourner le rondin de bois.
Lochbohrung: Zuerst musst du das Rundholz anbohren und kannst danach mit der
Bohrmaschine das 6 mm tiefe Loch bohren.
To make candle hole: Trace an outline of the candle holder on the top of the dowel
and use the drill to cut out a recess about 1/4“ deep.
Pour réaliser le trou de la bougie : tracez une esquisse de la bougie sur la partie
supérieure du rondin et utilisez la perceuse pour réaliser le trou qui doit être de 6
mm de profondeur minimum.
Klebe den Fuß auf der Bodenplatte, wie abgebildet,
fest.
Use wood glue (not included) to center and glue the
holder base onto the bottom piece as shown.
Utilisez la colle à bois (non fournie) pour centrer et
coller le pied de fixation sur la pièce inférieure
(voir dessin)
Das geschnitzte Rundholz wird jetzt in
die Mitte des Fußes geklebt.
Center and glue the carved dowel
onto the holder base.
Centrez et collez le bougeoir sur le
pied de fixation.
MUSTERVORLAGE
PATTERN
PATRON
RUNDHOLZ
DOWEL
RONDIN
6 mm LOCH
1/4’’ HOLE
TROU DE 6 mm
KERZE
CANDLE
BOUGIE
FUSS
HOLDER BASE
PIED
BODENPLATTE
BOTTOM
PIÈCE INFÉRIEURE
RUNDHOLZ
DOWEL
RONDIN
FUSS
HOLDER BASE
PIED
RUNDHOLZ
DOWEL
RONDIN
Nun kannst du den Kerzenständer noch bemalen oder lackieren (Farbe und Lack nicht enthalten).
The finished candle holder should look like the drawing at the top of the page.
If it does, great job! You may paint or glaze your finished holder as desired. (paint and glaze not included).
Vous pouvez désormais peindre ou vernir votre bougeoir (peinture et vernis non inclus).
12
34

12
SCHABLONEN FÜR KERZENSTÄNDER
CANDLE HOLDER CUTOUTS • PATRONS POUR LE BOUGEOIR
Zur Vorlage für Deine eigenen Muster.
You may use this pattern for lathe cutting, or create your own.
Vous pouvez utiliser ce patron de tournage ou créez le vôtre.
RUNDHOLZ
DOWEL
RONDIN
FUSS KLEIN VIER-
KANT
HOLER BASE
PIED DE FIXATION
BODENPLATTE
BOTTOM
BASE
MUSTERVORLAGE
PATTERN
PATRON DE TOURNAGE

13
BAUANLEITUNG FLUGZEUG
AIRPLANE ASSEMBLY • ASSEMBLAGE DE L' AVION
Klebe die vier Kabinenteile A,B,C,D, wie abgebildet, zusammen.
Use Wood Glue (not included) to glue the 4 cabin selections A,B,C,D together as
shown. Make sure that B and C are on the outside as indicated.
Utilisez la colle à bois pour coller les quatre parties A,B,C,D de la cabine comme cela
est montré. Assurez vous que les parties B et C sont à l´extérieur.
RÜCKSEITE
BACK
ARRIÈRE
KABINE
CABIN ASSEMBLY
CABINE ASSEMBLÉE
KABINENTEIL A
CABIN SECTION A
PARTIE DE CABINE A
KABINENTEIL B
CABIN SECTION B
PARTIE DE CABINE B
KABINENTEIL C
CABIN SECTION C
PARTIE DE CABINE C
KABINENTEIL D
CABIN SECTION D
PARTIE DE CABINE D
SCHLITZ
SLOT
RAINURE
GROSSE TRAGFLÄCHE
LARGE WING
GRANDE AILE
KLEINE TRAGFLÄCHE
SMALL WING
AILETTE
Stecke die mit Leim bestrichenen Tragflächen, wie abge-
bildet, in den Schlitz der kompletten Kabine.
Slide and glue the small wing section first and then the
large section into the slot in the cabin assembly as shown.
Insérez et collez les ailettes puis ensuite la grande aile à
l´intérieur de la rainure prévue à cet effet dans la cabine
déjà assemblée (voir dessin).
Jetzt musst du das obere Fahrwerkteil mit dem Fahrwerk zusammenkleben und
anschließend an die Unterseite des Flugzeugs, wie abgebildet, kleben.
Glue landing gear assembly to bottom of plane as shown.
Collez l´ensemble du train d´atterrissage sur le dessous de l´avion comme sur le
dessin.
OBERES FAHRWERKTEIL
LANDING GEAR TOP
PARTIE SUPÉRIEURE DU TRAIN D´ATTERRISSAGE
FAHRWERK
LANDING GEAR
ATTERRISSAGE
Klebe das Heck auf die Heckplatte und dann, wie abgebildet, auf das Flugzeug.
Glue the tail and tail bottom together, then glue the tail assembly to the top of the
plane as shown.
Collez l´aileron et la base de l´aileron ensemble, puis collez le tout sur le dessus de
l´avion comme cela est montré.
FLUGZEUG
PLANE
AVION
FLUGZEUG
PLANE
AVION
HECKPLATTE
TAIL BOTTOM
BASE DE L´AILERON
HECK
TAIL
AILERON
Du kannst jetzt dein Flugzeug bemalen und lackieren.
( Farbe und Lack nicht enthalten)
The finished airplane should look like the drawing on this page.
If it does, great job! You may paint or glaze your finished airplane as desired. ( Paint and glaze not
included).
Une fois fini l´avion doit ressembler le plus possible au dessin de la page.
Si c´est le cas, bien joué ! Vous pouvez désormais peindre ou vernir votre avion. (Peinture et vernis non inclus)
1
2
3
4

14
SCHABLONEN FÜR FLUGZEUG
AIRPLANE CUTOUTS • PATRONS POUR L´AVION
GROSSE TRAGFLÄCHE
LARGE WING SECTION
GRANDE AILE
4 mm - 1/6"
4 mm - 1/6"
4 mm - 1/6"
4 mm - 1/6"
KLEINE TRAGFLÄCHE
SMALL WING
AILETTE
HECKPLATTE
TAIL BOTTOM
BASE DE L´AILERON
OBERES FAHRWERKTEIL
LANDING GEAR TOP
PARTIE SUPÉRIEURE DU
ATTERRISSAGE
FAHRWERK
LANDING GEAR
TRAIN D´ATERRISSAGE
KABINENTEIL A
CABIN SECTION A
PARTIE DE CABINE A
KABINENTEIL D
CABIN SECTION D
PARTIE DE CABINE D
KABINENTEIL B
CABIN SECTION B
PARTIE DE CABINE B
KABINENTEIL C
CABIN SECTION C
PARTIE DE CABINE C
HECK
TAIL
AILERON
15
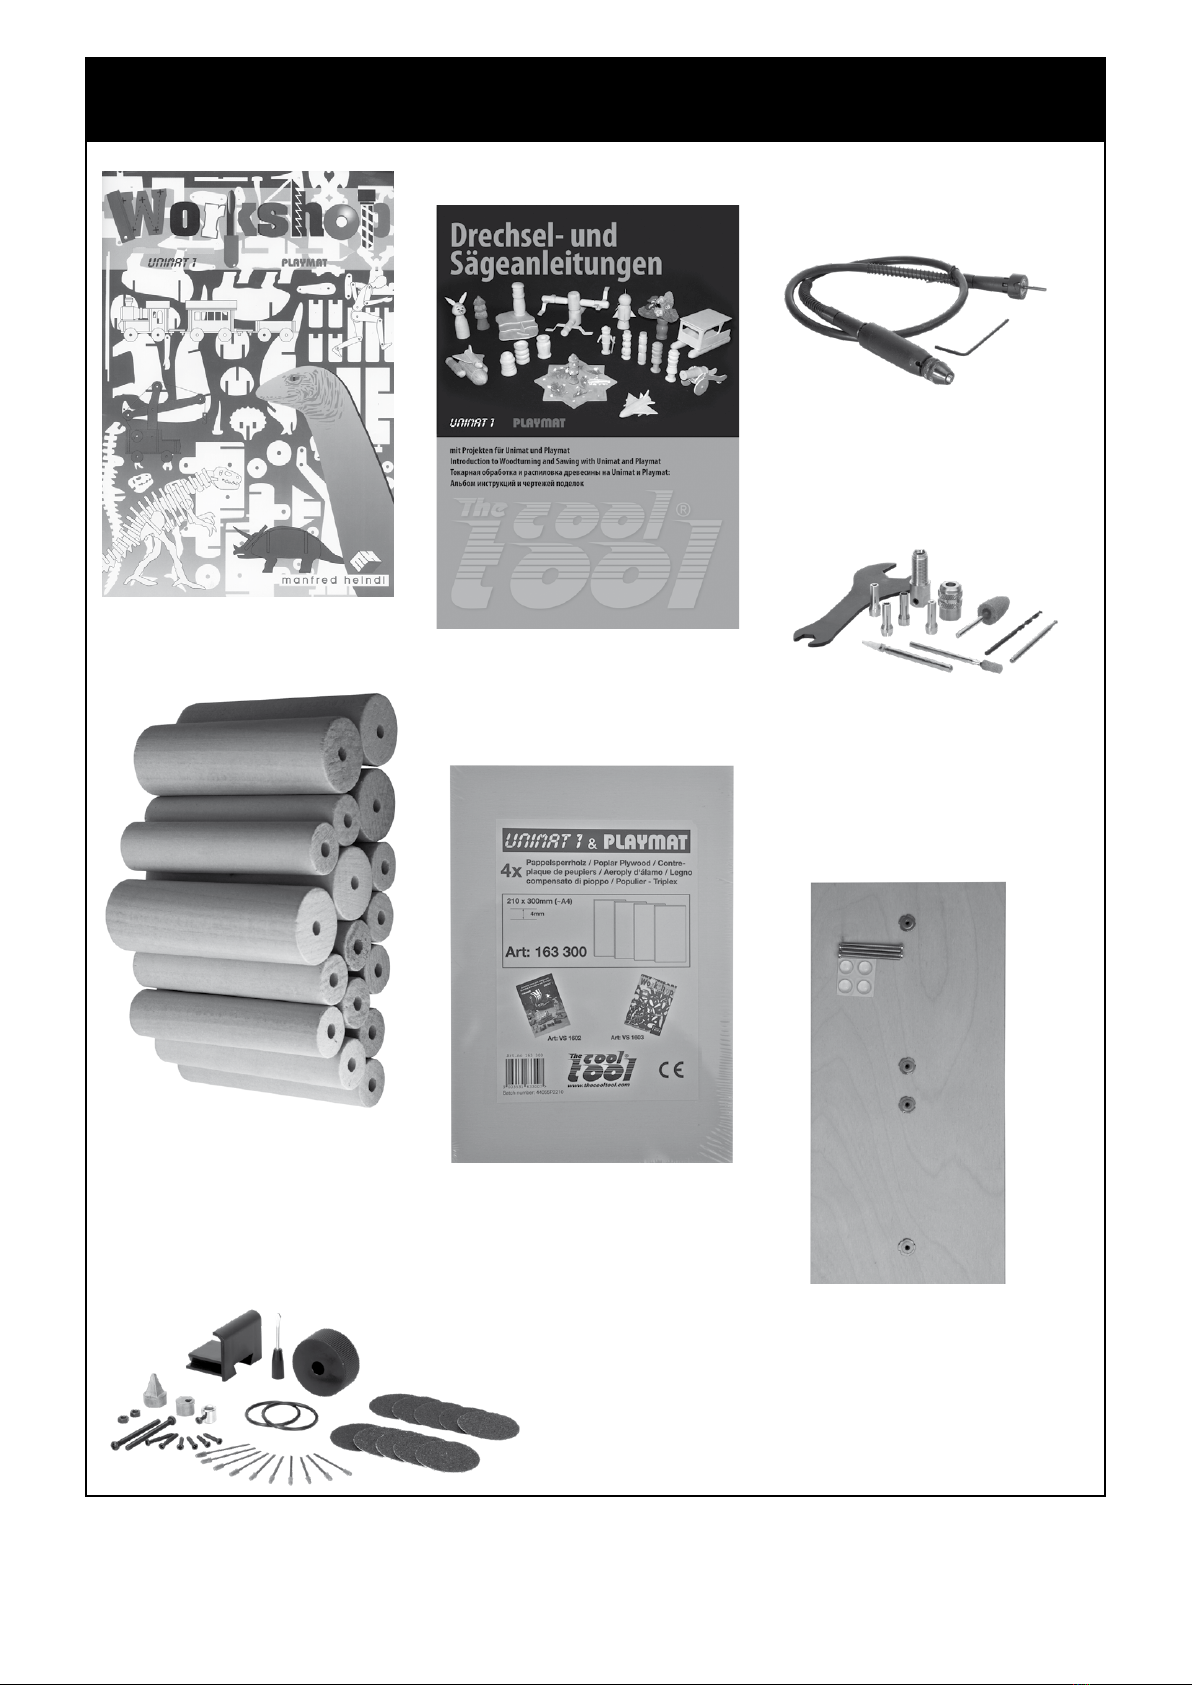
ZUBEHÖR
ACCESSORY • ACCESSOIRE
VS 1603
HOLZSET GEMISCHT
ASSORTED WOOD
JUEGO DE MADERAS
163 120
VS 1604
SERVICE SET 901 110
PAPPELSPERRHOLZPLATTEN
POPLAR PLYWOOD
MADERA DE CONTRACHAPADO
DE ÁLAMO
163 300 GRUNDPLATTE MIT RUTSCHSTOPP
MOUNTING-PLATE INC. SLIP-STOPPERS
PLANCHA BASICO CON ANTI DESLIZARSE
163 410
FLEXIBLE WELLE
FLEXIBLE SHAFT
ARBRE FLEXIBLE
901 440
SPANNZANGEN + WERKZEUG
COLLETS + TOOLS
PINCES + OUTILS
901 460

4
in
1WORKSHOP
PROBLEMLÖSUNGEN
1. Wenn das Gerät eingesteckt ist und
sich nichts bewegt…
Prüfe, ob der Motor mit dem Transformator
verbunden ist und ob das Transformatorkabel
eingesteckt ist
2. STICHSÄGE sägt nicht…
Möglicherweise hast du das Holz zu fest
gegen das SÄGEBLATT gedrückt. Nimm das
Holzstück vom SÄGETISCH und versuche es
anschließend langsam noch einmal.
3.Die STICHSÄGE funktioniert nicht,
aber die SCHLEIFMASCHINE bewegt
sich…
Drehe das Sticksägeblatt hoch und drücke
das Sägegehäuse gegen den Excenter und
beginne noch einmal.
4. BOHRER arbeitet nicht…
Vielleicht hast du den Bohrer zu fest gegen
das Holz gedrückt. Drehe den Knopf, um den
Bohrer nach oben zu heben und fange von
vorne an.
5. Mitnehmer der DRECHSELMASCHINE
dreht sich nicht…
Ziehe den Stecker aus dem Transformator
und gib ein paar Tropfen Öl auf die Spitze des
Reitstocks. Wenn sich das Rundholz immer
noch nicht dreht, ist es vielleicht zu fest zwi-
schen dem Spindelstock und dem Reitstock
eingeklemmt. Drehe den Knopf am
Spindelstock, um das Holz etwas zu lockern.
6. SPINDELSTOCK, REITSTOCK oder die
STICHSÄGE lassen sich nicht leicht
auf der Werkzeugschiene bewegen…
Lockere die Schrauben am Boden des
Gerätes.
7. Der Motor dreht sich, aber nicht die
Motorspindel im Spindelstock…
Die Antriebsriemen im Spindelstock haben
sich gelockert oder sind gerissen. Schraube
den Spindelstock auf und ersetze die
Antriebsriemen (Service Set Art.nr. 901 110).
8.Beachten Sie unsere zusätzlichen
Aufbauvideos online:
www. y o u t u b e . c om/ t h e c o o l t o o l 0 3
SOLUTIONS AUX PROBLEMES
RENCONTRES
1. Lorsque vous allumez l´interrupteur, il
ne se passe rien…
Vérifiez que le moteur est correctement
connecté à l´adaptateur. S´il ne se passe rien
vérifiez que l´adaptateur est correctement
connecté à la prise.
2. La scie sauteuse ne coupe pas…
Vous avez probablement poussé trop fort le
bois sur la lame de la scie. Retirez le bois et
recommencez plus doucement sans appuyer.
3. La scie ne fonctionne pas mais la
ponceuse oui…
Soulevez la scie et appuyez fermement
l´excentrique sur l´embase, puis recommen-
cez.
4. La perceuse ne perce pas…
Vous êtes probablement en train d´exercer
trop de pression sur la mèche. Tournez la
molette pour surélever la perceuse et rées-
sayez plus doucement sans exercer de
pression.
5. La contre pointe du tour ne tourne
pas…
Eteignez l´appareil et ajoutez un peu d´huile
sur la pointe de la poupée mobile. Si le bois
ne tourne toujours pas c´est qu´il est
probablement trop serré entre les deux
poupées. Tournez alors la molette de la
poupée mobile pour desserrer un peu et
réessayez.
6. Les poupées fixes et mobiles ainsi que
la scie ne s´insèrent pas facilement sur
la crémaillère du banc de machine…
Desserrez un peu les vis situées aux bases de
ces pièces.
7. Le moteur tourne mais pas l´axe de la
poupée fixe…
Cela provient probablement de la courroie
d´entraînement qui doit être défectueuse ou
cassée. Ouvrez la poupée fixe et remplacez
la courroie (Service Set art.no. 901 110).
8. Vous pouvez également visionner la
vidéo suivante:
www. y o u t u b e . c om/ t h e c o o l t o o l 0 3
TROUBLESHOOTING
1. When you turn on the switch,
nothing happens…
Check to see that motor is properly connec-
ted to the adaptor. If there is still no operati-
on, check if the adaptor plug is properly
plugged into the wall socket.
2. JIGSAW does not cut…
You are probably pushing the wood too hard
against the BLADE. Pull wood back and then
lightly re-insert the wood into the saw blade,
using slow, even pressure to cut.
3. JIGSAW does not operate but SANDER
does…
Lift up the jigsaw tip. Push saw base firmly
against the eccentric piece. Release jigsaw
tip and try again. Check if the eccentric piece
fits properly into the jigsaw base.
4. DRILL does not cut…
You are probably exerting too much pressure
on the drill. Turn knob to pull drill bit back up,
and then try again, using slow, even pressure
to cut.
5. WOOD LATHE does not turn…
Turn power off and add a few drops of
household oil (non-petroleum based) to the
tailstock as directed above. If wood still does
not turn, the wood may be placed too tightly
between headstock and tailstock. Turn knob
on headstock to loosen slightly, and try
again.
6. HEADSTOCK, TAILSTOCK or JIGSAW
do not move easily along tool bed…
Loosen the screws at the base of the piece.
7. The motor turns but the headstock
spindle does not …
Probably the drive belts inside the motor
went off or broken. Open the headstock
housing and replace the drive belts
(Service Set art.no. 901 110).
8. Please check our supplementary onli-
ne assembly video:
www. y o u t u b e . c om/ t h e c o o l t o o l 0 3
The Cool Tool GmbH Fabriksgasse 15, A-2340 Moedling – Austria
phone +43-2236-892 666
fax +43-2236-892 666-18
Please visit our website www.thecooltool.com
ERSATZRIEMEN (Service Set)
SPARE DRIVE BELT (Service Set)
COURROIE SUPPLÉMENTAIRE (Service Set)
SEE INSTRUCTION-VIDEO ONLINE!
7
Other manuals for PLAYMAT
2
Table of contents
Popular Motorized Toy Car manuals by other brands

HOMCOM
HOMCOM 370-227V70 Installation and operation manual

HPI Racing
HPI Racing WHEELY KING instruction manual

HPI Racing
HPI Racing Sprint 2 sport instruction manual

Alice's Garden
Alice's Garden QUAD manual

Power Wheels
Power Wheels Kawasaki ZX-7 78410 owner's manual

Reely
Reely Nitro Buggy "Generation X" 4WD RtR operating instructions


Associated Electrics
Associated Electrics RC10GT instruction manual

HPI Racing
HPI Racing 120026 instruction manual

Radio Shack
Radio Shack K-Rad Racer owner's manual

Jamara
Jamara Mercedes-Benz Arocs Instruction

Carrera RC
Carrera RC Nintendo Mario Kart Bumble V Assembly and operating instructions

Jamara
Jamara Ferrari F1 instructions