The Fountainhead Group 190655 User manual

Use and Care Manual
Do Not Return This Sprayer To The Store
For Help, Information or Parts, Call : 1-800-311-9903
The Fountainhead Group, Inc.
23 Garden St., New York Mills, NY 13417
1-800-311-9903
www.TheFountainheadGroup.com
CAUTION: Read and follow all instructions
Manual No. 184703
Rev. B 03/10/2021
5 1/2”X 8 1/2”Booklet
Battery-Powered
Water Supply Tank

Page 2
SAFETY PRECAUTIONS
•User must read and understand entire instruction manual before operating this Device.
•Never use ammable or combustible liquids, caustics, acids, or hot water in this Device.
•Always wear appropriate personal protection equipment. This includes at least goggles, gloves, and
protective clothing.
• Read and follow all instructions of this Device and any equipment this Device will be used in
conjunction with.
•To reduce risk of battery re or bursts, use only Fountainhead Group Chargers that are in good condition
and have not been damaged.
•Inspect Device, Hose and Quick Connect for damage or loose connections before each use.
•Always use replacement parts from the original manufacturer.
•Never attempt to alter Device from original condition.
•Any changes or modications to the Device not expressly approved by the manufacturer will void the
user’s authority to operate the Device and void the warranty.
•Do not lift or carry the Device by the Hose or Quick Connect. Carry by the Handles only.
•Store the Device, Pump, and Charger indoors in a warm, dry location out of direct sunlight and away
from any sources of moisture or intense heat. Do not store Device where freezing temperatures (below
32°F/0°C) will occur. Allowing water to freeze inside the Device may damage the Pump, Seals, Quick
Connect or other components, and void the Device warranty.
•Keep the Device out of the reach of children.
•Thoroughly clean the Device after each use. Failure to clean the Device may cause contamination of
subsequent applications, will cause premature Device wear, and void the Device warranty.
About this Device
WARNING: RISK OF FIRE, BURNS, OR ELECTRICAL SHOCK. To reduce the risk of injury, user must read
and understand entire instruction manual before operating this Device.
This is an electric-powered compressed-air style Device that is designed to dispense water.
This Device uses an internal rechargeable Lithium-Ion Battery to power an electric air compressor Pump.
The PumpZero Electric Pump is designed to provide a more convenient and more consistent alternative to
standard manual pumps. It operates by pressurizing the air above the uid in the Tank, which causes the
uid to be pushed through the Hose. Because the PumpZero Electric Pump operates by pressurizing air in
the Tank, it is important that a good air seal is achieved when the Pump is tightened on to the Tank.
While actively dispensing, it is normal for the Pump to turn on and o by itself periodically; it is not ex-
pected to run continuously. The Pump will pressurize the air inside the Tank, then turn o and let the air
pressure do the work of dispensing out the uid. As the uid is dispensed out, the air pressure inside the
Tank will decrease, eventually causing the Pump to turn on again. Having the Pump turn on and o in this
manner allows for longer Battery life and greater Pump longevity, compared to a continuously running
Pump.
The PumpZero Electric Pump contains an internal Lithium-Ion Battery. The shipment of Lithium-Ion Batter-
ies is subject to international shipping regulations. Accordingly, the Battery must be in a reduced-charge
state for shipping, so the Pump must be charged prior to initial use. As with all products containing Lithi-
um-Ion Batteries, consult your local shipping agent for instructions prior to shipping the Pump.
The PumpZero Electric Pump is equipped with an auto-o feature that turns the Pump o after 2 hours of
inactivity. This is to prevent the Battery from being drained if the Pump is left on when the Device is not in
use.
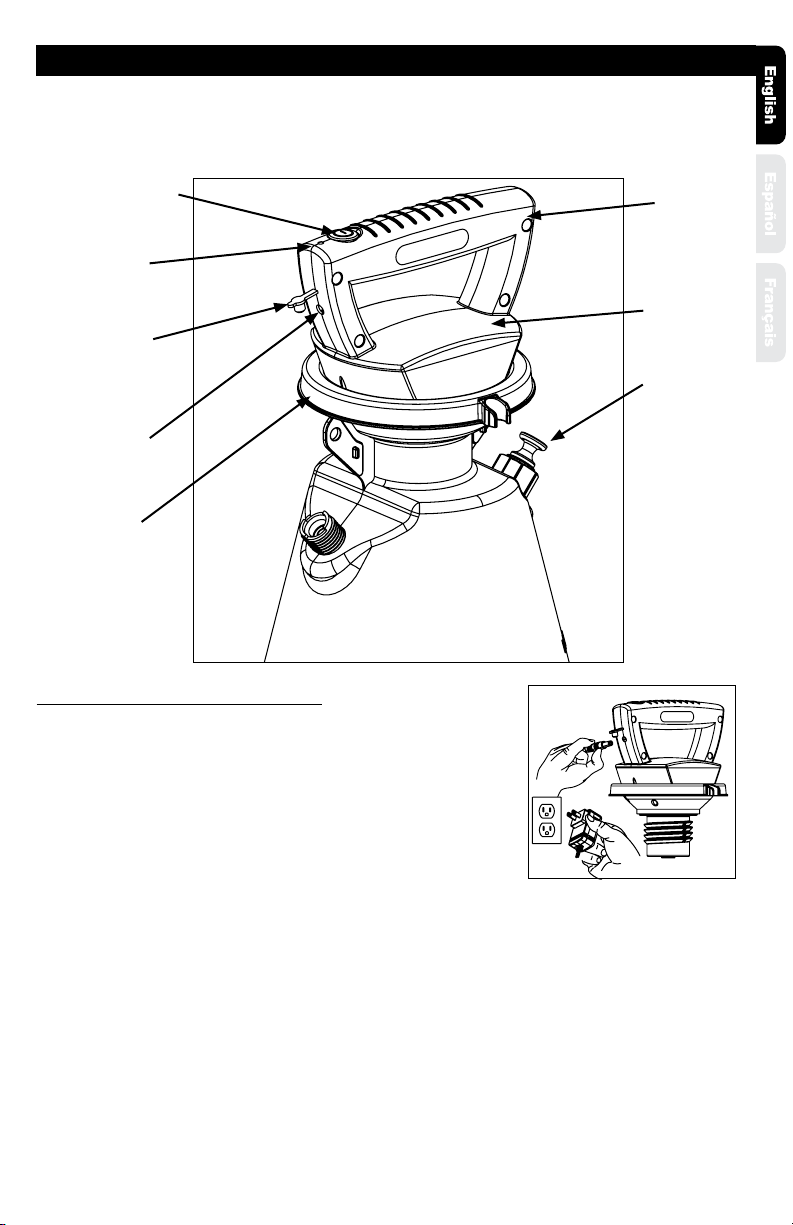
INTRODUCTION TO DEVICE
Page 3
OPERATING INSTRUCTIONS
Charging the Pump Internal Battery
1. In a dry, clean location insert the Charger Plug into a standard
electrical wall outlet. See Figure F. On the end of the
Pump Handle, remove the rubber Cover to expose the Charging
Port. Plug the Charger Cable into the Charging Port on the Pump.
The Light on the top of the Pump should start ashing green.
a. The Pump cannot be operated while Charging.
The Pump must be disconnected from the Charger
to permit further use.
b. If the Light on the Pump ashes red, the Battery is
too hot to be safely charged. This can happen when
the Battery is used heavily in very hot weather or if
the Battery is stored in a very hot location (such as in an enclosed vehicle or storage unit during
very hot weather). If this happens the Battery must be allowed to cool before it can be charged.
c. If the Light on the Pump ashes red and green alternately, this means the Battery has been
damaged and cannot be charged within the safe charging time limit. The internal Battery cannot
be serviced, so the Pump must be replaced.
2. Ensure the Pump and Charger are placed where they will not be exposed to liquids, falls or other sources of
damage for the duration of the charging period.
3. When charging is complete the Light will remain green and stay on constantly. Charging time will vary
depending on Battery condition at the start of charging. Charging time should not exceed 3 hours.
4. Remove the Charger Cable from the Pump once charging is complete. Pumps should not be connected
to the Charger during long periods of storage. To ensure optimal Battery life the Pump should be charged
at least once every 3 months when not in use.
5. Reinsert the rubber Cover into the Charging Port to protect it.
6. Unplug the Charger from the electrical wall outlet when not in use.
WARNING: RISK OF FIRE, BURNS, OR ELECTRICAL SHOCK. Use Charger only in a dry, dust-free location
free from any ammable or combustible liquids or vapors. Use only with Fountainhead Group Char-
gers – Other types of Chargers may cause Battery failure resulting in personal injury and damage. Do
not short circuit the Charger or Battery terminals. Do not charge damaged Batteries. Do not expose to
liquid, vapor, or rain.
Figure F
Power
Button
Charging
Port Cover
Charging
Port
Handle
Pressure
Release Valve
Light
Pump Zero
Pump
Dust Cap
Page 4
OPERATING INSTRUCTIONS
Filling the Device
CAUTION: RISK OF DAMAGE TO INTERNAL COMPONENTS. Use of chemicals other than water may
damage the Device and will void the warranty.
WARNING: RISK OF DEATH, PERSONAL INJURY AND/OR PROPERTY DAMAGE FROM IMPROPER CHEMI-
CAL USE OR MIXTURE. Never use ammable or combustible liquids, caustics, acids, or hot water in this
Device. Dispensing ammable or combustible liquids can create combustible fumes that could be ig-
nited by the electrical system in the Device, causing an explosion. Always wear appropriate personal
protection equipment as instructed by manufacturer when using, preparing, handling, or dispensing.
This includes at least goggles, gloves, and protective clothing.
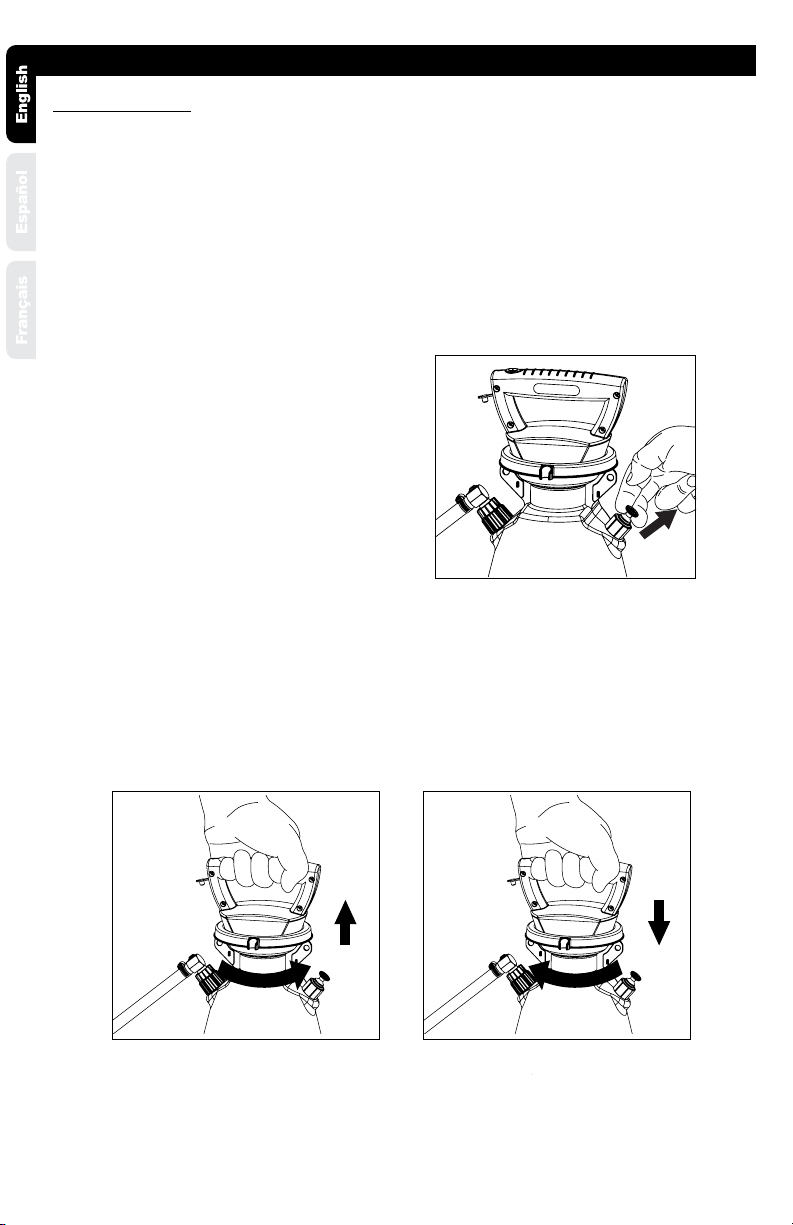
1. Ensure that the Pump is turned OFF (Light is OFF).
2. Pull up on the knob of the Pressure Release
Valve until all the pressure is released from the
Tank (See Figure G).
3. Turn the Pump Handle counterclockwise to remove the Pump (See Figure H).
4. Fill the Tank to the desired level. See ll markings on side of Tank.
5. Install the Pump into the Tank opening and turn clockwise until tightly sealed against the Tank
(See Figure I).
Figure G
Figure H Figure I
Page 5
OPERATING INSTRUCTIONS CONTINUED
1.The PumpZero Pump must be charged for the Device to operate. See Charging the Pump Internal Battery.
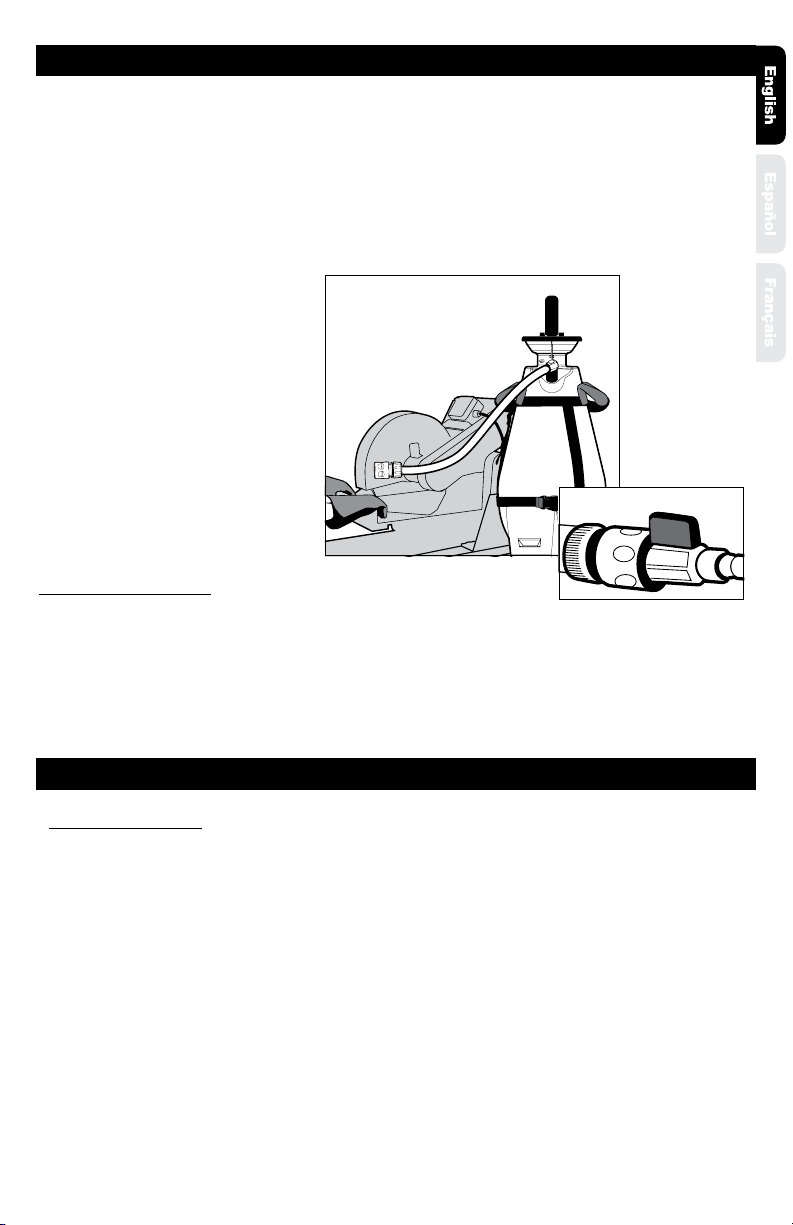
2. Connect the Quick Connect to the equipment. (See Figure K)
3. Press the Power Button to turn on the Pump and begin pressurizing the Tank.
a. The Light on the top should turn green and an audible hum should be heard, indicating the
Pump is running and is pressurizing the Tank.
b. The Pump will turn o once the Tank is pressurized, which may take 30 seconds to several
minutes depending on the size of the Tank and the amount of uid in it.
c. It is permissible to start dispensing before the Tank is fully pressurized, but in order to avoid
a sub-optimal ow, it is recommended to wait at least 20 seconds to allow some pressure to
build in the Tank.
4. To turn o the Device press the
Power Button. The Light will turn OFF.
5. Note that the Tank is still pressurized
even though the Pump has been
turned OFF.
6. To depressurize the Tank, pull up on
the Pressure Release Valve.
7. Always clean the Device when nished
using. See Cleaning & Storage.
DEVICE MAINTENANCE
Cleaning & Storage
WARNING: RISK OF PERSONAL INJURY. Always wear appropriate personal protection equipment as
instructed by manufacturer when using, preparing, handling or dispensing. This includes at least
goggles, gloves, and protective clothing. Prior to performing maintenance always depressurize De-
vice by turning o the Pump and operating the Pressure Release Valve until no pressure remains in
the Tank.
CAUTION: RISK OF DAMAGE TO INTERNAL COMPONENTS. Failure to properly rinse out the Device
may allow residue build-up that can clog or damage the Filters, Pump, or Quick Connect. Residue
build-up can also contaminate subsequent applications. Leaving residue in the Device when not in
use can lead to premature Device wear.
Figure K
Low Battery Indicator
The Pump is equipped with a Low Battery Indicator. When the Pump is operating, the Light on the top of the
Pump will change from steady green to ashing green when the Battery has 25% of charge remaining. This
is typically enough to nish dispensing the current Tank of uid and one additional Tank. The Pump should
then be charged. See Charging the Pump Internal Battery. When the Battery is completely out of charge the
Light will turn OFF and the Pump will not operate.
Page 6
Cleaning and Storage Continued:
1. Turn o the Pump by pressing the Power Button. The Light on the top of the Pump should turn o.
2. Operate the Pressure Release Valve on the side of the Tank by gently pulling it outward until the air
inside the Tank stops owing out.
3. Remove the Pump from the Tank by turning it counter-clockwise. Avoid placing the Pump down
where it may become contaminated with dirt, or debris that could later enter the Tank.
4. Use clean water to thoroughly rinse and empty the Tank until all residues are removed.
5. Use a wet cloth to wipe the bottom of the Pump until all residues are removed. Do not rinse the
Pump with a hose or submerge in water, as water will enter the Housing, damaging the
electrical components, rendering the Pump non-functional, and voiding the warranty.
6. Add approximately 1 quart [1 liter] of clean water to the Tank.
7. Attach the Pump to the Tank and tighten rmly.
8. Press the Power Button so the Pump will pressurize the Tank.
9. With clean water in the clean Tank, dispense water through the Hose and Quick Connect for at least
30 seconds to rinse them out. Failure to rinse out the Hose and Quick Connect may allow residue
build-up that can clog or damage the components.
10. Press the Power Button to turn o the Pump.
11. Operate the Pressure Release Valve on the side of the Tank to release pressure.
12. Remove the Pump. Avoid placing the Pump down where it may become contaminated with dirt or
debris that could later enter the Tank.
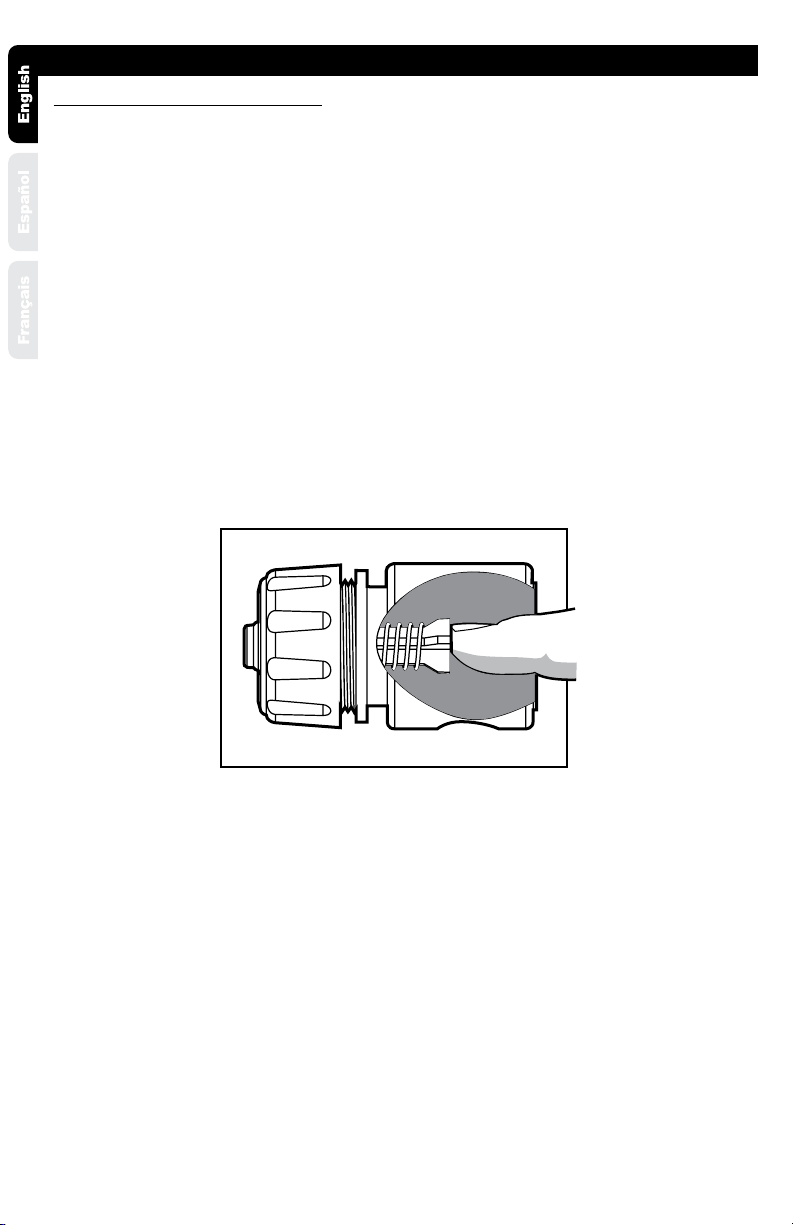
13. Open the Quick Connect (depress Lever) to drain any remaining water from the Hose. (See Figure L)
14. Empty out any remaining water from the Tank.
15. Allow the Device to dry. This is best done by hanging the Tank upside down to let it drain.
16. Once the Device is dried turn the Device upright and loosely assemble the Pump to the Tank to
prevent debris from entering the Tank.
17. Store the Device, Pump, and Charger indoors in a warm, dry location out of direct sunlight and
away from any sources of moisture or intense heat. Do not store Device where freezing tempera-
tures (below 32°F/0°C) will occur. Allowing water to freeze inside the Device may damage
the Pump, Seals, Quick Connect, or other components, and void the Device warranty.
18. To ensure optimal Battery life the Battery should be charged at least once every 3 months when not
in use. See Charging the Pump Internal Battery.
DEVICE MAINTENANCE CONTINUED
Figure L

Page 7
COMPLIANCE INFORMATION
FCC Compliance:
This Device complies with part 15 of the FCC Rules. Operation is subject to the following two conditions: (1)
This Device may not cause harmful interference, and (2) this Device must accept any interference received,
including interference that may cause undesired operation.
Note: This equipment has been tested and found to comply with the limits for a Class B digital device, pur-
suant to part 15 of the FCC Rules.These limits are designed to provide reasonable protection against harm-
ful interference in a residential installation.This equipment generates, uses and can radiate radio frequency
energy and, if not installed and used in accordance with the instructions, may cause harmful interference
to radio communications. However, there is no guarantee that interference will not occur in a particular in-
stallation. If this equipment does cause harmful interference to radio or television reception, which can be
determined by turning the equipment o and on, the user is encouraged to try to correct the interference
by one or more of the following measures:
- Reorient or relocate the receiving antenna.
- Increase the separation between the equipment and receiver.
- Connect the equipment into an outlet on a circuit dierent from that to which the receiver is connected.
- Consult the dealer or an experienced radio/TV technician for help.
Canada IC:
CAN ICES-3 (B)/NMB-3(B)

Page 8
TROUBLE LOOK FOR REMEDY
Device will not turn on when
Power Button is pressed (no
audible hum of the Pump.)
1. Battery not charged. Light
does not turn ON.
2. Pump is damaged, over
heated, or non-functional. Visual-
ly inspect the Pump for damage.
Use the Charger to diagnose any
Battery problem. See Charging
the Pump Internal Battery.
3. Tank is already pressurized so
the Pump has turned o auto-
matically.
4. Pump is connected to Charger.
1. Charge Pump if no Light is ON.
See Charging the Pump Internal
Battery.
2. Replace Pump if damaged or
non-functional. Allow Battery to
cool if overheated.
3. Open the Quick Connect to see
if water ows.
4. Disconnect Charger.
Device turns on (audible hum
of pump heard) but will not
dispense.
1. No liquid in Tank.
2. Quick Connect not secured to
equipment.
3. Pump is not tightened to Tank,
leaks at Seal.
1. Add liquid to Tank. See Filling
the Sprayer.
2. Disconnect and reconnect
Quick Connect to equipment.
3. Tighten Pump to Tank.
Device turns on but only ows at
low pressure.
1. Tank not yet pressurized.
2. Air leaking from Tank at Seal.
3. Tank Seal or Seal surfaces are
damaged.
4. Quick Connect not secured to
equipment.
1. Allow time for Pump to
pressurize Tank (at least to 20
seconds).
2. Tighten Pump to Tank.
3. Replace Tank Seal.
4. Disconnect and reconnect
Quick Connect to equipment.
Hose Leaks at Tank connection. 1. Cracked, swollen or faulty
Hose.
2. Damaged connection.
1. Replace Hose Assembly.
2. Replace Quick Connect.
Hose Leaks at Quick Connect. 1. Cracked, swollen or faulty
Hose.
2. Damaged connection.
1. Replace Hose Assembly.
2. Replace Quick Connect.
Quick Connect Leaks. 1. Dirt or debris in Quick Connect.
2. Damaged O-Ring or Seal in
Quick Connect.
1. Flush Quick Connect.
2. Replace Quick Connect.
Battery will not Charge. 1. Charger not plugged into
outlet.
2. No Lights illuminated on
Pump. Charger plugged into
outlet.
3. No Lights illuminated on
Pump. Charger plugged into
outlet, outlet functioning.
4. Red Light continues ashing
on Pump (Battery temperature
too high for safe charging).
5. Red and Green Lights ash
alternately on Pump (Battery can-
not be charged).
1. Plug Charger into outlet.
2. Check that outlet is
functioning.
3. Replace Charger.
4. Allow Pump to cool.
5. Replace Pump.
TROUBLESHOOTING

Page 9
KITS, PARTS & ACCESSORIES
KEY # PART # DESCRIPTION
1 184163 PUMP, CHARGER & GASKET
2 178039V GASKET
3 183821 HOSE ASSEMBLY
4 183820 QUICK CONNECT
5 182945 PRV ASSY
6 183819 HARNESS
7 184275 DUST CAP
DESCRIPTION
5
2
1
4
7
3
6

SERVICE KITS, PARTS & ACCESSORIES ARE AVAILABLE BY CONTACTING
The Fountainhead Group, Inc. - Customer Service Center
Monday - Friday 8 A.M. - 5 P.M., EST
Toll Free: 1-800-311-9903
or
e-mail: [email protected]
or
Access online at: www.TheFountainheadGroup.com

THIS PAGE INTENTIONALLY LEFT BLANK.

Manual de uso y cuidado
Manual No. 184703
Rev. B 03/10/2021
5 1/2”X 8 1/2”Booklet
Tanque de suministro
de agua con baterías
No devuelva este atomizador a la tienda
Para obtener ayuda, información o piezas, llame al:
1-800-311-9903
The Fountainhead Group, Inc.
23 Garden St., New York Mills, NY 13417
1-800-311-9903
www.TheFountainheadGroup.com
PRECAUCIÓN: Lea y siga todos las instrucciones

página 13
PRECAUCIONES DE SEGURIDAD
•El usuario debe leer y comprender el manual de instrucciones en su totalidad antes de utilizar este dispositivo.
•Nunca utilice líquidos inamables o combustibles, agentes cáusticos, ácidos o agua caliente en este disposi-
tivo.
•Siempre use equipo de protección personal apropiado. Esto incluye, al menos, gafas de seguridad, guantes y
ropa protectora.
•Lea y siga todas las instrucciones de este dispositivo, así como de cualquier equipo junto con el que se utilice
este dispositivo.
•Utilice solamente cargadores de Fountainhead Group que funcionen bien y que no tengan daños para reducir el
riesgo de que se enciendan o exploten.
•Antes de cada uso, inspeccione el dispositivo, la manguera y la conexión rápida para descartar conexiones
dañadas o sueltas.
•Siempre utilice las piezas de reemplazo del fabricante original.
•Nunca intente modicar la condición original del dispositivo.
•Cualquier cambio o modicación en el dispositivo que no haya sido expresamente aprobado por el fabricante
anulará la autoridad del usuario para utilizar el dispositivo y anulará la garantía.
•No alce ni sujete el dispositivo por la manguera o la conexión rápida. Únicamente sujételo por el mango.
•Guarde el dispositivo, la bomba y el cargador en interiores, en un lugar templado y seco, fuera del alcance de la
luz solar directa y lejos de cualquier fuente de humedad o calor intenso. No guarde el dispositivo donde haya
temperaturas gélidas (debajo de 32 °F/0 °C). Permitir que el agua se congele dentro del dispositivo puede cau-
sar daños a la bomba, los sellos, la conexión rápida u otros componentes, y anulará la garantía del dispositivo.
•Mantenga el dispositivo fuera del alcance de los niños.
•Limpie bien el dispositivo después de cada uso. El no limpiar el dispositivo puede ocasionar contaminación en
aplicaciones posteriores, causará un desgaste prematuro del dispositivo y anulará su garantía.
Acerca de este dispositivo
ADVERTENCIA: RIESGO DE INCENDIO, QUEMADURAS Y CHOQUE ELÉCTRICO. •Para reducir el riesgo
de lesiones, el usuario debe leer y comprender todo el manual de instrucciones antes de utilizar el
atomizador.
Este es un dispositivo eléctrico de aire comprimido diseñado como dispensador de agua.
Este dispositivo utiliza una batería interna recargable de iones de litio para alimentar una bomba eléctrica
de compresor de aire. La bomba eléctrica PumpZero está diseñada para brindar una alternativa más
conveniente y consistente a las bombas manuales estándar. Funciona al presurizar el aire sobre el uido
en el tanque, lo que genera que el uido pase a través de la manguera. Debido a que la bomba eléctrica
PumpZero funciona al presurizar aire en el tanque, es importante un buen sellado de aire al ajustar la
bomba.
Mientras el dispensador funciona, es normal que la bomba se active y desactive por sí misma periódica-
mente; no se espera que funcione continuamente. La bomba presurizará el aire dentro del tanque, luego
se desactivará y dejará que la presión del aire haga el trabajo de dispensar el uido. A medida que se
dispensa el uido, disminuirá la presión del aire dentro del tanque, generando en algún momento que la
bomba se vuelva a activar. El hecho de que la bomba se active y desactive de esta manera permite que la
batería dure más tiempo y una mayor longevidad de la bomba, en comparación con una bomba de eje-
cución continuamente.
La bomba eléctrica PumpZero contiene una batería de iones de litio. El envío de baterías de iones de litio está
sujeto a las regulaciones de envío internacional. En consecuencia, la batería debe estar en un estado de carga
reducida para el envío, por lo que la bomba debe cargarse antes de su primer uso. Como ocurre con todos
los productos que contienen baterías de iones de litio, consulte las instrucciones con su agente de envío local
antes del envío de la bomba.
La bomba eléctrica PumpZero está equipada con una función de apagado automático que la desactiva
después de 2 horas de inactividad. Esto es para evitar que la batería se consuma en caso de que la bomba
se quede encendida cuando el dispensador no está en uso.
INTRODUCCIÓN SOBRE EL DISPOSITIVO
INSTRUCCIONES DE USO
Carga de la batería interna de la bomba
1. En un lugar seco y limpio, inserte el enchufe del cargador en un toma-
corriente eléctrico estándar. Vea la Figura F. En el extremo del mango de la
bomba, retire la cubierta de goma para exponer el puerto de carga.
Conecte el cable del cargador en el puerto de carga de la bomba. La luz en
la parte superior de la bomba debería empezar a parpadear en color verde.
a. La bomba no puede utilizarse cuando se está cargando.
La bomba debe desconectarse del cargador para utilizarse
nuevamente.
b. Si la luz de la bomba parpadea de color rojo, es porque la
batería está demasiado caliente como para cargarse de forma
segura. Esto puede ocurrir cuando la batería se usa exhaustiva-
mente en un ambiente muy caliente o si la batería se guardó en un lugar muy caliente (como
en un vehículo cerrado o una unidad de almacenamiento con un clima muy caliente). Si esto
sucede, debe dejar que la batería se enfríe antes de que pueda cargarse.
c. Si la luz de la bomba parpadea rojo y verde alternativamente, signica que la batería está daña
da y no puede cargarse dentro del límite de tiempo de carga segura. La batería interna no se
puede reparar y se debe reemplazar la bomba.
2. Asegúrese de que la bomba y el cargador estén ubicados donde no estén expuestos a líquidos, caídas u
otras fuentes de daño mientras dure el periodo de carga.
3. Cuando la carga se complete, la luz permanecerá de color verde y se mantendrá encendida constante-
mente. El tiempo de carga variará según la condición de la batería al inicio de la carga. El tiempo de carga no
debe exceder las 3 horas.
4. Retire el cable del cargador de la bomba cuando la carga termine. Las bombas no deben conectarse al
cargador durante largos periodos de almacenamiento. Para asegurar la vida óptima de la bomba, esta debe
cargarse al menos una vez cada 3 meses cuando no esté en uso.
5. Reinserte la cubierta de goma en el puerto de carga para protegerlo.
6. Desconecte el cargador del tomacorriente eléctrico de la pared cuando no esté en uso.
ADVERTENCIA: RIESGO DE INCENDIO, QUEMADURAS Y CHOQUE ELÉCTRICO. Utilice un cargador solo
en un lugar seco y libre de polvo y de cualquier líquido o vapor inamable o combustible. Utilice
solamente cargadores de Fountainhead Group, otros tipos de cargadores pueden causar fallas en la
batería generar lesiones y daños físicos. No provoque un cortocircuito en los terminales del cargador o
la batería. No cargue baterías dañadas. No lo exponga a líquidos, vapores o lluvia.
Figure F
página 14
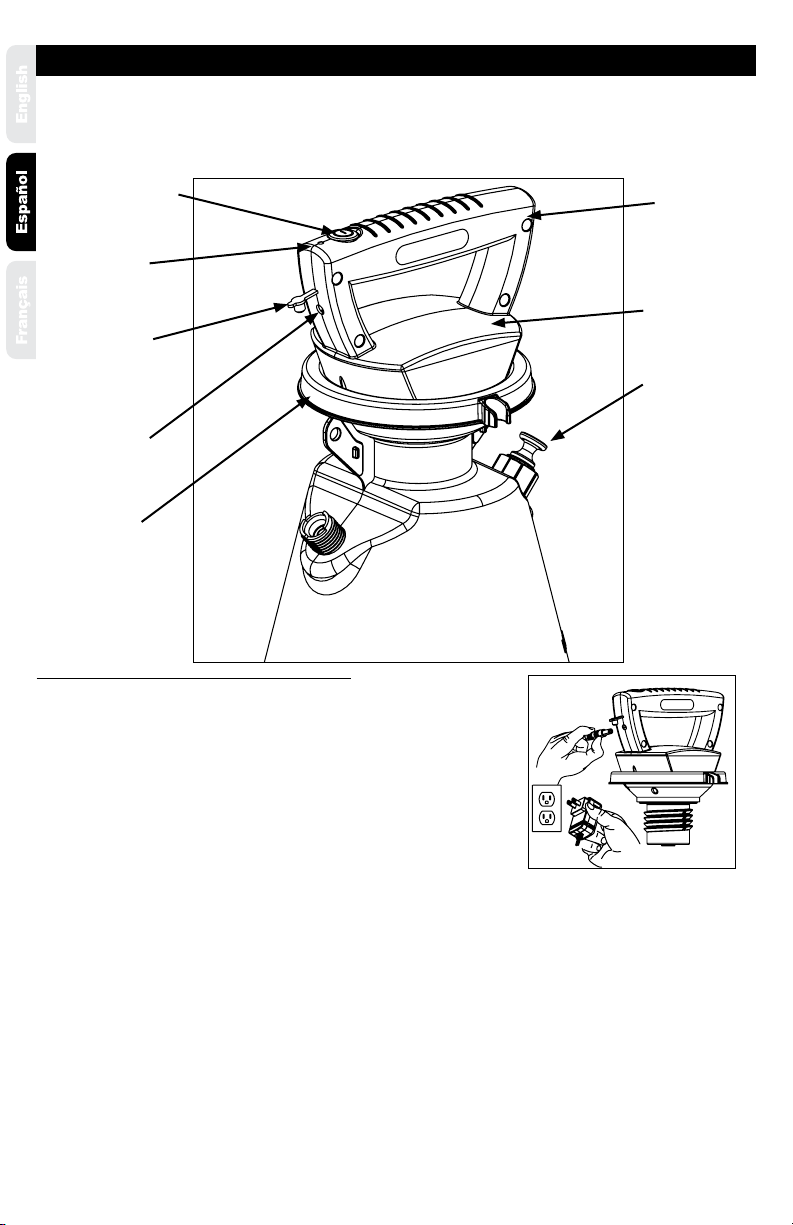
Botón de
encendido
Cubierta
del puerto
de carga
Puerto de carga
Mango
Válvula de alivio
de presión
Luz
Bomba
PumpZero
Tapa Guardapolvo
Mango
Válvula de alivio
de presión
Bomba
PumpZero
INSTRUCCIONES DE OPERACIÓN
Llenado del dispositivo
PRECAUCIÓN: RIESGO DE DAÑO DE COMPONENTES INTERNOS. El uso de sustancias químicas que no
sean agua pueden dañar el dispositivo y anular la garantía.
ADVERTENCIA: RIESGO DE MUERTE, LESIÓN PERSONAL O DAÑOS MATERIALES DEBIDO AL USO O LA
MEZCLA INAPROPIADA DE SUSTANCIAS QUÍMICAS. Nunca utilice líquidos inamables o combusti-
bles, agentes cáusticos, ácidos o agua caliente en este dispositivo. Dispensar líquidos inamables o
combustibles puede crear gases combustibles que se pueden encender debido al sistema eléctrico en
el dispositivo y generar una explosión. Siempre use equipo de protección personal adecuado según
las instrucciones del fabricante cuando use, prepare, maneje o dispense líquidos utilizando este dis-
pensador. Esto incluye, al menos, gafas de seguridad, guantes y ropa protectora.
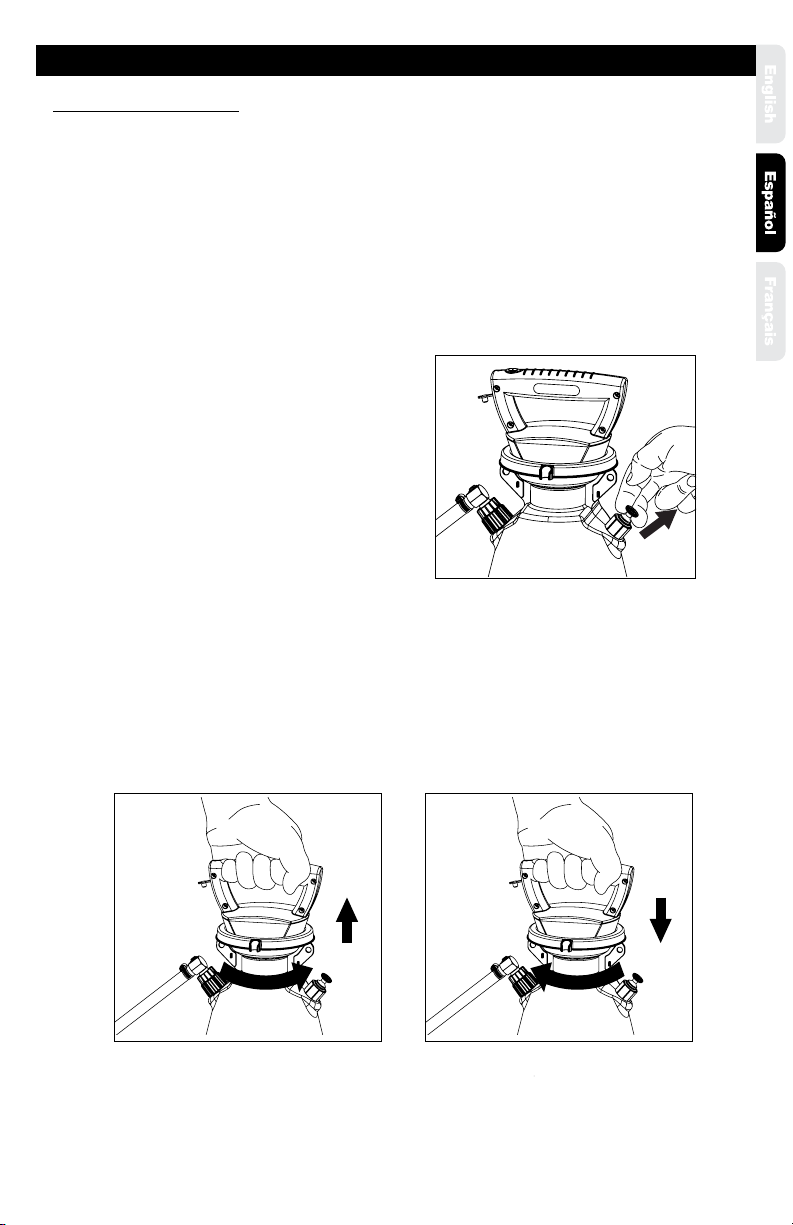
1.Asegúrese de que la bomba esté apagada (la luz
debe estar apagada).
2.Tire de la perilla de la válvula de alivio de presión
hasta que se libere toda la presión del tanque
(ver Figura G).
3. Gire el mango de la bomba en sentido antihorario para retirar la bomba (ver Figura H).
4. Llene el tanque hasta el nivel deseado. Vea las marcas de llenado al lado del tanque.
5. Instale la bomba en la abertura del tanque y gírela en sentido horario hasta que se selle de forma
ajustada en el tanque (ver Figura I).
Figura G
Figura H Figura I
página 15

CONTINUACIÓN DE INSTRUCCIONES DE USO
1. Se debe cargar la bomba PumpZero para que el dispensador funcione. Ver Cómo cargar la batería
interna de la bomba.
2. Conecte la conexión rápida al equipo. (Ver Figura K)
3. Presione el botón de encendido de la bomba y empiece a presurizar el tanque.
a. La luz en la parte superior debería ponerse de color verde y se debería escuchar un zumbido
que indique que la bomba funciona y presuriza el tanque.
b. La bomba se apagará cuando el tanque esté presurizado. Este proceso podría tomar desde
30 segundos hasta varios minutos según el tamaño del tanque y la cantidad de líquido que
contenga.
c. Se puede comenzar a dispensar el líquido antes de que el tanque esté completamente
presurizado, pero para evitar un patrón de ujo por debajo de lo óptimo, se recomienda es
perar por lo menos 20 segundos para permitir que se acumule algo de presión en el tanque.
4. Para apagar el dispositivo presione el
botón de encendido. La luz se apagará.
5. Tenga en cuenta que el tanque seguir
presurizado incluso cuando la bomba
esté apagada.
6. Para depresurizar el tanque, tire de
la válvula de liberación de presión.
7. Siempre limpie el dispositivo cuando
termine de usarlo. Ver Limpieza y
almacenamiento.
MANTENIMIENTO DEL DISPOSITIVO
Limpieza y almacenamiento
ADVERTENCIA: RIESGO DE LESIONES PERSONALES. Siempre use equipo de protección personal
adecuado según las instrucciones del fabricante cuando use, prepare, maneje o dispense líquidos
utilizando este dispensador. Esto incluye, al menos, gafas de seguridad, guantes y ropa protectora.
Antes de realizar el mantenimiento, siempre despresurice el atomizador apagando la bomba y ope-
rando la válvula de alivio de presión hasta que no quede presión en el tanque.
PRECAUCIÓN: RIESGO DE DAÑO DE COMPONENTES INTERNOS. El no enjuagar adecuadamente el
atomizador puede permitir que se acumulen residuos que pueden obstruir o dañar los ltros, la
bomba o la conexión rápida. La acumulación de residuos también puede contaminar las siguientes
aplicaciones. Dejar residuos en el dispositivo cuando no está en uso puede causar su desgaste pre-
maturo.
Indicador de batería baja
La bomba está equipada con un indicador de batería baja. Cuando la bomba esté funcionando, la luz
en su parte superior cambiará de un verde jo a un verde parpadeante cuando a la batería le quede 25
% de carga. Normalmente esto es suciente para terminar de dispensar el uido del tanque actual y
un tanque adicional. Luego, se debe cargar la bomba. Ver Cómo cargar la batería interna de la bomba.
Cuando la batería esté completamente descargada, se apagará la luz y la bomba dejará de funcionar.
Figura K
página 16
Continuación de limpieza y mantenimiento:
1. Apague la bomba al presionar el botón de encendido. La luz en la parte superior de la bomba debería
apagarse.
2. Tome la válvula de alivio de presión por el costado del tanque y jálela con gentileza hasta que el aire
dentro del tanque deje de salir.
3. Retire la bomba del tanque girando en sentido antihorario. Evite colocar la bomba donde pueda con
taminarse con suciedad o desechos que podrían meterse al tanque.
4. Utilice agua limpia para enjuagar bien y vaciar el tanque hasta eliminar todos los residuos.
5. Utilice un trapo húmedo para limpiar el fondo de la bomba hasta eliminar todos los residuos. No en
juague la bomba con una manguera ni la sumerja en agua, ya que el agua puede ingresar en la car
casa y dañar los componentes eléctricos, lo que provocaría la inoperatividad de la bomba y anularía la
garantía.
6. Agregue aproximadamente un cuarto de galón (1 litro) de agua limpia al tanque.
7. Fije la bomba al tanque y ajuste con rmeza.
8. Presione el botón de encendido para que la bomba presurice el tanque.
9. Con agua limpia en el tanque, dispense agua por la manguera y la conexión rápida durante por lo
menos 30 segundos para enjuagarlas. El no enjuagar la manguera y la conexión rápida puede permitir
que se acumulen residuos, los que a su vez pueden obstruir o dañar los componentes.
10. Para apagar la bomba, presione el botón de encendido.
11. Active la válvula de alivio de presión por el costado del tanque para aliviar la presión.
12. Retire la bomba. Evite colocar la bomba donde pueda contaminarse con suciedad o desechos que
podrían meterse al tanque.
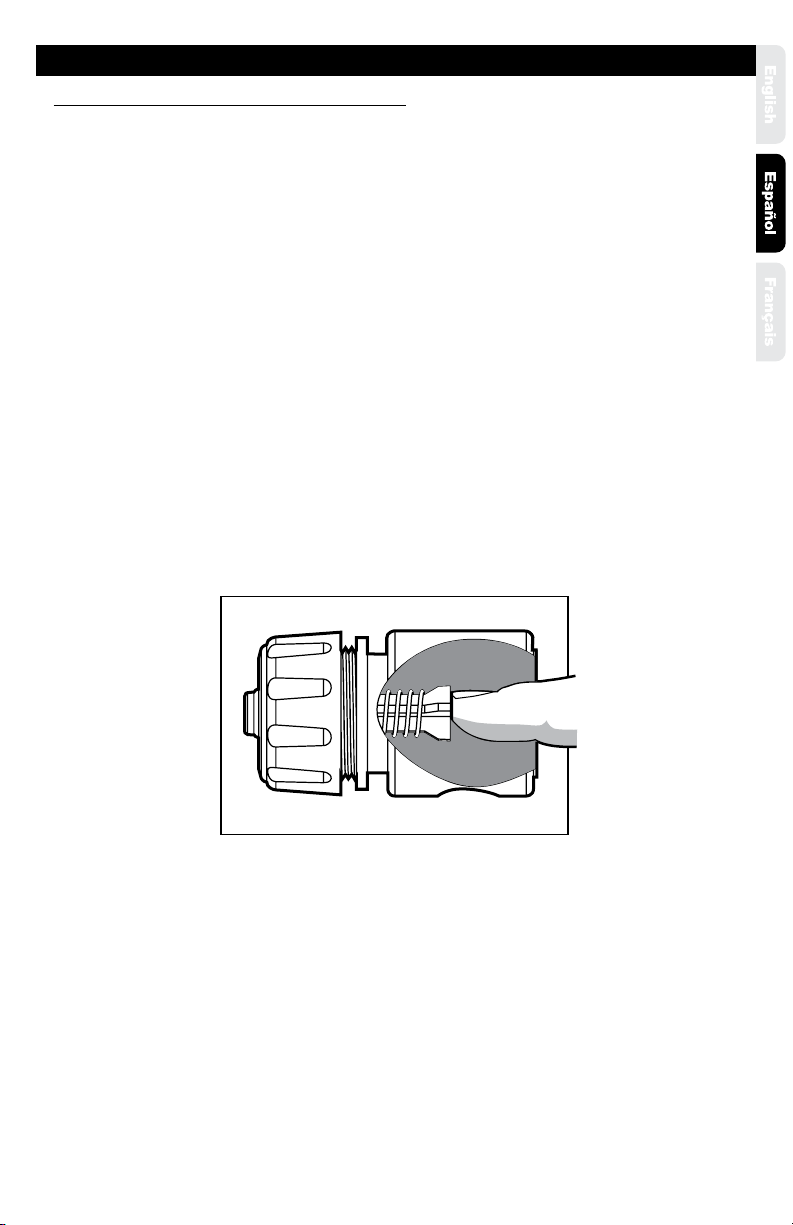
13. Abra la válvula de cierre (presione la palanca) para drenar cualquier resto de agua de la manguera, la
válvula de cierre y la varilla. (Ver Figura L)
14. Vacíe cualquier resto de agua del tanque.
15. Deje que el dispositivo se seque. Esto se logra mejor colgando el tanque boca abajo para dejarlo drenar.
16. Una vez que el dispositivo esté seco, enderece el dispositivo y ensamble la bomba suavemente al
tanque para evitar que le entren desechos.
17. Guarde el dispositivo, la bomba y el cargador en interiores, en un lugar templado y seco, fuera del
alcance de la luz solar directa y lejos de cualquier fuente de humedad o calor intenso. No guarde el
dispositivo donde haya temperaturas gélidas (debajo de 32 °F/0 °C). Permitir que el agua se congele
dentro del dispositivo puede causar daños a la bomba, los sellos, la conexión rápida u otros compo-
nentes, y anulará la garantía del dispositivo.
18. Para asegurar la vida óptima de la batería, esta debe cargarse al menos una vez cada 3 meses cuando no esté
en uso. Ver Carga de la batería interna de la bomba.
CONTINUACIÓN DE MANTENIMIENTO DEL DISPOSITIVO
Figure L
página 17

INFORMACIÓN DE CUMPLIMIENTO
página 18
Cumplimiento de FCC:
El dispositivo cumple con la parte 15 de las normas de FCC. El uso está sujeto a las siguientes dos condicio-
nes: (1) Este dispositivo no puede causar interferencias perjudiciales, y (2) este dispositivo debe aceptar cual-
quier interferencia recibida, incluidas las interferencias que puedan causar un funcionamiento no deseado.
Nota: Este equipo se ha probado y cumple con los límites para un dispositivo digital de Clase B, de conformi-
dad con la parte 15 de las normas de FCC. Estos límites están diseñados para proporcionar una protección ra-
zonable contra interferencias perjudiciales en una instalación residencial. Este equipo genera, utiliza y puede
emitir energía de radiofrecuencia y, si no se instala y utiliza de acuerdo con las instrucciones, puede causar
interferencias perjudiciales en las comunicaciones de radio. Sin embargo, no hay garantía de que no se pro-
duzcan interferencias en una instalación en particular. Si este equipo causa interferencias perjudiciales en la
recepción de radio o televisión, lo cual puede determinarse al encender y apagar el equipo, se recomienda al
usuario que intente corregir la interferencia mediante una o más de las siguientes medidas:
- Reoriente o reubique la antena receptora.
- Aumente la separación entre el equipo y el receptor.
- Conecte el equipo a un tomacorriente en un circuito diferente al que está conectado el receptor.
- Consulte con el distribuidor o con un técnico de radio/TV experimentado para obtener ayuda.
Canada IC:
CAN ICES-3 (B)/NMB-3(B)
PROBLEMA BUSCAR SOLUCIÓN
El dispositivo no enciende
cuando el botón de encen-
dido esté presionado (no se
escucha el zumbido audible
de la bomba).
1. La batería no está cargada. La luz no
enciende.
2. La bomba está dañada, sobrecalen-
tada o inoperativa. Inspeccione visu-
almente la bomba en busca de daños.
Utilice el cargador para diagnosticar cu-
alquier problema de batería. Ver Cómo
cargar la batería interna de la bomba.
3. El tanque ya está presurizado, por lo
que la bomba se ha apagado automáti-
camente.
4. La bomba está conectada al cargador.
1. Cargue la bomba si ninguna luz está
encendida. Ver Cómo cargar la batería
interna de la bomba.
2. Reemplace la bomba si está dañada
o no funciona. Deje que la batería se
enfríe si está sobrecalentada.
3. Abra la conexión rápida para ver si el
agua uye.
4. Desconecte el cargador.
El dispositivo enciende (se
escucha el zumbido de la
bomba) pero no dispensa.
1. No hay líquido en el tanque.
2. La conexión rápida no está asegurada
al equipo.
3. La bomba no está ajustada al tanque,
hay fugas en el sello.
1. Agregue líquido al tanque. Ver
Llenado del atomizador.
2. Desconecte y vuelva a conectar la
conexión rápida al equipo.
3. Ajuste la bomba al tanque.
El dispositivo enciende pero
solo uye con baja presión.
1. El tanque aún no está presurizado.
2. Hay fuga de aire del tanque en el
sello.
3. El sello del tanque o las supercies
del sello están dañadas.
4. La conexión rápida no está asegurada
al equipo.
1. Dé tiempo para que la bomba
presurice el tanque (por lo menos 20
segundos).
2. Ajuste la bomba al tanque.
3. Reemplace el sello del tanque.
4. Desconecte y vuelva a conectar la
conexión rápida al equipo.
La manguera gotea en la
conexión del tanque.
1. Manguera agrietada, hinchada o
defectuosa.
2. Conexión dañada.
1. Remplace el ensamblaje de
manguera.
2. Reemplace la conexión rápida.
La manguera gotea en la
conexión rápida.
1. Manguera agrietada, hinchada o
defectuosa.
2. Conexión dañada.
1. Remplace el ensamblaje de
manguera.
2. Reemplace la conexión rápida.
La conexión rápida gotea. 1. Suciedad o desechos en la conexión
rápida.
2. Junta tórica o sello dañado en la
conexión rápida.
1. Descargue la conexión rápida.
2. Reemplace la conexión rápida.
La batería no carga. 1. El cargador no está enchufado al
tomacorriente.
2. No hay luces encendidas en la
bomba. El cargador está enchufado al
tomacorriente.
3. No hay luces encendidas en la
bomba. El cargador está enchufado
al tomacorriente, el tomacorriente
funciona.
4. La luz roja sigue parpadeando en la
bomba (la temperatura de la batería
es demasiado alta para cargar con
seguridad).
5. Luces de color rojo y verde par-
padean alternativamente en la bomba
(la batería no se puede cargar).
1. Enchufe el cargador al tomacorriente.
2. Verique que el tomacorriente esté
funcionando.
3. Reemplace el cargador.
4. Deje que la bomba se enfríe.
5. Reemplace la bomba.
SOLUCIÓN DE PROBLEMAS
página 19

JUEGOS, PIEZAS Y ACCESORIOS
No. DE
CLAVE No. DE
PIEZA DESCRIPCIÓN
1 184163 BOMBA, CARGADOR Y JUNTA
2 178039V JUNTA
3 183821 ENSAMBLADO DE
MANGUERA
4 183820 CONEXIÓN RÁPIDA
5 182945 ENSAMBLAJE DE VÁLVULA
DE REDUCCIÓN DE PRESIÓN
(PRV, por sus siglas en inglés)
6 183819 ARNÉS
7 184275 TAPA GUARDAPOLVO
5
2
1
4
7
3
6
página 20
Table of contents
Languages:
Other The Fountainhead Group Paint Sprayer manuals

The Fountainhead Group
The Fountainhead Group D.B. Smith Professional Series User manual

The Fountainhead Group
The Fountainhead Group 190679 User manual

The Fountainhead Group
The Fountainhead Group SMITH PERFORMANCE NL403 User manual

The Fountainhead Group
The Fountainhead Group Backpack Sprayer User manual

The Fountainhead Group
The Fountainhead Group FIELD KING 190723W User manual


