THE-ONE TRD1 User manual

Roll Up Drum
(TRD1)
www.theonemusic.com
TheONE

Packing List
Roll Up Drum
Pedals
USB Cable Lithium Battery User Guide
Drumsticks 3.5mm Audio Cable Power Adaptor
User Guide
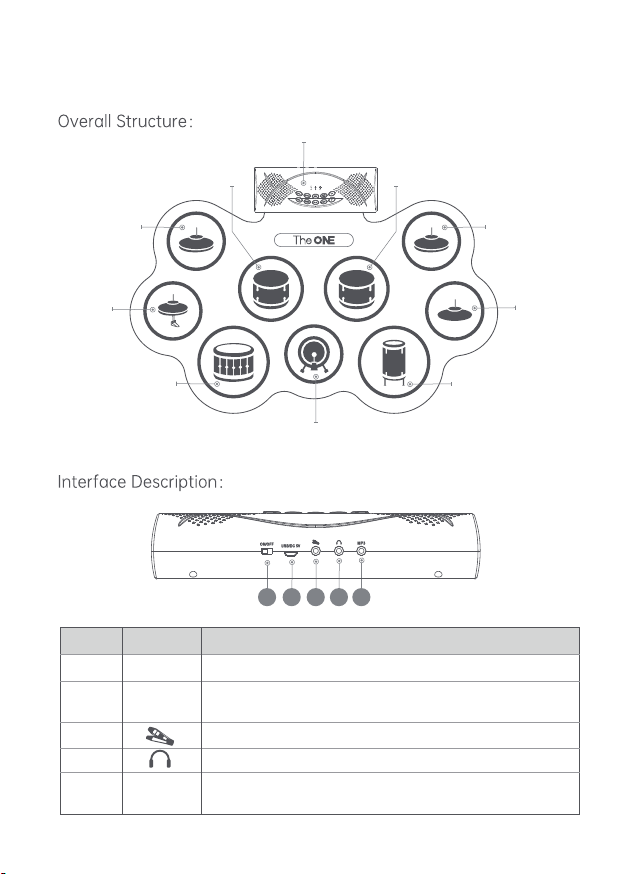
Introduction
Module
KICK
CRASHCRASH
HI-HAT
SNARE TOM3
RIDE
TOM2
TOM1
1 2 3 4 5
Number
1
2
3
4
5
ON/OFF
USB/DC5V
Mp3
Power Switch
USB power interface, available with power adapter and
mobile power supply
Audio format input, connect to mobile phone, iPad, computer
and other electronic equipment
Pedal Interface (Kick & Hi-Hat)
Connect headphones or speakers
Item Function Description
Introduction
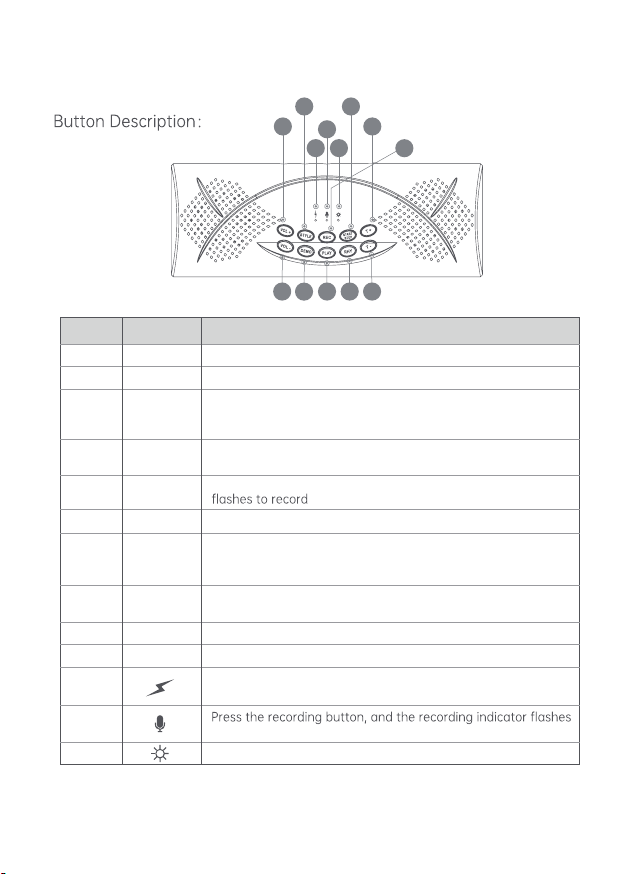
Number
6
7
8
9
10
11
12
13
14
15
16
17
18
VOL+
VOL-
STYLE
DEMO
REC
PLAY
RHY
T-
T+
START/STOP
Volume+
Play recording
Tempo-: Tempo control for Demo Songs and rhythm
Tempo-: Tempo control for Demo Songs and rhythm
Volume-
Shortpress: Drumkit
Press and hold for 1 second: Beep sounds "da" to enter lobby
reverberation mode
Short press: Play the accompaniment
Press and hold for 1 second: Beep "click" to enter square
reverb mode
Short press: Start/stop accompaniment, recording, demo song
Press and hold for 1 second: Beep "click" to exit reverb mode
to record
Power indicator: turn on the power, the indicator is always on
Short press: Demo songs
Press and hold for 1second: Beep "click" to enter roomreverb mode
Recording: Press the REC button and the recording light
Charging indicator light: whenthe battery is fully charged,
the light will turn off automatically, and lights up when charging
Item Function Description
7911 12 14
17
1816
6
813
15
10
Note: This product has a sleep function. If there is no operation within 30 minutes, the
drum machine will automatically enter the sleep state, and the Bluetooth will be
disconnected. If you useitagain, you can hit any drumsurfaceto activate the drum.

Install the battery
Power Supply
This section contains information on how to use the product and
how to prepare for performance. Please read this section carefully
before starting to use it.
This product is equipped with lithium battery, which must be
installed in the battery compartment before use.
In addition to battery power supply, you can also use the power
adapter to supply power directly, or use the power adapter to
charge the lithium battery.
1. Connect the USB end of the
power cable to the 5V DC plug;
2. Connect the 5V DC plug to
the 220V power socket;
3. Connect the Type-C end of
the power cable to the power
socket of the Module.
1. Open the back cover of the
battery compartment;
2. Install the battery according to
the positive and negative poles;
3. Close the back cover of the
battery compartment.
Functions
Note: When the battery is fully charged, it can
be used continuously for 2-3 hours depending
on thestate of use.
Functions
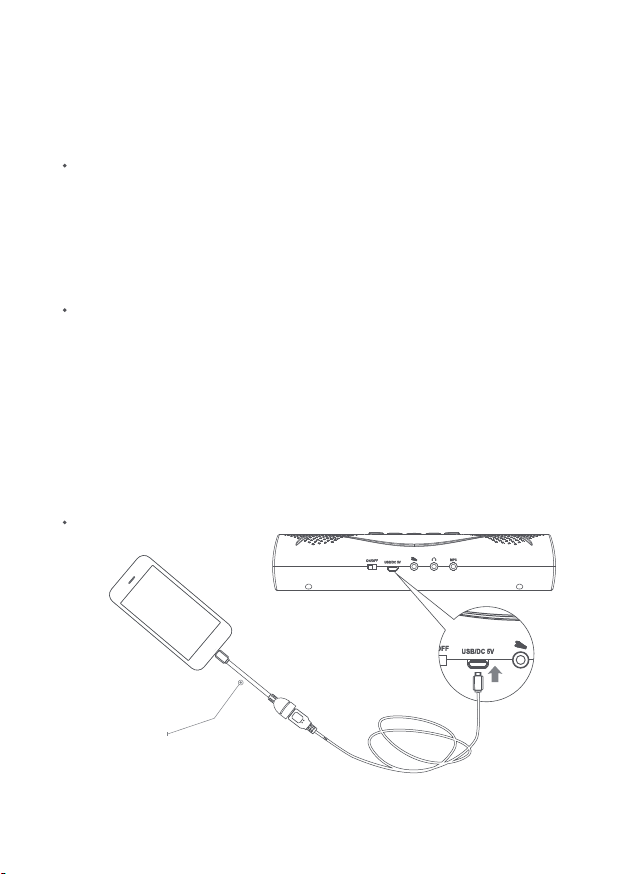
External connection
Device Connection
Connecting pedals
Supportwired or Bluetooth connection. Support Android 7.0+, iOS10.0
and above mobile phones or tablets.
This product supports an external hi-hat pedal and kick drum pedal,
connecting the pedals to enhance your drumming experience.
Connecting headphones
When headphones are plugged into the jack, the speakers will be cut off
automatically, and the drums can only be heard from the headphones.
Note: When the pedal is not connected, the hi-hat pad defaults to a closed cymbal
sound. After the pedal is connected, the hi-hat drum pad defaults to an open cymbal
sound. Press the pedalandstrike the hi-hat drum pad to producea closed cymbalsound.
Note: This productdoes not come with an OTG cable.
Cable connection
OTG Cable
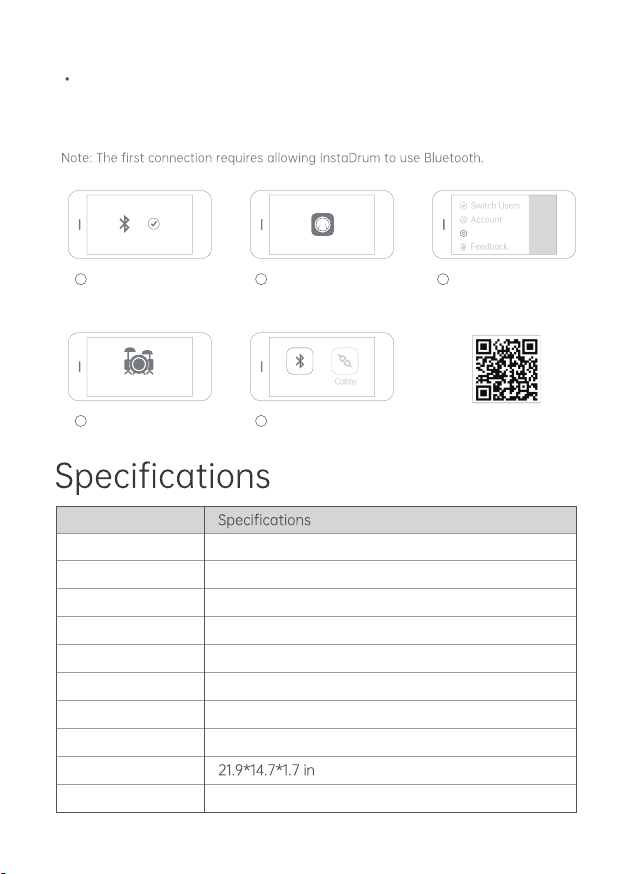
The Bluetooth connection needs to be done in the app "InstaDrum",
and the steps are as follows:
Bluetooth Connection
Model
Specs
Songs
Drum kits
Accompaniment
External pedal
Connection method
Recording
Size
Weight
TRD1
5 drums and 4 cymbals
10
6
10
Supported
Bluetooth, cable
Supported
2.2 lbs
Item
Turn on Bluetooth in
the phone settings
Open the app InstaDrum
Bluetooth
MIDI
Switch Users
Account
Settings
Feedback
My Drum
Cable
Click the icon in the upper
left corner to log in or
register an account. After
logging in, click "Settings"
Click "My Drum" Click "Bluetooth MIDI",
select "The ONE TRD
MIDI"
Scan and download InstaDrum
to experience more features
1
4 5
2 3

The power indicator does
not light up
No pedal response The plug is not inserted
properly
power
The plug needs to be fully
inserted or rotated
Headphones or speakers
are silent
During use, the drum has
sound leakage, volume
reduction, Bluetooth
disconnection, and
continuous sound of da
da da
The plug is not inserted
properly
Incorrect connection jack
Speaker volume is too low
The plug needs to be fully
inserted or rotated
Check whether the jack is
inserted correctly
Adjust the sound volume
Abnormal sound Replace the battery
Please charge the drum
External power supply
not plugged in
Pleasecheck if the power
supply is connected correctly
Trouble Cause of issue Solution
Notice
Troubleshooting
device to input audio sources.
Please do not place the electronic drum in overheated or dusty
places to work.
Please keep a distance from strong electromagnetic devices such
as radios and TV sets to avoid interference.
Do not place heavy objects on the electronic drum.
Please do not place this electronic drum in a humid or overheated
place.
Please do not over fold and squeeze the electronic drum.
Do not put sharp objects with this electronic drum.
1
2
3
4
5
6
7

Drum machine: Electronic drum cover, module One year
Other accessories: Pedal, battery, data cable, audio
cable, power adapter Six months
Warranty Type Warranty Period
Warranty Card
Note:This equipment has been tested and found to comply with
the limits for a Class B digital device, pursuant to part 15 of the
FCC Caution:
Any Changes or modifications not expressly approved by the party
responsible for compliance could void the user's authority to operate
the equipment.
This device complies with part 15 of the FCC Rules. Operation is
subject to the following two conditions: (1) This device may not cause
harmful interference, and (2) this device must accept any interfer-
ence received, including interference that may cause undesired
operation.
This Transmitter must not be co-located or operating in conjunc-
tion with any other antenna or transmitter.
This equipment complies with RF radiation exposure limits set
forth for an uncontrolled environment.
The device has been evaluated to meet general RF
exposure requirement. The device can be used in portable exposure
condition without restriction.
FCC RF Radiation Exposure Statement:
1
2

FCC Rules. These limits are designed to provide reasonable
protection against harmful interference in a residential installa-
tion. This equipment generates, uses and can radiate radio
frequency energy and, if not installed and used in accordance
with the instructions, may cause harmful interference to radio
communications. However, there is no guarantee that interfer-
ence will not occur in a particular installation. If this equipment
does cause harmful interference to radio or television reception,
which can be determined by turning the equipment off and on,
the user is encouraged to try to correct the interference by one
or more of the following measures:
Reorient or relocate the receiving antenna.
Increase the separation between the equipment and receiver.
Connect the equipment into an outlet on a circuit different from
that to which the receiver is connected.
Consult the dealer or an experienced radio/TV technician for help.

Note: This product will be constantly updated and optimized. The manual may not be
synchronized with the product update in time. Pleaseunderstand.
Tel.: 833-970-2670 (US)
E-mail: Support@theonemusic.com
Web: www.theonemusic.com

NO.2209015
Table of contents


