The Stair Barrier BWIO User manual
BEFORE INSTALLATION
To properly install, use, and enjoy
the Stair Barrier, you need to know
the staircase terms shown in the
diagram below.
Before installaon of the Stair
Barrier, measure the distance
between the Banisters at the
boom of your Staircase and
conrm that you have purchased
the correct Stair Barrier model.
USES
6–24 months large & small
Banister to Wall
Indoor/Outdoor (BWIO) on back page
package contains:
1 Stair Barrier (BWIO)
1 Installation kit
secures stair widths:
regular 36–43”w x 32”h
wide 43–52”w x 32”h
Banister to Banister
Indoor/Outdoor (BBIO)
package contains:
1 Stair Barrier (BBIO)
secures stair widths:
regular 36–42”w x 32”h
wide 42–52”w x 32”h
Kping children and pets off the stairs
Installaon Instrucons
Indoor/Outdoor (IO)
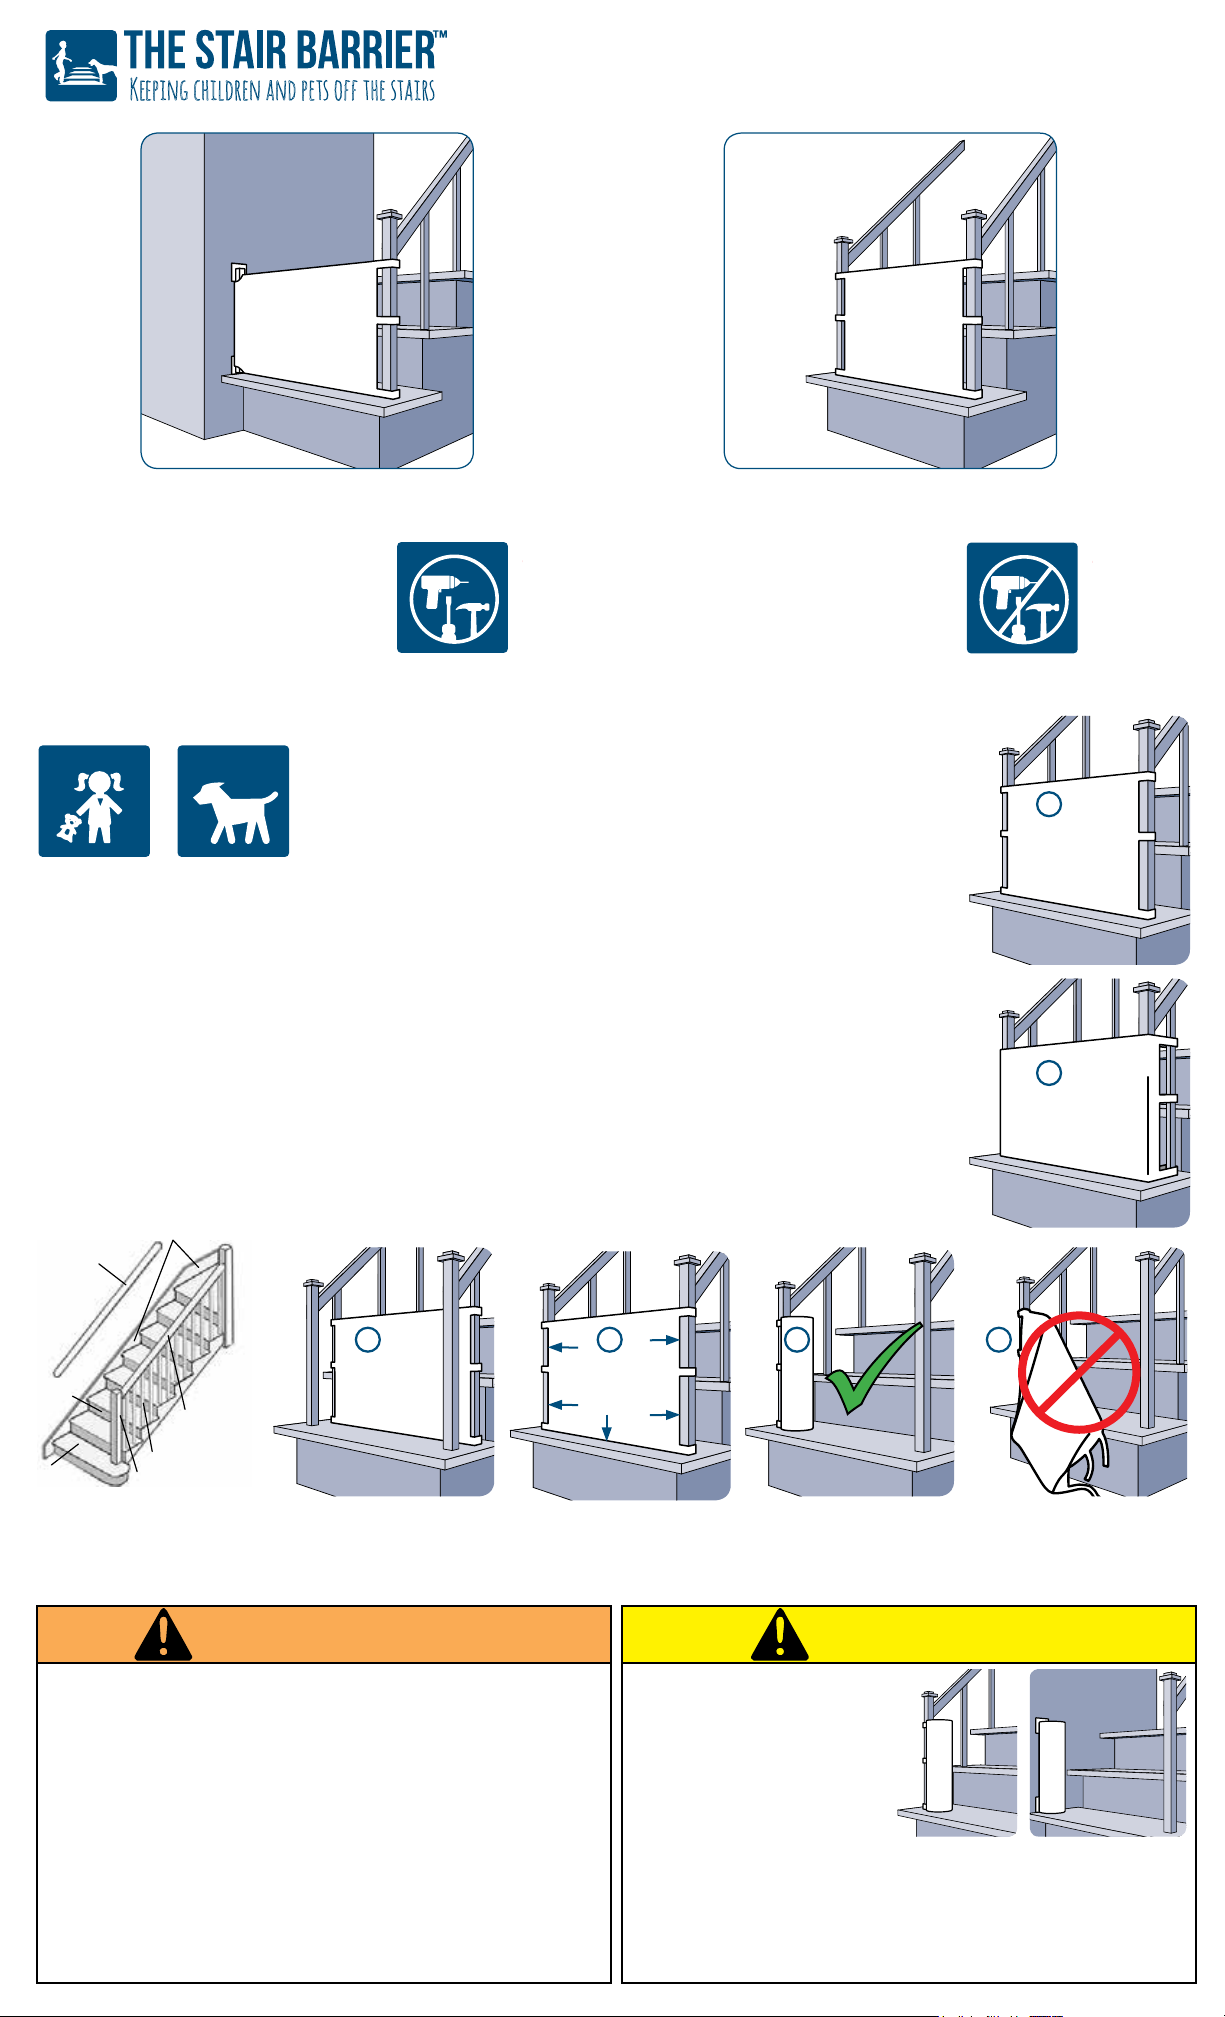
BANISTER TO BANISTER INSTALLATION INSTRUCTIONS:
1. While facing your staircase, posion the front of the Stair Barrier between the
banisters at the boom stair.
2. Posion the Stair Barrier as far to the rear of the tread as possible–if there are
mulple spindles on the tread where the Stair Barrier is to be installed, use the
spindle located closest to the rear of the tread. See Fig. 1.
3. Thread the top le strap of the Stair Barrier around the le banister and latch
the buckle. Next, thread the top right strap of the Stair Barrier around the
right banister and latch the buckle. You may use the banister, spindles, or both
to aach the straps. In some cases, you may choose to use mulple spindles.
See Figs. 2 and 3.
4. Repeat this process for the middle and boom straps.
5. Tighten all straps so that the Stair Barrier is taught.
6. As shown in Fig. 4, when properly installed, the sides of the Stair Barrier should
be ush with the banisters or spindles–there should be no gaps. The boom
edge of the Stair Barrier should be ush with the tread–there should be no gap.
7. If one side of the Side Barrier is unlatched to allow access to the staircase,
completely roll the Stair Barrier to the side that is sll aached to the banister.
See Fig. 5. When not in use, the Stair Barrier should not block the staircase.
See Fig. 6.
1
2
3
spindle
installaon
alternave
banister
installaon
Spindle
Riser
Tread
Molding
Wall
Wall Rail
Hand Rail
Banister
4
no gaps
5 6
WARNING
To prevent serious injury or death, securely install the
Stair Barrier and use according to the Stair Barrier’s
instructions. Read all warnings and instructions before
.reirraBriatSehtrevopetsottpmettareveN.noitallatsni
Never use at the top of any staircase. Only use with all
buckles latched and all straps tight and secure. Never
use the Stair Barrier without its internal struts. For use
.stepro/dnaegafosraey2otshtnom6nerdlihchtiw
Proper adult supervision is required — never leave any
child unattended. Never use with a child who can climb
over or dislodge the Stair Barrier. The Stair Barrier will
not prevent all accidents. Misuse may cause serious
injury or death.
CAUTION
Internal Struts must be
installed during use.
Do not remove Internal
Struts, except to clean.
Always latch Buckles
during use. Always
adjust all Straps to
ensure tight fit.
When one side of the Stair Barrier is unbuckled to
allow access to the staircase, completely roll the Stair
Barrier to other side of the staircase with Straps and
Buckles rolled internally. See Fig. 5 above.
CLEANING & CARE
The Indoor/Outdoor Stair Barriers are made of weather resistant fabric.
For spot cleaning: use a damp cloth to remove any dirt.
For dicult or large stains: rst remove internal plasc struts, See Fig. 10. Lay Stair Barrier on a at surface and
wet fabric with water. Use a soluon of warm water and mild dish soap along with a so bristle brush to clean and
remove stains. Thoroughly rinse o all soap residue and air dry. Do not machine wash, dry clean, or pressure wash.
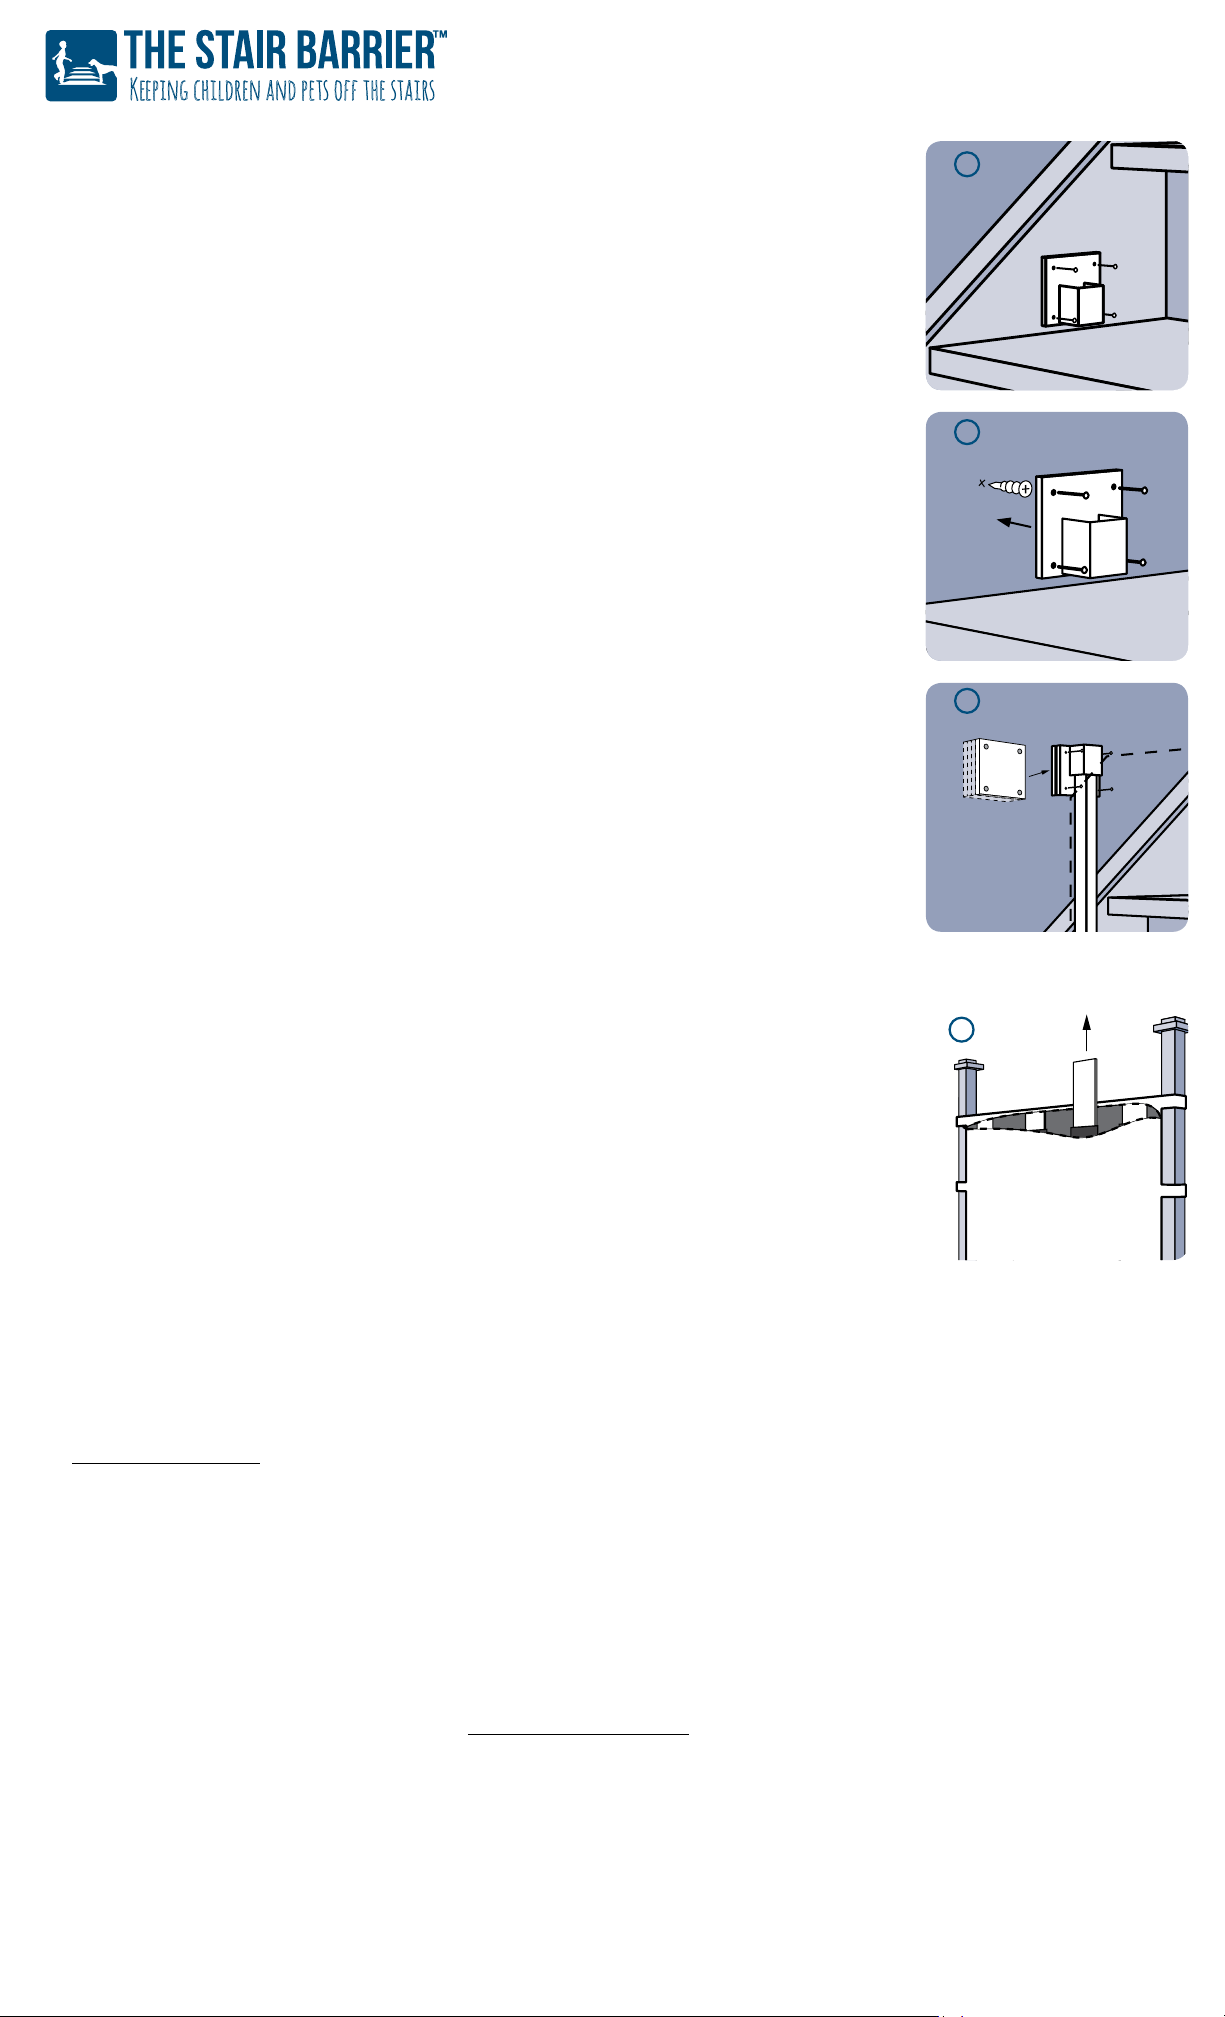
BANISTER TO WALL INSTALLATION INSTRUCTIONS:
Tools you will need: Electric drill, screw driver, level, stud nder, pencil, and hammer.
Parts included: Stair Barrier, install kit: Rod (rod already inserted into Stair Barrier), 2 brackets,
4 spacers, 8 anchor bolts, and 8 2-inch screws.
1. Refer to the previous page to choose the best place to aach straps and buckles on your banister. Aach the
Stair Barrier to the banister. The Stair Barrier will come with the rod inserted, but the rod can be removed and
may slide out, so hold it in place.
2. Pull the Stair Barrier across stairs with the rod in place. Slide one of the brackets onto the boom of the rod,
at side to the wall and ush to the boom of the step/oor. Mark the 4 bracket holes with a pencil. Roll the
Stair Barrier back to the banister side for the me being. If you have molding, install the 4 screws directly
through the bracket into the wood without the Stair Barrier. See Fig. 7.
If you are drilling into wood or studs, you will not need the Anchors. If you are aaching directly to drywall,
use a hammer to gently tap anchor bolts halfway into the drywall at the 4 pencil marks. Use a screwdriver to
install the rest of the way (unl ush with the wall). See Fig. 8.
NOTE: If you have a hand rail, according to code, it should be no lower than 34” inches and no higher than 38”
inches. This installaon kit is 33” inches including the bracket and rod.
3. Insert the Stair Barrier rod into the boom bracket. Take the 2nd bracket and slide onto the top of the rod, at
side against the wall. Use a level to ensure the rod is as level as possible. Mark 4 holes with a pencil. Roll the
Stair Barrier back to the banister side.
4. If you are aaching to drywall, use a hammer to gently tap anchor bolts halfway into the drywall at the 4
pencil marks. Use a screwdriver to install the rest of the way (unl ush with the wall). See Fig. 8.
5. If you are aaching both brackets directly to a wall, then you will not need the spacers that are provided. If
you have molding at the boom, you will likely need spacers to bring the bracket out from the wall. You will
use 1 to 4 of the spacers depending on the thickness of your molding. Once you have determined how many
spacers you need, screw your remaining screws through the bracket and appropriate number of spacers.
6. Slide the second bracket with screws and spacers onto the Stair Barrier rod. Line up to the anchor bolts and
screw into place. See Fig. 9.
7. When properly installed, See Fig. 4 on previous page, the sides of the Stair Barrier should be ush with the
banister or spindles–there should be no gaps. The boom edge of the Stair Barrier should be ush with the
tread–there should be no gap.
8. If the Side Barrier is unlatched to allow access to the staircase, completely roll the Stair Barrier to the
wall-side. See Fig. 5 on previous page. When not in use, the Stair Barrier should not block the staircase.
See Fig. 6 on previous page.
Spacers up to 4
depending on
baseboard moulding
Spacers up to 4
depending on
baseboard moulding
7
8
9
10
Top Bracket
Zipper located
at rear of the
Stair Barrier
Boom Bracket
Anchor Bolt x4
use up to
4 spacers
as needed
LIMITED WARRANTY
Beer Opons LLC will acvate this limited warranty upon receipt of your Warranty Registraon Card. Alternavely, to register online, visit
www.thestairbarrier.com.
Aer acvaon, Beer Opons warrants the Stair Barrier to be free from defects in material and workmanship for a period of 1 year from the
date of original retail sale. This limited warranty is valid only for the rst retail consumer. Proof of purchase is required.
If Beer Opons determines that the Stair Barrier is defecve in material or workmanship during the warranty period, Beer Opons shall, at
its sole opon, repair or replace the Stair Barrier with a similar product or replacement part(s) (collecvely, “replacement unit”). This is the sole
remedy. Any replacement unit shall be covered by the balance of any me remaining under this limited warranty.
The limited warranty does not cover deterioraon or malfuncon resulng from normal wear and tear, improper maintenance, misuse,
modicaon, neglect, abuse, and/or repairs, or aempted repairs, made by anyone not authorized by Beer Opons LLC.
To obtain warranty service, you must contact Beer Opons to make a claim within thirty (30) days aer you discover a problem. Just call
Beer Opons at 678-659-9901 or send an email to support@thestairbarrier.com. To fully evaluate your claim, Beer Opons may ask that
you send, at your expense, pictures of the Stair Barrier and/or the product itself.
This limited warranty disclaims any special, incidental or consequenal damages, including indirect damage, loss of use, cost and expense.
THIS LIMITED WARRANTY IS EXCLUSIVE AND IN LIEU OF, AND BETTER OPTIONS LLC EXPRESSLY DISCLAIMS, ANY OTHER WARRANTY,
EXPRESS OF IMPLIED, INCLUDING ANY IMPLIED WARRANTY OF MERCHANTABILITY AND/OR FITNESS FOR A PARTICULAR PURPOSE.
This limited warranty gives you specic legal rights, and you may also have other rights which vary from state to state. Some states do not allow
limitaons on implied warranes and/or do not allow the exclusion of incidental or consequenal damages, so the above limitaons may not
apply to you.
Kping children and pets off the stairs
Installaon Instrucons
Indoor/Outdoor (IO)
This manual suits for next models
1
Table of contents
Popular Other manuals by other brands


Aqua One
Aqua One Windsor 88 Assembly instructions

Aqua One
Aqua One CoralPower T5 60 manual

MICROMATIC
MICROMATIC MDD23W Series Installation, use & maintenance guide

Aqua Medic
Aqua Medic Reactor 500 Operation manual

Master cool
Master cool Mini Twin Turbo Series operating instructions

Aqua Medic
Aqua Medic CO2 reactor+ Operation manual