Theatrelight CUEMASTER User manual

CUEMASTER QUICK OPERATION
The SCENES and GRAND Masters should be UP, the Record LED ON.
Both CHANNELS and PARK Masters should be moved up and down together. Start with both Masters DOWN:
TWO PRESET OPERATION
1 Preset the first Scene on the Channel faders.
2 On cue, move both Masters UP to fade to the new cue, press [PARK], then take both Masters DOWN.
Repeat these two steps to preset and fade in the next cues.
1 Set up a Scene on the Channel faders and press [RECORD]. Repeat the step to record a Chase.
MANUAL SCENES AND CHASES
2 Hold [RECORD] and press a Scenemaster Flash key to assign the recording.
3 For playback, set the Scene LEDs On, then fade the Scenemaster to Full, or press the Scenemaster Flash key.
1 Set up a Scene, set its fade time, and press [RECORD]. Repeat this step to record a Show.
RECORDING FADE-SCENES AND SHOWS
2 Hold [RECORD] and press a Scenemaster Flash key to assign the recording.
A recording is assigned as a Scene or a Chase. For auto-timed playback, you must convert the recording:
> To convert a Manual to a Fade-Scene, hold [RECORD] and [MAN<<>>FADE], and press the Scenemaster Flash key.
> To convert a Chase to a Show, hold [RECORD] and [CHASE<<>>SHOW], and press the Scenemaster Flash key.
1 Set SCENE FADE at Auto, then set the Scenemaster 1-24 to Full: the Scene fades up at its recorded fade time.
FADE-SCENE AUTO-TIMED PLAYBACK
1 Set SCENE FADE at Auto, SPEED at Step Mode, then set the Scenemaster 1-24 to Full: Cue 1 fades up at its recorded
fade time.
SHOW CUE AUTO-TIMED PLAYBACK
2 Press [CUE GO] to cross-fade to subsequent cues at their auto fade times. To go back a cue, press [CUE BACK].
For further instructions refer to the Table of Contents or the Index.

CUEMASTER CONTENTS

CUEMASTER INTRODUCTION................................................1
CUEMASTER FEATURES........................................................3
CUEMASTER PANEL LAYOUT...............................................5
DESK LIGHTS.........................................................................10
CUEMASTER SET-UP............................................................11
MANUAL OPERATION...........................................................13
SETTING A SCENE...........................................................13
TWO PRESET OPERATION.............................................13
CROSS-FADING PRESETS..............................................13
FLASHING CHANNELS ....................................................13
FLASHING PRESET CHANNELS.....................................15
KILL MODE........................................................................15
GRAND MASTER..............................................................15
BLACKOUT........................................................................15
MEMORY OPERATION ..........................................................16
SCENEMASTER RECORDINGS......................................16
RECORDING TYPES........................................................16
SCENEMASTER MIMIC LEDs..........................................17
SCENEMASTER FLASH KEYS........................................17
SCENEMASTER FADERS................................................17
SCENEMASTER PAGES..................................................17
RECORDING METHOD ....................................................17
RECORD AND ERASE ENABLE ...........................................19
RECORD ENABLE............................................................19
ERASE MEMORY..............................................................19
RECORD DISABLE...........................................................19
RECORD CLEAR...............................................................19
MANUAL SCENE RECORDING AND PLAYBACK...............21
RECORDING AND ASSIGNING A SCENE......................21
RECORDING AND ASSIGNING A SCENE BLIND...........21
MANUAL SCENE PLAYBACK...........................................21
FLASHING MANUAL SCENES.........................................21
KILL MODE........................................................................21
FADE-SCENE RECORDING AND PLAYBACK .................... 23
CHANGING A MANUAL SCENE TO A FADE-SCENE..... 23
TIMED CROSS-FADING................................................... 23
HOLDING A TIMED FADE................................................23
AUTO FADE-SCENES ......................................................25
RECORDING AUTO FADE-SCENES...............................25
CROSS-FADING AUTO FADE-SCENES .........................25
EDITING RECORDED AUTO FADE TIMES..................... 25
OVER-RIDING AN AUTO FADE TIME .............................27
HOLDING AN AUTO FADE...............................................27
AUTO SNAP FADES.........................................................27
COMPLETING A FADE.....................................................27
SPLIT FADE TIMES ..........................................................27
SCENE EDITING.....................................................................29
EDITING PLAYBACK LEVELS..........................................29
COMPARING LEVELS......................................................29
CLEARING EDITED LEVELS............................................ 29
RECORDING MODIFIED SCENE LEVELS...................... 31
PROTECTING CHANNEL USAGE ................................... 31
COPYING A SCENE LIVE.................................................31
COPYING A SCENE BLIND.............................................. 33
TRANSFERRING A SCENE TO ANOTHER PAGE..........33
DELETING A SCENE........................................................33
OVER-WRITING A SCENE...............................................33
CHASE RECORDING AND PLAYBACK ............................... 35
RECORDING AND ASSIGNING A CHASE...................... 35
CHASE PLAYBACK...........................................................35
FLASHING CHASES......................................................... 35
STOPPING AND REVERSING CHASES .........................35
CHASE EDITING..................................................................... 37
RECORDING CHASE BEAT.............................................37
RECORDING CHASE SPEED.......................................... 37

RECORDING CHASE SPEED LIVE.................................37
DISPLAYING CHASE SPEED OR CHASE BEAT............ 37
EDITING CHASE STEP LEVELS...................................... 39
EDITING CHASE STEPS..................................................39
DELETING CHASE STEP.................................................39
INSERTING CHASE STEPS............................................. 39
COPYING A CHASE .........................................................41
DELETING A CHASE........................................................ 41
STACKING CHASES.........................................................41
SHOW RECORDING AND PLAYBACK................................. 43
RECORDING AND ASSIGNING A SHOW ...................... 43
SHOW PLAYBACK............................................................43
EDITING CUE FADE TIMES............................................. 43
OVER-RIDING CUE FADE TIMES ................................... 45
HOLDING CUE FADES..................................................... 45
SKIPPING CUES...............................................................45
COMPLETING A FADE.....................................................45
SPLIT FADE TIMES..........................................................45
SHOW EDITING ...................................................................... 47
EDITING CUE LEVELS..................................................... 47
DELETING CUES.............................................................. 47
INSERTING CUES ............................................................47
INSERTING A NEW FIRST CUE...................................... 49
CHANGING CUE ORDER.................................................49
COPYING A SHOW...........................................................49
DELETING A SHOW......................................................... 51
STACKING SCENES INTO A SHOW............................... 51
STACKING SHOWS AND FADE-SCENES ...................... 51
SHOW CUE LINKS ................................................................. 53
LINKING CHASES AND FADE-SCENES TO CUES........ 53
CUE LINK PLAYBACK......................................................53
AUTOMATIC PLAYBACK MODES........................................ 55
AUTOMATIC SHOW MODE.............................................. 55
CONTINUOUS CROSS-FADE MODE.............................. 55
REMOTE SHOW PLAYBACK................................................ 56
REMOTE SHOW SET-UP................................................. 56
REMOTE CUE FORWARD............................................... 56
REMOTE CUE REVERSE ................................................ 57
SHOW RESTART.............................................................. 57
REMOTE INPUT SPECIFICATIONS................................ 57
CUEMASTER PREVIEW MODES.......................................... 59
PREVIEWING THE NEXT CUE........................................ 59
PREVIEWING MANUAL SCENES AND FADE-SCENES 59
PREVIEWING CHASES AND SHOWS............................. 59
PREVIEWING PARK......................................................... 59
FLASH LATCH AND DISABLE MODES................................ 61
LATCHED CHANNELS ..................................................... 61
LATCHED SCENES.......................................................... 61
FLASH DISABLE............................................................... 61
CUEMASTER MEMORY CARD BACKUP............................. 63
SAVING TO CARD..............Error! Bookmark not defined.
LOADING FROM CARD......Error! Bookmark not defined.
CUEMASTER HARD COPY PRINTOUT................................ 65
CONNECTING THE PRINTER ......................................... 65
PRINTING THE CUE-LIST................................................ 65
PRINT CANCEL ................................................................ 65
CUEMASTER SCREEN DISPLAY......................................... 67
CONNECTING THE LCD DISPLAY.................................. 67
SCREEN LAYOUT ............................................................ 67
CUEMASTER ON-SCREEN HELP......................................... 73
SCREEN ERROR MESSAGES ........................................ 73

MAINTENANCE.......................................................................74
SPECIFICATIONS...................................................................75
GLOSSARY.............................................................................77
CONTROL CONNECTIONS.................................................... 80
INDEX ...................................................................................... 82

SYSTEM SETUP
DMX-512 INPUT DIMMER
COLOUR
SCROLLER
PARALLEL
PRINTER
ANALOGUE INPUT DIMMER
+
DMX-512
RECEIVER
MOVINGLIGHT
DMX-512 OUTPUT
CUEMASTER
DMX-512 OUTPUT


CUEMASTER OPERATION 1
CUEMASTER INTRODUCTION
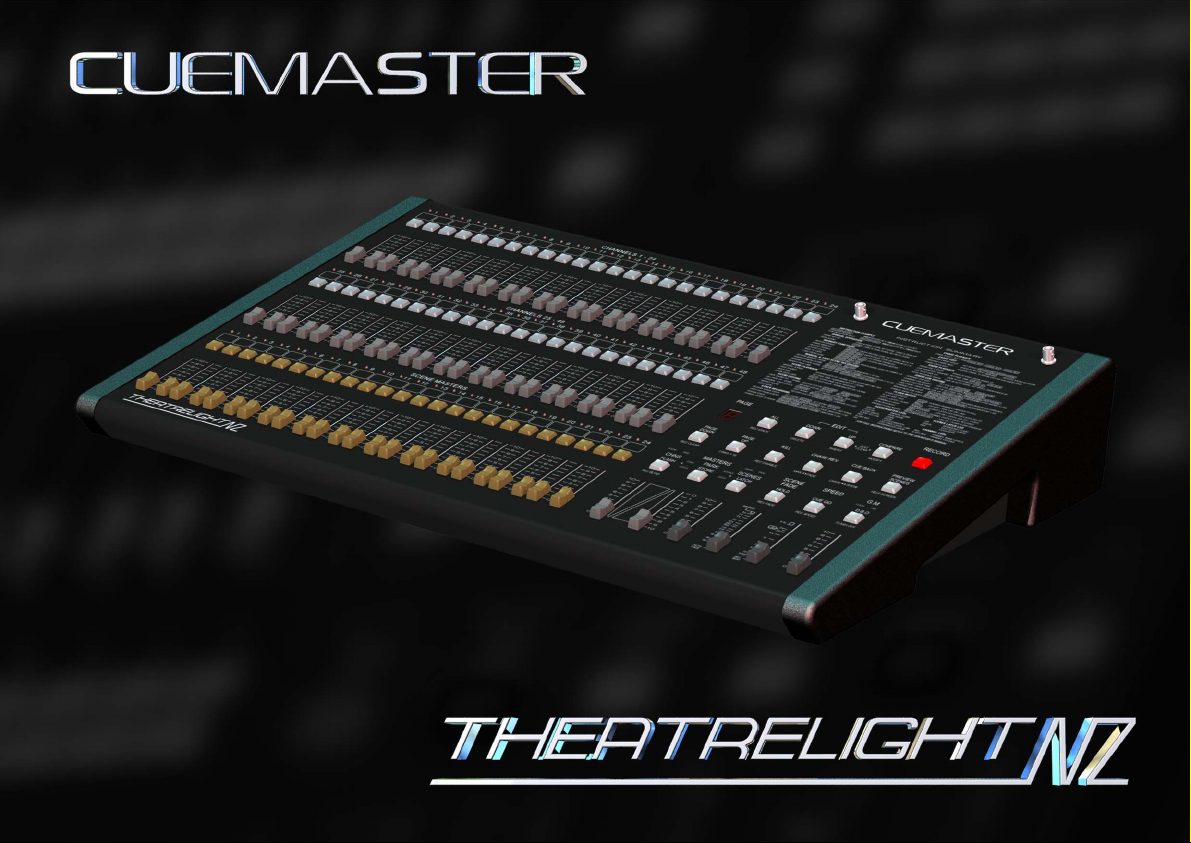
The Theatrelight Cuemaster is a general purpose lighting control desk with the best features of both manual and memory desks—a fader
per channel for fast plotting, and fast parallel access to Scenes, Chases and Shows. In contrast to desks which switch fader functions
from Masters to Channels (`Wide Mode'), the Cuemaster's dedicated Channel and Scenemaster faders make the desk simpler and faster
to operate. The single preset of 48 or 120 Channel faders is complemented by a second preset `Park' facility with dipless cross-fade,
which allows the Cuemaster to emulate a two preset manual desk when required without the space and expense of a second set of
faders.
The 24 playback Master faders are arranged in 10 pages for a total of 240 Scenemasters. Page overlay memory keeps the last page
active until the master is returned to zero thus allowing access to any page without change to the current lighting state. Each of the 240
Scenemasters can be recorded as a Manual Scene for manually timed fades; as a Fade-Scene for automatic fades from 0.5 second to 1
hour; as an auto-speed Chase, each Chase having its own chase rate; or as a Show, a sequence of auto-fade cues. Each Show cue can
also be programmed to link up to 16 Chases and Fade-Scenes for synchronised multi-part fades, snaps, effects lighting, colour scrollers
or moving lights at the push of a button.
A remote control input allows cue operation for automated or Audio-Visual applications from external devices such as projector control
boxes, and a variety of decoders. The Cuemaster can also be set up to provide a self automated lighting show incorporating hundreds of
snaps, fades, chases and delays for automated signage, display and exhibition purposes. Apart from controlling lighting dimmers, the
channel and scene latch functions built into the desk make it suitable for the manual or automatic control of many other effects such as
motors, strobes, colour scrollers, moving lights, smoke machines and pyrotechnics used in Disco and Rock lighting.
The Cuemaster can be supplied with an economical dynamic monitor display with help functions, a memory card show storage system for
backup or library purposes, and a printer socket for a hard copy of all recorded levels and times on an IBM standard printer.
The Cuemaster desk can be supplied with a companion desk, the DMX-Link, which incorporates a DMX mixer for combining the output of
a second Cuemaster or other DMX desk up to a total of 240 input channels, a soft-patch module, a set of 10 backup masters in 10 pages
to record 100 cue states of the 240 input channels, keypad set-up of any of the 100 backup cue states, a timed fader for backup cross
fades up to 1 hour, and a separate display monitor, printer output, and memory card. The four pages of the DMX-Link soft-patch enables
allocation of any of up to 512 dimmers at any level to any of the 240 input channels. The DMX-Link module is provided with channel and
dimmer test facilities, and with completely independent electronics and power supply is the ideal backup desk.
The facilities designed into the Cuemaster result in an easy to learn, easy to operate, hands-on control panel for Theatre, Television,
Disco, Rock, and Audio Visual or other automated presentations. It is ideally suited for venues where little time is allowed between
plotting and performance.

2CUEMASTER OPERATION
LA TCH
F LAS H
CHNS
S T OR E HOLD CUE GO D. B.O
PAGE
UP KILL
PAGE
D OWN CHASE REV CUE BA CK PREVIEW
SCENES
ALL UPDOWN C O M PA R E
PARK SCENES
1 2 3 4 5 6 7 8 9 10 11 12
13 14 15 16 17 18 19 20 21 22 23 24
25 26 27 28 29 30 31 32 33 34 35 36 37 38 39 40 41 42 43 44 45 46 47 4 8
1 2 3 4 5 6 7 8 9 10 11 12
13 1 4 15 16 17 18 19 20 21 22 2 3 2 4
CUEM A STER
SCENE MASTERS
CHANNELS 1 - 24
C HA N N EL S 2 5 - 48
MASTERS SCEN E
FADE SPEED G.M
EDIT RECORDPAGE

CUEMASTER OPERATION 3
CUEMASTER FEATURES
Large cue capacity—over 800 cue states with 5 year memory retention during power off.
DMX-512 international communication standard to dimmers.
Channel faders for faster plotting than keyboard entry desks.
Fast editing of all Channels via Up/Dn keys.
Two preset operation with dipless cross-fade between presets.
Flash, Add/Kill, and Latch on/off modes on both Channel and Scenes , with Flash Disable mode.
Up to 24 Scenemasters per page.
10 pages of Scenemasters for a total of 240, with page overlay memory.
Scenemasters can be programmed as a manual or auto-fade scene, a chase, or a show.
Independent auto-loading fade times (instant, or half second to 1 hour) for fade-scenes and show cues.
Single button auto-fade auto-effects cue operation simplifies complex shows.
Any cue of a show can link up to 16 auto-speed chases, or auto fade-scenes for split or stacked fades.
Chases are level sensitive, and can be of any length up to the maximum cue capacity.
Multiple chase speeds—up to 24 independent speed chases simultaneously.
Chase beat function for synchronising chase speeds to live music.
External control of chases or auto-fade auto-effects shows, for Audio-Visual applications or remote single button operation.
Auto-sequence mode allows shows to run automatically with programmable cue intervals from one tenth second to one hour.
Fast editing of stored cue levels, fade-times, and chase speeds, and insertion or deletion of chase steps or show cues.
Dust guard protection on all faders for extended life.
Colour display output provides live monitioring of desk operation, cue preview, and on-screen help.
Printer output for memory dump to PC standard parallel printer.
Memory card socket for memory extension, backup or library purposes.

4CUEMASTER OPERATION
LA TCH
F LAS H
CHNS
S T OR E HOLD CUE GO D. B.O
PAGE
UP KILL
PAGE
D OWN CHASE REV CUE BA CK PREVIEW
SCENES
ALL UPDOWN C O M PA R E
PARK SCENES
1 2 3 4 5 6 7 8 9 10 11 12
13 14 15 16 17 18 19 20 21 22 23 24
25 26 27 28 29 30 31 32 33 34 35 36 37 38 39 40 41 42 43 44 45 46 47 4 8
1 2 3 4 5 6 7 8 9 10 11 12
13 1 4 15 16 17 18 19 20 21 22 2 3 2 4
CUEM A STER
SCENE MASTERS
CHANNELS 1 - 24
C HA N N EL S 2 5 - 48
MASTERS SCEN E
FADE SPEED G.M
EDIT RECORDPAGE

CUEMASTER OPERATION 5
CUEMASTER PANEL LAYOUT
A DESK LIGHT SOCKETS are provided for plug-in goose-neck working lights.
INSTRUCTION SUMMARY commands summary for most Cuemaster functions are listed underneath as a convenient memory aid for
the desk operator.
B CHANNEL FADERS allow setting of lighting levels for manual playback or recording.
CHANNEL FLASH KEYS Channel flash keys give an instant flash of any channel to Full. These keys are also used
with the Up and Down keys to edit recorded levels.
CHANNEL MIMIC DISPLAY shows all live channel outputs, and previewed channel outputs.
TAPE AREAS are provided for identification of Channels and Masters above each Flash key.
C SCENEMASTER FADERS can store a Manual Scene, an auto-timed Fade-Scene, an auto-speed Chase, or a Show with auto-
timed fades and up to 16 links on every cue.
SCENEMASTER FLASH KEYS give an instant flash of any Manual Scene, Fade-Scene, or Chase to Full. Flashed levels are
controlled by the Grand Master. These keys are also used to assign recorded cues, and to record Fade times, Chase speeds, and
Show cue links.
SCENEMASTER MIMIC DISPLAY uses Red/Green LEDs to show the type of recording under each Scenemaster.
D CHANNELS MASTER FADERcontrols the output of the Channel faders. When used with the Park Master, it enables split dipless
cross-fades between Channel fader levels and levels stored under the Park fader, giving the Cuemaster an extra preset for the first 72
channels.
CHANNELS MASTER FLASH KEY instantly flashes the Channels Master to Full. With Record, this key enable blind recording from
the 72 preset faders when the Channels Master is at zero.
PARK KEYinstantly stores the current lighting levels for the first 72 channels under the Park Master Fader.
PARK MASTER FADER controls the output of the Park Store, in effect an extra preset. When used with the Channel Master, it
enables split dipless cross-fades between Channel fader levels and levels stored under the Park fader for the first 72 channels.
SCENES MASTER FADER controls the output of all Scenemasters 1-48, and Scenemasters 1-24—Manual Scenes, Fade-Scenes,
Chases, or Shows. s
SCENE FADE LED flashes while a timed Fade-Scene cross-fade is in progress.

6CUEMASTER OPERATION
0.1s
FLASH OFF
10s
20 s
30 s
1m
2m
5m
10m
5s
2s
1s
10
9
7
8
6
5
4
3
2
1
0
2 s
10 s
3 s
5 s
.5s
.2s
.3s
.5 s
1s
I NS TANT
AUTO
FADE
HOLD CUE GO D.B.O
30m
60m
.25 s
STEP
REC
BEAT
REC FADE REC SPEED FLASH OFF
SCENE
FADE SPEED G.M

CUEMASTER OPERATION 7
D SHOW FADE LED flashes while a timed Show cue cross-fade is in progress.
LATCH KEY allows changing the Scenemaster Flash keys from the normal Momentary Flash mode to a touch on-touch off mode,
either Solo (the latest key pressed cancels all others), or Latch (push on-push off latch).
SCENES LATCH LED indicates the state of the Scenemaster Flash keys. Off represents normal Momentary Flash mode, Green
shows Scenes Solo is on, Red shows Scenes Latch mode is on. Latched Scenemasters levels are controlled by the Scenes Master
fader.
CHANNELS LATCH LED indicates the state of the Channel Flash keys. Off represents normal instant flash to Full Momentary mode,
Yellow shows that the preset Flash keys are in push on-push off Latch mode. Channels Latch mode can be turned on and off by
holding the Latch key, and then touching the Channels Master Flash key. Channels Latch can be set independently of Scenes Latch
mode. Latched channels are controlled by the Grand Master fader.
E SCENE FADE MASTER defines the fade time of all recorded Fade-Scenes, and all Show cues. The time scale extends from 0.5
second to 60 minutes, and includes an instant setting. Manual scenes and Chases are not affected by the fade timer.
HOLD KEY freezes the current fade while pressed. With Record, Hold enables the setting of the Scene Fade master to be recorded
onto Fade-Scenes or designated cues of a Show for automatic fades. Hold key is also used to cancel a printout.
AUTO FADE setting of the Fade Time master enables Fade-Scenes or cues of a Show to load their pre-recorded fade times and then
execute the fades automatically.
F SPEED MASTER controls the speed at which cues of a Show are stepped, from 10 per second (600 beats per minute) to one step
every 10 seconds (6 beats per minute). Chases are initially recorded with a default speed of 288 beats per minute (0.25 second). This
speed setting can be edited in any Chase, so that every Chase can play back at its own pre-recorded speed.
STEP MODE setting of the Speed Fader is used for single stepping through the cues of a Show.
CUE GO KEY steps forward through the cues of the current Show if the Speed fader is set at Step Mode, and stops Show auto step if
the Speed fader is up. With Record, this key allows recording of automatic Chase speeds, and Chase Beat.
STEP LED blinks to mimic the step rate of the Speed Master, as well as indicating cue steps from the Cue Go key.
G GRAND MASTER FADER controls the entire output of the desk. If set at zero, all lighting will be blacked out. The normal setting for
this master is at Full.
DBO KEY gives a dead blackout onstage (DBO) when pressed. With Record, this key enables or disables all Flash modes.
FLASH DISABLE LED lights to indicate Flash modes are disabled.
8CUEMASTER OPERATION
PAGE
UP KILL
PAGE
DOWN CHASEREV CUE BACK PREVIEW
SCENES
ALL UPDOWN COMPARE
EDIT
CLEAR
REC DISABLE MAN FADE CHASE SHOWLIN KS 1-16
REC STACK INSERTDELETE MODIFY
HELPSCREEN
REC CLEAR
EDIT RECORDPAGE
CU EM A STER 4 8
Z348

CUEMASTER OPERATION 9
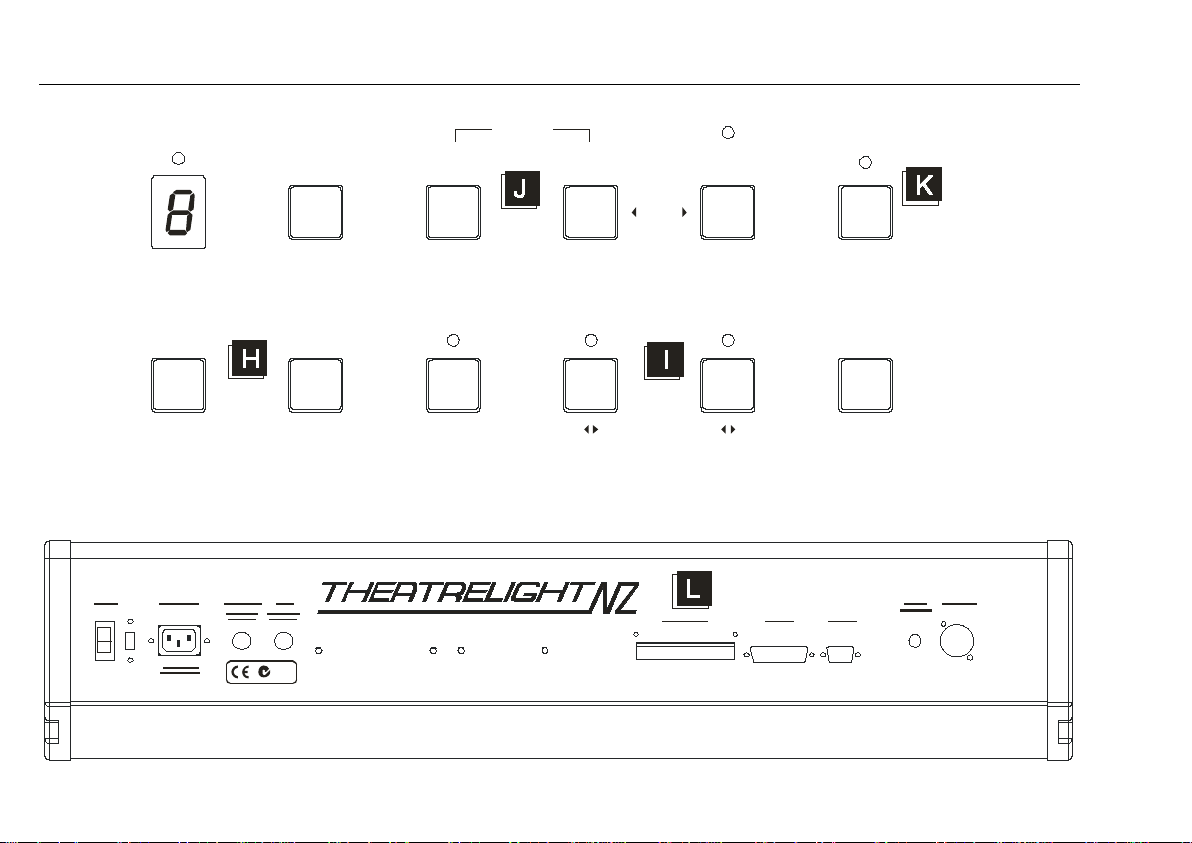
H PAGE NUMBER DISPLAY shows the current Scenemaster page. The Page Changed LED (above the Page Number display) flashes
if a Scenemaster from a previous page is still up.
PAGE UP AND DOWN KEYS change the current Scenemaster page. With Record, Page Down key enables the Record buffer to be
cleared, and Page Up key allows linking of Chases and Fade-scenes to cues of Shows.
I KILL KEY sets the flash mode for channels and scenes to either Add mode or Kill mode. The Kill LED lights when Kill is on. With
Record, this key disables Record mode, while the entry of a 4 digit code erases the entire memory of the desk.
CHASE REVERSE KEY stops all Chases when held, and reverses them when released. The Chase Reverse LED lights when
Chases are reversed. With Record, this keys changes Manual scenes to Fade-scenes and vice-versa.
CUE BACK KEY steps backwards through the cues of the current Show if the Speed fader is set at Step Mode. If the Speed fader is
up, any stepped Show is stopped while the Cue Back key is held down, and reversed when released. The Cue Back LED lights when
Shows are reversed. With Record, this key changes Chases to Shows and vice-versa.
PREVIEW KEY shows the contents of any Scenemaster recording. With Record, Preview displays on-screen Help.
J ALL KEY, when pressed with either the Up or the Down keys, fades all live channels up or down at the time set by the Scene Fade
master. With Record, this key enables recording of cue stacks.
UP/DOWN KEYS enable channels selected by the channel flash keys to be edited at the rate set by the Fade master. With the
Channels Edit Keys, they allow editing of all 48 or 120 channels using the preset flash keys. With Record, these keys enable insertion
and deletion of cues in any Show, or steps in any Chase.
COMPARE KEY swaps between original and edited levels, shown by the Compare LED, for live comparison of changed levels.
Pressing Up with Compare clears edited levels. With Record, this key enables modification of pre-recorded scenes.
K RECORD ENABLE LED shows the Record status, and can only be turned on by correct entry of a three digit record code.
RECORD KEY records the current output of the desk into spare memory. Record is also used as a shift key for other functions.
L MEMORY CARD socket takes standard 5 year life lithium battery powered Memory Cards for secure backup.
POWER SUPPLY socket can be switched for 120 or 230 volts AC, 50/60 Hertz supplies.
REMOTE STEP socket enables show control from a push-button, or from external Audio-Visual, Midi, or SMPTE decoders.
DMX-512 OUTPUT from the Cuemaster carries multiplexed dimmer levels to the remote dimmers.
PRINTER AND DISPLAY PORTS provide outputs to a dynamic display monitor, and to an PC compatible printer for hard-copy print-
outs of all recorded levels and fade times.
FUSES are provided for mains and work lights power.

10 CUEMASTER OPERATION
DESK LIGHTS
The Cuemaster is fitted with sockets for Littlite or similar BNC goose-neck working lights. Please note the following points:
The bulbs specified for use in the worklights fittings are 24 Volt, 2.8 Watts, Lucas LLB 865 or equivalent, and are easily obtainable at any
automotive electrical supply house.
If you attempt to use bulbs of a lower voltage, or higher wattage than that specified, the worklight fuse on the back panel may blow.
SYMBOLS USED IN THIS MANUAL
Press the indicated
key once and then
release it
Hold down the indicated
key and keep it held down
for the following operation
LED is on
Move the indicated
fader in the direction
of the arrow
LED be On
before starting the
operation
MUST

CUEMASTER OPERATION 11
CUEMASTER SET-UP
The Cuemaster has a 110/230 volt power select switch on the back panel. Check that the switch is correctly set for your mains supply.
Plug up a correctly wired DMX-512 cables between the Cuemaster and the dimmers, and power up the dimmers and the desk. The
Cuemaster powers up in the state in which it was last turned off—for a clean start, set the following:
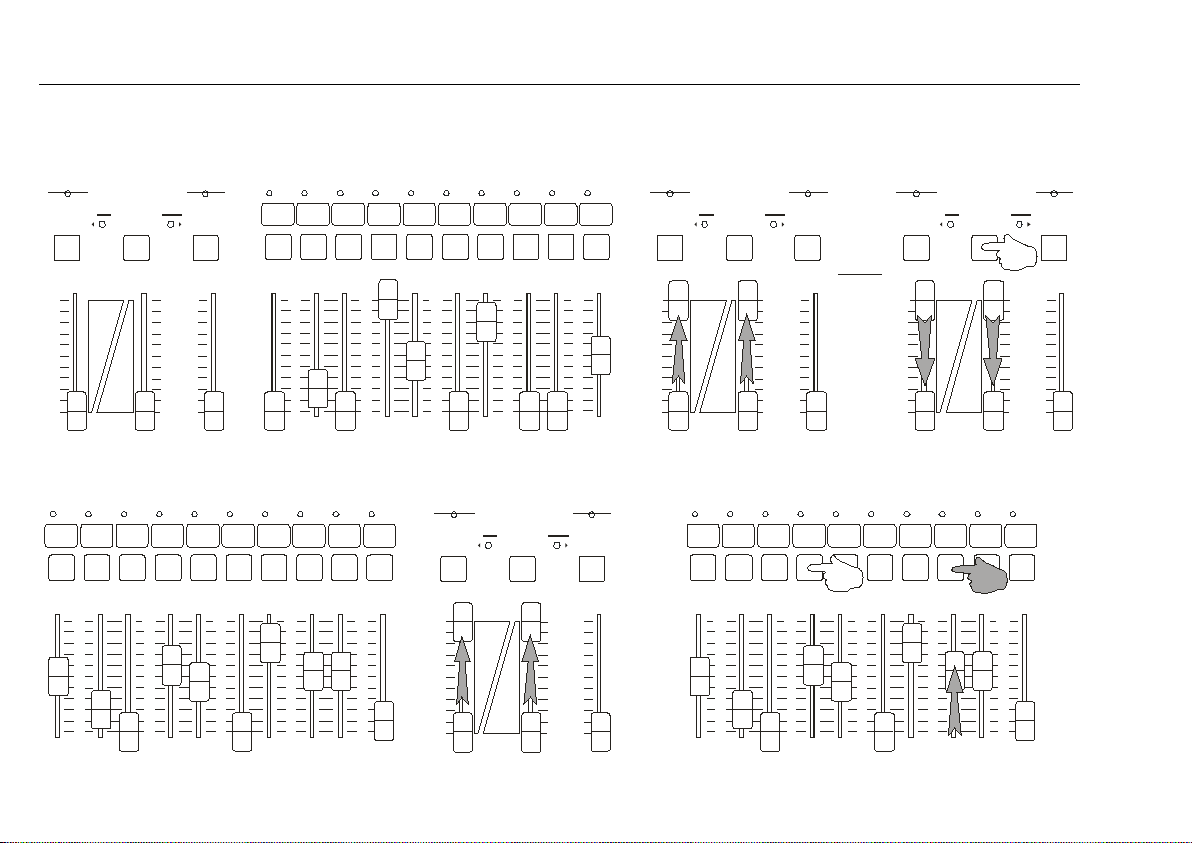
1 Set all Channel and Scenemaster faders DOWN.
2 Set the Channels, Park, Scenes, Scene Fade, and Grand Master faders UP.
3 Set the Speed Master down (at Step Mode).
4 If the Kill LED is on, press the Kill key to turn the LED off.
5 If the Chase Rev LED is on, press the Chase Rev key to turn the LED off.
6 If the Cue Back LED is on, press the Cue Back key to turn the LED off.
7 If the Solo/ Latch LED is on, press the Latch key once or twice to turn the LED off.
8 If the Channels Latch LED is on, hold the Latch key, then touch the Chns Flash key to turn the LED off.
9 If the Compare LED is on, hold the Compare key, then touch the Up key to turn the LED off.
10 Press Page Up or Page Down to select Page 1 in the Page display.
11 Press the Park Park key to clear levels stored under the Park master.
THIS PROCEDURE IS NECESSARY FOR CORRECT OPERATION OF THE EXAMPLES ON THE FOLLOWING PAGES
The symbols opposite are used to describe operation on the the following pages.
12 CUEMASTER OPERATION
1 2 3 4 5 6 7 8 9 10
CHANNELS 1 - 24
10
9
7
8
6
5
4
3
2
1
0
10
9
7
8
6
5
4
3
2
1
0
10
9
7
8
6
5
4
3
2
1
0
10
9
7
8
6
5
4
3
2
1
0
10
9
7
8
6
5
4
3
2
1
0
L ATCH LATCH LATCH
10 10 10
9 9 9
7 7 7
8 8 8
6 6 6
5 5 5
4 4 4
3 3 3
2 2 2
1 1 1
0 0 010 10 10
9 9 9
7 7 7
8 8 8
6 6 6
5 5 5
4 4 4
3 3 3
2 2 2
1 1 1
0 0 0
10 10 10
9 9 9
7 7 7
8 8 8
6 6 6
5 5 5
4 4 4
3 3 3
2 2 2
1 1 1
0 0 0
FLASH FLASH FLAS H
CHNS CHNS CHNS
ST OR E STORE STORE
PARK PARK PARKSCENES SCENES SCENES
1 2 3 4 5 6 7 8 9 10
RECBLIND RECBLIND REC BLIND
CHANNELS 1 - 24
MASTERS MASTERS MASTERS
10
9
7
8
6
5
4
3
2
1
0
10
9
7
8
6
5
4
3
2
1
0
10
9
7
8
6
5
4
3
2
1
0
10
9
7
8
6
5
4
3
2
1
0
10
9
7
8
6
5
4
3
2
1
0
STEP 1 STEP 2
STEP 3
CROSS-FADING PRESETS
FLASHING CHANNELS
1
22
LATCH
10
9
7
8
6
5
4
3
2
1
010
9
7
8
6
5
4
3
2
1
010
9
7
8
6
5
4
3
2
1
0
FLASH
CHNS
STORE
PARK SCENES
1 2 3 4 5 6 7 8 9 10
RECBLIND
CHANNELS 1 - 24
M ASTERS
10
9
7
8
6
5
4
3
2
1
0
10
9
7
8
6
5
4
3
2
1
0
10
9
7
8
6
5
4
3
2
1
0
10
9
7
8
6
5
4
3
2
1
0
10
9
7
8
6
5
4
3
2
1
0
1
2
Table of contents
Other Theatrelight Dj Equipment manuals


Popular Dj Equipment manuals by other brands


American DJ
American DJ X-Color LED Plus User instructions

Blizzard Lighting
Blizzard Lighting COLORSTORM 252 manual

Chauvet DJ
Chauvet DJ COREpar Q120 ILS user manual

Chauvet DJ
Chauvet DJ HURRICANE HAZE 4D user manual

MAX LIGHTING
MAX LIGHTING ML-1319 user manual

EuroLite
EuroLite LED Z-PAR QCL 7X10W user manual


