Theatrelight TL-F1000 User manual
Test Key and Test LED behaviour
Pressing the Test key:
Flashes the intensity or rate of the current effect to Full, and cancels held DMX levels
Holding for more than 3 sec on Wireless DMX F 000s, unlinks the receiver from its transmitter
The Test key has an internal blue LED which:
Mimics the intensity of the F 000 light output in non-Wireless DMX versions
Acts as a Link indicator in F 000s fitted with Wireless DMX (see Wireless DMX Operation)
Excepting over-temperature states, the Test and Status indicators are set off 5 minutes after power
up, or a change to the back panel controls.
Hiding the Instructions
A short form copy of the F 000 instructions is printed as a reminder on one side of the top lid of the
F 000. To hide or show the instructions:
Depress the lid latch, slide the top lid out, turn it upside down, then slide it back in
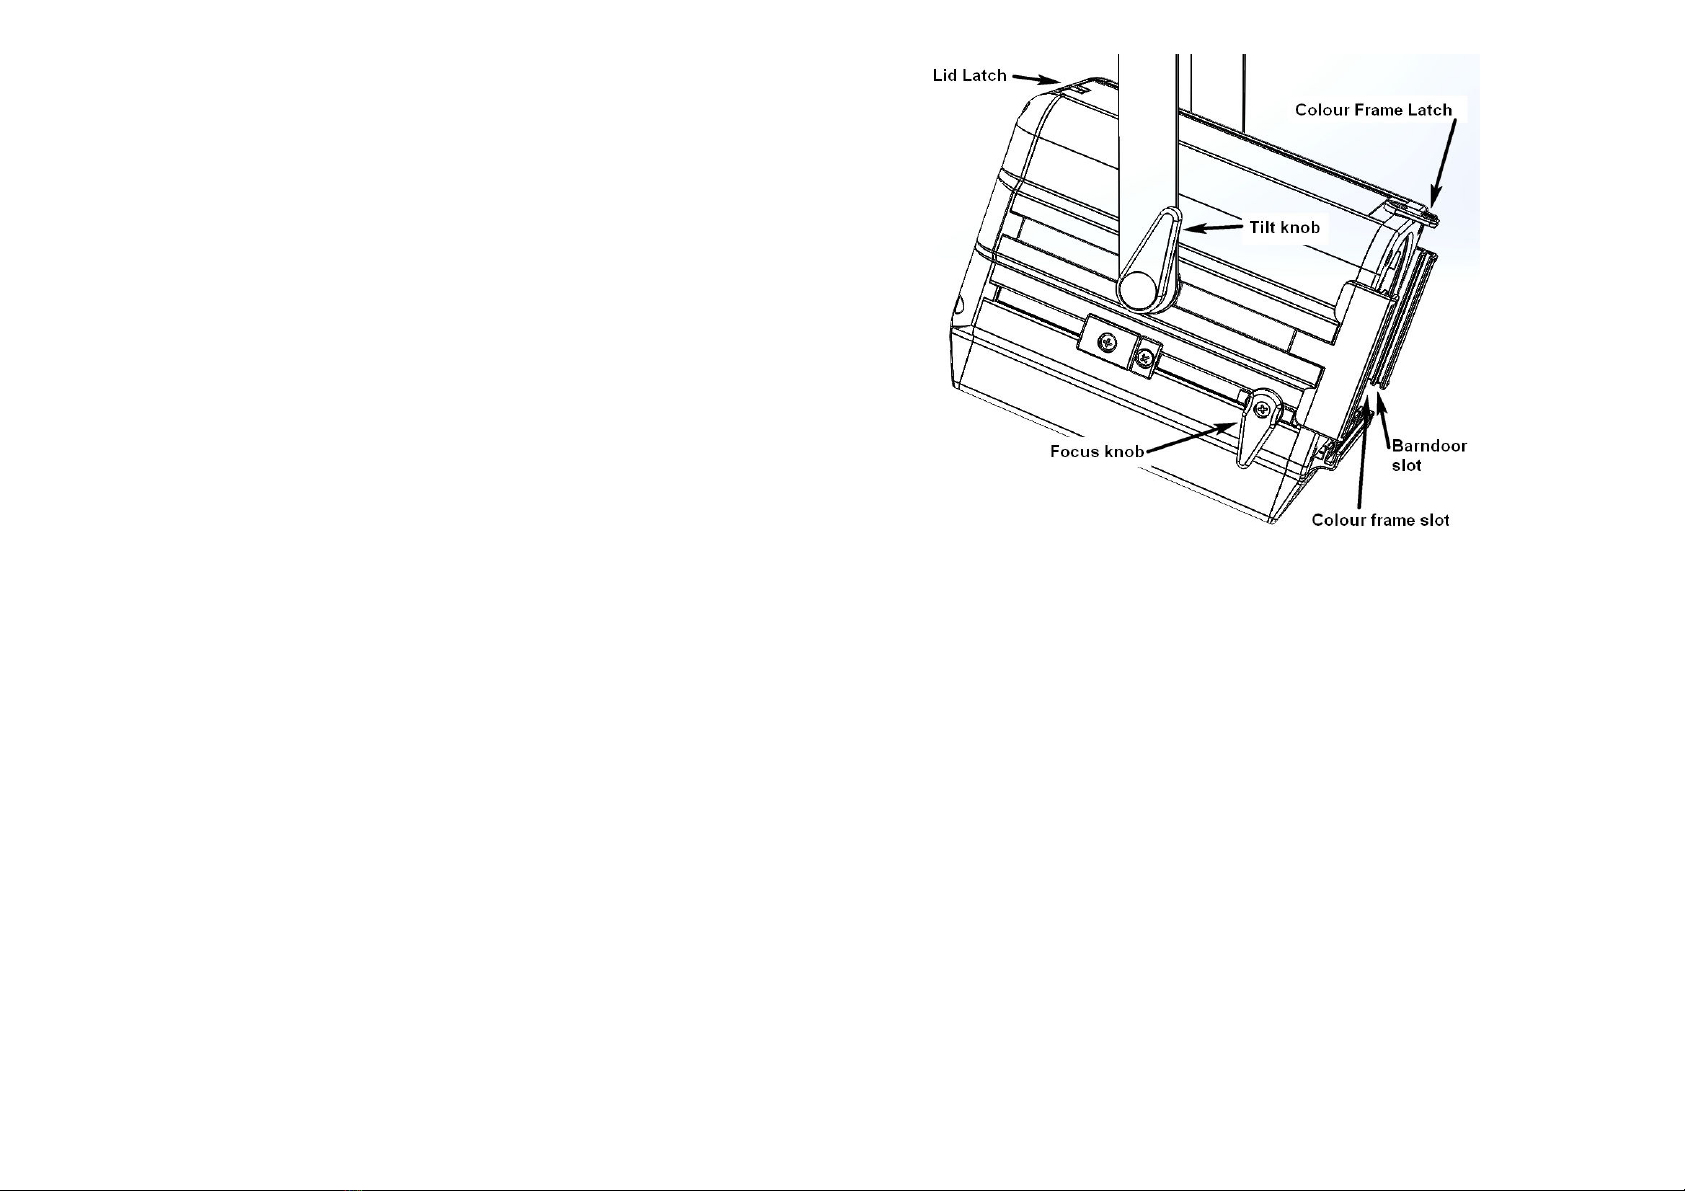
Focus Knob Lock adjustment
If required the focus knob locking tension may be adjusted:
Set the the focus knob in the lock postion by turning it so it points either forward or back
Turn the screw in the centre of the focus knob slightly to adjust the locking tension
Focus Slide Friction adjustment
If required the focus slide action may be adjusted:
Depress the lid latch and slide the top lid back
Turn the cam at the base of the lens tray with a flat blade screwdriver to adjust the slide action
Slide the top lid back into place
Tilt Friction adjustment
If required, the permanent tilt friction (with the tilt lock loose) may be adjusted:
Turn the tilt knob anticlockwise half a turn, then pull the cap off the left yoke nut
With an M8 spanner, adjust the left yoke nut to the required friction, then replace the cap
Yoke osition adjustment
The F 000 is initially supplied with the yoke centred so it can move around both ends of the F 000.
If required the yoke may be positioned closer to the front or back:
Turn the tilt knob anticlockwise one turn, then pull the cap off the left yoke nut
Use an M8 spanner to undo the left yoke nut so the yoke can slide forwards or backwards
When in position, adjust the left yoke nut to the required friction, then replace the cap
Changing Lenses
To remove the F 000 Fresnel lens for cleaning or changing:
Set the lens to the front using the focus knob, depress the lid latch and slide the top lid back
Turn the top lens clips clear of the lens, push the lens top back, lift the lens near horizontal,
then slide it out
Reverse the process to install a lens. The grooved side must be at the front.
Changing between Theatre and Display versions
The F 000 is supplied fitted with colour runners, or their blanking parts. To swap these:
With power disconnected, undo the four screws fixing the front molding and remove it
Swap the side and bottom colour runners with their blanking parts
Replace the front molding and its four screws
Cleaning the F1000
For maximum optical and electrical efficiency and long life, the F 000 must be kept free of dust:
Blow any dust out of the interior of the F 000, fan blades, and heatsink fins
Clean the Fresnel lens and the LED module lens with a damp lint-free cloth
Don’ts
Do not connect the F1000 to a dimmed mains supply
Do not use any solvent other than water to clean the lens
Do not subject the F 000 to excessive force or shock
Do not operate the F 000 in wet conditions
Do not attempt to repair the F 000 in case of faults - return it to your sales agent
This product is not for domestic use
Contact Details
Theatrelight New Zealand Theatrelight Asia
6 Rowe St, Onehunga, NZ QianLong Industrial District, SanXiang, ZhongShan, PRC
phone ++64 9 622- 97 phone ++86 7608 632-05 6
TL-F 000 Fresnel Operators Manual
The TL-F 000 is a white LED Fresnel spotlight suitable for general lighting in theatres and TV studios,
and for exhibition and display in art galleries and museums. It is available fitted with colour runners to
hold colour filters and beam shaping barndoors for theatre use, or without colour runners for display use.
The model can be changed by the user as the parts are included for both Theatre and Display types.
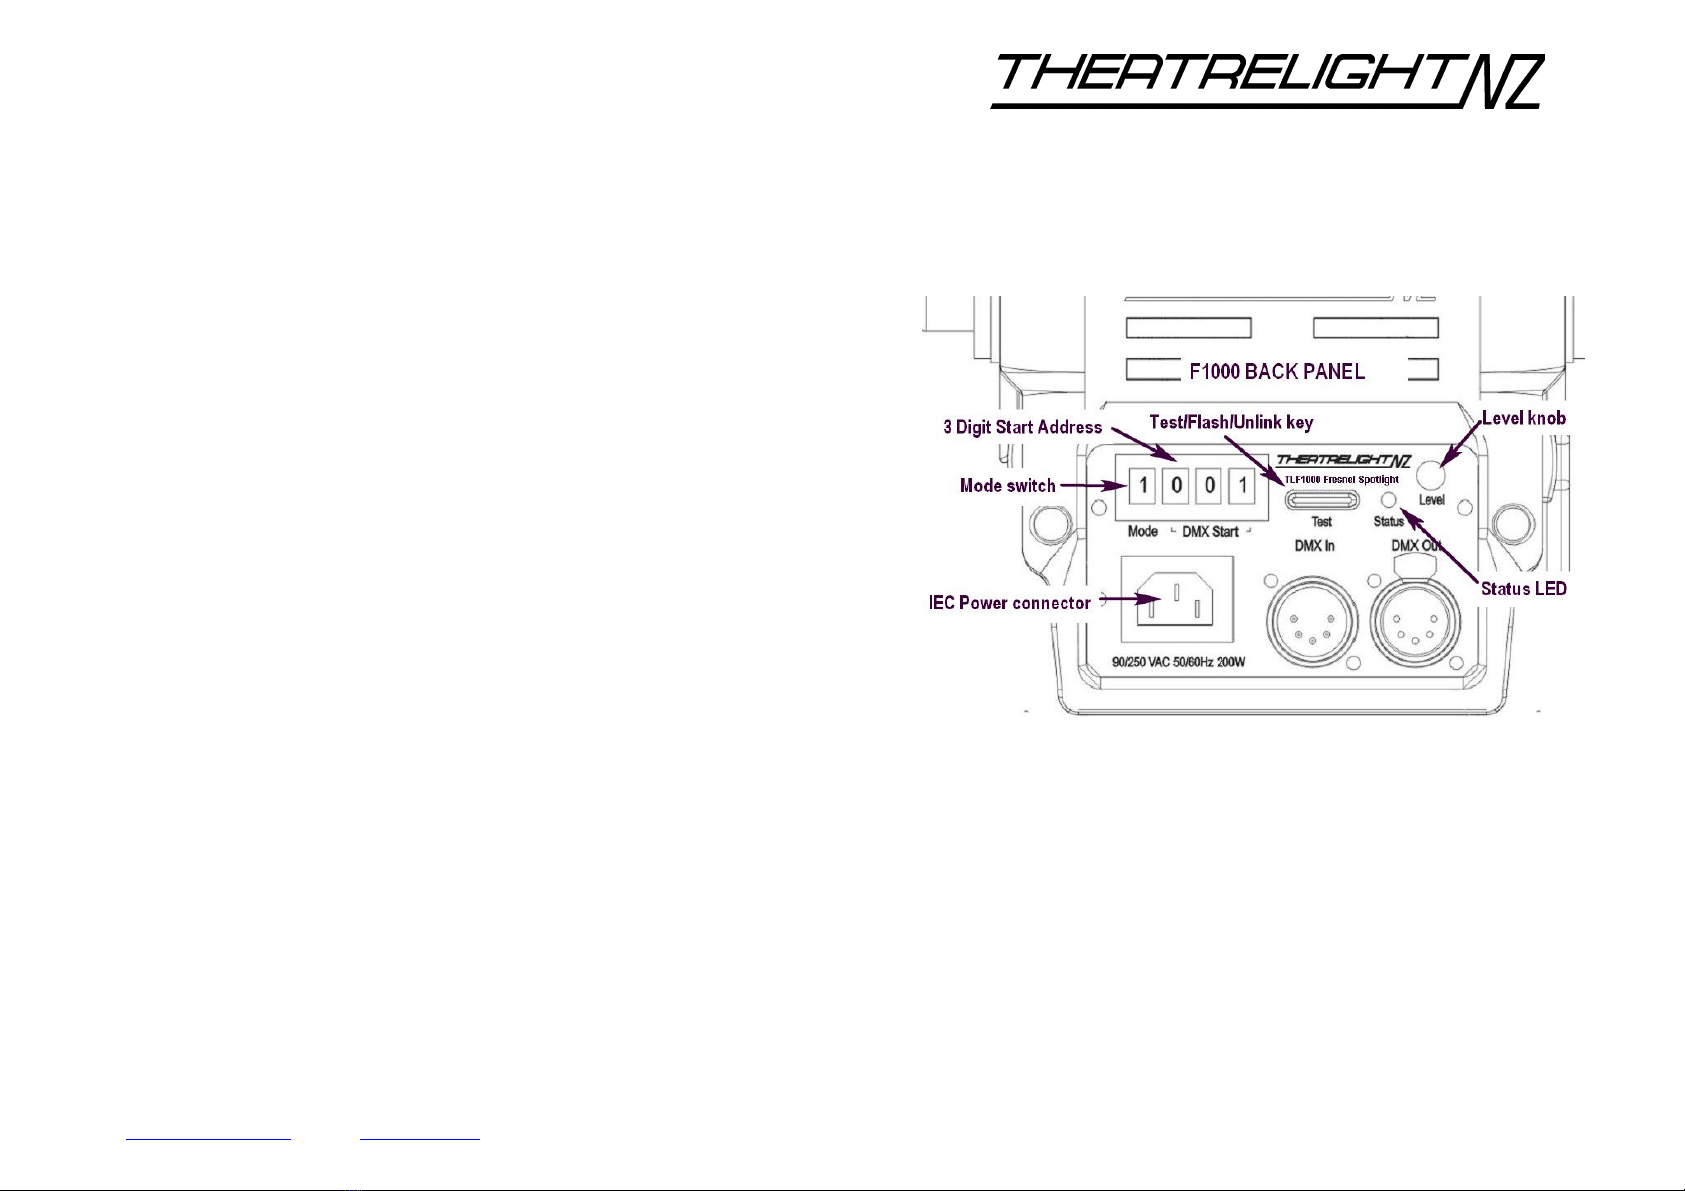
ower Connection
The F 000 requires a non-dimmed power supply of rated voltage marked on the back panel.
Operating the F1000 on a dimmed power supply will void your warranty
Plug the supplied power cable between the F 000 IEC socket and a power supply
Ensure the power supply is rated within the limits on the F 000 back panel
Ensure the power supply has an effective Earth connection
Standalone Operation
When DMX is not connected, the finger settable Level knob controls the intensity/rate of the
fade/effects function set by the Mode switch. Standalone operation is useful for permanent lighting
or effects, or for local On/Off control when focussing:
Set the Mode Switch for the following effects:
: Fade time matches 250 watt tungsten bulbs
2: Fade time matches 500 watt tungsten bulbs
3: Fade time matches kw tungsten bulbs
4: Fade time matches 2 kw tungsten bulbs
5: Fade time matches 5 kw tungsten bulbs
6: Fire fade/flicker effect: Off, slow/dim to fast/bright
7: Ramp cycle up/dn 0- 00%: Off, 0 minutes to 0.5 sec fade cycle
8: Random flash effect: Off, slow/dim to fast/bright
9: Strobe flash effect: Off, to 25 flashes per sec
Adjust the Level knob to set the intensity or rate of the effect
Press the Test key to test at Full the intensity or rate of the effect
DMX Single Channel Operation
If DMX is connected, then the highest of the DMX Start Channel (DMX ) and the Level knob
controls the intensity/rate of the fade/effects function set by the Mode switch:
Plug a DMX cable from a control panel into the XLR (or RJ45) connector labelled ‘DMX In’
Link the DMX signal to other F 000s using the ‘DMX Out’ connector
Set the DMX Start Address switch to the required address (eg set 00 to respond to
DMX Chn , set 5 to respond to DMX channel 5 etc)
Set the Mode Switch for the following effects:
: Fade time matches 250 watt tungsten bulbs
2: Fade time matches 500 watt tungsten bulbs
3: Fade time matches kw tungsten bulbs
4: Fade time matches 2 kw tungsten bulbs
5: Fade time matches 5 kw tungsten bulbs
6: Fire fade/flicker effect: Off, slow/dim to fast/bright
7: Ramp cycle up/dn 0- 00%: Off, 0 minutes to 0.5 sec fade cycle
8: Random flash effect: Off, slow/dim to fast/bright
9: Strobe flash effect: Off, to 25 flashes per sec
On the control panel, adjust the DMX level to control the intensity or rate of the effect
Set the Level knob above zero if a permanent minimum intensity/rate is required
Press the Test key to test at Full the intensity or rate of the effect
DMX Two Channel Operation
If DMX is connected and the Mode Switch set to 0, the highest of the DMX Start Channel (DMX )
and the Level knob controls the intensity/rate of the fade/effects function which is set by the D X
channel following the Start Channel (DMX 2):
Plug a DMX cable from a control panel into the XLR (or RJ45) connector labelled ‘DMX In’
Link the DMX signal to other F 000s using the ‘DMX Out’ connector
Set the DMX Start Address switch to the required DMX address (eg set 00 to respond to
DMX Channels and 2, set 5 to respond to DMX Channels 5 and 5 2 etc)
Set the Mode Switch to 0 for Two Channel operation
On the control panel, set the DMX 2 level to select the following effects:
0- 0%: Fade time matches 250 watt tungsten bulbs
20%: Fade time matches 500 watt tungsten bulbs
30%: Fade time matches kw tungsten bulbs
40%: Fade time matches 2 kw tungsten bulbs
50%: Fade time matches 5 kw tungsten bulbs
60%: Fire fade/flicker effect: Off, slow/dim to fast/bright
70%: Ramp cycle up/dn 0- 00%: Off, 0 minutes to 0.5 sec fade cycle
80%: Random flash effect: Off, slow/dim to fast/bright
90- 00%: Strobe flash effect: Off, to 25 flashes per sec
On the control panel, adjust the DMX level to control the intensity or rate of the effect
Set the Level knob above zero if a a mimimum intensity/rate is required
Press the Test key to test at Full the intensity or rate of the effect
Wireless DMX Operation
The F 000 can be supplied fitted with a Wireless DMX receiver able to receive either Lumen Radio
or Wirelesss Solutions (WDMX) transmissions. A wireless DMX signal takes instant priority over any
cable DMX signal. If the Wireless DMX fails, the F 000 reverts to the cable DMX signal if present.
To link currently powered On but unlinked F 000s to the transmitter, follow the instructions
provided with the transmitter (usually a short press of the transmitter link key)
To unlink an F 000 from its transmitter, press the Test key for 3 seconds: the F 000 reverts to
the cable DMX signal (if any) within second
In F 000s fitted with Wireless DMX, the Blue LED in the Test key indicates:
Blue LED Off: Not linked
Blue LED 00ms On/Off: Linked, Transmitter Off
Blue LED 000ms On/ 00ms Off: Linked, Transmitter On, DMX Off
Blue LED On: Linked, Transmitter On, DMX On
The Blue LED is set off 5 minutes after power up or a change to the back panel controls.
The selected DMX Start Address is valid for both Wireless and Cable DMX.
Focus adjustment
The F 000 has a quick acting focus knob at the right front of the body. To focus the lens:
Unlock the focus knob by turning it so it points down
Move the focus knob forward to narrow the beam, or back to widen the beam
Lock the focus knob by turning it so it points either forward or back
Tilt adjustment
The F 000 is fitted with a tilt lock knob on the right side of the yoke:
Turn the tilt knob anticlockwise half a turn, then adjust the tilt position
Turn the tilt knob clockwise to lock the tilt position
an adjustment
The F 000 is supplied with an M 0 bolt, wing-nut, flat washer, split washer, and friction washer:
Fit the composition friction washer between the F 000 yoke and its hook clamp
Fit the flat washer on top of the hook clamp, then the split washer and wingnut
Set the pan position, then tighten the wingnut to the required tension
Colour Frame fitting
Each F 000 is supplied with colour frame which accepts standard colour filter sheet:
Fit the colour frame in the inner slot of the F 000 colour runners
Set the colour frame latch forward to prevent the colour frame falling out
Barndoors fitting
The F 000 can be fitted with an optional 4 leaf rotating set of barndoors:
Fit the barndoors in the outer colour runner slot, with the safety cable at the top right corner
Pass the safety cable clip around the right side of the yoke and clip it back on its own wire
Set the colour frame latch forward to prevent the barndoors falling out
DMX Fail behaviour
If the Wireless DMX signal fails, the F 000 reverts to the cable DMX signal. If the cable DMX signal
fails, the F 000 maintains the previous DMX levels for 0 minutes before fading out over 5 minutes
for Modes -5, or instant off for Modes 6-9.
Status LED indications
The Status LED shows the status of the DMX signal (Green) and the internal Temperature (Red):
DMX (Green): On = DMX OK; Flash = DMX errors; Off = No DMX (for 5 mins after power on)
Temperature (Red): Blink = >60°C; On = >65°C; Flash = >70°C; Off = Normal temperature
If the F 000 is above 65°C, the LED level is faded down slowly, and faded back in when cooler.
Other Theatrelight Dj Equipment manuals


Popular Dj Equipment manuals by other brands


Fiilex
Fiilex Q1000 II user manual

Bazooka
Bazooka BPB24 installation instructions

Chauvet Professional
Chauvet Professional COLORado 2 Solo VW Quick reference guide

Hive
Hive KILLER Plasma Maxi operating instructions

thomann
thomann Ignition Pure UV 710 user manual

Color imagination
Color imagination SI-018L user manual


