theBit Opus 1S User manual
INSTRUCTION
Manual

| CONTENTS
Ⅰ. Getting Started
Package contents •••••••••••••••••••••••• 03
Part names and functions •••••••••••••••••••• 04
Button operation and functioning •••••••••••••••• 05
Power management and charging ••••••••••••••• 06
PC connection and disconnection •••••••••••••••• 07
Micro SD card insertion/removal ••••••••••••••••• 08
Earphones / Optical Out / Balanced Out ••••••••••••• 08
Firmware upgrade ••••••••••••••••••••••• 10
Ⅱ. Using the device
Home screen and playback screen •••••••••••••••• 11
Music library screen ••••••••••••••••••••••• 13
Notification bar screen •••••••••••••••••••••• 22
Quick settings screen •••••••••••••••••••••• 23
System settings screen •••••••••••••••••••••• 24
Ⅲ. Others
Specifications •• ••••••••••••••••••••••• 38
Safety precautions and disclaimers •••••••••••••••• 39
Fault detection prior to A/S request •••••••••••••••• 41
Applying for A/S and Customer service •••••••••••••• 42

OPUS#1S
User Quick Guide
Micro USB cable
Guarantee Card
※ Components may differ from an actual product and may be changed without
prior notice to improve the performance or quality of the product.
Instruction Manual can be downloaded from Audio-Opus website.
[www.audio-opus.com > support > manual]
| Package contents
Getting Started / 03
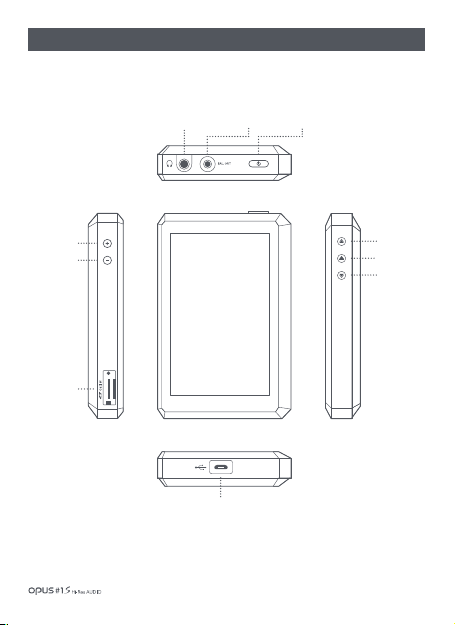
Balanced Out port
Micro SD
card slot x 2
(Lower, Upper)
Previous song
Power
Next song
Play/Pause
Volume Up
⊕
Volume Down
⊖
Micro USB Port
Earphone/Optical Out
Getting Started / 04
| Part names and functions

Volume Up
⊕
Volume Down
⊖
| Button operation and functioning
※ Caution! Read carefully. (Reset Function)
1. If the device shows signs of unexpected failure, freeze, press the power button for
more than 10 seconds to force a shutdown and reset the device.
2. Do not use this reset function an any other case besides the device failure and freeze.
Volume adjustment button
1. Volume up (+) / down (-): Volume can be adjusted
from 0 to 150 step.
Play/Pause button
1. Press the Play/Pause button to play a song. Press the Play/
Pause button to pause a song if being played.
1. Turning power On/Off :
Long press (over 2 secs.) the Power button to turn on the device.
While the device is on, long press the Power button (over 2 sec.) to turn off the device.
1. Short press Previous button to start a song from the
beginning and a short press Previous button
(within 5 seconds) again to play a previous song.
2. Press Next button to play next song.
Previous/Next buttons
Power
2. Turning the screen On/Off :
While the screen is on, press the Power button to turn off the screen.
Press the button again to turn off the screen.
Previous
Next
Play/Pause
Getting Started / 05
Power
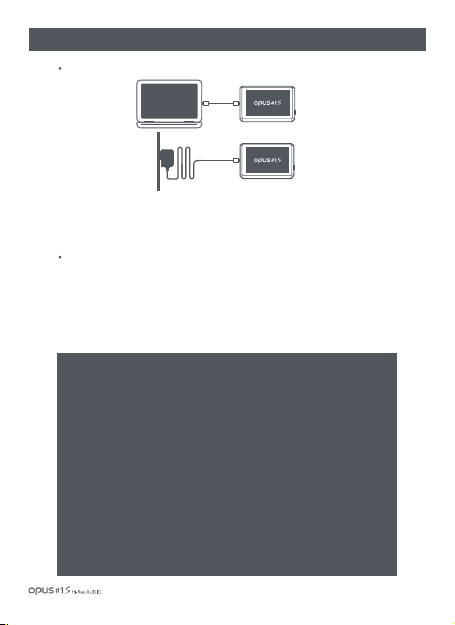
| Power management and charging
1. Charging with a PC: Turn on PC and use provided Micro USB Cable to connect PC and
USB port of the device.
2. Charging with an adapter: Use DC adapter of MICRO USB type (5V/2A) and plug
it into the device USB port.
※ Caution! Read carefully. [Precautions regarding power management and charging]
1. Use only the provided USB cable when charging. Connecting any other USB
cable may cause improper connection, lead to malfunctioning or decrease
charging effectiveness.
2. In case of a charging with 5V/2A Micro USB adapter for smartphones, that is
sold separately, it will take 4 hours for full charge. (Fully discharged device)
3. Charge the product with USB cable connected to the back USB port of PC.
Connecting to a front low-power USB port, USB hub or charging when computer
goes into standby mode may result in insufficient charging due to unstable power
supply.
4. Fully charge battery if product was not used for a long time or before an initial use.
5. Internal battery performance may declined with age depending on number of
discharge/recharge procedures.
6. Avoid charging with a portable charger inside bag or any other closed space to prevent
excessive heat generation and to ensure safe charging.
1. Screen will go off automatically if there is no user input to prevent unnecessary
battery consumption. Screen will be turned on by simple power button press.
2. This device will go into a suspension mode after a defined period of paused state
to prevent unnecessary battery consumption. Suspension mode will allow the device
to be in hibernation mode for about 4 weeks without power supply
(ULTRA POWER SAVING MODE).
Power connection and charging
Power management
PC
AC
Getting Started / 06

| PC connection and disconnection
1. Connect the device to your PC as a standard USB device by using a Micro-USB cable.
(In case that the device is connected to PC when power is switched off, charging icon
will appear on the screen displaying only a charging process.)
2. Connecting the device while the power is on will allow PC to recognize the device internal
/external storage as MTP, making search, copy and deleting files possible.
3. When file copying and transferring is complete, click the ‘Safe removal’ icon [ ] in the
system tray of PC and disconnect the device.
4. Check if the file transfer is complete and then disconnect the device if hardware safe removal
screen does not come up.
※ Caution! Read carefully. (Micro USB Cable functions when connected to PC)
1. There are 2 functional modes of Micro USB cable when connected to PC.
- Connection while device power OFF : Charging mode.
- Connection while device power ON : Charging and file transfer modes.
2. Music playback is not supported when device is connected to PC to ensure the device
effective charging and safety.
3. Use MICRO USB type constant voltage (5V/2A) adapter for charging the device when
playing a music.
4. File transfer speed may differ depending on PC environment and operation system.
5. If Micro USB cable is unplugged during file/folder transfer, SD memory card may be
damaged. Do not turn off PC and do not unplug USB cable during file transfer.
Getting Started / 07

2(lower) 1(upper)
| Micro SDcard insertion/removal
1. Insert and remove Micro SD card only when the power is
turned off.
2.
Gently insert Micro SD card according to direction depicted.
Gently press the Micro SD card to release it from the slot.
3. The directions of Micro SD card slots for lower(2) and
upper(1) are opposite. Please note that damage to
Micro SD card or device can occur when inserting both
slots in the same direction or trying to insert them in the
opposite direction.
| Earphones / Optical Out / Balanced Out(1)
1. Connect the device to a balanced audio input device
through earphones port (Ø3.5mm) (ground) and balanced
output port in conjunction.
Earphone (Ground) Balanced output(L/R)
Connection to balanced audio input device
R- R+ L+ L-
Getting Started / 08

| Earphones / Optical Out / Balanced Out(2)
1. Connect earphones/headphones to the earphones
port (Ø3.5mm) for an audio output.
2. Connect the device to audio device supporting
SPDIF-IN(input) function for an audio output.
1. Connect earphones/headphones support
balanced port to the balanced port (Ø2.5mm)
for an audio output
Earphone/ Optical Out
(Ø 3.5 mm)
Connection to earphones/headphones
Connection to balanced earphones/headphones
Balanced Out
(Ø 2.5 mm)
Getting Started / 09
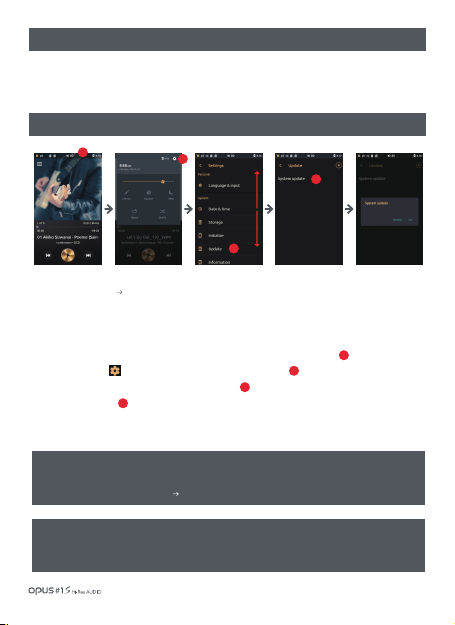
| Firmware upgrade
Firmware is an internal program (software) designed to provide control of the device operation.
Consistent device specification and functionality improvement is possible through firmware upgrade.
Methods of the device use and operation may be changed as a result of firmware upgrade without
prior notification.
| Firmware upgrade method 1 – Direct download
1. Download the newest firmware file (update.pack) from Audio-Opus website
(www.audio-opus.com) Support > download.
2. Turn on the device and connect it to PC using provided Micro USB cable.
3. Copy the newest firmware file (update.pack) into the top –level folder (root directory) in internal or external memory.
4. Disconnect the Micro USB cable when file copy is complete.
5. Drag down the Status bar in the upper side of the screen and enter the Quick settings screen.
6. Tap the settings icon [ ] in the right upper corner and enter the Settings screen.
7. Scroll down the Settings menu and choose the Update menu.
8.
Tap Update in the menu.
9. Check window will pop up to check if you want to proceed with an update.
10. When choose ‘Yes’ the device will start rebooting and firmware start upgrading.
(After completion of FW upgrade, you may check the version in Settings/Information.)
1
3
4
2
1
3
2
4
Getting Started / 10
※ Caution: Check for internal capacity availability is required.
Upgrade a firmware after checking that USB power cable is connected and battery level is
sufficient for an upgrade (more than 50% of battery level).
Refer to ‘System settings screen’ ‘Update’ section for more detailed information.
※ Caution: You may need to check if there is enough storage space in the internal memory.
More than 800MByte of internal memory availability is required for the firmware upgrade.
Check if there is enough storage capacity in the internal memory of the device.
The firmware upgrade may not initialize if the storage capacity is insufficient.
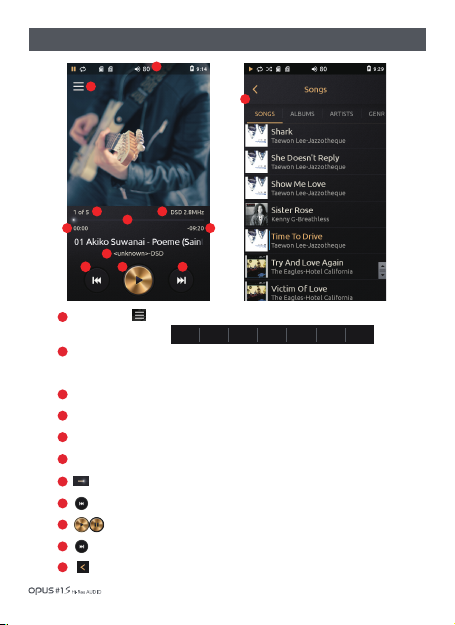
Press the icon [ ] to enter the music library (Songs, Albums, Artists, Genres, Folders,
Favorite, Playlists) menu.
‘Status Bar’ : Device settings and operation display.
Drag ‘Status Bar’ down to enter the Quick settings menu for
Balanced out, line out, Equalizer, Repeat, Shuffle, Sleep settings.
Number of all songs and currently playing song.
File information.
Song progress time.
Song’s remaining time.
Progress bar. Drag the indicator to move to the desired time.
Press to play previous song.
Play or pause the current song.
Press to play next song.
Press the icon or select a desired song from the list to go back to the Playback screen.
| Home screen and playback screen(1)
1
2
3
4
5
6
7
8
9
10
11
1
2
34
4
56
7
9
810
SONGS ALBUMS ARTISTS GENERS FOLDERS FAVORITES PLAYLISTS
11
Using the device / 11

Using the device
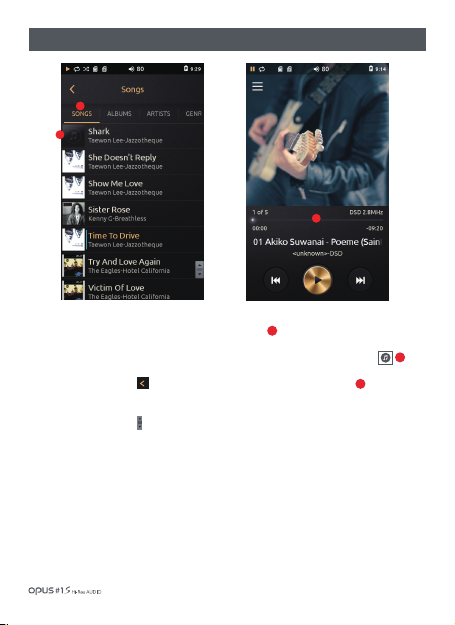
※ Go to File information screen and add a currently playing song to ‘Favorite’.
(Refer to ‘Favorite’ and ‘Playlists’ screen settings.)
| Home screen and playback screen(2)
Click at the File information screen to display lyrics.
Files with no lyrics are displayed as “No Lyrics.”
Drag the album artwork left and right to
skip to next and previous songs.
12
Click at the album artwork to see a file
information
(Genres/Composer/Pathname/File Info).
13
14
Click at the Lyrics to display album artwork again.
Files with no album artwork are displayed with a pre-set random image.
15
12 13
14
15
/ 12
Using the device
1. ‘Songs’ list displays all songs stored in the device by song title, artist name and album name.
Album artwork is displayed at the left side as a thumbnail.
2. If file does not contain an album artwork it will be displayed as a musical note logo.
3. Press the button[ ] or select a desired song from the list to go back to the
Playback screen.
4. Drag ‘Scroll bar’ [ ]up and down to search for a song.
| Music library ‘Songs’ list screen
1
3
2
1
3
2
/ 13
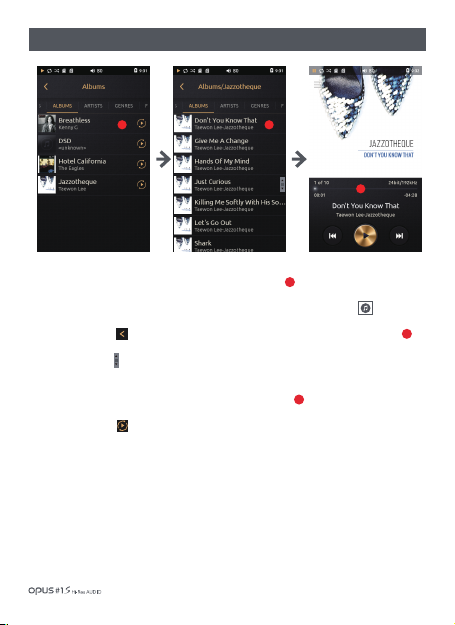
| Music library ‘Albums’ list screen
1.‘Album’ list displays all albums stored in the device by album name.
Album artwork is displayed as a thumbnail on the left side of the screen.
2. If file does not contain an album artwork it will be displayed as a musical note logo.
3. Press the button [ ] or select a desired song from the list to go back to the Playback screen.
4. Drag ‘Scroll bar’ [ ]up and down to search for a song.
5. Click at the album name and all songs in album will be shown by song title, artist name and
album artwork will be displayed at the left side in thumbnail type.
6. Press Play button[ ] located next to album name at the Albums list screen to
play the selected album.
1
2
3
13
2
Using the device / 14
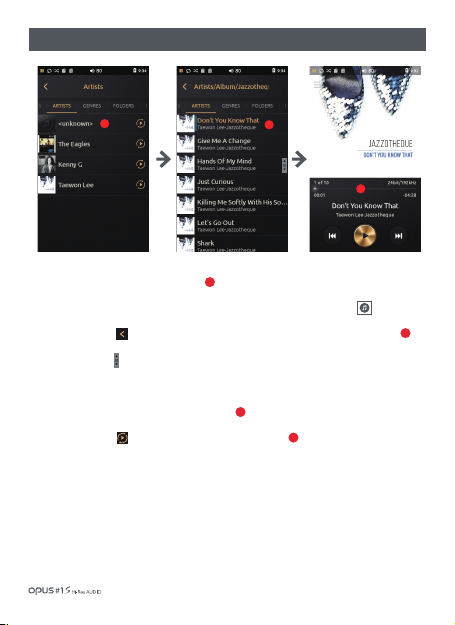
1. ‘‘Artists’ list displays all artists stored in the device by artist name. Album artwork is displayed as
a thumbnail on the left side of the screen.
2. If file does not contain an album artwork it will be displayed as a musical note logo.
3. Press the button [ ] or select a desired song from the list to go back to the Playback screen.
4. Drag ‘Scroll bar’ [ ] up and down to search for a song.
5. Click at the Artist name to show a particular artist’s albums list and songs list.
Tap at the Folder(Artist/Album) name to display the list of all music files in the last folder.
Lists are set in the order Artists > Albums > Songs.
6. Press Play button[ ] to play music in the Folder(Artist/Album).
1
2
2
3
13
2
| Music library ‘Artists’ list screen
Using the device / 15

1. ‘Genres’ list displays all genres stored in the device by genres . Album artwork is displayed as a thumbnail
on the left side of the screen.
2. If file does not contain an album artwork it will be displayed as a musical note logo.
3. Press the button [ ] or select a desired song from the list to go back to the Playback screen.
4. Drag ‘Scroll bar’ [ ] up and down to search for a song.
5. Click at the Genre name to display song title, artist and album information and artwork
will be displayed as a thumbnail on the left side of the screen.
6. Press Play button[ ] to play music in the Folder(Genres).
1
2
2
3
13
2
| Music library ‘Genres’ list screen
Using the device / 16
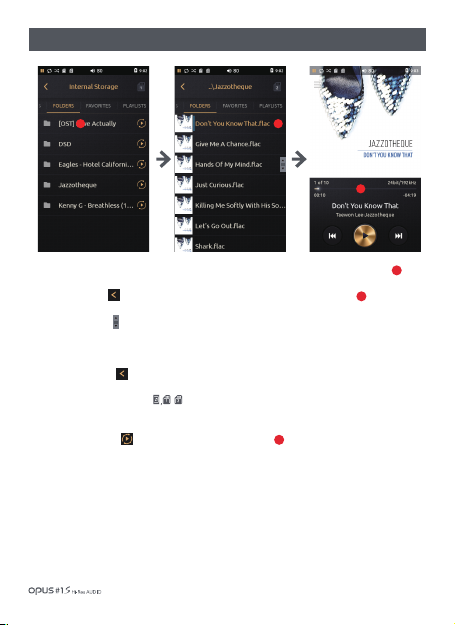
1. ‘Folders’ list is displayed by folder name and file name saved in internal and external memory.
2. Press the button [ ] or select a desired song from the list to go back to the Playback screen.
3. Drag ‘Scroll bar’ [ ] up and down to search for a song.
4. Click at the folder name to show folders and files in sub folder.
5. Press the button [ ] to move to top-level folder from sub folder.
6. Press Memory choice icon [ , ] to change memory storage choice to/
from Internal to/from External memory 1 to/from External memory 2
7. Press Play button [ ] to play music in the selected folder .
1
2
2
1 1
2
| Music library ‘Folders’ list screen
Using the device / 17

Adding a song to ‘Favorites’ playlist
2
1. ‘Favorites’ list is displayed by song title, artist name and album name, added to favorites by a user and
album artwork is displayed as a thumbnail on the left side of the screen.
2. If file does not contain an album artwork it will be displayed as a musical note logo.
3. Drag ‘Scroll bar’ [ ] up and down to search for a song.
4. Press the button [ ] or select a desired song from the list to go back to the Playback screen.
1. Press ‘Album art’ in Playback screen to enter File information screen for ‘Favorites’ adding function.
2. Add current song to ‘Favorites’ playlist by pressing the ‘Star’ icon [ ] in the right upper corner. ‘Star’ icon
of added to ‘Favorites’ song will turn yellow.
1
2
1
3
3
| Music library ‘Favorites’ list screen
Using the device / 18

1. ‘Playlists’ list shows all playlists created by a user.
2. Click one playlist to display all songs with a thumbnail at the left side for each song.
3. Click ‘Menu’ icon [ ] at the ‘Playlists’ screen for (Play all / Delete / Rename) menu to pop up.
4. Press “Play all’ to play music in the playlist.
5. Press “Delete” to remove selected playlist.
6. If you choose ‘Rename’, English keyboard will pop up to enter a new name for the playlist.
(*Only English and numerical key board available.)
1
| Music library ‘Playlists’ list screen
1
3
2
Using the device /Using the device / 19

Creating a playlist
1. Choose icon in File information screen for pop-up window to appear and press “New’ to create playlist.
2. English keyboard will pop up to enter a new name for the playlist.
3. Enter a name for the playlist and then press ‘Save’.
1. Choose icon in File information screen for pop-up window to appear and choose playlist.
Add current song to a playlist.
2. When current song is added to the playlist, message appears.
Adding a song to a playlist
1
2
3
| Music library ‘Playlists’ Creating / Adding Songs
1
3
2
1 song added to playlist 1
Using the device / 20
Table of contents


