TherAdapt TC-250 User manual

Transition Chair-
Secondary
Please read all of the following information before using this product.
TherAdapt®Products Inc. has designed and manufactured this product with the well being of the user
and caregiver(s) in mind. It is our endeavor to provide products which are attractive, comfortable,
useful, highly adjustable, long lasting and safe. As when using any product, precautions must be taken.
THE MANUFACTURER IS NOT RESPONSIBLE FOR INJURIES RESULTING
FROM ANY CUSTOMIZATION OR MODIFICATION OF THE EQUIPMENT THAT
WAS NOT COMPLETED BY THE MANUFACTURER.
USE: The Transition Chair is designed for a single purpose: as a freestanding floor chair. No other use is permitted,
including, but not limited to a seat used for transportation in an automobile, stroller, or any other mobility device.
CARE: Take care to inspect the ongoing condition of all parts of your Transition Chair. Verify that all knobs, bolts, and
washers are properly positioned and secure. Contact the manufacturer for replacement or repair of necessary items. All
components may be cleaned with mild soap and water, or a gentle sanitizing spray. Do not use abrasive cleaners. Wipe
components dry after cleaning. Always store indoors.
PLEASE COMPLETE AND RETAIN FOR YOUR RECORDS
Transition Chair TC-250 Serial Number: ________________
Purchase date: __________________
WARNING: This product must onl
y
be used under the
recommendation of a ph
y
sician and / or licensed therapist and with
adult supervision. Never leave user unattended. It is
y
our
responsibilit
y
to properl
y
use and maintain
y
our Transition Chair.
Failure to follow USE and CARE instructions or ASSEMBLE the
chair properly as outlined may result in bodily injury.
TherAdapt®Products Inc.
(800) 261-4919 phone (866) 892-2478 fax
www.theradapt.com
WARRANTY: The manufacturer provides a full one (1)
y
ear warrant
y
, be
g
innin
g
the date
shipped b
y
the manufacturer. The warrant
y
provides full replacement of all parts a
g
ainst
breaka
g
e when used in compliance with the manufacturer’s USE and CARE instructions. Use
or modification be
y
ond the normal capacit
y
or ran
g
e of adaptabilit
y
desi
g
ned into the products
will void the warranty. The foregoing is TherAdapt’s sole liability for consequential damages.
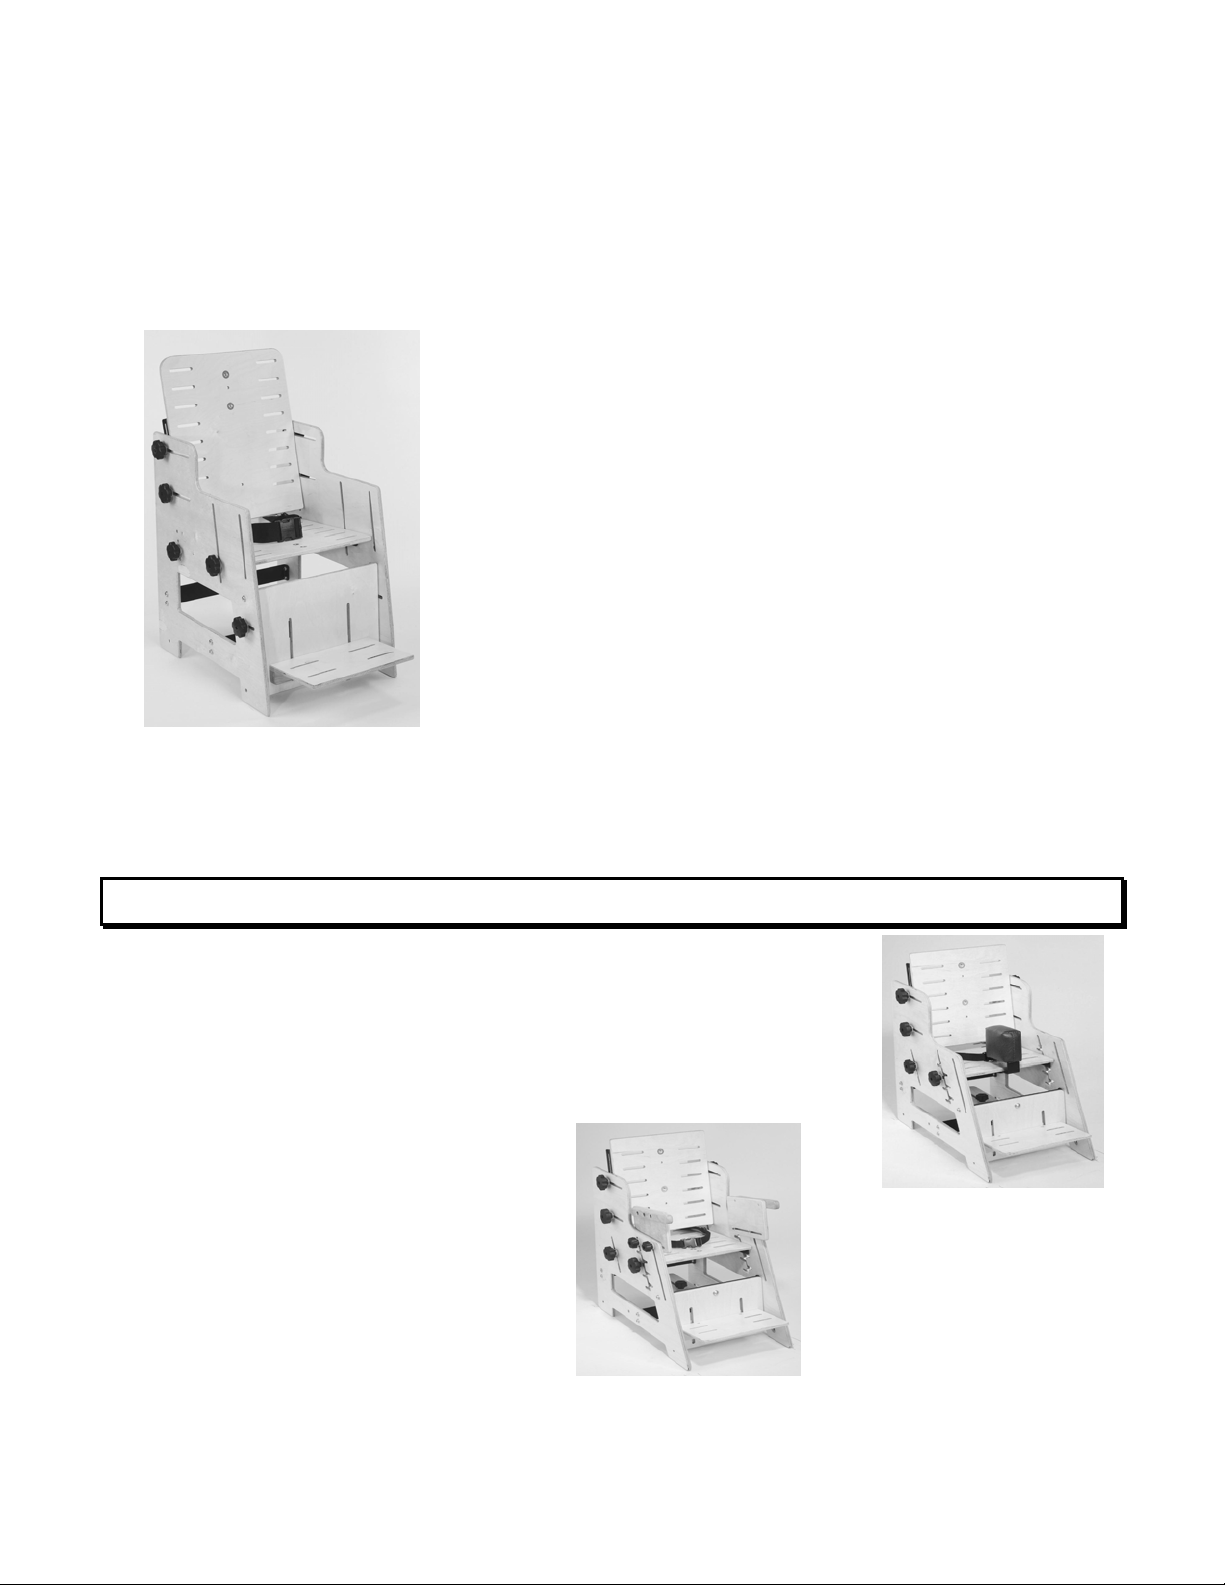
TherAdaptTransition Chair (TC-250) Instructions
Packing List: Hardware Package:
(2) Sides (10) ¼ x 1” Phillips head bolts
(1) Seat (2 black brackets & 2” lap belt attached) (10) ¼” metal washers
(1) Back (2 black brackets attached) (12) 1” white nylon washers
(1) Calf rest (2 black brackets attached) (10) ¼” locknuts
(1) Footrest (10) Knob with 5/16” thread insert
(2) Black metal chair supports (2) Knobs with 5/16 x 1 ½” stud
(10) 5/16 x 1” carriage bolts
Tools needed:
#3 Phillips head screwdriver
7/16” wrench
½” wrench
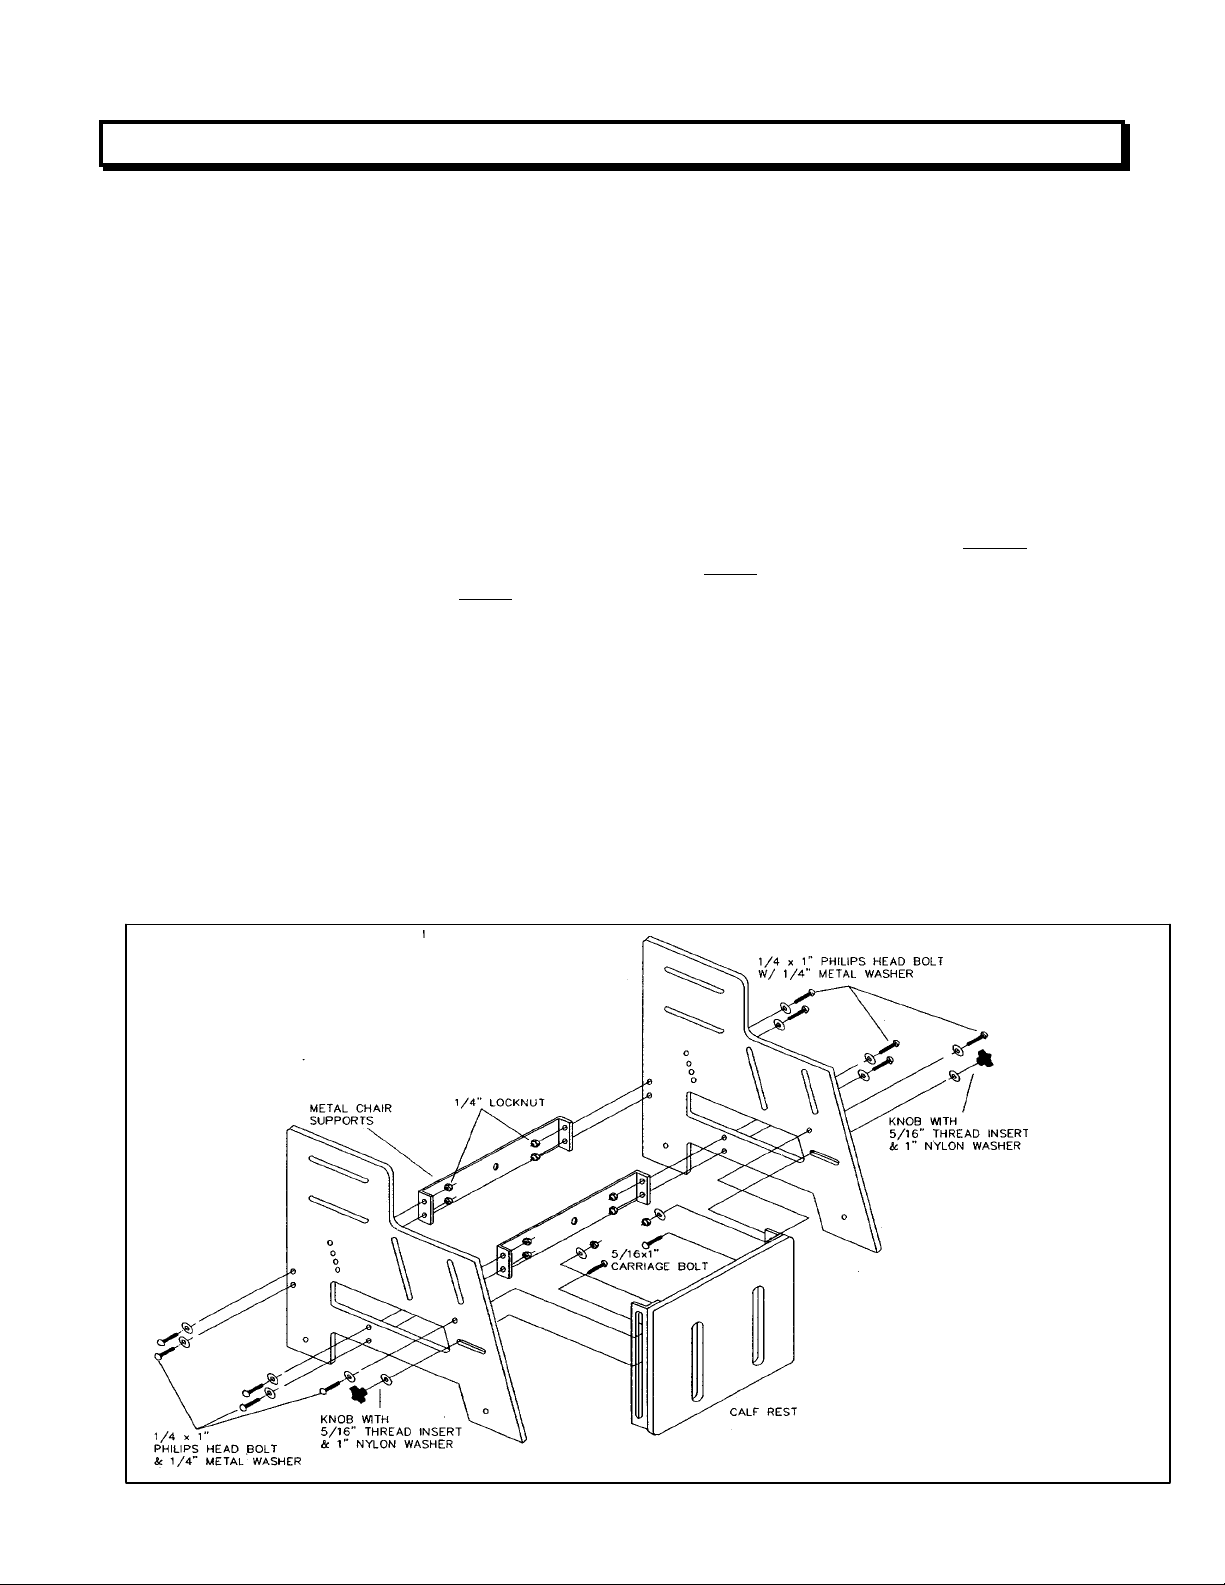
1. Attach metal chair supports to sides (See Figure 1):
Note: Find the clear TherAdapt®sticker (with the website address) – this must be to the outside of the
chair. Find the silver serial number sticker – this needs to be to the inside of the chair. Alternately, the flanged
(wide) part of the T-nuts must be to the inside of the chair (on both sides). Place the two black metal chair
supports between the two chair sides as shown in Figure 1.Notice that at the end of each support are fins with
two holes drilled. Position the supports with the fins facing the front of the chair.
Attach the 2 supports to one side of the chair as follows:
Slide a ¼” metal washer onto each of the 1” Phillips head bolts. Push the 1” Phillips head bolt
with washer into the 4 pre-drilled holes into one side of the chair.
As directed in the note above, place the fins of each support over the protruding 1” bolts. Attach
and hand-tighten the ¼” locknuts.
With a Phillips head screwdriver and a 7/16” wrench tighten the four locknuts.
Position the 2nd side of the chair to mirror the 1st side. Align the holes in the side with the
supports, and push through the 4 remaining 1” bolts with ¼” metal washers.
Attach and hand-tighten the four remaining ¼” locknuts. Securely tighten the locknuts with the
screwdriver and wrench.
Figure 1.
2. Attach calf-rest to chair:
Position the calf-rest between the 2 chair sides with the metal brackets facing the rear of the chair as
shown in Figure 1. Note that the vertical slots in the calf-rest should be closer to the bottom of the calf-rest than
the top. Insert a 1” Phillips head bolt with ¼” metal washer through the hole in the side of the chair (see Figure 1)
and then through the calf-rest bracket. Secure the bolt with a ¼” metal washer and a ¼” locknut. Repeat this
procedure for the other side of the calf-rest.
From the back of the calf-rest insert a 5/16 x 1” carriage bolt through the calf-rest bracket and then
through the small horizontal slot in the chair side (see Figure 1). Secure the bolt with a 1” white nylon washer
and a knob with 5/16” threaded insert. Repeat this procedure for the other side of the calf-rest. Be sure that all
bolts are secure, however, when the knobs are loosened the calf-rest should be able to pivot on the Phillips head
bolts. This allows angle adjustment of the calf-rest assembly.
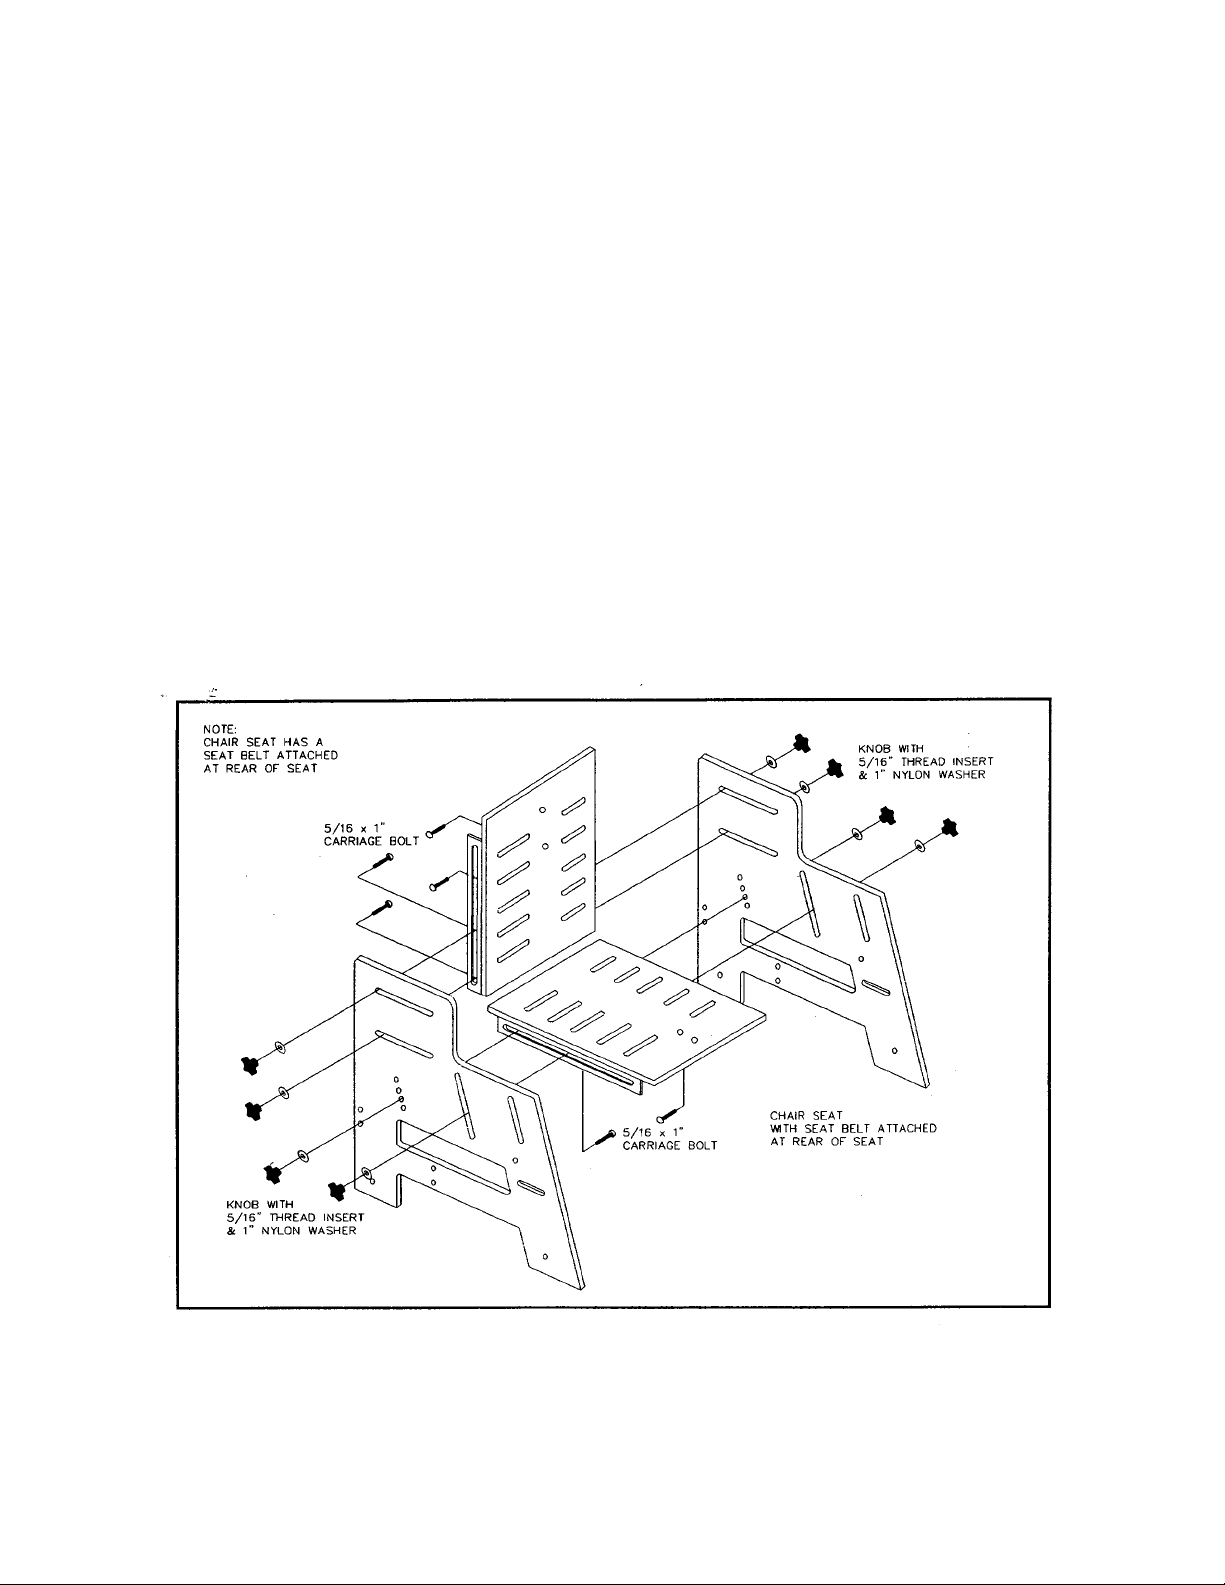
3. Attach seat to sides (See Figure 2):
Position the seat (with seat belt assembly attached) in between the two sides of the chair. Make sure the
seat belt assembly is at the rear of the chair, and rests on top of the seat. Align the black brackets with the long
slot and rear holes on one side of the chair. Important note: do not align the seat brackets with the slot at the
front of the chair. Under the seat push a 5/16” carriage bolt through the seat bracket and through one of the rear
holes on the side of the chair. While holding the carriage bolt in place, attach a 1” white nylon washer and 5/16”
threaded knob over the protruding carriage bolt on the outside of the chair. Leave the knob loose, only to hold the
seat in place. On the same side, attach a carriage bolt through the seat bracket and long slot on the chair. Apply a
nylon washer and knob, leaving it loose. Repeat this process for attaching the seat to the other side. Once all four
knobs are in place, tighten them securely.
FOR PROFESSIONAL ASSISTANCE CALL 1-800-261-4919
TherAdapt®Transition Chair –Early Childhood(TC-150) – Instructions: Page 2 of 7
Figure 2
4. Attach back to sides:
Position the back in between the two sides of the chair. Make sure the black back brackets face the rear
of the chair, and are positioned down toward the seat (flush with the bottom of the back). Align the black
brackets with the upper horizontal slots on each side of the chair. At the rear of the back push a 5/16” carriage
bolt through the back bracket and through the top slot of one side of the chair. While holding the carriage bolt in
place, attach a 1” white nylon washer and a 5/16” threaded knob over the protruding carriage bolt on the outside
of the chair. Leave the knob loose, only to hold the back in place. On the same side, attach a carriage bolt
through the back bracket and lower side slot. Apply a nylon washer and knob, leaving it loose. Repeat this
process for attaching the back to the other side. Once all four knobs are in place, tighten them securely.
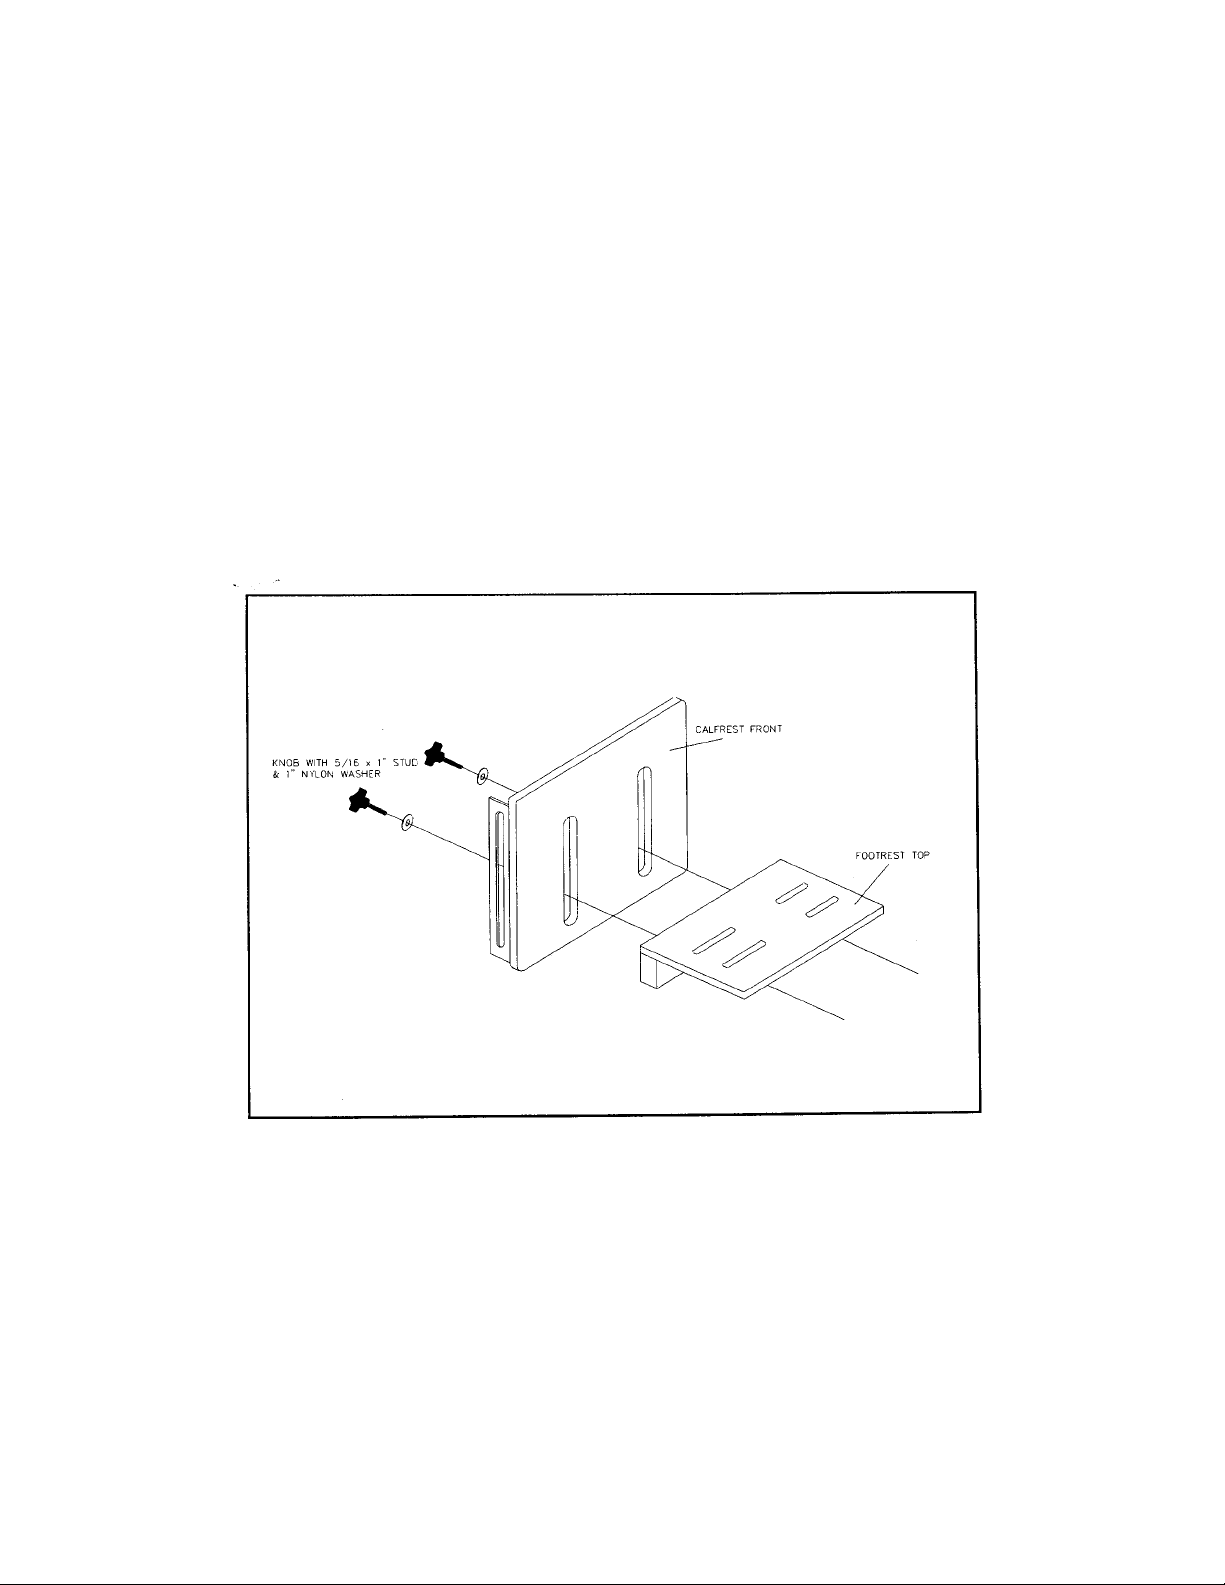
5. Attach footrest to calf-rest (See Figure 3):
Place a 1” white nylon washer over both 1 ½” knobs. From the back of the calf-rest insert one 1 ½” knob
through the left slot on the calf rest. With the wooden support of the footrest facing downward, align the left T-
nut with the knob protruding through the calf-rest. Tighten the knob only to be held in place. Push the other 1 ½”
knob through the right slot of the calf rest and tighten into the right T-nut of the footrest. Tighten both knobs
securely.
Once the chair is assembled it should be adjusted to fit the user properly.
1. Adjust the seat height and angle.
A. To adjust the seat height, loosen the (4) large knobs that secure the seat to the side. Raise
or lower the seat so that the end of the thigh is resting securely on the front edge of the seat.
B. To position the pelvis, the seat can be angled by moving the front of the seat in the front
slots on the side frame or the rear of the seat in the rear slots.
Once the desired depth and angle are achieved, tighten all knobs securely.
FOR PROFESSIONAL ASSISTANCE CALL 1-800-261-4919
TherAdapt®Transition Chair –Early Childhood (TC-150) – Instructions: Page 3 of 7
Figure 3.
2. Adjust the seat depth and back angle.
Note: The back support can be secured in a number of positions on the side of the chair. If a short seat depth
is required, position the back support toward the front of the chair. If a longer seat depth is needed, place the
bolts toward the rear of the chair. The seat should be 1 ½ “ – 2” behind the bend of the knee with the user
sitting on the seat, bending forward to get the hips to the back of the chair.
To adjust the back angle, move the top of the back support back from vertical until the desired angle is
achieved. Tighten the knobs securely.
3. Adjust the pelvic positioning belt.
The 1” adjustable pelvic belt with side release buckle should be positioned
in the notch created by the bend of the lap between the thigh and the pelvis,
and tightened snugly. Note: The double slotted rings on each side of the
pelvic strap have the loose ends of the strap threaded back through. This
prevents the strap from slipping, makes the belt completely adjustable and
allows the belt to snap closed at any location.
4. Adjust the footrest height and angle.
a. To adjust the footrest height, loosen the (2) knobs that secure the
footrest to the calf-rest. Raise or lower the footrest so that the
end of the thigh is resting securely on the front edge of the seat.
Tighten knobs securely before use.
b. To adjust the footrest angle, loosen the knobs through the small
horizontal slots in the chair sides (see photo). Slide the calf-rest
forward or backward in the slots to change the calf-
rest/footrest angle and tighten knobs securely.
Attach chair Options purchased and follow instructions.
Note: Placement of options may affect previous adjustments. Re-assess steps 1 – 4 for a proper fit.
TherAdaptTransition Chair – Secondary - Options - Instructions
1. Attach the Abduction Pommel. (TC-250AB)
Packing List:
(1) Padded pommel with metal “L” bracket
(2) Knobs with ¼ - 20 threaded bolts
Place the pommel on the padded seat pad with the metal bracket against the
bottom side of the seat. Secure with (2) knobs with bolts into the (2) pre-
installed ¼ - 20 threaded T-nuts on the seat.
2. Attach the Armrests (TC-250AR)
Packing List:
(2) Armrests
(4) 5/16 – 18 x 1 ¾” carriage bolts
(4) Nylon washers
(4) Thru-knobs with 5/16-18 threaded inserts
Note: There is a right and a left armrest. They are
placed on the inside of the chair sides with the top of the armrest towards the outside of the chair.
FOR PROFESSIONAL ASSISTANCE CALL 1-800-261-4919
TherAdapt®Transition Chair –Early Childhood(TC-150) – Instructions: Page 4 of 7
Table of contents
Other TherAdapt Indoor Furnishing manuals


Popular Indoor Furnishing manuals by other brands

Regency
Regency LWMS3015 Assembly instructions

Furniture of America
Furniture of America CM7751C Assembly instructions

Safavieh Furniture
Safavieh Furniture Estella CNS5731 manual

PLACES OF STYLE
PLACES OF STYLE Ovalfuss Assembly instruction

Trasman
Trasman 1138 Bo1 Assembly manual

Costway
Costway JV10856 manual


