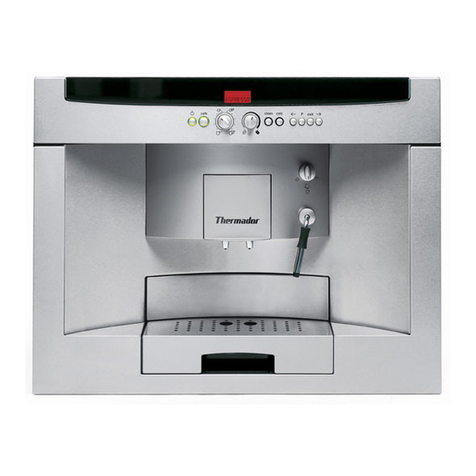
Thermador TCM24TS User manual

USE AND
CARE
GUIDE
USE AND
CARE
GUIDE
BUILT-IN COFFEE MACHINE
TCM24TS

110°
110°
92°
№ 00636455
92°
155°
110°155°
A
c
d
e f g hb
i
a
Included in delivery (see page 6)
Contenu de l’emballage (voir page 41)
Lista de partes incluidas (véase la página 78)
en English 2
fr Français 36
es Español 73

B
C
1
1a 22
1b
2
3
22c
22b
22a
4
4a

17a
17a
17b
E-Nr. ………..............
FD……......................
20
5a
5b
5c
5d
22
6
5
10 1311
18 14 21
9
9a
12
8
8a
7a
7b
7
7c
7d
19
19a
17

E
16
15a
1.
2.
14
15 15b
2.
1.

2
en
Important Safety Precautions ���������������������4
Included in delivery�������������������������������������6
Overview�����������������������������������������������������7
Controls ������������������������������������������������������8
Initial use ����������������������������������������������������8
Display������������������������������������������������������10
Preparing drinks ���������������������������������������10
����������������13
Preparation using milk������������������������������13
��������������14
Dispensing hot water��������������������������������15
Personalized drinks ����������������������������������15
Two cups at once��������������������������������������16
Adjusting the grind setting ������������������������16
Panel lock�������������������������������������������������17
Menu���������������������������������������������������������17
Home Connect������������������������������������������19
Care and daily cleaning����������������������������23
Service programs �������������������������������������26
Tips on energy saving ������������������������������29
Frost protection�����������������������������������������29
Storing accessories ����������������������������������29
Accessories ����������������������������������������������29
Disposal����������������������������������������������������29
����������������������������30
�����������������������������30
Warranty ���������������������������������������������������34
Contents
BSH Home Appliances Corporation
1901 Main Street, Suite 600
Irvine, CA 92614
Questions?
1-800-944-2904
www.thermador.com
We look forward to hearing from you�

3
en
How to use these instructions
You can open up the front cover of this
illustrations of the appliance with each part
to throughout the text�
These instructions also show display texts
This
you to clearly see where we refer to texts
the appliance�
Display indicators: “Latte Macchiato”
Latte Macchiato
6 oz (medium)normal
Buttons and controls on the display:
C
The appliance comes with a quick
most important functions at a glance� It can
appliance�
Pay special attention to the important
safety instructions in the “Important
Safety Precautions” section.
Safety Denitions
¡ WARNING
This indicates that death or serious injuries
this warning�
¡ CAUTION
This indicates that minor or moderate
injuries may occur as a result of
NOTICE:
This indicates that damage to the appliance
or property may occur as a result of
non-compliance with this advisory�
Note:
This alerts you to important information
and/or tips�

4
en Important Safety Precautions
When using electrical appliances, basic
safety precautions should always be
followed, including the following:
1� Please read and follow the operating
instructions carefully and keep them for
later reference� If the unit is transferred
include these instructions�
2� Check the appliance after unpacking it�
Do not connect the appliance if it has
3� Do not touch hot surfaces� Use handles
4� Be sure that all components are
5�
and injury to persons, do not immerse
other liquid� See Use and Care Guide
for cleaning�
6� Close supervision is necessary when the
7� Unplug from outlet when not in use and
cleaning the appliance�
8� Do not operate any appliance with
a damaged cord or plug or after it
any manner� Return appliance to the
nearest authorized service facility�
9� The use of accessories attachments
shock or injury to persons�
10� Do not use outdoors or in a damp area�
11�
or countertop, or touch hot surfaces�
12� Do not place unit or components on or
near a cooktop or range, or in a heated
oven�
13�
14� If water is leaking from the inlet hose,
connecting or working on the water pipe,
disconnect the appliance from the mains
power supply�
15�
then plug cord into the wall outlet� To
remove plug from wall outlet�
16� Do not use appliance for anything other
than its intended use�
17� Save these instructions�
18� Please note the special information on
cleaning in the instructions�
State of California
Proposition 65 Warnings
¡ WARNING
This product can expose you to chemicals
including vinyl chloride, which is known to
the State of California to cause cancer and
For more information go to
www.P65Warnings.ca.gov�
IMPORTANT!
This appliance is designed for
domestic and not commercial use.
Use indoors at room temperature only�
Do not use at more than 6560 feet /
Supervise children to ensure that they do
not play with the appliance�
A IMPORTANT SAFETY PRECAUTIONS
READ AND SAVE THESE INSTRUCTIONS

5
en
Important Safety Precautions
¡ WARNING
To reduce risk of re and electric shock:
Installation
Connect and operate the appliance only
according to the rating plate
Use appliance only with transformer
Do not connect the appliance to or
remote control socket� The unit must not
and appliance show no signs of damage�
disconnect from the power immediately�
Never immerse the appliance or power
Avoid spillage
on the connector�
Grounding
a power supply with 120 Volt AC via a
correctly installed receptacle with ground�
Repairs
To avoid potential hazards, repairs must
authorized service
personnel�
If the power cord of this appliance is
original replacement power cord, which
Service Department�
¡ CAUTION
To avoid the risk of scalding:
hot when dispensed�
Do not use chemically softened water!
¡ CAUTION
Risk of scalding (Home Connect)!
If an unattended remote start takes place,
dispensing� You should therefore make
sure that with an unattended remote start
that there is no risk to other people, in
particular not to children, or to property�
To avoid the risk of suocation:
Do not allow children to play with pack-
aging material� Store small parts safely as
To avoid the risk of injury:
children� Keep children away from the
Do not reach into the grinding unit� Be
closing the door� A misuse of the appliance
can potentially lead to injury�
To avoid the risk of burns:
touching� After use, the heating element
surfaces and warming plate can retain
Leave to cool a little as necessary�
To avoid the risk of inuence electronic
implants:
The appliance contains permanent
implants such as pacemakers or insulin
pumps�
Persons wearing electronic
implants must maintain a minimum
distance of
4
(10 cm) from the front of the
appliance and from the following parts
upon removal: milk container, milk
A IMPORTANT SAFETY PRECAUTIONS
READ AND SAVE THESE INSTRUCTIONS

6
en Included in delivery
Included in delivery
(Figure A on the fold-out pages)
a
b Instruction manual
c Quick reference guide
d
e Measuring spoon
f Water hardness testing strip
g
h Milk container
i Suction pipe
Congratulations ...
machine! You have now acquired a high-
quality and modern kitchen appliance� It
range of functions and is easy to use� It will
hot drinks quickly and simply – whether
you’re in the mood for an invigorating
espresso, a creamy cappuccino, a smooth
-
for adapting it to your individual taste�
To ensure that you can use this fully
-
recommend you familiarize yourself with
its components, functions, displays and
controls� These instructions are designed
to help you� So please take the time to read

7
en
Overview
Overview
(Figures B to Eon the fold-out pages)
1 Appliance door
a) Recessed grip (for opening the door)
b) Drip tray
2 Display
3 Control panel
4
a) Cover
5 Milk system
a) Snap lever
b) Beverage outlet
(upper part, lower part)
c)
d) Connecting element, metal
(for magnet holder)
6 Power switch J(power supply)
7 Accessory drawer
(for quick reference guide and
accessories)
a) Quick reference guide
b) Measuring spoon
c) Water hardness strip
d)
8
a) Lid for water tank
9
a)
10 Slide regulator for grinding degree
setting
11 Magnet holder (for connecting element)
12
13
14
15 Brewing unit
a) Locking mechanism
b) Cover
16 Eject lever
17
a) Drip tray cover
b)
18 Collecting tray
19 Holder (for suction pipe)
a) Suction pipe
20
21 Shelf with sensor (for milk container)
22 Milk container
a) Stainless steel container
b) Lower part of the lid
c) Upper part of the lid
Note:
such as how to change the opening angle
Installation
Instructions�

8
en Controls
Controls
The appliance features user-friendly menu
navigation to ensure that operation is as
with just a few operating steps�
Power switch J
The power switch J(with the door
open) is used to switch on the appliance or
interrupted)�
NOTICE:
Do not press the power switch while the
appliance is in use� Switch off the appli-
ance only when it is in energy saving mode,
so that it can rinse automatically�
Control panel (touch eld)
I
Press Ito switch on the
appliance or put it into energy saving mode�
The appliance is rinsed automatically�
The appliance does not rinse:
if it is still warm when switched on, or
The appliance is ready for use as soon as
on the display�
A
Press Ato go to menu� Settings
information� It can also connect the
appliance to Home Connect�
E
Press Eto view the selection of
service programs� Then select the desired
G
Press Gafter selecting a drink to
prepare two cups simultaneously (see the
B
Press Bto open the selection
C
Press Cto prepare a
Note:
If you press Cagain while
Arrow navigation button
Press the arrows to navigate the display or
to change the parameters�
Display
The display shows drinks, settings and
Initial use
General
Fill the appropriate container using only
pure, cold
roasted
treated with other additives containing
¡ WARNING
connected according to the enclosed
Setting up the appliance
NOTICE:
Only use the appliance in a frost-free

9
en
Initial use
recessed grip and open�
Replace the water tank and click into
place�
Set the power switch to Iand
close the appliance door�
The appliance heats up and is rinsed�
The display is activated�
“Set the language you require” appears�
Press the M
“English”
With the L
desired language�
Press the N
“Language”
Select the “Water hardness” with the L
Note:
It is important to set the water hardness
-
rately indicate when the descaling program
is level 4� If a water softener is installed in
the house, please set the water hardness to
level 3� You can also check the water hard-
Use the enclosed test strip to determine
strip in water and check the result after
one minute�
Level Water hardness
g/gal (US)
1
2
3
4
1�0426 - 7�2985
8�3412 - 14�597
15�64 - 21�896
22�938 - 31�279
L“Water
hardness”
Press the M
“4 (very hard)”
Select “Home Connect”with the touch
L�
To now connect the appliance to the Wi-Fi
network (home network), press the touch
M�
To connect the appliance to a Wi-Fi
L�
“Complete set-up” appears�
M� The settings
for Language and Water hardness are
saved�
F When selecting [ Home Connect]
please read the detailed description
The appliance is ready to use when the
The integrated fan switches on each time
after a few minutes�
Note:
When the appliance is used for the first
time after running a service program, or if
aroma�
Switch o appliance
Press the I
The appliance rinses and switches to
energy saving mode�
Exception: If only hot water is dispensed,
open the appliance door and set the
power switch to h�
NOTICE:
Do not press the power switch while the
appliance is in use�

10
en Display
Note:
The factory settings of the fully automatic
coffee machine are programmed for
optimal performance� The appliance
switches automatically to the energy saving
Note:
The appliance is equipped with a sensor�
correspondingly shown on the display
when switching to the energy saving mode�
If there is milk in the container, please store
in the fridge�
Display
Display
The display shows the drinks, settings and
the appliance’s operating status�
Examples:
Drink selection
Ristretto
1oz (medium)normal
Information
Information disappears after pressing the
Bean container almost empty
a
The information remains, however at the top
a
Bean container almost empty
b
Water tank almost empty
c
Replace water filter
d
Cleaning program necessary
e
Descaling program necessary
f
Clean & Descale program necessary
Prompts to take action
Fill bean container
a
Note:
If the action required was carried out,
disappear�
Preparing drinks
sealed containers�
Note:
water� This applies particularly to small
thick-walled espresso cups�
NOTICE:
cold water every day� The tank should
always contain sufficient water for
operating the appliance�
Note:
For some settings, coffee is prepared
in two stages (see the section
completely finished�

11
en
Preparing drinks
Beverage selection
Press the Kor L
appear in the middle� The name of the drink
and the values currently set, e�g� for the
lower row�
Ristretto
1oz (medium)normal
The following drinks can be selected:
Ristretto
Espresso
Espresso Macchiato
Coffee
Cappuccino
Latte Macchiato
Caffe Latte
Milk froth
Warm milk
Hot water
individual taste�
Note:
If the appliance is connected to Home
app is shown in the display and can also
appliance�
Drink adjustment
By pressing the M
on the drink�
An example:
changed as follows:
Select “Coffee” with the Kor Larrow
Coffee
4oz (medium)normal
Press the M
“mild” for the
Coffee
normal
4 oz (medium)
Temperature normal
“strong” with the Kor L
Press the M
Coffee
strong
4 oz (medium)
Temperature normal
“5oz (large)” with the Kor Larrow
Press the M
Coffee
strong
5 oz (large)
Temperature normal

12
en Preparing drinks
Set the desired temperature, e�g�
“Temperature high” with the Kor L
Coffee
strong
5 oz (large)
Temperature high
press the N
drink with C� The settings
are saved�
Note:
There are different setting options
depending on the type of drink� For coffee
drinks, for example, the strength, tempera-
the volume�
The following settings are possible:
Coee strength
mild
normal
strong
very strong
DoubleShot
DoubleShot +
DoubleShot ++
Note:
Aroma Double Shot
The longer the
scents are released�
Note:
When the 12 oz (360 ml) or 16 oz (480 ml)
function is not �
Note:
and when ground coffee is used�
Volume
“oz” or “ml” incre-
ments� The factory setting is in “oz” and can
“ml”, see chapter “Menu -
Note:
The volume dispensed can fluctuate
depending on the quality of the milk�
Drinks temperature
Temperature normal
Temperature high
Temperature very high
Values for hot water:
The factory setting is in “°F”
converted to “°C”, see chapter “Menu -
160°F (70 °C) White tea
180°F (80 °C) Green tea
200°F (90 °C) Black tea
Max Fruit tea
Note:
If no controls are activated for approx�
30 seconds, the appliance will automati-
cally exit the settings mode� The settings

13
en
Preparation using
coee beans
outlet�
Select “Ristretto”, “Espresso” or “Coffee”
with the Kor L
The display shows the selected drink along
with the preset values for the strength of the
Coffee
5oz (large)very strong
Note:
Press Cto start
dispensing�
into the cup�
Press Cagain to prematurely
halt dispensing�
Preparation using milk
milk froth and warm milk�
¡ CAUTION
Risk of burns!
touch it�
Milk container
designed to use together with this fully auto-
for use in the household, and for storing
milk in the refrigerator�
NOTICE:
the door to prevent them from falling�
Connecting the milk container or a milk
carton:
Open the appliance door�
towards the front�
connecting elements as illustrated�
Attach the suction pipe and insert into the
milk container�
Close the appliance door�
Note:
Dried milk residues are difficult to remove,
therefore always clean immediately after
use (see the section “Cleaning the milk

14
en
Coee drinks with milk
Place a cup or glass underneath the
Select “Espresso Macchiato”, “Cappuccino”,
“Latte Macchiato” or “Caffe Latte” with the
Kor L
The display shows the selected drink along
with the preset values for the strength of the
Note:
Press Cto start
dispensing�
The milk is dispensed into the cup or glass
into the cup or glass�
Cagain to stop
the current step of the process prematurely�
Milk froth or warm milk
Place a cup or glass underneath the
Select “Milk froth” or “Warm milk” with the
Kor L
Note:
Press Cto start
dispensing�
Milk froth or warm milk is dispensed from
Cagain to stop
the current step of the process prematurely�
Preparation using
ground coee
Note:
When using ground coffee, the setting
for the strength of the coffee, dispensing
two cups at once and dispensing larger
volumes (12 oz/360 ml or 16 oz/480 ml)
“Beverage
quantity not possible with ground coffee”
appears, please select a volume smaller
than 12 oz/360 ml�
NOTICE:
the door to prevent them from falling�
Open the appliance door�
NOTICE:
Close the appliance door� The display
shows “Ground coffee”
strength�
Note:
If coffee is not dispensed within
automatically to avoid an overflow� The
appliance is then rinsed�
outlet�
milk with the Kor L
The display shows the selected drink along
with the preset values for this drink�
Note:
Note:
the instructions in the section “Preparation
Press Cto start
dispensing�
Note:
For another drink with ground coffee,
repeat the procedure�

15
en
Dispensing hot water
¡ CAUTION
Risk of burns!
touch it�
container�
the outlet�
Place a cup or glass underneath the
Select “Hot water” with the Kor L
Note:
Press Cto start
dispensing�
The message appears “Milk tube removed
from milk container?”�
and press the M
Press Cagain to prematurely
halt the dispensing process�
Personalized drinks
Press Bto open the selection
for personalized drinks�
your favourite drinks that are frequently
dispensed here with all their settings�
Note:
Press Bto exit the menu
without saving at any time�
Entering or changing drinks
Press B�
The selection of memory locations appears�
Favorites 1
Create
Use the Kor L
select an empty memory location [for a
new entry, change an occupied memory
location, or to delete a favourite drink�
Select “Create” at an empty memory
location or “Change” at an occupied
memory location�
Press the M
Note:
If “Delete”is selected, the settings for the
memory location are deleted and it is again
empty�
The menu for adjusting the drinks opens�
The last drink dispensed is shown with the
last settings selected�
If you do not wish to save last drink
dispensed, select another drink with the
Kor L
the Mor N
Adjust the values to your own wishes with
the Kor L
on the drink selected�
Note:
For milk drinks, the mixing ratio of coffee
individual name� Select “Save name”�
The display for entering the name opens�
Choose character
Delete
STUVWXYZABCDEFGHIJ
A

16
en Two cups at once
With Nexit the entry without any
change� The drink selection menu
appears�
row with the Kor L
Press M
To delete select Kand press M�
Press Nto accept the entry� The
selection menu opens�
Press B to exit the menu�
Select a personalized drink and dispense
Press B� The selection of
memory locations opens�
Select the desired memory location with
the Kor L
Place a cup or glass underneath the
Press Cto start
dispensing�
Two cups at once
Press Gto prepare two cups of the
selected drink simultaneously� The setting is
e�g� “2x Espresso”�
Select the desired drink with the Kor
L
Press G�
Place two cups left and right underneath
Press Cto start
dispensing�
The selected drink is prepared and then
Note:
The drink is prepared in two stages (two
grinding operations)�
Please wait until the process is completely
finished, to remove the cup�
Note:
When the 12 oz (360 ml) or 16 oz (480 ml)
dispense two cups at once�
Note:
Adjusting the grind setting
changed�
Open the appliance door�
Slide the regulator to select the grinding
VW�
Close the appliance door�
Note:
Note:
Make only small changes to the grinding
degree setting�
Note:
until after the second cup of coffee�
Note:
If the display shows the message “Select
a coarser degree of grinding”, this means
Adjust the grinding level to a coarser
setting�
Other manuals for TCM24TS
1
Table of contents
Languages:
Other Thermador Coffee Maker manuals

Thermador
Thermador TCM24PS User manual

Thermador
Thermador SAVOR BICM24CS User manual

Thermador
Thermador TCM24RS Service manual

Thermador
Thermador SAVOR BICM24CS User manual

Thermador
Thermador TCMTK30RS User manual

Thermador
Thermador SAVOR BICM24CS Manual

Thermador
Thermador SAVOR BICM24CS User manual

Thermador
Thermador TCM24RS User manual

Thermador
Thermador TCM24RS User manual

Thermador
Thermador TCM24TS User manual