Thermasol Steam Suite User manual

Steam Suite Spa Package
Installation Operation Manual
thermasol.com/solutions
BY THERMASOL
2Tools and Materials
PLEASE REVIEW WARNINGS BELOW AND LEAVE THIS MANUAL WITH HOMEOWNER
DO NOT USE THIS PRODUCT UNLESS YOU HAVE CONSULTED WITH YOUR DOCTOR AND RECEIVED WRITTEN PERMISSION TO DO SO. USE OF THIS
PRODUCT MAY BE HAZARDOUS TO YOUR HEALTH.
PLEASE CONSULT YOUR PHYSICIAN BEFORE USING. IF YOU ARE PREGNANT, ELDERLY, HAVE HIGH BLOOD PRESSURE, DIABETES, SUFFER FROM
HEART DISEASE, AND INTOXICATED, OR NOT IN GOOD HEALTH, DO NOT USE THIS STEAM BATH.
STEAM IS HOT! DO NOT TOUCH OR GO NEAR THE STEAMHEAD FROM THE TIME THE UNIT IS “ON”, UP TO ONE HOUR AFTER IT HAS SHUT OFF.
SEVERE BURNS WILL OCCUR IF YOU COME IN CONTACT WITH THE STEAMHEAD OR STEAM EMITTING FROM THE STEAMHEAD.
NEVER ATTEMPT TO FILL AROMA RESERVOIR ON THE STEAMHEAD WHEN UNIT IS IN THE ON POSITION. SEVERE BURNS WILL OCCUR.
DO NOT USE THERMASOL AROMATHERAPY OILS OR SKIN CARE PRODUCTS OR ANY PRODUCT ASSOCIATED WITH YOUR THERMASOL UNIT WITHOUT
CONSULTING WITH YOUR ALLERGIST OR DOCTOR BEFORE USE. THESE PRODUCTS MAY BE HAZARDOUS TO YOUR HEALTH.
DO NOT USE STEAM ROOM WHILE UNDER THE INFLUENCE OF ALCOHOL OR DRUGS, AS THIS CAN BE HAZARDOUS TO YOUR HEALTH.
YOUR SHOWER MAY BE A SLIP-AND-FALL HAZARD. CHECK WITH YOUR CONTRACTOR OR FLOORING MANUFACTURER REGARDING THE SAFE USE
OF YOUR FLOORING IN A STEAM APPLICATION. SLIPPING AND FALLING INTO THE STEAMHEAD ITSELF OR INTO THE STREAM EMITTING FROM THE
STEAMHEAD WILL CAUSE SERIOUS BURNS OR PHYSICAL INJURY.
IF YOU ARE FEELING UNCOMFORTABLE, DIZZY, FAINT, OR STARTING TO FALL ASLEEP IMMEDIATELY EXIT THE STEAM ROOM.
DO NOT USE STEAM ROOM IF YOU ARE UNDER THE AGE OF 16 UNLESS SUPERVISED BY AN ADULT.
THERMASOL STEAM BATH GENERATORS ARE NOT DESIGNED TO BE USED FOR SPACE HEATING PURPOSES.
THERMASOL STEAM BATH GENERATORS ARE FOR INDOOR USE ONLY. THEY SHOULD NEVER BE LOCATED OUTSIDE THE HOME.
All products must be installed in accordance with installation instructions provided. Failure to do so may invalidate warranty at manufacturer’s discretion.
©2018 ThermaSol.
2THERMASOL.COM I800.776.0711
Make sure the walls, ceiling and floor materials are suitable for use with steam. If using acrylic walls, they must be steam
rated from their manufacturer. ThermaSol only recommends specific generators for acrylic modules. Ensure electrical power
is turned off for the duration of the installation.
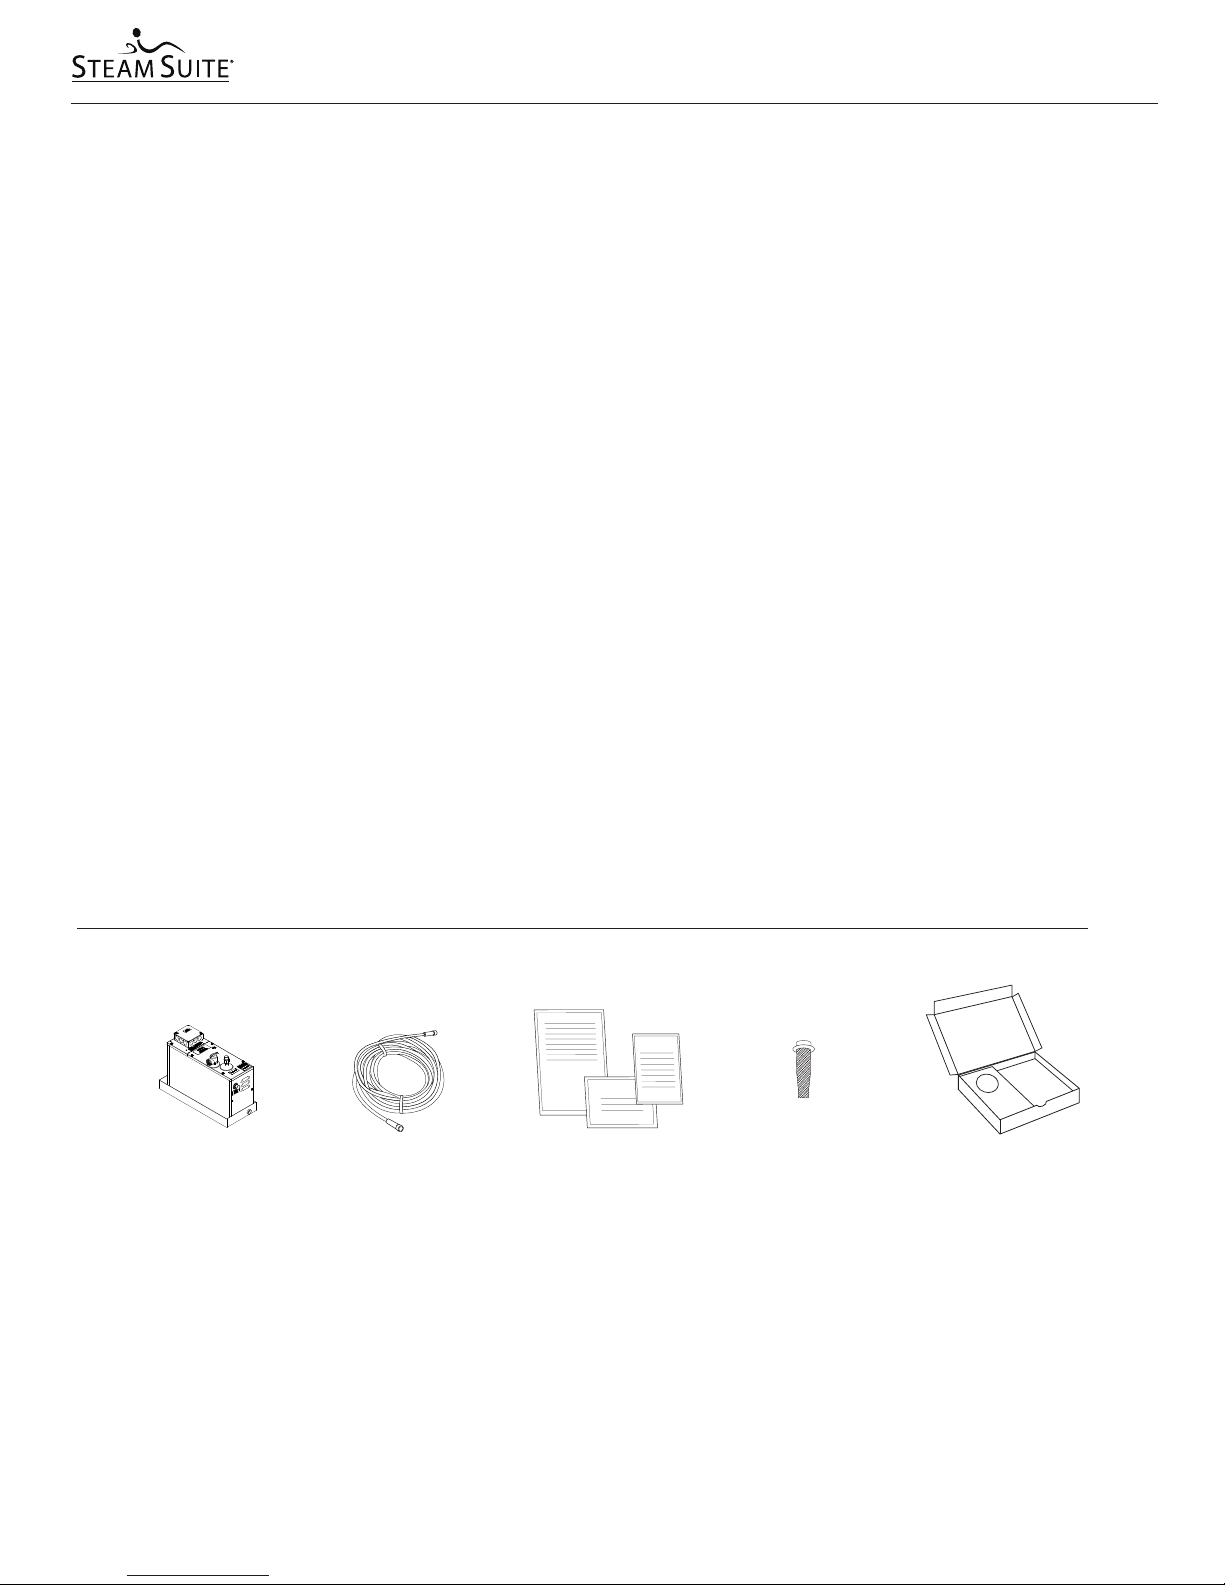
Parts enclosed with the generator:
Materials needed:
o Brass ball valve 3/8" NPT or
brass shut-off valve (for water supply
shut-off)
oPipe compound
oCopper or brass fittings & nipples
(sizes and quantities per instructions)
oWire (see page 3)
oCopper tube or pipe
o Wire cap nuts
o Flex conduit
o Brass or copper tee connection and plug
o Silicone
o Other materials as required
o Drain Pan
Materials recommended:
oIn-line water filter (recommended)
o Brass Union
Tools needed:
o Pipe wrench
o Tubing cutter
o Wire cutters or wire strippers
o Adjustable wrench
o Screwdriver (Phillips and regular)
o Solder and flux
o 1-1/16" inch masonry drill bit
o 7/8" inch hole saw for
deluxe steamhead
o Drill motor
o Propane torch
o Other tools as required
Steam generator Installation instructions,
warranty, static cling
warning label
50 foot
control cable
In-line water screen kit
(comes pre-installed from the
factory) Item 04-8457
Steam Suite Spa Package
1Important Information Before You Install
Control Kit
(purchased separately)
BY THERMASOL
4Electrical Wiring
3
THERMASOL.COM I800.776.0711
If you are installing the unit or thinking of adding one on your next
project, you will need to make sure the unit is sized properly.
Calculate the shower area
(Length x Width x Height = Cubic Feet)
and confirm the ceiling height does not exceed 8 feet.
The set of numbers in the generator model number
represents the maximum capacity.
Model number can be found on the box or generator.
ThermaSol’s generators can be placed up to 50 feet from the
shower; in an attic, closet or below a sink are ideal locations.
Make sure the walls, ceiling and floor materials are suitable
for use with steam.
o Tubing cutter
o Wire cutters or wire strippers
o Adjustable wrench
o Screwdriver (Phillips and regular)
o Solder and flux
o 1-1/16" inch masonry drill bit
o 7/8" inch hole saw for
deluxe steamhead
o Drill motor
o Propane torch
o Other tools as required
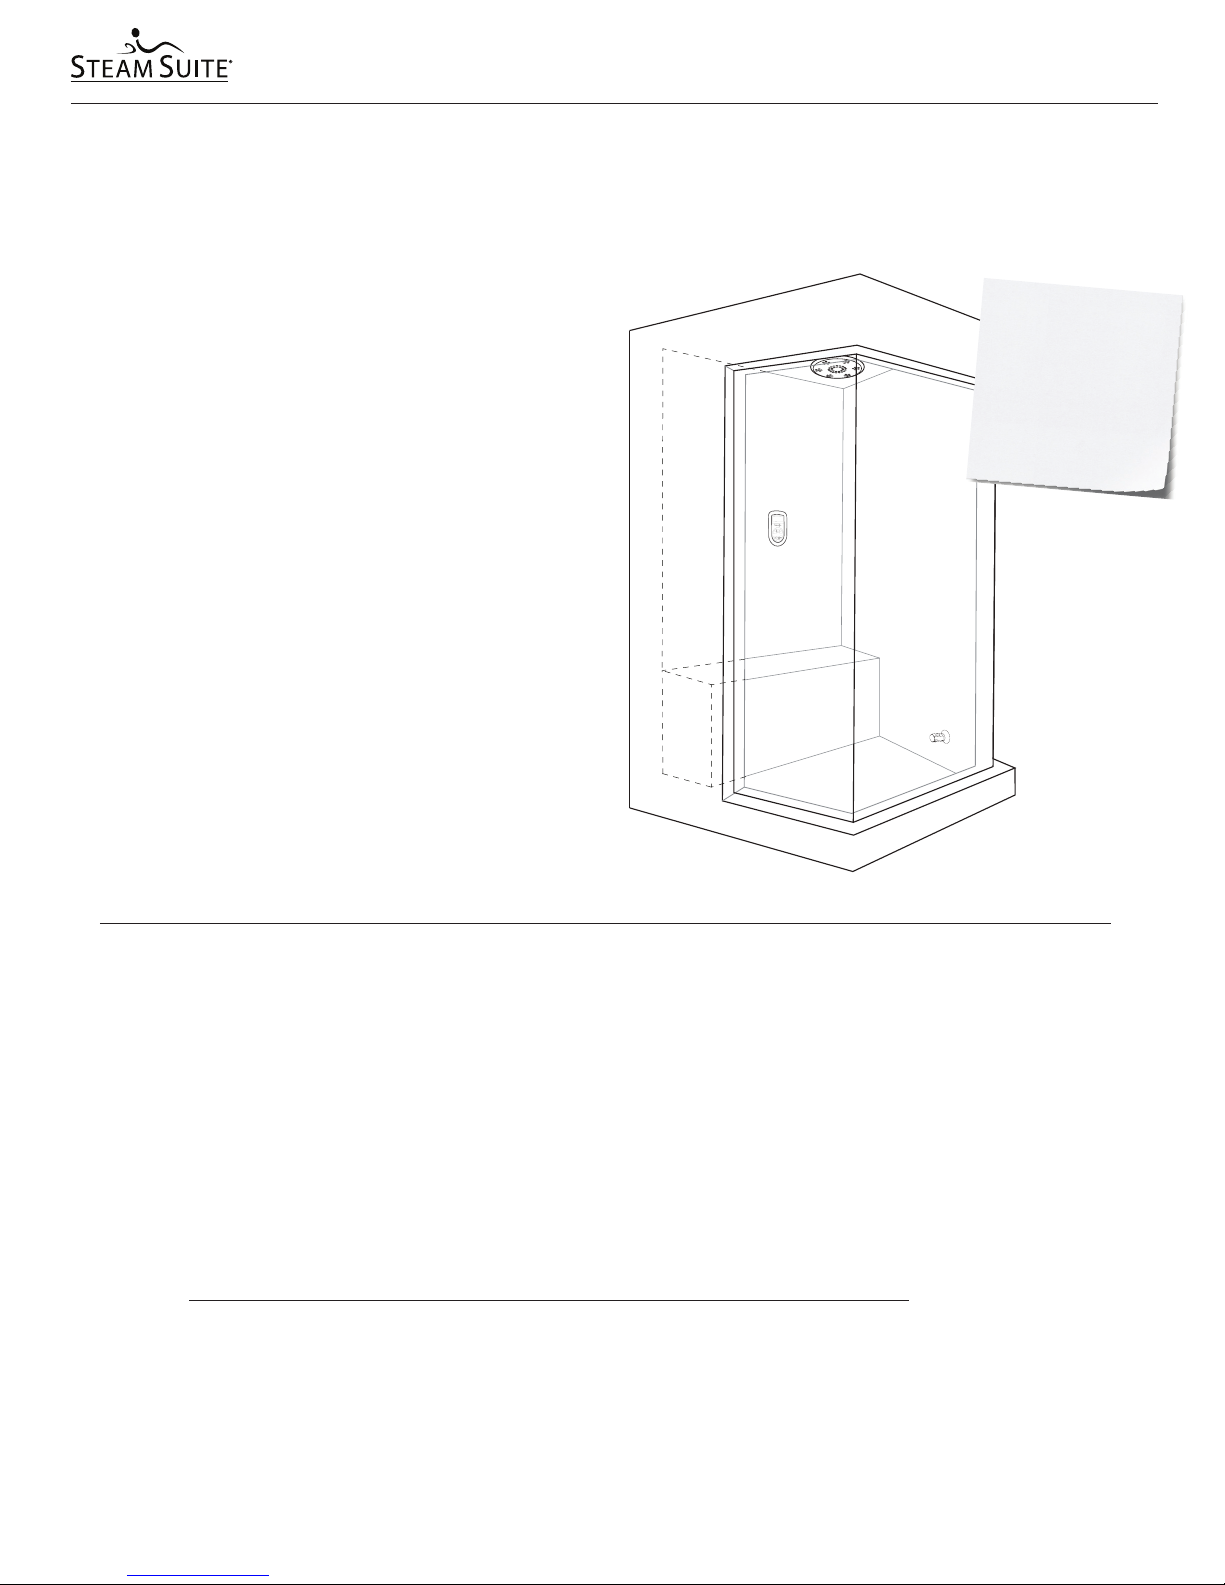
Read warnings on page 2. For illustrative purposes only. Consult with qualified professional for steam room construction details.
MODEL INPUT VOLTAGE KW RATING AMPS PHASE WIRE BREAKER MAX. ROOM SIZE
SSDA-135 208-240VAC 8 37 1 8 40 175 CU.FT.
SSDA-390 208-240V AC 11 55 1 6 60 395 CU.FT.
The size of the shower will determine the size
of the generator. The size of the generator will
determine electrical requirements.
o All the electrical wiring must be done per
National/Local Electrical Codes.
o Run 240V Power source to the generator.
o Use copper wire only.
o Wire sizes recommended by NEC. Minimum wire
temperature rating 90°C. Type THHN.
o Each generator should be wired to their own separate breaker.
o Turn off all electricity to the working area at the main breaker panel!
o Leave power OFF during installation process.
ThermaSol requires that a licensed electrician perform all electrical work.
Steam Suite Spa Package
3Sizing or Double Checking the Unit Specified
Installation note
We do not recommend a
ceiling height exceeding
10 feet. Lowering ceiling
height to 8 feet helps
create a more efficient
steam room
.
BY THERMASOL

THERMASOL.COM I800.776.0711
Select a location as near as practical to the steam shower.
Typical locations include: closet, vanity cabinet, climate
controlled attic or basement.
Be sure to install unit in a location that offers easy
accessibility for servicing of generator.
DO NOT install generator inside steam room.
DO NOT install generator or plumbing lines in unheated
attic or any locations where water could freeze.
DO NOT install generator outdoors or wherever
environmental conditions may affect the safety
and/or performance of the generator.
Generator may be installed up to 50 feet away from steam
shower and must be in a dry, non-combustible, well
ventilated space with 6" clearance around generator.
When constructing the ceiling add slope of 1"/foot. The
control cable provided with the generator is 50 feet in
length (Item 03-6152-050).
When locating the control unit, place it as far as possible
away from the steam head and as close as is practical to
where the user will be sitting.
The generator must be upright, accessible and on a
level surface with all connections on top. Access panel
must be unobstructed and allow for easy access.
Example of different
generator locations.
Read warnings on page 2. For illustrative purposes only. Consult with qualified professional for steam room construction details.
5Placing the Generator
Steam Suite Spa Package
Installed in
nearby vanity
Installed in
nearby closet
4
BY THERMASOL

6Water Supply and Drain Pan
THERMASOL.COM I800.776.0711
Read warnings on page 2. For illustrative purposes only. Consult with qualified professional for steam room construction details.
Once you select the generator location,
you will need to run water to the unit.
DO NOT use galvanized fittings. Use copper or brass fittings only!
DO NOT use PEX or PVC tubing.
DO NOT plumb the pressure relief valve into the steam line.
Plumbing the pressure relief valve into the steam line can be
hazardous, should the steam outlet be capped off or obstructed.
Recommend installing unions on all rigid pipe lines for ease of
removal and serviceability (if required).
Use 3/8" NPT line.
Plumb the 3/4" drain connection on pan to an approved drain.
Drain Pan must be installed on all generator installations.
All plumbing shall be performed by a qualified
licensed plumber and in accordance with
applicable national and local codes.
Connect a tee to the existing cold water line.
Install copper pipe from the tee to create inlet line for unit.
Install a brass shut off valve on the water inlet line
in an accessible area in front of the brass union (and
recommended in-line water filter). A stainless steel water
supply flex connector may be used.
Before making the water connection, flush the water line
into a five-gallon pail to remove any silt or other materials that
may be in the water inlet line.
Make final connection but DO NOT turn the water on yet.
A
D
B
E
C
A D
B
E
C
Steam Suite Spa Package
Water Inlet Line
(3/8" NPT with brass
shut-off valve)
3/4" Drain Line
Steam Line
5
BY THERMASOL
This manual suits for next models
2
Table of contents
Other Thermasol Hot Tub manuals


Popular Hot Tub manuals by other brands


 owner's manual")


CalderaSpas
CalderaSpas CalderaSpas Utopia Series owner's manual

anko
anko SS-601A user manual

CalderaSpas
CalderaSpas CANTABRIA owner's manual

Dimension One Spas
Dimension One Spas HYDRO SPORT Installation and owner's guide

Bestway
Bestway Lay-Z-Spa Maldives HydroJet Pro manual

Dimension One Spas
Dimension One Spas Nautilus Specifications