Thermo Concepts BEAUFORT User manual

1
OWNER MANUAL : BEAUFORT
OWNER MANUAL: BEAUFORT - Edition 2
Bottled water cooler, cold and room temperature,
with loading from the bottom.
For standard bottles of 8, 11 or 18 liters (2, 3 or 5 gallons).
Thank you for your trust. You have chosen a water cooler designed,
produced and assembled in North America (Quebec, Canada).
We manufacture water coolers that are ergonomic, reliable and durable.
For human communication 1-800-363-1333, business day, from 9h to 16h HE
or digitally by email at info@thermoconcepts.com.
12
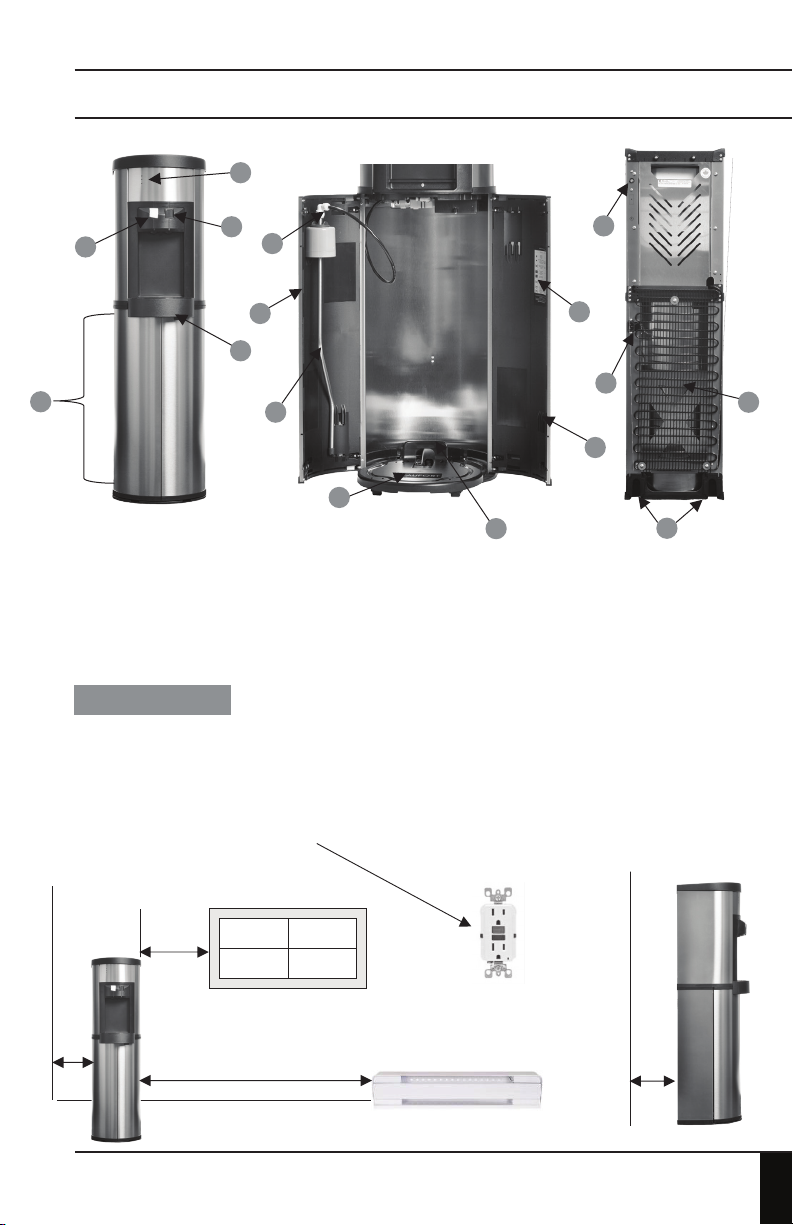
Dimensions in inches
Weight when packaged: 59.8 lbs / 27.1 kg Appliance’s weight: 46 lbs / 20.8 kg
26
33 3/4
37
Power cord
Drip Tray
Probe
12 1/4
43 1/2
La version française du guide de
l’utilisateur débute à la page 11.

36” min.
3”
min. 2”
min.
12”
min.
2
1) Cold water handle
2) Room temperature handle
3) LED indicator
4) Drip tray
5) Probe holder hook
• Make sure the drip tray, the power cord and the probe are present.
• Make sure the water cooler is steady. If necessary, use a shim and/or the stability
extensions at the back of the machine.
• Respect the minimal safety distances: 12" from a window, 36" from a heat source, 3" from
any wall to the side and 2" from any wall behind the machine.
• Plug on a GFI wall outlet, preferably without any other device or appliance.
LEGEND
INSTALLATION
6) Probe
7) Loading platform
8) Right door
9) Left door
10) Water bottle weight
11) LED chart definition
12) Thermostat adjustment
(cold water)
13) Stability extensions
14) Power supply
15) Bottle enclosure
16) Condenser
GRAPHICAL DESCRIPTION
15
2
3
1
4
9
5
6
7
10
8
11
12
16
14
15
OWNER MANUAL: BEAUFORT - Edition 2

3
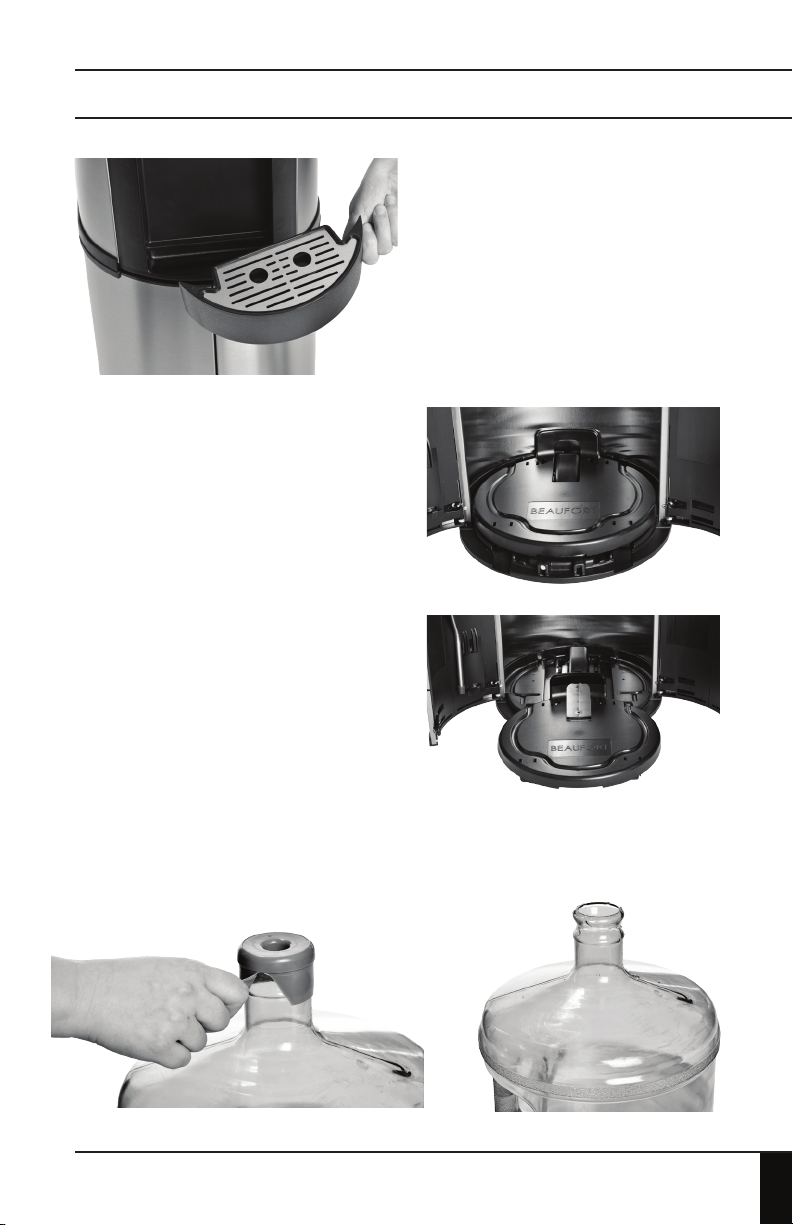
WATER COOLER USE AND BOTTLE REPLACEMENT
2) The right door must be opened
first, then the left one.
3) With your hand, push down on
the loading platform and bring it
forward until the platform is 3/4
out of its original position.
1) To access the water bottle, you
have to remove the drip tray from
its working position.
4) Put the bottle on the loading platform and remove its
disposable cap.
OWNER MANUAL: BEAUFORT - Edition 2

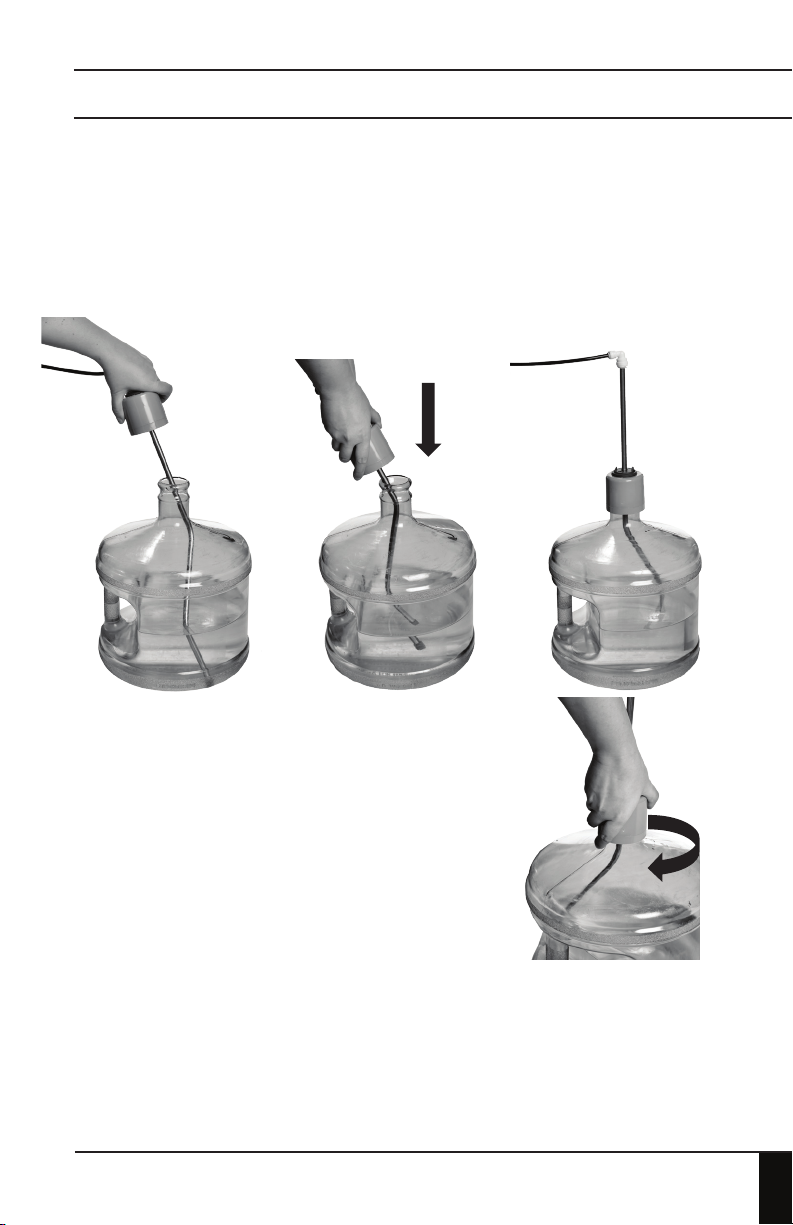
5) Insert the probe in the bottle and press the cap down on the neck of
the bottle.
Note: If you have opted for an 8 or 11 liters bottle (3 or 5 gallons), you will
have to push down the cap along the probe until it sits on the neck of the
bottle (clockwise rotations might be required).
6) Finally, put everything back together by doing the steps in reverse
order (3, 2 then 1), in order for the loading platform to be back in its
original position.
Note: After the machine is plugged in, the water will take approximately
half an hour to become cold (this can vary depending on the thermostat
adjustment).
When the cap is pressed on the neck of the
bottle, complete a slight rotation clockwise
to activate the lock mechanism of the cap.
4
WATER COOLER USE AND BOTTLE REPLACEMENT (CONT'D)
OWNER MANUAL: BEAUFORT - Edition 2

It is recommended to clean your water cooler at least annually. Under
normal operating conditions, a cleaning every year is adequate. A
good indication that a water cooler needs to be cleaned is when the
taste of the water deteriorates.
The complete water circuit must be cleaned. This includes: the probe,
the flexible hose, the pump, the tank and the faucets. Use a
food-related sanitizer*, which you will have to dilute according to the
level of cleaning required. Circulate the sanitizer from the tip of the
probe until it reaches the faucets, with both handles in open position
throughout the process.
*Note: Diluted vinegar can also be used as disinfectant.
The equivalent of 4.5 liters (1.2 gallon) of cleaning solution has to
circulate, with a portion of this liquid staying at least 10 minutes in the
water circuit. This waiting time is ideal to clean the exterior of the water
cooler with a gentle soap and a clean cloth (especially the loading
platform if it was moved with feet, a method we do not recommend).
You should also check the black grid behind the machine (condenser)
and remove any dust with a vacuum. The drip tray and its metal grid
are generally the most disregarded part when it comes to cleaning, but
are also the ones that usually contain the most bacteria. It is
recommended to soak the tray in hot soap water and to clean the grid
manually with a cloth.
After these 10 minutes, rinse the water circuit in its entirety, by running
9 liters (2.5 gallons) of water from the tip of the probe to the faucets.
You will require a bucket, or a second water bottle able to contain 9
liters (2.5 gallons), to collect the soiled rinse water.
5
MAINTENANCE
OWNER MANUAL: BEAUFORT - Edition 2

6
TROUBLESHOOTING
6
PROBABLE CAUSE
1) There is too much ice in the
water cooler’s tank.
2) Door(s) not closed properly.
3) The flexible hose part of the probe
(in the bottle enclosure) is partially or
completely unplugged from its fitting.
1) Thermostat setting.
2) The tank is completely empty.
3) The condenser is dirty.
4) The cycle is not receiving
electricity.
1) Thermostat setting.
1) Compressor is running its cycle
(frequent on/off) when there is
no water in the bottle.
2) Humming sound
with continuous rumbling.
PROBLEM
No water is coming out
of the faucets.
The water is not cold.
The water is too cold.
The water cooler makes
too much noise.
OWNER MANUAL: BEAUFORT - Edition 2

6
TROUBLESHOOTING
VERIFICATIONS AND CORRECTIONS
1) Unplug the machine (ideally 24 hours), then slowly move the thermostat
setting button (behind the water cooler) a quarter turn anti-clockwise.
Reconnect the machine and check if the problem is solved. When there is a lot
of ice, a second period of disconnection (ideally 24 hours) might be necessary,
as well as another quarter turn anti-clockwise. You can also check that the
minimum safety distances for installation are respected (p.2), as well as the
cleanliness of the condenser at the back of the machine. Too much dust or dirt
can lower the water cooler’s efficiency and increase electricity consumption.
2) Check if the flexible hose of the probe is blocking the doors.
3) Reconnect the hose to the probe and make sure it is deeply inserted in its
fitting.
1) Decrease the temperature by slowly moving the thermostat’s button (at
the back of the water cooler) a quarter turn clockwise.
2) When the tank has been emptied completely, there is a waiting time of
about half an hour before cold water is available again.
3) Clean the condenser at the back of the machine with a vacuum.
4) Check the machine is correctly plugged into the wall outlet, as well as in
the power supply at the back of the water cooler. In the electrical panel,
check the fuse that is connected to the outlet that the water cooler is
plugged in.
1) Increase the temperature by slowly moving the thermostat’s button (at
the back of the water cooler) a quarter turn anti-clockwise.
1) This situation is normal because the Manufacturer wants cold water to
enter the tank. If this is unpleasant, unplug the machine, empty the tank and
wait for a new water bottle to be installed before starting the water cooler
again.
2) A part of the condenser might be touching the metal case of the water
cooler. Distance or a cushion must be created between the two parts. Apply
a little pressure to the part of the condenser that is touching the metal so it
moves slightly.
7
TROUBLESHOOTING
OWNER MANUAL: BEAUFORT - Edition 2

6
TECHNICAL DATA
LED INDICATIONS
8
Water tank volume: 3.7 L / 0.9 gallon
Volume of water in the tank: 2.1 L / 0.5 gallon
Materials: ASTN 304
Cold water faucet flow: 1 L/26 sec.
Temp. water faucet flow: 1 L/26 sec.
Compressor power: 1/12 HP
Compressor: 2.45cc
Amperage: 1.29 amp.
Tension: [110, 120] volts
Cooling cycle: R-134a
Cold temperature setting: [3°, 8°C]*
*May vary according to the environment
of the water cooler
Position
First
(from the
top)
Second
Third
First and
third
Color
Green
Blue
Blue
Yellow
Green
and
yellow
Segment
Continuous
Continuous
Blinking
Blinking
Blinking
Meaning
Normal
Bottle empty or
almost empty
Door Open
Auto protect
Water spill
Solution
_
Change the bottle
when empty.
Close the door.
Unplug and
reconnect water
cooler.
Find the source of
the spill.
Dry, unplug and
reconnect water
cooler.
OWNER MANUAL: BEAUFORT - Edition 2

When the water cooler is activated, the thermostat emits a “click” and,
during approximatively 30 seconds, the condenser’s pressure rises and
the compressor is a little noisier before it goes back to a regular running
sound (generally below 43 dbA, when measured at the faucets’ level,
one meter from the machine).
In a cooling cycle, the refrigerant gas goes from high to low pressure
very rapidly, which creates a sound that is to be expected (below 43
dbA).
When the water cooler stops functioning, a “click” from the thermostat
can also be heard, as well as the pressures balancing. All of these are
normal noises that are intermittent and transitional.
9
NORMAL NOISES
During the first year of ownership and maximum two years after the
manufacture date (both conditions must be fulfilled simultaneously)
the Manufacturer promises the original buyer (user) to repair and/or
replace parts which prove to be inoperative due to a defect in material,
assembly and/or conception, as long as the Beaufort watercooler has
been used in normal conditions, was transported safely and was cleaned
as per advised sanitary maintenance instructions. This includes the
refrigeration cycle, the electric circuit (thermostat, power cord, internal
wiring 120V or 220V depending on the region, compressor overload
device, starting relay) and the electronical components.
During the second year of ownership and maximum three years after
manufacture date (both conditions must be fulfilled simultaneously)
the Manufacturer promises the initial buyer (user) to repair and/or
replace electrical or cooling problems in the factory, as long as the
Beaufort watercooler has been used in normal conditions, was
transported safely and was cleaned as per advised sanitary
maintenance instructions.
During the third year and until the end of the fifth year of ownership and
maximum six years after the manufacture date (both conditions must
be fulfilled simultaneously) the Manufacturer promises the initial buyer
(user) to repair and/or replace a defective cooling cycle (complete cycle
of replacement) in the factory, as long as the Beaufort watercooler has
been used in normal conditions and was cleaned as per advised sanitary
maintenance instructions.
LIMITED WARRANTY
OWNER MANUAL: BEAUFORT - Edition 2

10
General provisions and exclusions
This limited warranty applies only within the limits of Canada and the
United States. However, a number of foreign distributors benefit from
an official certification from the Manufacturer which covers this
warranty. Please contact your distributor or the Manufacturer directly
(info@thermoconcepts.com) for further details.
This limited warranty does not apply if the affixed serial number is
removed, defaced or obliterated.
This limited warranty does not apply if service of the seal refrigeration
system or cold water system or parts furnished as original equipment
by the Manufacturer are not obtained from an approved service center
or the factory.
The limited warranty does not apply to any water components that
become inoperative due to liming conditions.
This limited warranty does not cover performance, failure or damages
of any part resulting from external causes such as alterations, abuse,
misuse or misapplication.
The foregoing is in lieu of all other agreements expressed, implied or
statutory and all other obligations of liabilities of the Manufacturer.
The Manufacturer does not assume or authorize any person to assume
any obligations of liability in connection with this product or its
warranty. In no event will the Manufacturer be liable for special or
consequential damages or for any delay in the performance of this
agreement due to causes beyond their control.
LIMITED WARRANTY (CONT’D)
OWNER MANUAL: BEAUFORT - Edition 2

11
GUIDE DE L’UTILISATEUR : BEAUFORT
Refroidisseur d’eau embouteillée, eau froide et eau tempérée,
avec chargement par le bas.
Pour les bouteilles standards de 8, 11 ou 18 litres (2, 3 ou 5 gallons).
Merci de votre confiance. Vous avez choisi un refroidisseur conçu, fabriqué et assemblé en
Amérique du Nord (Québec, Canada).
Nous produisons des refroidisseurs ergonomiques, fiables et durables.
Pour communication humaine 1-800-363-1333, jour ouvrable, de 9h à 16h HE
ou électroniquement l’adresse courriel info@thermoconcepts.com.
Dimensions en cm
Poids avec l’emballage: 59,8 livres / 27,1 kg Poids de l’appareil: 46 livres / 20,8 kg
GUIDE DE L’UTILISATEUR: BEAUFORT - Édition 2
30,5
66
85,7
94
Cordon
électrique
Gobelet
Tube
d’alimentation
d’eau
31
110,5
36” min.
3”
min. 2”
min.
12”
min.
12
1) Clapet d’eau froide
2) Clapet d’eau tempérée
3) Indicateur LED
4) Gobelet
5) Crochet du tube
d’alimentation d’eau
• S’assurer que le gobelet, le cordon électrique et le tube d’alimentation d’eau sont présents.
• Mettre le refroidisseur à niveau. Au besoin utiliser une pièce d’ajustement (shim en anglais)
et/ou utiliser les deux extensions de stabilité à l’arrière.
• Respecter les distances minimales de sécurité : 12" d’une fenêtre, 36" d’une source de chaleur,
3" d’un mur de côté et 2" d’un mur arrière.
• Brancher sur une prise murale GFI, de préférence sans aucun autre appareil.
LÉGENDE
INSTALLATION
6) Tube d’alimentation d’eau
7) Tiroir
8) Porte droite
9) Porte guahce
10) Lecteur de présence
de bouteille
11) Charte de définition des LED
12) Ajustement du thermostat
(eau froide)
13) Extensions de stabilité
14) Fiche électrique
15) Enceinte de la bouteille
16) Condenseur
DESCRIPTION GRAPHIQUE
15
2
3
1
4
9
5
6
7
10
8
11
12
16
14
15
GUIDE DE L’UTILISATEUR: BEAUFORT - Édition 2
13
UTILISATION DU REFROIDISSEUR ET CHANGEMENT DE LA BOUTEILLE
2) La porte de droite doit
d’abord être ouverte, puis celle
de gauche.
3) Avec une main, appuyer sur le
tiroir, puis amener le vers l’avant
afin de sortir le tiroir au ¾de son
emplacement.
1) Pour accéder à l’emplacement
de la bouteille, il faut d’abord que
le gobelet soit retiré de sa
position fonctionnelle.
4) Installez la bouteille sur le tiroir, puis retirez son bouchon jetable.
GUIDE DE L’UTILISATEUR: BEAUFORT - Édition 2
5) Insérez le tube d’alimentation dans la bouteille et appuyez son
bouchon pour que ce dernier s’appuie sur le goulot de la bouteille.
Note: Si vous avez opté pour une bouteille de 8 ou 11 litres (3 ou 5 gallons),
il faut également descendre le bouchon du tube d’alimentation (peut
nécessiter des tours en sens horaire pour y arriver), jusqu’à ce qu’il
s’appuie sur le goulot de la bouteille.
6) Finalement, remettez le tout ensemble en effectuant de nouveau
l’étape 3, puis l’étape 2 et l’étape 1, pour remettre le tiroir dans sa
position initiale.
Note: Après le branchement électrique, l’eau du refroidisseur deviendra
froide dans environ une demi-heure (peut varier selon l’ajustement du
thermostat).
Une fois que le bouchon du tube
d’alimentation s’appuie sur le goulot,
effectuez une légère rotation en sens
horaire pour activez le mécanisme de la
barrure du bouchon.
14
UTILISATION DU REFROIDISSEUR ET CHANGEMENT DE LA BOUTEILLE (SUITE)
GUIDE DE L’UTILISATEUR: BEAUFORT - Édition 2

Il est recommandé de nettoyer votre refroidisseur au moins une fois
par année. Dans des conditions normales d’utilisation, un entretien
annuel est suffisant. Une bonne indication qu’un refroidisseur doit être
nettoyé est la détérioration du goût de l’eau.
Le nettoyage doit inclure tout le circuit d’eau, soit : le tube
d’alimentation, la tubulure flexible, la pompe, le réservoir et les
robinets. Utilisez un désinfectant pour usage alimentaire*, qu’il vous
faudra préalablement diluer selon la sévérité du nettoyage requis.
Faites circuler le mélange par le tube d’alimentation jusqu’à la sortie
des deux robinets, et ce en activant les deux clapets de robinets en
continu.
*Note: L’utilisation du vinaigre dilué comme désinfectant est acceptable.
L’équivalent d’au moins 4,5 litres (1,2 gallon) du mélange nettoyant
doit avoir circulé, et une partie de ce liquide doit être demeuré au
moins 10 minutes dans le circuit d’eau. Ce temps d’attente de 10
minutes est idéal pour laver l’extérieur du refroidisseur avec un savon
doux et un linge propre (surtout le dessus du tiroir si certains ont
déplacé le tiroir avec leur pied, une méthode non conseillée). Vérifiez
aussi la grille arrière noire (condenseur) et, s’il y a lieu, enlevez la
poussière avec un aspirateur. Le gobelet est généralement la pièce la
plus négligée et celle qui habituellement contient le plus de bactéries.
Il est recommandé de faire tremper la partie réceptacle dans de l’eau
chaude savonneuse et de nettoyer à la main la grille métallique avec un
linge.
Après ces 10 minutes, rincez le circuit d’eau en entier, en faisant
parcourir 9 litres (2,5 gallons) d’eau du bout du tube d’alimentation
jusqu’à la sortie des robinets. Vous aurez besoin d’un seau ou une
seconde bouteille d’eau capable de contenir 9 litres (2,5 gallons), afin
de réceptionner l’eau de rinçage souillée.
15
ENTRETIEN
GUIDE DE L’UTILISATEUR: BEAUFORT - Édition 2

6
DIAGNOSTIC DES DÉFAILLANCES
16
CAUSE PROBABLE
1) Il y a trop de glace dans le
réservoir du refroidisseur.
2) Porte(s) mal fermée(s).
3) La tubulure flexible du tube
d’alimentation d’eau située dans
l’enceinte de la bouteille est
partiellement ou complètement
débranchée de son raccord.
1) Réglage du thermostat.
2) Réservoir récemment vidé.
3) Condenseur sale.
4) Le cycle ne reçoit pas
d’électricité.
1) Réglage du thermostat.
1) Cyclage du compresseur
(on/off trop fréquent) quand il
n’y pas d’eau dans la bouteille.
2) Ronronnement accompagné
de bruits de tambours continus.
DÉFAILLANCE
Il n’y a pas d’eau qui sort
des robinets.
L’eau n’est pas froide.
L’eau est trop froide.
La machine fait trop de bruit.
GUIDE DE L’UTILISATEUR: BEAUFORT - Édition 2

6
VÉRIFICATIONS ET CORRECTIONS À EFFECTUER
1) Débrancher l’appareil (idéalement 24 heures), puis tourner lentement le bouton
de réglage du thermostat à l’arrière du refroidisseur, dans le sens anti-horaire
jusqu’à effectuer un quart de tour. Rebrancher et vérifier si le problème est réglé.
Lors d’une très grande présence de glace, il se peut qu’une seconde période de
débranchement (idéalement 24 heures) suivie d’un second quart de tour en sens
anti-horaire soit nécessaire. Vérifier également le respect des dimensions minimales
de sécurité recommandées pour l’installation (p.12), ainsi que la propreté du
condenseur à l’arrière de l’appareil. Trop de poussières ou de saletés diminue la
performance du refroidisseur et augmente la consommation électrique.
2) Vérifier si la partie flexible du tube d’alimentation bloque les portes,
déplacez-la.
3) Raccorder la tubulure en s’assurant d’emboîter profondément le tube dans son
raccord.
1) Ajuster le thermostat pour diminuer la température en tournant lentement un
quart de tour dans le sens horaire sur le bouton d’ajustement à l’arrière du
refroidisseur.
2) Une attente d’une demi-heure peut être nécessaire lorsque le réservoir du
refroidisseur a été complètement vidé.
3) Nettoyer la grille noire à l’arrière du refroidisseur avec un aspirateur.
4) Vérifier le branchement de l’appareil dans la prise murale ainsi qu’au niveau de
la fiche électrique à l’arrière du refroidisseur. Dans le panneau électrique, vérifier
le disjoncteur qui est relié à la prise murale utilisée par le refroidisseur.
1) Ajuster le thermostat pour augmenter la température en tournant lentement un
quart de tour anti-horaire sur le bouton d’ajustement à l’arrière du refroidisseur.
1) Cette situation est normale puisque le manufacturier veut garder l’eau fraîche
dans le réservoir. Si jugé déplaisant, débrancher l’appareil, vider le réservoir et
attendre qu’une nouvelle bouteille soit installée avant la remise en marche.
2) Une partie du condenseur touche peut-être au boîtier métallique du
refroidisseur. Il faut distancer ou amortir la vibration entre ces deux parties.
Appuyer une faible pression sur la partie du condenseur qui touche au métal afin
de le déplacer légèrement.
17
DIAGNOSTIC DES DÉFAILLANCES
GUIDE DE L’UTILISATEUR: BEAUFORT - Édition 2

6
DONNÉES TECHNIQUES
INDICATIONS LED
18
Volume du réservoir d’eau: 3.7 L / 0.9 gallon
Volume d’eau dans le réservoir:
2.1 L / 0.5 gallon
Materiel du réservoir: ASTN 304
Débit du robinet froid: 1 L/26 sec.
Débit du robinet tempéré: 1 L/26 sec.
Puissance du compresseur: 1/12 HP
Compresseur: 2.45cc
Ampérage: 1.29 amp.
Voltage: [110, 120] volts
Réfrigérant: R-134a
Réglage de température froid: [3°, 8°C]*
*Peut varier selon l’environnement
du refroidisseur
Position
Première
(à partir
du haut)
Deuxième
Troisième
Première et
troisième
Couleur
Vert
Bleu
Bleu
Jaune
Vert et
jaune
Segment
En continu
En continu
Clignotant
Clignotant
Clignotant
Signification
Normal
Bouteille vide
ou presque vide
Porte ouverte
Mise en
protection
Présence d’eau
Solution
_
Changer
la bouteille
lorsqu’elle est vide.
Fermer la porte.
Débrancher et
rebrancher
l’appareil.
Trouver la source
du dégât d’eau.
Assécher,
débrancher
et rebrancher
l’appareil.
GUIDE DE L’UTILISATEUR: BEAUFORT - Édition 2

Au départ, le thermostat fait entendre un « clic » et, pour
approximativement 30 secondes, la pression du condenseur s’élève et le
compresseur est un peu plus bruyant pour ensuite revenir à un
fonctionnement régulier (niveau sonore généralement inférieur à 43
dBA, mesuré à la hauteur des robinets à un mètre de distance).
Dans un cycle de réfrigération, il y a une circulation du gaz réfrigérant
allant de la haute pression vers la basse pression à une vitesse élevée, on
doit donc s’attendre à un niveau sonore y étant relié (inférieur à 43 dBA).
À l’arrêt de fonctionnement, on entend également un déclic du
thermostat et un équilibre brusque des pressions. Ce sont tous des
bruits ponctuels normaux et transitoires.
19
BRUITS NORMAUX
Durant la première année de possession et au maximum deux ans après
la date de fabrication (les deux conditions devant s’appliquer en même
temps) le manufacturier s’engage auprès de l’acheteur-utilisateur initial,
à remplacer et/ou à réparer les composantes défectueuses dû à un
défaut de pièces, d’assemblage et/ou de conception lorsque le
refroidisseur Beaufort a fonctionné dans des conditions normales
d’utilisation, de transport et d’entretien sanitaire. Cela inclut le cycle de
réfrigération, le circuit électrique (thermostat, cordon d’alimentation,
câblage interne 120V ou 220V selon la région, dispositif de surcharge du
compresseur, relais de démarrage) et les composantes électroniques.
Durant la deuxième année de possession et au maximum trois ans après
la date de fabrication (les deux conditions devant s’appliquer en même
temps) le manufacturier s’engage auprès de l’acheteur-utilisateur initial
à remplacer et/ou à réparer en usine les problèmes de nature électrique
ou du cycle de réfrigération, lorsque le refroidisseur Beaufort fonctionne
dans des conditions normales d’utilisation et d’entretien sanitaire.
Durant la troisième année et jusqu’à la fin de la cinquième année de
possession et au maximum six ans après la date de fabrication (les deux
conditions devant s’appliquer en même temps) le manufacturier
s’engage auprès de l’acheteur-utilisateur à remplacer et/ou à réparer en
usine le cycle de réfrigération fautif (cycle complet de remplacement),
lorsque le refroidisseur Beaufort fonctionne dans des conditions
normales d’utilisation et d’entretien sanitaire.
GARANTIE LIMITÉE
GUIDE DE L’UTILISATEUR: BEAUFORT - Édition 2

20
Dispositions générales et exclusions
La présente garantie limitée ne s’applique qu’au Canada et aux
États-Unis. Cependant, un certain nombre de distributeurs étrangers
bénéficient d’une attestation officielle du manufacturier qui émet cette
garantie limitée. Communiquez avec votre distributeur ou directement
avec le manufacturier (info@thermoconcepts.com) pour de plus
amples informations.
La présente garantie limitée ne s’applique pas aux appareils dont le
numéro de série a été retiré, oblitéré ou endommagé.
La présente garantie limitée ne s’applique pas lorsque la réparation du
système de réfrigération scellé, du système d’eau froide ou des pièces
d’origines fournies par le fabricant ne se fait pas par l’intermédiaire
d’un centre de service approuvé ou du service de réparation en usine.
La présente garantie limitée ne s’applique pas lorsque les composantes
du système d’eau froide ne fonctionnent plus à cause de la présence de
calcaire.
La présente garantie limitée ne couvre pas les mauvais rendements,
panne ou dommages causée, entre autres, par des modifications, des
abus, une mauvaise utilisation ou une mauvaise application.
La présente garantie limitée remplacement tout autre contrat explicite,
implicite ou réglementaire et toute autre obligation ou responsabilité
du fabricant.
Le fabricant n’autorise personne à assumer une quelconque
responsabilité relativement à ce produit ou à sa garantie. En aucun cas
le fabricant ne peut être tenu responsable de dommages spéciaux ou
de retards dans l’application de la présente garantie limitée pour des
raisons indépendantes de sa volonté.
GARANTIE LIMITÉE (SUITE)
GUIDE DE L’UTILISATEUR: BEAUFORT - Édition 2
Table of contents
Languages:
Other Thermo Concepts Water Dispenser manuals

Popular Water Dispenser manuals by other brands

Emerson
Emerson InSinkErator H990 owner's manual

Murdock
Murdock BF3 series Installation and maintenance instructions

Water Control
Water Control Dakotah series Installation & operation manual

Kinetico
Kinetico S250 OD installation guide

Krystal Pure
Krystal Pure KS15HE operating instructions

Halsey Taylor
Halsey Taylor HACFSCWSD1F owner's manual

GE
GE SmartWater GXSF27B Owner's Manual & Installation Instructions

Crystal Mountain
Crystal Mountain Summit user manual

Sunbeam
Sunbeam 6131 user manual

SpectraPure
SpectraPure MAXCAP RO/DI Installation and operating manual

Beko
Beko BSS 4600 TT user manual

Water Boss
Water Boss cityBoss Installation and service manual


