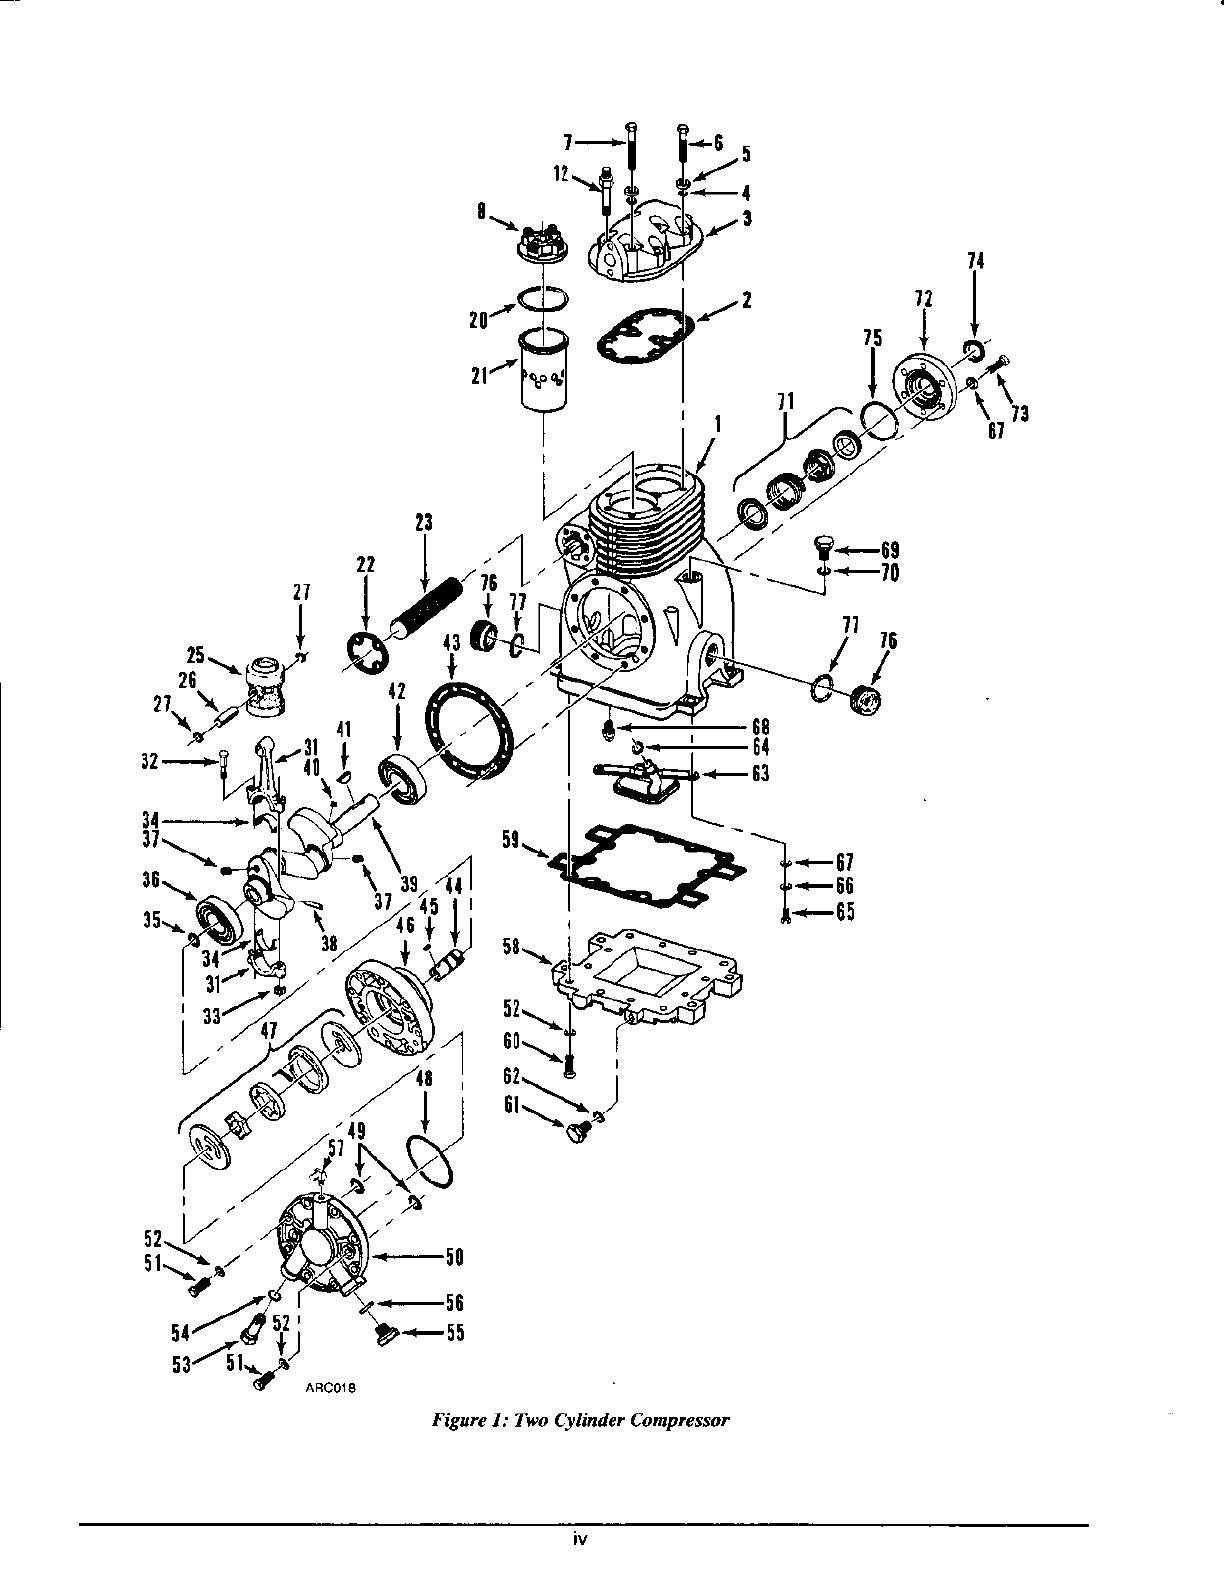
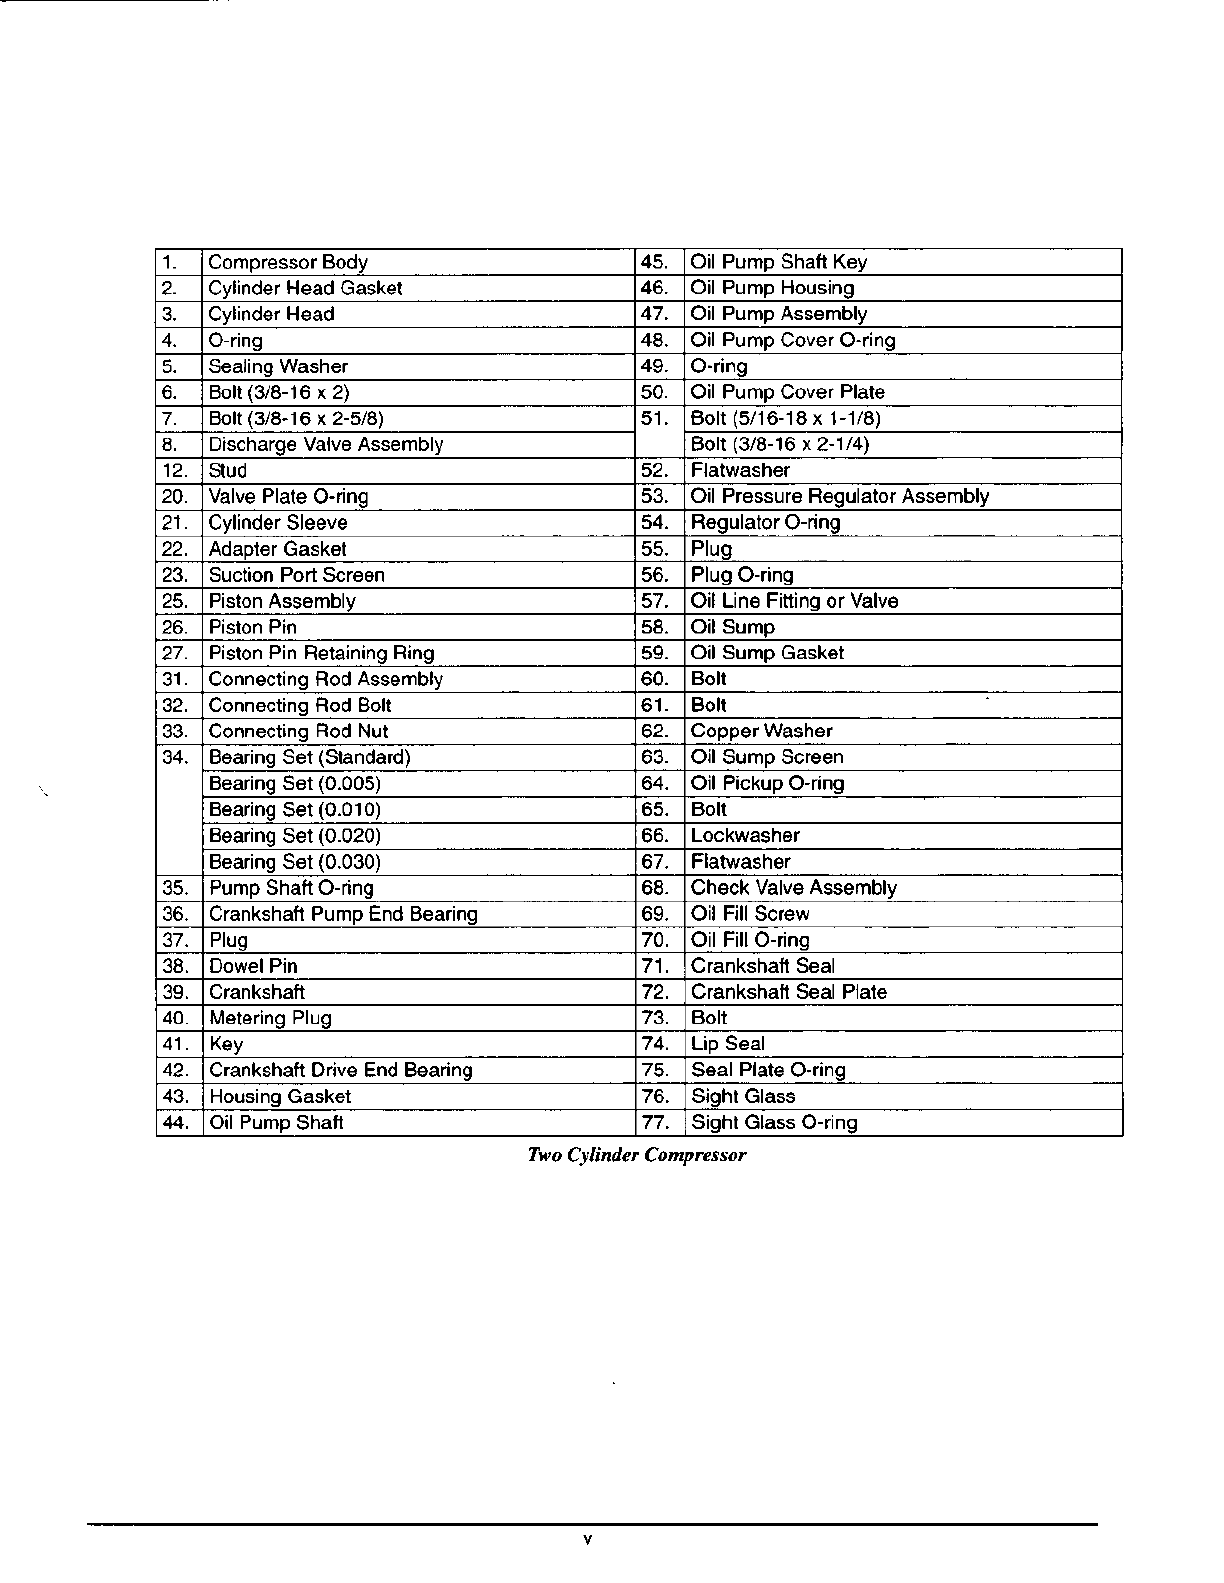
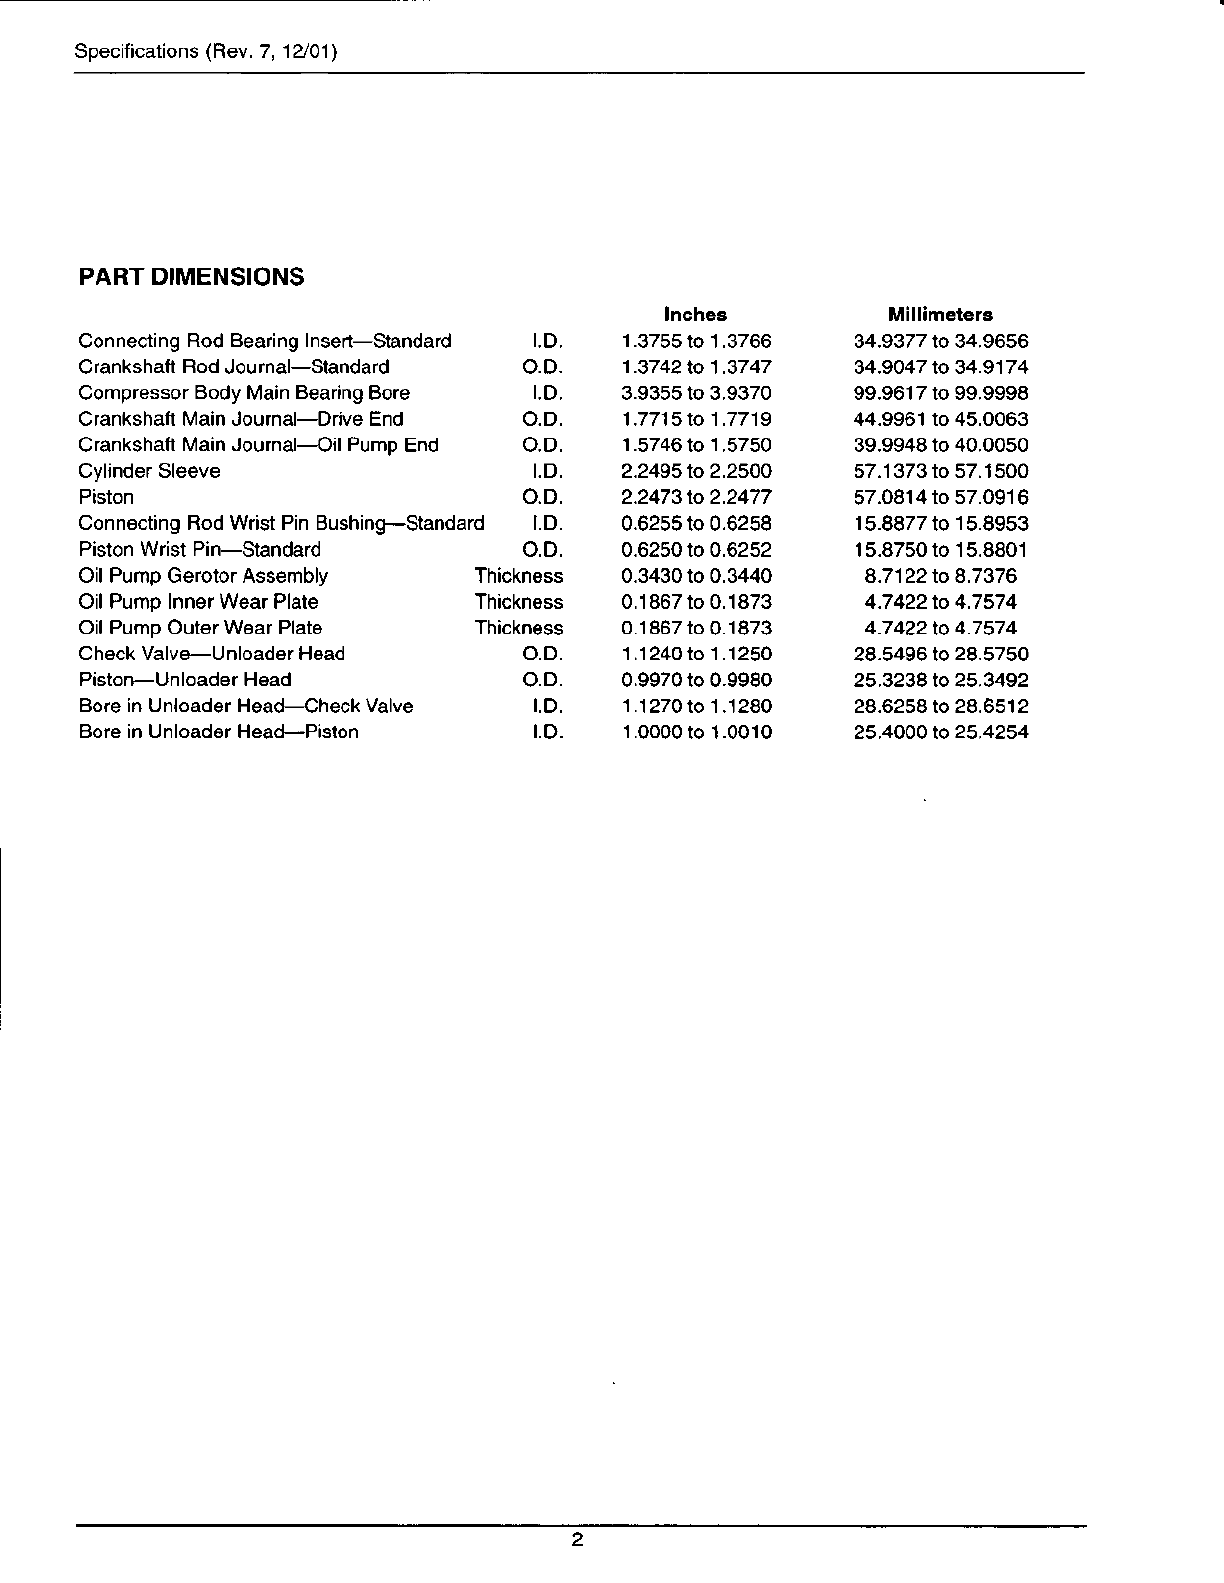
Thermo King X214 User manual

OverhaulManual
x214,
X419,
x426&X430
Compressor
TK687s-8-OM
(Rev.7,
12/01)
Copyrighf
l9S9Thermo
KingColp.,Minneapolis,
N4N,
U.S.A.
Printed
inU.S.A.

Thismanualis
published
for
informalional
purposes
onlyandtheinlormation
so
provided
shouldnot
b€considered
asall_inclusive
orcoveing
allconlingencies.
Itfunh€r
intormationrsrequired,
Thermo
KingCoqtoration
should
be
consulted.
Saleotproducl
showninthismanual
issubiect
toThemo
King'stemsandconditionsincluding,
butnotlimited
to,
theThermoKing
LimitedExpress
Warranty.
Suchterms
andconditions
areavailableupon
request.
ThermoKing's
warranty
willnot
applytoany
equipmentwhichhas
been
'sorepahed
oraltered
outsidethemanu-
tacturer's
plants
as,in
themanufacturer,s
judgment,
toelfectits
stability."
Nowarhntics, expressor implied, including waftanti,s ol frtncsslor aparticular purposeor fierchantabil-
ity, or waftanties a singlrcm courseol dealingor uaage
ol tnde, aremadcrcgarding theinfomation, rcc-
omficndations, and descriptions contained hercin.Manulactureris not responsiblcand wiu not be held
liable in contract or in tort (including negligance)for any special, indirect ot consequential damages,
including injury or damage causedto vehictes, con'r,nb or persons,by rcasonot rhe insta ation ol any
ThermoKing prcduct oaits mechanicalfailuk.

RecoverRefrigerant
AtThermo
King,werecognize
the
needto
preserve
the
environ-
mentandlimitthe
potential
harmtotheozonelayerthatcan
resullfrom
allowing
refrigerant
toescape
intothe
atmosphere.
Westrictlyadheretoa policy
that
promotes
therecoveryand
limitsthelossofrefrigerantintotheatmosphere.
Inaddition,service
personnel
mustbeawareof
Federalregula-
tionsconcerningthe
useofrefrigerantsandthecertiticationot
technicians.Foradditional
information
on
regulations
and
tech-
nician
certification
programs,
contact
your
localTHERMOKING
dealer.

Table
of Contents
ThermoKing
Compressois..,........... .............iii
SafetyPrecautions ,......,....... xi
Specifications .. . .. .. ........ .....1
Torque
Values.... ... ... .......... ..3
GeneralCompressorRepairTechniques . ...... ...... ....5
Dirlandlroisture
can
EasilyRuin
Compressors!.............. .........................5
CompressorOilIndicaTlons...-.... ............5
Compressor
OiloolorCode
........ ............5
Disassembly
andReassembly............. .............7
DisassemblySequence ....... ---.....7
Ffeass€mbfySequence .. .. ...... ... ..7
FaslenerTorque
procedute..
...,
,.,., ,.,.,..........
,,.,,7
Cleaning
Components. ..... ........... .... ..7
Diveooupling... .............
........7
Removal.... .............
.......7
Inslallation.. .. .. .... ....... ...... .. ..8
CylinderHead... ........._..........1i
DischargeValvePlates ....... ............. .'12
Two-Piece
CompressorSealPlateandNrountingFlangeAssembly .... ... .. .......... . .14
SealPlaleAssemblv.. ..........-.
........14
lnstallation
otSpringLoadedNeopreneBellowsType
Seal
........... ...............16
Installation
otl\4elalBellowsSealwilh
SelScrews
... .. . .... ... ... ............... .18
lnstallation
ollvlelalBellowsS6alwith
Drive
Tangs
...... ...............21
OilSumpandOilPickup
Screen
... .. .. .... .. ....... .. .. .23
OilPump....... .......... ....24
ConnectingRod,Piston
andSleeve.....
.
.... ............... .. .29
Crankshatt......... ......................32
CrankshattEndPlay. ... ..... .. ... ...... ..35
CompressorCrankshaftPrecautions ,,. . .. ,,. ,. ,,.,...... .36
RemovalandInstallingCrankshaft
Counterweights. .. . ........... ... . .. .. ..... ...... ..37
CompressorBodyRepair. .............-.. . .. ... .....-.. .38
UnloaderHead,..... .............41
LeakTe3ting,
Slorage,andBreakln....... ...,.........43
Leak
Testing ........43
Slorage
.......... .........43
Br€akln.
...
..
..... ........43

Thermo
KingCompressors
The most significantpan of therefrigeration
systemis the
compressorlts function;sto pumplow pressuregas
outof
theevaporatorsothata rapidrnd continuousboilingaction
i. n)rjnll]in(d in rh<e!:rpu':rrurLUil.Thc los nr(,\ure garrs
cornpressedand forcedinto thecondensercoil wh€re
il is
cooledby air passing
through the coil. The high pressure
andrcduced
temperaturecausesn 10liquety(condense).
The conrpr€sso.scovered
by this nunual arereciprocating
piston type pumps,conslrucledmainly of casraluminum.
The aluminum alloy pistons md casr iron sleevesar€
mnchincdto closclolcrances
to thatno ringsareneededlo
fxl Ihr ti\ron r,' Ih( cylind(r$all lhe conrpr(\\oris
cquippld wirh ahighnickelalloyductileiron crankshafr.
To
prevenl
leakagenroundthecrankshafi,the
compressorisfit-
ted$ith arotrry typcrcfrigcrarionseal.
Prcssurizedlubrica(ionis piovidcd to thc conn€ctingrods
.rndblarinls by agcroror
oil punrp
in the
compr€ssorbody.
Thcoil lcvelin thc
compressorcan
bcinspectedthmughrhe
oil n\.1 'ithr gl.\. inthe
hod) Srncerh<r(frip(rJrionsls-
tcm ir scaled.il shouldbe necessrryto rdd oil only if thcre
hrs bcen r largc .efrigcration leak in the system.or if a
mnior iten in $c rcftgcration syslem,
suchasanevrporr-
ld coil or acondcnsercoilhasbeenreplaced.
A springloadeddisch.fg€valvernd springbadedvalve
crge
providc
pressurereliefif liquidreftSerant
ententhe
compressor.Theentirecagelittsnnd
prevems
bre*ing or
deformingolthe
vrlves.
When
any
repairs
or replacementsareto bemde on thc
conrpressor.it is
very
i ponmr
th
thepa suscdaru
clcan
andnol nickedor scratched.Duringdis.Nsembly,
pans
shouldbcclcancd
nnd
;Dspecledi
andif theyaretobeused
in rcasscmbly.
theyshouldbewnpped
in a cleanclothto
prcvent
marringthesurfaces.Oil .rllpanswithcompressor
oil duringrssembly,
andbesuretheyareinslalledin the
snne
posirion
lhcy
were
inbcforedi$ssembly.
NOTE: Whenrcplaccnentpatt arc requircd, wc rccom-
nend usingonq FoctoryApprured Ther o King Rcplaee-
ment Parls. Onlt Gentine Thenno King Replacencnt
Po s deliverthenliabilio, p.oductirit!, qualitr, and per-
fon nncc yr'rc co'neto erpect
fron Thcrno King.
NOTE:MostoI theot'erhaulprycedures
lor theconprcs-
so^ coveredin thisnanual are thesane. Photogruphsof
anX426
comprcssorare usedin thk nanual asexamplcs.
Other illustutions arc pmided in eascswherethephoto-
Cmphk notapplbable.

20
2l
.'/ 9''-6e
-
-_.__t.-,0
-*68
E-.- 6l
22
I
21
I
31+
tr\
3[
5t_*
vl
i; 60\
+56
Fiswe 1: Tv'oCrlinder Conpressor

1. Compressor
Body OilPumDShaftKev
2. CvlinderHeadGasket 46. OilPumpHousing
3. Cylinder
Head 47. Oil PumpAssembly
4. u-nno 48. Oil
Pump
CoverO-rinq
5. SealingWasher 49. O-rinq
6. Bolt
(3/8-
16x2) 50. OilPumpCover
Plate
7. Bolt
(3/8-16
x 2-518) 51. Bolt
(5i
16-18x 1-118)
8. DischaroeValv€Assemblv Bolt(3/8-'16
x2-1l4)
12. 5lud 52. Flatwasher
20. ValvePlate
O.rinq OilPressur€ReoulatorAssemblv
21. CvlinderSleeve 54. Requlator
O-dno
22. AdaplerGasket 55. Pluq
23. SuctionPortScreen 56. rtuo(,-nno
25. PistonAss6mbly OilLinoFitlingorValv€
26. PislonPin 54. OilSumo
27. PistonPin
Retaininq
Rinq 59. Oil SumpGasket
ConnectingRod
Assembly 60. Boll
32. ConnectinqRodBolt Bolt
33. Connecting
RodNut 62. CopperWasher
34. BearinqSet
(9andard) OllSumpScreen
BearingS6t
(0.005) 64. OilPrckupO-nng
Bearinq
Sel
(0.010) Bolt
Bearinq
Set
(0.020) Lockwash6r
BearingS€t
(0.030) 67. Flatwasher
PumoShaftO-dnq 68. CheckValve
Assemblv
36. CrankshatlPumpEndBearing 69. OilFillScrew
Pluo 70. OilFillO-rinq
38. DowelPin 71. CrankshatlSeal
39. Crankshaft 72. CrankshaflSealPlale
40. MeterinqPluq 73. Bolt
^ey 74. LipSeal
42. CrankshaftDriv€EndBeainq 75. S6al Plate
O-rinq
43. HousingGasket SiqhtGlass
OilPumD
Shatt 77. SiqhtGlassO-rino
T\|o Cylindet Conpnssor

lt
ll II
€)
\
Figu.e 2: Ea r S,rleFour CJlinderConprcssor
NOTE: Theea y st}r'econpnssor hana lpfins loadodshtft seal,
and the scal
platc andnomthe llangc wen nane in o'tepiacc.
?
O<-ll
\l

l. CompressorBody 33. CheckValveAssembly
2. ConnectinqRodNut 34. PumpEnd
Gasket
3. ConnectinqRod
Bolt 35. Pump
Housing
ConnectingRodAssembly 36. O-ing
5. BearingSet Standard) 37. O-ring
BearingSet 0.00s) 38. oi PumpCoverPlug
andCopper
Washer
BearingSet 0.010) 39. oi Pump
Cover
BearingSet 0.020) 40. oi Pump
CoverBoltandWasher
Bearing
Set 0.030) 4l. oi Pump
CoverBoltandWasher
Bearing
Set 0.00s) 42. Begulator
O-rin9
7. PistonPin 43_ OilPressure
Fequlator
8. PistonAssembly Regulator
Spring
LBetainingRing 45. Plung€r
10. Key 46. FlequlalorRetaininq
Rinq
't'1 CrankshattD veEndBearino 47. OilLine
FittingorValve
12. lvlet6ringPluq 48. Oil
Pump
Assembly
13. Crankshaft 49. O-ring
14. CranlshaftOil
Pump
EndB€aring 50. OilPumpShatt
15. DowelPin 5t. OilPumpDdveKey
SuctionO-rinoandScreon 52. S€alPlate/MountinqFlanqe
17. CopperWasherandBolt 53. Screw
and
Washer
'18. CylinderSle€ve 54. O-dng
't
9. O-ring 55. Oil
SumpGasket
20. DischarqeValve
Plate
Ass€mblv OilSump
21. SighlGlassO-ring 57. OilSumpBoltandWash€i
22. SiqhtGlass 58. CheckValveAssemblv
23. CylinderHeadGasket Ch€ck
ValveAssembly
24. CylinderHead 60. O-inq
25. Cylind6rHeadBolt
andFlatWasher 61. OilSuctionScreenAssemblv
26. CylinderHeadBolt
andFlat
Washer 62. I\rounling
ScreenHardwar€
27. ManifoldGasket 63. ScreenBracket
24. Manifold 64. I\,lounlingBracketBolt
and
Washer
29. PipePllg 65. CrankshaftSealAssemblv
30. ManifoldNrounling
Bolt 66. SealPlateGasket
31. Flatwasher RotalionNameplale
32. MagneticPlugand
Copp€r
Washer
Ea f Stlle Four C|linler Conpressor

:.i6
ffi*t
:ru;' "G>*
33
T
I
It
5t
Fieun 3: late SEleFour Crlinder Compressor
NOTE: ThelatesEleconprcssorhas4,ncul bello*s tlpe shalt seaL
Becauseof thevafiaustrpesoI nounnng requircdondfurent instauations,
thennuntingllange andseol
platc aremade
asaseparateparts-
5l*d,,

1Compressor
Body
2. ConnectingRodNut
3. ConnectingRodBolt 32. Magn€ticPlugandO-dnq
4. ConnectingRodAssembly 33. CheckValv6Assemblv
BearingSet Standard) 34. PumpEndGasket
BeafingSet 0.005) Oil
PumpHousinq
BearingS€t o.010) 36. O-dng
Beaflng
Set 0.020) 37. O-inq
Bearing
Set 0.030) 38. Oil
Pump
CoverPlugandO-ring
BearingSet 0.00s) 39. OilPumpCover
7. PistonPin 40. OilPumo
Cover
Bolt
and
Washer
a. PistonAssembly 41. OilPumDCoverBolt
and
Washer
9. R6lainingRing 42. Requlator
O-rinq
'tl CrankshaftDriveEndBearinq 43. Oil
Pressure
Regulator
MeteringPlug 44. SealPlateGasket
Crankshaft 45. Oil
PickupTube
andScreen
14. CrankshaftOilPumpEndBearing 46. OilPickuoTub€ClamDandHardware
15. DowelPin 47. OilPickupTube
MounlingBrack€t
SuctionO-rinqandScreen 48. BoltandLockwashar
't7. OilFillPluo
andO-rinq 49. Oil
LineFittinq
or
Valve
14. Cylinder
Sleeve 50. Oil
PumpAssembly
19. O-ring
20. DischargeValvePlateAssemblv 52. OilPumpDriveShaft
SightGlassO- ng OilPumpDrivoKey
22. SightGlass u. SealPlatel\rountinaBolt
23. HeadGasket 55. OilSump
Gashet
24. cvlnderHaad 56. OilSump
25. cvlnderHeadBoltAss€mbly 57. OilSumpBoll
26. cylnderHead
Bolt
Assembly 58. Check
Valve
Assemblv
27. [.4anitold
Gasket 59. CheckValveAssembly
24. Manitold 60. O-ring
CrankshattSeal
62. Bolt
63. Seal
Plate
Iate Stlle Four Cylinter Comryessor

Safety
Precautions
GENERALPRACTICES REFRIGERANT
Although
fluorocarbonrefrigerantsan:classifiedassrfe
refrigerants.cenain
precautions
mustbe observedshcn
handlingthemor servicingr Lrnilin which
theynreuscd.
Whenexposed10thcrtmosphcrcintheliquidstatc.fluoro
carbonrefrigerants
evaporate
rapidly,
freezinganylhing
Firsr
Aid
In thccvcntof frostbitc,
the
obicctivcsof FirstAid e10
protcct
thefrozcn
arca
from funheriniury.
to warm
the
affecledarerrnpidly.andtomdn(ainrespimtion.
. EYES:
Forcontacl
withliquid,imnlediatelyflusheyes
with largenmountsol walerand
ge(prompr
medical
attenlion.
. SKIN| Flush
arca
with largcanounlsof lukewarm
water.Donotrpplyhem.Removeconuminatcdcbth-
ing and shocs.Wrlp bumswith dry, stcrile,
bulky
dr€ssingto prolecl
frominfe€tion/iniury.Cel medical
altention.
Wash
contaminedclothingbctorereusc.
' INHALATIONTMov€victim10freshairanduseCPR
or mouth-lo-nroulh
ventilnion.
if necesvrry.Strywith
victim
untilarrivalofemergencymedicrl
personnel.
REFRIGERANT
OIL
Avoid refrigeralionoil conlacl with the eyes.Avoid pro-
longedor repeat€dcontactof rethgerationoil wilh skinor
clorhing.Washthoroughly
aflcrhandlingr€frigeration
oilto
Fir.t Aid
In caseof eye contact,immediatelyflr'sh with plenty of
water
fbr atleasl15rninures.CALL A PHYSICIAN. Wlsh
skinwith soapandwrter
4.
5.
6.
:1.
1.
l.
ll.
to.
ALWAYS WEAR GOGGLES OR SAFETY
GLASSES.Refrigerantliquidandbatteryacidcan
p€r'
nrnncntlydrmage
theeyes
(see
FirstAid under
Refrig'
erationOil).
Ncler opcratetheunit wilh rhecompressordischarge
Kccp your hands
cle of thefansandbehswhenthe
unil is running.This shouldalsob€ consideredwhen
openingnndcbsing thcco'nprcssorservicevalvcs.
Mrke surcthe
snuge
manifoldhosesarein good
condi-
tion. Ncvcr lct rhcmcomc in contact
with a b!lt. fan
nolor pullcy.
or anyhotsurfacc.
Neverrpply hc to .r scalcdrcfrigerntionsysrcn or
Fluorocrrt'on re|rigeflmts. in thc prcscncc of an open
flameor electrical
shon. produce
loxic gnscs
thatnre
sevcrcrcspiratory
irrilanl$cap$le ofcausingdeath.
Mrke surcall mouDlingbolts
arelight andareth€coF
recllenglh
lbrlheir panicuhr application.
U." rrrr(m( \'uuron
wh(n drill,nghol(s'n rheunn
The hole$may weak€nstructumlcomponents.Holes
drillcdintoelccrical wiri
ngcancrusefireorexplosion.
Usc caution
when worfting aroundexposedcoil fins.
Thelinscancruse
painfulhcerarions.
Usecirurionwhenworking with a rcffgerant or r€ft9,
erdrionsyst€m
in anyenclosedor confinedareawith a
linited rir supply (fo. exanple, a bus or garag€).
Rcftgcrrnl lendsto displaceair andcancauseoxygen
depletion.resuldngin sutfocation.
EPA Section 608 Cenificalion is needed to work on
reftgeralionsystems.

Specifications
x214
COMPRESSOR
No.Cylind€r Two
Bore/9roke 2.25in.
{57
mm)/1.75in.
(45
mm)
CubicInch
Displacement 13.92cu.in.
(22g
cm3)
Weight 45lbs
(20
kq)
X418
COMPRESSOR
No.Cylinder Four
Bore/Slroke 2.25in.
(57
mm)/1.62
in.
(41
mm)
CubicInchDisplacement' 1gcu.in.
(295
cm3)
Weighl 78lbs
(35
ks)
Four
2.25in.
(57
mm)/1.62in.
(41
mm)
25.84cu.in.
(424
cm3)
78lbs
(35
ks)
x430GoMPRESSOR
\ No.Cylinder Four
Bore/Stroke 2.25in.
(57
mm)/1.88in.
(48
mm)
Cubic
fnchDispfacemenl 29.92
cu.
in.
(489
cm3)
Weighl 78lbs
(35
kg)
X426COMPRESSOR
No.Cylinder
Bore/Stroke
CubicInchDisplacement'
Weighl
OPERATING
CLEARANCES
CrankshattEnd Play @70 F (21
C)
Bearinglockedin bore
Bearingunlockedin bor6
Connecting
RodBearingTo
Crankshatl
RodJoumal
Oil PumpCoverClearance
(distance
belowhousing)
PistontoSleeve
PistonWristPinto Bushing
Unloader
CheckValveto Bore
UnloaderPistonto Bore
lnches Millimcter3
0.00701o0.0125 0.1778to0.3175
0-00701o0.0470 0.1778to
1.1938
0.00081o0.0024 0.0203to0.0610
0.0010to0.0040 0.0254to0.1016
0.0018to0.0027 0.0457to0.0686
0.0001to0.0006 0.0025to0.0152
0.0020to0.0040 0.0508to0.1016
'The X41aand X426 compresaorchave the samcborc/strokc butdilfer in cubic inch displaccmcnt, fhis
is accomplished by using dilletent pott locations in thc cylinder sleeve,fhc closer the poris are to the
top ot thecylinder sleeve, the smallcr thc total displacemeht,

Specifications
(Rev.
7,1201)
PARTDIMENSIONS
Connecting
RodBearingInsert-Standard l.D.
Crankshaft
Rod
Journal-Slandard O.D.
Compressor
Body
Main
Beaing
Bore l.D.
Crankshattl\rainJournal-DriveEnd O.D.
Crankshatt
irainJournal-OilPump
End O.D.
CyljnderSleeve l.D.
Piston O.D.
Conn€ctingRodWristPinBushing-Standard LD.
PistonWristPin-Standard O.D.
OilPumpGerotorAssembly Thickness
OilPumpInnerWearPlate Thickness
OilPumpOuterW6arPlate Thickness
CheckValve-Unload€rHead O.D.
Piston-UnloaderHead O.D.
BoreinlJnloaderHeaHheck Valve LD.
BoreinUnloadorHead-Pislon LO.
lnche3
1.3755
to1.3766
1.3742
to1.3747
3.9355to3.9370
1.77151o1.7719
1.5746
to
1.5750
2.2495ro2.25OO
2.2473ro2.2477
0.6255to0.6258
0.6250to0.6252
0.3430to0.3440
0.1867to0.1873
0.1867to
0.1873
1.1240to1.125O
0.9970to0.9980
1.1270
to1.1280
1.0000
to1.0010
Millimeters
34.9377to34.9656
34.9047to 34.9174
99.9617to99.9998
44.9961to45.0063
39.9948to40.0050
57.1373to57.1500
57.0814
to57.0916
15.8877
to
15.8953
'l5.8750
to15.8801
4.71221o8.7376
4.7422ro4.7574
4.74221o4.7574
28.5496to
28.5750
25.3234lo25.3492
28.6258to28.6512
25.4OOOlo 25.4254

Specitications
(Rev.
7,12l01)
TOROUEVALUES
Locotionof Screw
orComponent
THREADSIZE TOROUE
Dia.
in. Pitch Lcngth in-lb Ir-tb kgm Nm Part
No. Req.
cvlnderHead 3/a 2-5/a 275 22.9 3.17 31.1 55-6806 I
cvlnderHead a8 2275 22_9 3.17 31.1 5s-6805
CylinderHeadw/Unloaders 3/8 16 1-118 275 22.9 3.17 31.1 55.9106 1
Cylind6rH€adMUnloaders 3/8 16 4-1/A 22.9 3.17 31.1 55-6823 3
CylinderHoadw/Unloaders 5/16 18 1-1/8 150 12.5 1.73 17.O 55-681 3
CylinderHeadw/lJnloaders 1t4 20 '1-1/4 120 10.0 1.38 13.6 4
CenlerScrewinLargeCheck
ValveAssembly 1t4 2A 0.29 2.4 55-4281 1
CheckValv€
Assembly-Large 1-1/4
NEF 18 336 2A.O 3.87 38.0 22-747 1
CheckValve
Assembly-Upper 1t4
NPT 300 25.O 3.46 33.9 22-653 2
CheckValve
Assembly-Lower NPT 120 10.0 1.38 13.6 22-564 2
ConnectingRodNut 5/16 24 300 25.0 33.9 55-1681 A/R
On6
Piece
SealPlateand
MountingFlange-€arly
StyleFourCylinder 3t8 1-5/8 335 28.0 3.86 3.79 55-2306 9
l/ountingFlange-Lato
Style
Fo0r
Cylinder 3t8 16 1-5/8 335 2A.O 3.86 3.79 55-2306 6
SealPlate-Lat€ Style
FourCylinder 3/8 11la 335 2A.O 3.86 3.79 55-9106 3
Seal
Plate-Four
Cylinder
withoutMountingFlange 3/8 16 t1la 335 27.9 3.86 3.79 55-9106 I
Seal
Plale-TwoCylinder 18 1-1/4 150 1.73 17.0 55-172 6
SightGlass 600 50 6.91 67.8 22-350
Manitold 3/8 1-3/4 335 2a.o 3.86 37.9 55-3641 4
Manitold 3B 2-3/a 335 2A.O 3.46 37.9 55-6822
Plug 5/8 18 450 5.18 50.9 55-6751 A/R
oil FitlPlug '1t2 1450 5.18 50.9 1

Specifications
(Rev.
7, 12y01)
TOBQUEVALUES
(CONTINUED)
Locationof Screw
orComponent
THREADSIZE TORQUE
Oia.
tn. Pitch Length
tn, inib fi-tb kgm Nm Part
No. Req.
OilPickupTub6Bracket 1/4 20 1t2 120 10.0 1.38 't3.6 55-'t65 2
Oil
PickupPlug 5/8 18 450 5.18 50.9 55-6751 1
OilPressureRelielValve 9/16 18 225 18.8 25.4 22-784 1
Oil
Pump
Cover/Housing 2-1/4 275 22.9 3.17 31.1 55-183 8
OilPumpCover 5/16 18 1-3/8 150 12.5 1.73 17.0 55-681 2
OilSump 335 27_9 3.86 37.9 55-1417 16
OilSump 3/A 16 1-1/4 335 27.9 3.86 37.9 55-129
PislonH6adNut,Flexloc
Typewithoul
Oil 5/16 24 '|
60 1.85 1.80 A,/R
PistonHeadNut,Flangenut
TypewithOil 5/16 24 130 10.8 1.50 14.7 55-318 A/R
ThrottlingValveBody v8 1-1/8 275 3.17 31.1 55-9106 4
AllOtherBolts 5/'16 18 't
50 12.5 1.73 17.O A,/R
AllOtherBolls 3/8 275 3.17 31.'l l/B
NOTI::Toryue
tin-lhtx 0.t8JJ3
=torque
A-lb I
TorquetinJhtx 0,0lIS2
=torqu. tkgmt
Toryuc(in-lb)x 0.1t30 = totque (Nm)

General
CompressorRepairTechniques
Becauseof the vanous refrigeration unir models a given
compressormry be usedon, no aitemptis being madein
this mnnual to show a rcmoval procedure.
This manual
assumesthal thecompressorhas
beenremoved
properlyin
cord.rnL(lo thc n'.rintcn.nce
manuilIorth<Jpprcpri.tc
This mnnual doescot'er the drive coupling removal and
re-inslallation. Th. illusfations used rrc typical. your
i'tstallationmayvary frornwhal is shown.
DIRTANDMOISTURE
CANEASILYRUIN
COMPRESSORS!
Comprcssonarc assembledat the facroryin special
clean
roonrswilh fihered. condilioned dr. Field conditionswill
nol alwaysallow fnctoryclcanrepair
arensbu(evcrycffon
should
betakenlo keeprhccomprcssorwork areaasclem
as
possible.
Follow thesctules1o
protecl
compressoBfron
. Pumpdown thc system
and recovcrthe refrigeranlin
compliancc
with Federal,Srareandlolalregularions.
. Usc dry nitrcgcn lo break the vacuum.This prevcnts
din andnoisrurefrom geuing intorhcconrpressor.
. Usc
cap
plugs
or lapeinsteadof raSs1o
covcrcompres-
soropcningsassoonasvibrasorbcrsor servicevalves
arcremoved.
Poloyolesreroil drawsin moisturelike I
,ponpc rnd rJgs uill n, rtop moisturelrom rnrcring
rhc
conrpressor.
. Rcnovc alldirt anddebrisfrom theconpressorpriorto
. Work in a cldan. closed area. Stay rway from open
doorsor windowsthatallow din roblow in pans
clean-
ing areas.
grjndingareasandbeadblasting
machines.
. Ke€p your tools and workbench spolless.
Keep your
hands
ascleanas
possible.
On(( rhecompre,,ori, opinfd rorhe
nro\ph<r(.
!(l
lhe
job donequickly-Planahead.
Haveyour pansand
Only use
chemicalsolv€ntsthrl leaveno oily rcsidue.
suchasnaphtha.
lacquer(hinner.
or br*e clcanerto
clean compressorcomponents.Do No. Bead Blast
compr€ssorcomponentsclean.
lfthejob mustb€inlerrupted.covcr
thccompressor.A
fiesh.clean
piccc of plasticsheeling
wrapped
lightly
aroundftecompressor
isbest.Clo(hshouldnotbeuscd
as
it doesnotblockmoisture-
Bc sure
to usethecorrectoil to prevent
contaminalion
Always leep your refrigerationoil capp€d.A tew
inuteswilh thecapoff crn ruinirl
Do nordip sealpansin oil. Conhinersol oil us€dfor
dipping pan! sit open and collcct moislure,drn and
dusl.Insk.d. use
r small.cleanoil candedicatedfor
useonlywilh tb€correctoil for thecompressoryou drc
Disdrd rlllhc oldO-ringsand
gaskets
thararcexposcd
while working
on tbe compressolO-ringsandgaslets
shouldno(
br rcused.Replacerhernwith ncwones.
COMPRESSOR
OIL
INDICATIONS
Discolorationof lh€ oil is an indication
of a conrainin ed
sy\rrm.n,i lurure
prohl(m,.
R(le' ro rh. lollo$ing
com-
pressor
Oil ColorCode
to diagnosetheconditionsandcor-
COMPRESSOR
OILCOLORCODE
COLORLESS
or LICHT YELLOW Indicnts good
com,

ceneralCompressor
RepairTechniques
(Rev.
7.1zo1)
BLACK OlL. Indicatescarbonizrtioncausedby air in the
systcmor the presence
of wearpanicles
thatcontrin iron.
ChaDgcthccompressoroilandoil filter.
LIGHT BROWN OIL. Us€anacidtestki110lestrheacidity
of a srmpleofthe compressoroil. Foralkyl benzineoil use
acidtesl
kit P/N 20:l-346.Forpolyol esteroil useacidtest
kil P/Nl0.l 518.Changethc compressoroil ifthe testindi-
cntcstheoil isacidic.
BROWN OIL. Indicatescopper
plating
cruscd
by moisture
in thesystcm.Air in lhesystenor highcompressortenp€r-
aturescancauscoxidrtion which will (um theoil brown.
Changethe compressoroil if lhe test indicrtesthe oil is
CRAY ORMETALLIC OIL.lndicaresthe
presence
ofwear
panicles
tharconrainaluminurn.
This is usurlly causedby
bcaringwcaror piston
sconng.Th€ compressorshouldbe
disassembledand insp€cledtbr wom or damagedcompo-
nenls.Thcoil and
oil fikcr shouldbechanged.
CREEN
.)lL. Crc(n
(omprcssor
oil indiLrte\th.reir sJrer
in thc systemandcopper
plating mry haveorcuned.The
compressorshouldbedisass€mbledandthe
shatiseal.beaF
ings,gcrrs.md rotorsshouldbe insp€cred.Pans
with sig-
nificanrcoppcr
plaringshouldbereplrced.theoil separator
should bc rcplaced.and the oil md oil fiker shouldbc
A contarninatedsystem
will causea failurc if lefi uncor-
rected-The contaminatein the syslem
{ill breakdown ihe
refrigerantoil, causingexcessive
bearingwearandsconng
of panswithin thecompressor
Copperphdng andmoisture
will affectthevalveplale
ringsandbreakdownthcrcftger-
anlandrffeclsthecapacityoflhe unit.
Paniclesand bearingscaletraveling with thc rcfrigerant
will plug the driers andexpansion
valves.causingeratic
opcrationuntil the condition is coffected. nushing with
refrig€ranlor th€useof suclionfilters andliquid line driers
is rcconmendedwheneveracontaminatedsystemis found.
In somecases.lheconhminaledcondilion canbeconecl€d
by changingoil. refrigerant
anddrier Usc r recommended
evacuation
process
beforeth€unil is placedin servicc.Scc
TK 40229 Clean-upof RefrigerationSystcms
with Thermo
KingCompressors.
'

Disassembly
and
Reassembly
Thefollowing aresuggcstcdsequencesfor a full disassem- 8. Installhead,or headsandmanifold.
blt nndrclssemblyofthe compressor.
CAUTION: Whenservking comprcsso^,nake
sureo parls arc rei stalledi their ongintl loca-
L lnstall
crankshaftsealandseal
plate/mounting
flnnge.
10. Install
d;ve coupling.
tions. Carelu y 'turk similar componenE,and pa\)
speciotarcntio, to Jasknet
tensth," ."""," in", FASTENER ToRQUE PRoCEDURE
L Removc'nanitbtd
(tou.cylindercompressobonty). comPrcs\or
oil jusrprior 1oassenrblv'
:1. Removehcnd.orbcndsirorn
compressorbody. 3lnstnll:rllbolts('rndw$hen)andpre'tight€nlo70'tof
' lh{ ruLommcndfdtorque.foll"wrng
J (n\\-cro\i prl-
5. Rcmovc
discharge
vrlvc plares
frolncylinden. tem.
6. Removesealplate/mounting
flrngeandcrankshaftscal- .1. Use
ahand
torqucw€nch ondlhe sanNcriss-cross
pal,
arercinsta edconcctq.
DISASSEMBLY
SEQUENCE
L Remove
drivecoupling.
2. Dnin residualoil.
Usethefollowing
procedure
whenspecificstepsarcnot
provided.
L Caretullyremoveany remaining
gasket
mrterialrnd
clcanboihgasketsurfaces
thoroughly.
2. Alwxysuser new
gaskel
andcortthe
g$ketwith
clean
t€mto bringall boltsto finaltorque.Holdbolts On
Torqueforafewseconds.
CLEANINGCOMPONENTS
CAUTION: Do not beadblast compressorcompo-
nenb cleon. The abrasive nedia can bccone
enbeddedin castinss,Irce i^eu duins cotnpftssol
operution,and da,naqe the compnssoL Onlr use
chemhal solvents
that learenooil| rcsAue,suchas
naphtho"lacquerthinner or brukecleanerto ckan
conprcssorcomponents.cfocus cloth mal beused
to remorc rustor oiidation frcn extenul conpres-
DRIVECOUPLING
Removal
Thereare severaldifferent types of drive couplings and
clutchesusedon the foul cylindercompressorsin unic
7. Renole oil sunrpandoil pickup
screen.
L R(m,'\
(.onnc(ling
rod\.
p'\lon'
rndslr.\cr.
9. Renole oil pump.
lO. Remo!ecr:rnkshrfr.
ll. Remole€hcckvnh'es.
REASSEMBLY
SEOUENCE
L lnstnllcheckv,rlvcs.
2. Insrrll
crankshaft.
3. Installoilpunp.
,1. Installconnectingrods.
pislons
andsleeves.
5. Installoilpickup
screen.
6. Iflstalloil sump.
7. Insmlldischargevalveplates.

Disassembly
andReassembly
(Flev.
7. 12lO1)
manufncturedby Themo King,butlheyareall hcldon by a
single
bolt threadedinto theend of the conpressor
crank-
shafl.Oncethisboltisremoved,thecouplingor clutch can
beremovedfrom rhcshaft.Remove
thebolt andrhenusc a
puller
to rcmovcthccoupling
or clutch.
CAUTION: as. a puler to rcmovethe drit'e cou-
plins or pu cr fton the crunkhafL PuAer
(P/N2U-139) or pu et wuh handte(P/N 204-991)
ue availablc
tor useon conprcstu. couplinss wilh
threadcdholes.DO NOT usea hanncr to pound
thc couptins ot pu et oJJ.Thit s'i damase the
lnstallation
ThermoKingempbys
a hpcrcd
joint lo securerhe
drive
couplingor dnlc pulley
to thecompr€ssorshdr.Thishas
twodvantages:firstil pr€vcnts
anyloosencss
thatmight
occur
aswhen
usingi slidingfit on a shafi.
Thesecond
advantageis lhal whcn torqucdpmperlythe fricrion
berwccn
thctwotap€rscanbeusedrodrive
rhecompressor
A keyisuscdinthctapered
ioint
toguarmree
propcrposi-
tioning
of lhecouplertothecompressor,
andtotheengine
or driv€ pulley.
Usingr kcy can alsoprevent
slippagc
bctweentheiapersurfmesincase
ofextremeshockloads.If
thetrpersarerllowcd
toslip,
galling
ofthesurfaces
occurs.
Grllcdsurfaces
nalicdisassemblydifficult.
aodreassem-
blinggalledpanswillnotassure
prop€r
aligoment.
Keyways
arecut
with
atoolwhichleaves
aradiusattheend
oflhekeyw:ty.Ifrhekey
beinginstalledispushcd
onto
rhe
rdius atthe
end
ofthe
keyway.thetaperwill nolseatprop-
erlymd th€
coupling
will wobble.Thiscrusesstr€ss
robe
pul
onthecrankshaflandreducesitslife.Makesurekeys
areof lhe correctlengthto fit entirely
in theirrespective
keyway
prior
toinstallation.
The
following
procedure
shouldbcusedto installa com-
pressor
couplingonto
thecompressorshaft.
l. Cleanthe compressorshafl and raper
andthe rap€red
boreof lhe couplingwith a solvent
lhalleavesno oily
residue.suchasnaphtha,
lacquerthinner,bral€ clcaDer
or lhelike.
2- Inspectboth m ing surfaces
for burs. oxidarionmd
othersurtuceinrperfections.
Dresswirhcrocuscloth if
necessaryandreclean
asrequired.
NOTE: Do not sand o.lop .he tapcred a.ea as component
fftcturc nar nsull
L Using no lubricants.set thc couplingon the crank-
shaft and align the keywry using the Keywry Tool
(P,4.,1
:0,1-972)-lnscn the tapercdendof ihe lool inro
thekeywayandgently movethc coupling
on the shafi
whilc pressingth€ lool imo rhc keyway.This will
align thc keyway in the crankshaftwi(hthdkeywayin
Figurc 1: Ke!*at ToolP/N2M-972
CAUTION: If you arc assenbhns a used
coupleror crunkshalt and tho tool doesnol fi
eosily ,hen k a pnbln wilh one o[ the
kcli,als! Do not renmvethecoupb andpla.(
thekq in thecrunkshaltkerwarandthendrop
the couplcr on. If the tool doesnotfir, the kef
|'iA not lit, and it eil hoA the taper in thc
coupdngofl the bper on thesh4ft.Checkboth
keywrs for buns ot corrosion.A her can be
c.ntetl |'ilh Jine lappinstonaound anduseda!
a lapping tool to cleanthe keru)aJs.Cleanthe
ket and kelwar virh solyent bclon linat
Other manuals for X214
1
This manual suits for next models
3
Table of contents
Other Thermo King Air Compressor manuals
Popular Air Compressor manuals by other brands

ULTIMATE SPEED
ULTIMATE SPEED UMK 10 C2 Operation and safety notes

Mea
Mea SMAC 90-H Owner's/operator's manual

SIP
SIP 03663 quick start guide

EINHELL
EINHELL TH-AC 190 Kit Original operating instructions

Premier
Premier MDP-4807C instruction manual

GEA
GEA Grasso VHS Series Installation and maintenance instructions