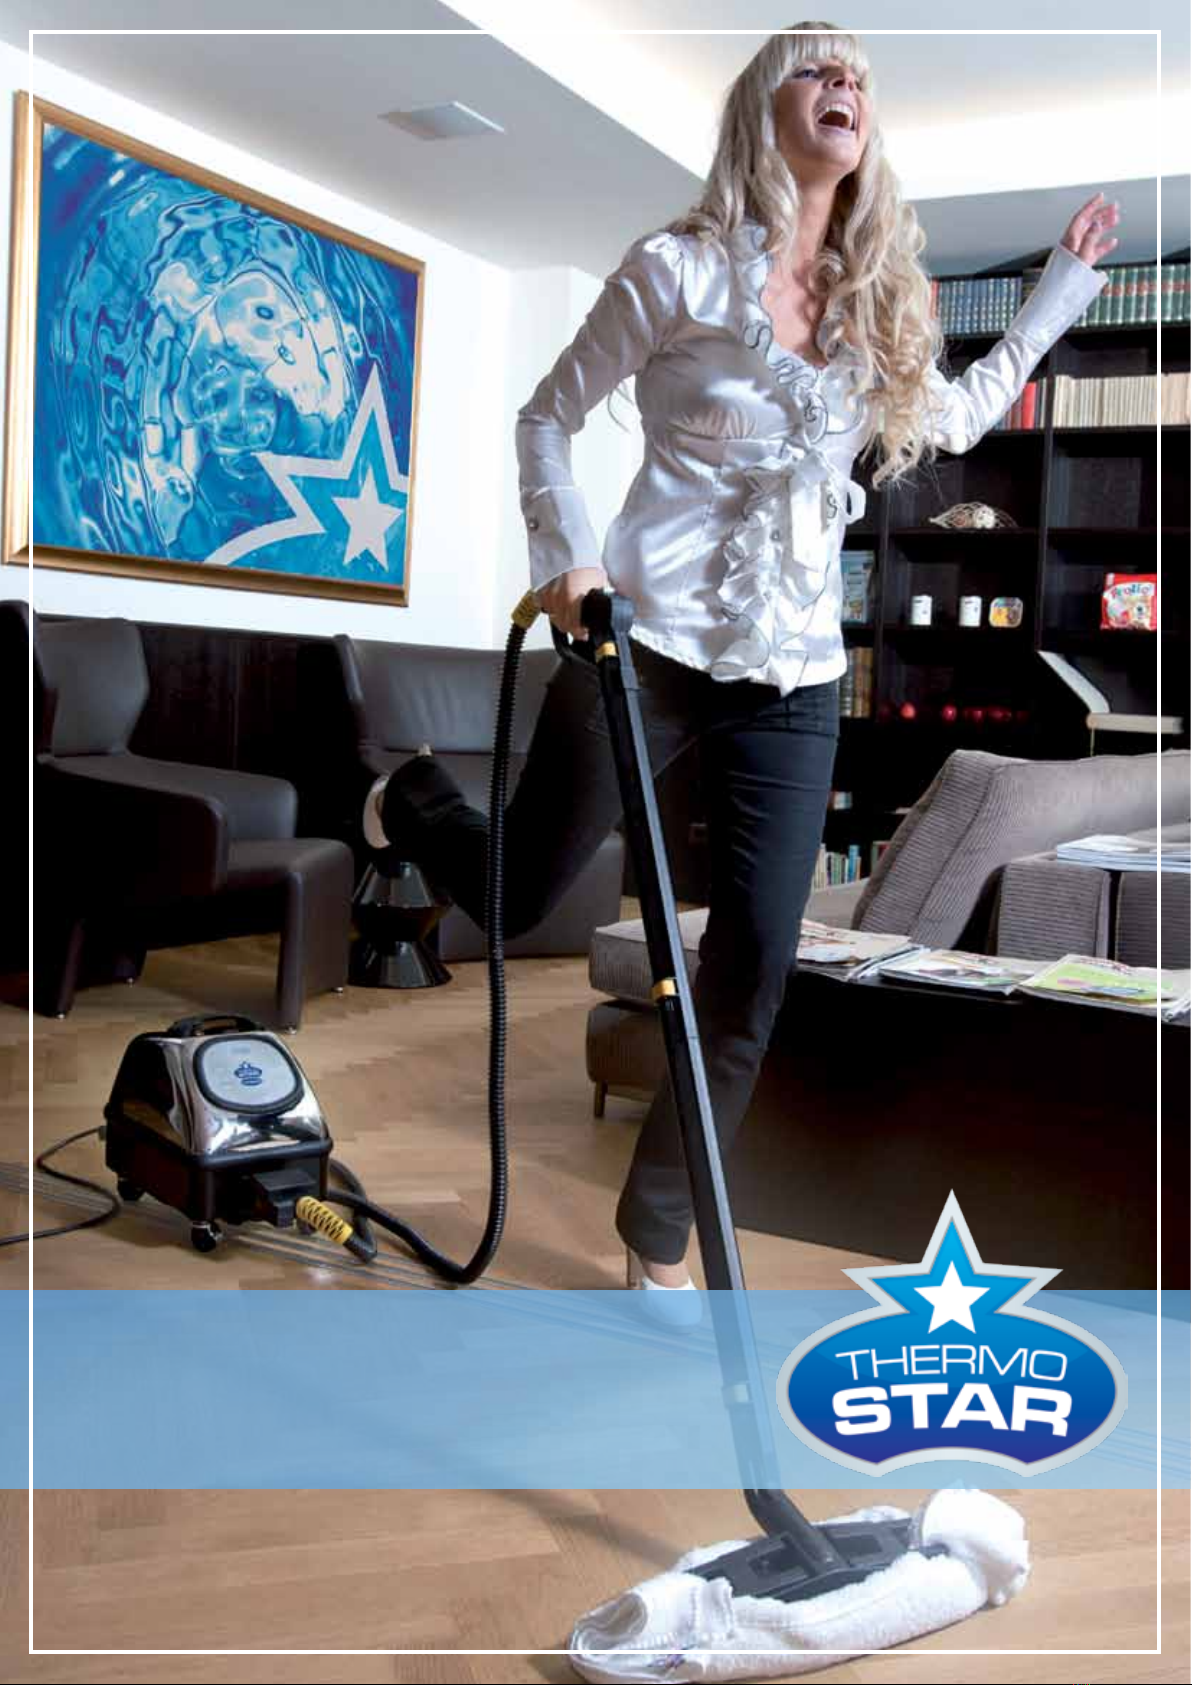
Thermo-Star Avantgarde Operating instructions
Operating and
Maintenance Manual

2
Dear Thermostar Customer,
congratulations on your purchase of a
newThermostar Dry Steam Cleaner.
This unique cleaning system is exclu-
sively available from selected author-
ized dealers. It allows you to not only
clean your home faster, more efficiently
and more cost-effectively, but also pro-
tects your valuable furniture as well as
other interior items since there is no
need to use any chemicals.
This user’s guide illustrates how to use
your Thermostar Dry Steam Cleaner
correctly and in the most efficient way
in a few easy steps.
Allow yourself to be surprised how ef-
fective and efficient your new Thermo-
star operates and soon it will become
an integral part of your household.
Please take a few moments and read
this user’s guide before you operate the
machine. Please also note the included
safety instructions!
We hope you enjoy your new Thermo-
star!
Products for Life
We sometimes think that we own
nature – the truth is that we are only
part of nature.The way we treat nature
directly affects our children! We atTher-
mostar believe that waste should be
prevented whenever possible. With this
cleaning system we have found a so-
lution that is ecologically practical and
makes good economic sense. Products
for life are only purchased once and
disposed once.
The Thermostar dry steam system is
available exclusively from selected au-
thorized dealers. It offers outstanding
quality standards as well as extraordi-
nary guarantees – it just doesn’t com-
pare to any other commercially avail-
able product.
Introduction

3
Commonly available steam cleaners
generally operate with low pressure
(app. 3 to 4 bar) and low steam temper-
atures. This creates a very wet steam
with low cleaning capacity, which can
be harmful to wood surfaces.This is the
main reason why many of those appli-
ances are rarely used and will finally
end up in the basement. Many manu-
facturers therefore offer steam vacuum
cleaners that suction excessive mois-
ture directly during the cleaning pro-
cess. This results in the appliances be-
ing larger and their hoses being thicker
and heavier. Numerous market analy-
ses show that household appliances
will only be used on a regular basis if
they are light, small and convenient.
Furthermore, these appliances will only
function properly when the steam is
not too hot and/or wet – which is con-
trary to one of the basis rules for effec-
tive steam cleaning: Because less heat
equals less cleaning performance.
The terms dry steam, micro steam or
heat cleaning are used in describing
appliances that operate with high tem-
peratures and pressures (beginning at
app. 160° C and app. 6 bar pressure).
Larger heating elements and compre-
hensive safety features are generally
necessary in order to generate more
heat and pressure. This results in the
appliances to be larger and rather in-
convenient to handle. Thanks to the
unusually high capacity of the AKU-
THERM-COMPACT heating system
used in the Thermostar it is possible
even in relatively small boilers to gen-
erate a rather high working pressure
of up to 8 bar. The result is an amazing
high-capacity appliance with a practical
size that fits every household.
The major advantage of cleaning with
dry steam is that fabrics and other ma-
terial do not become wet but rather
slightly damp. The high temperature
and speed at which the steam is dis-
charged removes dirt and dust from its
carriers.
The high steam temperature has there-
fore a “releasing” effect.The hot steam.
What is dry
steam?

4
The manufacturer is not li-
able for damages arising
from improper or incorrect use.
Do not direct the steam or hot wa-
ter jet toward persons or ani-
mals. Do not touch the steam or hot
water jet – danger of severe burns!
The Thermostar is equipped with
a pressure meter, which allows you
to regulate the pressure and main-
tain a preset level (see “rated pres-
sure” listed on the technical speci-
fications label attached to the appli-
ance). If steam should ever exit from
the bottom section of the appliance,
the appliance may not be functioning
properly and the safety valve is limit-
ing the pressure within the
boiler. In this case we strongly
recommend that you stop using
the appliance, immediately
disconnect the power supply and
contact the customer service
department.
Do not use the appliance if the power
cord or other major components
such as safety devices, high-pres-
sure hoses or the handle/pistol grip
are damaged.
The Thermostar Dry Steam Cleaner
is equipped with a “solids
discharge” warning system. If
“CALC” is displayed on the multi-
function display, it is time to clean
the boiler (see “Maintenance”).
Remove the discharge cover only if
the appliance has been turned off
and the power cord has been
disconnected for a minimum of 5
hours.
This appliance is not intended to be
used by persons (including children)
with limited physical, sensory or
mental aptitude or lack of experi-
ence and/or knowledge unless they
are supervised by a person respon-
sible for their safety or have received
instruction from this person as
to howThermostar is used. Children
should be supervised to ensure they
are not playing with the appliance.
High-pressure hoses, accessories
and connections are necessary to
safely operate the appliance. Only
use those hoses, accessories and
connections recommended by the
manufacturer.
CAUTION: Before using brushes,
you should always try them first in
an inconspicuous area to avoid
damaging any surfaces. The steam
generated by the steam generator
is very hot. You should therefore
always conduct a test on a small
surface area. Wood surfaces and
silicone joints should only be treated
with a minimum amount of steam
and then immediately dried using a
micro-fibre cloth.
When using an extension cord, the
connector plugs as well as the
receptacles must be completely
waterproof. Incorrect extension
cords can be hazardous.
Never leave the optional iron unat-
tended once it is connected to the
power supply.
Any alteration to the appliance
releases the manufacturer from all
claims and liabilities.
The data for hand-arm vibration with
respect to this appliance is less than
2.5 m/s² and is therefore not
specified.
Safety regulations
5
PLEASE READ THESE OPERATING INSTRUCTIONS BEFORE USING THIS APPLI-
ANCE. PLEASE KEEPTHEM IN A SAFE PLACE SOTHATYOU MAY REFERTOTHEM
LATER AND PROVIDETHEMTO ANY SUBSEQUENT OWNERS.
IT IS ESSENTIALTHATYOU CAREFULLY READ AND FAMILIARIZEYOURSELF WITH
ALL SAFETY REQUIREMENTS BEFORE USING THE APPLIANCE FOR THE FIRST
TIME. NOTIFY YOUR AUTHORIZED DEALER IMMEDIATELY IF YOU NOTICE THAT
THE APPLIANCE WAS DAMAGED DURING SHIPPING.
Introduction 2
What is dry steam? 3
Safety regulations 4
Component index 6
Keypad functions 8
Steam generator maintenance 9
Operating hours counter 9
Pressure gauge 9
Operating instructions 10
UsingThermostar micro steam 12
Iron (optional) 16
Steam mop (optional) 16
Interpretation of the symbols
Environmental protection
CAUTION!
STEAM …
Risk of injury
Please read the
instructions
Manual;
Instruction for use
All packaging materials can be reused. The packaging should not be treated as
household waste but instead be taken to respective collection sites.
Please remember that the appliance contains precious materials that should be
recycled and taken to respective collection sites when necessary. Electric and elec-
tronic appliances, batteries, oil and similar substances may not be disposed in the
environment. Please separate all waste.
Substances such as motor oil, heating oil, gasoline or diesel fuel may not be dispo-
sed in the natural environment. Please protect the soil and dispose used oil accor-
ding to the environmental regulations.
CAUTION!
Technical Data
Look at the technical badge on the
machine.
Features
Stainless steel boiler
(10-year warranty!)
Integrated fan to keep the
electronic cool
Self-decalcifying heating
element (expansion during
heating process causes cal-
cium deposits to fall off). The
capacity of these elements is
four times greater than equiv-
alent spiral heating elements
(28 instead of normally
7 W/cm²). They offer very long
service life and – contrary to
most spiral heating elements –
can be replaced.
Self-decalcifying electrome-
chanical float (with TrueTemp
Technology for constantly high
steam temperature)
24 x 7: Constant steam– 2 tank
systems allow continuous
operation
Table of content
6

7
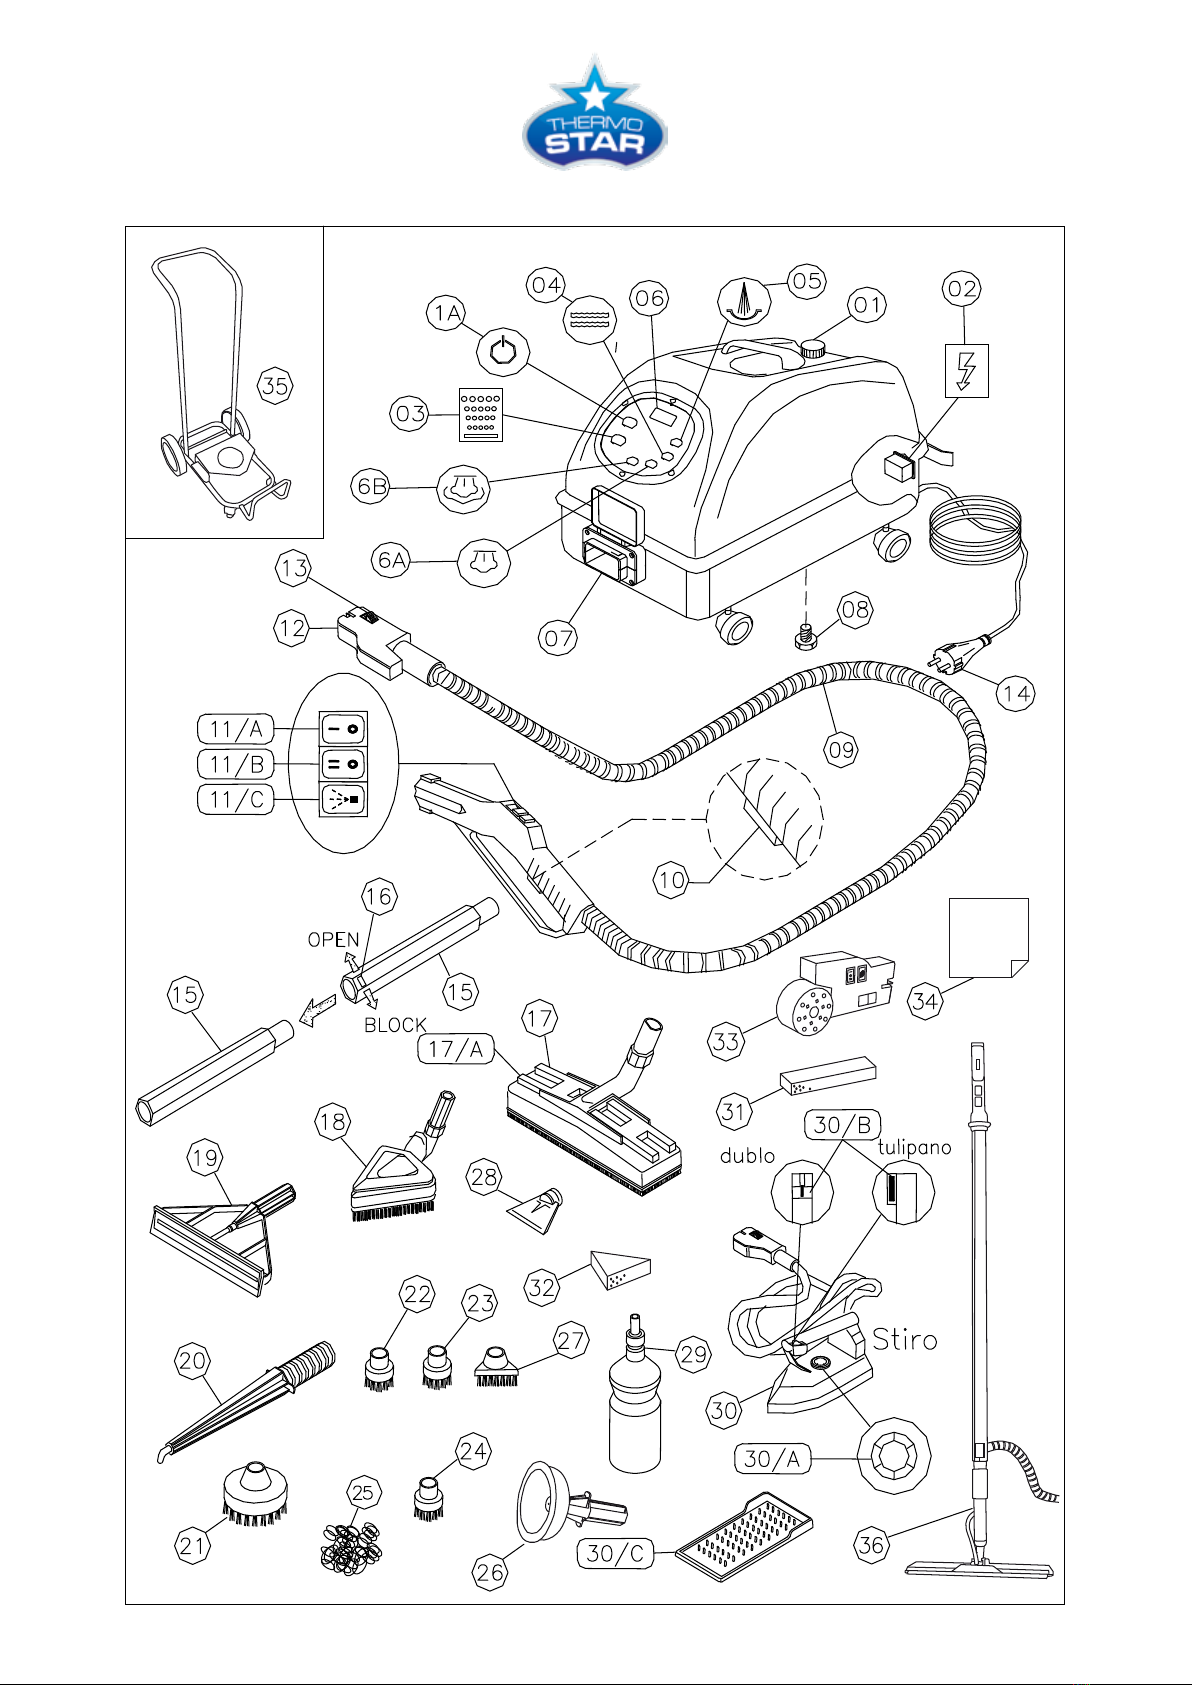
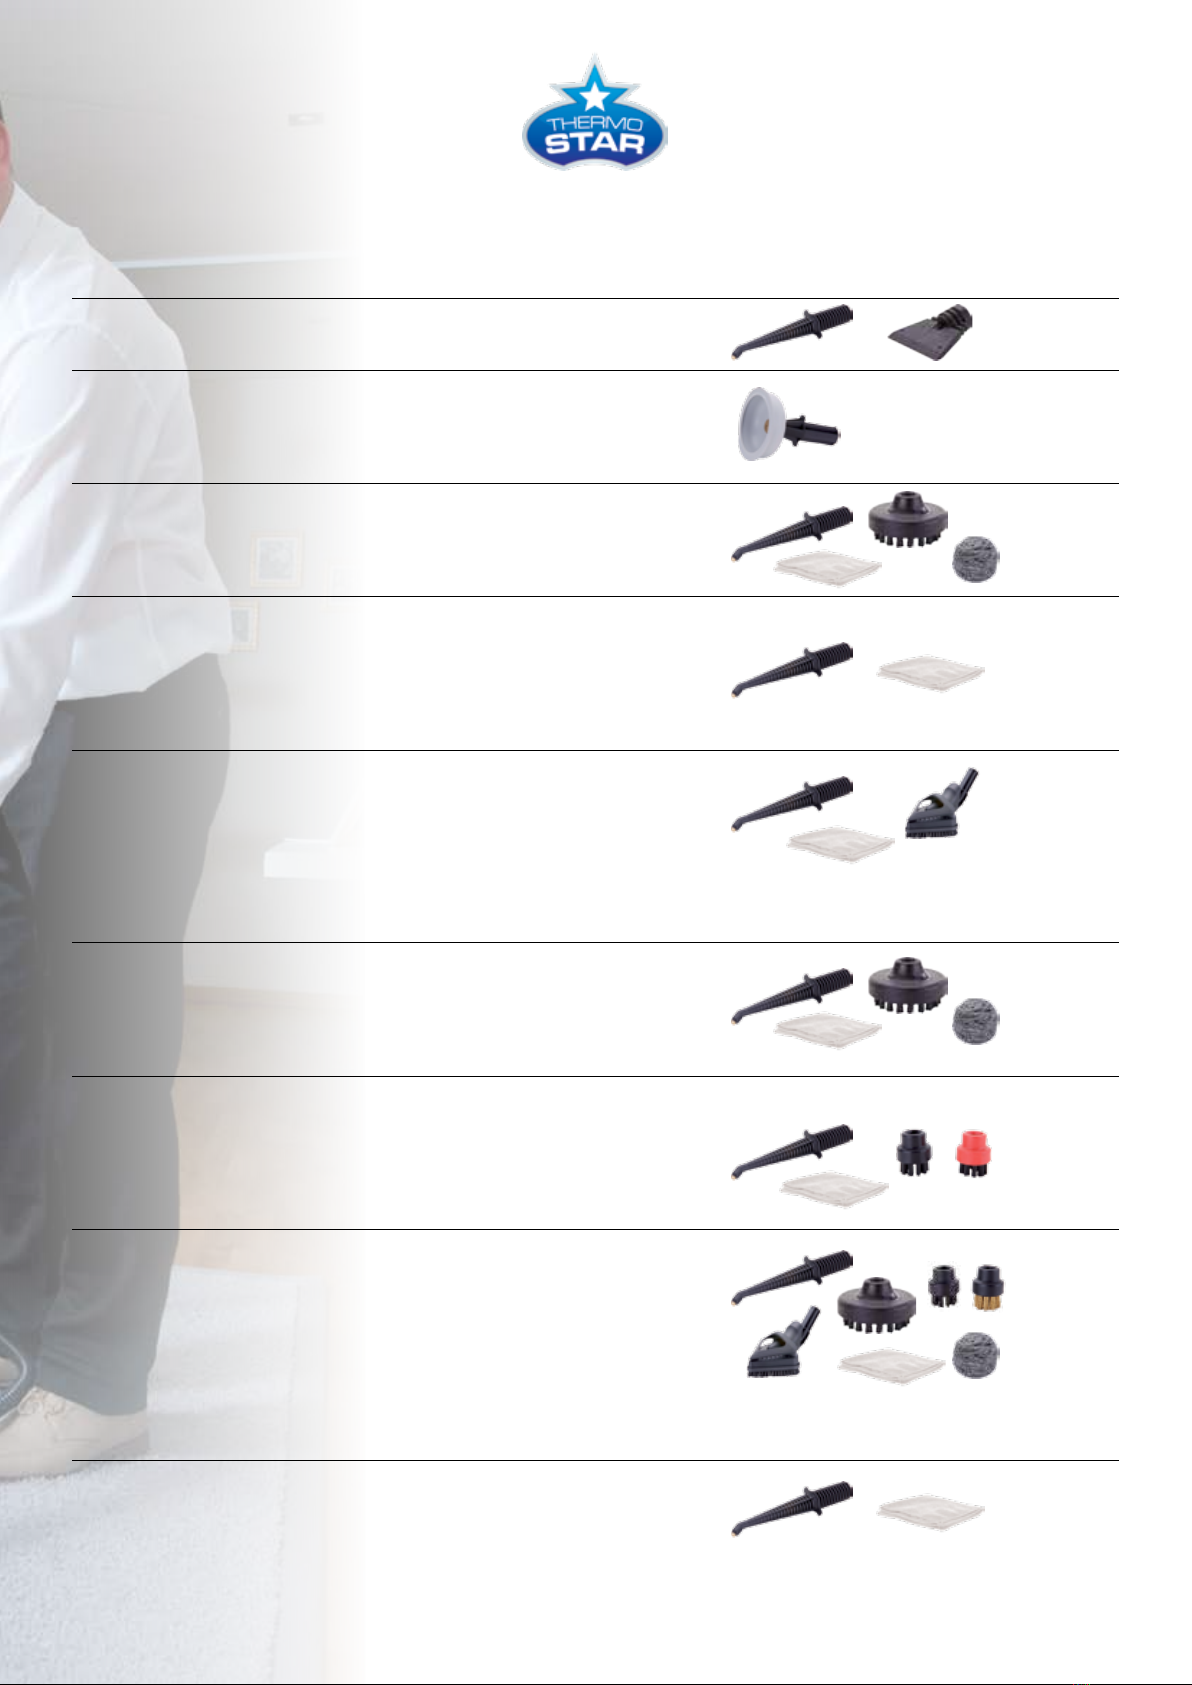
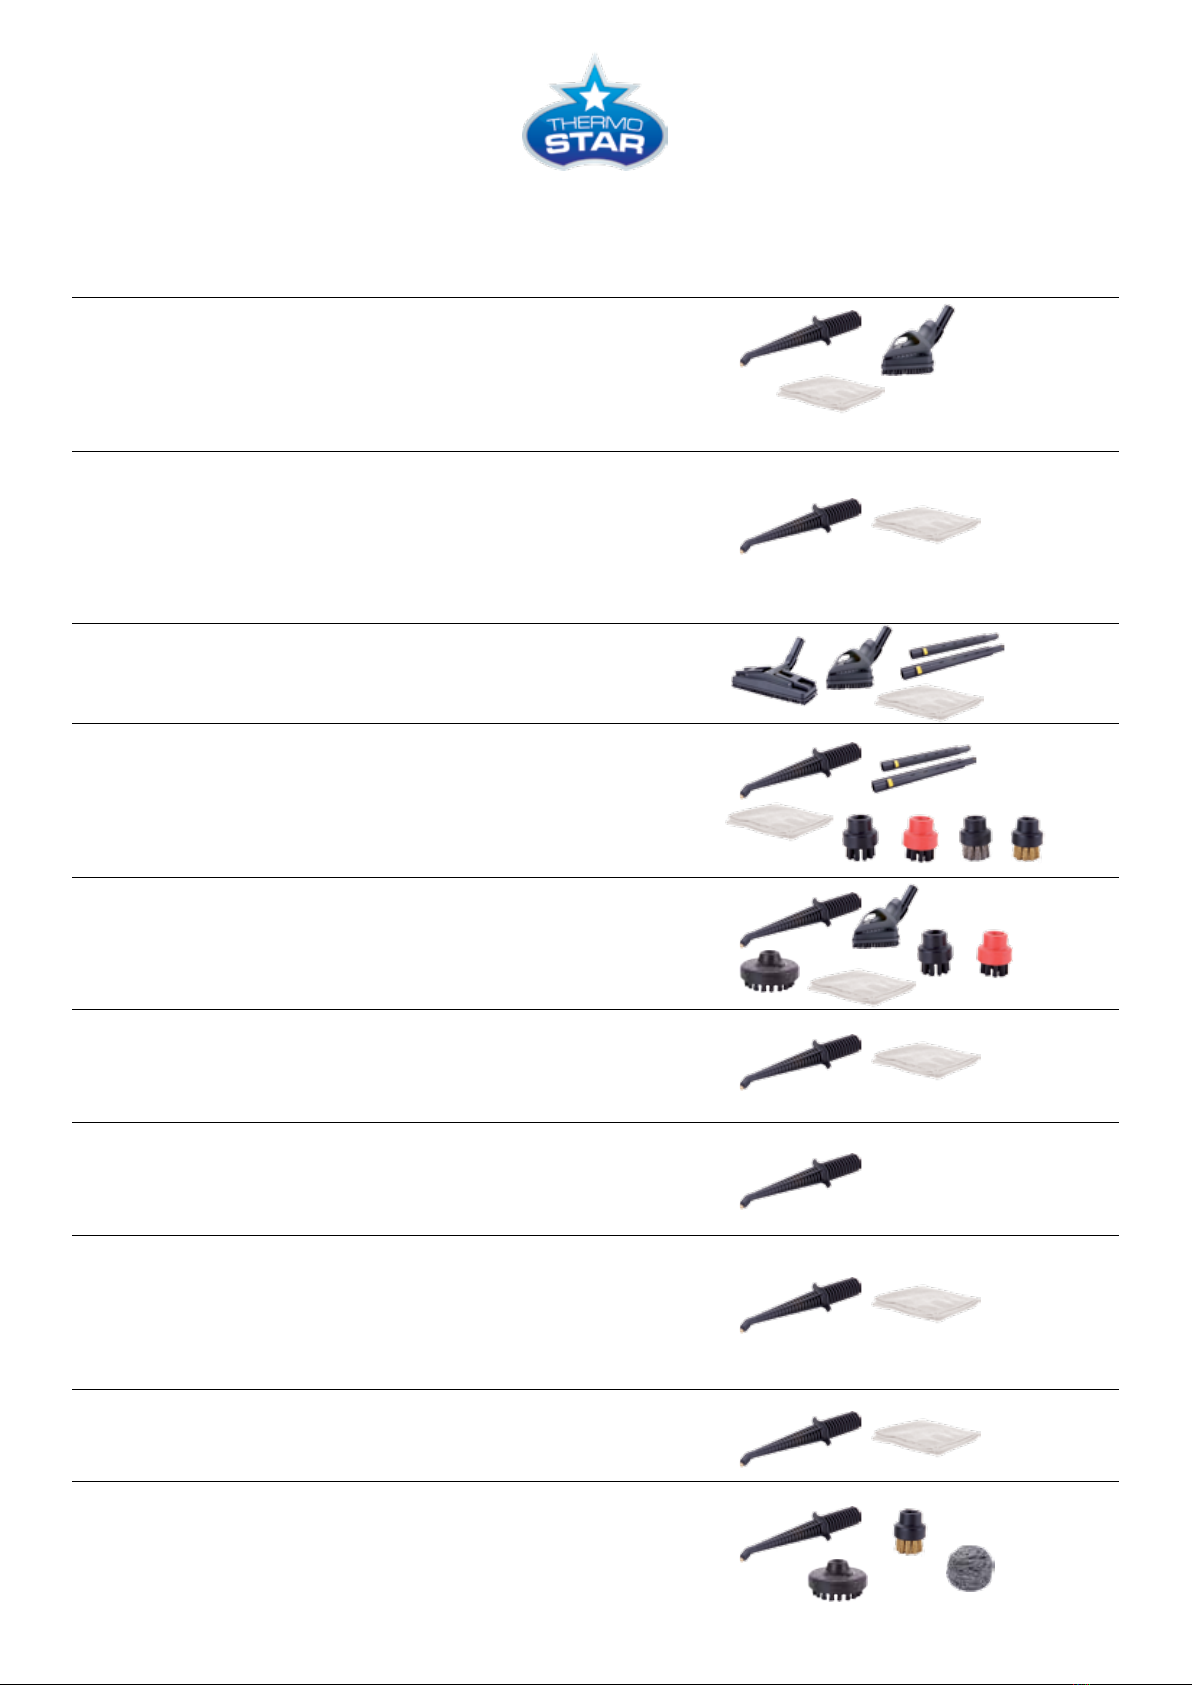
Component
index*
1) Lid for cold-water reservoir
1A) Stand-By switch
2) Main switch
3) Boiler switch
4) “Low water” indicator light
5) “Steam ready” indicator light
6) Digital thermometer and hour counter
6A) “Minimum steam” indicator light
6B) “Medium steam” indicator light
7) Power outlet for accessories
8) Discharge cover (drain)
9) Handle/Pistol grip with steam hose
10) Steam button
11A) Minimum Steam button
11B) Medium Steam button
11C) Hot water button (press simultaneously with steam button “10”)
12) Steam connector plug
13) Securing button for steam connector plug
14) Power cord and plug
15) Extension pipe
16) Locking button
17) Rectangular brush
17A) Attachment clip for micro-fibre cloths
18) Large triangular brush
19) Window cleaner (optional) 19
20) Steam nozzle
21) Brass brush (Ø 60mm) or nylon brush (Ø 60mm, optional)
22) Nylon brush (Ø 28mm)
23) Brass brush (Ø 28mm)
24) Stainless steel brush (Ø 28mm) (optional)
25) Stainless steel wool (optional)
26) Drain cap
27)Triangular brush (optional)
28) Steam scraper
29) Refill bottle (optional)
30) Iron (optional)
30A)Thermostat
30B) Steam button
30C) Rubber mat (optional)
31) Rectangular steam puffer (optional)
32)Triangular steam puffer (optional)
33) Evaporator (optional)
34) Micro-fibre cloths (optional)
35) Stainless steel trolley (optional)
36) Steam mop (optional)
* Accessories included withThermostar may vary for different countries (except for Germany).

8
Keypad functions
Multi-function display
Steam readyOn-button
Low waterBoiler button
Medium steam activation Minimum steam
activation
The two keys located on the front keypad as well as the main switch located at the back of the appliance are used to control
different operating modes:
The keys are designated as follows:
1A)Appliance on-switch hereinafter only 1A
3) Boiler on-switch hereinafter only 3
2) Main power switch hereinafter only 2

9
CAUTION: WE STRONGLY REC-
OMMEND THAT YOU CLEAN THE
BOILER ONLY AFTER THE APPLI-
ANCE HAS COOLED DOWN, PAR-
TICULARLY AFTER IT HAS BEEN
TURNED OFF FOR A MINIMUM OF
5 HOURS AND THE POWER CORD
HAS BEEN DISCONNECTED.
TheTrueTemp Technology makes it pos-
sible to use distilled or osmosis water
in your Thermostar (contrary to many
other commonly available steam clean-
ing systems). It is therefore not neces-
sary to decalcify the appliance. If you
use calcium-free water and the main-
tenance display indicates “CALC” it is
okay to just turn the display off (see *1).
The appliance is equipped with a main-
tenance alert system that is activated
when the “CALC” is displayed alter-
nating with the temperature. You can
still complete your cleaning chores
when these letters are displayed. Then
disconnect the appliance from the pow-
er source and allow it to cool off for at
least five hours. Follow the aforemen-
tioned steps to ensure that no steam or
pressure is present in the boiler interior.
1. Fill water reservoir (1) with water.
2. Either place a suitable small tub
underneath the appliance or
position it on top of the kitchen
sink and remove the discharge
cover (8) from the appliance
bottom.
3.Turn on the appliance by activating
the main switch (2) and the Stand-
By switch (1A) (the boiler switch (3)
must be in the off position) and
allow the pump to run for app. 2
to 3 minutes until all water has
drained. Shake the machine a little
in order to completely remove all
calcium deposits.
The boiler switch / heater (3) must
remain off during the entire decalcifica-
tion process. Do not turn the machine
upside down or calcium may enter into
the valves!
If you are using water with high cal-
cium content it is recommended to re-
fill the machine with water again and
repeat the aforementioned steps.
4. Replace the drain cover (8) and refill
the machine with water (1).
5. Turn on the main switch (2) and
the Stand-By switch (1A) and wait
approximately two minutes before
activating the boiler switch (3).The
machine will initially pump water
into the boiler for app. 2 minutes
(you will hear the pump working).
Only then you may turn on the
boiler switch (3).
6. It is recommended that you turn
on the steam button (11A) located
on the handle (activate safety
switch (10 simultaneously) in order
to release the air from the empty
boiler.
*1 Reset the maintenance intervals
CALC
Turn on the machine by activating both
button (2) and (1A), then press and
hold button (1A) for app. 10 seconds.
“CALC” will no longer be displayed
until the next time maintenance is
needed.
This machine is equipped with 2 hour
counters.
In order to read the elapsed hours you
must first turn off the machine using
button (1A) and then activate button
(3). Pressing this button will
alternatively show the elapsed hours
for counter 1 and/or 2.
Keep button (3) depressed while the
machine is turned on. After a few
seconds the display will show the
pressure (in bar) currently present
inside the boiler. The value remains
visible on the display for app. 10
seconds before the temperature is
again shown in °C.
Steam generator maintenance
Removal of calcium deposits within the boiler
Hour counter
Pressure gauge
10 11
Operating instructions
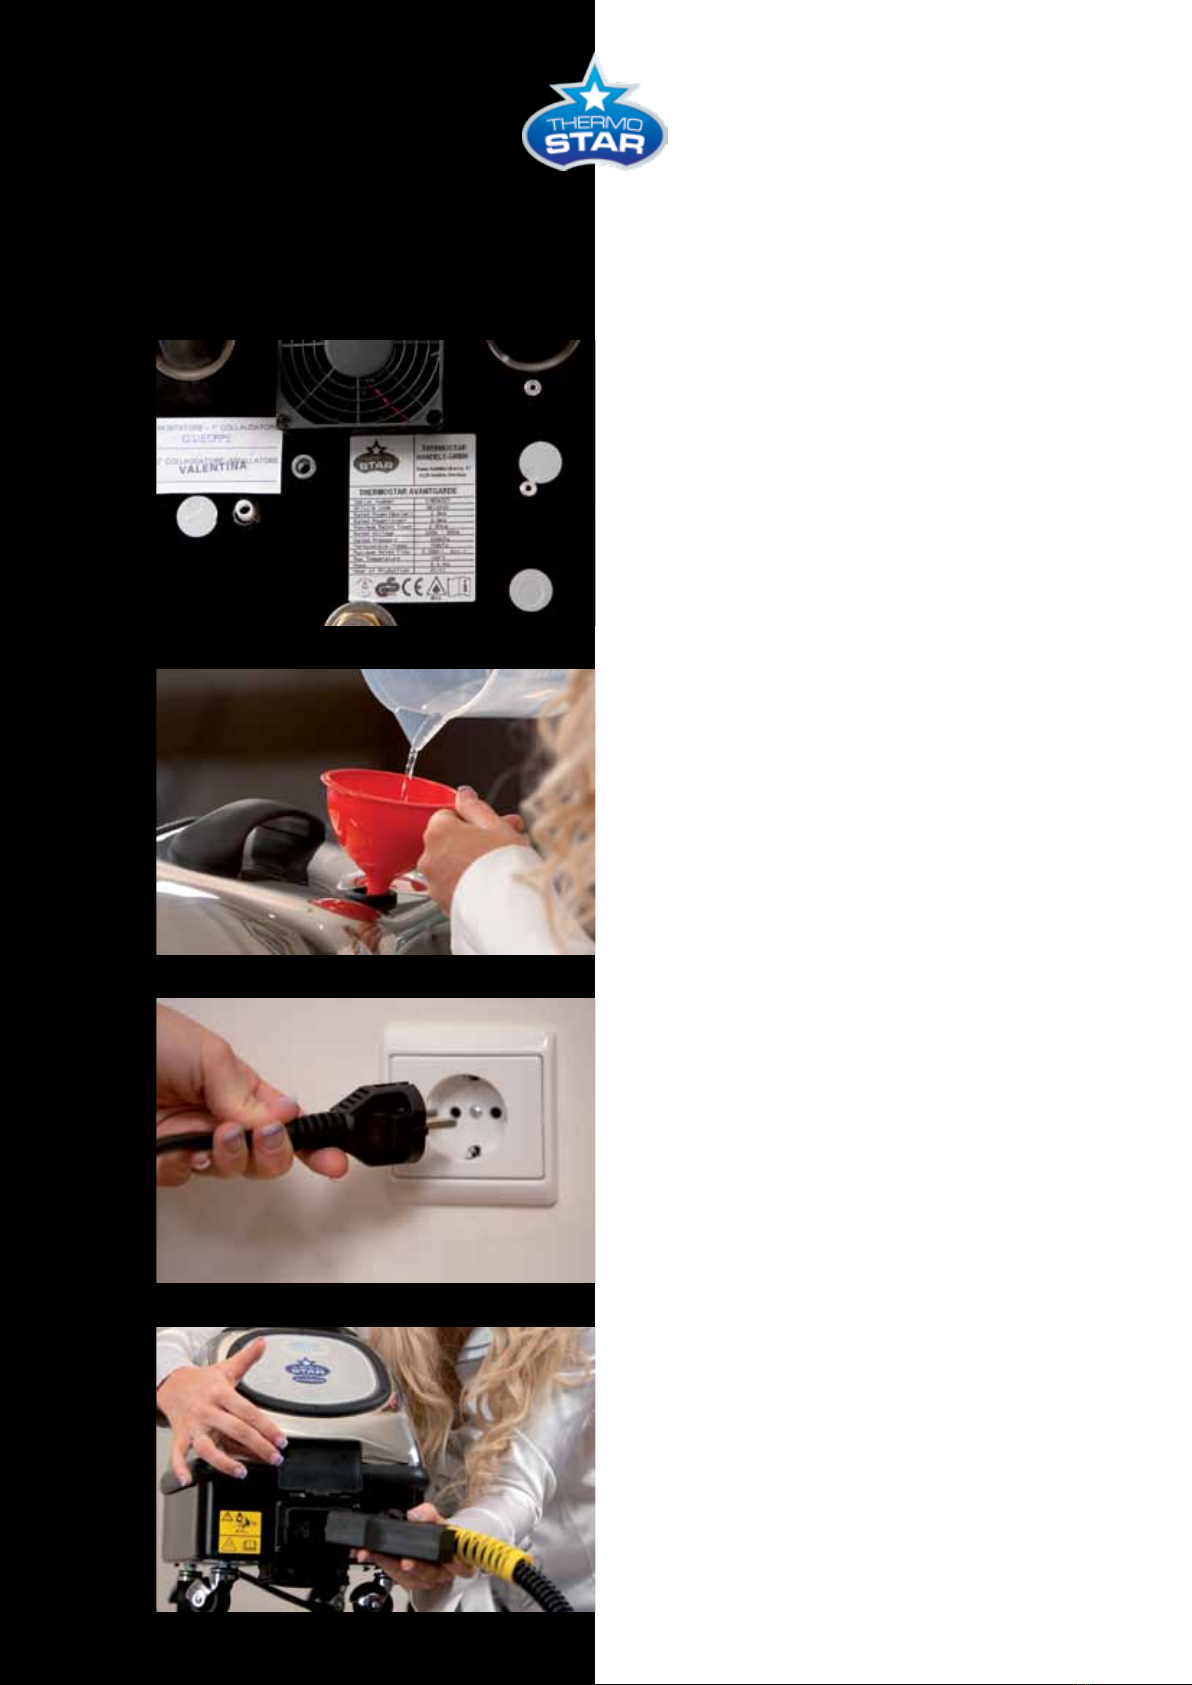
1. Before using your Thermostar,
please ensure that there is no
visible damage to the appliance.
Verify that the volt and ampere
ratings for your power source match
those listed on the appliance sticker.
2. Remove the reservoir lid (1) from the
appliance and fill the reservoir with at
least 1 litre water.You may use straight
tap water, distilled or osmosis water.
Please don’t fill any type of chemicals
into yourThermostar.
3. Connect the power cord (14) to an
outlet.
4. Connect the steam connector plug (12)
to the designated appliance accessory
outlet. Press firmly until you hear the
locking button (13) click.

10 11
Operating instructions
5.
Press main switch (2) located at the
front of the appliance, button (1A)
and the boiler switch (3) and wait for
app. 5 minutes until the indicator light
(5) is illuminated. It indicates that the
boiler has steam. Both switches (11A
and 11B) located on the handle should
be turned off.
6.
When the indicator light (5) is illu-
minated you can adjust the desired
steam volume (steam switch 11A and
11B) as follows:
a. 11A = Minimum steam
b. 11B = Medium steam
c. 11A + 11B = Maximum steam
Activate the steam switch (10) to
release steam. The status is displayed
on the control panel (indicator lights
(6A) and (6B)).
7.
Using switch (11C) allows you to add
hot water to the steam. Activate the
switch only in short intervals (a few
seconds) to avoid discharging the
generator. The switch (11C) will only
function if the boiler switch (3) was
also activated.
CAUTION
THE RED INDICATOR LIGHT “LOW WATER”
(4) WILL LIGHT UP IF THE WATER FROM THE
RESERVOIR IS DEPLETED. THIS WILL BE
FOLLOWED BY A RECURRING AUDIBLE ALERT.
THE POWER SUPPLY FOR THE HEATING
ELEMENT WILL BE INTERRUPTED UNTIL THE
WATER RESERVOIR (1) IS AGAIN FILLED.
THERE IS NO NEED TO TURN THE MACHINE
OFF TO DO THIS.
(2)

12
General tips:
The cleaning temperature remains
equally high regardless of whether
you use the machine with minimum
or maximum steam. We therefore
recommend that you perform the
majority of your cleaning using the
minimum steam setting. Moving
the tip of the steam nozzle closer to
the surface that is to be cleaned will
increase the cleaning efficiency.
Maximum steam is only necessary
where additional pressure is
needed to remove the dirt, for
example in hard-to-reach places (i.e.
heating radiators) and all areas that
require more moisture to clean, such
as carpets and upholstery (more
steam = more moisture).
When using triangular (18) or rectan-
gular brushes (17) with attached
micro-fibre cloth, you should insert a
steam puffer (31, 32) between the
brush and the cloth to expand the
cleaning area and thus achieve the
optimum effect.
When cleaning wood floors, lami-
nates or other wood surfaces we
recommend that you use only little
steam/moisture. In this case you
should work the same area for just a
short period and apply steam only
occasionally. The same applies to all
surfaces with silicone.
When cleaning marble and stone we
recommend nylon brushes and
triangular or rectangular brushes
with attached micro-fibre cloth. Brass
brushes could damage and/or discol-
our the object to be cleaned.
Carpets and sofas should be thor-
oughly vacuumed before steam
cleaning.
Never use steam to clean untreated
wood.
It may be necessary to change the
micro-fibre cloths several times
depending on how dirty the carpets,
upholstery or floors are.
Using Thermostar
micro steam
13
Application Accessory and description Level
Thawing/Defrosting Attach the steam nozzle (20) with the steam scraper (28) Maximum
steam
Drain cleaning First fill the drain with a little and place drain cap (26) over
the drain. Close all overflow openings and flush the drain
with hot water (11C) using short intervals.
Hot water
Cleaning fixtures and
removing calcium
Use steam nozzle (20) and (if necessary) the round nylon
brush (22) with stainless steel wool (25). For larger calcium
deposits add small amount of decalcifier (vinegar or citric
acid).
Minimum to
maximum
steam
Exterior car cleaning Many contaminants remain on the car even after using a
commercial carwash, i.e. insects on the windshield or car
body, brake dust on wheels. Using the steam nozzle (20)
you can spot-clean these contaminants directly. Wipe with a
micro-fibre cloth to finish.
Minimum to
maximum
steam
Interior car cleaning
(Fabric and leather)
For normal contaminations use the triangular brush and
clean the surface areas with an inserted cloth – you may use
old towels for simple materials while we recommend using
micro-fibre cloths for leather and Alcantara.
Maximum
steam for
cloth seats
Minimum
steam for
leather and
Alcantara
Kitchen oven Use the round nylon brush (21) with stainless steel wool (25).
To remove stubborn stains move the brush back and forth
while applying pressure to the particular spot until the stain
is resolved by the heat.
Minimum
steam
Vent hood Use the steam nozzle (20) for cleaning the grease filter. Blow
filter out using maximum steam. Use the steam nozzle for the
vent hood and wipe clean with the micro-fibre cloth. Depen-
ding on the surface material you may also clean the corners
with the round nylon brush (22).
Minimum to
maximum
steam
Shower stall and wall tiles In case of heavy calcium deposits on glass doors and wall
tiles we recommend an initial application of vinegar or citric
acid. Allow to penetrate for 20 minutes.Then continue to
clean surfaces with steam nozzle (20) and micro-fibre cloth
(34) or triangular brush (18) with inserted micro-fibre cloth
(34).You can clean any joints and grooves using the round
nylon or brass brush (22/23).To remove stubborn stains you
can also use the round nylon brush (21) with stainless steel
wool (25) immediately on the glass.
Minimum to
maximum
steam
Bicycles and motorcycles Clean with steam nozzle (20) and finish with micro-fibre cloth
(34).
Hot water,
minimum to
maximum
steam
14
Application Accessory and description Level
Window frames and
shutters
Use either the steam nozzle (20) (finish with micro-fibre
cloth (34)) or the triangular brush (18) with inserted cloth for
cleaning. CAUTION: Apply only slight amount of moisture/
steam on wood frames. Keep steam nozzle at safe distance
from wood.
Minimum
steam
Removing stains from
fabrics and carpet
Place steam nozzle (20) directly above stain and move quickly
back and forth. Wipe clean using micro-fibre cloth (34).
CAUTION: Ensure that the material is suitable for steam prior
to cleaning.This type of treatment may be damaging to the
structure of carpets, particularly wool carpets.
Minimum
steamf
Tiles and PVC Use the triangular brush or rectangular brush (17, 18) with
inserted micro-fibre cloth (34).
Minimum
steam
Joints Use the round brass or nylon brushes (22/23) together with
the extension pipes (15) to relax your back during work. Move
slowly with the direction of the joint while applying little
pressure.This allows you apply more heat with less force
required.Your brushes will also last longer!
Minimum
steam
Garden furniture
Plastic and rattan
Use the triangular brush (18) with inserted cloth; for stubborn
dirt also use the small or large round nylon brush (21, 22).
For plastic furniture place a micro-fibre cloth between the
brush and the surface to be cleaned to prevent damaging it.
Minimum
steam
Glass cleaning Resolve dirt with steam nozzle (20) and wipe clean with mic-
ro-fibre cloth (34). Since the steam contains neither calcium
nor cleaning agents you will be able to deep-clean windows
and other glass surfaces free of streaks and watermarks.
Minimum
steam
Polished wood surfaces Great care must be used when cleaning polished wood; ne-
ver apply pressure during treatment.Terry towels work best.
Micro-fibre clothes are not appropriate since they clean too
thoroughly and would thus remove the polish.)
Minimum
steam
Wood furniture Apply small amount of steam from further away using the
steam nozzle (20) and immediately wipe clean with micro-
fibre cloth (34). Although this process will take a little longer
it is much gentler.
Minimum
steam
Not to long
at one place
Heating radiators Use the steam nozzle (20) to clean the radiators from the top
down.The dust will cohere and can then be wiped off at the
bottom.
Maximum
steam
Kitchen grease on cook
tops and various metal
surfaces
Depending on the sensitivity of the surface to be treated, we
recommend cleaning with the steam nozzle (20), small round
brass brush (23) and/or large round brush (21) with stainless
steel wool.
Maximum
steam

15
Application Accessory and description Level
Venetian blinds Venetian blinds are delicate. Clean using short puffs of steam
and wipe clean with micro-fibre cloth (34).
Minimum
steam
Cork (sealed) Only sealed cork floors may be treated with steam (do not
treat oiled or waxed cork floors!). Clean with rectangular
brush (17) and inserted micro-fibre cloth (34).
Minimum
steam
Laminates and parquet Clean with rectangular brush (17) and inserted micro-fibre
cloth (34) – use only little moisture (activate steam button (10)
only occasionally). If used properly steam will not damage
parquet and laminates. (In comparison: A stay in sauna at 90
°C is no problem while a bath at this temperature is impossi-
ble.) Micro-steam is also gentler on areas to be cleaned than
is wet cleaning or using commonly available steam cleaners!
Minimum
steam
Leather Use the triangular brush or rectangular brush (17, 18) with
inserted micro-fibre cloth (34). Activate the steam button (10)
only occasionally (do not hold down continuously). Old or
brittle leather should not be cleaned. Apply leather conditio-
ner after cleaning.
Minimum
steam
Mattresses, upholstery,
carpets
Use the triangular or rectangular brush (17, 18) with inserted
micro-fibre cloth (34). Always test in an inconspicuous area
to verify that the material is colourfast. For sensitive material
use the steam nozzle (20) to apply steam from a 10 cm dis-
tance and then wipe the surface with a micro-fibre cloth (34).
Maximum
steam
Plants Apply short puffs of steam from 40 to 50 cm away using the
steam nozzle (20). From this distance the steam is no longer
hot but comfortably cool.
Maximum
steam
Bathrooms and sanitary
equipment
Large areas can be cleaned using the triangular or rectangu-
lar brush (17, 18) together with the inserted micro-fibre cloth
(34); use the steam nozzle (20) either with or without brushes
(22) for hard to reach areas.
Minimum to
maximum
steam
Watch bands and jewellery Place jewelry or watch bands on a micro-fibre cloth (34) and
apply the steam nozzle (20) directly to clean and polish. CAU-
TION: Never apply steam directly to the watch case – apply
only to the watch band.
Minimum
steam
Animal cages, metal
grates and other hard to
reach places
Simply clean with steam nozzle (20) and wipe clean with
micro-fibre cloth (34).
Minimum to
maximum
steam
Toilet Cleaning without the use of chemicals! The hot water function
(11C) is just right for cleaning the inner edges of the toilet.
Simply apply steam from up close using the steam nozzle
(20) and finish by wiping dry.
Hot water

16
The iron (30) is connected to the
Thermostar using the connector cable.
Use the Thermostat (30A) to adjust the
temperature of the iron that is appro-
priate for the materials being ironed.
Wait until both appliances have reached
the correct operating temperature
before activating the steam button
(30B).
The soleplate of our iron is made
from pure aluminium. Since there is a
chance that it may oxidize, we recom-
mend using a Teflon sole (30D) which
is appropriate for ironing all types of
materials. Always place the iron on the
designated rubber mat (30C) whenever
you have finished ironing or you are
not using the iron for a while.
The steam entering the iron does not
contain any calcium. It is therefore not
necessary to decalcify the iron.
The steam mop is perfect for clean-
ing large areas, regardless of whether
this involves floors or walls (vertical
areas). It is light and extremely easy to
handle. It is equipped with a 5 m long
hose (10 m optional), a telescopic pipe
and 40 cm cloths made of cotton or
polyester and/or micro-fibre (optional).
The steam adjustment (min-med-max)
is located directly on the handle.
Iron (optional)
Steam mop (optional)
Thermostar Handels GmbH
Auen-Süduferstraße 67
9220 Velden
Office: +43(0) 4274 2821
Fax: +43 (0) 4274 2821 4
UID: ATU65046906
FN329029t
www.thermostar.info
info@thermostar.info
!
Table of contents
Other Thermo-Star Steam Cleaner manuals


