ThermoTek T257P User manual

!
!
!
!
!
!
T257P&Precision&Chiller&
&
&
&
&
&
&
&
&
&
User&Manual&
!
!
!
!
!

2!
TABLE&OF&CONTENTS&!
!Table&of&Contents&.....................................................................................................................................................&2!!
!Introduction&..............................................................................................................................................................&4!"
!How!to!Contact!ThermoTek!Inc.!.....................................................................................................!4!2.1
!Explanation!of!Symbols!...................................................................................................................!4!2.2
!EMC!Precautions!.............................................................................................................................!5!2.3
!Warnings:!Risk!of!Electrical!Shock!..................................................................................................!5!2.4
!Warnings:!Risk!of!Personal!Injury!...................................................................................................!5!2.5
!Warnings:!Risk!of!Device!Damage!...................................................................................................!6!2.6
!Unpacking!Instructions!...................................................................................................................!6!2.7
!Device&Description&..................................................................................................................................................&7!#
!Features!..........................................................................................................................................!7!3.1
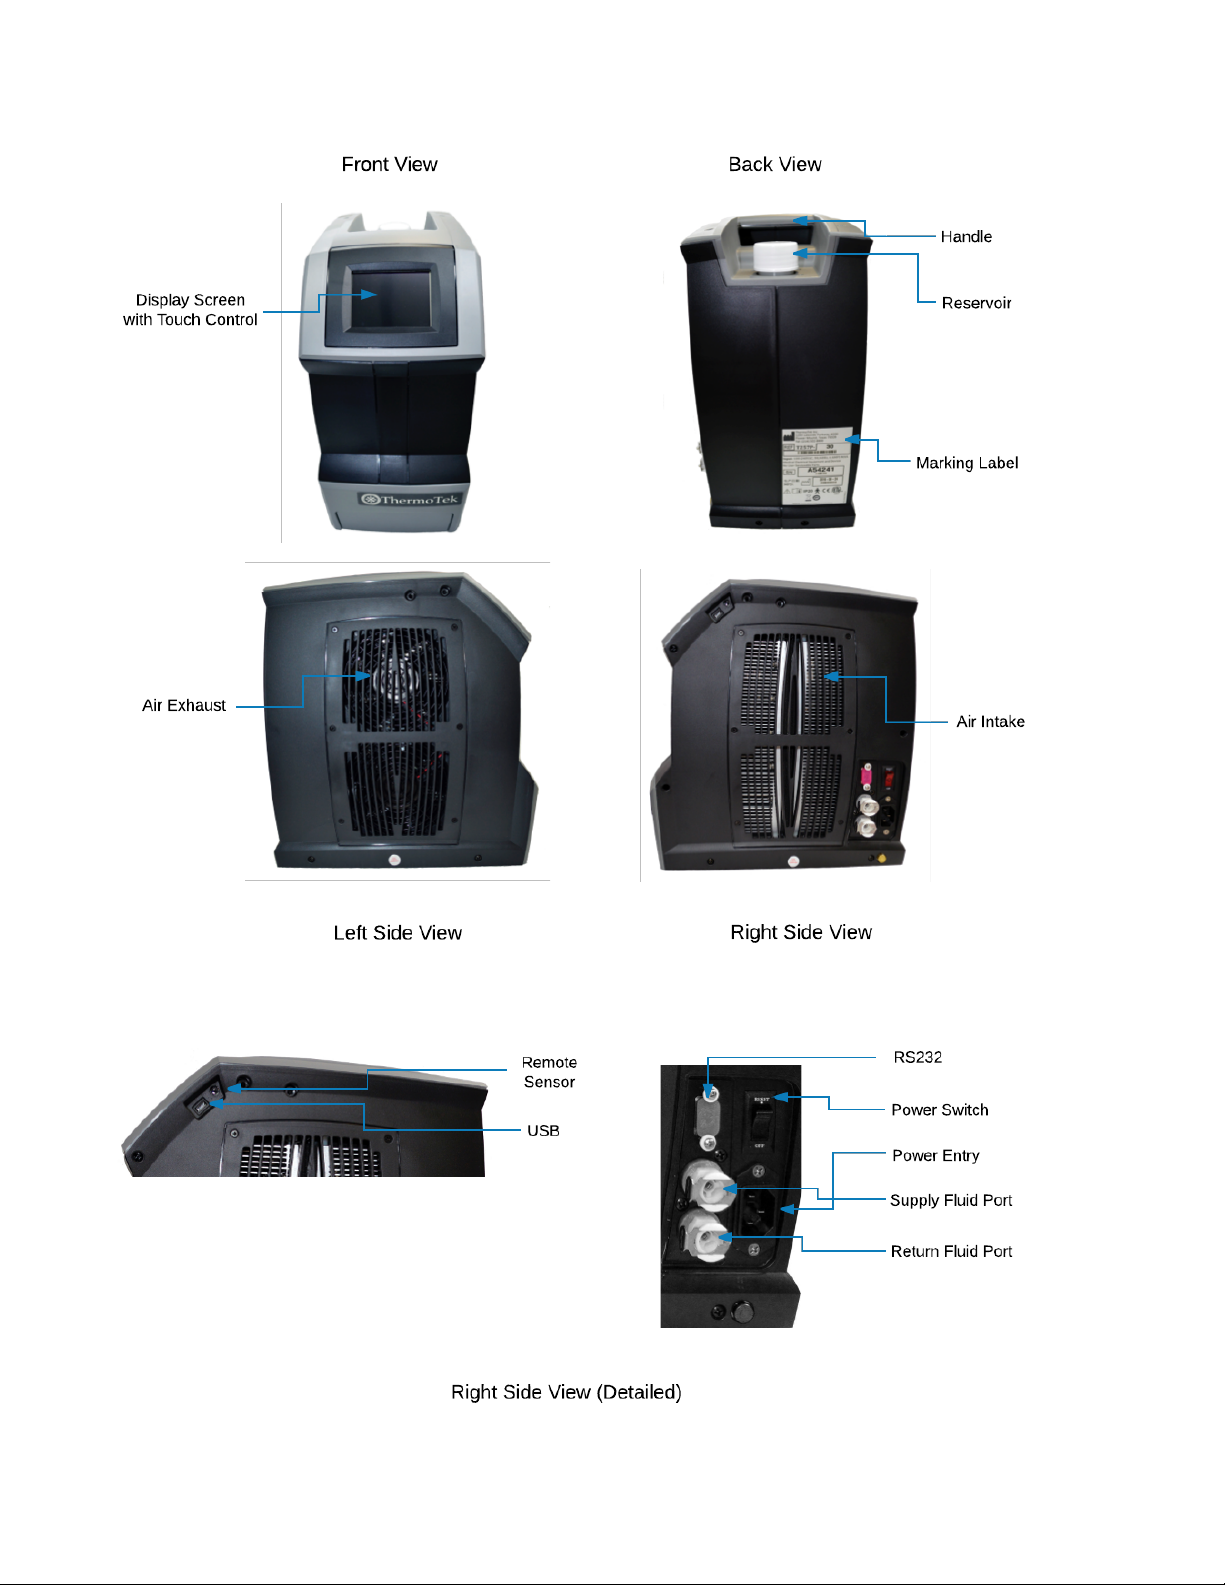
!Device!Illustration!...........................................................................................................................!8!3.2
!T257P&System&Setup&...............................................................................................................................................&9!$
!Setting!up!the!T257P!Temperature!Control!System!.......................................................................!9!4.1
!Startup!Procedure!...........................................................................................................................!9!4.2
!RUN&Mode&Operating&Procedures&....................................................................................................................&11!%
!How!to!Stop!and!Start!the!T257P!Chiller!......................................................................................!11!5.1
!How!to!Change!the!Set!Temperature!...........................................................................................!12!5.2
!How!to!Change!the!User!Specified!Temperature!Alarm!Limits!....................................................!13!5.3
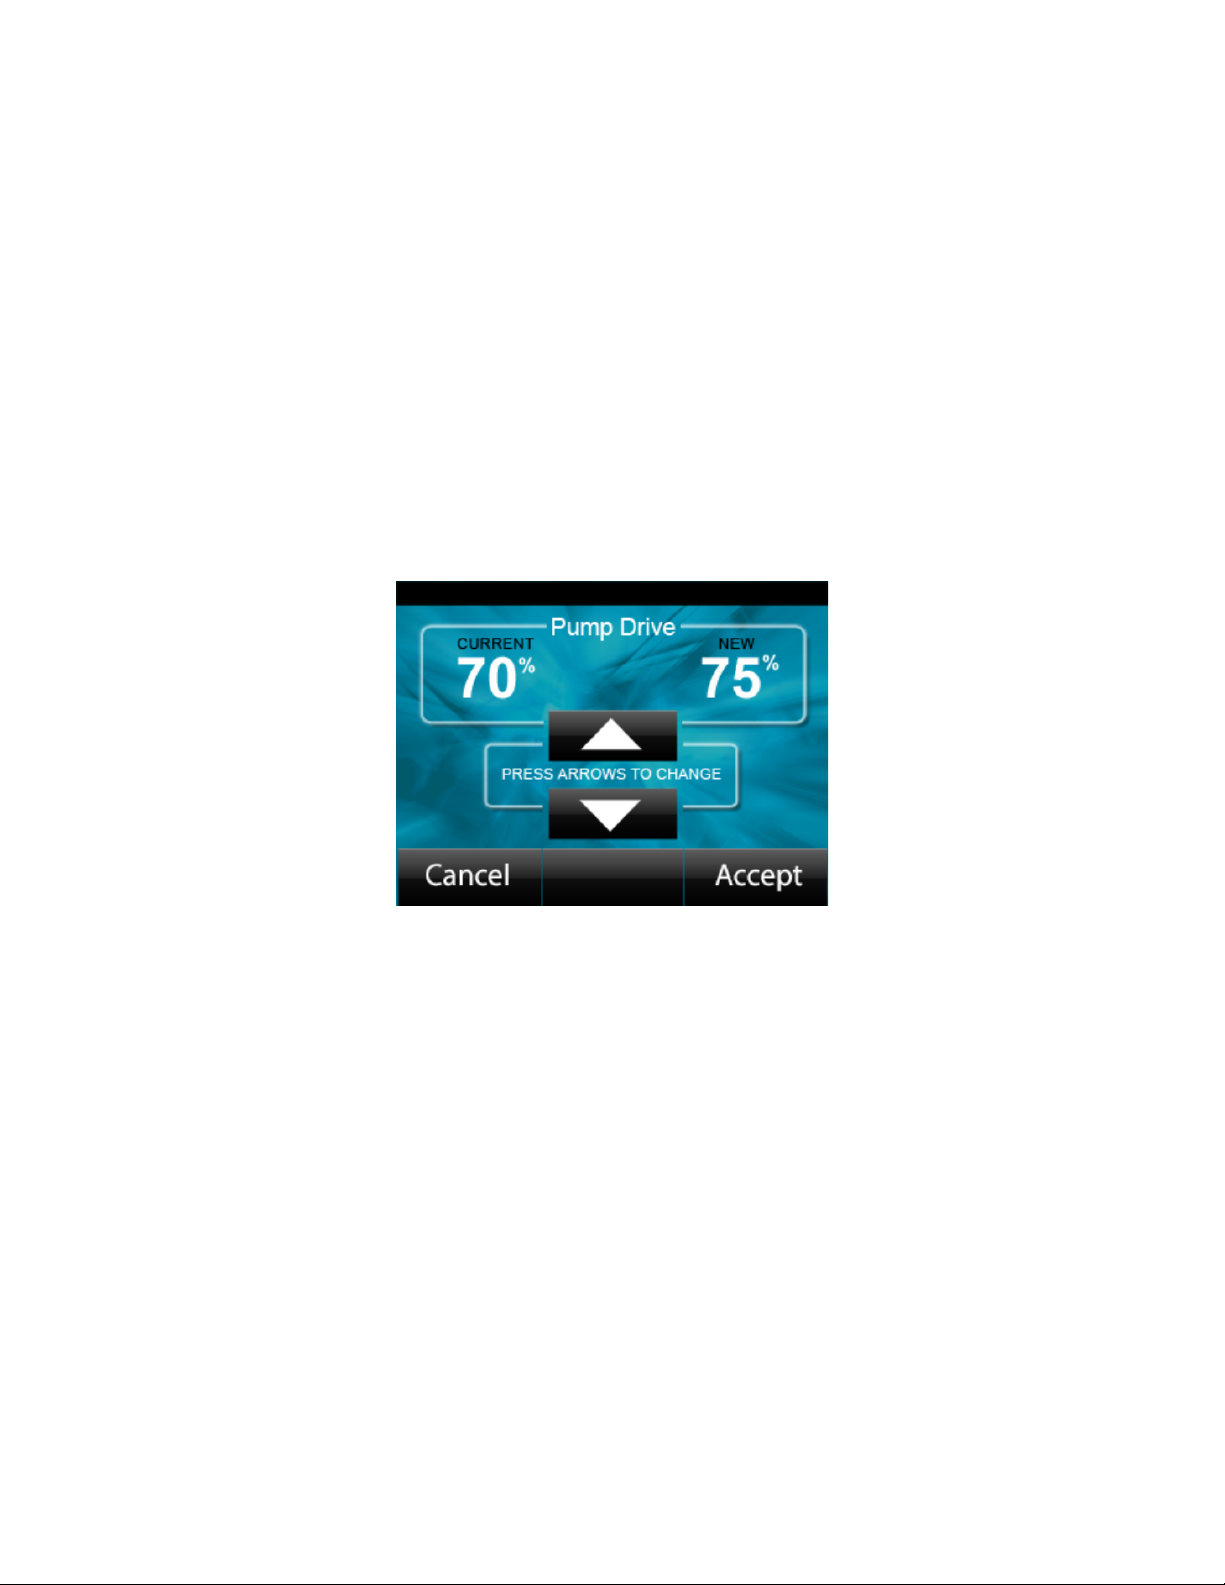
!How!to!Change!the!Pump!Drive!(for!applicable!configurations)!..................................................!14!5.4
!How!to!Access!the!Monitor!Screen!...............................................................................................!14!5.5
!STANDBY&Mode&Operating&Procedures&..........................................................................................................&16!&
!How!to!Set!the!Control!Mode!.......................................................................................................!16!6.1
!How!to!Set!the!Control!Sensor!......................................................................................................!16!6.2
!How!to!Set!the!COM!Port!.............................................................................................................!17!6.3
!How!to!Change!the!Fan!Drive!.......................................................................................................!18!6.4
!Alarm!History!................................................................................................................................!19!6.5
!System!Information!......................................................................................................................!19!6.6
!Turning!the!T257P!System!OFF!.....................................................................................................!19!6.7
!Taking&Care&of&Your&T257P&System&.................................................................................................................&20!'
!Checking!the!Coolant!Level!...........................................................................................................!20!7.1
!Changing!the!Coolant!within!the!T257P!System!...........................................................................!20!7.2
!Changing!the!Application!Coolant!................................................................................................!20!7.3
!Cleaning!the!Exterior!of!the!T257P!System!...................................................................................!21!7.4
!Cleaning(the(Exterior(of(the(T257P(System(.............................................................................(21!7.4.1

3!
!Cleaning(the(Heat(Sinks(of(the(T257P(system(.........................................................................(21!7.4.2
!Storing!the!T257P!System!.............................................................................................................!22!7.5
!Alarm&Messages&......................................................................................................................................................&23!(
!Accessories&/&Replacement&Parts&.....................................................................................................................&25!)
!Technical&Specifications&....................................................................................................................................&26!!*
!T257P!System!Technical!Specification!........................................................................................!26!10.1
!T257P!System!Performance!........................................................................................................!27!10.2
!T257P!Communication!Protocol!.................................................................................................!28!10.3
!T257P!System!Wetted!Path!Materials!........................................................................................!29!10.4
!T257P!System!–!Conformance!Information!................................................................................!29!10.5
!T257P!System!–!Guidance!and!Manufacture’s!Declaration!–!Electromagnetic!Emissions!.........!29!10.6
!Warranty&................................................................................................................................................................&31!!!
!
!
! !

4!
INTRODUCTION&"
Read! the! entire! guide! before! attempting! to! connect! or! operate! this! product.! Keep! this! guide! for!
future!reference.!
!
The!T257P!is!a!solid\state!thermoelectric!heating!and!cooling!system.!!It!is!designed!to!maintain!a!set!
temperature!of!the!working!fluid!that!is!circulated!between!the!thermal!management!application!and!
itself.!
!
This! guide! provides! the! information! required! to! setup!and! use! the! T257P!precision!temperature!
control!system.!
How&to&Contact&ThermoTek&Inc.&&"+!
If!you!have!questions!about!the!T257P!system,!or!require!service,!please!contact!ThermoTek!Inc.!at:!
!
1200!Lakeside!Parkway,!#200!
Flower!Mound,!TX!75028!
Tel:!972\874\4949!(8:00am!–!5:00!pm!CT)!
!
Explanation&of&Symbols&"+"
!
IMPORTANT:!Read!Instructions!before!Use!
Before! operating! the! device,! please! read! the! entire! instruction! guide.! ! Keep! the!
guide!available!for!future!reference.!
!
CAUTION.!!Consult!user!manual! to! determine! potential!hazards!prior!to! operating!
the!device.!
!
Manufacturer’s!Part!Number!
!
Device!Serial!Number!
!
AC!Power!
!
Ingress!Protection!Of!the!Device.!!Solid!Particles!>!12.5!mm!will!be!protected!from!
access!to!hazardous!parts.!!The!device!does!not!have!any!ingress!protection!against!
liquids.!

5!
!
Do!NOT!Dispose!with!General!Household!Waste!
Please!consult!local!government!/!city!laws!on!acceptable!method!of!disposal!of!electro\mechanical!
systems!in!compliance!with!the!Waste!Electric!and!Electronic!Equipment!Directive!(WEEE)!
2001/96/EC.!!&
!
Device!Manufacturing!location!
!
Device!Manufacture!Date!Code!
!
RoHS!Compliant!!
EMC&Precautions&"+#
The!T257P!precision!temperature!control!system!is!an!Electrical!Equipment!that!requires!installation!
precautions! regarding! electromagnetic! compatibility! (EMC).! ! Installation! is! to! be! completed! as!
specified!in!the!Technical!Information!Section.!
Warnings:&Risk&of&Electrical&Shock&"+$
Do!not!attempt!open!or!service!the!T257P!system.!!Such!attempts!could!result!in!injury!and!/!or!
damage!to!the!product,!and!will!void!any!warranty.!
Do!not!spill!liquids!of!any!kind!on!T257P!system.!
Always!use!the!T257P!system!with!a!grounded!power!inlet.!
Do!not!use!the!T257P!system!with!power!cord!that!is!damaged!or!has!exposed!copper!wires.!!
Do!not!use!a!power!cord!with!lower!electrical!rating!than!250!VAC,!10A.!
Do!not!limit!access!to!the!power!cord!inlet.!!Only!the!removal!of!the!power!cord!disconnects!
ALL!hazardous!voltages!form!the!device.!
Warnings:&Risk&of&Personal&Injury&"+%
Use!T257P!system!for!its!intended!purpose,!as!directed!in!this!guide.!
Install!the!T257P!system!as!specified!in!the!Technical!Information!Section.!
Do!not!use!the!T257P!with!a!working!fluid!temperature!of!>!45°C!
Do! not! use! the! T257P!system! in! the! presence! of! flammable! gasses,! including! flammable!
anesthetics.!
Do!not!place!the!product!on!an!unstable!cart,!stand!or!table.!!They!product!may!fall,!causing!
serious!damage.!

6!
Warnings:&Risk&of&Device&Damage&"+&
Never! block! the! ventilation! openings! on! the! side! of! the! T257P!device.! ! Keep! the! ventilation!
openings!free!of!debris!such!as!lint!and!dust.!
The!device!is!to!be!used!on!a!horizontal,!level!surface,!with!the!reservoir!opening!at!the!top!of!
the!device.!!!Do!not!use!the!device!in!any!other!orientation.!
Do!not!install!the!device!such!that!access!to!the!power!switch,!power!cord!inlet!and!coolant!
connectors!are!limited.!
Use!recommended!fluids!only.!!
Do!not!use!deionized!water.!
Do!not!use!Copper!or!Brass!fittings!/!cold!plates!with!the!T257P!Chiller.!
Never!drop!or!insert!any!objects!into!the!T257P!device.!
Do!not!drop!or!cause!impact!to!the!T257P!device.!
Do!not!operate!the!T257P!device!if!it!is!damaged!or!leaking!fluids.!
Do!not!operate!the!T257P!device!beyond!its!rated!capacity.!
Do!not!operate!the!T257P!device!outdoors.!
Do!not!operate!the!T257P!device!in!a!sealed!environment.!
Do!not!operate!the!T257P!device!at!set!points!below!5°C!without!90%!distilled!water!and!10%!
inhibited!Glycol!solution,!or!90%!distilled!water!and!10%!isopropyl!alcohol.!
Unpacking&Instructions&"+'
When! the! T257P!system! arrives,! it! is! important! that! you! carefully! unpack! the! contents! and! ensure!
that!you!have!all!the!equipment!required!for!operation.!!Please!retain!the!shipping!carton!for!storage!
and!future!transportation!of!the!device.!
!
Included!in!the!box,!you!should!find!the!following:!
•User!Manual!
•T257P!Precision!Temperature!Control!system!
•Power!Cord!
•Male!QD!Fittings!in!a!bag!
•Certificate!of!Conformance!
! !
!

7!
DEVICE&DESCRIPTION&#
The! T257P!is! a! solid\state,! re\circulating! cooling! and! heating! system.! ! ! It! uses! a! pump! to! transfer!
temperature\controlled!fluid! to! the! thermal! management! application!and! itself.! ! The! system! uses!
thermoelectric! technology! and! custom! electronics! to! generate! the! required! energy! to! thermally!
control!the!re\circulating!fluid.!!The!heat!removed!from!the!application!is!rejected!to!the!environment!
via!the!heat!transfer!system,!housed!within!the!device.!!!
Features&#+!
•Lightweight,!portable!system!
•Ergonomic,!easy!to!carry!handle!
•User!friendly,!graphics!display!with!integrated!touch!control!
•Easy!to!read!display!
•Universal!Input!Voltage!
•Nominally!leak!free!fluid!fittings!
•Built!in!non\volatile!memory!for!retention!of!user!set!parameters!
•USB!and!RS232!communication!interface!
•Quiet!mode!fan!operation!
•Optional!remote!temperature!sensor!interface!
!

8!
Device&Illustration&#+"

9!
T257P&SYSTEM&SETUP&$
Setting&up&the&T257P&Temperature&Control&System&$+!
Follow!the!steps!outlined!below:!
1. Connect! the! T257P!chiller! to! the! application! using!fluid! transport! hoses! from! ThermoTek! or!
hoses!using!Colder!PLC!or!PLCD!insert!fittings,!or!custom!fittings!as!configured.!
2. Keep!the!chiller!horizontal!and!on!a!level!surface.!
3. Make!sure!there!is!a!minimum!12”!clearance!and!free!path!for!flow!of!air!entry!and!exit!at!the!
left!side!and!right!side!of!the!T257P!chiller!prior!to!operation.!
4. Check!to!see!if!the!power!switch!is!in!the!OFF!position.!
5. Insert! the! fluid! transport! hose! into! the! T257P!Chiller.! If! the! fittings! are! the! standard! Colder!
quick!disconnects,!hearing!a!“click”!indicates!a!secure!connection.!!Check!the!labels!next!to!the!
ports!for!coolant!flow!direction.!
6. Remove!the!reservoir!cap!and!add!coolant!to!the!reservoir!until!the!fluid!reaches!the!bottom!of!
the!neck.!Please!refer!to!the!technical!information!section!for!recommended!coolants.!!!
7. Close!the!cap!securely!to!the!reservoir.!!Make!sure!not!to!overfill!the!reservoir.!
8. Install!the!appropriate!end!of!the!power!cord!into!the!unit.!
9. Plug!the!male!end!into!the!AC!voltage!outlet!within!the!device!specified!voltage.!!Please!refer!
to!the!technical!information!section!for!input!voltage!specifications.!
!
Startup&Procedure&$+"
1. Verify!that!the!T257P!Chiller!is!plugged!into!the!appropriate!AC!voltage!outlet.!
2. Verify!the!T257P!Chiller!coolant!ports!are!connected!to!the!application.!!!
A. It!is!recommended!that!insulated!tubing,!with!minimum!3/8”!ID,!be!used!when!connecting!
to!the!application.!!!
B. Even!if!the!application!flow!path!is!smaller!than!the!recommended!ID,!it!is!important!to!use!
the!recommended!ID!for!the!transport!hose!to!minimize!system!pressure!drops.!
C. Do!not!use!Copper!or!Brass!components!in!the!application\wetted!path.!!This!will!adversely!
impact!the!T257P!Chiller!heat!exchanger.!See!the!technical!information!section!for!T257P!
Chiller!wetted!path!component!list.!
3. Turn! ON! the! T257P!Chiller.! ! The! power! switch! is! located! on! the! right! side!of! the! device,!
adjacent!to!the!coolant!ports.!
4. When!the!unit!first!powers!up!a!rotating!circle!will!appear!on!the!LCD!screen!located!on!the!
front!of!the!unit.!
5. The!unit!will!automatically!start!and!enter!the!RUN!Mode!with!the!fans!and!pump!active!and!
the!control!system!set!to!control!the!operating!fluid!to!20!C!or!the!last!set!temperature.!

10!
6. Open!the!reservoir!and!add!additional!fluid!as!needed.!!Close!the!cap!securely!to!the!reservoir.!
7. It! is! possible! that! the! initial! startup! and! fluid! transport! could! generate! a! “Low! Fluid”! alarm.!!
Clear!the!alarm!by!pressing!the!“Accept”!key.!!Open!the!reservoir!cap!and!add!fluid.!!Close!the!
cap!and!press!“Start”!to!re\start!the!chiller.!
8. When!the!unit!is!operating!and!controlling!to!set!temperature,!the!RUN!Mode!screen!content!
will!be!displayed!on!the!LCD!screen.!
!
Note:!!If!the!application!is!located!above!the!chiller,!there!is!a!potential!for!the!fluid!to!overflow!the!
reservoir!due! to! gravity,! when! the! cap! is! opened! with! the! pump! stopped.!During! these! cases,! it! is!
recommended!that!the!external!tubing!sections!be!individually!primed!by!connecting!it!to!the!chiller.!
When!all!sections!are!primed,!then!connect!the!external!tubing!to!the!chiller!and!the!application,!and!
complete!the!final!priming!of!the!application.!!!!
!
!
!&

11!
RUN&MODE&OPERATING&PROCEDURES&%
When!the!T257P!Chiller!is!operating!and!providing!temperature!controlled!fluid!it!is!said!to!be!in!the!
RUN!Mode.! ! During!the!RUN! Mode! the!screen! content! shown! in!figure! 5\1! is! displayed.! !! The! RUN!
Mode!screen!shows!the!instantaneous!fluid!temperature,!the!maximum!and!minimum!temperature!
stability! over! the! past! 60! minutes,! the! set! temperate;! the! sensor! used! to!control! the! fluid! and! if!
applicable,!the!coolant!flow!rate.!
!
Figure!5\1:!RUN!Mode!Screen!
!
While!in!the!RUN!Mode!the!following!features!are!accessible:!
•Set!the!device!in!STANDBY!Mode!
•Set!/!Change!control!temperature!
•Set!/!Change!pump!speed!(if!applicable)!
•Set!/!Change!user!specified!temperature!alarms!
•Access!the!Monitor!screen!for!detailed!operational!status!
How&to&Stop&and&Start&the&T257P&Chiller&%+!
1. To!stop!the!T257P!Chiller,!press!the!“Stop”!button.!!This!will!place!the!system!in!standby!mode!
with!the!coolant!pump!and!the!temperature!control!subsystem!in!idle!state.!
2. The!fans! will! continue! to! operate! for!some! time! to! cool! the! heat! sinks.! ! Once! the! heat! sink!
temperature!is!near!ambient!the!fans!will!enter!the!idle!state.!
3. To! Start! the! T257P!Chiller,! press! the! “Start”! button.! ! This! will! display! the! RUN! Mode! screen!
with!the!chiller!controlling!the!fluid!to!the!previous!set!temperature.!
!

12!
!
Figure!5\2:!STANDBY!Mode!Screen!
How&to&Change&the&Set&Temperature&%+"
1. From!the!RUN!Mode!Screen,!press!the!“SetTemp”!button!on!the!screen.!
2. This!will!navigate!to!the!Set!temperature!screen.!This!screen!will!show!the!current!and!the!new!
temperature.!!
3. Press!the!UP!or!DOWN!arrow!to!change!the!temperature!to!a!new!setting.!!The!new!setting!will!
be!shown!on!the!right!under!“New!Temp”.!!!!
4. When! the! arrow!buttons! are! pressed! the! temperature! setting! will! initially! change! in! 0.1C!
increments.!!If!the!key!is!held!down!for!more!then!5!seconds,!the!temperature!will!change!in!
1.0C!increments.!!To!go!back!to!0.1C!steps,!let!go!of!the!arrow!key!and!re\press!it!to!achieve!
fine!control.!
5. Once!the!correct!set!temperature!is!selected,!press!the!“Accept”!button!to!confirm!change!to!
the!set!temperature.!
6. If! the! “Cancel”! button! is! pressed,! the! new! changes! are! canceled! and! the! previous! set!
temperature!will!stay!active.!
7. Pressing!the!“Accept”!or!“Cancel”!button!will!return!you!to!the!RUN!Mode!screen.!
!
!
Figure!5\3:!SET!TEMP!Screen!

13!
How&to&Change&the&User&Specified&Temperature&Alarm&Limits&%+#
1. From!the!RUN!Mode!screen,!press!the!Next!button.!
2. On!the!Selection!screen!press!the!Set!High!Temp!or!Low!Temp!Alarm!button.!
3. This!will!navigate!to!the!Set!Temp!Alarm!screen.!!The!screen!will!show!the!current!and!the!new!
alarm!limits.!
4. Press!the!UP!or!DOWN!arrow!to!change!the!temperature!to!a!new!setting.!!The!new!setting!will!
be!shown!on!the!right!under!“New”.!
5. Once!the!correct!alarm!temperature!is!selected,!press!the!“Accept”!button!to!confirm!change!
to!the!alarm!setting.!
6. If! the! “Cancel”! button! is!pressed,! the! new! changes! are! canceled! and! the! previous! alarm!
temperature!limits!will!stay!active.!
7. Pressing!the!“Accept”!or!“Cancel”!button!will!return!you!to!the!RUN!Mode!screen.!
!
!
!!
Figure!5\4:!User!Set!Temperature!Alarm!Limits!Screen!
!
!
!

14!
How&to&Change&the&Pump&Drive&(for&applicable&configurations)&%+$
1. Some!T257P!Systems!are!equipped!with!a!variable!speed!pump.!For!these!models,!the!option!
to!customize!the!system!flow!is!available!via!the!user!interface.!
2. From!the!RUN!Mode!screen,!press!the!Next!button.!
3. On!the!Selection!screen!press!the!Set!Pump!Drive!button.!
4. This!will!navigate!to!the!Set!pump!drive!screen.!!The!screen!will!show!the!current!and!the!new!
pump!drive.!
5. Press! the! UP! or! DOWN! arrow! to! change! the! pump! drive! to! a! new! setting.! ! The! new! drive!
setting!will!be!shown!on!the!right!under!“New”.!
6. Once!the!correct!pump!drive!is!selected,!press!the!“Accept”!button!to!confirm!change!to!the!
set!temperature.!
7. If!the!“Cancel”!button!is!pressed,!the!new!changes!are!canceled!and!the!previous!pump!drive!
will!stay!active.!
8. Pressing!the!“Accept”!or!“Cancel”!button!will!return!you!to!the!RUN!Mode!screen.!
!
Figure!5\5:!User!Set!Pump!Drive!Screen!
!
How&to&Access&the&Monitor&Screen&%+%
1. Press!the!Next!button!from!the!RUN!Mode!screen!
2. On!the!Selection!Screen!press!the!Monitor!Button.!
3. This!will!display!the!monitor!screen.!!The!monitor!screen!shows!the!detailed!operational!state!
of!the!T257P!system.!!This!is!a!useful!diagnostic!tool!to!verify!the!operation!of!the!device.!
4. Press!the!Next!button!to!cycle!through!the!available!monitor!screens.!!!
5. Press!the!Back!button!to!return!to!the!Selection!screen.!
6. Press!the!Home!button!to!return!to!the!RUN!Mode!screen.!

15!
Figure!5\6:!Monitor!Screen!
The! monitor! screen! as! shown! in! figure! 5\6,! displays! the! internal! system! control! parameters! of! the!
T257P!system.!!From!this!one!can!view!all!the!available!temperatures,!TEC!drive!levels,!pump!and!fan!
states!to!aid!in!the!diagnosis!of!the!system!and!its!installation.!!!
!
&
!&

16!
STANDBY&MODE&OPERATING&PROCEDURES&&
When! the! T257P!Chiller! is! powered! on!(AC! power),! and! is! in! an! idle! state,! it! is! said! to! be! in! the!
STANDBY!mode.!!In!the!STANDBY!state,!the!chiller!pump!and!temperature!control!is!turned!off.!!!
!
While!in!the!STANDBY!Mode!the!following!features!are!accessible:!
•Set!the!device!to!RUN!Mode!
•Set!/!Change!Control!Mode!
•Set!/!Change!Control!Sensor!
•Set!/!Change!COM!Port!
•Set!/!Change!fan!speed!
•View!Alarm!History!
•View!System!Info!
!
!
!!!!!!!!!! !!
Figure!6\1:!Standby!Mode!Options!
How&to&Set&the&Control&Mode&&+!
The!control!mode!has!been!optimized!to!provide!temperature!stability!from!a!minimum!flow!rate!of!
0.75!to!3.5!lpm.!!Currently!only!one!control!mode!is!available.!!In!the!future!if!additional!optimization!
is!required,!it!will!be!made!available!and!settable!from!this!selection.!
How&to&Set&the&Control&Sensor&&+"
1. Some! T257P!Systems! are! equipped! with! alternate! temp! sensors! that! can! be! selected! as! the!
control!sensor.!!The!“supply”!sensor!is!the!default!selection.!
2. Apply!power!to!the!chiller.!
3. From!the!STANDBY!Mode!screen,!press!the!Next!button.!
4. On!the!following!screen,!press!the!Set!Control!Sensor!button.!

17!
5. This!will!navigate!to!the!Set!Control!Sensor!screen.!!The!screen!will!show!the!current!and!the!
other!available!sensors.!
6. Press!the!UP!or!DOWN!arrow!to!change!the!control!sensor!to!a!new!setting.!!The!new!sensor!
setting!will!be!shown!on!the!right!under!“New”.!
7. Once!the!correct!control!sensor!is!selected,!press!the!“Accept”!button!to!confirm!changes!to!
the!sensor!selection.!
8. If! the! “Cancel”! button! is! pressed,! the! new! changes! are! canceled! and! the! previous! control!
sensor!selection!will!stay!active.!
9. Pressing!the!“Accept”!or!“Cancel”!button!will!return!you!to!the!STANDBY!Mode!screen!
!
!
Figure!6\2:!Control!Sensor!Selection!Screen!
!
Note:!!!
1. At!present!only!the!supply!sensor!option!is!available.!!The!remote!sensor!operation!is!a!
planned!future!update!to!the!product.!
How&to&Set&the&COM&Port&&+#
1. T257P!Systems! are! equipped! with!alternate! communications! port! that! can! be! selected! for!
remote!monitoring!and!communication.!!USB!Port!is!the!default!selection.!
2. Apply!power!to!the!chiller.!
3. From!the!STANDBY!mode,!screen!press!the!Next!button.!
4. On!the!following!screen,!press!the!Set!COM!Port!button.!
5. This!will!navigate!to!the!Set!COM!Port!screen.!!The!screen!will!show!the!current!and!the!other!
available!ports.!
6. Press!the!UP!or!DOWN!arrow!to!change!the!port!to!a!new!setting.!!The!new!sensor!setting!will!
be!shown!on!the!right!under!“New”.!
7. Once! the! correct! com! port! is! selected,! press! the! “Accept”! button! to! confirm! changes! to! the!
port!selection.!

18!
8. If! the! “Cancel”! button! is! pressed,! the! new! changes! are! canceled! and! the! previous! com! port!
selection!will!stay!active.!
9. Pressing!the!“Accept”!or!“Cancel”!button!will!return!you!to!the!STANDBY!Mode!screen.!
!
!
Figure!6\3:!COM!Port!Selection!Screen!
How&to&Change&the&Fan&Drive&&+$
1. From!the!RUN!Mode!screen,!press!the!Next!button.!
2. On!the!Selection!screen,!press!the!Set!Fan!Drive!button.!
3. This!will!navigate!to!the!Set!Fan!drive!screen.!!The!screen!will!show!the!current!and!the!new!
Fan!drive.!
4. Press!the!UP!or!DOWN!arrow!to!change!the!fan!drive!to!a!new!setting.!!The!new!drive!setting!
will!be!shown!on!the!right!under!“New”.!
5. Once!the!correct!fan!drive!is!selected,!press!the!“Accept”!button!to!confirm!change!to!the!fan!
drive!setting.!
6. If!the!“Cancel”!button!is!pressed,!the!new!changes!are!canceled!and!the!previous!fan!drive!will!
stay!active.!
7. Pressing!the!“Accept”!or!“Cancel”!button!will!return!you!to!the!RUN!Mode!screen.!
!
Figure!6\4:!Fan!Speed!Selection!Screen!

19!
If!the!selection!is!AUTO,!the!system!will!automatically!control!the!fan!speed!by!increasing!or!lowering!
the!fan!speed!to!maintain!the!set!temperature!and!cooling!requirements.!!
!
If!the!selection!is!HIGH,!the!fan!speed!will!remain!at!its!maximum!setting.!!This!will!improve!the!time!
to!temperature!and!will!provide!the!most!efficient!operation!of!the!system.!
!
Alarm&History&&+%
The!Alarm!History!selection!shows!the!last!ten!alarm!events!detected!by!the!chiller.!!This!is!available!
for!diagnosing!and!problem!resolution!of!the!chiller!or!installation.!
1. Apply!power!to!the!chiller.!
2. From!the!STANDBY!Mode!screen!press!the!Next!button!twice.!
3. On!the!following!screen!Press!the!Alarm!History!button.!
4. After! reviewing! the! alarm! history! press! the! “Accept”! button! to! return! to! the! Standby! Mode!
screen.!
!
System&Information&&+&
The!System!Info!selection!shows!the!following!system!information:!
•Device!serial!number!
•Device!operational!hours!(Lifetime!hours)!
•Software!part!numbers!and!revision!
!
1. Apply!power!to!the!chiller.!
2. From!the!STANDBY!Mode!screen!press!the!Next!button!twice.!
3. On!the!following!screen,!press!the!System!Info!button.!
4. After! reviewing! the! information,!press! the! “Accept”! button! to! return! to! the! Standby! Mode!
screen.!
!
Turning&the&T257P&System&OFF&&+'
1. If!the!T257P!system!is!operating,!press!the!Stop!button!to!set!it!in!idle!mode.!!!
2. Wait!60!seconds!and!turn!he!power!switch!to!the!OFF!position.!
!
!

20!
TAKING&CARE&OF&YOUR&T257P&SYSTEM&'
Checking&the&Coolant&Level&'+!
1. Once!a!week,!check!the!coolant!level!of!the!T257P!system!
2. Set!the!system!in!RUN!Mode.!
3. Open! the! reservoir! cap! and! check! the! fluid! level! in! the! reservoir.! ! If! the! level! is! below! the!
reservoir! neck,! add! recommended! fluid! to! fill! it.!!Please! refer! to! the! technical! information!
section!for!recommended!coolants.!
4. Close!the!cap,!finger!tight,!when!complete.!
Changing&the&Coolant&within&the&T257P&System&'+"
1. Disconnect!power!to!the!unit!by!turning!the!power!switch!to!the!off!position.!
2. Disconnect!the!unit!from!the!application!by!depressing!the!CPC!fittings!thumb!tabs!and!gently!
remove!the!hose!connectors!from!the!unit!connectors.!!If!the!connections!are!other!than!CPC,!
please!refer!to!the!specific!connector!manufacture’s!recommended!practice!for!installation!/!
removal!of!connectors.!
3. Connect! the! drain! hoses! (with! the! CPC! male! connectors!on! one! side! and! open! tube! on! the!
other)!to!the!supply!and!return!ports!and!drain!the!fluid!into!a!discard!vessel.!
4. Turn!on!the!unit!and!set!the!unit!in!Run!Mode.!!!
5. Keep! adding! fresh! fluid! of!500! ml,! into! the! reservoir! to! circulate! it! through! the! system! and!
pump!it!out!to!the!discard!vessel.!!!
6. When!all!the!fluid!is!emptied!from!the!reservoir,!the!system!will!issue!a!“Low!Coolant!Level”!
alarm!message.!!Disconnect!the!drain!hoses!and!reconnect!the!Chiller!to!the!application.!
7. Add!fluid!to!the!reservoir;!press!“Accept”!to!clear!the!alarm.!!
8. Start! the! system! and! add! fluid! as! required! for! the! fluid! level! to! be! at! the! bottom! of! the!
reservoir!neck.!
9. Once!complete,!close!the!cap.!
10. It!is!recommended!that!a!coolant!change!be!implemented!at!minimum,!every!six!months,!to!
keep!the!system! in! working!order.! ! Based!on! your! use!conditions,! you!may!need!to! perform!
this!PM!more!frequently.!
Changing&the&Application&Coolant&'+#
1. It!is!highly!recommended!the!fluid!contained!within!the!application!also!be!flushed!when!the!
T257P!Chiller!coolant!is!changed.!!!
2. Follow!application!guidelines!for!flushing!procedure.!
Table of contents
Popular Chiller manuals by other brands

SMC Networks
SMC Networks HRS-R Series Operation manual

Carrier
Carrier 19FA Series installation instructions

Serene
Serene SC112N-A user manual

Dunham-Bush
Dunham-Bush ACDX Installation, operation and maintenance instructions

Nordcap
Nordcap SF 19/15-CW CRIO CHILL manual

AIREDALE
AIREDALE TurboChill TCC1 Series installation manual

Gree
Gree T1/R410A/50Hz Service manual

York
York MAXE YST Wiring diagram

Carrier
Carrier 30HR Series Product data

Liebert
Liebert Indoor/Outdoor Process Chiller PS036A Specification sheet

AERMEC
AERMEC NBW 147 Technical and Installation Booklet

EUROKLIMAT
EUROKLIMAT EKS Series Installation, operation and maintenance manual