THG PARIS U6J-151LED User manual

1/8
Nov.2014
F
R
GB
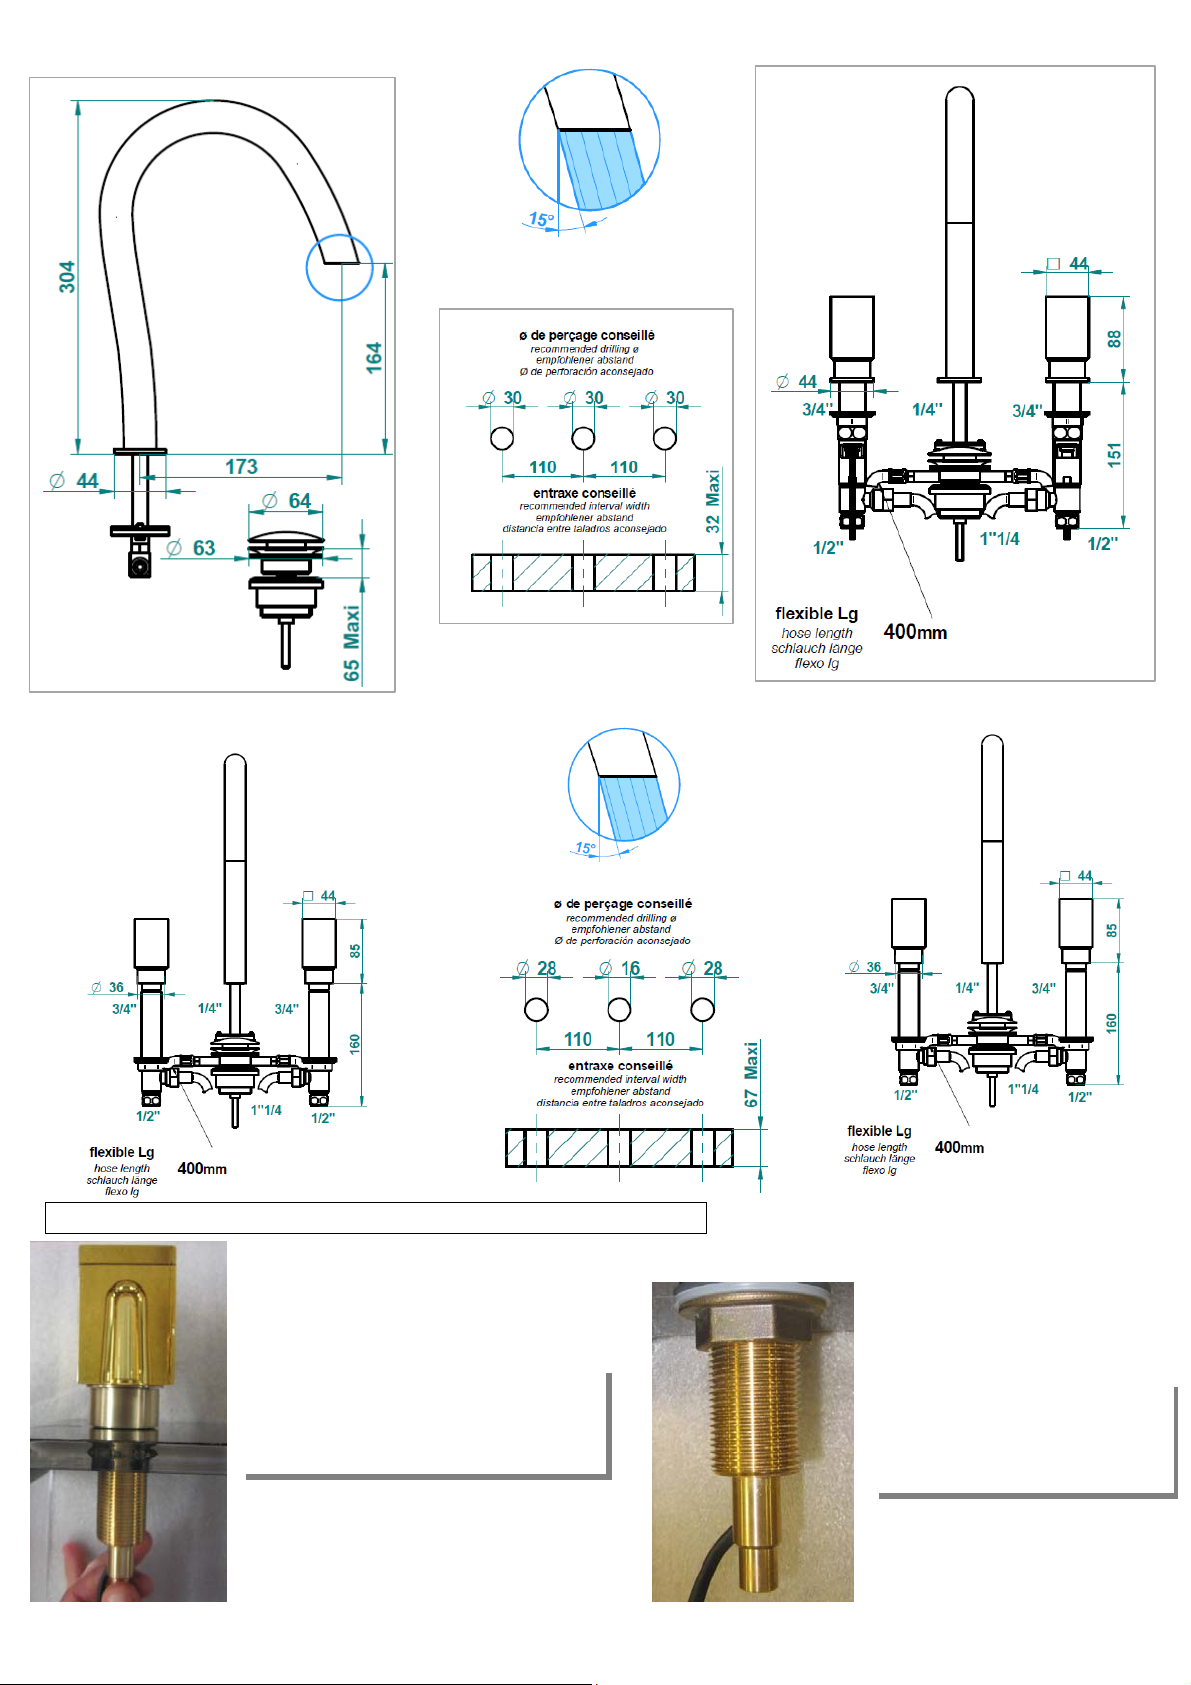
MÉLANGEUR DE LAVABO 3 TROUS
3 HOLE
S
BASIN MIXER AND POP UP WASTE
Référence commerciale /sale reference/
00151LED : MELANGEUR DE LAVABO 3 TROUS AVEC VIDAGE AVEC SYSTEME
D’ECLAIRAGE PAR LED
3 HOLE BASIN MIXER AND POP UP WASTE WITH LED LIGHTING
SYSTEM
06801:ALIMENTATION + CARTE ELECTRONIQUE POUR SYSTEME
D'ECLAIRAGE PAR LED
SUPPLY + ELECTRONIC SYSTEM BOARD OF LED LIGHTING
06802: JEU DE DEUX TELECOMMANDES POUR SYSTEME D'ECLAIRAGE
PAR LED
SET OF TWO REMOTE SYSTEM FOR LED LIGHTING
06803: TRANSFORMATEUR + VARIATEUR POUR CONNECTION SUR
INTERRUPTEUR MURAL, POUR SYSTEME D'ECLAIRAGE PAR LED
TRANSFORMER + VARIATOR FOR CONNECTION ON WALL
SWITCH, FOR LED LIGHTING SYSTEM
U6J/151LED/FR GB
Caractéristiques / Caracteristics
L’installation doit être conforme à la NF C 15-100. L’éclairage Led fonctionne en 12V, le
boitier avec transformateur doit être impérativement placé hors volumes 1 et 2.
The installation must be in accordance with NF C 15 100. LED lighting functions with 12V.
The box with trans
f
ormer must im
p
erativel
y
be
p
laced out volumes 1 and 2.
Le transformateur doit impérativement être placé dans le
volume 3 ou hors volume
The transformer must be placed in volume 3 or off
0
1
2
3
4
5
6
7
8
9
0bar 1bar 2bar 3bar
L/Minute
Pression/Pressure
COURBEDEDEBIT/FLOWRATECURVE
Alimentation / Power supply
12V
Durée de vie moyenne d’une led : 20000h
Consommation : < à1W par led
Puissance d’éclairage : 10 Lux max à 1m
Average lifespan of an LED: 20000h
Power consumption: <A1W per Led
Lighting power: max 10 lux max 1m
Voir page 4 pour l’appairage (procédure de jumelage) de la
télécommande avec le boitier électroni
q
ue.

2/8
Nov.2014
Installation
Mettre le côté en position
Place the rim mounted
Serrer l’écrou à plateau
Overtighten the nut
Montage avec rosace
Monta
g
e sans rosace

3/8
Nov.2014
INSTALLATION PARTIE ELECTRONIQUE ET COMMANDE
ELECTRONIC AND REMOTE SYSTEM CONNECTION
Positionner le dessous du côté. Passer le fil dans la lumière prévue à
cet effet. Visser l’écrou.
Position the rim mounted side. Pass the thread through the aperture
provided. Tighten the nut.
Monter le bec. Bloquer l’écrou de fixation. Relier les côtes
avec la nourrice à l’aide des flexibles.
Fit the spout. Block nut. Connect the rim mounted with the T
junction using hoses.
3 INSTALLATIONS POSSIBLES
1. Installation avec commande par télécommande (références commerciales commandées 151LED +
6801 + 6802)
2. Installation avec commande par interrupteur potentiomètre (références commerciales commandées
151LED + 6803
3. Branchemenent sur installation LED maison
3 INSTALLATIONS ARE POSSIBLE
1. Installation with commande by remote system (sales ref . 151LED + 6801 + 6802)
2. Installation with control switch potentiometer (commercial items ordered 151LED + 6803)
3. Connection on Installation LED home

4/8
Nov.2014
Le branchement des leds est à effectuer ici, fil rouge sur le +, après branchement refermer correctement la boite.
The connection of the LEDs is to do here, red wire on the +. After connection close the box properly.
Transformateur 12V
Transformer 12 V
Transformator 12 V
Bouton de télécommande
Remote control Button Bouton poussoir
Pushbutton
1) Installation avec télécommande / Installation with commande by remote system
Procédure d’appairage (jumelage) de la télécommande
Appuyer pendant 10s sur le bouton poussoir qui se trouve dans la boite de
raccordement, les leds clignotent lentement pendant 60s. Appuyer enfin 10s sur le
bouton de la télécommande jusqu’à ce que les leds s’arrètent de clignoter, l’appairage
est réalisé. Une seule télécommande peut être appairer à plusieurs cartes
électroniques. Recommencer l’appairage dans le cas d’un dysfonctionnement.
Pairing procedure on the remote
Press for 10s on the button which is located in the connecting box. The LEDs
flash slowly for 60 seconds. Press finally 10s on the button on the remote until
the LED stops flashing, the pairing is done. One remote can be paired with
several electronic cards. Repeat the pairing in the case of a malfunction

5/8
Nov.2014
La télécommande permet d’alumer la led d’éclairage avec 5 niveaux d’intensité. En appuyant 1 fois sur le bouton
on effectue l’allumage des leds avec l’intensité la plus basse, une 2ème impulsion permet d’avoir le deuxième
niveau d’intensité, ceci jusqu’au 5ème niveau d’intensité. En appuyant une nouvelle fois les leds s’éteignent
The remote control enables you to switch on the LED lighting with 5 levels of intensity The remote control
enables you to switch on the LED lighting with 5 levels of intensity-
1st pression on the button : the lower light intensity, 2nd pression on the button : more light intensity
untill the 5th pression : the higher light intensity, 6th pression on the button : the light switches off
Connectin
g
j
ust one 151
Connectin
g
two 151
Exemple de configuration / Configuration example

6/8
Nov.2014
Transformateur 12V
Transformer 12 V
Transformator 12 V
2) Installation avec commande par interrupteur potentiomètre
Installation with control switch potentiometer
Un variateur peut commander plusieurs batteries de lavabo référence 151LED
A variator can control several batteries sink reference 151LED
Le branchement des LEDS est à effectuer ici, fil rouge sur le +, après branchement refermer correctement la
boite.
The connection of the LEDs is to do here, red wire on the +. After connection close the box properly.

7/8
Nov.2014
Garantie générale de 5 ans (acceptation après expertise) de la robinetterie et de la finition chromée.
Garantie de 1 an pour les traitements hors chromé (acceptation après expertise)
5 years general Warranty :Valves, fitting and our chrome finish
All other finishes are Warranted For 1 year claims are accepted after analyze.
Installation par des professionnels, conformément aux règles de l’art, aux normes et DTU.
Installations must be carried out by professional plumbers / contractors and in accordance with the code of practice and standards in line with DTU.
Utilisation conforme à leurs destinations et aux prescriptions d’utilisation.
Products must be used and maintained in accordance with their purpose and in line with manufacturers instructions.
Entretien régulier (changement des joints, nettoyage des filtres et aérateurs, détartrage des mécanismes, graissage, …) ;
Product must be regularly maintained and must include regular cleaning out of aerators and filters. Where necessary systems should be de-scaled to reduce the damaging
effects of hard water calcium build up which are beyond the control of the manufacturer.
Nettoyage régulier de la robinetterie avec des produits non corrosifs et non abrasifs (eau savonneuse + nettoyage avec un chiffon doux)
Cleaning must be undertaken with non-abrasive and non-corrosive products and cloths.
Exclusions de la garantie - Warranty exclusions
Pièces d’usure (inverseurs, têtes à clapet ou céramique, cartouche céramique ou thermostatique) Normal wear and tear of working parts to include diverters, ceramic
heads, spindle heads, ceramic or thermostatic cartridges
Dégât du au gel - Frost damage
Choc accidentel - Accidental impact
Utilisation de produits corrosifs ou abrasifs – Use of corrosive or abrasive products which includes marble cleaners.
Dégât causé par passage de corps étranger (canalisations non purgées)
Damage from particles of dirt, etc caused by lack of cleaning of aerators or filters.
Mauvaise installation. Incorrect installation. Damage to products caused by installation or dismantling.
Service après vente - After-sales service for defective product
Le Service après-vente T.H.G. assure la prise en charge d’un produit défectueux à la demande d’un distributeur.
3) Branchement sur installation Led maison /
Connection on Installation LED home
Un électricien qualifié peut intégrer les led de la batterie de lavabos dans un éclairage de salle de bain plus global.
Dans ce cas la télécommande et le boitier d’alimentation + variateur ne doivent pas être commandés (il faut
uniquement commander la référence 151LED.
Alimentation 12-24V + variateur et interrupteur spécifique led à prévoir.
A qualified electrician can integrate LED battery sinks in the lighting bathroom. In this case the remote
and the supply box + variator must not be ordered (only order the 151LED reference.
+ Power supply 12-24V + variator and specific switch led to predict.
GARANTIE, NETTOYAGE ET MAINTENANCE / WARRANTY, CLEANING AND MAINTENANCE

8/8
Nov.2014
Les envois doivent être faits par l’expéditeur en port payé et adressés au service après-vente THG.
Les produits doivent être emballés de façon individuelle de manière à ne causer aucun coup ou détériorations.
A réception les produits sont expertises :
-Si le défaut est imputable à THG, il est soit réparé, remplacé
-Si le défaut n’est pas imputable à THG, un rapport d’expertise est rédigé ; le produit pourra être réparé ou remplacé aux frais de l’expéditeur après acceptation.
Toutes détériorations lors du démontage d’un produit pour retour ne sera pas couvert par la garantie.
Dans le cas d’une demande d’avoir sur un retour produit neuf, après expertise, il sera établi un avoir.
Une décote pourra être appliquée dans le cas d’un traitement spécial ou dans le cas d’un produit abîmé.
Tous nos produits sont contrôlés à 100% en étanchéité. Purger les canalisations est impératif afin de ne pas endommager les têtes céramiques, les cartouches
céramiques et les cartouches thermostatiques.
Defective items must be returned to the factory at the clients expense and addressed to the THG
After Sales Department. We recommend that returned items are correctly insured during transit.
Product must be carefully wrapped by the returnee, with each item individually protected to prevent any impact during delivery. We recommend a digital image be
taken of the wrapped goods to confirm their packing.
Upon receipt of the returned items goods will be inspected by THG Quality Control and a report will be prepared. Such report will determine if the alleged fault/damage
is a result of the manufacturer.
All our products are checked for water tightness. In order to maintain the warranties it is necessary to regularly drain through water systems to ensure the prevention
of dirt damage to the ceramic heads and cartridges and thermostatic cartridges.
Goods found NOT to be defective will be repaired or changed at full charge to the client.
ENTRETIEN - CLEANING
Pour garder votre robinetterie belle et en parfait état le plus longtemps possible, l’idéal est de la nettoyer après chaque utilisation. Le nettoyage doit s’effectuer avec de
l’eau savonneuse et un chiffon doux, un rinçage à l’eau et un essuyage avec un chiffon doux.
To maintain fittings in perfect condition cleaning is recommended after every use with soapy water applied, rinsed and then dried off with a soft, non-abrasive cloth.
Tous les produits abrasifs contenant de l’alcool ou basés sur d’autre acides, ainsi que les anti-tartre sont à exclure.
Pour un entretien plus approfondi (trace résiduelle ou de calcaire), nous commercialisons deux types de produits suivant la finition :
Abrasive products which contain alcohol, acid or anti-scale ingredients are prohibited and will nullify the Warranty.
For a deeper clean and to remove residual or corrosive markings we recommend a monthly application of a suitable cleaner for the metal installed or
we offer the following recommended cleaning products:
Renov’rob (réf commerciale :140R et 140MR)
Ce produit élaboré à partir de cires et de savons organiques peut être utilisé sur les finitions chromé et nickel. Il forme un film protecteur de cire qui permet le lustrage et
donne un éclat durable.
For use on CHROME and NICKEL finishes this wax and organic soap based cleaner, applied and removed with a non-abrasive soft cloth, creates a protective wax-film
which enables the fittings to be polished and produces a lasting brightness.
Brillor (réf commerciale :140B et 140MB)
Ce produit élaboré à partir de savon acide gras et de micro-granulés d’élastomères organique peut être utilisé sur les finitions doré, luxbrass et finition satinée. Il forme un
film protecteur de cire qui permet le lustrage et donne un éclat durable.
For use on GOLD, LUXBRASS and SATIN finishes this fatty-acid soap and micro-granules of organic content, applied and removed with a non-abrasive soft cloth,
creates a protective wax film which enables the fittings to be polished and produces a lasting brightness. (satin Finishes should be lightly buffed).
Il est possible de commander des aérateurs (voir catalogue pour la référence).
It is possible to order aerators (look at our brochure)
Nettoyage des pommeaux de douche, des douchettes et des aérateurs-
Cleaning of the handshowers and shower heads
Ils peuvent être enlevés toutes les 6 – 8 semaines et trempés dans la même solution (8 volumes d’eau - 1
volume de vinaigre blanc). Pour les douchettes à main qui ne sont pas équipées de protection contre la
dureté de l’eau, nous vous recommandons de faire un nettoyage régulier à l'eau additionnée de vinaigre
blanc.
These should be removed each 6-8 weeks and soaked in the same solution (8 parts water – 1 part white
vinegar) For handshowers which are not equipped with hard-water protection, we recommend you to do a
regular cleaning in water with some white vinegar.
This manual suits for next models
1
Table of contents
Other THG PARIS Bathroom Fixture manuals
Popular Bathroom Fixture manuals by other brands

Rohl
Rohl PERRIN & ROWE U.5886X/TO installation instructions

Glacier bay
Glacier bay 3075-512-WS1 Use and care guide

Samo
Samo B7880 Assembly instruction

Kohler
Kohler 10-Jet K-1005-H2 Homeowner's guide

Franke
Franke F5ST2001 Installation and operating instructions

LIXIL
LIXIL DXV Equility D12045-004 installation instructions

Fontana Showers
Fontana Showers EMILIA FS3362 installation instructions

Hans Grohe
Hans Grohe AXOR STARck 10715000 Assembly instructions

Brizo
Brizo Charlotte 85785-PNCO manual

Pfister
Pfister Ideal LF-548-ID Quick installation guide

Fackelmann
Fackelmann 82951 Instructions for mounting and use

Gessi
Gessi 40511 Installation