ThinkGizmos TG643 User manual

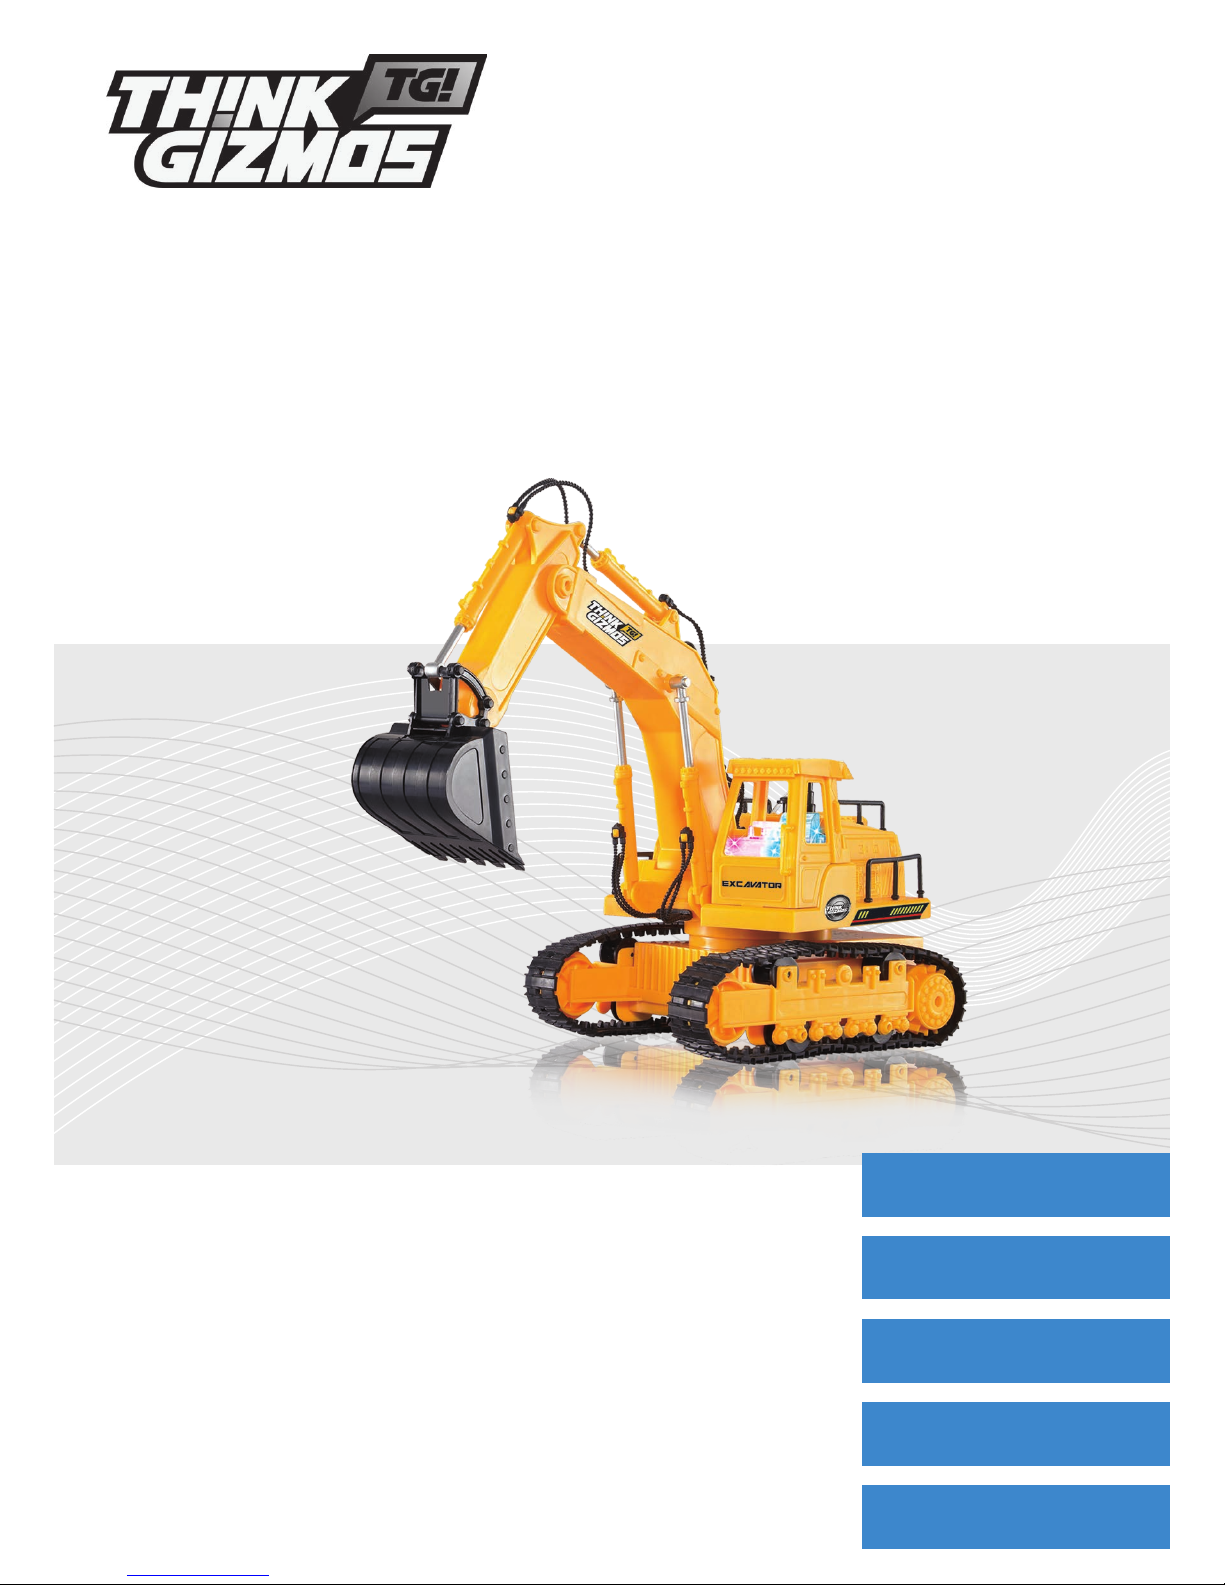
TG643 REMOTE CONTROL EXCAVATOR
CONGRATULATIONS!! YOU ARE NOW THE OWNER OF THE EXCAVATOR.
FOR AGES 3+
PLEASE READ AND FOLLOW THESE INSTRUCTIONS AT ALL TIMES FOR OPTIMUM ENJOYMENT.
User Manual
English p 1
Deutsch p 8
Francais p 15
Italiano p 22
Español p 29
This toy contains small parts that could be a
choking hazard. Small Children under 6 years
old should be closely supervised while playing
with this toy.

ENGLISH MANUAL - CONTENTS
1.
2.
3.
2.1 Controlling Excavator.......................................................................................... 4
2.2 Controlling Excavator Continued....................................................................... 5
2.3 Troubleshooting ..................................................................................................6
1.1 Excavator Battery Installation ........................................................................... 3
1.2 Remote Battery Installation ............................................................................... 3
OPERATING INSTRUCTIONS
IMPORTANT INFORMATION
2
3.1 Warranty Information ........................................................................................ 7
WARRANTY

1. IMPORTANT INFORMATION
3
1.1 Excavator Battery Installation
●Turn the Excavator over so that you can gain access to the underside of the vehicle.
●Making sure that the Power switch is in the OFF position, remove the screw from the
battery cover and remove the battery compartment cover.
●Insert 4x AA batteries (supplied) into the battery compartment observing the correct
polarity as indicated.
●Re-t the battery cover and secure with the screw.
(Warning - Remove the batteries if the Excavator is not going to be used for a long time.)
1.2 Remote Battery Installation
●The battery compartment is located on the
underside of the controller.
●Remove the screw from the battery cover and
remove the battery compartment cover.
●Insert 2 AA batteries (supplied) into the battery
compartment observing the correct polarity as
shown.
●Re-t the battery cover and secure with the
screw.
WARNING
Do not mix old and new batteries.
Keep batteries away from small children.
Do not short-circuit batteries or dispose of in a re.
Remove the batteries if the Excavator is not going to
be used for a long time.
Requires 4x AA Batteries (Included)
Requires 2x AA Batteries
(Included)

2. OPERATING INSTRUCTIONS
4
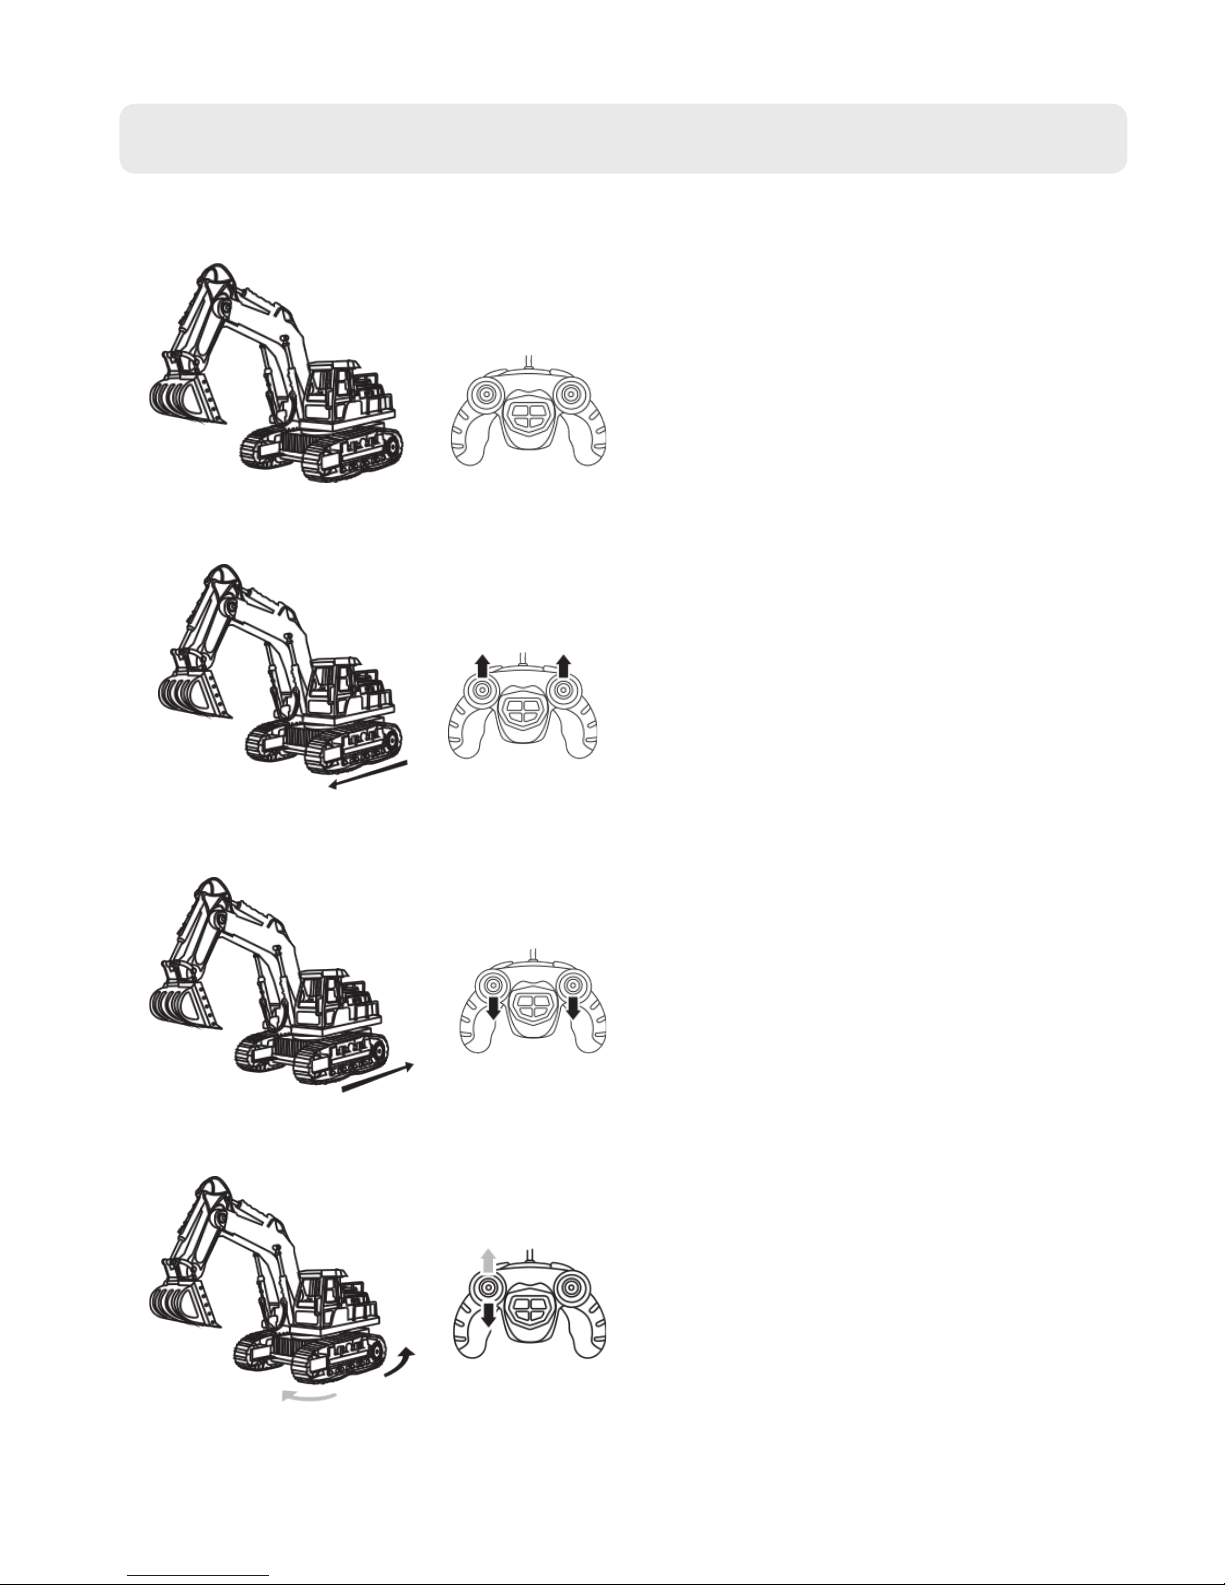
2.1 Controlling the Excavator
●Load the batteries in the controller and
Excavator.
●Switch on the power of the controller
and Excavator.
●Press the Left and Right Stick on the
controller Forwards.
●The Excavator will move Forward.
●Press the Left Stick on the controller
Forwards or Backwards.
●The Excavators right tracks will rotate
forwards of backwards causing it to
turn.
●Press the Left and Right Stick on the
controller Backwards.
●The Excavator will move Backward.

5
2.2 Controlling the Excavator Continued
●Press the Right Stick on the controller
Forwards or Backwards.
●The Excavators right tracks will rotate
forwards of backwards causing it to
turn.
●Press the Shoulder Buttons on the
Remote Control.
●The Excavators Arm and Scoop will
move up and down.
●Press the Top Left or Top Right
Buttons in the middle of the controller
Backwards.
●The Excavators Arm will Rotate Left or
Right.

6
2.3 Troubleshooting
If you are experiencing problems with your Excavator, here are some quick and easy checks
that you can carry out, which may help to resolve the problem.
No Response from the Excavator:
●Please ensure that the Excavator is in range of the controller and that there are no
obstructions between the controller and the Excavator which could block the signal.
●Make sure that the batteries in the Controller are tted correctly and that they have not
reached the end of their life. If required replace the batteries in the controller.
●Make sure that the batteries in the Excavator are tted correctly. If required replace the
batteries in the Excavator.
●Please ensure that the power switch on the Excavator and Controller is switched to ‘ON’.
The Excavator Starts to Run Slow:
●The batteries in the Excavator are running low, please insert new batteries.

3. WARRANTY
3.1 Warranty Information
Think Gizmos, Unit 19, Lawson Hunt Industrial Park,
Broadbridge Heath, West Sussex, RH12 3JR
Tel.: +44/(0)203 384 8304
What is Covered:
This warranty covers any defects in materials or workmanship, with the exceptions stated
below.
How Long Coverage Lasts:
This warranty runs for 1 Year from the date your Excavator is delivered.
What is not covered:
Any problem that is caused by abuse, misuse, or an act of God (such as a ood) are not
covered.
What We Will Do:
If the Product proves defective during the warranty period, we will provide you with the
instructions for the return, and we will take one of the following actions: (i) replace the
Product with a product that is the same or equivalent to the Product you purchased; (ii)
repair the Product; or (iii) refund to you the whole of or part of the purchase price of the
Product.
How To Get Service:
To obtain instructions on how to obtain service under this warranty, contact our customer
service by phone or email. You will nd the contact details of our customer service below.
Customer service may ask you questions to determine your eligibility under this warranty,
and if you are eligible you’ll be given instructions for returning the defective Product. If
we send you a replacement or repair your Product, we will pay the cost of delivering the
replacement or repaired Product to you.
Do not return the item to the original place of purchase, please contact Think
Gizmos direct.
7
TG643 REMOTE CONTROL EXCAVATOR
HERZLICHEN GLÜCKWUNSCH! SIE BESITZEN NUN DEN EXCAVATOR.
AB 3 JAHREN
BITTE LESEN UND BEFOLGEN SIE FÜR DEN GRÖSSTEN SPASSFAKTOR IMMER DIESE ANLEITUNG.
BEDIENUNGSANLEITUNG
English p 1
Deutsch p 8
Francais p 15
Italiano p 22
Español p 29
Dieses Spielzeug enthält Kleinteile , die eine Er-
stickungsgefahr sein könnte. Kleine Kinder unter
6 Jahren sollten engmaschig überwacht werden,
während sie mit diesem Spielzeug spielen.

DEUTSCHE BEDIENUNGSANLEITUNG - INHALTSVERZEICHNIS
1.
2.
3.
2.1 Die Excavator steuern....................................................................................... 11
2.2 Die Excavator steuern - fortgesetzt................................................................. 12
2.3 Fehlerbehebung .................................................................................................13
1.1 Batterien in die Excavator einlegen ................................................................ 10
1.2 Batterien in die Fernsteuerung einlegen ....................................................... 10
BETRIEBSANLEITUNG
WICHTIGE INFORMATIONEN
9
3.1 Garantieinformationen .................................................................................... 14
GARANTIE

1. WICHTIGE INFORMATIONEN
10
1.1 Batterien in die Excavator einlegen
●Drehen Sie die Excavator um, sodass Sie Zugang zum Boden des Fahrzeugs erhalten.
●Stellen Sie sicher, dass sich der Netzschalter in der Position “OFF” bendet und
schrauben Sie die Schraube vom Batteriefach ab und entfernen Sie dieses.
●Legen Sie 4 AA Batterien (enthalten) in das Batteriefach ein und achten Sie dabei auf die
korrekte Polarität.
●Schrauben Sie das Batteriefach wieder an.
(Achtung - Entfernen Sie die Batterien, wenn der Excavator für längere Zeit nicht verwendet
wird.)
1.2 Batterien in die Fernsteuerung einlegen
●Das Batteriefach bendet sich auf der Unterseite
der Fernsteuerung.
●Schrauben Sie die Schraube vom Batteriefach ab
und entfernen Sie dieses.
●Legen Sie 2 AA-Batterien (enthalten) in das
Batteriefach ein und achten Sie dabei auf die
korrekte Polarität.
●Schrauben Sie das Batteriefach wieder an.
ACHTUNG
Verwenden Sie keine alten und neuen Batterien
zusammen.
Halten Sie die Batterien von kleinen Kindern fern.
Schließen Sie Batterien nicht kurz oder entsorgen
Sie sie in einem Feuer.
Entfernen Sie die Batterien, wenn der Excavator
für längere Zeit nicht verwendet wird.

2. BETRIEBSANLEITUNG
11
2.1 Die Excavator steuern
●Legen Sie die Batterien in die
Fernbedienung und den Excavator ein.
●Schalten Sie die Fernbedienung und den
Excavator ein.
●Drücken Sie den linken und den rechten
Joystick der Fernbedienung nach vorne.
●Der Excavator bewegt sich vorwärts.
●Drücken Sie den linken Joystick der
Fernbedienung nach vorne oder nach
hinten.
●Die linke Kette des Excavators bewegt
sich nach vorne oder nach hinten,
wodurch er sich dreht.
●Drücken Sie den linken und den rechten
Joystick der Fernbedienung nach hinten.
●Der Excavator bewegt sich rückwärts.

12
2.2 Die Autoscooter steuern - fortgesetzt
●Drücken Sie den rechten Joystick der
Fernbedienung nach vorne oder nach
hinten.
●Die rechte Kette des Excavators bewegt
sich nach vorne oder nach hinten,
wodurch er sich dreht.
●Drücken Sie die Knöpfe auf der Seite der
Fernbedienung.
●Der Arm und die Schaufel des
Excavators bewegen sich nach oben und
unten.
●Drücken Sie den oberen linken
oder rechten Knopf in der Mitte der
Fernbedienung nach hinten.
●Der Arm des Excavators dreht sich nach
links oder nach rechts.

13
2.3 Fehlerbehebung
Hier nden Sie einige schnelle und einfache Tests, die Sie durchführen können, wenn Sie
Probleme mit Ihrem Excavator haben und die dabei helfen können, diese Probleme zu
lösen.
Der Excavator reagiert nicht:
●Stellen Sie bitte sicher, dass sich der Excavator in Reichweite der Fernsteuerung bendet
und dass sich zwischen der Fernsteuerung und dem Excavator keine Hindernisse
benden, die das Signal blockieren könnten.
●Stellen Sie sicher, dass die Batterien ordnungsgemäß in die Fernsteuerung eingelegt
wurden und dass sie nicht leer sind. Tauschen Sie, falls erforderlich, die Batterien der
Fernsteuerung aus.
●Stellen Sie sicher, dass die Batterien ordnungsgemäß in die Excavator eingelegt wurden.
Tauschen Sie, falls erforderlich, die Batterien in den Excavator aus.
●Stellen Sie bitte sicher, dass sich die Netzschalter am Excavator und an der
Fernsteuerung auf der Position ‘ON’ benden.
Der Excavator fährt langsam:
●Die Batterien im Excavator werden leer. Legen Sie bitte neue Batterien ein.

3. GARANTIE
3.1 Garantieinformationen
Think Gizmos, Unit 19, Lawson Hunt Industrial Park,
Broadbridge Heath, West Sussex, RH12 3JR
Tel.: +44/(0)203 384 8304
Was ist abgedeckt:
Die Garantie deckt alle Defekte von Materialien und der Verarbeitung, mit Ausnahme der
unten angeführten Fälle.
Wie lange die Garantie gilt:
Die Garantie gilt für ein Jahr ab dem Lieferdatum Ihrer Excavator.
Was nicht abgedeckt ist:
Jedes Problem das durch Missbrauch oder höhere Gewalt (wie Überschwemmung) entsteht
ist nicht gedeckt.
Was wir tun werden:
Sollte das Produkt innerhalb der Laufzeit der Garantie als defekt befunden werden,
erhalten Sie Anweisungen für die Rückgabe und wir werden eine der folgenden Handlungen
vornehmen: (i) wir tauschen das Produkt gegen ein gleiches oder gleichwertiges Produkt
um, (ii) wird reparieren das Produkt, oder (iii) wir erstatten Ihnen den vollen oder einen
Teilbetrag des Kaufpreises des Produkts zurück.
Wie man Service in Anspruch nehmen kann:
Kontaktieren Sie unseren Kundendienst per Telefon oder E-Mail, um Anweisungen zu
erhalten wie Sie eine Serviceleistung unter diesen Garantiebestimmungen erhalten. Sie
nden die Kontaktdaten unseres Kundendienstes weiter unten. Unser Kundendienst kann
Ihnen Fragen stellen, um festzustellen, ob es sich um einen Garantiefall handelt. Sollte dies
der Fall sein, erhalten Sie Anweisungen zur Rücksendung des defekten Produkts. Sollten wir
Ihnen einen Ersatz schicken oder das Produkt reparieren, übernehmen wir die Lieferkosten.
Schicken Sie den Artikel nicht an den Händler zurück bei dem Sie ihn erworben
haben, sondern kontaktieren Sie bitte Think Gizmos direkt.
14

TG643 REMOTE CONTROL EXCAVATOR
FELICITATIONS ! VOUS ETES MAINTENANT LE PRIOPRIETAIRE DE BUMP ‘N’ EJECT BUMPER CARS.
CONVIENT A PARTIR DE 3 ANS ET PLUS.
VEUILLEZ LIRE ET SUIVRE CES INSTRUCTIONS POUR UN PLAISIR OPTIMAL.
Manuel de l’utilisateur
English p 1
Deutsch p 8
Francais p 15
Italiano p 22
Español p 29
Ce jouet contient de petites pièces qui pour-
raient être un risque d’étouement. Les petits
moins de 6 ans Les enfants doivent être sur-
veillés de près tout en jouant avec ce jouet.

MANUEL FRANCAIS - SOMMAIRE
1.
2.
3.
2.1 Pilotage des auto- tamponneuses .................................................................. 18
2.2 Pilotage des auto- tamponneuses suite ......................................................... 19
2.3 Résolution des problèmes ................................................................................20
1.1 Installation des piles de l’Excavateur ............................................................. 17
1.2 Installation des piles de la télécommande .....................................................17
NOTICE D’UTILISATION
INFORMATIONS IMPORTANTES
16
3.1 Informations sur la garantie ............................................................................ 21
GARANTIE

1. INFORMATIONS IMPORTANTES
17
1.1 Installation des piles de l’Excavateur
●Retournez l’Excavateur an de pouvoir accéder en dessous du véhicule.
●Assurez-vous que le bouton d’alimentation soit éteint, et enlevez la vis du couvercle de
piles puis enlevez le couvercle du compartiment à piles.
●Insérez 4 piles x AA (fournies) dans le compartiment à piles en respectant la polarité
indiquée.
●Replacez le couvercle de piles puis xer avec la vis.
(Avertissement – Enlevez les piles si vous n’utilisez pas l’Excavateur pendant une longue
période.)
1.2 Installation des piles de la télécommande
●Le compartiment à piles se trouve en dessous
du boîtier de la télécommande.
●Enlevez la vis du couvercle de piles puis enlevez
le couvercle du compartiment à piles.
●Insérez 2 piles x AA (fournies) dans le
compartiment à piles en respectant la polarité
indiquée.
●Replacez le couvercle de piles puis xez avec la
vis.
AVERTISSEMENT
Ne mélangez pas des piles usagées avec des piles
neuves
Tenez les piles hors de portée des enfants.
Ne faites pas de court-circuit avec les piles et ne les
jetez pas dans un feu.
Enlevez les piles si l’Excavateur n’est pas utilisée
pendant une longue période.
2. NOTICE D’UTILISATION
18
2.1 Pilotage de l’Excavateur
●Insérez les piles dans la télécommande
et l’Excavateur.
●Allumez la télécommande et
l’Excavateur.
●Appuyez sur l’avant- gauche de la
manette droite.
●L’Excavateur avancera.
●Appuyez vers l’avant ou l’arrière de la
manette gauche de la télécommande.
●Les rails droits de l’Excavateur
tourneront en marche avant et marche
arrière, les faisant tourner.
●Appuyez sur l’arrière- gauche de la
manette droite.
●L’Excavateur reculera.

19
2.2 Pilotage de l’Excavateur Suite
●Appuyez vers l’avant ou l’arrière de la
manette droite de la télécommande.
●Les rails droits de l’Excavateur
tourneront en marche avant et marche
arrière, les faisant tourner.
●Appuyez sur les boutons latéraux de la
télécommande.
●Le bras et la pelle de l’excavateur
monteront et descendront.
●Appuyez vers l’arrière des boutons
supérieurs gauches ou droits se situant
au milieu de la télécommande.
●Le bras de l’Escavateur tournera vers la
gauche ou la droite.

20
2.3 Résolution des problèmes
Si vous rencontrez des problèmes avec votre l’Excavateur, voici quelques vérications
rapides que vous pouvez eectuer, qui pourraient vous aider à résoudre le problème.
Pas de réponse de l’Excavateur:
●Veuillez-vous assurer que l’Excavateur se trouve dans la direction de la télécommande et
qu’il n’y ait pas d’obstacles entre la télécommande et l’Excavateur qui pourraient bloquer
le signal.
●Assurez- vous que les piles de la télécommande soient correctement insérées et qu’elles
ne soient pas en n de vie. Si nécessaire, remplacez les piles de la télécommande.
●Assurez- vous que les piles de l’Excavateur soient correctement insérées. Si nécessaire,
remplacez les piles de l’Excavateur.
●Assurez- vous que la télécommande et l’Excavateur soient allumées.
L’Excavateur commence à rouler plus lentement:
●Les piles de l’Excavateure sont faibles, veuillez insérer de nouvelles piles.
Table of contents
Languages:
Other ThinkGizmos Motorized Toy Car manuals


Popular Motorized Toy Car manuals by other brands


Jamara
Jamara Pico Quad Instruction

Team Losi
Team Losi 8IGHT-XE manual

Harbor Freight Tools
Harbor Freight Tools 68770 Instructions and precautions

Primal RC
Primal RC 1/5 Mega Truck manual

HC-HOBBY
HC-HOBBY A-10 Warthog Twin EOF Assembly instructions

THUNDER TIGER
THUNDER TIGER SLEDGE HAMMER S50 Instruction manual & parts catalogue


