1.0 Einleitung
Herzlichen Glückwunsch zum Ankauf Ihres Go-Karts der Firma BERG Toys! Die Mitarbeiter der Firma BERG Toys
setzen ihre gesamten Kräfte dafür ein, ein robustes und sicheres Produkt zu entwerfen und zu fabrizieren. Durch
Ihre Wahl haben Sie ein Produkt erworben, an dem Sie sicher jahrelang Ihre Freude haben werden.
Das Go-Kart von BERG zeichnet sich durch eine lange Lebensdauer aus, dies setzt allerdings Wartung von Zeit
zu Zeit voraus. Wenn man das Go-Kart richtig und rechtzeitig wartet, hat man sicher ein riesenstarkes Spielzeug,
dass sehr viele Jahre hält. In diesem Handbuch stehen Anweisungen zur Wartung des Go-Karts. Sie werden
entdecken, dass sie hierbei viel selber tun können. Bei größeren Reparaturen ist ein BERG Toys - Fachhändler
der richtige Ansprechpartner. Der Fachhändler verfügt über die notwendigen Kenntnisse und hat das richtige
Werkzeug.
Besuchen Sie doch auch einmal unsere Homepage unter www.bergtoys.com .
2.0 Richtlinien zur sicheren Benutzung
• Man muss vor Benutzung des Go-Karts kontrollieren, ob alles richtig funktioniert.
• Kinder sollten - je nach Alter und Umgebung - von einem Erziehungsberechtigten eingewiesen und
ggf. dauernd beaufsichtigt werden.
• Mit einem Go-Kart von BERG darf man nicht auf öentlichen Straßen fahren. Man muss mit angemes-
sener Geschwindigkeit fahren, abhängig von der jeweiligen Situation. Wenn man einen Hang schräg
herunterfährt, besteht die Gefahr des Umkippens. Bergabwärts kann eine sehr hohe Geschwindigkeit
erreicht werden. Man muss damit Rechnen, dass sich bei einer Abfahrt der Bremsweg verlängert!
• Man darf bei hohen Geschwindigkeiten keine zu scharfen Kurven nehmen, dadurch besteht die
Gefahr des Umkippens.
• Man muss immer gut auf die Umgebung achten.
• Man darf nicht mit hoher Geschwindigkeit rückwärts fahren. Man kann dann nämlich die Kontrolle
über das Lenkrad verlieren. Wenn man schnell rückwärts fährt und bremst, besteht die Gefahr, dass
sich die Vorder-Räder von dem Boden abheben.
• Man darf nie unter Einuss von Alkohol oder Medikamenten fahren, die das Wahrnehmungs- oder
Reaktionsvermögen negativ beeinträchtigen. Falls durch unsachgemäße Nutzung, Zusammenstöße
oder andere„Kunststücke”ein Personen- oder Materialschaden entsteht, kann BERG TOYS oder ein
Händler nicht dafür verantwortlich gemacht werden.
• Man darf bei Modellen mit einem automatischen Freilauf (AF) nicht rückwärts treten wenn man
vorwärts fährt und umgekehrt. Man darf bei Modellen mit einem Bremsfreilauf (BF) oder einer 3-/7-
Nabelschaltung (BF-3/-7) nicht vorwärts treten wenn man rückwärts fährt. Die Pedale können durch
den Antrieb mitgeführt werden.
• Man muss alle Go-Karts mittels der Handbremse zum Bremsen bringen.
• Man darf keine überüssigen Gegenstände an dem Bremshebel oder auf dem Lenkrad befestigen.
Man muss dafür sorgen, dass die Bremse und das Lenkrad immer funktionsfähig sind.
• Trotz großer Vorsorge können Kleidungsstücke, Gliedmaßen oder Haare zwischen den drehenden
Teilen eingeklemmt oder verdreht werden. Man sollte also beim Fahren keine lose Kleidungsstücke
wie Schals und oene Schnürsenkel tragen. Diese können Unfälle verursachen.
• Man muss beim Fahren direkten Kontakt zu den Rädern vermeiden.
• In der Broschüre stehen die Richtlinien bezüglich der Alterskategorien vermeldet. Der Fahrer oder
Eigentümer ist selber für seine Auswahl bezüglich der geeigneten Größe des Go-Karts verantwortlich.
• Man muss dafür sorgen, dass der Fahrersitz bei jeder Fahrt in Bezug auf die Pedale in der richtigen
Position steht. Auf diese Weise kann sicher gefahren werden.
• Man darf während der Fahrt nicht auf- oder absteigen. Man darf das Fahrzeug nicht überbelasten.
• Man darf im Dunkeln nicht ohne Beleuchtung fahren.
• Wenn Sie die Schutzkappen während der Wartung entfernen, müssen Sie diese vor
• Benutzung des Go-Karts immer wieder auf die ursprüngliche Weise montieren.
• Wenn man das Fahrzeug parkt, muss man immer die Feststellbremse zum sicheren abstellen benutzen.
3.0 Wartung
3.1 Rahmen
Der Rahmen ist pulverbeschichtet. Dadurch entsteht eine harte Lackschicht. Um Rostbildung zu vermeiden, ist
es wichtig, den Rahmen regelmäßig zu säubern. Wenn Sie den Rahmen mit Fett konservieren wollen, benutzen
Sie dann bitte ausschließlich säurefreie Vaseline. Kleine Beschädigungen können Sie mit Lack beheben. Bei Ihrem
Fachhändler ist der richtige Lack erhältlich.
3.2 Räder / Reifen
Kontrollieren Sie regelmäßig die Felgen und Reifen bezüglich eventueller Beschädigungen (Stiche, Schnitte,
Risse und Unebenheiten). Passen Sie also bitte auf, da Beschädigungen an den Felgen oder Reifen zu Unfällen
führen können!
Die Reifendruck beträgt minimal 1 Bar und maximal 1,5 Bar. (Denken Sie bitte daran, dass sich die Spannung bei
hohen Temperaturen erhöht.) Wenn die Reifen die richtige Druck aufweisen, fährt das Go-Kart leicht und ge-
schmeidig. Wenn die Reifendruck zu niedrig ist, bekommt man schneller Reifenpannen und tritt ein übermäßig
großer Verschleiß auf. Wenn die Reifenspannung zu hoch ist, kann sich der Reifen von der Felge lösen. Dies
kann zu gefährlichen Situationen führen. (Beachten Sie bitte, dass bei starker Sonneneinwirkung und bei hohen
Temperaturen die Spannung steigt!) Reifen dürfen nicht in Kontakt mit Ölen, Fetten und Brennstoen kommen.
Sorgen Sie dafür, dass sich die Ventilkappen immer auf den Ventilen benden.
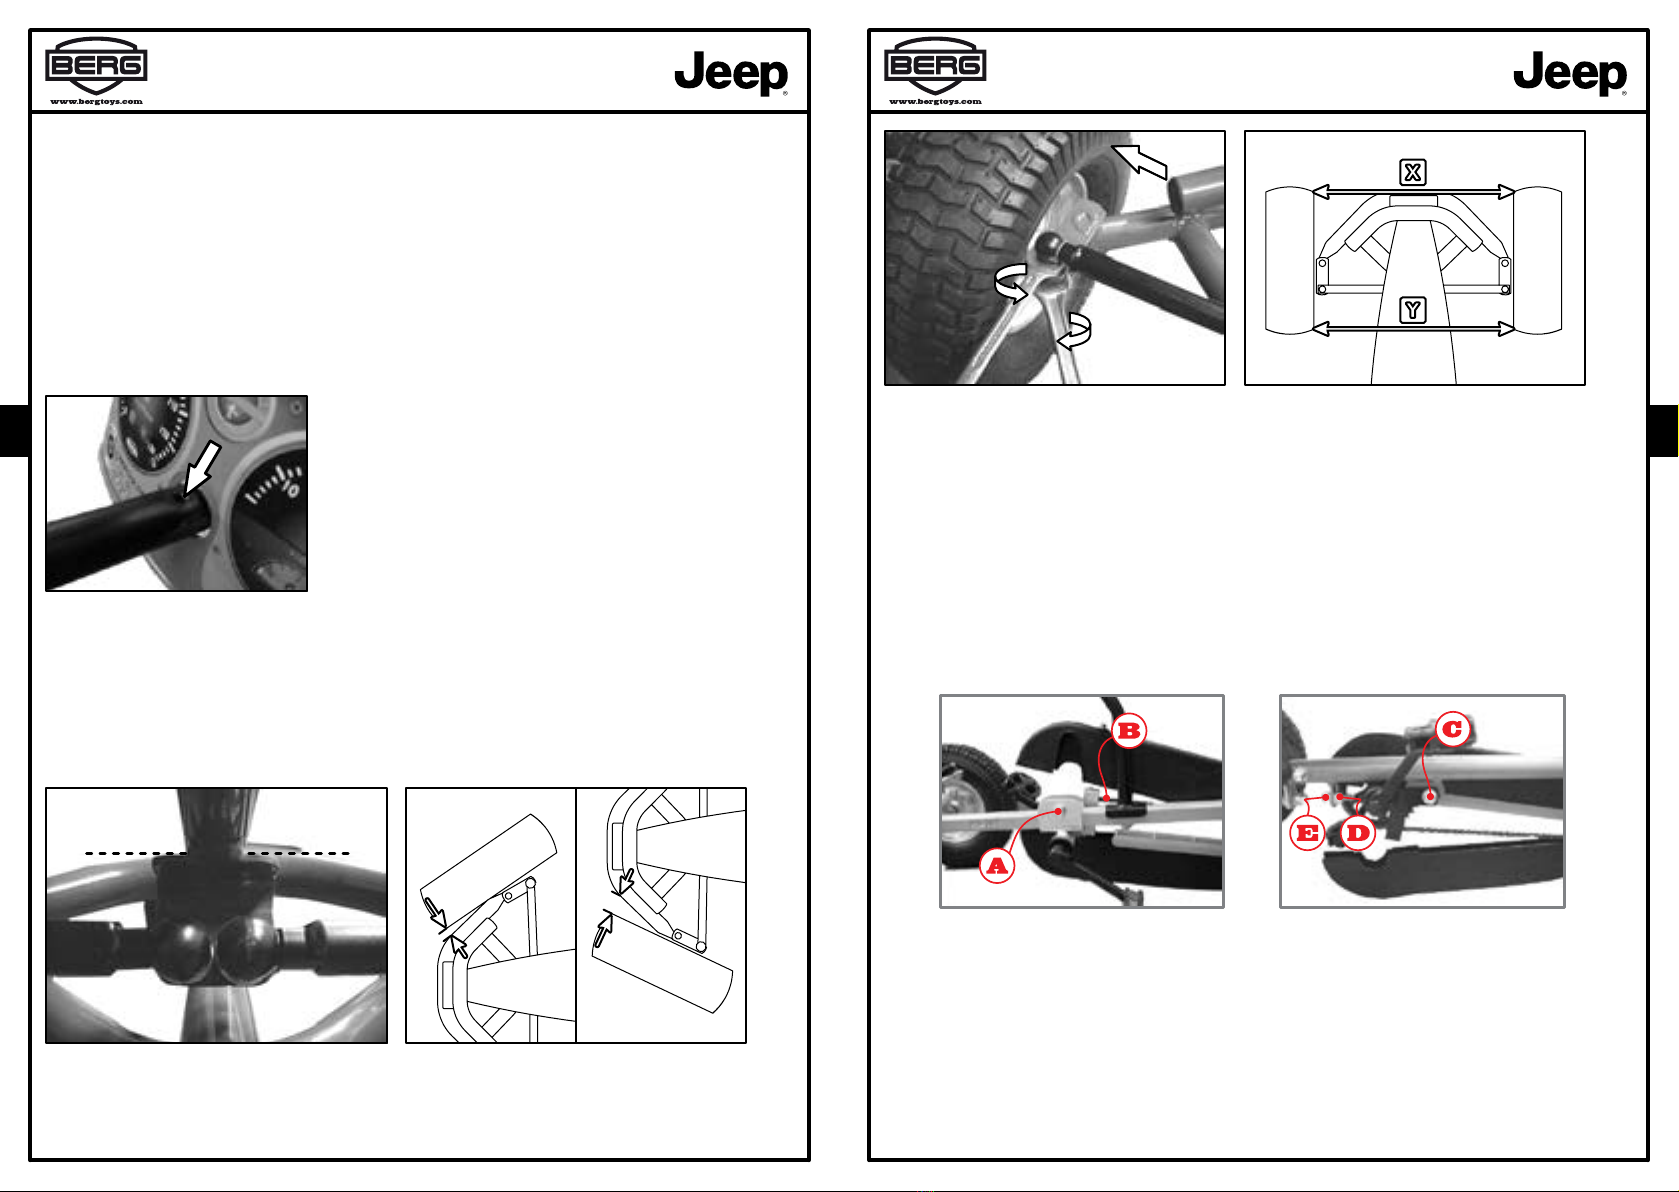
3.3 Lenkung
Die Lenkung muss in regelmäßigen Abständen geschmiert werden, so dass sie kontinuierlich gut funktioniert.
Bei einem verstellbaren Lenkrad müssen Sie darauf achten, dass die Markierung (Loch) an der Seite der innersten
Lenkachse nicht sichtbar wird. Falls Sie die Markierung wohl erkennen können, dann müssen Sie das innere
Lenkachse zurückschieben
Fig. 1
Die Lenkung aller Go-Karts von Berg Toys muss monatlich auf folgende Punkte hin kontrolliert werden:
• Bruch, Verschleiß und / oder Beschädigung aller Teile der Lenkung
• Bedienung (alle Drehpunkte ölen / schmieren)
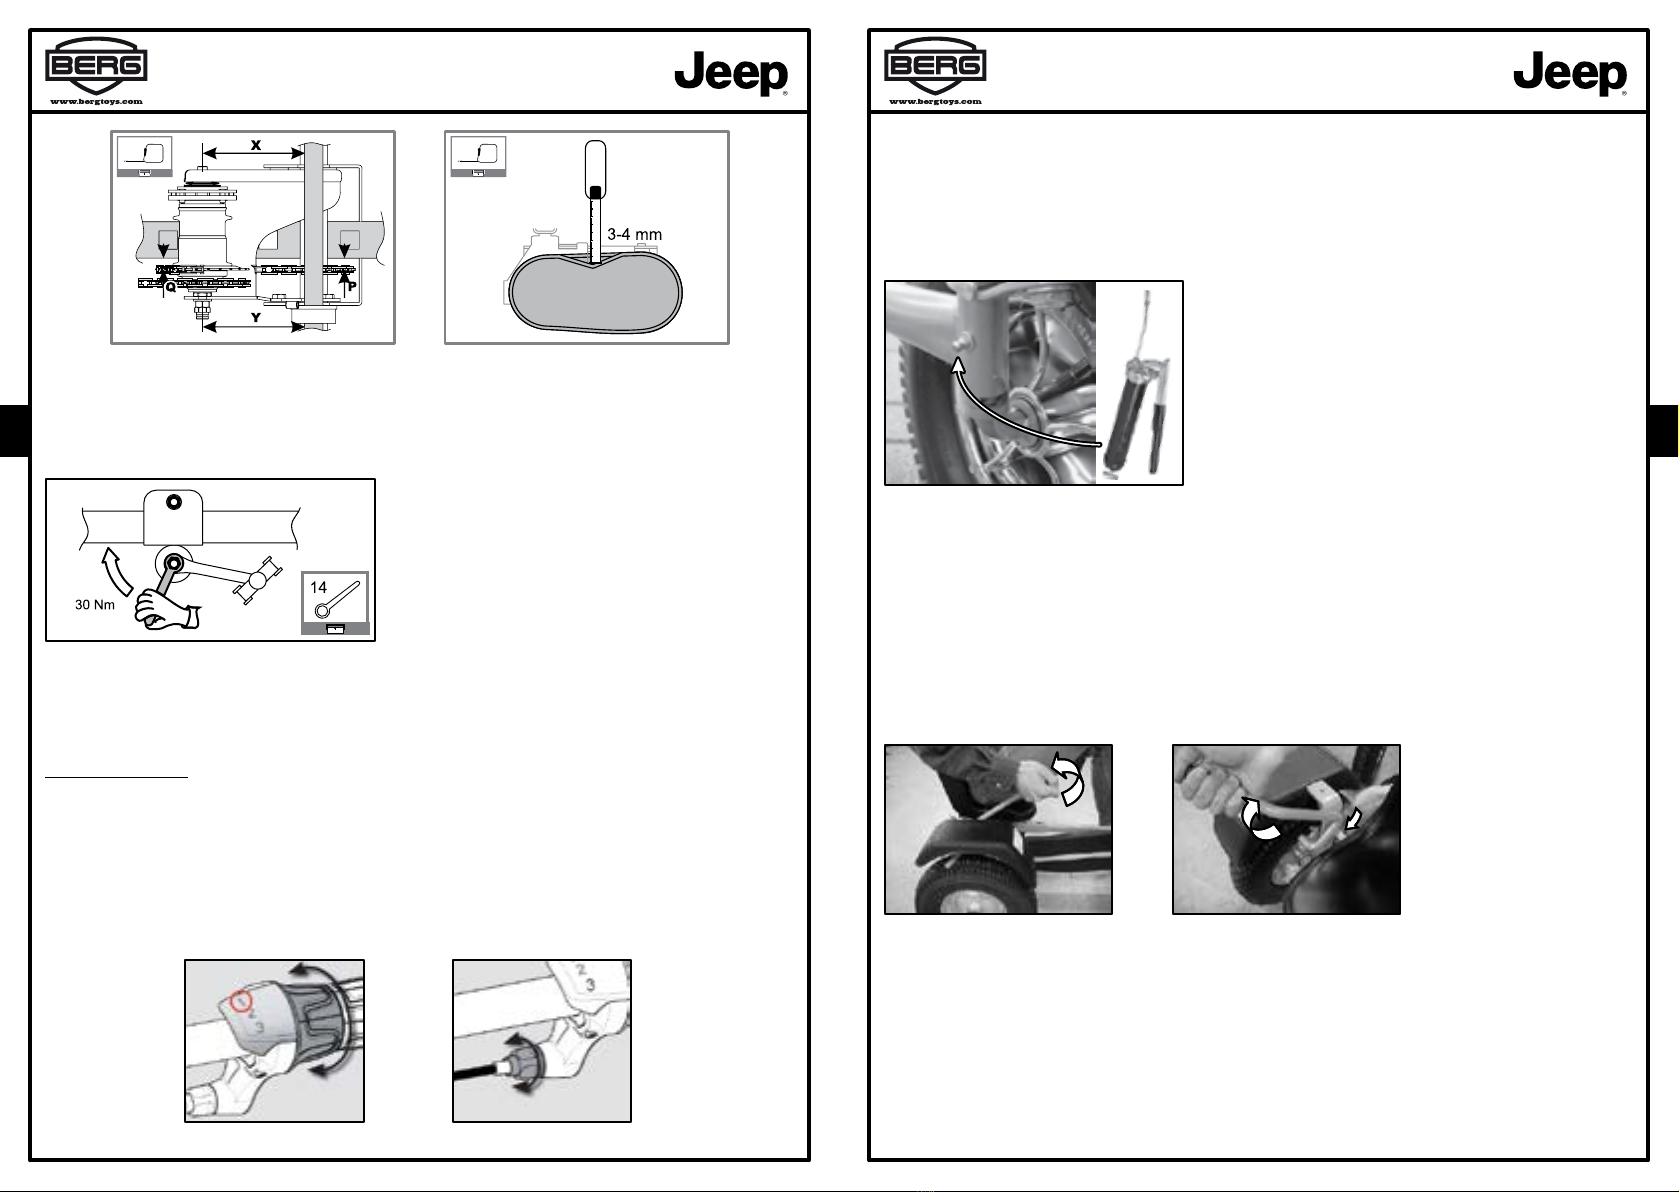
• Ausrichten der Vorderräder (s. Fotos auf der nächsten Seite) bei den Modellen mit einer doppelten
Kugelkopenkung
• Fester Sitzen aller Verschraubungen