Thorlux Lighting LCM 13479 User manual

Technical Data
Dimensions :
112 x 66 x 22mm
(excl. holder)
Power: 2-off CR2032 3V
battery (supplied)
Technical Data
Dimensions :
99.5 x 182.5 x 44mm
Power: 4-off AA/1.5V
battery (not supplied)
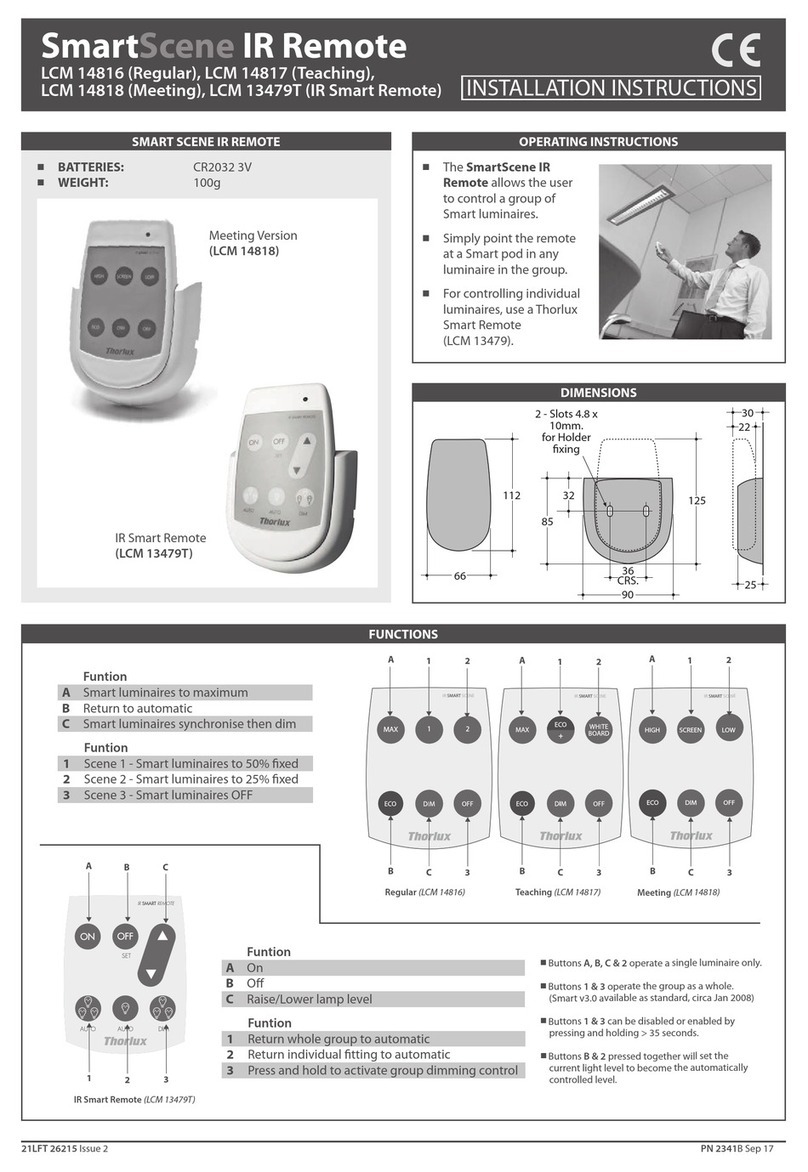
Smart Controls LCM 13479 - Smart Remote Transmitter
LCM 10777 - Smart Programmer
THE SMART SYSTEM SMART PROGRAMMER - LCM 10777
SMART REMOTE TRANSMITTER -
LCM 13479
CONTROL ADJUSTMENT
SMART REMOTE TRANSMITTER - LCM 13479
The Smart Remote Transmitter will manually
override the regulated light level (automatic
mode) on individual fittings putting the Smart
Luminaire into manual mode.
When in manual mode the automatic light
sensing function is disabled but occupancy
is detected. The system is easily set back
to automatic mode by pressing the automatic
button, or it will reset upon switch on.
OPERATION
Point the transmitter at the Smart Pod on the
selected Smart luminaire and choose from the
following commands:-
All adjustments and settings are made by hand
held infra-red transmitters which communicate
with the SMART POD in EACH luminaire.
Simple, temporary adjustments may be made
using the SMART REMOTE TRANSMITTER
(LCM 13479) and more complex permanent
adjustments using the SMART PROGRAMMER
(LCM 10777).
SMART PROGRAMMER - LCM 10777
The Smart Programmer has six ‘touch pad’
buttons to control the whole system.
DISPLAY
On the first LCD line the actual menu point
is displayed. On the second line, the status
line, the possible settings for this menu point
are shown.
During a data transmission, the actual
transmission status (as well as any error
messages) is shown.
FUNCTIONS
Light Level
May be changed from the factory setting
of 70. The dimming increments possible
are in steps of 1 on a scale of 1-100, or the
full light output may be selected
(no dimming). The setting of 100 is slightly
less than full output.
The factory setting of 70 will typically achieve
approx. 500lux average maintained illuminance
at 2.4m luminaire centres.
‘Bright-out’
This factory setting may be switched off.
When left on, the luminaire is switched off when
the illuminance level exceeds the maintained
illuminance setting by more than 50% for longer
than 10 minutes. When the illuminance level
falls below the maintained illuminance setting
(e.g. 100), the luminaire is switched back on.
Time Delay
Factory set (after area evacuation) to 10 minutes
before the luminaire dims then switches off.
Other time delays which may be set are:-
60, 45, 30, 20, 15, 10, 5, 3, 2 mins. 1 min., 30 secs.
Alternatively a ‘continuous’ setting may be
selected to isolate the PIR, in conjunction with
the INACTIVE setting detailed below.
Security Level
Factory set to 1%. May be set between 1 - 100%.
This allows the user to set the level the
luminaires dim to, following the Time Delay
time out period.
When Vacant
Factory set to OFF - switches the luminaire off
when the PIR time delay runs out.
Luminaire dims to Security Level after PIR time
delay runs out for a selected time of 60,45, 30,
20, 15, 10, 5, 3, 2 or 1 minute before luminaire
switches off.
Or changed to CONT- luminaire dims to Security
Level after PIR time delay runs out but does NOT
switch off.
PIR
May be changed from ACTIVE factory setting
giving conventional PIR control (i.e. luminaire
dims/switches off when area is vacated and
raises light level/switches on when area is
re-occupied).
Change options are:-
INACTIVE- PIR functions are deactivated.
OFF ONLY- luminaire is dimmed/switched
off but NOT switched on again when area
is re-occupied. A wall switch or ‘push-to-make’
switch will be required to switch luminaire on.
Not recommended with emergency luminaires.
Power Up
Factory set ON - switches luminaires back on
after power is restored due to a mains power
interruption. Luminaires then switch off as per
PIR programming.
May be changed to OFF but will switch on only
if presence is detected upon power restoration.
Hold Overwrite
Factory set to NO - ignores the last Smart-
Controller light level setting, returning
luminaire back to auto mode after a power
up or interruption caused by vacation.
Changed to YES, the last Smart- Controller
light level setting is retained after power up.
Motion Line : Old/New
The Smart system was upgraded in April 2008.
If new equipment is installed in installations that
took place before this date, this parameter has
to be set to ‘Old’ for correct operation.
The SMART system provides a simple, effective
means of controlling luminaires independently
or in groups (zones). Significant energy savings
and reduced operating costs may be achieved
due to the system’s control of light levels and
presence detection.
SMART LUMINAIRES
A Maintained Illuminance level of nominal 500lux,
PIR time settings and lux levels are factory set
and need no further adjustment.
These settings are approximate and will vary
according to conditions such as carpet colour
etc. Two optional accessories are available, the
Smart Remote Transmitter and the Smart
Programmer which allows alteration of the
factory set values.
Luminaires provide the following features:-
1. OCCUPANCY SENSING - each luminaire has
a detection angle of approximately 90owhich
covers an area 5 metres diameter at a mount
ing height of 2.4 metres.
Any detection by one luminaire will trigger
a signal to switch on (and eventually off) the
other connected luminaires in the zone.
2. LIGHT MEASUREMENT/REGULATION -
light from the luminaire is regulated so that
the ambient light (artificial+natural daylight)
remains at a constant level (maintained
illuminance and daylight linking).
3. INFRA-RED CONTROL - using the Smart
Remote Transmitter enables the light level
to be adjusted remotely for individual or
group control of the luminaires.
The Smart Programmer enables more complex
and permanent adjustments to light levels,
time delays and switching patterns etc.
4. MANUAL CONTROL - with the addition of
a ‘push-to-make’, wall switch (not supplied)
the group of luminaires can be dimmed and
switched.
ON - Luminaire switches on at
maximum light output (individual
luminaire).
OFF - Luminaire switches off (individual
luminaire).
DOWN - Light level is manually reduced
(individual luminaire).
UP - Light level is manually increased
(individual luminaire).
AUTOMATIC - Returns luminaire to auto
mode (individual luminaire).
GROUP DIM - Press and hold to
synchronise all luminaires at full
output. Keep pressed to dim to the
required level. Let go and press again
to brighten to the desired level. To switch all
luminaires off, dim to minimum and hold for
1.5 seconds.
GROUP AUTOMATIC - Returns all
luminaires to automatic mode after
the group dim feature has been used.
DISABLE GROUP DIM - To disable the
group dim function, press and hold the
group dim button for 35 seconds.
Repeat to re-enable the group dim
function.
To activate this parameter,do not point the
controller at luminaire(s).

21LFT 17201 Issue 4 PN 2022D Sep.‘08
MERSE ROAD NORTH MOONS MOAT
REDDITCH WORCS B98 9HH ENGLAND
Tel +44 (0)1527 583200 Fax +44 (0)1527 584177
e-mail thorlux@thorlux.co.uk
Web www.thorlux.com
NOTICE TO CONTRACTOR - PLEASE PASS THIS LEAFLET TO THE END-USER
Modifications
Thorlux products should not be modified. Any modification may
render the product unsafe and will invalidate any Safety/Approval
marks.
Operation and Maintenance
Smart Controller or Programmer - should not be subjected
to undue mechanical shock or extremes of temperature. Clean only
with a clean dry cloth.
Using the SMART PROGRAMMER - LCM 10777 - Recommended General Programming Sequence
STEP FUNCTION BUTTON DISPLAY
1 Switch on the Smart-Programmer SMART Programmer
2 Change to <downld/progr> setting <downld/progr>
3 Select the menu <downld/progr> download all
4 Load all parameters from the Smart download all
luminaire into Smart-Programmer TxD.Data: OK
5 All parameters are memorised in the <downld/progr>
programmer. Exit this menu point
6 Change to <parameter> setting <parameters>
7 Confirm (Select). Option name and light level: 70
current status are now displayed 1-100/max
on the top line.Second line shows
available programming range for
this parameter
8 To change light level press the light level: 70*
Select button. A star in the upper 1-100/max
corner indicates access of the
program mode.
9 Use the scroll buttons, to select the light level: 65*
required value (e.g. 65) 1-100/max
10 To exit the setting mode press Esc. light level: 65
The new selected value will now 1-100/max
be displayed on the first line
11 The next parameter may now be t-delay: 20 min
selected. 30s-60min/cont
12 Select this parameter. Option name t-delay: 20 min*
and current status are now 30s-60min/cont
displayed on the top line
STEP FUNCTION BUTTON DISPLAY
13 Use the scroll buttons, to select t-delay: 15 min*
required value (e.g. 15min) 30s-60min/cont
14 To exit the setting mode press Esc. t-delay: 15 min
The new selected value will now 30s-60min/cont
be displayed on the first line
15 Repeat this procedure until all other parameters as listed
above (i.e. PIR, Bright-out, etc.) are set as required
16 When all parameters are set to the <parameter>
requested values, exit, (press Esc.)
the menu <parameter>
17 Scroll to <downld/progr> <downld/progr>
18 Select the <downld/progr> menu download all
19 Change to program all Program all
20 To configure the SMART POD with Program all
the chosen parameters select SEND. TxD_Data: OK
During the data upload, the luminaire
will switch off and after the data
transfer will operate in the automatic
mode according to the new settings.
Now all parameters are memorised in the Smart luminaire
Check that all transmission has been confirmed by a TxD_Data: OK,
otherwise correct programming cannot be guaranteed.
If the Smart luminaire is used in combination with electronic ballasts
that run the lamps at a frequency of approx. 36kHz there could be
interference that makes programming of the luminaire more difficult.
In such a case we suggest the luminaire is switched off with the
SMART-CONTROLLER before programming. The distance of control
to luminaire with the SMART-CONTROLLER may also be reduced.
Using the SMART PROGRAMMER - LCM 10777 - Programming Single Parameters
Status and Error Messages
STEP FUNCTION BUTTON DISPLAY
1 Switch on the Smart-Programmer SMART Programmer
2 Change to <parameters> setting <parameters>
3 Option name and current status are Light-level: 70
now displayed on the top line. 1-100/max
Second line shows available progra-
mming range for this parameter.
4 Select parameter to be changed (e.g. Bright-out: yes
parameter bright-out from yes to no). Yes/no
STEP FUNCTION BUTTON DISPLAY
5 Select Read to interrogate the Bright-out: yes
actual set value from the luminaire TxD_Data OK
6 To change ‘bright-out’ option press Bright-out: yes*
Select button. A star in the upper Yes/no
corner indicates access of program
mode.
7 Use scroll buttons to select Bright-out: no*
required value (e.g. no). Yes/no
8 SEND will now update the chosen Bright-out: no*
value within the Smart luminaire. TxD_Data OK
TxD_Data: OK Transmission was correct
TxDTimeout No response from Smart luminaire, e.g. misaligned
transmission
TxD_Error Transmission was o.k. but error message received
try again
Error_Flag Transmission not correct - try again
LB Batteries low
Repeat this procedure until all parameters are set to the requested values
This manual suits for next models
1
Other Thorlux Lighting Remote Control manuals
