Thrane&Thrane sailor 60 Technical manual

Document Name: SAILOR_60_90_Satellite_TV_Create_a_New_Satellite_List Revision:
D
Introduction: This document describes how a new satellite list can be generated for a new coverage area for the
SAILOR 60 and SAILOR 90 Satellite TV Antennas. This is needed to be done when the SAILOR
Satellite TV antenna is going to be used outside Northern Europe region which is the factory default
satellite list.
Description:
Install the NavSat PC program and USB driver for the SAILOR Satellite TV antenna.
Connect the USB cable from the PC to the SAILOR Satellite TV ACU and set the ACU in PC override
mode.
Start the PC program NavSat and press the Satellites button. See figure 1 below.
Figure 1: NavSat Main Window
The window with the satellite list will show. See figure 2 below.
TECHNICAL DOCUMENT
SAILOR 60/90 Satellite TV – Create a New Satellite List

Technical Document New Satellite List Page 2/9
Figure 2: Satellites Window
Press the Sat Id button to see the Sat Id window shown in figure 3 below.
Figure 3: Sat Id window

Technical Document New Satellite List Page 3/9
Delete all the satellites that will not be used for the new operating region of the SAILOR Satellite TV
Antenna. These are done by high-lighting each satellite and press the Delete button. One by one.
The SATELLITES list in Sat Id window shown in figure 3 will now be empty or only contain the rest of
the satellites that is valid for the new operating region.
Now decide which satellites the SAILOR satellite TV antenna is going to use in the new operating
region.
Go to www.lyngsat.com or www.kingofsat.com and lookup the satellite names and position, and write
a list of the desired satellites. One of the satellites needs to be entered as a reference with following
details filled in:
•Name of satellite
•Position
•Transponder Frequency
•Symbol Rate (SR)
•Forward Error Correction (FEC)
•Network ID codes (NID).
The reference satellite’s transponder must be:
•Horizontal polarised
•In the High frequency band (between 11700 – 12750 MHz)
This is because the built-in DVB decoder in the antenna is using that Horizontal-High signal to
determine the NID for the satellites.
The next part will show an example of how a new list of satellites can be generated, using one
satellite as reference (Thor). See example of satellites and their data in figure 4 below:
Figure 4: New satellite list

Technical Document New Satellite List Page 4/9
Enter the reference satellite. In this case Thor as shown in figure 5 below.
Satellite: THOR, Position: W0.8, Polarisation: 0, InView: YES, Usable: YES, Tracking Mode: A(Auto)
Figure 5: New satellite added.
Press New Satellites button to store Thor in the Satellites list.
Now highlight the newly added satellite and enter its:
Frequency: 12476, SBR: 28000, FEC: 5/6, NID Code: 4369
Figure 6. New added channel

Technical Document New Satellite List Page 5/9
Press the New Channels button to save it in the Channels list. See figure 6 above.
The rest of the satellites (Astra_2, Sirius_4, and Hotbird) are added just like the Thor satellite was
added, but without their frequencies, SBR, FEC and NID Codes because the satellites will be
scanned for these information automatically with reference to Thor’s position on the sky.
After adding the rest of the satellites to the satellite list:
1. Press Close button to go back to the main window.
2. Press Satellites button to see the list of satellites.
Note: Thor is the reference satellite. See figure 7 below.
Figure 7: Satellite list
1. Select Thor (highlight it).
2. Press the Set Satellite button to make the SAILOR Satellite TV antenna track for this
satellite. The main window will appear.
3. Press the Auto button in the MANUAL CONTROL panel.
4. Wait until the STATUS reads TRACKING, CONFIRMED for the Thor satellite. See figure 8
below.

Technical Document New Satellite List Page 6/9
Figure 8: Tracking - Confirmed
1. Go to Satellites – Sat Id.
2. Highlight Thor satellite
3. Press Scan Sat button.
A new window will appear where it is possible to set the symbol rate for the satellite that needs to be
scanned. Only in special cases this needs to be altered. Use the default value 15 Msymb/s.
Press the Start Scan button. See figure 9 below.
Figure 9: Set Symbol rate
The SAILOR Satellite TV antenna will now start to scan the Thor satellite for available Horizontal
High transponders and write them into a list of SCANNED CHANNELS.
Wait until it reads SatScan – Finished in the window’s top bar. See figure 10 below.

Technical Document New Satellite List Page 7/9
Figure 10: Scanned Channels
Store some channels for the satellite by highlighting the transponder and press the Add button. Add
the ones with best (lowest) BER.
The selected channels and NID codes are used to locate the satellite in order to confirm exact
pointing direction and satellite. As many satellites have beams directed at different areas, it is
possible to enter several NID codes and channels per satellite. Using several channels and NID
codes increases the probability of a correct identification under difficult reception conditions but can
prolong the scanning time as well. It is therefore recommended to limit the number of channels and
NID codes to about 5-10 per satellite. See example of the chosen channels in figure 11 below.

Technical Document New Satellite List Page 8/9
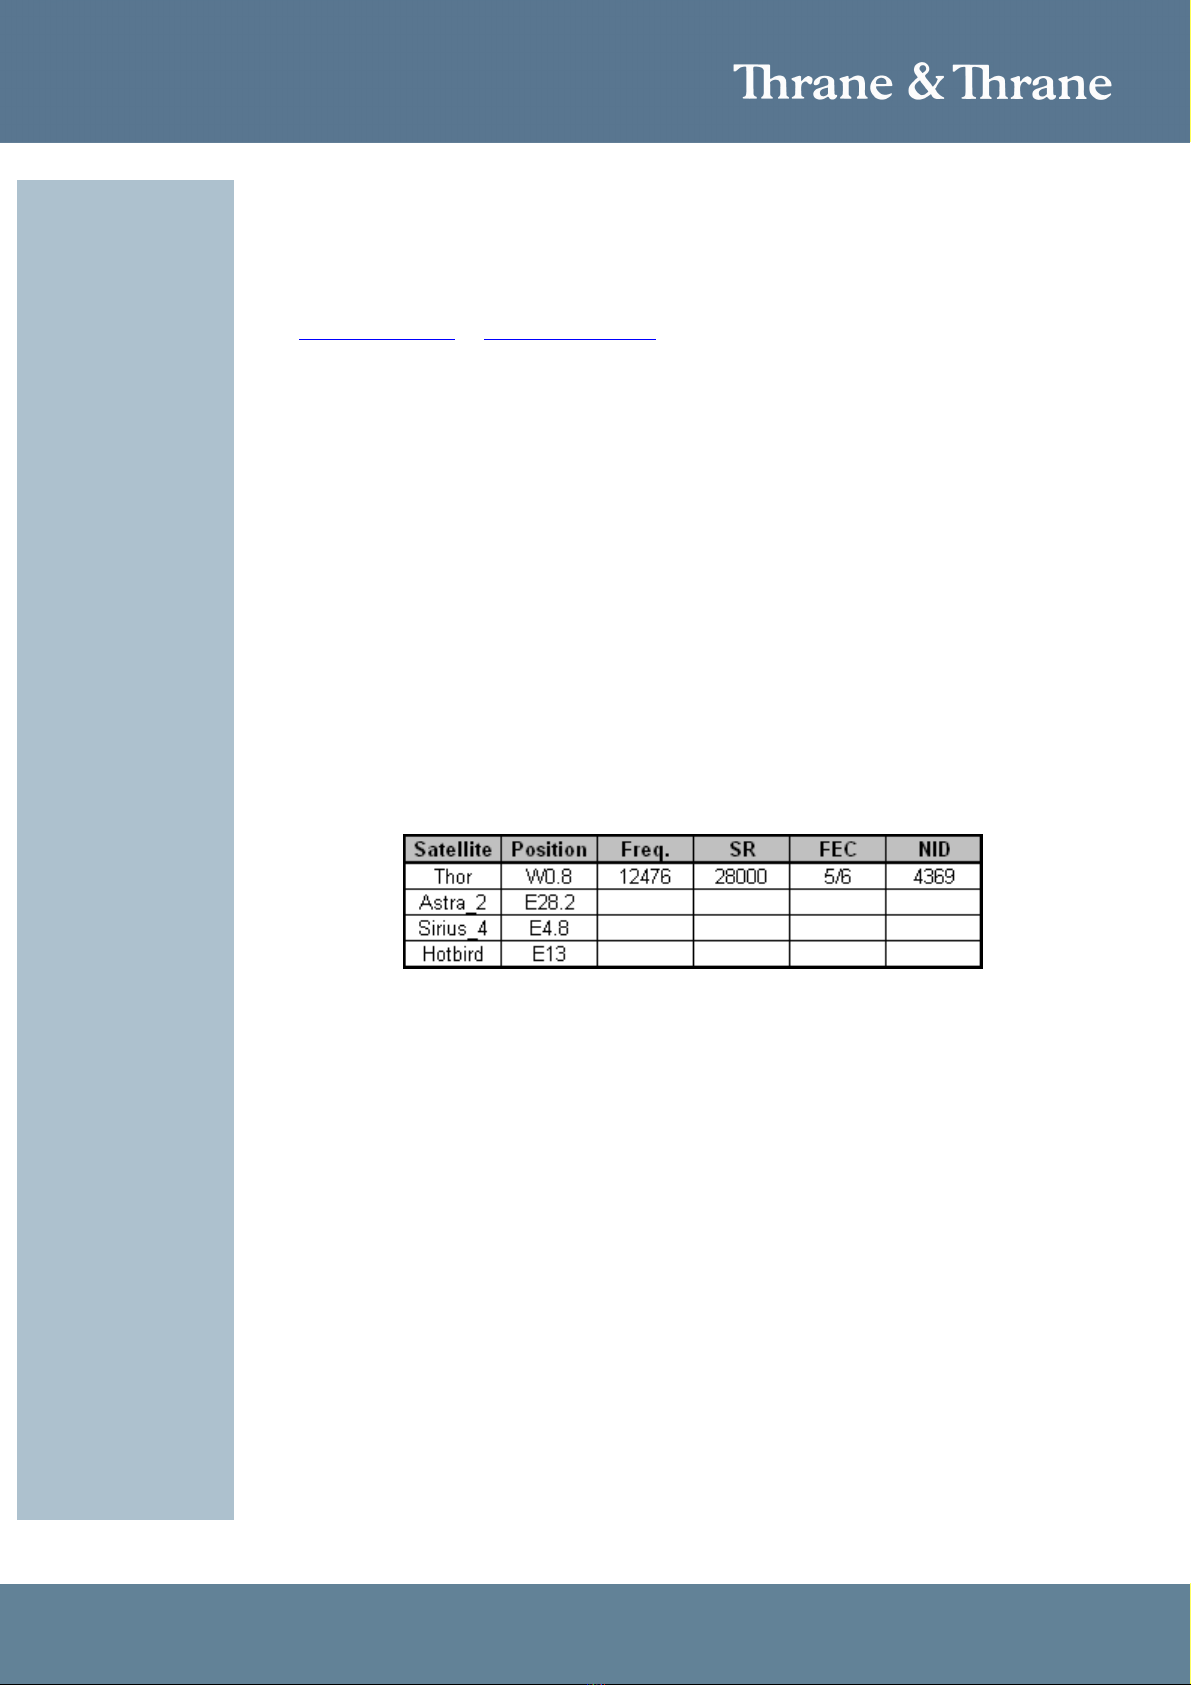
Figure 11: Chosen channels
1. Press Close button to close the satellites window.
2. Press Close button to enter the main window.
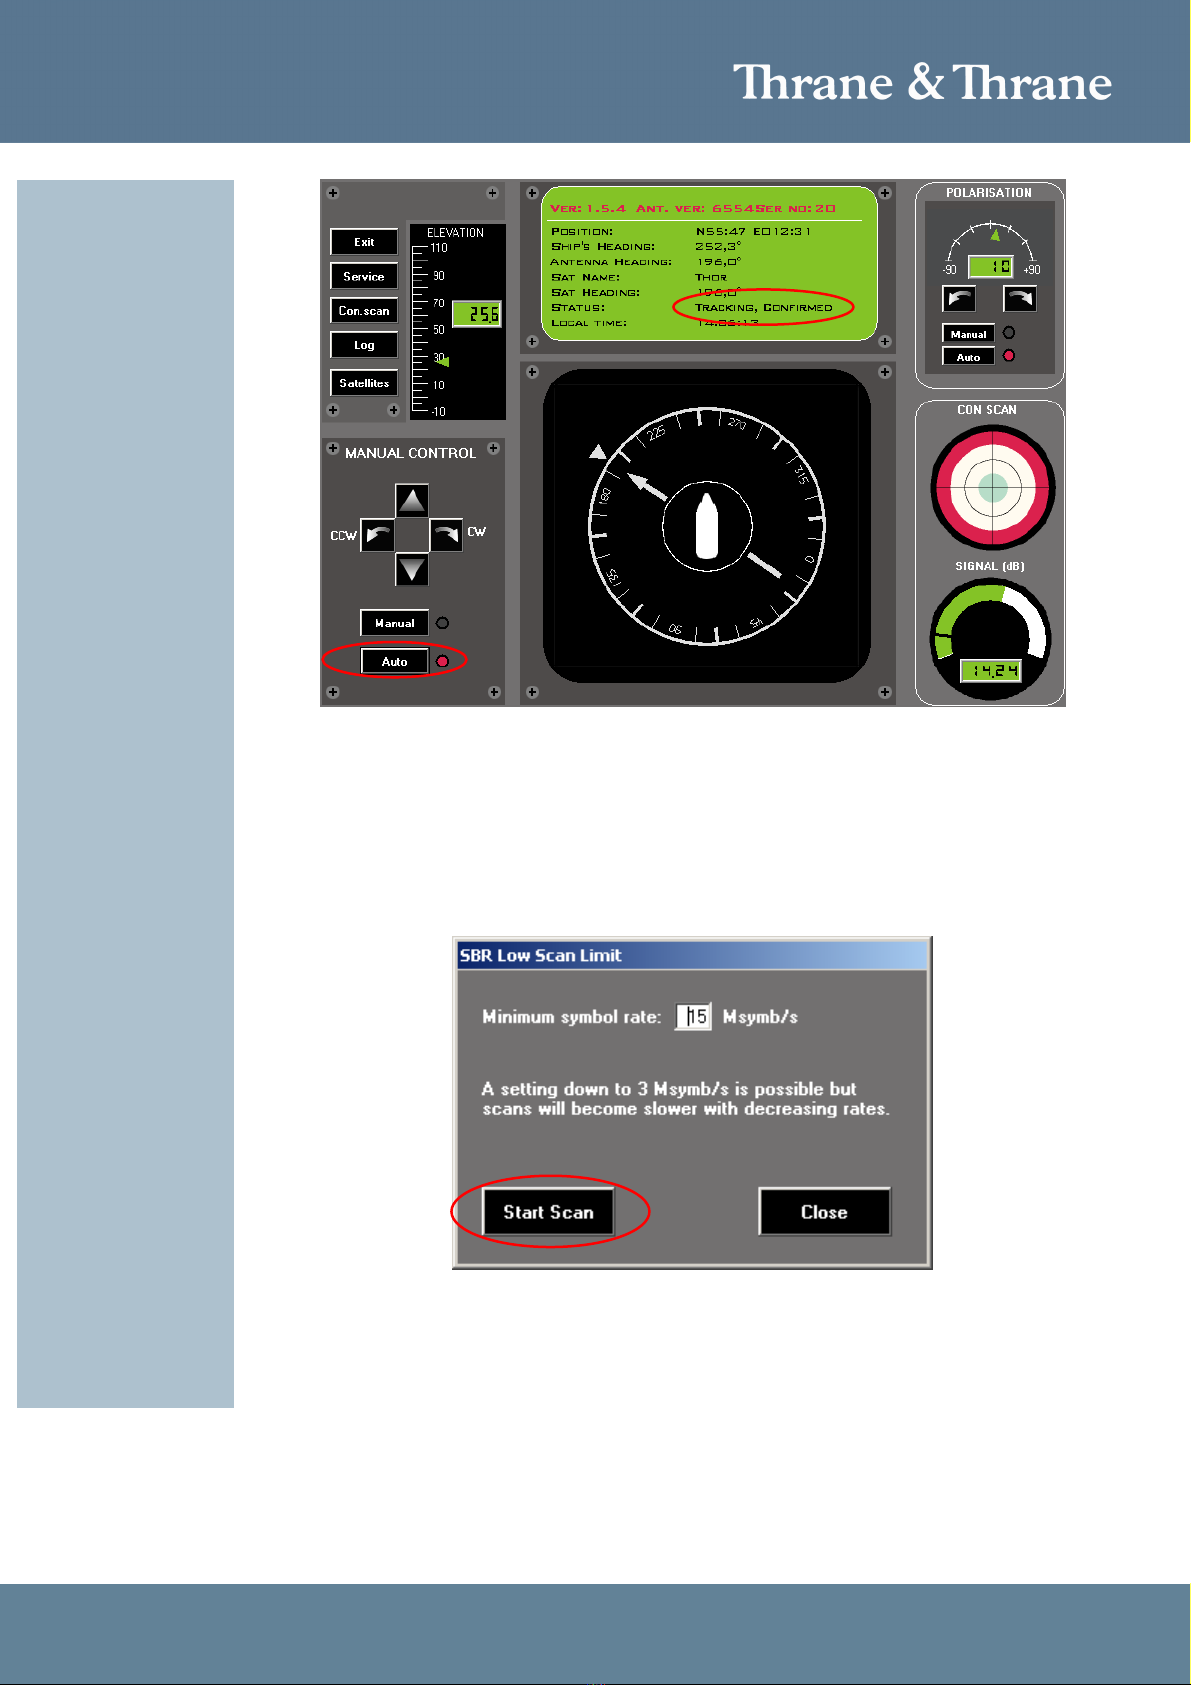
3. Press Auto button in the MANUAL CONTROL panel to make the SAILOR Satellite TV
antenna to track Thor satellite.
4. Wait until it reads TRACKING, CONFIRMED.
5. Press Satellites button.
6. Highlight next satellite in the list.
7. Press the Set Satellite button.
Immediately after it has been noticed that the antenna has turned to the direction of the next satellite,
press Manual button in the MANUAL CONTROL panel.
1. Press the Satellites button.
2. Press the Sat Id button.
3. Highlight the satellite that the antenna is directed to now.
4. Press the Scan Sat button.
5. Press the Start Scan button to scan for the available channels on this satellite.
When the scanning is finished, select 5-10 channels same way as it was done for the reference
satellite (Thor).
Press Close button when the channels are added.
Press the Close button on the Satellites window to get back to the main window.
Press the Auto button to track the new satellite using the selected channels.
Same procedure is used for the rest of the satellites in the list.

Technical Document New Satellite List Page 9/9
When done:
1. Press Satellites button
2. Press Sat Id button
3. Press Save list button
4. Choose a filename and folder to store the new satellite list.
This needs to be done once for each region the SAILOR Satellite TV antenna is going to be used at.
Then when re-entering one of the regions the only thing that needs to be done is to:
1. Press Satellites button
2. Press Sat Id button
3. Press Open List button
4. Choose the satellite file for new region.
The antenna will now be able to track on the satellites for the new region.
Information in this document is subject to change without notice and
does not represent a commitment on the part of Thrane & Thrane A/S.
©
2010
Thrane & Thrane A/S. All rights reserved. Printed in Denmark.
Other manuals for sailor 60
1
This manual suits for next models
1
Popular Satellite TV System manuals by other brands

AFN
AFN AFN7500HD Guide

KVH Industries
KVH Industries KVH TracVision TracVision G6 Technical manual

King-Dome
King-Dome Relay KD5500 Installation and operating instructions

Winegard
Winegard RD-4610 Owner's manual and installation instructions

Dish Network
Dish Network HDTV user guide

KVH Industries
KVH Industries TracVision R5SL user guide