Thulos TH-FR1825 User manual

FREIDORA SIN ACEITE
Manual De Instrucciones
TH-FR1825 / 1.8L
NOTA IMPORTANTE
- Leer atentamente este manual antes de empezar a utilizar el aparato.
- Guardar este manual para futuras consultas.
- Este aparato ha sido diseñado solo y exclusivamente para uso doméstico y ocasional.

INTRODUCCIÓN
Estimado cliente:
Agradecemos la confianza depositada en nosotros al adquirir este producto THULOS®
Nuestro principal empeño es ofrecer artículos excelentes, manteniendo los más estrictos controles de
calidad y cumpliendo todas las normativas vigentes de seguridad, con el objetivo de presentar un
producto perfecto y seguro para el uso doméstico.
INSTRUCCIONES POR Y PARA SU SEGURIDAD
- Comprobar si el voltaje indicado en el aparato se corresponde con el voltaje de la red de su casa.
- Colocar el aparato en una superficie plana y nivelada.
- No utilizar el aparato en exteriores.
- Nunca sumergir el aparato central en agua y tampoco bajo el grifo.
- No deje que entre agua u otro líquido en el aparato, para evitar descargas eléctricas.
- Poner siempre los ingredientes a freír en el cesto, nunca fuera del cesto.
- No cubrir el aparato mientras esté en funcionamiento.
- Nunca añadir aceite y tampoco cocinar con aceite en este aparato, puede provocar un incendio.
- No toque nunca el interior del aparato mientras esté en funcionamiento.
- No utilizar el aparato si el enchufe, el cable de alimentación o el propio aparato están dañados.
- Revisar periódicamente que el cable y enchufe no estén dañados.
- En caso de cable, enchufe u otra parte dañada, se debe reparar en un servicio técnico autorizado.
- No usar el aparato si alguna de las partes está dañada.
- Este aparato no es adecuado para niños ni para personas con discapacidades físicas o mentales o
que carezcan de experiencia y conocimientos. Si desea que otra persona utilice el aparato, debe
guiarse adecuadamente sobre su uso.
- Mantenga el aparato y su cable de alimentación fuera del alcance de los niños cuando el aparato esté
encendido o se esté enfriando.
- Mantenga el cable de alimentación alejado de superficies calientes.
- No enchufe el aparato ni opere el panel de control con las manos mojadas.
- Conecte el aparato únicamente a una toma de corriente con toma de tierra. Asegúrese siempre de
que el enchufe esté correctamente insertado en la toma de corriente.
- Nunca conecte este aparato a un temporizador externo.
- No coloque el aparato sobre o cerca de materiales combustibles como manteles o cortinas.
- No coloque el aparato contra una pared o contra otros aparatos. Deje al menos 10 cm de espacio libre
en la parte posterior y los lados y 10 cm de espacio libre por encima del aparato. No coloque nada
encima del aparato.
- No utilice el aparato para ningún otro propósito que no sea el descrito en este manual.
- No deje que el aparato funcione sin vigilancia.
- Durante la fritura con aire caliente, se libera vapor caliente a través de las aberturas de salida de aire.
Mantenga las manos y la cara a una distancia segura del vapor y de las aberturas de escape de aire.
También tenga cuidado con el vapor caliente y el aire caliente cuando retire la bandeja de freír del
aparato.
- La superficie debajo del aparato puede calentarse durante el uso.
- Desenchufe inmediatamente el aparato si observa que sale humo oscuro del aparato.
Espere a que cese la emisión de humo antes de retirar la bandeja de freír del aparato.
- Desenchufe siempre el aparato cuando termine el cocinado y no lo esté usando.
- Dejar enfriar al aparato 30 minutos después de su uso, antes de limpiar y guardar.
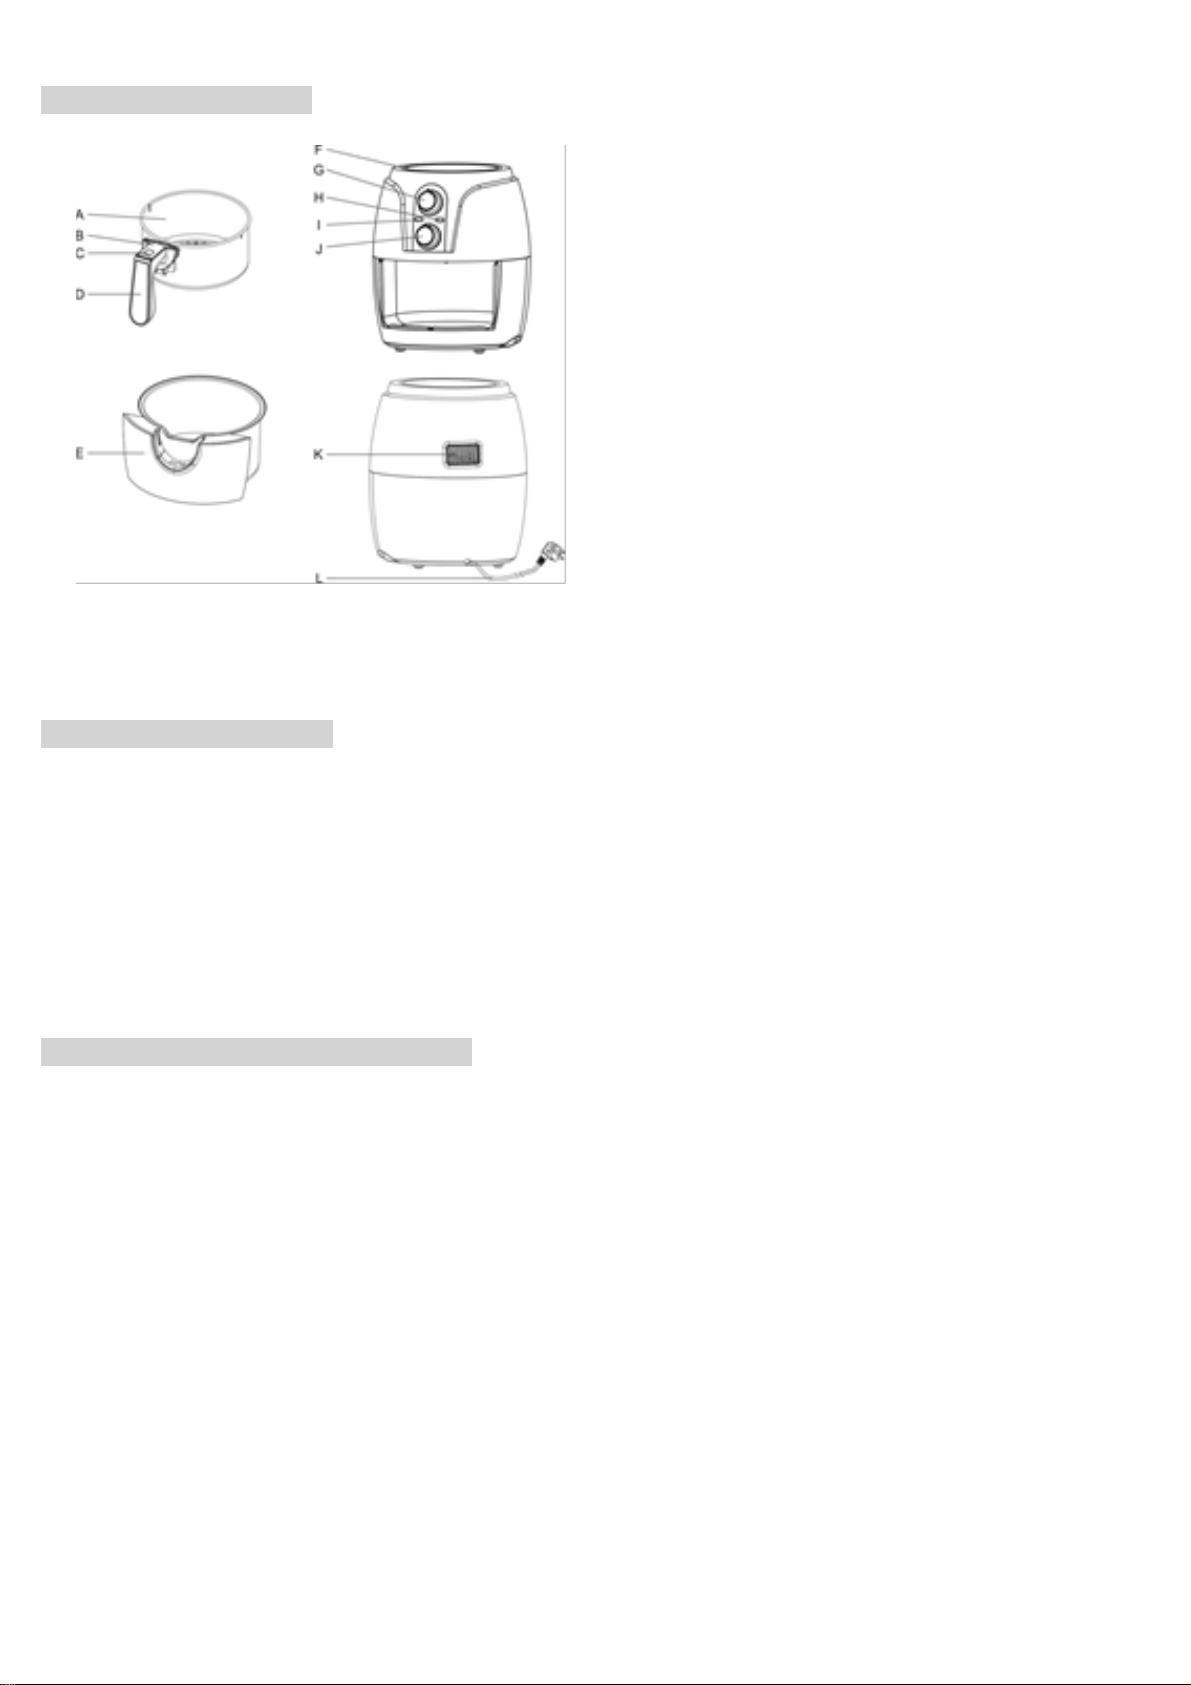
PARTES DEL APARATO
A.Canasta o Cesto.
B.Tapa protectora.
C. Botón liberación de cesto.
D. Asa de cesto.
E.Bandeja.
F.Entrada de aire.
G. Temporizador.
H. Luz indicadora de temperatura. I. Luz de
funcionamiento (tiempo).
J.Selector de temperatura.
K.Ventana de ventilación.
L.Cable de alimentación.
ANTES DEL PRIMER USO
- Retire todo el material de embalaje.
- Quite los adhesivos o etiquetas del aparato, que no sean la etiqueta de clasificación.
- Limpiar a fondo la cesta y la bandeja de freír con agua caliente y un poco de jabón neutro con una
esponja suave no abrasiva.
- Limpie el interior y el exterior del aparato con un paño ligeramente húmedo.
- Secar muy bien todas las partes con papel absorbente de cocina.
EN GENERAL ANTES DEL COCINADO
- Colocar el aparato sobre una superficie estable, horizontal, nivelada y resistente al calor.
- Coloque correctamente la cesta en la bandeja para freír.
- Saque todo el cable del compartimento en la parte posterior del aparato.
- No llene la bandeja hasta arriba para cocinar.
- Nunca cocinar en este aparato con aceite ni ningún otro líquido.
- No coloque nada encima del aparato.
Esto interrumpe el flujo de aire y afecta al resultado del cocinado.

FUNCIONAMIENTO
1. Enchufe el enchufe de red en una toma de corriente con toma de tierra.
2. Extraiga con cuidado la bandeja para freír de la freidora.
3. Ponga los ingredientes en la canasta, según instrucciones del apartado “CONFIGURACION”.
4. Vuelva a deslizar la bandeja para freír en la freidora. No utilice nunca la bandeja de freír sin la
cesta.
5. Seleccionar la temperatura deseada. (Consultar el apartado “CONFIGURACIÓN”).
6. Para encender el aparato, gire el botón del temporizador y seleccione el tiempo deseado. -
Agregar 3 minutos al tiempo de preparación cuando el aparato esté frío.
- También puede dejar que el aparato se precaliente sin ningún ingrediente en su interior.
- Se encenderán la luz de encendido y la luz de calentamiento.
- El temporizador comienza la cuenta atrás del tiempo de preparación establecido.
Nota.
Durante el proceso de fritura con aire caliente, el piloto de calentamiento se enciende y se apaga de
vez en cuando. Esto indica que el elemento calefactor se enciende y apaga para mantener la
temperatura establecida.
7. Algunos ingredientes deben agitarse a mitad del cocinado.
- Sacar la bandeja de freír del aparato por el asa y agitar.
- Introducir de nuevo la bandeja en la freidora.
- Precaución: No presione el botón de liberación de la cesta durante la agitación.
8. Cuando escuche el timbre del temporizador, el tiempo de preparación establecido ha transcurrido.
El aparato se apagará automáticamente.
Saque la sartén del aparato y colóquela sobre una superficie resistente al calor.
Nota: También puede apagar el aparato manualmente girando el termostato a la posición “0”.
9. Compruebe si los ingredientes están listos. Si los ingredientes aún no están listos, simplemente
deslice la bandeja para freír nuevamente en el aparato y establezca el temporizador en unos
minutos adicionales.
10. Para quitar los ingredientes pequeños, presione el botón de liberación de la canasta y saque la
canasta de la bandeja para freír. No coloque la canasta boca abajo con la bandeja de freír todavía
unida a ella, ya que cualquier exceso de aceite que se haya acumulado en el fondo de la bandeja
de freír se derramará y se derramará sobre los ingredientes. Después de freír con aire caliente, la
bandeja de freír y los ingredientes están calientes. Dependiendo del tipo de ingredientes en la
freidora, el vapor puede salir de la bandeja de freír.
11. Vacíe la canasta en un bol o en un plato.
Consejo: para quitar los ingredientes grandes o frágiles, use un par de pinzas para sacar los
ingredientes de la canasta.
RECUERDE
- Nunca cocinar con aceite en este aparato ni con ningún otro líquido.
- Extraer la bandera siempre sujetando de su asa, ya que puede estar caliente y quemarse.
- Nunca utilizar la bandeja sin la canasta o cesto.
- Nunca llenar demasiado el cesto con ingredientes para cocinar.
- Consultar las tablas de cocinado y configuración según los alimentos a cocinar.
- Añadir 3 minutos al tiempo de cocinado si el aparato esta apagado y frío.
- También puede precalentar el aparato, antes de introducir los alimentos a cocinar.

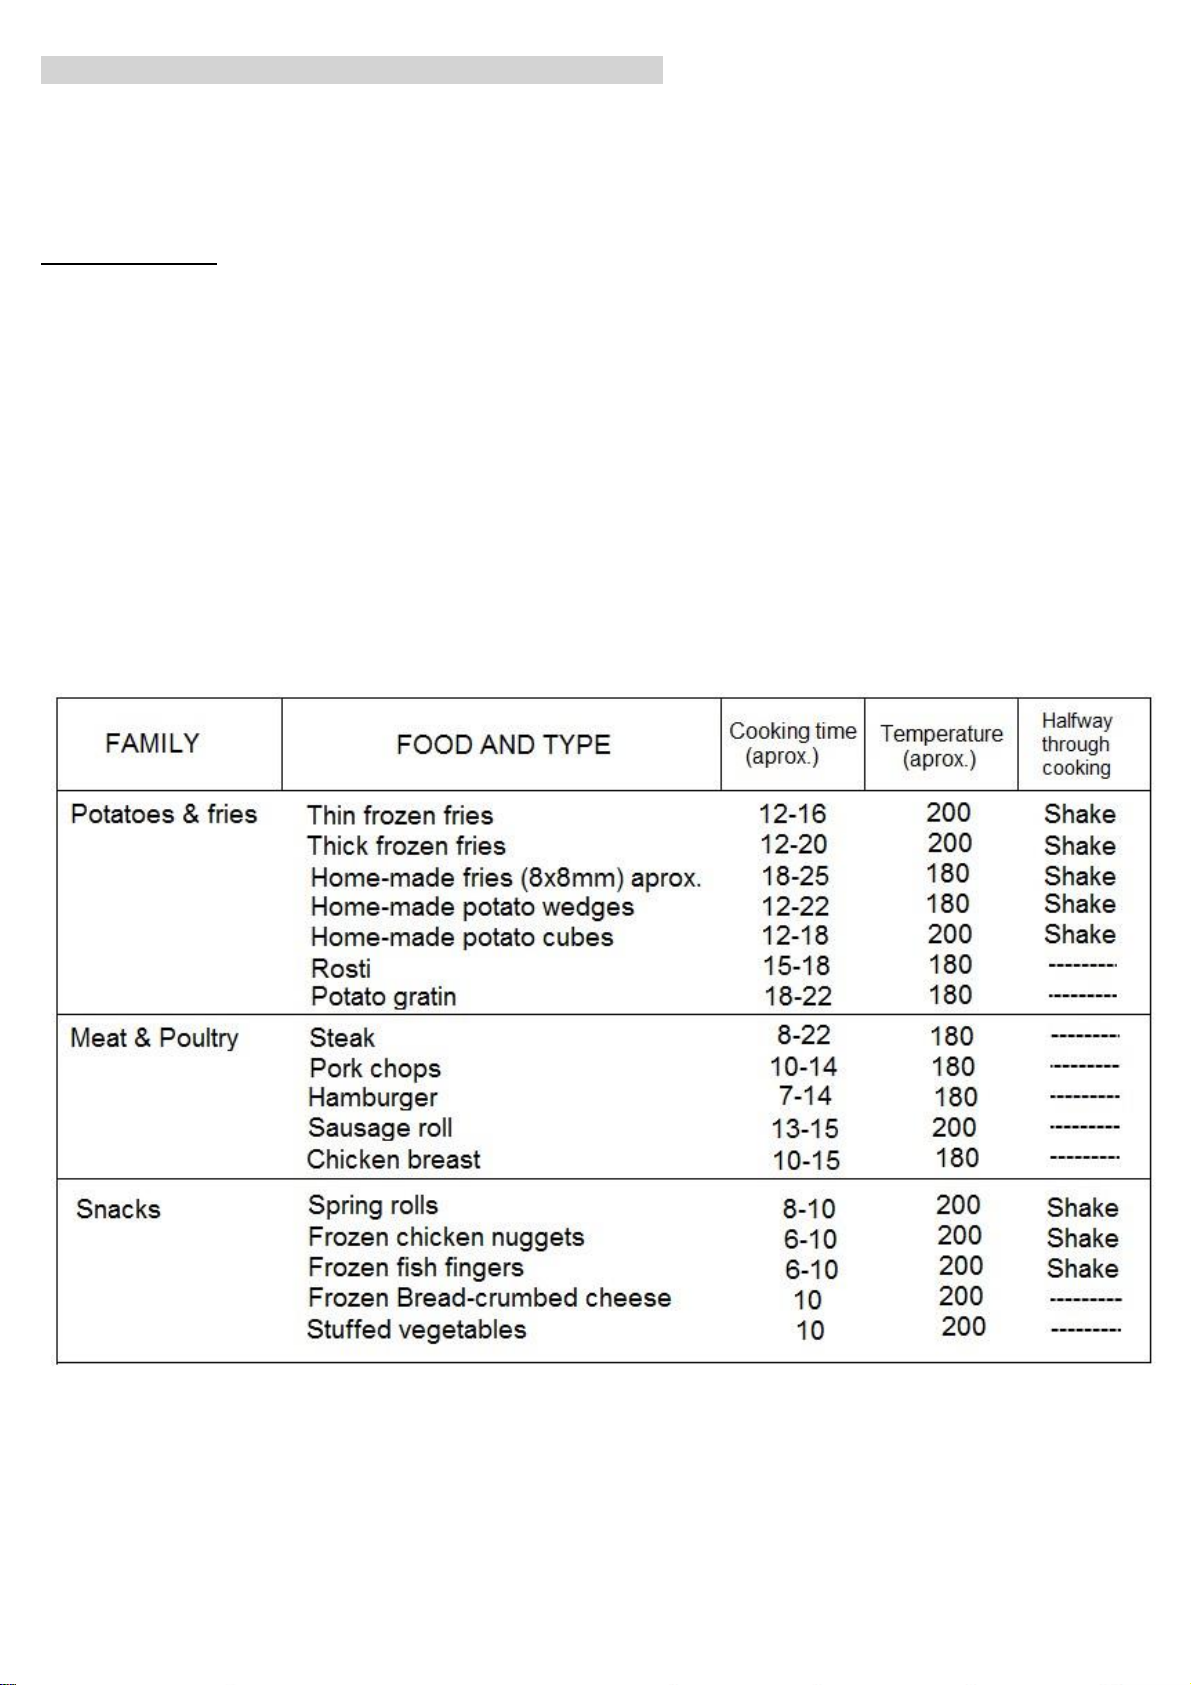
CONFIGURACIONES DE TEMPERATURAS Y TIEMPOS DE COCINADO
A continuación se muestra una tabla de ayuda a seleccionar los ajustes básicos para los ingredientes
que desea preparar.
Tenga en cuenta que estas configuraciones son solo para referencia, orientativos aproximados. No
se puede garantizar configuraciones de temperatura y tiempo exactos ya que los ingredientes
difieren en origen, tamaño, forma y marca.
Consejos a tener en cuenta:
- Los ingredientes cortados más pequeños generalmente requieren un tiempo de preparación menor.
- La cantidad de ingredientes también influye en el tiempo de cocinado.
- Agitar los ingredientes más pequeños a la mitad del tiempo de preparación optimiza el resultado final
y puede ayudar a evitar que los ingredientes se fríen de manera desigual.
- No prepare ingredientes extremadamente grasientos como salchichas en la freidora.
- Los bocadillos que se pueden preparar en un horno también se pueden preparar en la freidora.
- La cantidad óptima para preparar patatas fritas crujientes es de 500 gramos.
- Utilice masa prefabricada para preparar bocadillos rellenos de forma rápida y sencilla.
La masa prefabricada también requiere un tiempo de preparación más corto que la masa casera. -
También puede utilizar la freidora para recalentar los ingredientes ajustando la temperatura a 150 ° C
y el temporizador a unos 10 minutos.

LIMPIEZA Y ALMACENAMIENTO
- Quite el enchufe de la toma de corriente y deje que el aparato se enfríe.
Nota: Puede retirar la bandeja para freír para que la freidora se enfríe más rápidamente.
- Limpiar siempre el aparato después de cada uso.
- La bandeja de freír, la cesta y el interior del aparato tienen un revestimiento antiadherente. - No utilice
utensilios de cocina metálicos o materiales de limpieza abrasivos para limpiarlos, - Limpie el exterior
del aparato con un paño ligeramente húmedo.
- Limpiar la bandeja y el cesto de freír con agua caliente, jabón neutro y una esponja suave.
- Para restos de grasa adheridos en la bandeja o cesto, cubra de agua y jabón el resto adherido y deje
reposar unos minutos. Después limpiar con una esponja suave no abrasiva.
- Limpiar el interior del aparato con agua caliente y una esponja no abrasiva.
- Limpie el elemento calefactor con un cepillo suave de limpieza para eliminar cualquier residuo de
comida.
- Una vez limpio todo el aparato y seco, almacenar en un lugar seco y libre de polvo.
NOTA.
Este aparato NO es apto para lavavajillas.
ESPECIFICACIONES
- Voltaje: 220V –240V / 50 –60Hz.
- Potencia: De 1100W a 1300W.
- Capacidad: 500 gr.
- Tecnología de alta y veloz circulación de aire caliente para una deliciosa fritura sin aceite.
- Cocinado sin aceite para una alimentación saludable liberando hasta el 80% de grasas.
- Pilotos indicadores de funcionamiento y temperatura.
- Alta potencia de cocinado rápido.
- Bandeja y cesto anti-adherente que hace que los alimentos no se peguen y fácil limpieza.
- Temperatura ajustable de 100 ºC hasta 200 ºC.
- Temporizador ajustable desde 1 minuto hasta 30 minutos.
- Fácil y sencillo control de mandos.
- Sistema de seguridad de auto-apagado en caso de sacar la bandeja con el cesto.
CONDICIONES DE GARANTÍA
- La garantía cubre cualquier avería que haya sido causada por el propio sistema del
fabricante.
- El fabricante se reserva el derecho a poder anular la garantía en caso de observar
cualquier uso indebido del aparato así como uso excesivo, mal uso, golpes u otros motivos.
- La garantía solamente tendrá validez presentando el ticket o factura de compra, siempre y
cuando sean completamente legible vendedor, fecha, marca y modelo del aparato. - Bajo
ningún concepto se hará cambio o abono del aparato sin ser antes revisado por el servicio
técnico autorizado.
MOTIVOS DE ANULACIÓN DE GARANTÍA
- Toda utilización inadecuada, o en desacuerdo con las instrucciones de uso, puede suponer peligro,
anulando la garantía y la responsabilidad del fabricante.

- En caso de avería llevar el aparato a un Servicio de Asistencia Técnica autorizado.
No intente desmontarlo o repararlo por usted mismo ya que se considera manipulación.
- Todo uso excesivo será también motivo de anulación de garantía, recuerde que este aparato es
solamente para uso doméstico y ocasional.
MEDIO AMBIENTE
¡Usted también puede contribuir a la conservación del medio ambiente!
Este aparato no debe desecharse con la basura doméstica al final de su vida útil, sino que se debe
depositar en un punto de recogida para el reciclaje de aparatos eléctricos y electrónicos. Este símbolo
en el aparato, manual de instrucciones y embalaje quiere atraer su atención sobre esta importante
cuestión. Los materiales utilizados en este aparato se pueden reciclar.
Mediante el reciclaje de electrodomésticos, usted contribuye a fomentar la protección del
medioambiente.
Solicite más información sobre los puntos de recogida a las autoridades locales.

FRYER WITHOUT OIL
Instructions Manual
TH-FR1825 / 1.8L
IMPORTANT NOTE
- Read this manual carefully before starting to use the appliance.
- Keep this manual for future reference.
- This appliance has been designed only and exclusively for domestic and occasional use.

INTRODUCTION
Dear Customer:
We appreciate the trust placed in us by purchasing this THULOS® product.
Our main commitment is to offer excellent articles, maintaining the strictest controls of quality and
complying with all current safety regulations, with the aim of presenting a perfect and safe product for
domestic use.
INSTRUCTIONS BY AND FOR YOUR SAFETY
- Check if the voltage indicated on the appliance corresponds to the voltage of your home network.
- Place the appliance on a flat and level surface.
- Do not use the appliance outdoors.
- Never immerse the central unit in water and never under the tap.
- Do not let water or other liquid enter the appliance, to avoid electric shock.
- Always put the ingredients to be fried in the basket, never outside the basket.
- Do not cover the appliance while it is in operation.
- Never add oil or cook with oil in this appliance, it may cause a fire.
- Never touch the inside of the appliance while it is in operation.
- Do not use the appliance if the plug, the power cord or the appliance itself are damaged.
- Periodically check that the cable and plug are not damaged.
- In case of damaged cable, plug or other part, it must be repaired by an authorized technical service.
- Do not use the appliance if any of the parts are damaged.
- This appliance is not suitable for children or for people with physical or mental disabilities or that lack
experience and knowledge. If you want someone else to use the appliance, you must be adequately
guided on its use.
- Keep the appliance and its power cord out of the reach of children when the appliance is switched on
or is cooling down.
- Keep the power cord away from hot surfaces.
- Do not plug in the appliance or operate the control panel with wet hands.
- Only connect the appliance to a grounded socket. Always make sure that the plug is properly inserted
into the outlet.
- Never connect this appliance to an external timer.
- Do not place the appliance on or near combustible materials such as tablecloths or curtains. - Do not
place the appliance against a wall or against other appliances. Leave at least 10 cm of free space
on the back and sides and 10 cm of free space above the appliance. Do not place anything on top
of the appliance.
- Do not use the appliance for any other purpose than that described in this manual.
- Do not let the appliance operate unattended.
- During hot air frying, hot steam is released through the air outlet openings. Keep hands and face a
safe distance from steam and air exhaust openings. Also be careful of hot steam and hot air when
removing the frying pan from the appliance.
- The surface under the appliance may become hot during use.
- Unplug the appliance immediately if you notice dark smoke coming out of the appliance.
Wait for the smoke to stop before removing the frying pan from the appliance.
- Always unplug the appliance when cooking is finished and you are not using it.
- Let the appliance cool down 30 minutes after use, before cleaning and storing.

PRODUCT PARTS
A.Basket or Basket.
B.Protective cap.
C. Basket release button.
D. Basket handle.
E.Tray.
F.Air inlet.
G. Timer.
H. Temperature indicator light.
I. Operating light (time).
J.Temperature selector.
K.Ventilation window.
L.Power cord.
BEFORE THE FIRST USE
- Remove all packing material.
- Remove any stickers or labels from the appliance, other than the classification label. - Thoroughly
clean the basket and the frying pan with hot water and a little mild soap with a soft non-abrasive
sponge.
- Clean the inside and outside of the appliance with a slightly damp cloth.
- Dry all parts very well with absorbent kitchen paper.
IN GENERAL BEFORE COOKING
- Place the appliance on a stable, horizontal, level and heat resistant surface.
- Correctly place the basket on the frying pan.
- Take the entire cable out of the compartment at the back of the appliance.
- Do not fill the tray to the top for cooking.
- Never cook in this appliance with oil or any other liquid.
- Do not place anything on top of the appliance.
This interrupts the air flow and affects the cooking result.

OPERATION
1. Plug the mains plug into a grounded outlet.
2. Gently remove the frying pan from the fryer. 3. Put the ingredients in the basket, according to the
instructions in the “CONFIGURATION” section.
4. Slide the fry pan back into the fryer. Never use the frying pan without the basket.
5. Select the desired temperature. (See the "CONFIGURATION" section).
6. To turn on the appliance, turn the timer knob and select the desired time. - Add 3 minutes to the
preparation time when the appliance is cold.
- You can also let the appliance preheat without any ingredients inside.
- The power light and the warm-up light will come on.
- The timer starts counting down the set preparation time.
Note.
During the hot air frying process, the heating light goes on and off automatically ocasionally.
This indicates that the heating element turns on and off to maintain the set temperature.
7. Some ingredients should be stirred halfway through cooking.
- Take the frying tray out of the appliance by the handle and shake.
- Put the tray back in the fryer.
- Caution: Do not press the basket release button during shaking.
8. When you hear the timer chime, the set preparation time has elapsed. The appliance will turn off
automatically. Take the pan out of the appliance and place it on a heat resistant surface.
Note: You can also turn off the appliance manually by turning the thermostat to the “0” position.
9. Check if the ingredients are ready. If the ingredients are not ready yet, simply slide the frying pan
back into the appliance and set the timer for a few additional minutes.
10. To remove small ingredients, press the basket release button and remove the basket from the fry
pan. Do not turn the basket upside down with the frying pan still attached to it, as any excess oil that
has accumulated in the bottom of the frying pan will spill over and over the ingredients. After hot air
frying, the frying pan and ingredients are hot. Depending on the type of ingredients in the fryer,
steam may come out of the frying pan.
11. Empty the basket into a bowl or plate.
Tip: To remove large or fragile ingredients, use a pair of tweezers to remove the ingredients from the
basket.
REMEMBER
- Never cook with oil in this appliance or with any other liquid.
- Always remove the flag holding its handle, as it can be hot and burn.
- Never use the tray without the basket or basket.
- Never overfill the basket with cooking ingredients.
- Consult the cooking and configuration tables according to the food to be cooked.
- Add 3 minutes to the cooking time if the appliance is off and cold.
- You can also preheat the appliance, before introducing the food to be cooked.
SETTINGS OF TEMPERATURES AND COOKING TIMES
Below is a table to help you select the basic settings for the ingredients you want to prepare.
Please note that these settings are for reference only.
Exact temperature and time settings cannot be guaranteed as the ingredients they differ in origin, size,
shape and brand.
Tips to consider:
- Smaller cut ingredients generally require less prep time.
- The quantity of ingredients also influences the cooking time.
- Shaking the smallest ingredients halfway through the preparation time optimizes the final result and it
can help prevent ingredients from frying unevenly.
- Do not prepare extremely greasy ingredients like hot dogs in the deep fryer.
- Sandwiches that can be prepared in an oven can also be prepared in the deep fryer.
- The optimal amount to prepare crispy fries is 500 grams.
- Use pre-made dough to make filled sandwiches quickly and easily. Pre-made dough also requires a
shorter prep time than homemade dough.
- You can also use the deep fryer to reheat the ingredients by setting the temperature to 150 ° C and
the timer to about 10 minutes.

CLEANING AND STORAGE
- Remove the plug from the socket and let the appliance cool down.
Note: You can remove the frying pan to allow the fryer to cool more quickly.
- Always clean the appliance after each use.
- The frying pan, the basket and the inside of the appliance have a non-stick coating. - Do not use
metallic kitchen utensils or abrasive cleaning materials to clean them, - Clean the outside of the
appliance with a slightly damp cloth.
- Clean the frying pan and basket with hot water, mild soap and a soft sponge.
- For grease residues adhering to the tray or basket, cover the rest adhered with soap and water and
leave stand for a few minutes. Then clean with a soft non-abrasive sponge.
- Clean the inside of the appliance with hot water and a non-abrasive sponge.
- Clean the heating element with a soft cleaning brush to remove any food residue.
- Once the entire appliance is clean and dry, store in a dry and dust-free place. NOTE. This appliance
is NOT dishwasher safe.
SPECIFICATIONS
- Voltage: 220V - 240V / 50 - 60Hz.
- Power: From 1100W to 1300W.
- Capacity: 500 gr.
- High and fast hot air circulation technology for delicious oil-free frying.
- Cooked without oil for a healthy diet, releasing up to 80% fat.
- Indicator lights for operation and temperature.
- High power for quick cooking.
- Non-stick tray and basket that makes food not stick and easy to clean.
- Adjustable temperature from 100 ºC to 200 ºC.
- Adjustable timer from 1 minute to 30 minutes.
- Easy and simple control of controls.
- Auto-off security system in case of removing the tray with the basket.

WARRANTY CONDITIONS
- The warranty covers any breakdown that has been caused by the manufacturer's own system. -
The manufacturer reserves the right to be able to cancel the guarantee in case of observing any
improper use of the device as well as excessive use, misuse, blows or other reasons.
- The guarantee will only be valid by presenting the purchase receipt or invoice, provided they are
fully legible seller, date, brand and model of the device.
- Under no circumstances will change or payment of the device be made without first being
reviewed by the authorized technical service.
REASONS FOR CANCELLATION OF WARRANTY
- Any improper use, or in disagreement with the instructions for use, may pose a danger, voiding the
warranty and the responsibility of the manufacturer.
- In the event of a breakdown, take the device to an authorized Technical Assistance Service.
Do not try to disassemble or repair it yourself as it is considered tampering.
- Any excessive use will also be a reason for cancellation of the guarantee, Remember that this
appliance is for domestic and occasional use only.
ENVIRONMENT
You too can contribute to the conservation of the environment..!
This appliance must not be disposed of with household waste at the end of its useful life,
but must be deposited at a collection point for the recycling of electrical and electronic equipment. This
symbol on the appliance, instruction manual and packaging wants to draw your attention to this
important issue.
The materials used in this appliance can be recycled.
By recycling appliances, you are helping to protect the environment.
Request more information about the collection points from the local authorities.

Table of contents
Languages:
Other Thulos Fryer manuals


