Thunder TH-0119M User manual

1
THUNDER E-BIKE
USER’S MANUAL
MODELTH-0119M

2
CONTENTS
Safety Instruction---------------------------------------------------------------------------------Page 3
Bike Display---------------------------------------------------------------------------------------Page 3
LCD Display Operation-----------------------------------------------------------------------Page 4-5
Battery: Further Information & Maintenance-------------------------------------------------Page 6
Charging--------------------------------------------------------------------------------------------Page 6
Installation Instruction-------------------------------------------------------------------------Page 7-9
Packing List -------------------------------------------------------------------------------------Page 10

3
1. Safety Instructions ___________________
1. Thank you for purchasing the E-BIKE. The E-BIKE features the most recent innovation in
technology.
2. For Safety reasons, it is most important that you read this user’s manual before you operate
the bike. Improper handling can reduce its riding performance and most importantly, cause
danger to your Health and Safety.
3. For handling and maintenance of the bicycle, please refer to the E-BIKE user’s manual
which is an integral part of this e-bike.
4. Do not at any time dismantle or disassemble any of the e-bike components!
5. Please check all parts are tight and locked before riding.
6. Please make sure that the battery charger and charging plug are always kept dry and does
not get wet.
7. The charger should only be cleaned with a dry cloth. Never use a wet cloth, oil or any other
liquid.
2. Bike Display
Handle Bar
Battery Inside
Controller Inside
Saddle
Seat Tube
Rear Mudguard
Tyre
Motor
Shimano 7 Speed
Shimano 3 Speed
Crankset
Pedal
Shock Absorber
Front Suspension Fork
Front Mudguard
Front Light
LCD Display Screen
Disk Brakes
Light & Horn Switch
Gears
Rear Light
Throttle
Folding bike leaver
4
3. LCD Display Operation
3.1 Display Instruction
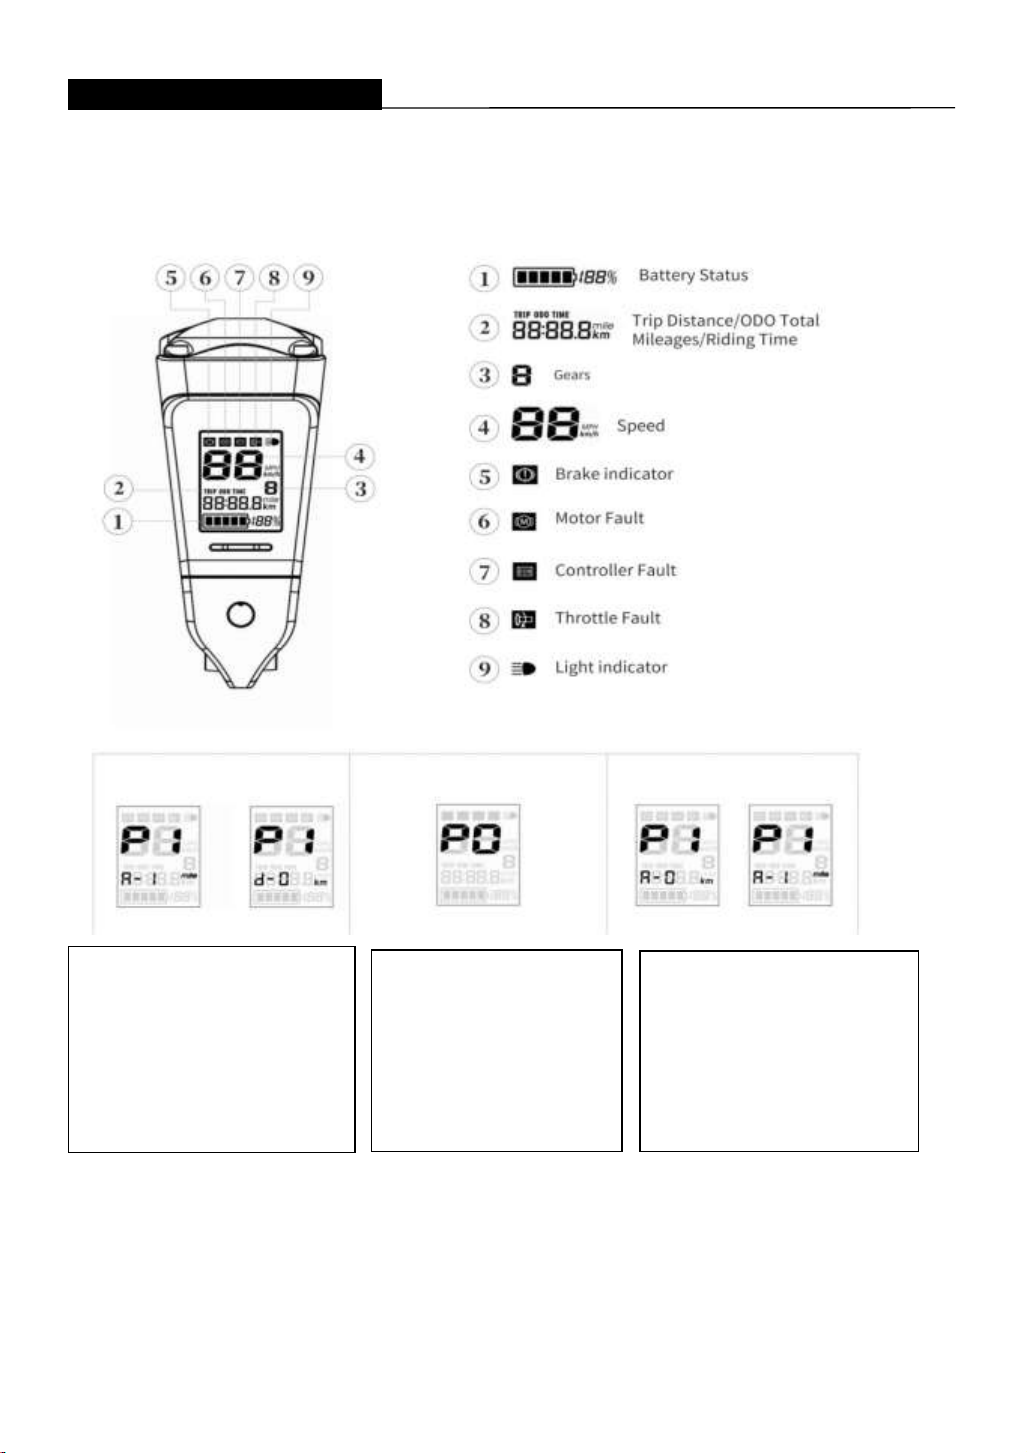
2. P0 Restore the Factory Settings.
Enter into the Main Menu, set”
P0” Long Press “Left” key for 30
seconds, Then the display will
restore to factory setting
3. P1: Miles / Kilometers Setting.
Enter into the Main Menu Press P1,
Press “Left” or “Right” Key, choose “0”
or “1” (0 is Kilometers & Miles is 1)
Press “left” or “Right” Combination
key to exit.
1.LongPress “Left” “Right” Combination
key, enter into “main Menu Mode”
Then Short Press “Right Key and set
from P0-P7 Long Press “Right” Key to
change the setting function “Left” Key
Then “A”, Press Left key to increase
numerical Value, Then “d”, Press Left
key to reduce numerical value.
5
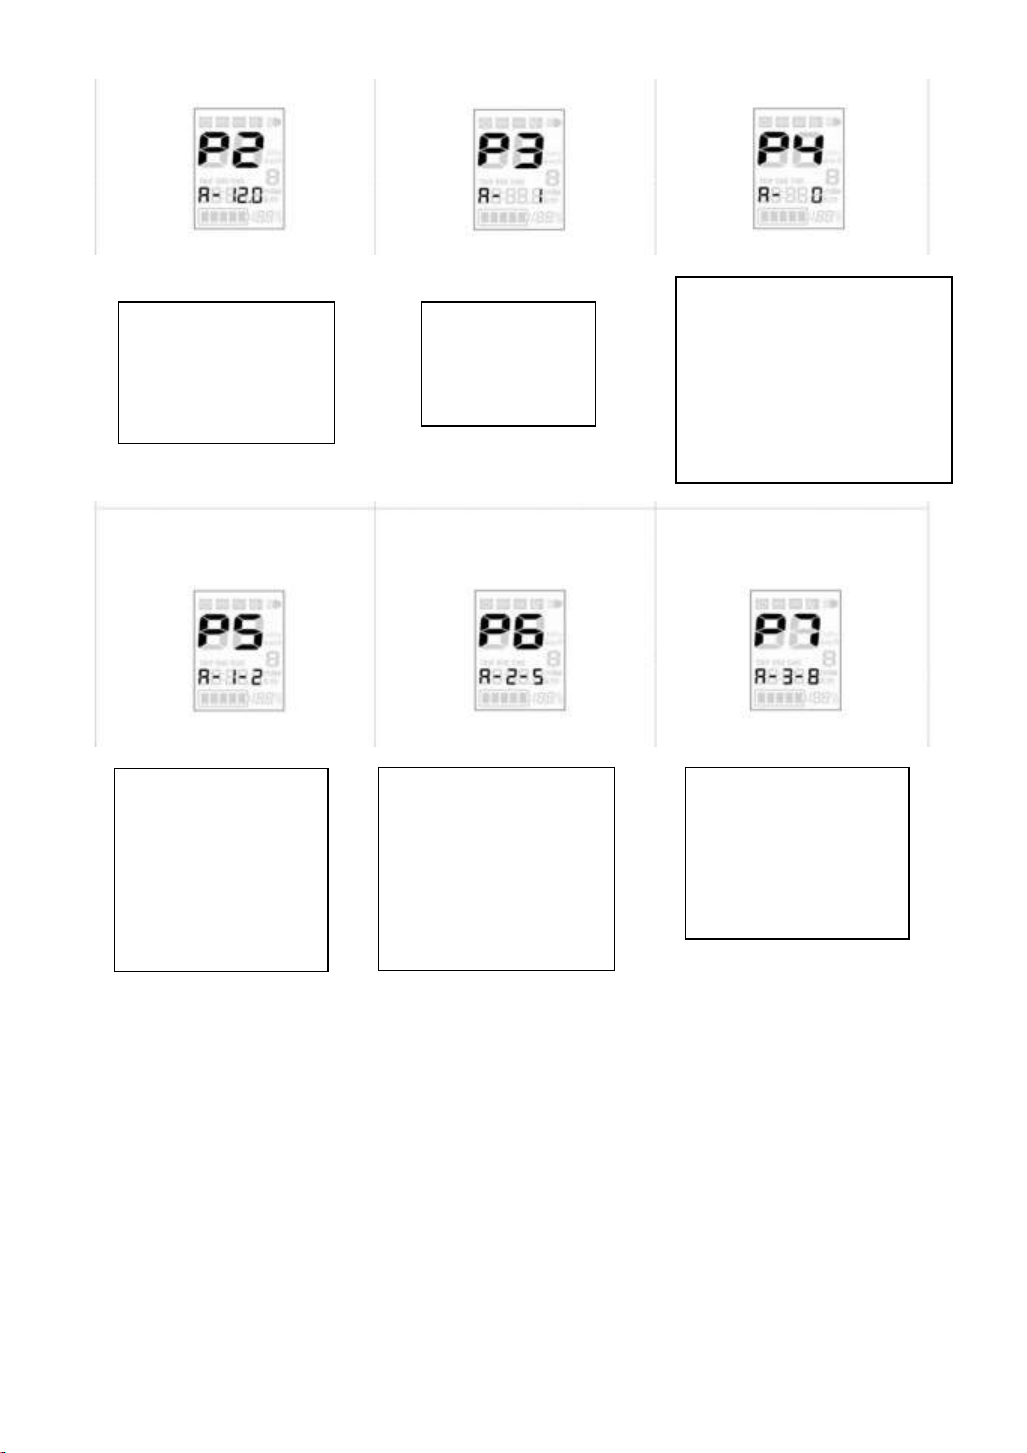
6. P4: Limited Speed Setting Enter into
set “P4”, change the numerical value
in the display. 0-100, set the speed
limit percentage, set “50” is the speed
limit of 50%; “0” or “100” is no limit
speed.
5. P3: Magnetic Steel
Number Setting.
4. P2: Wheel Diameter
setting enter into set “P2”,
change the numerical value
in the display.
7. P5: Grade Power- Assisted
Setting
1 Grade: A-1 (1-3) The last
number can be adjusted
from 1-3. The larger the
value, the faster the speed.
8. P6: 2 Grade Power- assisted
Setting
2 Grade: A-2 4-6) The last
number can be adjusted from 4-
6. The larger the value the faster
the speed.
9. P7: 3 Grade Power- Assisted
Setting 3 Grade: A-3 (7-9). The
last number can be adjusted
from 7-9. The larger the value,
the faster the speed.

6
3.2 Operation Cautions
Be careful of the safety use, do not attempt to release the connector when charging the
battery.
● Avoid the risk of collision.
●Do not modify the system parameters to avoid parameters disorder.
●Reset the display when error code appears.
4. Battery: Further Information And Maintenance
1. How far can you travel with a fully charged battery? That depends on the loading
weight, road conditions and battery capacity, however at the same time, average
speeds can vary on distance travelled.
2. When storing the battery for a longer time period, (e.g. during wintertime) it is
important to place the fully charged battery on a flat surface in a dry place.
3. Attention: The battery should be re-charged once every 2-3 month when it is not
used.
4.1 Keep the battery out of reach of children.
4.2 Never try to open the battery.
4.3 If the battery is damaged because it has been dropped somewhere or because of a
biking accident, there might be a risk of leakage. Beware of chemical burns! and
immediately stop using the damaged battery.
4.4 Do not touch the battery without wearing gloves and make sure no acid touches
your eyes.
5. Charging
1. To charge the battery with the bike, simply place the bike within reach of the
power supply and plug it in. Note: The plug socket is located in the left of the battery.
2. The battery can either be charged while on the bike or the battery can be removed
and charged at a place of your convenience.

7
3. The RED light indicates that it is charging and GREEN light indicates the battery
is fully charged. (Please remove the plug from the electrical socket) Usually the
charging time is 4-6 hours, however this is dependent on the battery capacity.
4. Warning: Charging time over 10 hours is prohibited, please keep it away from high
temperature environment and store it in a Safe cool place.
5. You also remove the battery for charging.
a. Fold the bike
b. Turn the key
c. Take out the battery
6. Installation Instructions
1. When opening the bikes box, remove the E-bike and use tools to cut off the package
strings.
2. Install front wheel:
2.1 Take out the protection axle the front fork and front hub, and then take out front
wheel.
2.2 Take out the front disc from toolbox, install the disc on the hub of front wheel.
Attention: There is indicated sticker which shows the outside surface.
2.3 Make sure the front wheel is in line with the rear wheel and proceed to install.
(Pull the wheel upwards and insert it into the fork drop out, insert the quick release
though the axle and tighten bolts)
(2.1) (2.3) (2.3)
(2.3) (2.3)
Key
Handle
r
Quick release
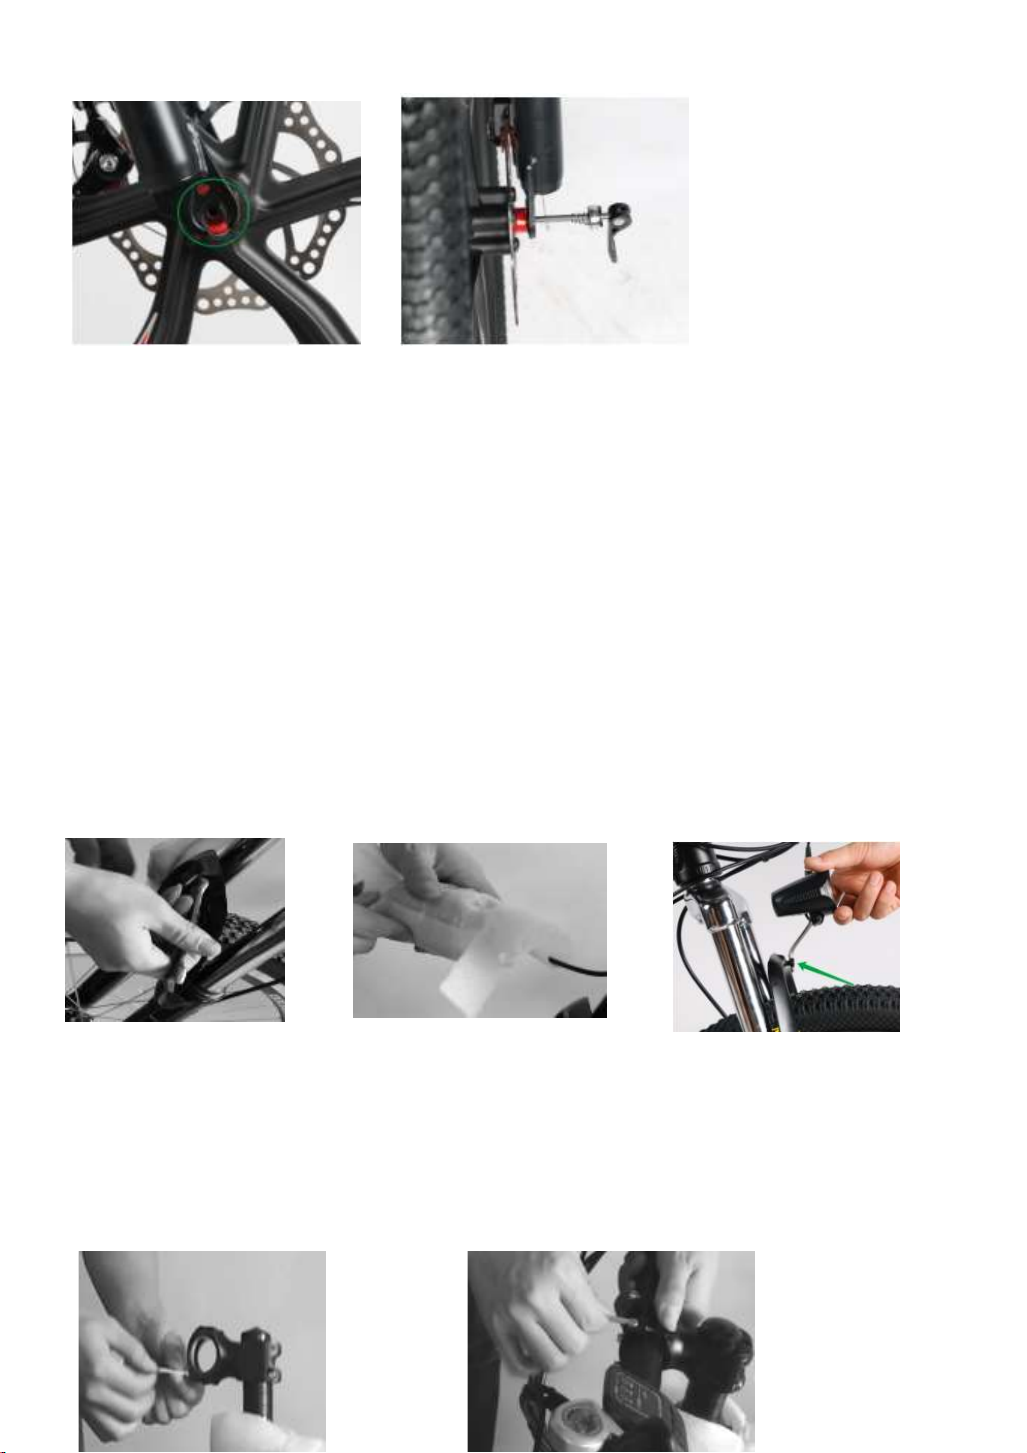
8
3. Install the front light
3.1 Take the screw from the fork;
3.2 Open the lamp
3.3 Install the lamp and use the tool to tighten it.
(3.1) (3.2) (3.3)
4. Install the handle bar
4.1 Use inner hexagon tool to loosen the stem cover and don't tighten all bolts
immediately before adjusting the handlebar in a proper angel and position.
4.2 Then tighten with tool.
(4.1) (4.2)

9
5. Install pedals: Check 2 pedals, the one imprinted "L" should be install in left side
and "R" in the right side. Please use the wrench as displayed to tighten them.
6. Install the Seat post.
6.1. Open the seat post and saddle,
6.2 Install the rear light.
6.3 Put the seat post into the frame.
6.4 Adjust seat post to the height that suits your riding position best and tighten quick
release. (Please make sure that the quick release is tightened firmly).
(6.1) (6.2) (6.3) (6.3)
7. Adjust angle of brake lever, meter, gear shifter, throttle and louder controller on
handlebar, then tighten them with tools.
8. Fold the bike
8.1 Fold the frame, turn the locker, and then open quick release.
(8.1)
L
R

10
Any question about the item, please contact us at
Sales@thundere-bikes.com
Packing List

11
Serial Number :2424219010__________
Model
Description
Quantity
Checked
TH-0119M
Electric Bike
1
Tool kit (open end spanner
10 ,open-end spanner 13-15, open-
end spanner 14-17, screwdriver,
inner hexagon spanner M6, M5, M4,
M3)
1
Manual
1
Specification Sheet
1
Keys
2
Front & Rear Mud Flaps
1
Rear Light
1
Charger
1
Pedals (Pair)
1
Table of contents


