TI Navigator User manual

TI-Navigator™
Reference Guide

ii
Important Information
Texas Instruments makes no warranty, either express or implied,
including but not limited to any implied warranties of merchantability
and fitness for a particular purpose, regarding any programs or book
materials and makes such materials available solely on an "as-is" basis. In
no event shall Texas Instruments be liable to anyone for special,
collateral, incidental, or consequential damages in connection with or
arising out of the purchase or use of these materials, and the sole and
exclusive liability of Texas Instruments, regardless of the form of action,
shall not exceed the purchase price of this product. Moreover, Texas
Instruments shall not be liable for any claim of any kind whatsoever
against the use of these materials by any other party.
Copyright © 2006 Texas Instruments Incorporated.
Microsoft® and Windows® are trademarks of their owners.

Contents
iii
Important Information................................................................... ii
3 Getting started with TI-Navigator....................................1
Starting TI-Navigator™ on your computer................................... 1
The TI-Navigator computer home screen ..................................... 2
TI-Navigator computer tools.......................................................... 7
Creating and managing your teacher account............................. 8
Using calculator screen options................................................... 11
Logging in to TI-Navigator on your calculator ........................... 12
Logging in to TI-Navigator (student instruction) ....................... 13
The TI-Navigator calculator home screen ................................... 15
TI-Navigator calculator tools ....................................................... 15
4 Managing classes.............................................................17
Creating classes............................................................................. 17
Selecting a class ............................................................................ 19
Beginning and ending class sessions ........................................... 20
Changing the class view............................................................... 20
Removing items from the Class Record....................................... 23
Removing classes .......................................................................... 24
5 Managing student accounts ...........................................25
Adding students to classes........................................................... 25
Checking student login status ..................................................... 27
Arranging the seating chart ........................................................ 27
Sorting student information........................................................ 28
Using the Student Portfolio view ................................................ 29
Resetting student passwords ....................................................... 32
Changing the classes of a student............................................... 34
Changing student names and identifiers.................................... 36
Moving a student to another class.............................................. 37
Copying a student to another class............................................. 38
Removing a student from a class................................................. 38
6 Exchanging files with students ......................................41
Sending files ................................................................................. 41
Sending files (student instruction) .............................................. 46
Collecting files .............................................................................. 48
Receiving files (student instruction)............................................ 50
Deleting files from calculators..................................................... 51
Checking the status of file transfers ........................................... 53
Canceling file transfers ................................................................ 54

iv
Finding transferred files ...............................................................55
Changing the unprompted file location ..................................... 55
Viewing file properties................................................................. 56
7 Running interactive activities ........................................ 59
Introduction to the Activity Center tool ..................................... 59
Configuring activities ................................................................... 68
Changing the graph window settings.........................................79
Saving and loading activity settings ........................................... 90
Starting and managing activities.................................................91
Creating and adding activity data ...............................................94
Contributing activity data (student instruction)....................... 102
Plotting activity data .................................................................. 113
Editing activity data.................................................................... 120
Saving and loading activity data ...............................................121
Deleting activity data .................................................................124
Viewing activity data..................................................................126
Viewing Frequency Plots ............................................................128
Showing and hiding activity data..............................................130
Highlighting activity data ..........................................................134
Sorting activity data ...................................................................136
8 Polling students ............................................................ 141
The Quick Poll tool window and tabs .......................................141
Opening the Quick Poll tool ......................................................143
Polling your students..................................................................144
Stopping polls .............................................................................145
Pausing polls ...............................................................................145
Resuming paused polls...............................................................146
Responding to polls (student instruction).................................146
Sending poll results to students................................................. 148
Saving polls .................................................................................148
Viewing poll results ....................................................................148
Sorting poll data......................................................................... 150
Showing and hiding display names...........................................150
Viewing previous polls ...............................................................150
Closing the Quick Poll tool......................................................... 151
9 Capturing calculator screens........................................ 153
Capturing calculator screens......................................................153
Viewing Captured Screens ......................................................... 154
Saving captured screens ............................................................. 155
Refreshing captured screens ......................................................156
Showing and hiding display names...........................................157

v
10 LearningCheck™ Creator ............................................159
LearningCheck™ Creator Main Window ................................. 160
Creating a new document ......................................................... 162
Specifying document properties ............................................... 162
Adding questions ...................................................................... 165
Adding specific question types.................................................. 166
Creating a question with a pull-down blank............................ 171
Editing Presentation Sequence.................................................. 175
Adding questions from the Item Bank..................................... 178
Saving a document .................................................................... 181
Adding special characters to text ............................................. 183
Adding topics and keywords .................................................... 185
Working with documents .......................................................... 185
Printing a Report ........................................................................ 193
Working with Images ................................................................ 195
Previewing a document ............................................................. 203
Sending documents to calculators ............................................ 204
Sending a document to a classroom network .......................... 206
Troubleshooting LearningCheck Creator.................................. 207
11 The Class Analysis Tool ................................................211
Getting started ........................................................................... 211
Creating a new class analysis ..................................................... 211
Interrupting file transfers .......................................................... 215
Opening a saved analysis ........................................................... 218
Viewing a slide show of the analysis......................................... 225
Glossary of terms used in Class Analysis.................................... 246
12 Installing Apps and OS files ........................................249
Opening the App and OS Transfer tool .................................... 249
Adding files to the transfer list ................................................. 250
Selecting and unselecting files to send..................................... 251
Removing files from the transfer list ........................................ 251
Installing Apps or OS files .......................................................... 252
Closing the App and OS Transfer tool....................................... 252
13 Troubleshooting ..........................................................255
Frequently-asked questions ....................................................... 255
System requirements.................................................................. 263
Error messages............................................................................ 264
14 Glossary........................................................................267
Terms ........................................................................................... 267
File types ..................................................................................... 270

vi
15 Legal Information ....................................................... 273
Texas Instruments Support and Service .....................................273
TI-Navigator™ 3.x License Agreement 274
TI LearningCheck 3.x License Agreement..................................286
Privacy Policy...............................................................................294

Getting started with TI-Navigator 1
Getting started with TI-Navigator
The TI-Navigator™ classroom learning system provides the hardware and
software tools you need to set up a wireless classroom network.
TI-Navigator lets you:
• Create and manage classes on the classroom network.
• Transfer files between your computer or calculator and your
students’ calculators.
• Monitor your students with screen captures and polling.
• Perform various interactive activities with your students to enhance
your lessons.
• Use different tools to create, distribute, and analyze educational
content.
• Install TI Graphing Calculator Applications (Apps) on your students’
calculators.
TI-Navigator has two main components that make it work:
• TI-Navigator computer software. The TI-Navigator computer
software contains the tools and options you need to run your
wireless classroom network.
• TI-Navigator calculator software. The TI-Navigator calculator
software contains the tools you and your students need to exchange
information with each other through the TI-Navigator network.
This section provides basic information about TI-Navigator, including
information on both the computer software and the calculator software.
Starting TI-Navigator™ on your computer
You can start the TI-Navigator™ classroom learning system from your
computer’s start menu.
To start TI-Navigator on your computer
fClick Start > Programs > TI Tools > TI-Navigator > TI-Navigator™.
The TI-Navigator computer home screen opens.
Note: If you have not used TI-Navigator before, a prompt opens
asking if you want to set up your classroom. You can choose to set up
your classroom or continue on to the TI-Navigator computer home
screen.
2 Getting started with TI-Navigator
Note: Make sure that the network indicator at the bottom of the screen
indicates that the TI-Navigator network is available. If it is not available,
this indicates an error. (See “Troubleshooting” on page 255.)
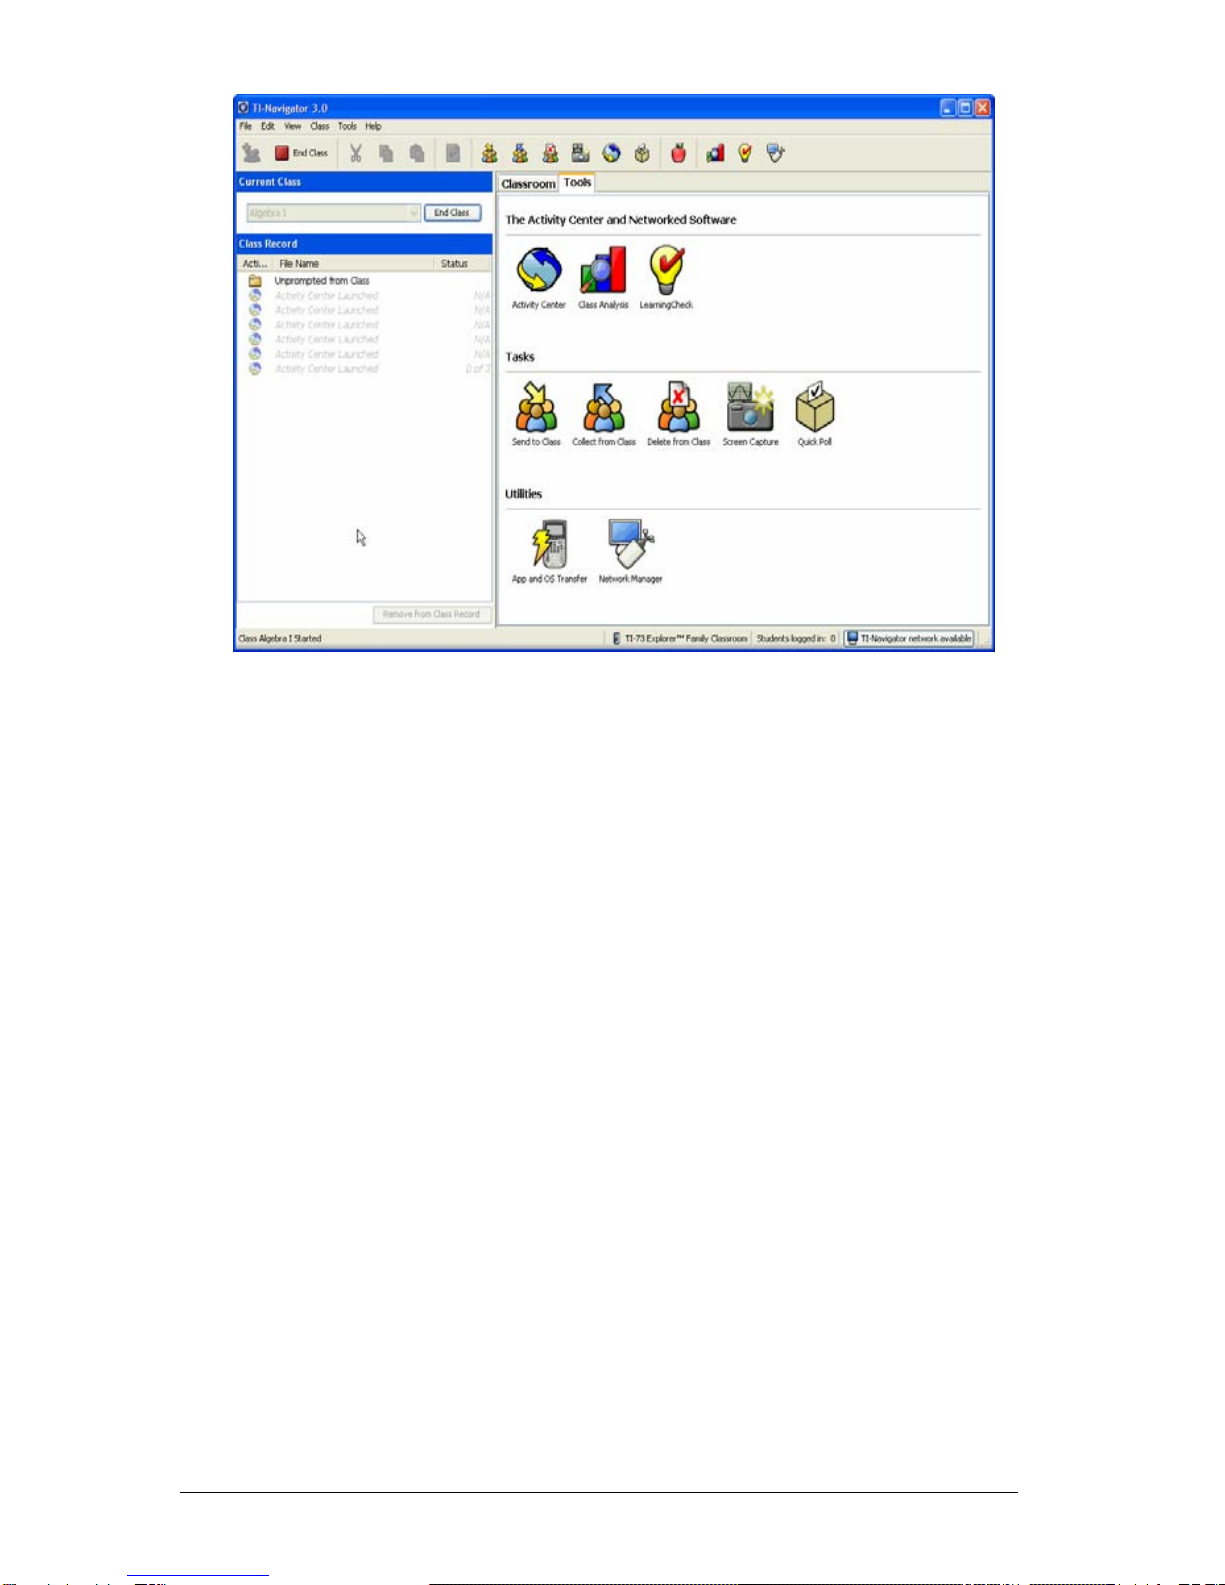
The TI-Navigator computer home screen
The TI-Navigator computer home screen provides the tools and options
you need to run TI-Navigator. Below you can see an example of the
TI-Navigator computer home screen with its main parts labeled.
Following the TI-Navigator computer home screen, you can find detailed
explanations of each labeled part.

Getting started with TI-Navigator 3
ÊClassroom tab
ËTools tab
ÌCurrent Class
Í Class Record
Classroom tab
In the Classroom tab, you can view the students in the selected class and
add, remove, or edit students. The Classroom tab has three views, the
Seating Chart, Student List and Student Portfolio views. In the Seating
Chart view, you can view your students by their display name and an
icon. In the Student List view, you can view your students listed in a table
with some of their account information. The Student Portfolio view
displays student names and the scores for every assignment. Below you
can see an example of the Classroom tab with its main parts labeled.
Note: The example below shows the Classroom tab in Student List view.
ÊË
Ì
Í

4 Getting started with TI-Navigator
Ê Classroom toolbar. Lets you add, edit, and remove students.
Ë Student roster. 1) Seating Chart view - Shows students listed with
display names and student icons. The Seating Chart view lets you arrange
your students in the Classroom tab like they are seated in your classroom.
(See “Arranging the seating chart” on page 27.)
2) Student List view - Shows students listed in a table with some of their
account information. The Student List view lets you sort students by
display name, first name, last name, user name, and student ID. (See
“Sorting student information” on page 28.)
3) Student Portfolio View - Displays students listed in a table with scores
associated with each assignment that you have included in the Student
Portfolio.
Ì View selector. Lets you toggle between the Seating Chart view and
the Student List view.
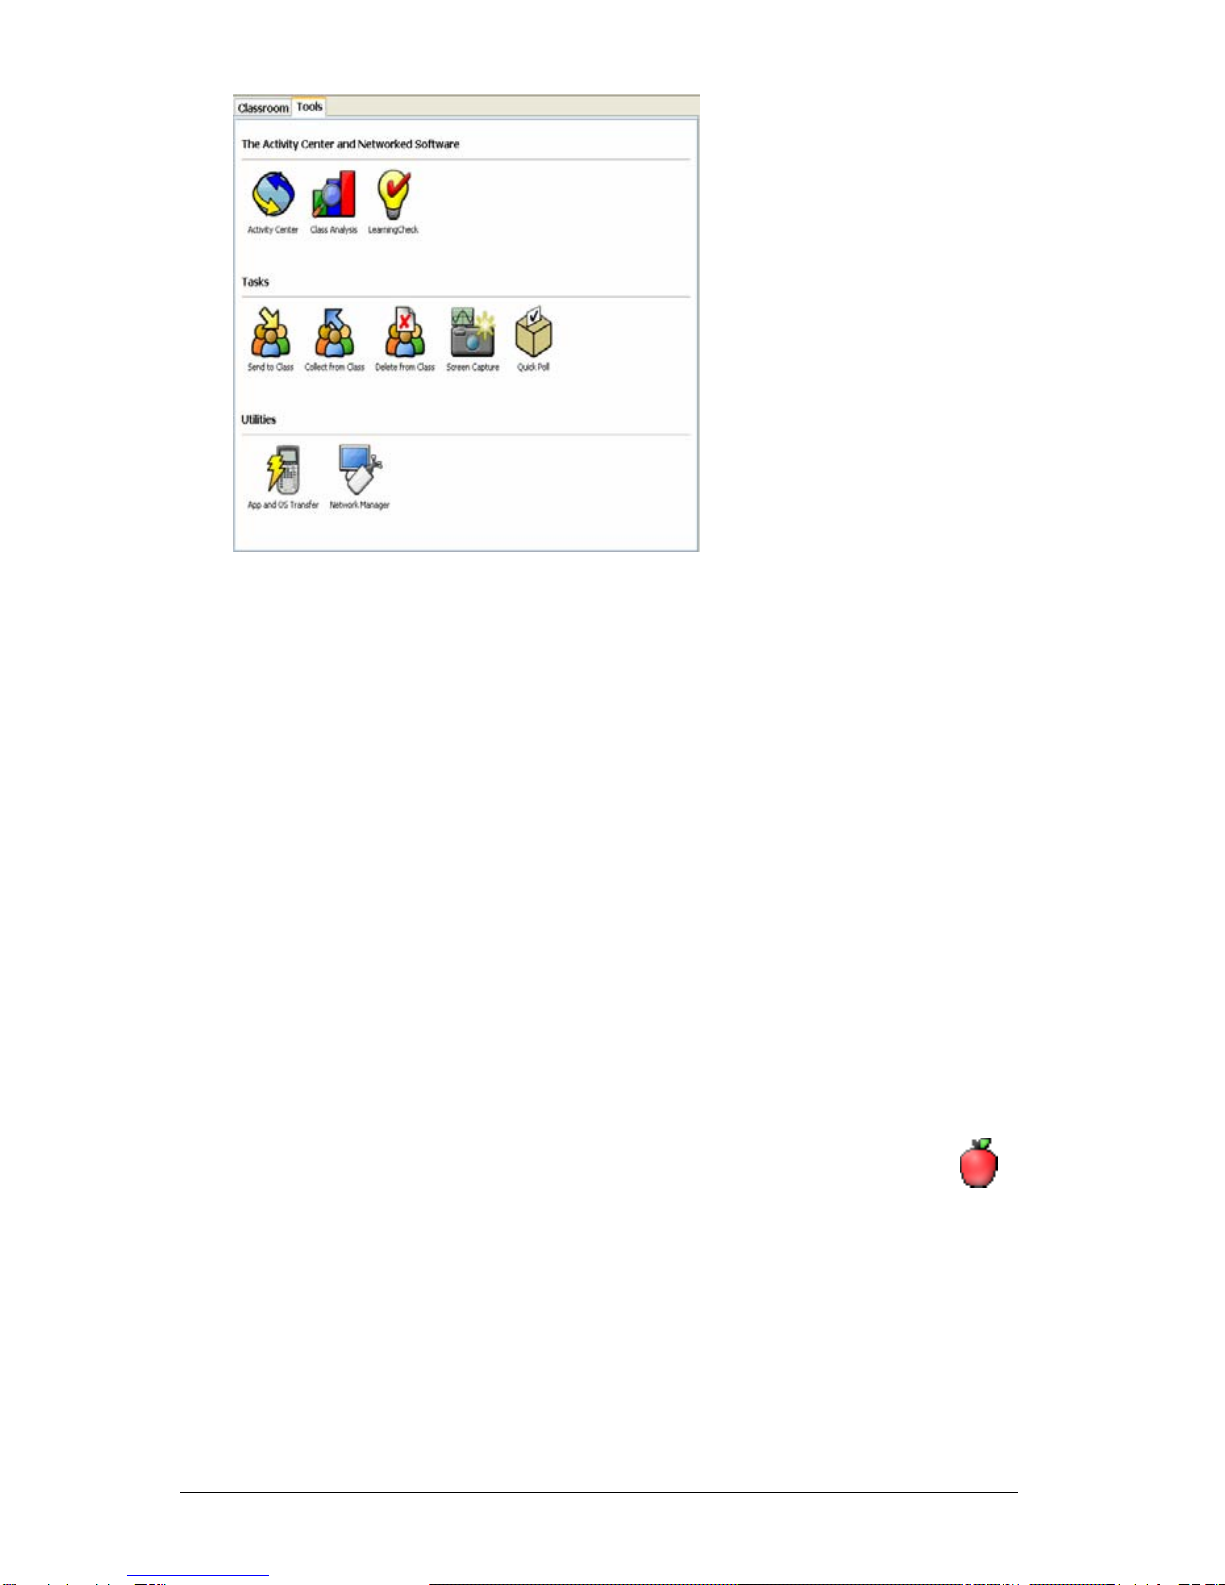
Tools tab
The Tools tab contains three main sections, including The Activity Center
and Networked Software, Tasks, and Utilities. Each section contains icons
that link to a particular tool in the TI-Navigator software.
Ê
Ë
Ì
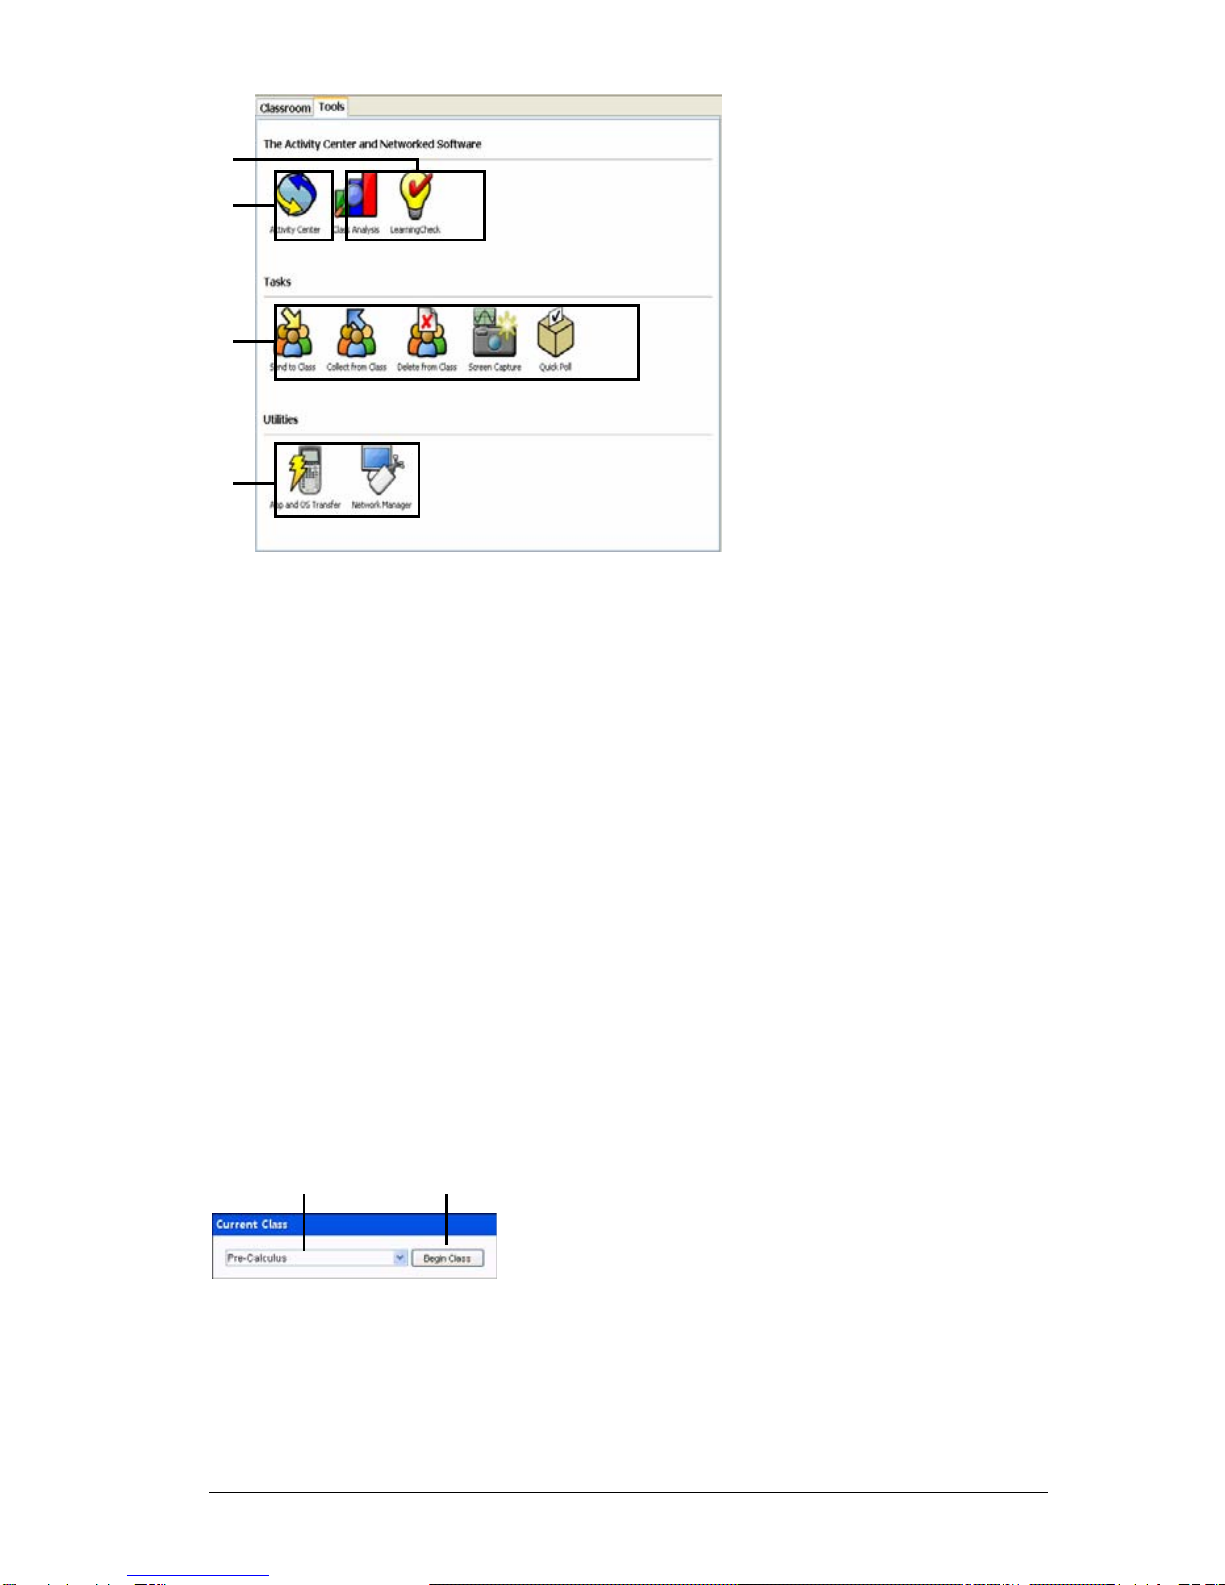
Getting started with TI-Navigator 5
Ê Networked software icons. Icons that let you launch the TI Computer
Applications (Apps) that you can use with the TI-Navigator software,
including Class Analysis and LearningCheck. You must have these Apps
installed on your computer in order to launch them from TI-Navigator.
Ë Activity Center icon. Icon that launches the Activity Center tool, a TI-
Navigator tool you can use to create and run interactive activities with
your class.
Ì Tasks icons. Icons that launch task tools in the TI-Navigator software,
including Send to class, Collect from class, Delete from class, the Screen
Capture tool, and the Quick Poll tool.
Í Utilities icons. Icons that launch utilities in the TI-Navigator software,
including the App and OS Transfer tool and Network Manager.
Current Class
Current Class lets you select classes you have created, as well as begin and
end class sessions for the selected class. Below you can see an example of
the Current Class with its main parts labeled.
Ê Class list. A drop-down list where you can select a class from the ones
you have created. The Class list is disabled when you have a class session
running.
Ë Begin/End Class button. Button that lets you begin or end a class
session.
Ê
Ì
Í
Ë
Ê
Ë
6 Getting started with TI-Navigator
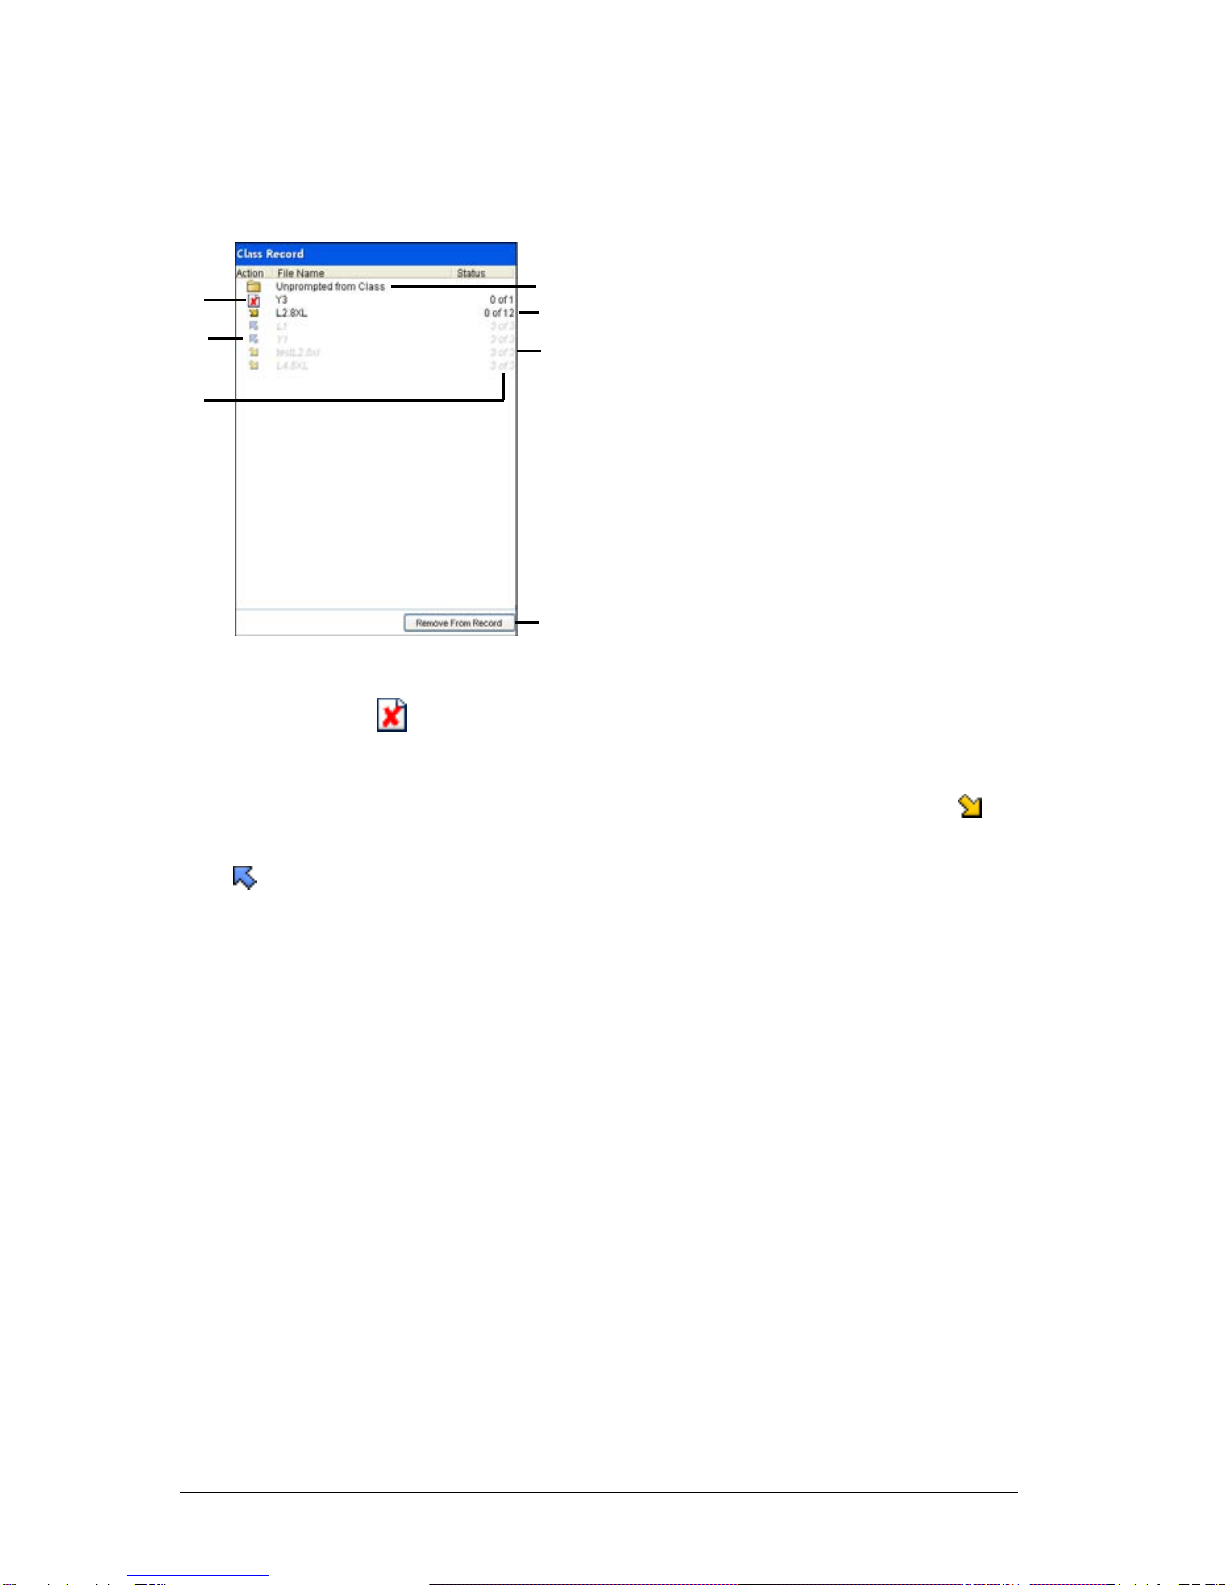
Class Record
The Class Record contains both the current and historical activity for the
selected class. Below you can see an example of the Class Record with its
main parts labeled.
Ê File deletion. The deletion of a file from your students’ calculators,
indicated by the symbol.
Ë File transfer. The transfer of files between your computer and your
students’ calculators. Arrows beside files indicate file transfers. The
symbol indicates transfers from your computer to your class’s calculators.
The symbol indicates transfers from your class’s calculators to your
computer. File transfers remain current until all students receive the file,
you stop the transfer, or you end the class session.
Ì Status. The progress of an action. For example, “23 of 25” indicates
that 23 out of 25 students have received a file.
Í Unprompted from Class folder. A folder that contains the files
students have sent to you that were not part of a collect action.
ÎCurrent action. An action (for example, send) that is still active.
Ï Historic action. An action (for example, send) that is inactive. Historic
actions are disabled.
Ð Remove From Record button. Button that lets you remove selected
historic or active actions from the Class Record. You can remove a single
action or multiple actions. (See “Removing items from the Class Record”
on page 23.)
Í
Î
Ï
Ì
Ë
Ê
Ð

Getting started with TI-Navigator 7
TI-Navigator computer tools
The TI-Navigator™ classroom learning system contains tools that you can
use to interact with your students from your computer. Some of the tools
are part of TI-Navigator, while other tools are optional. This section
describes different tools you can use in TI-Navigator, as well as how to
launch them.
The TI-Navigator computer tools
Activity Center – Contains various activities you can use to interact with
your students during your lessons. With the Activity Center tool, you can
run interactive activities with your class involving lists, graphs, points,
and equations.
App and OS Transfer – Lets you install TI Graphing Calculator
Applications (Apps) on your students’ calculators.
Class Analysis – Lets you collect and analyze answers to assignments, as
well as use a slide show to review the results with your students. Class
Analysis is an optional tool. If you do not install it, then you cannot
launch it in TI-Navigator.
LearningCheck Creator – Lets you create assignments to run on TI
calculators and send the assignments to your students.
Network Manager – Lets you activate access points and hubs and
resolve network problems.
Quick Poll – Lets you send polls to your students and receive their poll
responses.
Screen Capture – Lets you capture your students’ calculator screens and
display them on your computer.
To launch TI-Navigator computer tools
1. Click View > Tools or click the Too l s tab.
The Tools tab opens.
8 Getting started with TI-Navigator
2. If the tool you want to launch is inactive, begin the class session. (See
“Beginning and ending class sessions” on page 20.)
3. Click the icon of the tool you want to launch.
Note: You can also launch many of these tools from the Tools menu.
Creating and managing your teacher account
You can create your teacher account in the Teacher Preferences section of
the TI-Navigator™ classroom learning system. Your teacher account lets
you log in to the TI-Navigator network from your calculator. (See
“Logging in to TI-Navigator on your calculator” on page 12.) After you
create your teacher account, you can later change your password or your
user name.
To create your teacher account
1. If you have a class session running, end it. (See “Beginning and
ending class sessions” on page 20.)
2. Click Tools > Teacher Preferences or click Teacher Preferences .
The Teacher Preferences dialog box opens.
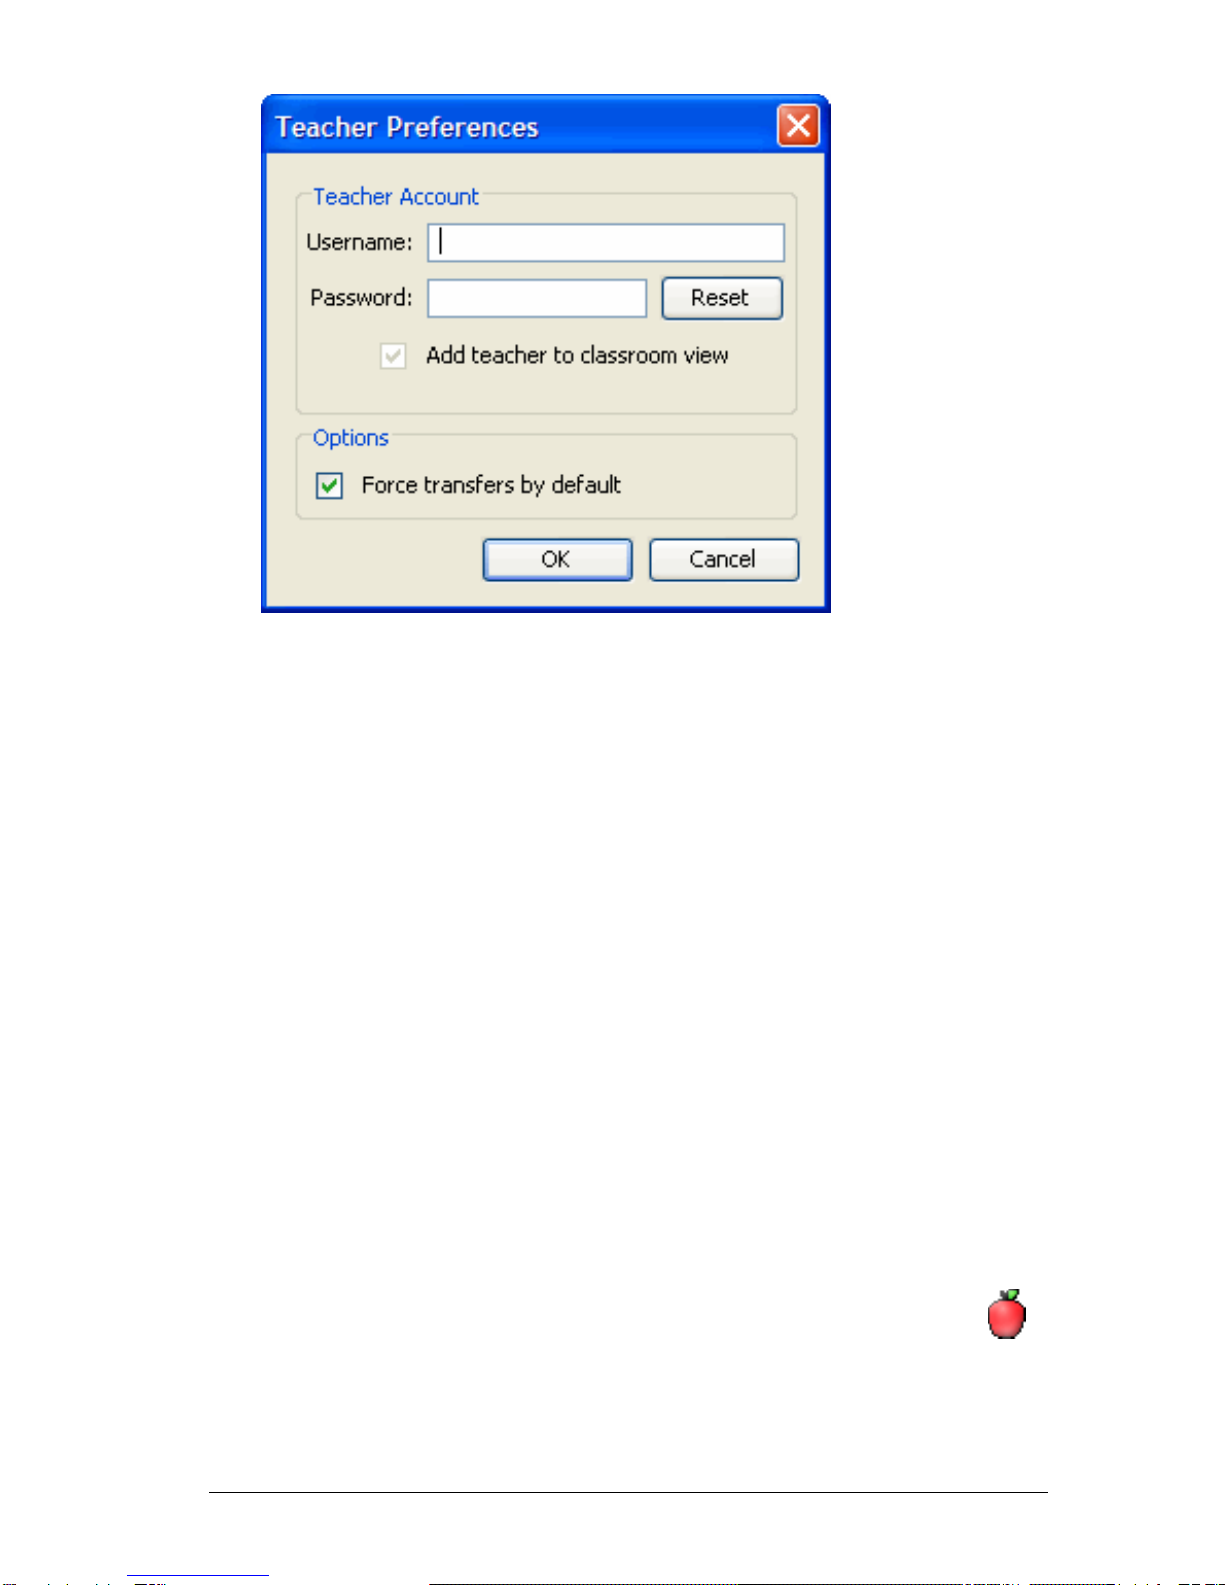
Getting started with TI-Navigator 9
3. Enter a user name.
4. Enter a password.
5. Select or deselect the preference for the teacher icon to appear in
the classroom view.
If you select this preferebce, the teacher icon will appear in the
classroom view, and you will be included as a recipient in Send to
Class, Collect from Class and Delete from Class operations. The
teacher calculator screen will be included in screen captures of the
class.
6. Select or deselect the option for transfers to be forced by default.
If you select this option, all file transfers will be forced to student
calculators, unless you specifically deselect the option for a given file
transfer.
7. Click OK.
To change the password of your teacher account
1. Make sure you are not logged in to the TI-Navigator network on
your calculator.
2. Click Tools > Teacher Preferences or click Teacher Preferences .
The Teacher Preferences dialog box opens.
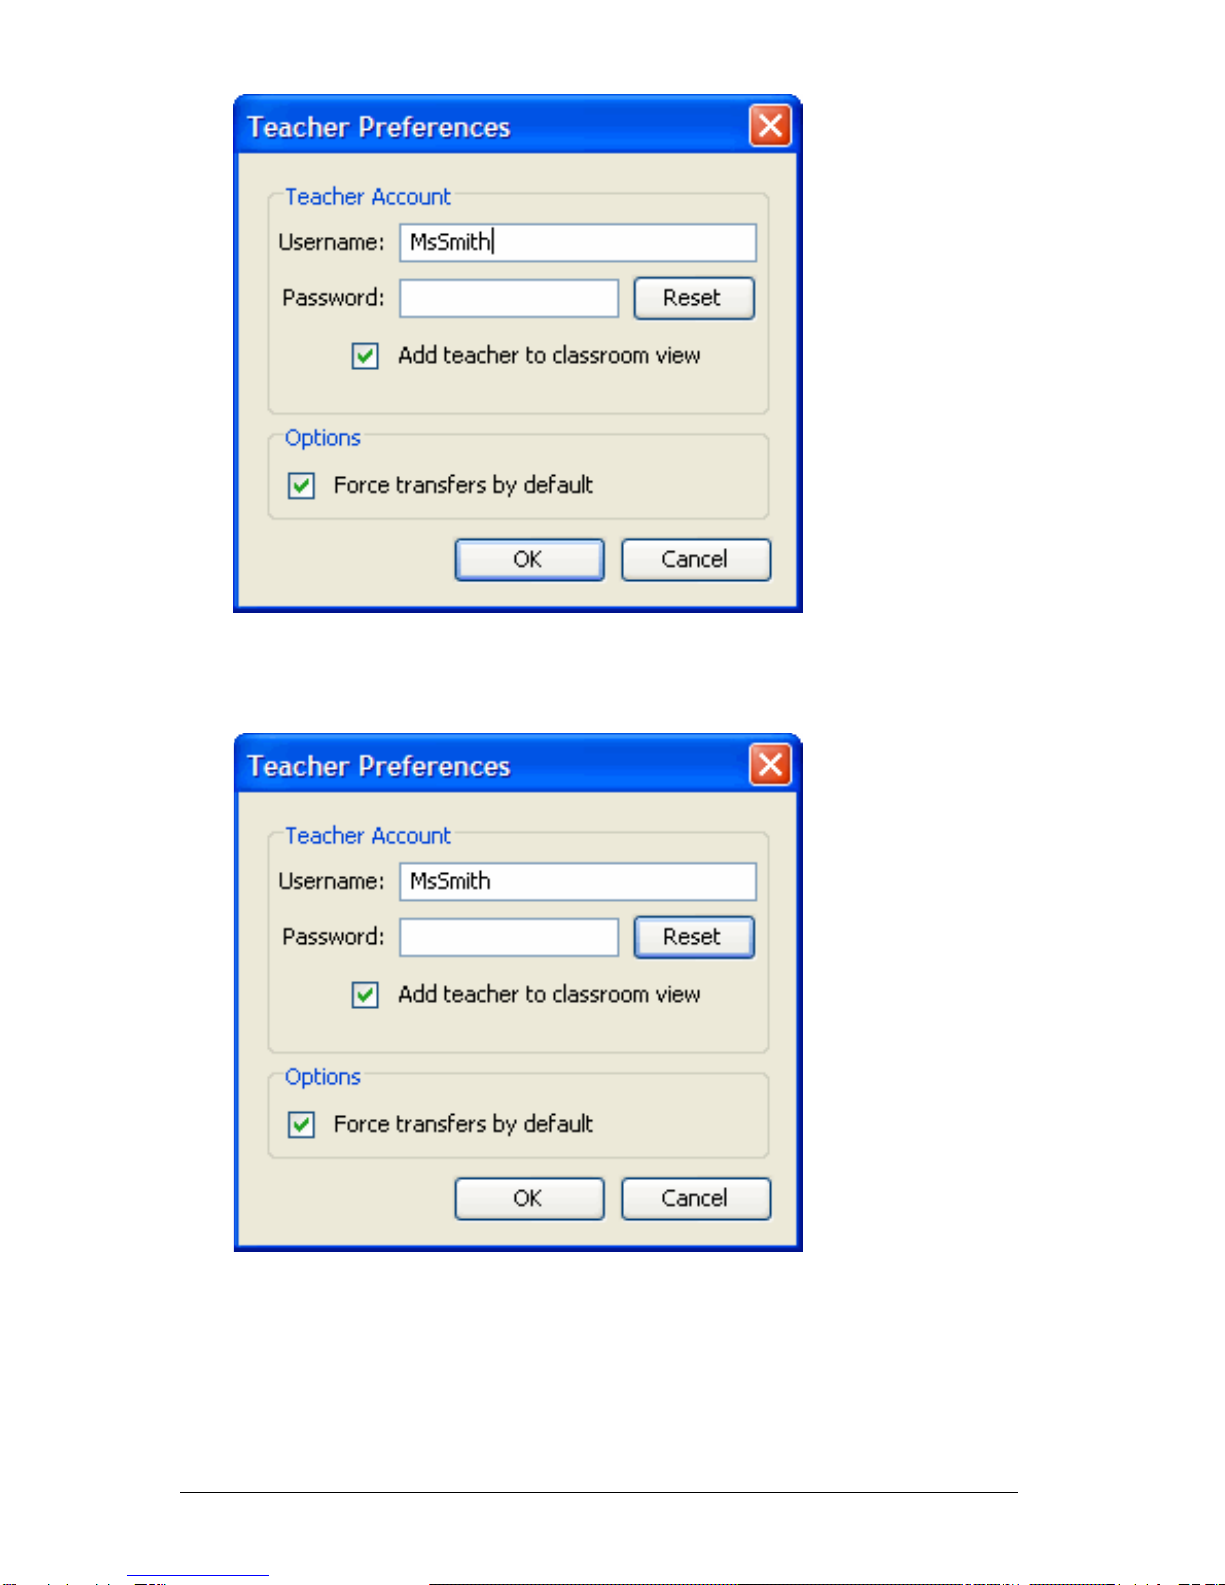
10 Getting started with TI-Navigator
3. Click Reset.
TI-Navigator clears the current password.
4. Enter a new password.
5. Click OK.
Getting started with TI-Navigator 11
To change the user name of your teacher account
1. Make sure you are not logged in to the TI-Navigator network on
your calculator.
2. Click Tools > Teacher Preferences or click Teacher Preferences .
The Teacher Preferences dialog box opens.
3. Enter a new user name.
4. Click OK.
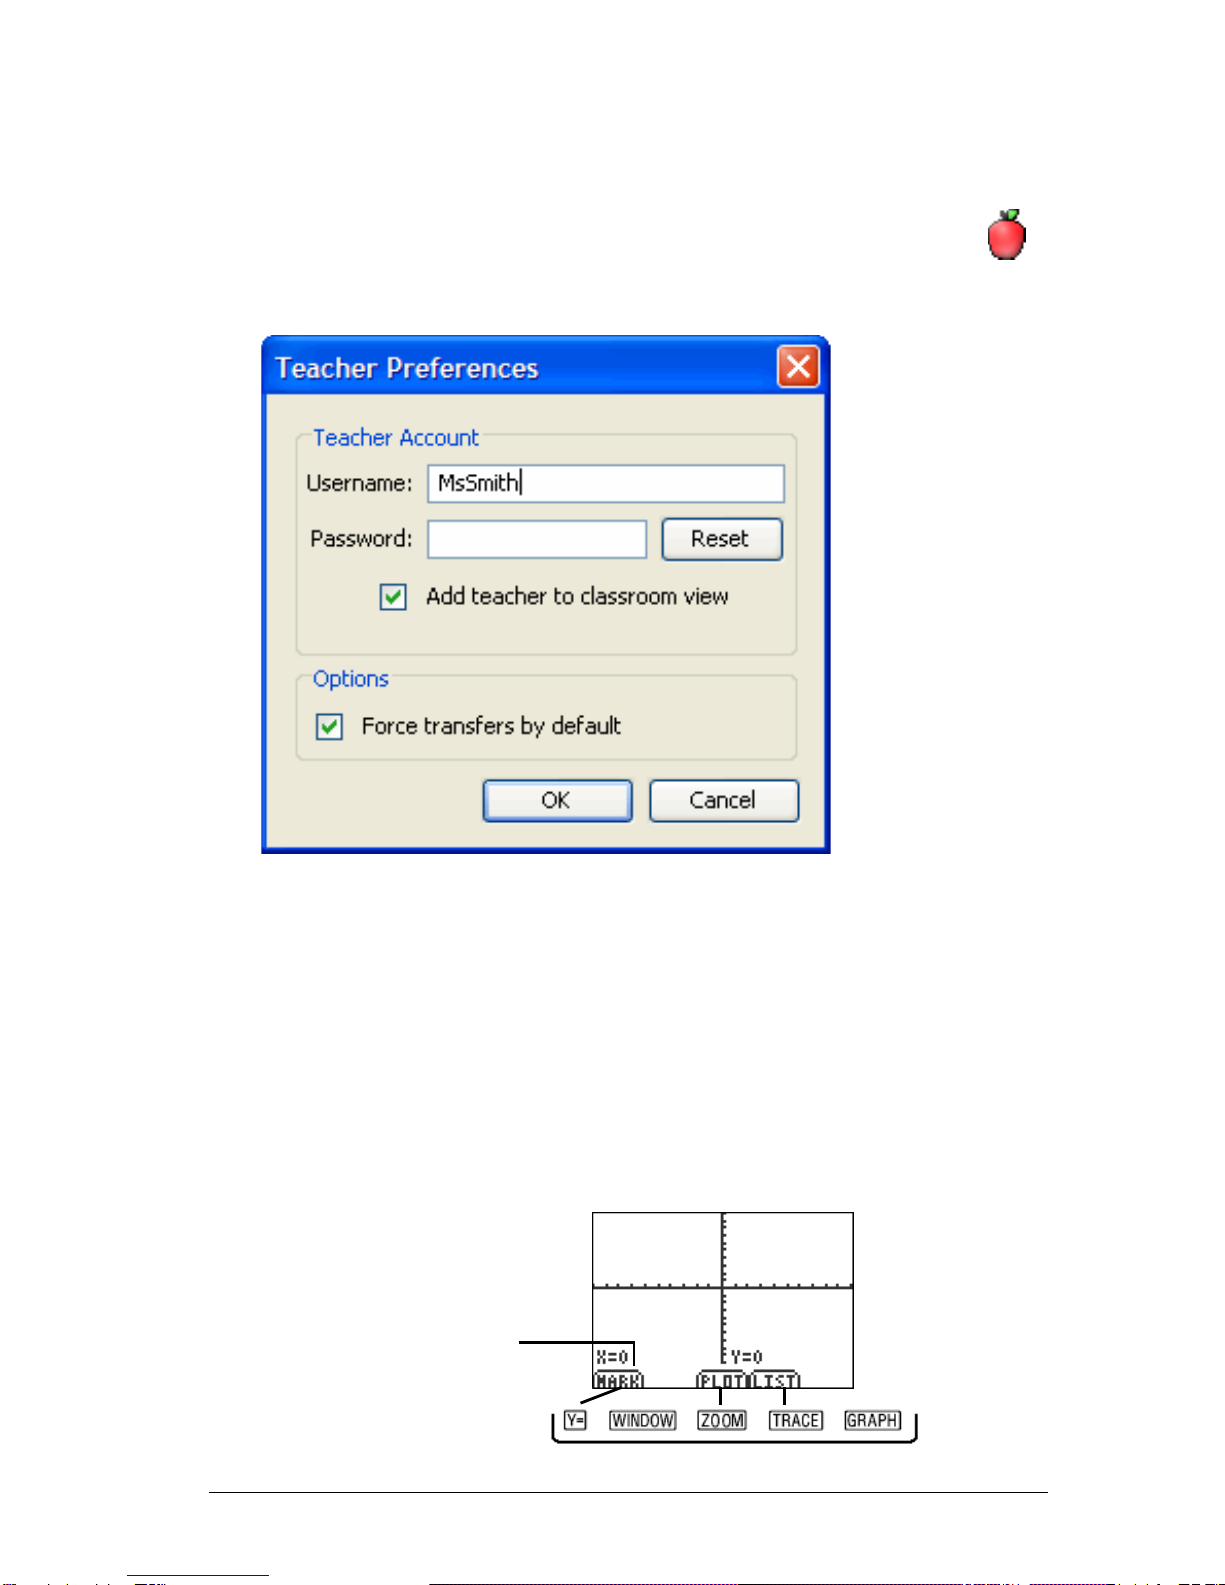
Using calculator screen options
The TI-Navigator™ classroom learning system has a number of options
you and your students can use from your calculator screens. To select an
option defined at the bottom of the calculator screen (such as Mark
associated with the okey), press the graph key directly below the
option.
Press a key to select one of these
options. For example, press o
to select Mark.

12 Getting started with TI-Navigator
Logging in to TI-Navigator on your calculator
The TI-Navigator™ classroom learning system uses both your computer
and your students’ calculators. Your computer and your students’
calculators communicate through the TI-Navigator network. You do not
have to log in to the TI-Navigator network on your computer to
communicate with your students. However, if you plan to participate
from your calculator during the TI-Navigator class session, then you must
also log in to the TI-Navigator network from your calculator.
Before you log in
Create your teacher account in Teacher Preferences. (See “Creating and
managing your teacher account” on page 8.)
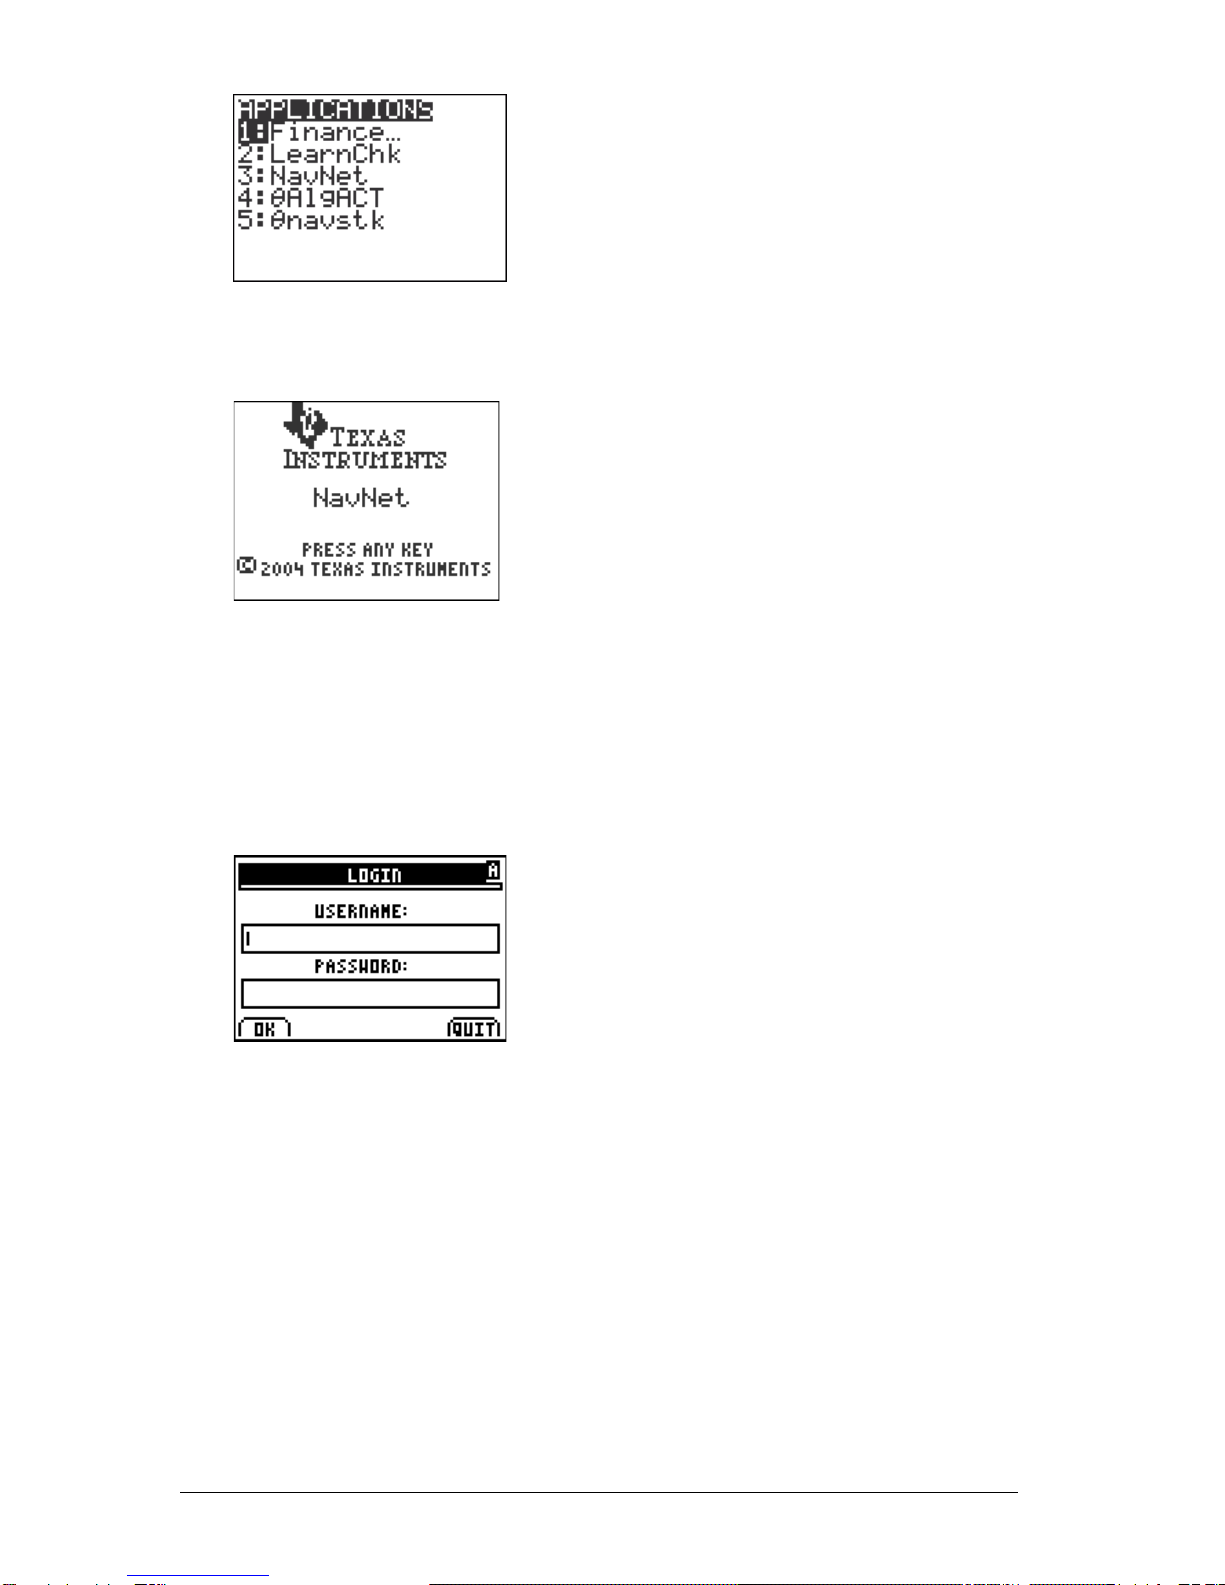
To log in to the TI-Navigator network
1. If you have not already done so, begin the class session on your
computer. (See “Beginning and ending class sessions” on page 20.)
2. On your calculator, press Apps.
The Applications menu opens.
3. Select NavNet from the list of applications.
The NavNet screen opens.
4. Press any key on your calculator.
The Login screen opens.

Getting started with TI-Navigator 13
5. Enter your user name and password.
Note: TI-73 users, press -t to type text characters.
6. Select OK.
The TI-Navigator Home screen opens. From the TI-Navigator Home
screen, you can use the TI-Navigator activities, network apps, quick
poll tool, and transfer capabilities.
Logging in to TI-Navigator (student instruction)
Your computer and your students’ calculators communicate through the
TI-Navigator™ network. In order for you and your students to
communicate using this network, your students must log in to the
network from their calculators. Below you can find instructions you can
use to tell your students how to log in to the TI-Navigator network.
Before your students log in
• Create your students’ accounts. (See “Adding students to classes” on
page 25.)
• Provide your students with their user names and, if necessary, their
passwords.
Student Point of View: The steps below are from the student’s
point of view.
To log in to the TI-Navigator network
1. On your calculator, press Apps.
The Applications menu opens.
14 Getting started with TI-Navigator
2. Select NavNet from the list of applications.
The NavNet screen opens.
Note: If you attempt to log in to a class using a calculator other than
the type of calculator that is being used for the class, you will receive
an error message. (For example, you cannot log in to a class designed
for the TI-73 Explorer using a TI-84 Plus Silver Edition.)
3. Press any key on your calculator.
The Login screen opens.
4. Enter your user name and password.
Note: If you do not know your user name or password, ask your
teacher.
5. Select OK.
The TI-Navigator Home screen opens. From the TI-Navigator Home
screen, you can use the TI-Navigator activities, network apps, and
transfer capabilities.
Other manuals for Navigator
2
Table of contents
Other TI GPS manuals


 user manual")


